Pro Bash Programming: Scripting the GNU/Linux Shell, Second Edition (2015)
CHAPTER 14. Scripting the Screen
Unix purists will shake their heads over this chapter. Traditionally, screen manipulation is done through the termcap or terminfo database that supplies the information necessary to manipulate any of dozens or even hundreds of types of terminals. The shell interface to the database is an external command, tput.
On some systems, tput uses the termcap database; on others (mostly newer systems), it uses the terminfo database. The commands for the two databases are not the same, so a tput command written for one system may not work on another.
On one system, the command to place the cursor at the 20th column on the 10th row is as follows:
tput cup 9 19
On another system, this is the command:
tput cm 9 19
These commands will produce the correct output for whatever type of terminal is specified in the TERM variable. (Note: tput starts counting at 0.)
However, the plethora of terminal types has, for all intents and purposes, been reduced to a single, standard type. This standard, ISO 6429 (also known as ECMA-48 and formerly known as ANSI X3.64 or VT100), is ubiquitous, and terminals that do not support it are few and far between. As a result, it is now feasible to code for a single terminal type. One advantage of this homogeneity is that the necessary coding can be done entirely within the shell. There’s no need for an external command.
Teletypewriter vs. Canvas
There are two methods of sending the output of a script to a terminal screen. The first and more traditional method uses the terminal as if it were a printer or teletypewriter (which is the origin of the abbreviation tty for the screen or terminal). In this mode, as each line is printed, the paper (or screen image) is scrolled up. Old lines fall to the floor (or disappear off the top of the screen). It’s simple, and it is more than adequate for many applications.
The second method treats the screen as a blackboard or canvas and prints to specific points on its surface. It erases and overprints previously written sections. It may print text in columns or at specific locations on the screen. The terminal becomes a random-access, rather than serial, device.
This chapter looks at the screen as a canvas or blackboard. It defines a number of variables and functions for screen manipulation, as well as presenting some demonstration programs that use them.
Stretching the Canvas
To use the screen as a canvas, the most important capability is to be able to position the cursor at any given location on the screen. The sequence for that is ESC[<ROW>;<COL>H. When converted to a printf format string, it can be used directly or in a function:
cu_row_col=$'\e[%d;%dH'
printf "$cu_row_col" 5 10 ## Row 5, column 10
echo "Here I am!"
All of the functions in this chapter are part of the screen-funcs library, which sources the screen-vars file. Listing 14-1 gives the screen manipulation function.
Listing 14-1. screen-funcs, Library of Screen Manipulation Functions
. screen-vars
The printat function (Listing 14-2) places the cursor at the requested location and, if there are any further arguments, it prints them. If the row and column are not specified, printat moves the cursor to the top left corner of the screen.
Listing 14-2. printat, Place the Cursor at a Specified Location and Print Optional String
printat() #@ USAGE: printat [row [column [string]]]
{
printf "${cu_row_col?}" ${1:-1} ${2:-1}
if [ $# -gt 2 ]
then
shift 2
printf "%s" "$*"
fi
}
Command Sequence Introducer
Like all the escape sequences, cu_row_col begins with ESC[. This is the command sequence introducer (CSI). It is defined in the screen-vars file (Listing 14-3).
Listing 14-3. screen-vars, Screen Variable Definitions
ESC=$'\e'
CSI=$ESC[
Priming the Canvas
Before drawing on the screen, it must usually be cleared, and from time to time, various parts of the screen will need to be cleared. These variables contain the fundamental sequences for clearing the screen or lines (Listing 14-4).
Listing 14-4. screen-vars, Variable Definitions for Erasing All or Part of the Screen
topleft=${CSI}H ## move cursor to top left corner of screen
cls=${CSI}J ## clear the screen
clear=$topleft$cls ## clear the screen and move to top left corner
clearEOL=${CSI}K ## clear from cursor to end of line
clearBOL=${CSI}1K ## clear from cursor to beginning of line
clearEOS=${CSI}0J ## clear from cursor to end of screen
clearBOS=${CSI}1J ## clear from cursor to beginning of screen
There are also functions for clearing rectangular areas of the screen, which are presented later in the chapter.
Moving the Cursor
Besides being moved to an absolute location, the cursor can be moved relative to its current position. The first four sequences are the same as those generated by the cursor keys, and they take arguments for moving more than one line or column. The next two turn the cursor on and off. The following two variables save the cursor position and move it back to the saved position, respectively.
The last two move to the next or previous line at the same column as the beginning of the previously printed line. The printf specifier, %s, is removed because it would consume arguments that are to be printed (Listing 14-5).
Listing 14-5. screen-vars, Variable Definitions for Moving the Cursor
## cursor movement strings
cu_up=${CSI}%sA
cu_down=${CSI}%sB
cu_right=${CSI}%sC
cu_left=${CSI}%sD
## turn the cursor off and on
cu_hide=${CSI}?25l
cu_show=${CSI}?12l${CSI}?25h
## save the cursor position
cu_save=${CSI}s ## or ${ESC}7
## move cursor to saved position
cu_restore=${CSI}u ## or ${ESC}8
## move cursor to next/previous line in block
cu_NL=$cu_restore${cu_down/\%s/}$cu_save
cu_PL=$cu_restore${cu_up/\%s/}$cu_save
The format strings for cursor movement use the %s specifier rather than %d, even though any argument will be a number. This is because printf replaces %d with a zero when there is no argument to fill it. If that happened, the cursor would not move at all. With %s, they move one column or row when there is no argument because %s is replaced by a null string.
The script in Listing 14-6 puts these variables and the printat function to work.
Listing 14-6. screen-demo1, Script to Make printat Work
. screen-funcs ## source the screen-funcs library
printf "$clear$cu_hide" ## Clear the screen and hide the cursor
printat 10 10 "${cu_save}XX" ## move, save position, and print XX
sleep 1 ## ZZZZZZZZ
printat 20 20 "20/20" ## move and print
sleep 1 ## ZZZZZZZZ
printf "$cu_restore$cu_down${cu_save}YY" ## restore pos., move, print, save pos.
sleep 1 ## ZZZZZZZZ
printf "$cu_restore$cu_down${cu_save}ZZ" 4 ## restore pos., move, print, save pos.
sleep 1 ## ZZZZZZZZ
printat 1 1 "$cu_show" ## move to top left and show cursor
For a variation, try changing the coordinates of the first printat command to other values, say, 5 and 40.
Changing Rendition Modes and Colors
Characters can be printed in bold, underline, or reverse modes as well as in various colors for those terminals that support them. (Are there any left that don’t?) These attributes are all modified with a sequence in the form ESC[ATTRm, where ATTR is the number of an attribute or color (Listing 14-7). Multiple attributes can be specified by separating them with semicolons.
Colors are specified with the integers 0 to 7, and 9 will reset to the default. These are prefixed by 3 for foreground color and 4 for background color. Attributes are also specified by 0 to 7 but without a prefix. Though eight attributes are defined, only three are widely supported: 1 (bold), 4 (underline), and 7 (reverse). These attributes can be turned off individually with the values 22, 24, and 27, respectively. A value of 0 resets all attributes and colors to their defaults.
Listing 14-7. screen-vars, Variable Definitions for Colors and Attributes
## colours
black=0
red=1
green=2
yellow=3
blue=4
magenta=5
cyan=6
white=7
fg=3 ## foreground prefix
bg=4 ## background prefix
## attributes
bold=1
underline=4
reverse=7
## set colors
set_bg="${CSI}4%dm" ## set background color
set_fg="${CSI}3%dm" ## set foreground color
set_fgbg="${CSI}3%d;4%dm" ## set foreground and background colors
As the next demonstration script shows, the colors and attributes can be used in “tty” mode as well as “canvas” mode (Listing 14-8).
Listing 14-8. screen-demo2, Color and Attributes Mode
. screen-funcs
echo
for attr in "$underline" 0 "$reverse" "$bold" "$bold;$reverse"
do
printf "$set_attr" "$attr"
printf "$set_fg %s " "$red" RED
printf "$set_fg %s " "$green" GREEN
printf "$set_fg %s " "$blue" BLUE
printf "$set_fg %s " "$black" BLACK
printf "\e[m\n"
done
echo
Placing a Block of Text on the Screen
The put_block function prints its arguments one beneath the other at the current cursor position; put_block_at moves the cursor to the specified location, shifts the arguments to remove the row and column, and then calls put_block with the remaining arguments (Listing 14-9).
The cu_NL variable moves the cursor to the saved position and then moves down a line and saves that position.
Listing 14-9. put_block and put_block_at, Print a Block of Text Anywhere on the Screen
put_block() #@ Print arguments in a block beginning at the current position
{
printf "$cu_save" ## save cursor location
printf "%s$cu_NL" "$@" ## restore cursor location, move line down, save cursor
}
put_block_at() #@ Print arguments in a block at the position in $1 and $2
{
printat "$1" "$2"
shift 2
put_block "$@"
}
Listing 14-10 shows the script for screen-demo3, which displays blocks of data on the screen in columnar format.
Listing 14-10. screen-demo3
. screenfuncs
printf "$cls"
put_block_at 3 12 First Second Third Fourth Fifth
put_block_at 2 50 January February March April May June July
The output of screen-demo3 is as follows:
January
First February
Second March
Third April
Fourth May
Fifth June
July
The put_block and put_block_at functions work well when the screen is empty. If there’s a lot of text already on the screen, the output may be obscured. For those cases, there are the print_block_at and print_block functions that clear a rectangular area around the block.
To determine the width that needs to be cleared, put_block passes its arguments to the _max_length function, which loops through the arguments to find the longest (Listing 14-11).
Listing 14-11. _max_length, Store Length of Longest Argument in _MAX_LENGTH
_max_length() #@ store length of longest argument in _MAX_LENGTH
{
local var
_MAX_LENGTH=${#1} ## initialize with length of first parameter
shift ## ...and remove first parameter
for var ## loop through remaining parameters
do
[ "${#var}" -gt "$_MAX_LENGTH" ] && _MAX_LENGTH=${#var}
done
}
The print_block function uses the result from _max_length as a width specification to printf (Listing 14-12). Blank lines are printed before and after the text, and a space is printed before and after each line. The only difference between print_block_at andput_block_at is that one calls print_block and the other calls put_block.
Listing 14-12. print_block, Clear Area and Print Block
print_block() #@ Print arguments in a block with space around them
{
local _MAX_LENGTH
_max_length "$@"
printf "$cu_save"
printf " %-${_MAX_LENGTH}s $cu_NL" " " "$@" " "
}
print_block_at() #@ Move to position, remove 2 parameters and call print_block
{
printat $1 $2
shift 2
print_block "$@"
}
The text to be printed with either print_block or print_block is more likely to be a single string than separate arguments. To split the string into words or phrases short enough to fit a given space, use the wrap function (Listing 14-13). This function splits a string into lines with a maximum width that is specified on the command line.
Listing 14-13. wrap, Split String into Array with Elements Not Exceeding Maximum Length
wrap() #@ USAGE: wrap string length
{ #@ requires bash-3.1 or later
local words=$1 textwidth=$2 line= opts=$-
local len=0 templen=0
set -f
unset -v wrap
for word in $words
do
templen=$(( $len + 1 + ${#word} )) ## Test adding a word
if [ "$templen" -gt "$textwidth" ] ## Does adding a word exceed length?
then
wrap+=( "$line" ) ## Yes, store line in array
printf -v line "%s" "$word" ## begin new line
len=${#word}
else
len=$templen ## No, add word to line
printf -v line "%s" "${line:+"$line "}" "$word"
fi
done
wrap+=( "$line" )
case $opts in
*f*) ;;
*) set +f ;;
esac
}
The sample shown in Listing 14-14 uses wrap and print_block_at.
Listing 14-14. screen-demo4, Demonstrates the wrap and print_block Functions
clear
wrap "The quick brown fox jumps over the lazy dog" 15
x=xxxxxxxxxxxxxxxxxxxxxxxxxxxxxxxxxxxxxxxxxxxxxxxxxxxxxxxxxxxxxxxxxxxxxxxxxxxxxxxx
printat 1 1
printf "%s\n" $x{,,,,,,,,,,} ## print 11 lines of 'x's
print_block_at 3 33 "${wrap[@]}"
printat 12 1
The output is as follows:
xxxxxxxxxxxxxxxxxxxxxxxxxxxxxxxxxxxxxxxxxxxxxxxxxxxxxxxxxxxxxxxxxxxxxxxxxxxxxxxx
xxxxxxxxxxxxxxxxxxxxxxxxxxxxxxxxxxxxxxxxxxxxxxxxxxxxxxxxxxxxxxxxxxxxxxxxxxxxxxxx
xxxxxxxxxxxxxxxxxxxxxxxxxxxxxxxx xxxxxxxxxxxxxxxxxxxxxxxxxxxxxxx
xxxxxxxxxxxxxxxxxxxxxxxxxxxxxxxx The quick xxxxxxxxxxxxxxxxxxxxxxxxxxxxxxx
xxxxxxxxxxxxxxxxxxxxxxxxxxxxxxxx brown fox jumps xxxxxxxxxxxxxxxxxxxxxxxxxxxxxxx
xxxxxxxxxxxxxxxxxxxxxxxxxxxxxxxx over the lazy xxxxxxxxxxxxxxxxxxxxxxxxxxxxxxx
xxxxxxxxxxxxxxxxxxxxxxxxxxxxxxxx dog xxxxxxxxxxxxxxxxxxxxxxxxxxxxxxx
xxxxxxxxxxxxxxxxxxxxxxxxxxxxxxxx xxxxxxxxxxxxxxxxxxxxxxxxxxxxxxx
xxxxxxxxxxxxxxxxxxxxxxxxxxxxxxxxxxxxxxxxxxxxxxxxxxxxxxxxxxxxxxxxxxxxxxxxxxxxxxxx
xxxxxxxxxxxxxxxxxxxxxxxxxxxxxxxxxxxxxxxxxxxxxxxxxxxxxxxxxxxxxxxxxxxxxxxxxxxxxxxx
xxxxxxxxxxxxxxxxxxxxxxxxxxxxxxxxxxxxxxxxxxxxxxxxxxxxxxxxxxxxxxxxxxxxxxxxxxxxxxxx
Scrolling Text
By combining an array with substring expansion, text can be scrolled in any area of the screen. Because the entire area can be printed with a single printf command, scrolling is fast, though it gets slower as the array size increases. The demonstration in Listing 14-15 stores the file names in/usr/bin/ in the array, list; scrolls the list up; waits for a second; and then scrolls it down.
Each loop, up and down, contains a commented-out read -t "$delay" line. When uncommented, it will slow down the scrolling. It uses the bash-4.x fractional delay. If you are using an earlier version, use sleep instead. Most implementations (certainly GNU and *BSD) accept a fractional argument.
Listing 14-15. scroll-demo, Scrolls a Block of Text Up and Then Down
list=( /usr/bin/* ) ## try it with other directories or lists
rows=9 ## number of rows in scrolling area
delay=.01 ## delay between scroll advance
width=-33.33 ## width spec: (no more than) 33 chars, flush left
x=XXXXXXXXXXXXXXXXXXXXXXXXXX ## bar of 'X's
x=$x$x$x$x ## longer bar
clear ## clear the screen
printf "%50.50s\n" $x{,,,,,,,,,,,,,} ## print 14 lines of 'X's
n=0 ## start display with first element
## scroll upwards until reaching the bottom
while [ $(( n += 1 )) -lt $(( ${#list[@]} - $rows )) ]
do
printf "\e[3;1H"
printf "\e[7C %${width}s\n" "${list[@]:n:rows}"
# read -sn1 -t "$delay" && break
done
sleep 1
## scroll downwards until reaching the top
while [ $(( n -= 1 )) -ge 0 ]
do
printf "\e[3;1H"
printf "\e[7C %${width}s\n" "${list[@]:n:rows}"
# read -sn1 -t "$delay" && break
done
printf "\e[15;1H" ## finish with cursor well below scrolling area
Rolling Dice
Dice are used in many games and are simple to program if you are satisfied with printing just the number:
printf "%s\n" "$(( $RANDOM % 6 + 1 ))"
However, a respectable graphic rendition can be programmed surprisingly easily with the shell. To print a die, position the cursor at the desired location on the screen, set the foreground and background colors, and print the element from the array (Figure 14-1).
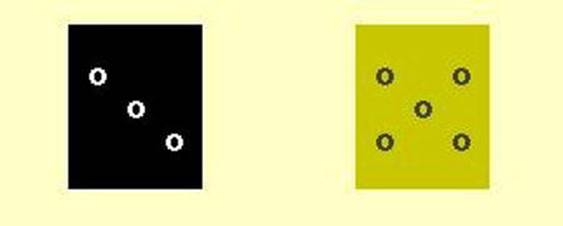
Figure 14-1. Listing 14-16 contains the code for these dice
An array of six dice can be programmed in about 25 lines of code. Each die is a concatenation of 18 variables. Some of these have the same contents as those in the screen-funcs library, but their names are shortened here to keep the lines shorter. Here is a description of the die with the number 5:
$b ## set bold attribute (optional)
$cs ## save cursor position
$p0 ## print blank row
$cr ## restore cursor to left side of die
$dn ## move down one line
$cs ## save cursor position
$p4 ## print row with two pips
$cr ## restore cursor to left side of die
$dn ## move down one line
$cs ## save cursor position
$p2 ## print row with one pip
$cr ## restore cursor to left side of die
$dn ## move down one line
$cs ## save cursor position
$p4 ## print row with two pips
$cr ## restore cursor to left side of die
$dn ## move down one line
$p0 ## print blank row
After defining the dice, the script in Listing 14-16 clears the screen and prints two random dice near the top of the screen.
Listing 14-16. dice, Defines an Array of Six Dice and Places Two on the Screen
pip=o ## character to use for the pips
p0=" " ## blank line
p1=" $pip " ## one pip at the left
p2=" $pip " ## one pipe in the middle of the line
p3=" $pip " ## one pip at the right
p4=" $pip $pip " ## two pips
p5=" $pip $pip $pip " ## three pips
cs=$'\e7' ## save cursor position
cr=$'\e8' ## restore cursor position
dn=$'\e[B' ## move down 1 line
b=$'\e[1m' ## set bold attribute
cu_put='\e[%d;%dH' ## format string to position cursor
fgbg='\e[3%d;4%dm' ## format string to set colors
dice=(
## dice with values 1 to 6 (array elements 0 to 5)
"$b$cs$p0$cr$dn$cs$p0$cr$dn$cs$p2$cr$dn$cs$p0$cr$dn$p0"
"$b$cs$p0$cr$dn$cs$p1$cr$dn$cs$p0$cr$dn$cs$p3$cr$dn$p0"
"$b$cs$p0$cr$dn$cs$p1$cr$dn$cs$p2$cr$dn$cs$p3$cr$dn$p0"
"$b$cs$p0$cr$dn$cs$p4$cr$dn$cs$p0$cr$dn$cs$p4$cr$dn$p0"
"$b$cs$p0$cr$dn$cs$p4$cr$dn$cs$p2$cr$dn$cs$p4$cr$dn$p0"
"$b$cs$p0$cr$dn$cs$p5$cr$dn$cs$p0$cr$dn$cs$p5$cr$dn$p0"
)
clear
printf "$cu_put" 2 5 ## position cursor
printf "$fgbg" 7 0 ## white on black
printf "%s\n" "${dice[RANDOM%6]}" ## print random die
printf "$cu_put" 2 20 ## position cursor
printf "$fgbg" 0 3 ## black on yellow
printf "%s\n" "${dice[RANDOM%6]}" ## print random die
Summary
Without touching on traditional ASCII art, there are many ways to draw things on a terminal screen. This chapter has presented a number of them, giving the basics that can be used to create many more.
Exercises
1. Write a function, hbar, that accepts two integer arguments, a width and a color, and prints a bar of that color and width. Write a second function, hbar_at, that accepts four arguments: row, column, width, and color; moves the cursor to the row and column; and passes the remaining arguments to hbar.
2. Write a function, clear_area, that accepts two integer arguments, rows and columns, and clears a rectangular area of that many rows and columns.
All materials on the site are licensed Creative Commons Attribution-Sharealike 3.0 Unported CC BY-SA 3.0 & GNU Free Documentation License (GFDL)
If you are the copyright holder of any material contained on our site and intend to remove it, please contact our site administrator for approval.
© 2016-2025 All site design rights belong to S.Y.A.