Linux Bible 9th Ed (2015)
Part III. Becoming a Linux System Administrator
Chapter 10. Getting and Managing Software
IN THIS CHAPTER
1. Installing software from the desktop
2. Working with RPM packaging
3. Using yum to manage packages
4. Using rpm to work with packages
5. Installing software in the enterprise
In Linux distributions such as Fedora and Ubuntu, you don't need to know much about how software is packaged and managed to get the software you want. Those distributions have excellent software installation tools that automatically point to huge software repositories. Just a few clicks and you're using the software in little more time than it takes to download it.
The fact that Linux software management is so easy these days is a credit to the Linux community, which has worked diligently to create packaging formats, complex installation tools, and high-quality software packages. Not only is it easy to get the software, but after it's installed, it's easy to manage, query, update, and remove it.
This chapter begins by describing how to install software in Fedora using the new Software graphical installation tool. If you are just installing a few desktop applications on your own desktop system, you may not need much more than that and occasional security updates.
To dig deeper into managing Linux software, I next describe what makes up Linux software packages (comparing deb and rpm formatted packaging), underlying software management components, and commands (yum and rpm) for managing software in Fedora and Red Hat Enterprise Linux. That's followed by a description of how to manage software packages in enterprise computing.
Managing Software on the Desktop
In Fedora 21, the Fedora Project includes the new Software application to replace the PackageKit Add/Remove Software window. The Software window offers a more intuitive way of choosing and installing desktop applications that does not align with typical Linux installation practices. With the Software window, the smallest software you install is an application. With Linux, you install packages.
Figure 10.1 shows an example of the Software window.
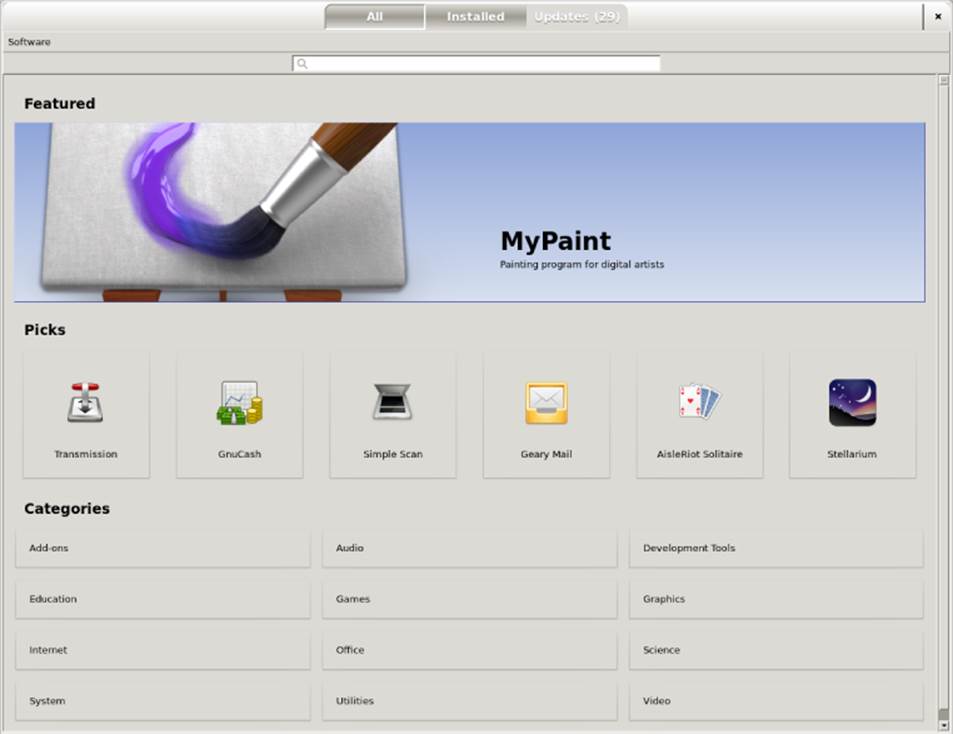
Figure 10.1 Install and manage software packages from the Software window.
From the Software window, you can select the applications you want to install from the Picks group (a handful of popular applications), choose from categories of applications (Internet, Games, Audio, Video, and so on), or search by application name or description. Select the Install button to have the Software window download and install all the software packages needed to make the application work.
Other features of this window let you see all installed applications (Installed tab) or view a list of applications that have updated packages available for you to install (Updates tab). If you want to remove an installed application, simply click the Remove button next to the package name.
If you are using Linux purely as a desktop system, where you want to write documents, play music, and do other common desktop tasks, the Software window might be all you need to get the basic software you want. By default, your system connects to the main Fedora software repository and gives you access to hundreds of software applications.
But although the Software window lets you download and install hundreds of applications from the Fedora software repository, that repository actually contains tens of thousands of software packages. What packages can you not see from that repository, when might you want those other packages, and how can you gain access to those packages (as well as packages from other software repositories)?
Going Beyond the Software Window
If you are managing a single desktop system, you might be quite satisfied with the hundreds of packages you can find through the Software window. Open source versions of most common types of desktop applications are available to you through the Software window after you have an Internet connection from Fedora to the Internet.
However, here are some examples of why you might want to go beyond what you can do with the Software window:
· More repositories—Fedora and Red Hat Enterprise Linux distribute only open source, freely distributable software. You may want to install some commercial software (such as Adobe Flash Player) or non-free software (available from repositories such asrpmfusion.org).
· Beyond desktop applications—Tens of thousands of software packages in the Fedora repository are not available through the Software window. Most of these packages are not associated with graphical applications at all. For example, some packages contain pure command-line tools, system services, programming tools, or documentation that don't show up in the Software window.
· Flexibility—Although you may not know it, when you install an application through the Software window, you are actually installing multiple RPM packages. This set of packages may just be a default package set that includes documentation, extra fonts, additional software plugins, or multiple language packs that you may or may not want. With yum and rpm commands, you have more flexibility with exactly which packages related to an application or other software feature is installed on your system.
· More complex queries—Using commands such as yum and rpm, you can get detailed information about packages, package groups, and repositories.
· Software validation—Using rpm and other tools, you can check whether a signed package has been modified before you installed it or whether any of the components of a package have been tampered with since the package was installed.
· Managing software installation—Although the Software window works well if you are installing desktop software on a single system, it doesn't scale well for managing software on multiple systems. Other tools are built on top of the rpm facility for doing that.
Before I launch into some of the command-line tools for installing and managing software in Linux, the next section describes how the underlying packaging and package management systems in Linux work. In particular, I focus on RPM packaging as it is used in Fedora, Red Hat Enterprise Linux, and related distributions, as well as Deb packages, which are associated with Debian, Ubuntu, Linux Mint, and related distributions.
Understanding Linux RPM and DEB Software Packaging
On the first Linux systems, if you wanted to add software, you would grab the source code from a project that produced it, compile it into runnable binaries, and drop it onto your computer. If you were lucky, someone would have already compiled it in a form that would run on your computer.
The form of the package could be a tarball, containing executable files (commands), documentation, configuration files, and libraries. (A tarball is a single file in which multiple files are gathered together for convenient storage or distribution.) When you install software from a tarball, the files from that tarball might be spread across your Linux system in appropriate directories (/usr/share/man, /etc, /bin, and /lib, to name a few).
Although it is easy to create a tarball and just drop a set of software onto your Linux system, this method of installing software makes it difficult to do these things:
· Get dependent software—You would need to know if the software you were installing depended on other software being installed for your software to work. Then you would have to track down that software and install that too (which might itself have some dependencies).
· List the software—Even if you knew the name of the command, you might not know where its documentation or configuration files were located when you looked for it later.
· Remove the software—Unless you kept the original tarball or a list of files, you wouldn't know where all the files were when it came time to remove them. Even if you knew, you would have to remove each one individually.
· Update the software—Tarballs are not designed to hold metadata about the contents they contain. After the contents of a tarball are installed, you may not have a way to tell what version of the software you are using, making it difficult to track down bugs and get new versions of your software.
To deal with these problems, packages progressed from simple tarballs to more complex packaging. With only a few notable exceptions (such as Gentoo, Slackware, and a few others), the majority of Linux distributions went to one of two packaging formats—DEB and RPM:
· DEB (.deb) packaging—The Debian GNU/Linux project created .deb packaging, which is used by Debian and other distributions based on Debian (Ubuntu, Linux Mint, KNOPPIX, and so on). Using tools such as apt-get and dpkg, Linux distributions could install, manage, upgrade, and remove software.
· RPM (.rpm) packaging—Originally named Red Hat Package Manager but later recursively renamed RPM Package Manager, RPM is the preferred package format for SUSE, Red Hat distributions (RHEL and Fedora), and those based on Red Hat distributions (CentOS, Oracle Linux, and so on). The rpm command was the first tool to manage RPMs, but later yum was added to enhance the RPM facility.
For managing software on individual systems, there are proponents on both sides of the RPM vs. DEB debate with valid points. Although RPM is the preferred format for managing enterprise-quality software installation, updates, and maintenance, DEB is very popular among many Linux enthusiasts. This chapter covers both RPM (Fedora and Red Hat Enterprise Linux) and (to some extent) DEB packaging and software management.
Understanding DEB packaging
Debian software packages hold multiple files and metadata related to some set of software in the format of an ar archive file. The files can be executables (commands), configuration files, documentation, and other software items. The metadata includes such things as dependencies, licensing, package sizes, descriptions, and other information.Multiple command-line and graphical tools are available for working with DEB files in Ubuntu, Debian, and other Linux distributions. Some of these include the following:
· Ubuntu Software Center—Select the Ubuntu Software Center icon from the Ubuntu desktop. The window that appears lets you search for applications and packages that you want by searching for keywords or navigating categories.
· aptitude—The aptitude command is a package installation tool that provides a screen-oriented menu that runs in the shell. After you run the command, use arrow keys to highlight the selection you want and press Enter to select it. You can upgrade packages, get new packages, or view installed packages.
· apt*—There is a set of apt commands (apt-get, apt-config, apt-cache, and so on) that you can use to manage package installation.
The Ubuntu Software Center is fairly intuitive for finding and installing packages. However, here are a few examples of commands that can help you install and manage packages with apt* command. In this case, I'm looking for and installing the vsftpd package:
NOTE
Notice that the apt* commands are preceded by the sudo command in these examples. That's because it is common practice for an Ubuntu administrator to run administrative commands as a regular user with sudo privilege.
$ sudo apt-get update Get the latest package versions
$ sudo apt-search vsftpd Find package by key word (vsftpd)
$ sudo apt-cache show vsftpd Display information about a package
$ sudo apt-get install vsftpd Install the vsftpd package
$ sudo apt-get upgrade Update installed packages
$ sudo apt-cache pkgnames List all packages that are installed
There are many other uses of apt* commands that you can try out. If you have an Ubuntu system installed, I recommend that you run man apt to get an understanding of what the apt and related commands can do.
Understanding RPM packaging
An RPM package is a consolidation of files needed to provide a feature, such as a word processor, a photo viewer, or a file server. Inside an RPM can be the commands, configuration files, and documentation that make up the software feature. However, an RPM file also contains metadata that stores information about the contents of that package, where the package came from, what it needs to run, and other information.
What is in an RPM?
Before you even look inside an RPM, you can tell much about it by the name of the RPM package itself. To find out the name of an RPM package currently installed on your system (such as the Firefox web browser), you could type the following from the shell in Fedora or Red Hat Enterprise Linux:
# rpm -q firefox
firefox-24.7.0-1.el7_0.x86_64
From this, you can tell that the basename of the package is firefox. The release number is 24.7 (assigned by the upstream producer of Firefox, the Mozilla Project). The version number (assigned by the packager, Red Hat, each time the package is rebuilt at the same release number) is 1. The firefox package was built for Red Hat Enterprise Linux 7.0 (el7_0) and is compiled for the x86 64-bit architecture (x86_64).
When the firefox package was installed, it was probably copied from the installation medium (such as a CD or DVD) or downloaded from a YUM repository (more on that later). If you had been given the RPM file and it was sitting in a local directory, the name would appear as firefox-24.7.0-1.el7_0.x86_64.rpm and you could install it from there. Regardless of where it came from, once installed, the name and other information about the package are stored in an RPM database on the local machine.
To find out more about what is inside an RPM package, you can use options other than the rpm command to query that local RPM database. For example:
# rpm -qi firefox
Name : firefox
Version : 24.7.0
Release : 1.el7_0
Architecture: x86_64
Install Date: Tue 29 Jul 2014 09:39:20 AM EDT
Group : Applications/Internet
Size : 92377616
License : MPLv1.1 or GPLv2+ or LGPLv2+
Signature : RSA/SHA256, Mon 21 Jul 2014 05:09:41 PM EDT, Key ID
199e2f91fd431d51
Source RPM : firefox-24.7.0-1.el7_0.src.rpm
Build Date : Fri 18 Jul 2014 07:58:58 AM EDT
Build Host : x86-030.build.eng.bos.redhat.com
Relocations : (not relocatable)
Packager : Red Hat, Inc.
Vendor : Red Hat, Inc.
URL : http://www.mozilla.org/projects/firefox/
Summary : Mozilla Firefox Web browser
Description :
Mozilla Firefox is an open-source web browser, designed for standards
compliance, performance and portability.
Besides the information you got from the package name itself, the -qi (query information) option lets you see who built the package (Red Hat, Inc.), when it was built, and when it was installed. The group the package is in (Applications/Internet), its size, and the licensing are listed. To find out more about the package, the URL points to the project page on the Internet and the Summary and Description tell you what the package is used for.
Where do RPMs come from?
The software included with Linux distributions, or built to work with those distributions, comes from thousands of open source projects all over the world. These projects, referred to as upstream software providers, usually make the software available to anyone who wants it, under certain licensing conditions.
A Linux distribution takes the source code and builds it into binaries. Then it gathers those binaries together with documentation, configuration files, scripts, and other components available from the upstream provider.
After gathering all those components into the RPM, the RPM package is signed (so users can test the package for validity) and placed in a repository of RPMs for the specific distribution and architecture (32-bit x86, 64-bit x86, and so on). The repository is placed on an installation CD or DVD or in a directory that is made available as an FTP, web, or NFS server.
Installing RPMs
When you initially install a Fedora or Red Hat Enterprise Linux system, many individual RPM packages make up that installation. After Linux is installed, you can add more packages using the Software window (as described earlier). Refer to Chapter 9 for information on installing Linux.
The first tool to be developed for installing RPM packages, however, was the rpm command. Using rpm, you can install, update, query, validate, and remove RPM packages. The command, however, has some major drawbacks:
· Dependencies—Most RPM packages are dependent on some other software (library, executables, and so on) being installed on the system for that package to work. When you try to install a package with rpm, if a dependent package is not installed, the package installation fails, telling you which components were needed. At that point, you have to dig around to find what package contained that component. When you go to install it, that dependent package might itself have dependencies you need to install to get it to work. This situation is lovingly referred to as “dependency hell” and is often used as an example of why DEB packages were better than RPMs. DEB packaging tools were made to automatically resolve package dependencies well before RPM-related packaging tools could do that.
· Location of RPMs—The rpm command expects you to provide the exact location of the RPM file when you try to install it. In other words, you would have to give firefox-24.7.0-1.el7_0.x86_64.rpm as an option if the RPM were in the current directory orhttp://example.com/firefox-24.7.0-1.el7_0.x86_64.rpm if it were on a server.
As Red Hat Linux and other RPM-based applications grew in popularity, it became apparent that something had to be done to make package installation more convenient. The answer was the YUM facility.
Managing RPM Packages with YUM
The Yellowdog Updater Modified (YUM) project set out to solve the headache of managing dependencies with RPM packages. Its major contribution was to stop thinking about RPM packages as individual components and think of them as parts of larger software repositories.
With repositories, the problem of dealing with dependencies fell not to the person who installed the software, but to the Linux distribution or third-party software distributor that makes the software available. So, for example, it would be up to the Fedora project to make sure that every component needed by every package in its Linux distribution could be resolved by some other package in the repository.
Repositories could also build on each other. So, for example, the rpmfusion.org repository could assume that a user already had access to the main Fedora repository. So if a package being installed from rpmfusion.org needed a library or command from the main Fedora repository, the Fedora package could be downloaded and installed at the same time you install the rpmfusion.org package.
The yum repositories could be put in a directory on a web server (http://), an FTP server (ftp://), or a local medium such as a CD, DVD, or local directory (file://). The locations of these repositories would then be stored on the user's system in the /etc/yum.conf file or, more typically, in separate configuration files in the /etc/yum.repos.d directory.
Understanding how yum works
This is the basic syntax of the yum command:
# yum [options] command
Using that syntax, you can find packages, see package information, find out about package groups, update packages, or delete packages, to name a few features. With the YUM repository and configuration in place, a user can install a package by simply typing something like this:
# yum install firefox
The user only needs to know the package name (which could be queried in different ways, as described in the section “Searching for packages” later in this chapter). The YUM facility finds the latest version of that package available from the repository, downloads it to the local system, and installs it. Figure 10.2 shows what happens when someone installs a package using the yum command.

Figure 10.2 Local and remote activities when installing an RPM with YUM.
The result of a yum install package command is that the package requested is copied from the yum repository to the local system. The files in the package are put in the filesystem where needed (/etc, /bin, /usr/share/man, and so on). Information about the package is stored in the local RPM database, where it can be queried.
To gain more experience with the YUM facility, and see where there are opportunities for you to customize how YUM works on your system, follow the descriptions of each phase of the YUM install process illustrated in Figure 10.2 and defined here.
1. Checking /etc/yum.conf
When any yum command starts, it checks the file /etc/yum.conf for default settings. The /etc/yum.conf file is the basic YUM configuration file. You can also identify the location of repositories here, although the /etc/yum.repos.d directory is the more typical location for identifying repositories. Here's an example of /etc/yum.conf on a RHEL 7 system:
[main]
cachedir=/var/cache/yum/$basearch/$releasever
keepcache=0
debuglevel=2
logfile=/var/log/yum.log
exactarch=1
gpgcheck=1
plugins=1
Settings in yum.conf tell YUM where to keep cache files (/var/cache/yum) and log entries (/var/log/yum.log), and whether to keep cache files around after a package is installed (0 means no). You can raise the debuglevel value in the yum.conf file to above 2 if you want to see more details in your log files.
Next, you can see whether the exact architecture (x86, x86_64, and so on) should be matched when choosing packages to install (1 means yes) and whether to use plugins (1 means yes) to allow for things such as blacklists, whitelists, or connecting to Red Hat Network for packages.
Finally, gpgcheck says whether to validate each package against a key you receive from those who built the RPM. For packages that come with Fedora or RHEL, the key is included with the distribution to check all packages. However, if you try to install packages that are not from your distribution, you need to either import the key needed to sign those packages or turn off that feature (gpgcheck=0).
To find other features you can set in the yum.conf file, type man yum.conf.
2. Checking /etc/sysconfig/rhn/up2date (RHEL only)
For Red Hat Enterprise Linux systems, instead of pointing to a single public software repository (as Fedora does), you register your system with Red Hat Network and purchase entitlements to download software from different channels.
When your system is registered with Red Hat Network, information is added to the /etc/sysconfig/rhn/up2date file to tell yum where to find Red Hat Enterprise Linux packages (either from a hosted Red Hat Network or from an RHN Satellite server).
3. Checking /etc/yum.repos.d/*.repo files
Software repositories can be enabled by dropping files ending in .repo into the directory /etc/yum.repos.d/ that point to the location of one or more repositories. In Fedora, even your basic Fedora repositories are enabled from .repo files in this directory.
Here's an example of a simple yum configuration file named /etc/yum.repos.d/myrepo.repo:
[myrepo]
name=My repository of software packages
baseurl=http://myrepo.example.com/pub/myrepo
enabled=1
gpgcheck=1
gpgkey=file:///etc/pki/rpm-gpg/MYOWNKEY
Each repository entry begins with the name of the repository enclosed in square brackets. The name line contains a human-readable description of the repository. The baseurl line identifies the directory containing the RPM files, which can be an httpd://, ftp://, orfile:// entry.
The enabled line indicates whether the entry is active. A 1 is active; 0 is inactive. If there is no enabled line, the entry is active. The last two lines in the preceding code indicate whether to check the signatures on packages in this repository. The gpgkey line shows the location of the key that is used to check the packages in this repository.
You can have as many repositories enabled as you like. However, keep in mind that when you use yum commands, every repository is checked and metadata about all packages is downloaded to the local system running the yum command. So to be more efficient, don't enable repositories you don't need.
4. Downloading RPM packages and metadata from a YUM repository
After yum knows the locations of the repositories, metadata from the repodata directory of each repository is downloaded to the local system. In fact, it is the existence of a repodata directory in a directory of RPMs that indicates that it is a yum repository.
Metadata information is stored on the local system in the /var/cache/yum directory. Any further queries about packages, package groups, or other information from the repository are gathered from the cached metadata until a timeout period is reached.
After the timeout period is reached, yum retrieves fresh metadata if the yum command is run. By default, the timeout is 90 minutes. You can change that period by setting metadata_expire in the /etc/yum.conf file. Uncomment that line, and change the number of minutes.
Next, yum looks at the packages you requested to install and checks if any dependent packages are needed by those packages. With the package list gathered, yum asks you if it is okay to download all those packages. If you choose yes, the packages are downloaded to the cache directories and installed.
5. RPM packages installed to Linux file system
After all the necessary packages are downloaded to the cache directories, yum runs rpm commands to install each package. If a package contains preinstall scripts (which might create a special user account or make directories), those scripts are run. The contents of the packages are copied to the filesystem (commands, config files, docs, and so on). Then any post install scripts are run. (Post install scripts run additional commands needed to configure the system after each package is installed.)
6. Store YUM repository metadata to local RPM database
The metadata contained in each RPM package that is installed is ultimately copied into the local RPM database. The RPM database is contained in files stored in the /var/lib/rpm directory.
After information about installed packages is in the local RPM database, you can do all sorts of queries of that database. You can see what packages are installed, list components of those packages, and see scripts or change logs associated with each package. You can even validate installed packages against the RPM database to see if anyone has tampered with installed components.
The rpm command (described in the section “Installing, Querying, and Verifying Software with the rpm Command” later in this chapter) is the best tool for querying the RPM database. You can run individual queries with rpm or use it in scripts to produce reports or run common queries over and over again.
Now that you understand the basic functioning of the yum command, your Fedora system should be automatically configured to connect to the main Fedora repository and the Fedora Updates repository. You can try some yum command lines to install packages right now. Or you can enable other third-party YUM repositories to draw software from.
Using YUM with third-party software repositories
The Fedora and Red Hat Enterprise Linux software repositories have been screened to contain only software that meets criteria that make it open and redistributable. In some instances, however, you may want to go beyond those repositories. Before you do, you should understand that some third-party repositories have these limitations:
· They may have less stringent requirements for redistribution and freedom from patent constraints than the Fedora and RHEL repositories have.
· They may introduce some software conflicts.
· They may include software that is not open source and, although it may be free for personal use, may not be redistributable.
· They may slow down the process of installing all your packages (because metadata is downloaded for every repository you have enabled).
For those reasons, I recommend that you either don't enable any extra software repositories, or enable only the RPM Fusion repository (http://rpmfusion.org) at first for Fedora and the EPEL repository (http://fedoraproject.org/wiki/EPEL) for Red Hat Enterprise Linux. RPM Fusion represents a fusion of several popular third-party Fedora repositories (Freshrpms, Livna.org, and Dribble). See the repository's FAQ for details (http://rpmfusion.org/FAQ). To enable the free RPM Fusion repository in Fedora, do the following:
1. Open a Terminal window.
2. Type su – and enter the root password when prompted.
3. Type the following command on one line with no space between the slash and rpmfusion. (I had to break the line into two because it was too long to fit in one line on the printed page, so be sure to type the entire address on one line with no space):
# rpm -Uvh http://download1.rpmfusion.org/free/fedora/
rpmfusion-free-release-stable.noarch.rpm
The RPM Fusion non-free repository contains such things as codecs needed to play many popular multimedia formats. To enable the non-free repository in Fedora, type the following (again, type the following two lines on a single line, with no space between the two):
# rpm -Uhv http://download1.rpmfusion.org/nonfree/fedora/
rpmfusion-nonfree-release-stable.noarch.rpm
Most of the other third-party repositories that might interest you contain software that is not open source. For example, if you want to install the Adobe Flash plug-in for Linux, download the YUM repository package from Adobe and you can use the yum command to install the Flash plug-in, and get updates later by running the yum update command, when updates are available.
Managing software with the YUM command
The yum command has dozens of subcommands you can use to work with RPM packages on your system. The following sections provide some examples of useful yum command lines to search for, install, query, and update packages associated with your YUM repositories. It also includes a section describing how to remove installed packages with the yum command.
NOTE
Metadata, describing the contents of YUM repositories, is downloaded from each of your enabled YUM repositories the first time you run a yum command. Metadata is downloaded again after the metadata_expire time is reached (90 minutes, by default). The more YUM repositories you enable and the larger they are, the longer this download can take. You can reduce this download time by increasing the expire time (in the /etc/yum.conf file) or by not enabling repositories you don't need.
Searching for packages
Using different searching subcommands, you can find packages based on key words, package contents, or other attributes.
Let's say you want to try out a different text editor, but you can't remember the name of the one you wanted. You could start by using the search subcommand to look for the term “editor” in the name or description:
# yum search editor
...
eclipse-veditor.noarch : Eclipse-based Verilog/VHDL plugin
ed.x86_64 : The GNU line editor
emacs.x86_64 : GNU Emacs text editor
The search uncovered a long list of packages containing “editor” in the name or description. The one I was looking for is named emacs. To get information about that package, I can use the info subcommand:
# yum info emacs
Name : emacs
Arch : x86_64
Epoch : 1
Version : 24.4
Release : 3.fc21
Size : 3.0 M
Repo : updates/21/x86_64
Summary : GNU Emacs text editor
URL : http://www.gnu.org/software/emacs/
License : GPLv3+ and CC0-1.0
Description : Emacs is a powerful, customizable, self-documenting,
: modeless text editor. Emacs contains special code editing
: features, a scripting language (elisp), and the capability
: to read mail, news, and more without leaving the editor.
If you know the command, configuration file, or library name you want, but don't know what package it is in, use the provides subcommand to search for the package. Here you can see that the dvdrecord command is part of the wodim package:
# yum provides dvdrecord
wodim-1.1.11-25.fc21.x86_64 : A command line CD/DVD recording program
Repo : fedora
Matched from:
Provides : dvdrecord
The list subcommand can be used to list package names in different ways. Use it with a package base name to find the version and repository for a package. You can list just packages that are available or installed, or you can list all packages.
# yum list emacs
emacs.i686 1:24.4-3.fc21 updates
# yum list available
389-admin.i686 1.1.35-2.fc21 fedora
389-admin-console.noarch 1.1.35-2.fc21 fedora
389-admin-console-doc.noarch 1.1.8-7.fc21 fedora
...
# yum list installed
Installed Packages
GConf2.x86_64 3.2.6-11.fc21 @koji-override-0/$releasever
LibRaw.x86_64 0.16.0-4.fc21 @koji-override-0/$releasever
...
# yum list all
...
If you find a package, but want to see what components that package is dependent on, you can use the deplist subcommand. With deplist, you can see the components (dependency) but also the package that component comes in (provider). Using deplist can help if no package is available to provide a dependency, but you want to know what the component is so you can search other repositories for it. Consider the following example:
# yum deplist emacs | less
package: emacs.x86_64 1:24.4-3.fc21
dependency: /bin/sh
provider: bash.x86_64 4.3.33-1.fc21
dependency: /usr/sbin/alternatives
provider: chkconfig.x86_64 1.3.63-1.fc21
dependency: dejavu-sans-mono-fonts
provider: dejavu-sans-mono-fonts.noarch 2.34-4.fc21
Installing and removing packages
The install subcommand lets you install one or more packages, along with any dependent packages needed. With yum install, multiple repositories can be searched to fulfill needed dependencies. Consider the following example of yum install:
# yum install emacs
...
Package Arch Version Repository Size
====================================================================
Installing:
emacs x86_64 1:24.4-3.fc21 updates 3.0 M
Installing for dependencies:
ImageMagick-libs x86_64 6.8.8.10-5.fc21 fedora 2.0 M
emacs-common x86_64 1:24.4-3.fc21 updates 37 M
libXaw x86_64 1.0.12-4.fc21 fedora 190 k
liblockfile x86_64 1.08-16.fc21 updates 27 k
libotf x86_64 0.9.13-5.fc21 fedora 96 k
Transaction Summary
====================================================================
Install 1 Package (+5 Dependent packages)
Total download size: 42 M
Installed size: 109 MIs this ok [y/N]: y
You can see here that emacs requires that emacs-common and several other packages be installed so all are queued up for installation. The six packages together are 26MB to download, but consume 91MB after installation. Pressing y installs them. You can put a -y on the command line (just after the yum command) to avoid having to press y to install the packages, but personally, I usually want to see all the packages about to be installed before I agree to the installation.
You can reinstall a package if you mistakenly delete components of an installed package. If you attempt a regular install, the system responds with “nothing to do.” You must, instead, use the reinstall subcommand. For example, suppose you installed the zsh package and then deleted /bin/zsh by mistake. You could restore the missing components by typing the following:
# yum reinstall zsh
You can remove a single package with the erase subcommand. For example, to erase the emacs package, you could type the following:
# yum erase emacs
Dependencies Resolved===========================================
Package Arch Version Repository Size
================================================================
Removing:
emacs x86_64 1:24.4-3.fc21 @updates 14 M
Transaction Summary
================================================================
Remove 1 Package
Installed size: 14 MIs this ok [y/N]: y
Notice that even though six packages were installed when emacs was installed, only the emacs package itself was removed with the erase subcommand. Although emacs required that emacs-common be installed, emacs-common did not depend on emacs and could therefore stay on the system without breaking dependencies. Running yum remove emacs-common would have removed both packages.
An alternative method to remove a set of packages you have installed is to use the history subcommand. Using history, you can see your yum activities and undo an entire transaction. In other words, all the packages you installed can be uninstalled using the undooption to the history subcommand. For example:
# yum history
ID | Login user | Date and time | Action(s) | Altered
---------------------------------------------------------------------
96 | Chris Negus <cnegus> | 2016-12-10 06:25 | Install | 2
...
# yum history info 96
Transaction ID : 96
...
Command Line : install emacs
...
# yum history undo 96
Undoing transaction 96, from Wed Dec 14 06:25:41 2014
Dep-Install emacs-common-1:24.4-3.fc21.x86_64 @updates
Dep-Install libXaw-1.0.12-4.fc21.x86_64 @fedora
...
Before you undo the transaction, you can view the transaction to see exactly which packages were involved. Viewing the transaction can save you from mistakenly deleting packages you want to keep. By undoing transaction 96, you can remove all packages that were installed during that transaction. If you are trying to undo an install that included dozens or even hundreds of packages, undo can be a very useful option.
Updating packages
As new releases of a package become available, they are sometimes put in separate update repositories or simply added to the original repository. If multiple versions of a package are available (whether in the same repository or another enabled repository), yumprovides the latest version when you install a package. If a new version shows up later, you can download and install the new version of the package by using the update subcommand.
The check-update subcommand can check for updates. The update subcommand can be used to update a single package or to get updates to all packages that are currently installed and have an update available. Or you can simply update a single package (such as the cups package). For example:
# yum check-update
...kernel.x86_64 3.10.0-123.6.3.el7 rhel-7-server-rpms
kernel-headers.x86_64 3.10.0-123.6.3.el7 rhel-7-server-rpms
# yum update
...Resolving Dependencies
--> Running transaction check
---> Package kernel.x86_64 0:3.10.0-123.6.3.el7 will be installed
---> Package kernel-headers.x86_64 0:3.10.0-123.4.4.el7 will be
updated
...
Transaction Summary
=====================================================================
Upgrade 38 Package(s)
Total download size: 50 M
Is this ok [y/N]: y
# yum update cups
The preceding command requested to update the cups package. If other dependent packages need to be updated to update cups, those packages would be downloaded and installed as well.
Updating groups of packages
To make it easier to manage a whole set of packages at once, YUM supports package groups. For example, you could install GNOME Desktop Environment (to get a whole desktop) or Virtualization (to get packages needed to set up the computer as a virtual host). You can start by running the grouplist subcommand to see a list of group names:
# yum grouplist | less
Available environment groups:
Fedora Server
...
Installed groups:
Administration Tools
Design Suite
...
Available Groups:
Authoring and Publishing
Books and Guides
C Development Tools and Libraries
...
Let's say you want to try out a different desktop environment. You see LXDE, and you want to know what is in that group. To find out, use the groupinfo subcommand:
# yum groupinfo LXDE
Group: LXDE
Group-Id: lxde-desktop
Description: LXDE is a lightweight X11 desktop environment...
Mandatory Packages:
lxde-common
lxmenu-data
...
In addition to showing a description of the group, groupinfo shows Mandatory Packages (those that are always installed with the group), Default Packages (those that are installed by default, but can be excluded), and Optional Packages (which are part of the group, but not installed by default). When you use some graphical tools to install package groups, you can uncheck default packages or check optional packages to change whether they are installed with the group.
If you decide you want to install a package group, use the groupinstall subcommand:
# yum groupinstall LXDE
This groupinstall resulted in 30 packages from the group being installed and 5 existing packages being updated. If you decide you don't like the group of packages, you can remove the entire group at once using the groupremove subcommand:
# yum groupremove LXDE
Maintaining your RPM package database and cache
Several subcommands to yum can help you do maintenance tasks, such as check for problems with your RPM database or clear out the cache. The YUM facility has tools for maintaining your RPM packages and keeping your system's software efficient and secure.
Clearing out the cache is something you want to do from time to time. If you decide to keep downloaded packages after they are installed (they are removed by default, based on the keepcache=0 setting in the /etc/yum.conf file), your cache directories (under/var/cache/yum) can fill up. Metadata stored in cache directories can be cleared, causing fresh metadata to be downloaded from all enabled YUM repositories the next time yum is run. Here are ways to clear that information:
# yum clean packages
Cleaning repos: rhel-7-server-rpms
7 package files removed
# yum clean metadata
43 metadata files removed
13 sqlite files removed
# yum clean all
Cleaning repos: rhel-7-server-rpms
Cleaning up Everything
Although unlikely, it's possible that the RPM database can become corrupted. This can happen if something unexpected occurs, such as pulling out the power cord when a package is partially installed. You can check the RPM database to look for errors (yum check) or just rebuild the RPM database files, as follows:
# yum check
check all
# yum clean rpmdb
Cleaning repos: rhel-7-server-rpms
4 rpmdb files removed
Of the yum clean examples in the preceding three command lines, all remove cached data from the /var/cache/yum subdirectories, except for the rpmdb example. That command removed db* files from the /var/lib/rpm directory (regenerating those database files to clean up any problems).
The rpmdb option is one of the few options to yum that is used to work with the RPM database directly. In general, yum is used for manipulating yum repositories. The command best suited for working with the local RPM database is the rpm command.
Downloading RPMs from a yum repository
If you just want to examine a package without actually installing it, you can use the yumdownloader command. Running that command causes the package you name to be downloaded from the YUM repository and copied to your current directory.
For example, to download the latest version of the Firefox web browser package from the YUM repository to your current directory, type the following:
# yumdownloader firefox
...(1/2): firefox-35.0-3.fc21.x86_64.rpm | 68 MB 00:00:09
(2/2): firefox-35.0-3.fc21.i686.rpm | 68 MB 00:00:10
In this case, because x86_64 and i686 versions of the firefox package are available, both are downloaded to the current directory. With any downloaded RPM packages now sitting in your current directory, you can use a variety of rpm commands to query or use those packages in different ways (as described in the next section).
Installing, Querying, and Verifying Software with the rpm Command
There is a wealth of information about installed packages in the local RPM database. The rpm command contains dozens of options to enable you to find information about each package, such as the files it contains, who created it, when it was installed, how large it is, and many other attributes. Because the database contains fingerprints (md5sums) of every file in every package, it can be queried with RPM to find out if files from any package have been tampered with.
The rpm command can still do basic install and upgrade activities, although most people only use rpm in that way when there is a package sitting in the local directory, ready to be installed. So let's get one in our local directory to work with. Type the following to download the latest version of the zsh package:
# yumdownloader zsh
zsh-5.0.7-4.fc21.x86_64.rpm | 2.5 MB 00:03
With the zsh package downloaded to your current directory, try some rpm commands on it.
Installing and removing packages with rpm
To install a package with the rpm command, type this:
# rpm -i zsh-5.0.7-4.fc21.x86_64.rpm
Notice that the entire package name is given to install with rpm, not just the package base name. If an earlier version of zsh were installed, you could upgrade the package using -U. Often, people use -h and -v options to get hash signs printed and more verbose output during the upgrade:
# rpm -Uhv zsh-5.0.7-4.fc21.x86_64.rpm
Preparing... ######################### [100%]
1:zsh ######################### [100%]
Although an install (-i) only installs a package if the package is not already installed, an upgrade (-U) installs the package even if it is already installed. A third type of install called freshen (-F) installs a package only if an existing, earlier version of a package is installed on the computer. For example:
# rpm -Fhv *.rpm
You could use the previous freshen command if you were in a directory containing thousands of RPMs but only wanted to update those that were already installed (in an earlier version) on your system and skip those that were not yet installed.You can add a few interesting options to any of your install options. The --replacepkgs option enables you to reinstall an existing version of a package (if, for example, you had mistakenly deleted some components), and the --oldpackage enables you to install an earlier version of a package.
# rpm -Uhv --replacepkgs emacs-common-24.4-3.fc21.x86_64.rpm
# rpm -Uhv --oldpackage zsh-4.3.10-7.el6.x86_64.rpm
You can remove a package with the -e option. You only need the base name of a package to remove it. For example:
# rpm -e emacs
The rpm -e emacs command would be successful because no other packages are dependent on emacs. However, it would leave behind emacs-common, which was installed as a dependency to emacs. If you had tried to remove emacs-common first, that command would fail with a “Failed dependencies” message.
Querying rpm information
After the package is installed, you can query for information about the package. Using the -q option, you can see information about the package, including a description (-qi), list of files (-ql), documentation (-qd), and configuration files (-qc).
# rpm -qi zsh
Name : zsh
Version : 5.0.7
Release : 4.fc21
...
# rpm -ql zsh
/bin/zsh
/etc/skel/.zshrc
/etc/zlogin
/etc/zlogout
...
# rpm -qd zsh/usr/share/doc/zsh/BUGS
/usr/share/doc/zsh/CONTRIBUTORS
/usr/share/doc/zsh/FAQ# rpm -qc zsh
/etc/skel/.zshrc
/etc/zlogin
/etc/zlogout
You can use options to query any piece of information contained in an RPM. You can find what an RPM needs for it to be installed (--requires), what version of software a package provides (--provides), what scripts are run before and after an RPM is installed or removed (--scripts), and what changes have been made to an RPM (--changelog).
# rpm -q --requires emacs-common
/bin/sh
/sbin/install-info
/usr/bin/perl
...
# rpm -q --provides emacs-common
config(emacs-common) = 1:24.4-3.fc21
emacs-common = 1:24.4-3.fc21
emacs-common(x86-64) = 1:24.4-3.fc21
emacs-el = 1:24.4-3.fc21
pkgconfig(emacs) = 1:24.4
# rpm -q --scripts httpd
# Add the "apache" user
/usr/sbin/useradd -c "Apache" -u 48 \
-s /sbin/nologin -r -d /var/www apache 2> /dev/null || :
postinstall scriptlet (using /bin/sh):
...
# rpm -q --changelog httpd | less*
Wed Sep 03 2014 Jan Kaluza
<jkaluza@redhat.com> - 2.4.10-9
- fix hostname requirement and conflict with openssl-libs
...
In the previous two examples, you can see that scripts inside the httpd package add an apache user at installation time and turn on the httpd service with chkconfig. The --changelog option enables you to see why changes have been made to each version of the package. The fix # represents a fixed bug that you can look up in http://bugzilla.redhat.com.
Using a feature called --queryformat, you can query different tags of information and output them in any form you like. Run the --querytags option to be able to see all the tags that are available:
# rpm --querytags | less
ARCH
ARCHIVESIZE
BASENAMES
BUGURL
...
# rpm -q binutils --queryformat "The package is %{NAME} \
and the release is %{RELEASE}\n"
The package is binutils and the release is 30.fc21
All the queries you have done so far have been to the local RPM database. By adding a -p to those query options, you can query an RPM file sitting in your local directory instead. The -p option is a great way to look inside a package that someone gives you to investigate what it is before you install it on your system.
If you haven't already, get the zsh package and put it in your local directory (yumdownloader zsh). Then run some query commands on the RPM file.
# rpm -qip zsh-5.0.2-7.el7.x86_64.rpm View info about the RPM file
# rpm -qlp zsh-5.0.2-7.el7.x86_64.rpm List all files in RPM file
# rpm -qdp zsh-5.0.2-7.el7.x86_64.rpm Show docs in the RPM file
# rpm -qcp zsh-5.0.2-7.el7.x86_64.rpm List config files in RPM file
Verifying RPM packages
Using the -V option, you can check the packages installed on your system to see if the components have been changed since the packages were first installed. Although it is normal for configuration files to change over time, it is not normal for binaries (the commands in/bin, /sbin, and so on) to change after installation. Binaries that are changed are probably an indication that your system has been cracked.
In this example, I'm going to install the zsh package and mess it up. If you want to try along with the examples, be sure to remove or reinstall the package when you are finished.
# rpm -i zsh-5.0.7-4.fc21.x86_64.rpm
# echo hello > /bin/zsh
# rm /etc/zshrc
# rpm -V zsh
S.5....T. /bin/zsh
missing c /etc/zshrc
In this output, you can see that the /bin/zsh file has been tampered with and /etc/zshrc has been removed. Each time you see a letter or a number instead of a dot from the rpm -V output, it is an indication of what has changed. Letters that can replace the dots (in order) include the following:
S file Size differs
M Mode differs (includes permissions and file type)
5 MD5 sum differs
D Device major/minor number mismatch
L readLink(2) path mismatch
U User ownership differs
G Group ownership differs
T mTime differs
P caPabilities differ
Those indicators are from the Verify section of the rpm man page. In my example, you can see that the file size has changed (S), the md5sum checked against the file's fingerprint has changed (5), and the modification time (T) on the file differs.
To restore the package to its original state, use rpm with the --replacepkgs option, as shown next. (The yum reinstall zsh command would work as well). Then check it with -V again. No output from -V means that every file is back to its original state.
# rpm -i --replacepkgs zsh-5.0.2-7.el7.x86_64.rpm
# rpm -V zsh
Good practice is to back up your RPM database (from /var/lib/rpm) and copy it to some read-only medium (such as a CD). Then, when you go to verify packages that you suspect were cracked, you know you aren't checking it against a database that has also been cracked.
Managing Software in the Enterprise
At this point, you should have a good working knowledge of how to install, query, remove, and otherwise manipulate packages with graphical tools, the yum command, and the rpm command. When you start working with RPM files in a large enterprise, you need to extend that knowledge.
Features used to manage RPM packages in the enterprise with Red Hat Enterprise Linux offer a bit more complexity and much more power. Instead of having one big software repository, as Fedora does, RHEL provides deployment through Red Hat Network, which requires a paid subscription and entitlements to a variety of software channels (RHEL, Red Hat Enterprise Virtualization, Red Hat Cluster Suite, and so on).
In terms of enterprise computing, one of the great benefits of the design of RPM packages is that their management can be automated. Other Linux packaging schemes allow packages to stop and prompt you for information when they are being installed (such as asking for a directory location or a username). RPM packages install without interruption, offering some of the following advantages:
· Kickstart files—All the questions you answer during a manual install and all the packages you select can be added into a file called a kickstart file. When you start a Fedora or Red Hat Enterprise Linux installer, you can provide a kickstart file at the boot prompt. From that point on, the entire installation process completes on its own. Any modifications to the default package installs can be made by running pre and post scripts from the kickstart file, to do such things as add user accounts or modify configuration files.
· PXE boot—You can configure a PXE server to allow client computers to boot an anaconda (installer) kernel and a select kickstart file. A completely blank computer with a network interface card (NIC) that supports PXE booting can simply boot from its NIC to launch a fresh installation. In other words, turn on the computer, and if it hits the NIC in its boot order, a few minutes later you can have a freshly installed system, configured to your exact specifications without intervention.
· Satellite server (Spacewalk)—Red Hat Enterprise Linux systems can be deployed using what is referred to as Satellite Server (the open source project is called Spacewalk). Built into Satellite Server are the same features you have from Red Hat Network to manage and deploy new systems and updates. Without logging in directly, RHEL systems can be configured to get software updates at times set from the satellite server. Sets of packages called Errata that fix specific problems can be quickly and automatically deployed to the systems that need them.
Descriptions of how to use kickstart files, satellite servers, and other enterprise-ready installation features are beyond the scope of this book. But the understanding you have gained from learning about YUM and RPM will serve as a solid foundation for any RHEL software installation work you do in the future.
Summary
Software packaging in Fedora, Red Hat Enterprise Linux, and related systems is provided using software packages based on the RPM Package Manager (RPM) tools. Debian, Ubuntu, and related systems package software into DEB files. You can try easy-to-use graphical tools such as the Software window for finding and installing packages. The primary command-line tools include the yum and rpm commands for Red Hat-related systems and aptitude, apt*, and dkpg for Debian-related systems.
Using these software management tools, you can install, query, verify, update, and remove packages. You can also do maintenance tasks, such as clean out cache files and rebuild the RPM database. This chapter describes many of the features of the Software window, as well as yum and rpm commands.
With your system installed and the software packages that you need added, it's time to further configure your Fedora, RHEL, Debian, or Ubuntu system. If you expect to have multiple people using your system, your next task could be to add and otherwise manage user accounts on your system. Chapter 11 describes user management in Fedora, RHEL, and other Linux systems.
Exercises
These exercises test your knowledge of working with RPM software packages in Fedora or Red Hat Enterprise Linux. To do the exercises, I recommend you have a Fedora system in front of you that has an Internet connection. (Most of the procedures work equally well on a registered RHEL system.)
You need to be able to reach the Fedora repositories (which should be set up automatically). If you are stuck, solutions to the tasks are shown in Appendix B (although in Linux, there are often multiple ways to complete a task).
1. Search the YUM repository for the package that provides the mogrify command.
2. Display information about the package that provides the mogrify command and determine what that package's home page (URL) is.
3. Install the package containing the mogrify command.
4. List all the documentation files contained in the package that provides the mogrify command.
5. Look through the changelog of the package that provides the mogrify command.
6. Delete the mogrify command from your system, and verify its package against the RPM database to see that the command is indeed missing.
7. Reinstall the package that provides the mogrify command, and make sure the entire package is intact again.
8. Download the package that provides the mogrify command to your current directory.
9. Display general information about the package you just downloaded by querying the package's RPM file in the current directory.
10.Remove the package containing the mogrify command from your system.
All materials on the site are licensed Creative Commons Attribution-Sharealike 3.0 Unported CC BY-SA 3.0 & GNU Free Documentation License (GFDL)
If you are the copyright holder of any material contained on our site and intend to remove it, please contact our site administrator for approval.
© 2016-2025 All site design rights belong to S.Y.A.