Linux Bible 9th Ed (2015)
Part VI. Extending Linux into the Cloud
Chapter 27. Deploying Linux to the Cloud
IN THIS CHAPTER
Creating Linux cloud images
Deploying a cloud image to virt-manager (libvirtd)
Deploying a cloud image to OpenStack
Deploying a cloud image to Amazon EC2
To get a new Linux system to use, instead of just running a standard installation program from a physical DVD, you can get a Linux image and deploy it to a cloud. One way to do that is to take a generic Linux image (one that is bootable but unconfigured) and provide information to configure that image to your needs. Another way is to go to a cloud provider, choose an image, click through selections to configure it, and launch it.
The point is that cloud computing is offering new ways to start up and use Linux systems. In Chapter 26, I had you do a standard Linux installation to create a virtual machine that runs on a Linux hypervisor. In this chapter, I show you how to use cloud images to start up a fresh Linux system.
First, I describe how to use cloud-init to manually combine a Linux cloud image with configuration information, to allow it to run in a variety of environments. Next, I tell how a similar process is done on an OpenStack Cloud or an Amazon Elastic Compute Cloud (EC2), by clicking through easy-to-use cloud controllers to choose images and settings to run the Linux cloud instance you want.
Getting Linux to Run in a Cloud
Cloud platforms are great for spinning up new virtual machines quickly and efficiently. They can do so because a fresh install is not required each time you want a new instance of an operating system.
Public clouds, such as Amazon EC2 (http://aws.amazon.com/ec2), offer instances of different Linux distributions for you to start and use. You choose a Linux instance, such as Ubuntu, Red Hat Enterprise Linux (RHEL), or SUSE Linux Enterprise Server (SLES), that is tuned for specific purposes. For example, there are instances that are optimized for high-performance processing or memory-intensive applications.
The content of a cloud instance tends to be generic in nature. It is expected that more information is attached to the image by the cloud user or the cloud provider using a service such as cloud-init. This information falls into two general categories: meta-data and user-data:
· meta-data—Included with meta-data is information that is needed before the image boots. This is data that is outside the contents of the image and is typically managed by the cloud provider. Some of this data comes from the fact that things such as storage, memory, and processing power are drawn from a pool of resources, rather than from the physical machine you are installing on. So the meta-data tells the cloud provider how much of those resources, and possibly others, to allocate early in the process of starting up the instance.
· user-data—The user-data information is inserted into the operating system that exists on the image. This is data that the person using the virtual machine provides. This might include a user account and password, configuration files, commands to run on first boot, the identities of software repositories, or anything else you might want to run or change within the operating system itself.
When you go to run a Linux instance in a cloud environment, you typically enter the meta-data and user-data information by clicking check boxes and filling in forms from a Web-based cloud controller (such as the OpenStack Dashboard or Red Hat Enterprise Virtualization Manager). The information may not be identified as meta-data and user-data when you configure the instance through the cloud controller.
The cloud you use to run your Linux virtual machines may be a public cloud, a private cloud, or a hybrid cloud. The type of cloud you choose may depend on your needs and your budget:
· Public cloud—Amazon EC2 and Google Compute Engine are examples of cloud platforms that let you launch and use Linux virtual machines from a web-based interface. You pay for the time that the instance is running. The amount of memory, storage, and virtual CPUs you use to run the service are also figured into the costs. The advantage of public clouds is that you don't have to purchase and maintain your own cloud infrastructure.
· Private cloud—With a private cloud, you put your own computing infrastructure in place (hypervisors, controllers, storage, network configuration, and so on). Setting up your own private cloud means taking on more up-front costs to own and maintain infrastructure. But it gives you added security and control of your computing resources. Because you control the infrastructure, you can create the images users have access to in your OpenStack infrastructure and account for user usage of that infrastructure in your own way.
· Hybrid cloud—Many companies are looking toward hybrid cloud solutions. A hybrid cloud can allow multiple cloud platforms to be managed by a central facility. For example, Red Hat Cloudforms can deploy and manage virtual machines on OpenStack, VMware vSphere, and Red Hat Enterprise Virtualization platforms, provisioning different types of workloads to appropriate environments. At times of peak demand, Cloudforms can also direct virtual machines to run on Amazon EC2 clouds.
These cloud environments have different ways of provisioning and configuring virtual machines. However, the features that clouds need to provide to virtual machine management are similar. Having an understanding of those features can help you when you configure a Linux system to run in a cloud.
To get a better feel for configuring Linux cloud instances, the next section describes how cloud-init works to configure Linux cloud instances. It then helps you create your own meta-data and user-data files and apply them to your cloud instance so the information can be used when the cloud image boots.
Creating Linux Images for Clouds
Think about what you did when you installed a Linux system in Chapter 9. During a manual installation process, you set a root password, created a regular user account and password, possibly defined your network interfaces, and did other tasks. The information you entered became a permanent part of the operating system that remained each time you booted the system.
When you start with a prebuilt cloud image as your Linux system, you can use cloud-init to get a Linux system ready to run. The cloud-init facility (http://launchpad.net/cloud-init) sets up a generic virtual machine instance to run in the way you want it to run without going through an install process. The next section describes some ways of using cloud-init.
Configuring and running a cloud-init cloud instance
In the next procedure, I show you how to manually create data that can be combined with a bootable Linux cloud image, so when that image boots, it is configured based on your data. Combining data with the image at runtime allows you to change the data each time before the image is run, instead of installing it permanently in the image.
I suggest that you run this procedure on one of the hypervisors you configured in Chapter 26. This not only allows you to create the customized data for your Linux cloud image, but also lets you run that image as a virtual machine on that hypervisor.
To add data and run an existing cloud image, this procedure requires you to obtain a cloud image, create data files, and generate a new image that combines those elements. This procedure is meant to be very simple to get a cloud image booted. Later, I tell you how to add more features to these data files. To configure and run a cloud image, follow these steps:
1. Create a cloud-init meta-data file. Create a file named meta-data to hold data that identifies information about the cloud instance from the outside. For example, you can add a name to identify the instance (instance-id), a hostname (local-hostname), and other information. To keep it simple for the first try, I assign only two fields (set them to any names you like):
2. instance-id: FedoraWS01
local-hostname: fedora01
3. Create a cloud-init user-data file. Create a file named user-data to hold data that configures inside the operating system on the image itself. For this simple case, I just set a password for the default user (fedora) to cloudpass and cloud-init not to expire the password:
4. #cloud-config
5. password: cloudpass
chpasswd: {expire: False}
6. Combine the data into a separate image. With the meta-data and user-data files in the current directory, create an ISO image that contains that data. Later, we present this image as a CD-ROM to the Linux image, so cloud-init knows how to configure the Linux image. (Install the genisoimage package first, if you haven't already.)
7. # yum install genisoimage
8. # genisoimage -output fedora21-data.iso -volid cidata \
-joliet -rock user-data meta-data
9. Get a base cloud image. Cloud images for Ubuntu, Fedora, and RHEL are configured for use with cloud-init. Get an official Fedora cloud image (images for other distributions are described later), and do the following:
· Go to getfedora.org. Open a web browser, and go to https://getfedora.org/en/cloud/download/.
· Click OpenStack. Click the "Are you an OpenStack user" link under General Purpose and select the "Download" button that appears to get a qcow2 image that can be used in an OpenStack environment. The image name is something like: Fedora-Cloud-Base-20141203-21.x86_64.qcow2.
10.Snapshot the image. You probably need to run this procedure a few times before you get the exact image you want. So, instead of using the downloaded image directly, make a snapshot of it. To keep track of my versions, I added 01 to the new snapshot name:
11. # qemu-img create -f qcow2 \
12. -o backing_file=Fedora-Cloud-Base-20141203-21.x86_64.qcow2 \
Fedora-Cloud-Base-01.qcow2
13.Copy the files to the images directory. It's good practice to copy images to the /var/lib/libvirt/images/ directory when you are using them on a hypervisor (libvirtd service). For example, to copy the cloud image and data image to that directory, type the following:
14. # cp Fedora-Cloud-Base-20141203-21.x86_64.qcow2 \
15. Fedora-Cloud-Base-01.qcow2 \
16. fedora21-data.iso \
/var/lib/libvirt/images/
17.Start the cloud instance. With the files in place, run the following commands to start an instance of your cloud image:
18. # cd /var/lib/libvirt/images
19. # virt-install --import --name fedora21-01 --ram 4096 --vcpus 2 \
20. --disk path=Fedora-Cloud-Base-01.qcow2,format=qcow2,bus=virtio \
21. --disk path=fedora21-data.iso,device=cdrom \
--network bridge=virbr0 &
The previous virt-install example shows that the virtual machine is assigned to consume 4GB of RAM (--ram 4096) and two virtual CPUs (--vcpus 2). The RAM and VCPU values on your system may be different, depending on the resources your computer has.
At this point, a virtual machine named fedora21-01 is running on your hypervisor. As the virtual machine boots up, a console window should open allowing you to log into the new cloud virtual machine.
Investigating the cloud instance
To investigate the cloud image we created you can open up the running instance and look inside. One way to do that, if it is not already open, is to open the virtual machine with virt-viewer:
# virt-viewer fedora21-01
From the console window that appears, use the data we added to the image to log in. Use fedora as the user and cloudpass as the password to log in. The fedora user has sudo privilege, so you can use that account to investigate the instance by typing some commands:
Here, you see where the user-data was copied into the instance:
$ sudo cat /var/lib/cloud/instances/FedoraWS01/user-data.txt
#cloud-config
password: cloudpass
chpasswd: {expire: False}
The basic cloud configuration is done in the /etc/cloud/cloud.cfg file. You can see here that the root user account is disabled by default. At the bottom of the file, you can see that the user named fedora is the default user and has sudo privilege without requiring a password.
$ sudo cat /etc/cloud/cloud.cfg
users:
- default
disable_root: 1
...
system_info:
default_user:
name: fedora0
lock_paswd: true
gecos: Fedora Cloud User
groups: [wheel, adm, systemd-journal]
sudo: ["ALL=(ALL) NOPASSWD:ALL"]
shell: /bin/bash
distro: fedora
paths:
cloud_dir: /var/lib/cloud
templates_dir: /etc/cloud/templates
ssh_svcname: sshd
# vim:syntax=yaml
You can see other things in the cloud.cfg file as well. You can see which cloud_init_modules run during initialization (such as those that set the hostname or start rsyslog logging). You can see cloud_config_modules that set the locale, set the time zone, and run further configuration tools (such as chef and puppet).
Because yum repositories are enabled, provided you have an available network connection (DHCP should have assigned addresses to the virtual machine by default), you can install any packages available from the Fedora repositories.
Cloning the cloud instance
If you decide you like the cloud instance you created, you can save a copy of it to run later by making a clone of the two images (cloud and data image) that make up the cloud instance. To create a clone of the running cloud instance, using virt-manager, do the following:
1. Launch virt-manager. On the host system running the virtual machine, run the virt-manager command or start Virtual Machine Manager from the Activities screen on your desktop.
2. Pause the virtual machine. Right-click the virtual machine instance entry in the virt-manager window, and select Pause. This makes the virtual machine inactive for the moment.
3. Clone the virtual machine. Right-click the virtual machine instance entry again, and select Clone. The Clone Virtual Machine window appears, as shown in Figure 27.1.
4. Choose the clone settings. For the cloud base image and the data image, you can choose to either make new copies or share them with the existing virtual machine. After you do, select clone.
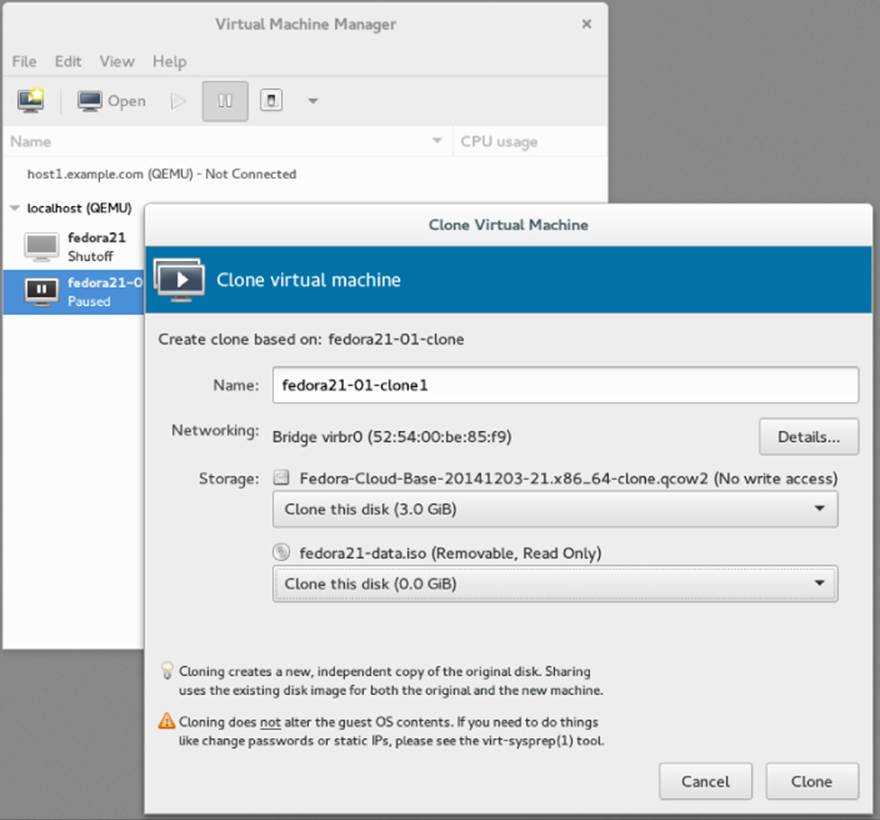
Figure 27.1 Cloning lets you save a permanent copy of a cloud instance.
The cloned cloud instance is now available to start, stop, and otherwise manage as you like from the Virtual Machine Manager window or the virsh command.
Trying an Ubuntu cloud image
Any Linux image that is enabled for cloud-init can be configured in much the same way as has just been shown for Fedora. Here is an example of how to get Ubuntu cloud image running without a cloud provider on your local Linux hypervisor:
1. Download the Ubuntu cloud tarball. Go to the Ubuntu site, and select the release and specific images you want. I downloaded the ubuntu-14.10-server-cloudimg-amd64.tar.gz cloud tarball from the following site:
http://cloud-images.ubuntu.com/releases/
2. Untar the cloud tarball. I typed the following to extract the files from the tarball:
# tar xvf ubuntu-14.10-server-cloudimg-amd64.tar.gz
3. Combine the data into a separate image. Start with the same meta-data and user-data files you used for Fedora. Change the meta-data names to ubuntu instead of fedora. The default user is different (ubuntu), but you can assign a password in the same way. Run this command to create the data image:
4. # genisoimage -output ubuntu-data.iso -volid cidata \
-joliet -rock user-data meta-data
5. Snapshot the image. Take a snapshot of the image as follows:
6. # qemu-img create -f qcow2 \
7. -o backing_file=utopic-server-cloudimg-amd64.img \
utopic-server-01.img
8. Copy the image files. Copy the Ubuntu image files to the appropriate directory. For the Ubuntu image file to run, you need to add the floppy image to make the cloud instance bootable:
9. # cp ubuntu-data.iso \
10. utopic-server-cloudimg-amd64-floppy \
utopic-server-cloudimg-amd64.img /var/lib/libvirt/images/
11.Start the cloud instance. To start the Ubuntu cloud instance, run the following command:
12. # cd /var/lib/libvirt/images
13. # virt-install --import --name ubuntu1410-01 --ram 4096 --vcpus 2 \
14. --disk path=utopic-server-cloudimg-amd64-floppy,device=floppy \
15. --disk path=utopic-server-cloudimg-amd64.img,format=raw,bus=virtio \
--disk path=ubuntu-data.iso,device=cdrom --network bridge=virbr0 &
At this point, you have a bare-bones Ubuntu cloud instance running. Log in as the user ubuntu and the password defined in the user-data file.
Expanding your cloud-init configuration
You can add much more information to your meta-data and user-data files to configure your cloud instances. Examples of cloud-init settings can be found on the Cloud-Init Config Examples page (http://cloudinit.readthedocs.org/en/latest/topics/examples.html). The following sections show examples of settings you can add to your user-data files.
NOTE
The user-data and meta-data files are in yaml format. The yaml format uses indents and well-known delimiters. Items in a list are preceded by a hyphen and a space. Keys and values are separated by a colon and a space. If you are not familiar with yaml, I recommend digging around the Yaml Project site (https://github.com/yaml).
Adding ssh keys with cloud-init
Instead of using passwords to log into your cloud instances, you can use key-based authentication along with the ssh command to log in over the network. This is commonly used by cloud providers to allow user access to cloud images.
If you have already generated public and private ssh keys for the user account you plan to use to ssh into the cloud instance, you can use that public key for this procedure. If you had generated an RSA keypair, the public key is located in the id_rsa.pub file by default:
# cat $HOME/.ssh/id_rsa.pub
ssh-rsa AAAAB3NzaC1yc2EAAAADAQABAAABAQDMzdq6hqDUhueWzl7rIUwjxB/rrJY4o
ZpoWINzeGVf6m8wXlHmmqd9C7LtnZg2P24/ZBb3S1j7vK2WymOcwEoWekhbZHBAyYeqXK
YQQjUB2E2Mr6qMkmrjQBx6ypxbz+VwADNCwegY5RCUoNjrN43GVu6nSOxhFf7hv6dtCjv
osOvtt0979YS3UcEyrobpNzreGSJ8FMPMRFMWWg68Jz5hOMCIE1IldhpODvQVbTNsn/ST
xO7ZwSYV6kfDj0szvdoDDCyh8mPNC1kIDhf/qu/Zn1kxQ9xfecQ+SUi+2IwN69o1fNpex
JPFr+Bwjkwcrk58C6uowG5eNSgnuu7GMUkT root@host2.example.com
The public key from that file is typically copied to the $HOME/.ssh/authorized_keys file for the user on the remote system you want to log in to. We can have the key added to that file on our cloud instance using entries in the user-data file that looks like this:
users:
- default
- name: wsmith
gecos: William B. Smith
primary-group: wsmith
sudo: ALL=(ALL) NOPASSWD:ALL
lock-passwd: true
ssh-authorized-keys:
- ssh-rsa AAAAB3NzaC1yc2EAAAADAQABAAABAQDMzdq6hqDUhueWzl7rIUwjx
B/rrJY4oZpoWINzeGVf6m8wXlHmmqd9C7LtnZg2P24/ZBb3S1j7vK2WymOcwEoWekhbZH
BAyYeqXKYQQjUB2E2Mr6qMkmrjQBx6ypxbz+VwADNCwegY5RCUoNjrN43GVu6nSOxhFf7
hv6dtCjvosOvtt0979YS3UcEyrobpNzreGSJ8FMPMRFMWWg68Jz5hOMCIE1IldhpODvQV
bTNsn/STxO7ZwSYV6kfDj0szvdoDDCyh8mPNC1kIDhf/qu/Zn1kxQ9xfecQ+SUi+2IwN6
9o1fNpexJPFr+Bwjkwcrk58C6uowG5eNSgnuu7GMUkT root@host2.example.com
From the previous information, you can see that wsmith is the default user. The gecos entry is typically the user's full name, used in the fifth field of the /etc/passwd file. The password is locked for this user. However, because the ssh-rsa entry from my root account onhost2.example.com is provided here under ssh-authorized-keys for the user, I can log into the cloud instance as wsmith over ssh without typing a password (provided my private key is associated with that public key).
Adding network interfaces with cloud-init
If you want network interfaces to be configured on your cloud instances early in the boot process, you can add network-interfaces entries to your meta-data file for those cloud instances. Here is an example:
network-interfaces: |
iface eth0 inet static
address 192.168.100.50
network 192.168.100.0
netmask 255.255.255.0
broadcast 192.168.1.255
gateway 192.168.100.1
bootcmd:
- ifdown eth0
- ifup eth0
The network-interfaces values shown here identify the eth0 interface within the cloud instance as containing static addresses (in other words, not from DHCP). The IP address for the interface is set to 192.168.100.50, while the gateway that routes packets out to the world is set to 192.168.100.1. To bring that interface up on the new address, the bootcmd is set to bring the interface down (ifdown eth0) and then back up (ifup eth0).
Adding software with cloud-init
You aren't limited to the software already on your cloud image. Inside your user-data file, you can define yum repositories (in Fedora and RHEL) or apt repositories (in Ubuntu or Debian), and then identify any packages you want to have installed when the cloud instance starts.
The following example shows what entries in a user-data file might look like to add a yum repository (for Fedora or RHEL) to your cloud instance and then install packages from that repository or any other enabled repository:
myownrepo:
baseurl: http://myrepo.example.com/pub/myrepo/
enabled: true
gpgcheck: true
gpgkey: file:///etc/pki/rpm-gpg/RPM-GPG-KEY-MYREPO
name: My personal software repository
packages:
- nmap
- mycoolcmd
- [libmystuff, 3.10.1-2.fc21.noarch]
In the example just shown, a new yum repository is created in the file /etc/yum.repos.d/myownrepo.repo. A gpgkey is provided to check the validity of installed packages, and GPG checking is turned on. After that, the nmap package is installed (that's in the standard Fedorayum repository), the mycoolcmd package is installed (from my private repository), and a specific version of the libmystuff package is installed.
Configuring apt software repositories for Ubuntu is done a bit differently. Failsafe primary and security apt package mirrors are configured by default (in the cloud.cfg file in the image), along with settings to cause the instance, if run in an Amazon EC2 cloud, to search the closest region for packages. To add more repositories, entries in your user-data file could look as follows:
apt_mirror: http://us.archive.ubuntu.com/ubuntu/
apt_mirror_search:
- http://myownmirror.example.com
- http://archive.ubuntu.com
packages:
- nmap
- mycoolcmd
- [libmystuff, 3.16.0-25]
The myownmirror.example.com entry tells apt to use your own private apt repository to search for packages. Note that packages you want to install can be entered in basically the same format as you did with Fedora, although specific version information (if entered) might look different in some cases.
You can add many other settings to your user-data and meta-data files. Again, refer to the Cloud-Init Cloud Config Examples page (http://cloudinit.readthedocs.org/en/latest/topics/examples.html) for details.
Using cloud-init in enterprise computing
So far, the cloud-init examples in this chapter have focused on taking a cloud image, manually adding configuration data, and running it as a virtual machine temporarily on your local hypervisor. This approach is useful if you want to understand how cloud-initworks and the opportunities you have for tuning cloud images to your specifications. But this approach doesn't scale well if you are managing large enterprises of virtual machines.
Cloud-init supports the concept of datasources. By placing user-data and meta-data in a datasource, you don't have to manually inject that information into a cloud instance, as we did earlier in this chapter. Instead, when the cloud-init service starts running on the instance, it knows to look not only on the local system for data sources, but also outside it.
For Amazon EC2 clouds, cloud-init queries a particular IP address (http://169.254.169.254/) for data. For example, it may check http://169.254.169.254/2009-04-04/meta-data/ for meta-data and http://169.254.169.254/2009-04-04/user-data/ for user-data. This allows the configuration data to be stored and accessed from a central location.
As for what might be inside the meta-data and user-data, far more complex configuration schemes can be developed for deployment of your cloud instances. Cloud-init supports configuration tools, such as Puppet (http://puppetlabs.com/puppet/puppet-open-source) and Chef (https://www.chef.io/chef/). These tools let you apply scripts of configuration information to your cloud instances, even doing such things as replace components or restart services as needed to return the system to a desired state.
At this point, however, my job is not to make you into a full-blown cloud administrator (a few hundred pages ago, you could have been a Linux novice). Instead, I want you to understand what you will be dealing with if you eventually land in a cloud data center . . . because many people believe that most data centers will be managed as cloud infrastructures in the not-too-distant future.
So far in this chapter, you have looked at the inside of configuring Linux for cloud computing. Next, let's step back and look at how you can use two of the most popular Linux-based cloud platforms to run your own Linux-based virtual machines: OpenStack and Amazon EC2.
Using OpenStack to Deploy Cloud Images
By most accounts, OpenStack is the hottest open source project today. With OpenStack, you get a continually evolving platform for managing your physical cloud computing infrastructure, as well as the virtual systems that run on it. OpenStack lets you deploy your own private cloud or offer it up to the world as a public cloud.
Rather than have you set up your own OpenStack cloud, I'm going to show how you can use OpenStack to deploy virtual machines from an OpenStack Dashboard. If you want to try it yourself, OpenStack is available in the following ways:
· Linux distributions—Fedora, Ubuntu, and CentOS have free versions of OpenStack that you can deploy yourself. Red Hat Enterprise Linux offers a version of OpenStack that is available by subscription. It's tricky to set up. Some all-in-one setups for OpenStack can run on a single machine, but I think you will have a better experience if you start with three physical machines: one controller node and two hypervisors.
· Public OpenStack clouds—You can try out public OpenStack clouds for varying costs. A list of public OpenStack clouds is available from the OpenStack project site (http://www.openstack.org/marketplace/public-clouds/).
My first point is to help you run a Linux system in a cloud, when you don't have the capacity to do what you want on your own computers. However, my other point is to show you how a cloud provider's web-based interface (like OpenStack Dashboard) can greatly simplify the cloud configuration we did manually with cloud-init earlier in this chapter.
Starting from the OpenStack Dashboard
I'm going to start with an OpenStack setup that is already in place. The OpenStack environment's administrator has created a project for me called cnegus-test-project and a user account (cnegus) that lets me access that project. Here's what I plan to do:
· Configure networking—Just as I would set up a router and physically plug my computers into that router, I'm going to set up a virtual network. That virtual network will include a set of addresses that are distributed to my virtual machines via DHCP.
· Configure virtual machines—I'll step through the process of choosing, configuring, and deploying a couple of virtual machines.
The version of OpenStack used for this demonstration is Red Hat Enterprise Linux OpenStack Platform (RHEL-OSP). However, the experience would be similar on any OpenStack environment. The next section shows you how to start configuring your network.
Configuring your OpenStack virtual network
1. Log in to OpenStack. Using the username and password assigned to you by the OpenStack administrator, log in to the OpenStack Dashboard from your web browser. You should see an Overview screen, similar to the one shown in Figure 27.2.
2. Create a network. To create a network, from the left column on the Overviews page, select Networks. From the Networks screen that appears, create a new network as follows (the examples I used are in parentheses):
a. Select the Create Network button.
b. On the Network tab, type a Network Name (mynet).
c. On the Subnet tab, type a Subnet name (mysub01), Network Address (192.168.100.0/24), IP Version (IPv4), and Gateway IP (192.168.100.1), and leave Disable Gateway unchecked.
d. On the Subnet Detail tab, type a comma-separated range of IP addresses in the Allocation Pool box. For my example, I chose 192.168.100.10,192.168.100.50 to hand out a range of IP addresses to clients from 192.168.100.10 to 192.168.100.50. Get a name server suggestion from the administrator of your OpenStack cloud or use a public DNS server (such as Google's 8.8.8.8 or 8.8.4.4).
e. Select Create to create the new network. The new network appears on the Networks screen.
3. Create a router. For your virtual machines to be able to access the Internet, you need to identify a router that is attached to your private network on one interface and a network that can reach the public Internet on the other. Here's how to do that:
a. From the left column, select Routers.
b. Click the Create Router button.
c. Type a Router Name (myrouter01), and click Create router.
d. Select the Set Gateway button.
e. From the Set Gateway screen, click the External Network box and choose from the available external networks. Leave the Router Name and Router ID as they are. Click Set Gateway. The new router appears on the Routers screen.
4. Connect your network to the external router. From the Routers screen (you should still be on that screen), select the name of the router you just created (myrouter1):
a. From the Router Details screen, select the Add Interface button.
b. From the Add Interface screen, click the Subnet box and choose the subnet you created earlier (mynet: 192.168.100.0/24 mysub01). You shouldn't have to change Router Name or Router ID.
c. Click Add Interface.
5. View the network topology. Click Network Topology from the left column. Then hover your mouse pointer over the router name (myroute01). Figure 27.3 shows an example of what your network configuration might look like.
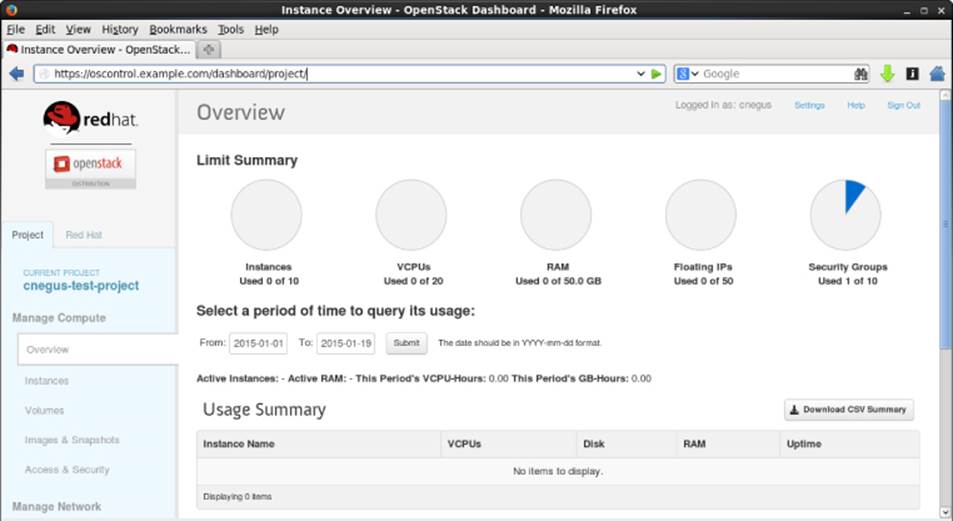
Figure 27.2 Log in to the OpenStack Dashboard.
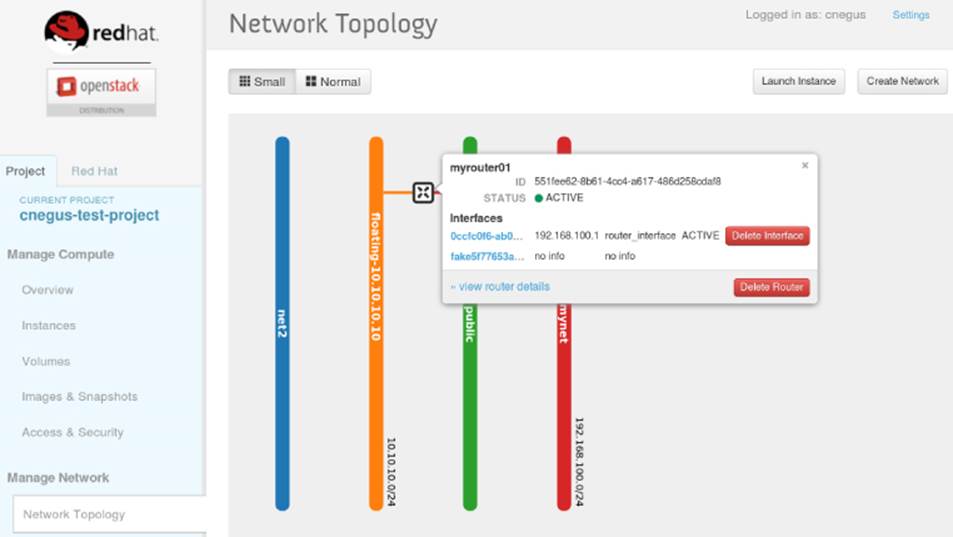
Figure 27.3 View your Network Topology from the OpenStack Dashboard.
With your networking in place, you can create keys to use to access your virtual machines in OpenStack.
Configuring keys for remote access
The normal way to configure access to your virtual machines in a cloud environment is to create a public/private keypair that provides secure access to your virtual machines using ssh and related tools from your desktop system. The private key is stored in your desktop user's home directory, and the public key is injected into the virtual machine so you can log in remotely (via ssh) to the virtual machine without typing a password. Here's how to set up your keys:
1. Select Access & Security. From the left column, select Access & Security.
2. Create a keypair. If you already have a keypair, you can skip to the next step. If not, select the Keypairs tab and click the Create Keypair button. When the Create Keypair window appears, do this:
a. Type a Keypair Name (mycloudkey), and click the Create Keypair button. A pop-up window asks if you want to open or save the *.pem file.
b. Select Save File, and click OK. When prompted where to save it, save it to the .ssh directory in your home directory.
You are ready to deploy an OpenStack instance (cloud-based virtual machine).
Launching a virtual machine in OpenStack
To begin launching a new cloud virtual machine instance, go to the left column and select Instances. Then click the Launch instance button. The Launch Instance screen appears. To fill in the information you need to launch the instance, follow these steps:
1. Select Details. From the Details tab, select the following items:
· Availability Zone—An availability zone consists of a group of compute hosts. Separate zones are sometimes created to identify a group of computers that are physically together (such as on the same rack) or that have the same hardware features (so they could be used for the same types of applications). Choose one of the zones from the list.
· Instance Name—Give the instance any name that helps you remember what it is.
· Flavor—By choosing a flavor, you allocate a set of resources to your virtual machine instance. The resources include the number of virtual CPU cores, the amount of memory available, the disk space assigned, and ephemeral disk space available. (Ephemeral space is space that is available from the local disk while the instance is running, but is not saved when the instance shuts down.) Default flavors include m1.tiny, m1.small, m1.medium, m1.large, and m1.xlarge. Other flavors can be added by your cloud administrator.
· Instance Count—By default, this is set to 1, to start one instance. Change the number to start more instances if you like.
· Instance Boot Source—The instance can be booted from an image, a snapshot, a volume, an image that includes a new volume, or a volume snapshot that includes a new volume.
· Image Name—Select the image you want to start. The names typically include the names of the operating systems you are booting.
· Device size and Device Name (optional)—If, when you selected your Instance Boot Source, you selected to include a new volume, you set the size (in GB) and device name for the volume in these fields. For the Device Name, if you choose vda as the device name (for the first disk on a virtual machine), the device representing that device would be /dev/vda.
2. Select Access & Security. Select the Access & Security tab, and choose the keypair you created earlier.
3. Select Networking. Select the Networking tab. From the list of available networks, grab the one you want with your mouse and drag it into the Selected Networks box.
4. Add Post-Creation settings. You can add commands and scripts that configure the system further after it is booted. This is where you can add the kinds of information you added in the user-data files described in the sections on cloud-init earlier in this chapter.
Select Launch to start up the virtual machine. With the virtual machine running, you can log in to that system by selecting the instance and clicking the Console tab. The virtual machine's console window should present you with a login prompt. If you want to be able to gain access to the virtual machine using ssh over the network, go on to the next section.
Accessing the virtual machine via ssh
With your public key injected into your running virtual machine, it is ready for you to log in using ssh. However, before you can do that, you must take these steps:
1. Add a floating IP address. From the OpenStack Dashboard, select Instances from the left column, click More on the entry containing the instance, and click Associate Floating IP. Select the plus sign (+) next to the IP Address box, select a Pool that has floating IPs available, and click Allocate IP. The allocated address should appear in the IP Address field. Select the Port to be associated, and click Associate.
2. Use ssh to access the instance. From a Linux system that has access to the network on which the floating address was assigned, run the ssh command to log in. Assuming your key's .pem file was called mycloud.pem, the default user on the instance is cloud-user, and the IP address is 10.10.10.100, you could type the following to log in:
# ssh -i mycloud.pem cloud-user@10.10.10.100
You should be able to log in now without a password. To do administration on the system, you can use the sudo command as the default user.
Using Amazon EC2 to Deploy Cloud Images
Amazon Elastic Computer Cloud (Amazon EC2) is a cloud platform that is particularly suited for pay-as-you-go cloud computing. Like OpenStack, it lets you choose from preconfigured virtual machine images and configure them as you need.
To start using Amazon EC2 to launch virtual machines, go to the Getting Started with Amazon Web Services page and follow links to create a new account (http://aws.amazon.com/getting-started/). After you log in, the full range of AWS services is displayed. Select EC2, and you see the EC2 Management Console, as shown in Figure 27.4.
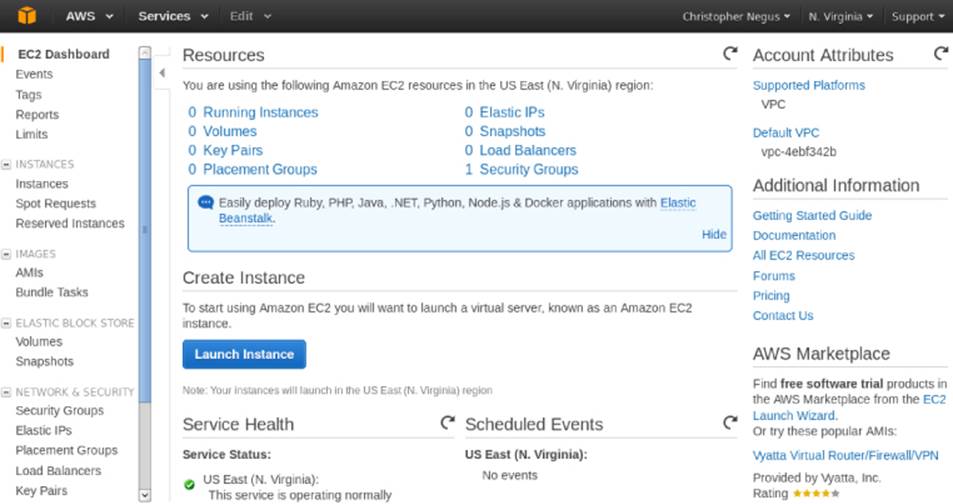
Figure 27.4 Launch cloud instances using the Amazon EC2 Management Console.
To start your first instance, select the Launch Instance button. You are then given a choice of Linux (Red Hat Enterprise Linux, SUSE Linux, Ubuntu, and so on) and Windows images to start up. The wizard takes you through the selection of different instance types (general purpose or optimized) and lets you configure instance details, add storage, tag the instance, and configure security.
After the virtual machine is configured, you can work with the virtual machine directly from a console window or log in over the network using ssh and public/private keypairs. At any point, you can go back to the EC2 Management Console to keep track of the resources you are consuming and watch over the health of your virtual machines.
Summary
Understanding how cloud computing differs from simply installing an operating system directly on computer hardware will help you adapt as more and more data centers move toward cloud computing. In the beginning of this chapter, I encouraged you to get your hands on some cloud images, combine them with data, and launch them on a local Linux hypervisor to understand how cloud images work.
After that, I demonstrated how you can launch your own virtual images in an OpenStack cloud platform. That included configuring network interfaces, choosing how the virtual instance would run, and launching the virtual image. I also quickly introduced the Amazon Elastic Compute Cloud service, where you can pay to use cloud storage and processing time if you don't have enough computing resources of your own.
This chapter has no exercises because I meant it to be a stretch beyond the scope of this book. I hope you find this material useful after you have locked down your basic Linux skills and are ready to extend those skills into the clouds.
All materials on the site are licensed Creative Commons Attribution-Sharealike 3.0 Unported CC BY-SA 3.0 & GNU Free Documentation License (GFDL)
If you are the copyright holder of any material contained on our site and intend to remove it, please contact our site administrator for approval.
© 2016-2025 All site design rights belong to S.Y.A.