Linux Bible 9th Ed (2015)
Part VII. Appendixes
IN THIS PART
1. Appendix A
Media
2. Appendix B
Exercise Answers
Appendix A. Media
IN THIS APPENDIX
1. Getting Linux distributions
2. Creating a bootable CD or DVD
Unless you bought a computer with Linux preinstalled or had someone install it for you, you need to find a way to get a Linux distribution and then either install or run it live on your computer. Fortunately, Linux distributions are widely available and come in a variety of forms.
In this appendix, you learn how to:
· Get a few different Linux distributions
· Create a bootable disk to install your distribution
· Boot Linux from a USB drive
To use this book effectively, you should have a Linux distribution in front of you to work on. It's important to be able to experience Linux as you read. So try the examples and do the exercises.
Linux distributions are most commonly available from the websites of the organizations that produce them. The following sections describe websites associated with Linux distributions that offer ISO images you can download.
NOTE
An ISO is a disk image that is formatted in the ISO 9660 file system format, a format that is commonly used with CD and DVD images. Because this is a well-known format, it is readable by Windows, Mac, and Linux systems.
An ISO image can be burned to a CD or DVD medium, depending on the size of the image. An ISO image in your file system can be mounted on a Linux system in loopback mode, so you can view or copy its contents.
When an ISO image contains a Linux Live CD or installation image, the images are bootable. This means that instead of starting up an operating system, such as Windows or Linux, from the computer's hard disk, you can tell your computer to boot from the CD or DVD instead. This enables you to run a totally different operating system than is installed on your hard disk without changing or damaging the data on that disk.
Getting Fedora
You can download Fedora from the https://getfedora.org site. That page contains links to download images for installing Fedora Workstation, Server, and Cloud flavors.
NOTE
I recommend downloading the Fedora Workstation Live Image to work along with this book because most of the book works with that distribution. You can run it live without committing to overwriting your computer's hard disk until you feel comfortable enough to install it permanently.
To test the examples in this book, I used Fedora 21, 32-bit or the 64-bit Fedora Workstation Image. If you have a 64-bit ISO, you must use a 64-bit machine. If you have a 32-bit ISO, it works on 32-bit or 64-bit machines.
Later versions of Fedora that come with a GNOME desktop should work as well. Here's a link to the exact ISO used for the Fedora 21 Workstation: http://download.fedoraproject .org/pub/fedora/linux/releases/21/Workstation/x86_64/iso/Fedora-Live-Workstation-x86_64-21-5.iso. Keep in mind that the latest Fedora Workstation ISO image does not fit on a CD, so you must burn it to DVD. See the descriptions of CD/DVD burning tools available for Windows, Mac OS X, and Linux later in this appendix.
Figure A.1 shows an example of the Get Fedora page.
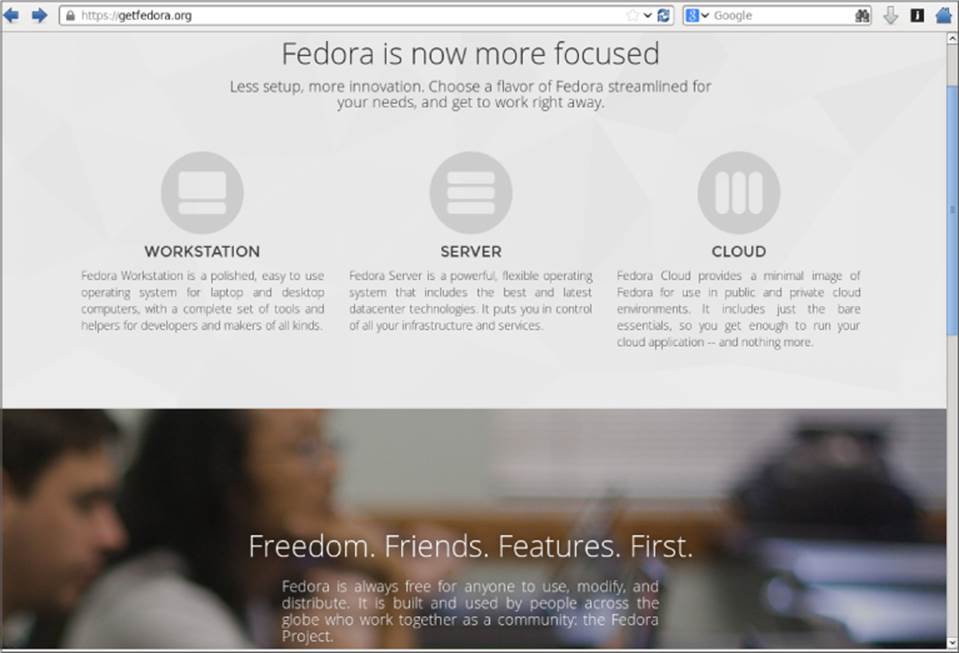
Figure A.1 Download Fedora ISO images from the Get Fedora page.
Today, the default download is an ISO image of a 64-bit PC-type Fedora Workstation (GNOME) Live DVD. You can boot this image on your computer, and if you choose, you can permanently install it to your computer's hard disk. To download this image, do the following:
1. Select Workstation, Server, or Cloud. I recommend Workstation to follow along with this book.
2. Select the Download Now button, and click the Download button. A pop-up should appear, asking what you want to do with the ISO.
3. Select to save the ISO. Depending on your settings, either you are asked where you want to download it or it simply begins downloading to a default folder (in Linux, it is probably a Downloads folder).
4. If you are prompted for where to put the ISO, select a folder that has enough space to hold it. Remember where this folder is because you need to locate the ISO when you go to burn it later.
If you need more information about what to do with the downloaded image, there are links to help you on the Fedora page that appears. At the time of this writing, there are links to “burn the image to a blank DVD disc,” “write the image to a USB flash drive,” “find common tips” for booting the media, and read the “complete Installation Guide.”
You have other choices for downloading ISOs from Fedora. From the bottom of the Get Fedora page, you can download specially configured Fedora ISO images called spins (https://spins.fedoraproject.org). Here are some special types of Fedora spins that might interest you:
· Desktop spins—People who prefer the KDE desktop to the GNOME desktop can download the KDE spin. If you are trying Linux on a computer with less memory or processing power, consider Xfce and LXDE spins (representing lightweight desktops of the same name). The MATE-Compiz spin offers more of the other extreme, with desktop effects like wobbly windows and desktops that rotate on a cube.
· Security spins—One of the early uses of live Linux media was to provide bootable, removable media containing security tools. If you have an unbootable or otherwise broken computer, the Security spin can be booted up to repair file systems, debug network problems, or do hundreds of other tasks to check and fix the computer (even if the installed operating system is Windows or some other Linux version).
· Design-suite—The Design-suite spin contains a consolidation of software for creative endeavors. This includes tools for working with documents, images, video, audio, and other media.
· Games—Try the wide array of open source and free software games available today in the Fedora Games spin.
These special spins can be fun, but to work along with most of the book I recommend the standard Workstation ISO image. After you have downloaded the ISO image, proceed to the description later in this chapter of how to burn that image to CD or DVD.
Getting Red Hat Enterprise Linux
Many large corporations, government agencies, and universities use Red Hat Enterprise Linux to run their mission-critical applications. While most of the procedures in this book will run well on Fedora, there are many references to how things are done differently in Red Hat Enterprise Linux because, when you go to get a job as a Linux system administrator, you will, in most cases, be working with Red Hat Enterprise Linux systems.
Although the source code for Red Hat Enterprise Linux is freely available, the ISOs containing the packages you install (often referred to as the binaries) are available only to those who have accounts on the Red Hat customer portal (https://access.redhat.com) or through evaluation copies.
If you don't have an account, you can try signing up for a 30-day trial. If either you or your company has an account with Red Hat, you can download the ISOs you need. Go to the following site and follow the instructions to download a Red Hat Enterprise Linux server ISO or sign up to get an evaluation copy:
https://access.redhat.com/downloads
Red Hat does not offer live versions of Red Hat Enterprise Linux. Instead, you can download installation DVDs that you can install as described in Chapter 9 of this book.
NOTE
If you are unable to obtain a Red Hat Enterprise Linux installation DVD, you can get a similar experience using the CentOS installation DVD. CentOS is not exactly the same as RHEL. However, if you download the CentOS installation DVD for CentOS 7 from links on the CentOS site (http://www.centos.org/download/), the installation procedure is similar to the one described for Red Hat Enterprise Linux in Chapter 9.
Getting Ubuntu
Many people new to Linux begin by downloading and installing Ubuntu. Ubuntu has a huge fan base and many active contributors. If you have problems with Ubuntu, there are large, active forums where many people are willing to help you overcome problems.
If you already have an Ubuntu system installed, you can follow along with most of this book. You can get Ubuntu with a GNOME desktop, and its default dash shell is similar to bash (or you can switch to bash in Ubuntu to match the shell examples in this book). Although most of the examples of this book focus on Fedora and RHEL, I have added many more references to Ubuntu through out the book in this edition.
To get Ubuntu, you can download a Live ISO image or installation medium from the Download Ubuntu page: http://www.ubuntu.com/download/ubuntu/downloaddesktop.
Figure A.2 shows an example of the Download Ubuntu Desktop page.
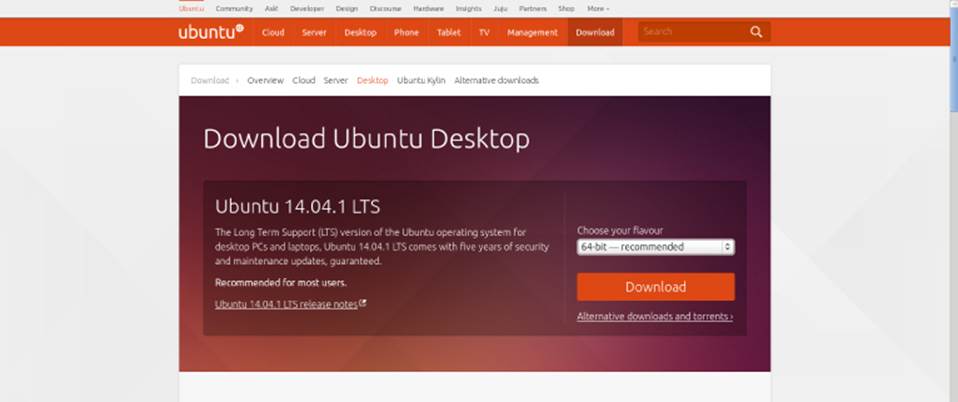
Figure A.2 Download Ubuntu Live CD ISO images, or choose an alternative download.
As with Fedora, the easiest way to download Ubuntu is to select the 64-bit Ubuntu Live CD, download it, and burn it. Here's how to do that from the Download Ubuntu page:
1. Click the Download button. By default, this downloads the most recent 64-bit Ubuntu desktop Live ISO image.
2. Either you are asked where you want to download the ISO image or it simply begins downloading to a default folder.
3. If you are asked where to put the ISO, select a folder that has enough space to hold the ISO. Remember where this folder is because you need to locate the ISO when you go to burn it later.
After the download is complete, burn the ISO image to a DVD using procedures described in the “Creating Linux CDs and DVDs” section.
Other types of Ubuntu installation media are also available. To find other Ubuntu media, go to the Alternative Downloads page (http://www.ubuntu.com/download/alternative-downloads). From this site, you can get media that contains a variety of desktop and server installs.
Creating Linux CDs and DVDs
After you have downloaded a Linux CD or DVD image, you can use several tools to create bootable CDs or DVDs for either installing or just running Linux live from those media. Before you begin, you must have the following:
· DVD or CD ISO images—Download the ISO images to your computer that represent the physical DVD or CD you will ultimately burn. Today, many Linux ISO images are too big to fit on a DVD (including those for RHEL, Fedora, and Ubuntu).
· Blank DVDs/CDs—You need blank DVDs or CDs to burn the images to. CDs hold up to about 700MB; DVDs hold up to about 4.7GB (single layer).
· CD/DVD burner—You need a drive that is capable of burning CDs or DVDs, depending on which you are burning. Not all CD/DVD drives can burn DVDs (especially older ones). So you may need to find a computer with a drive that has that capability.
The following sections describe how to burn bootable CDs and DVDs from Windows, Mac OS X, and Linux systems.
Burning CDs/DVDs in Windows
If you have downloaded your Linux ISO image to a Windows system, you can burn that image to CD or DVD in different ways. Here are some examples:
· Windows—In the latest Windows releases, the function of burning ISO images to CD or DVD is built into Windows. After an ISO image is downloaded, simply insert the appropriate CD or DVD into your computer's drive (assuming the drive is writeable), right-click the ISO image icon from the folder you downloaded it to, and select Burn disc image. When the Windows Disc Image Burner window appears, select Burn to burn the image.
· Roxio Creator—This third-party Windows application contains many features for ripping and burning CDs and DVDs. You can read about the product here: http://www.roxio.com/enu/products/creator/.
· Nero CD/DVD Burning ROM—Nero is another popular CD/DVD burning software product for Windows systems. You can find out more about Nero here: http://www.nero.com.
Burning CDs/DVDs on a Mac OS X system
Like Windows, Mac OS X has CD/DVD burning software built into the operating system. To burn an ISO image to disk on a Mac OS X system, follow these steps:
1. Download the ISO image you want on your Mac OS X system. An icon representing the ISO should appear on your desktop.
2. Insert a blank CD or DVD into your CD/DVD burner, as appropriate for the size of the image.
3. Right-click the icon representing the Linux ISO you just downloaded, and select Burn “Linux” to Disk. A pop-up window appears, asking if you are sure you want to burn the image.
4. Fill in the name you want to give the ISO and the write speed. Then select Burn. The image begins burning to disk.
5. After the image has been burned, eject the disk; you are ready to boot the CD or DVD on an appropriate computer.
Burning CDs/DVDs in Linux
Linux has both graphical and command-line tools for burning CD and DVD images to physical media. Examples in this section show how to use K3b from the desktop or cdrecord (or wodim) to burn ISO images to CD or DVD. If they are not installed, you can install either one as follows:
# yum install k3b
# yum install wodim
Burning CDs from a Linux desktop
Here's how to create bootable Linux CDs from a running Linux system (such as Fedora) using K3b. K3b comes with the KDE desktop but runs on the GNOME desktop as well.
1. Download the ISO images you want to your computer's hard drive. (A CD image is under about 700MB in size. Single-layer DVD images are under 4.7GB.)
2. Open a CD/DVD burning application. For this procedure, I recommend K3b CD and DVD Kreator (http://www.k3b.org). In Fedora, select Activities and type K3b (or type k3b from a Terminal window). The “K3b – The CD and DVD Kreator” window appears.
3. From the K3b window, select Tools &cmdarr; Burn Image to burn a CD or DVD ISO Image. You are asked to choose an image file.
4. Browse to the image you just downloaded or copied to hard disk, and select it. After you select the image you want, the Burn Image window appears, as does a checksum on the image. (Often, you can compare the checksum number that appears against the number in an md5 file from the download directory where you got the image, to make sure the image was not corrupted.) Figure A.3 shows the Burn CD Image window ready to burn an image of Fedora.
5. Insert a blank CD or DVD into the CD/DVD drive, which may be a combination CD/DVD drive. (If a CD/DVD Creator window pops up, you can close it.)
6. Check the settings in the Burn CD Image window (often, the defaults are fine, but you may want to slow down the speed if you get some bad burns). You can also select the Simulate check box to test the burn before actually writing to the CD/DVD. Click Start to continue.
7. When the CD is finished burning, eject it (or it may eject automatically) and mark it appropriately (information such as the distribution name, version number, date, and name of the ISO image).
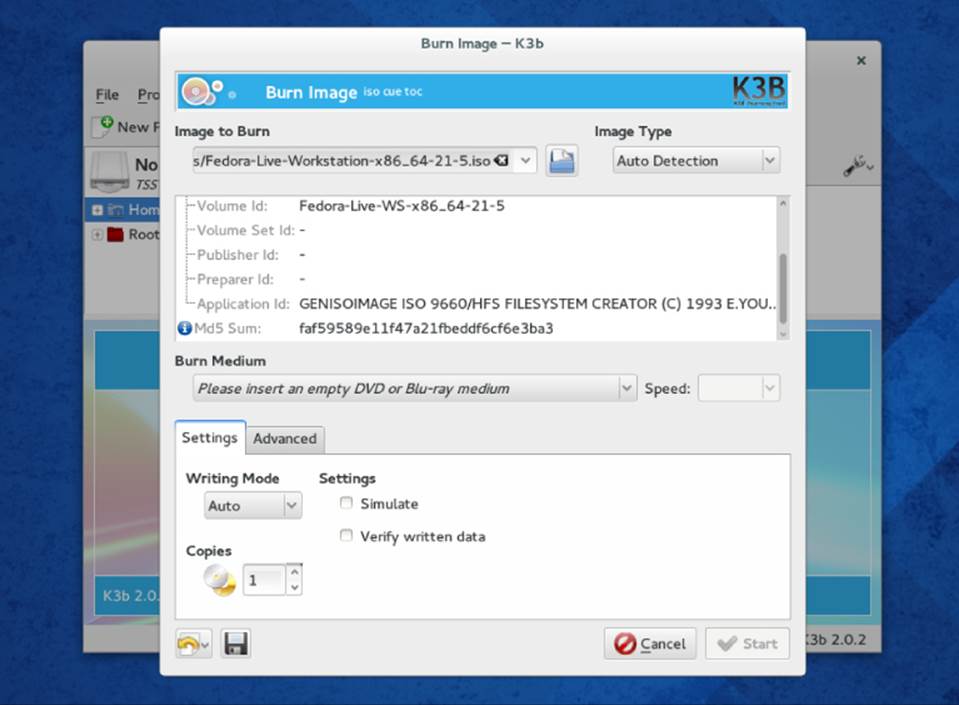
Figure A.3 Use K3b to burn your Linux CDs or DVDs.
Now you're ready to begin installing (or booting) the Linux distribution you just burned.
Burning CDs from a Linux command line
If you have no GUI, or you don't mind working from the shell, you can use the cdrecord command to burn the ISOs. With a blank CD inserted and the ISO image you want to burn in the current directory, you can use the following simple command line for burning a CD image to CD using cdrecord:
# cdrecord -v whatever.iso
See the cdrecord man page (man cdrecord) for other options available with the cdrecord command.
Booting Linux from a USB Drive
Instead of burning ISO images to a CD or DVD, you can put your Linux system on a USB drive. USB drives offer the advantage of being writable as well as readable, so you can save your content between sessions. Most modern computers can boot from a USB drive, although you may have to interrupt the boot process to tell the BIOS to boot from USB instead of hard drive or CD/DVD drive.
You can find procedures for putting Fedora and Ubuntu on a USB drive in the following locations:
· Fedora on USB drive—Using a tool called Live USB Creator (https://fedorahosted .org/liveusb-creator/), you can install a Fedora ISO image to a USB drive in either Windows or Linux. To run Fedora from that drive, insert it into a USB port on your computer, reboot the computer, interrupt the BIOS as it is booting (possibly F12), and select to boot from a USB drive. The procedure for using Live USB creator is located at https://fedoraproject.org/wiki/How_to_create_and_use_Live_USB.
· Ubuntu on USB drive—Ubuntu has procedures for creating a bootable USB drive with Ubuntu on it that work from Windows, Mac OS X, or Linux. To find out how to do this, go to the Ubuntu Download page and under “Easy ways to switch to Ubuntu,” look for the appropriate “How to create a bootable USB stick...” procedure for Ubuntu, Windows, or Mac OS X: http://www.ubuntu.com/download/ubuntu/downloaddesktop.
Visit the Linux Bible website
To find links to various Linux distributions and other useful content related to Linux, go to the Linux Bible, Ninth Edition website: http://www.wiley.com/go/linuxbible9.
All materials on the site are licensed Creative Commons Attribution-Sharealike 3.0 Unported CC BY-SA 3.0 & GNU Free Documentation License (GFDL)
If you are the copyright holder of any material contained on our site and intend to remove it, please contact our site administrator for approval.
© 2016-2025 All site design rights belong to S.Y.A.