Linux Bible 9th Ed (2015)
Part II. Becoming a Linux Power User
Chapter 4. Moving around the Filesystem
IN THIS CHAPTER
1. Learning about the Linux filesystem
2. Listing file and directory attributes
3. Making files and directories
4. Listing and changing permission and ownership
5. Making copies and moving files
The Linux filesystem is the structure in which all the information on your computer is stored. In fact, one of the defining properties of the UNIX systems on which Linux is based is that nearly everything you need to identify on your system (data, commands, symbolic links, devices, and directories) is represented by items in the filesystems. Knowing where things are and understanding how to get around the filesystem from the shell are critical skills in Linux.
In Linux, files are organized within a hierarchy of directories. Each directory can contain files, as well as other directories. You can refer to any file or directory using either a full path (for example, /home/joe/myfile.txt) or a relative path (for example, if /home/joe were your current directory, you could simply refer to the file as myfile.txt).
If you were to map out the files and directories in Linux, it would look like an upside-down tree. At the top is the root directory (not to be confused with the root user), which is represented by a single slash (/). Below that is a set of common directories in the Linux system, such as bin, dev, home, lib, and tmp, to name a few. Each of those directories, as well as directories added to the root directory, can contain subdirectories.
Figure 4.1 illustrates how the Linux filesystem is organized as a hierarchy. To demonstrate how directories are connected, the figure shows a /home directory that contains a subdirectory for the user joe. Within the joe directory are the Desktop, Documents, and other subdirectories. To refer to a file called memo1.doc in the memos directory, you can type the full path of /home/joe/Documents/memos/memo1.doc. If your current directory is /home/joe/Documents/memos, refer to the file as simply memo1.doc.
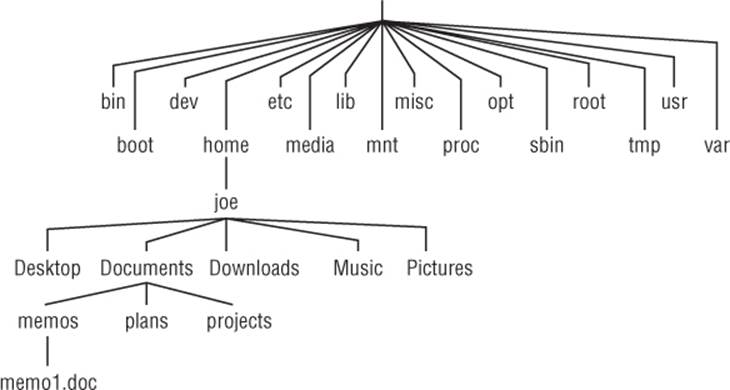
Figure 4.1 The Linux filesystem is organized as a hierarchy of directories.
Some of these Linux directories may interest you:
· /bin—Contains common Linux user commands, such as ls, sort, date, and chmod.
· /boot—Has the bootable Linux kernel and boot loader configuration files (GRUB).
· /dev—Contains files representing access points to devices on your systems. These include terminal devices (tty*), floppy disks (fd*), hard disks (hd* or sd*), RAM (ram*), and CD-ROM (cd*). Users can access these devices directly through these device files; however, applications often hide the actual device names from end users.
· /etc—Contains administrative configuration files. Most of these files are plaintext files that can be edited with any text editor if the user has proper permission.
· /home—Contains directories assigned to each regular user with a login account. (The root user is an exception, using /root as his or her home directory.)
· /media—Provides a standard location for automounting devices (removable media in particular). If the medium has a volume name, that name is typically used as the mount point. For example, a USB drive with a volume name of myusb would be mounted on/media/myusb.
· /lib—Contains shared libraries needed by applications in /bin and /sbin to boot the system.
· /mnt—A common mount point for many devices before it was supplanted by the standard /media directory. Some bootable Linux systems still use this directory to mount hard disk partitions and remote filesystems. Many people still use this directory to temporarily mount local or remote filesystems that are not mounted permanently.
· /misc—A directory sometimes used to automount filesystems upon request.
· /opt—Directory structure available to store add-on application software.
· /proc—Contains information about system resources.
· /root—Represents the root user's home directory. The home directory for root does not reside beneath /home for security reasons.
· /sbin—Contains administrative commands and daemon processes.
· /tmp—Contains temporary files used by applications.
· /usr—Contains user documentation, games, graphical files (X11), libraries (lib), and a variety of other commands and files that are not needed during the boot process. The /usr directory is meant for files that don't change after installation (in theory, /usr could be mounted read-only).
· /var—Contains directories of data used by various applications. In particular, this is where you would place files that you share as an FTP server (/var/ftp) or a web server (/var/www). It also contains all system log files (/var/log) and spool files in /var/spool (such asmail, cups, and news). The /var directory contains directories and files that are meant to change often. On server computers, it is common to create the /var directory as a separate filesystem, using a filesystem type that can be easily expanded.
The filesystems in the DOS and Microsoft Windows operating systems differ from Linux's file structure, as the sidebar “Linux Filesystems versus Windows-Based Filesystems” explains.
Linux Filesystems versus Windows-Based Filesystems
Although similar in many ways, the Linux filesystem has some striking differences from filesystems used in MS-DOS and Windows operating systems. Here are a few:
· In MS-DOS and Windows filesystems, drive letters represent different storage devices (for example, A: is a floppy drive and C: is a hard disk). In Linux, all storage devices are connected to the filesystem hierarchy. So the fact that all of /usr may be on a separate hard disk or that /mnt/remote1 is a filesystem from another computer is invisible to the user.
· Slashes, rather than backslashes, are used to separate directory names in Linux. So C:\home\joe in a Microsoft system is /home/joe in a Linux system.
· Filenames almost always have suffixes in DOS (such as .txt for text files or .doc for word-processing files). Although at times you can use that convention in Linux, three-character suffixes have no required meaning in Linux. They can be useful for identifying a file type. Many Linux applications and desktop environments use file suffixes to determine the contents of a file. In Linux, however, DOS command extensions such as .com, .exe, and .bat don't necessarily signify an executable. (Permission flags make Linux files executable.)
· Every file and directory in a Linux system has permissions and ownership associated with it. Security varies among Microsoft systems. Because DOS and Microsoft Windows began as single-user systems, file ownership was not built into those systems when they were designed. Later releases added features such as file and folder attributes to address this problem.
Using Basic Filesystem Commands
I want to introduce you to a few simple commands for getting around the filesystem to start out. If you want to follow along, log in and open a shell. When you log in to a Linux system and open a shell, you are placed in your home directory. In Linux, most of the files you save and work with will probably be in that directory or subdirectories that you create. Table 4.1 shows commands to create and use files and directories.
Table 4.1 Commands to Create and Use Files
|
Command |
Result |
|
cd |
Changes to another directory |
|
pwd |
Prints the name of the current (or present) working directory |
|
mkdir |
Creates a directory |
|
chmod |
Changes the permission on a file or directory |
|
ls |
Lists the contents of a directory |
One of the most basic commands you use from the shell is cd. The cd command can be used with no options (to take you to your home directory) or with full or relative paths. Consider the following commands:
$ cd /usr/share/
$ pwd
/usr/share
$ cd doc
/usr/share/doc
$ cd
$ pwd
/home/chris
The /usr/share option represents the absolute path to a directory on the system. Because it begins with a slash (/), this path tells the shell to start at the root of the filesystem and take you to the share directory that exists in the usr directory. The doc option to the cdcommand said to look for a directory called doc that is relative to the current directory. So that made /usr/share/doc your current directory.
After that, by typing cd alone, you are returned to your home directory. If you ever wonder where you are in the filesystem, the pwd command can help you. Here are a few other interesting cd command options:
$ cd ~
$ pwd
/home/chris
$ cd ~/Music
$ pwd
/home/chris/Music
$ cd ../../../usr
$ pwd
/usr
The tilde (~) represents your home directory. So cd ~ takes you there. You can use the tilde to refer to directories relative to your home directory as well, such as /home/chris/Music with ~/Music. Typing a name as an option takes you to a directory below the current directory, but you can use two dots (..) to go to a directory above the current directory. The example shown takes you up three directory levels (to /), and then takes you into the /usr directory.
The following steps lead you through the process of creating directories within your home directory and moving among your directories, with a mention of setting appropriate file permissions:
1. Go to your home directory. To do this, simply type cd in a shell and press Enter. (For other ways of referring to your home directory, see the “Identifying Directories” sidebar.)
2. To make sure that you're in your home directory, type pwd. When I do this, I get the following response (yours will reflect your home directory):
3. $ pwd
/home/joe
4. Create a new directory called test in your home directory, as follows:
$ mkdir test
5. Check the permissions of the directory:
6. $ ls -ld test
drwxr-xr-x 2 joe sales 1024 Jan 24 12:17 test
This listing shows that test is a directory (d). The d is followed by the permissions (rwxr-xr-x), which are explained later in the “Understanding File Permissions and Ownership” section. The rest of the information indicates the owner (joe), the group (sales), and the date that the files in the directory were most recently modified (Jan 24 at 12:17 p.m.).
NOTE
In Fedora and Red Hat Enterprise Linux, when you add a new user, the user is assigned to a group of the same name by default. For example, in the preceding text, the user joe would be assigned to the group joe. This approach to assigning groups is referred to as the user private group scheme.
For now, type the following:
$ chmod 700 test
This step changes the permissions of the directory to give you complete access and everyone else no access at all. (The new permissions should read rwx------.)
7. Make the test directory your current directory as follows:
8. $ cd test
9. $ pwd
/home/joe/test
If you followed along, at this point a subdirectory of your home directory called test is your current working directory. You can create files and directories in the test directory along with the descriptions in the rest of this chapter.
Using Metacharacters and Operators
Whether you are listing, moving, copying, removing, or otherwise acting on files in your Linux system, certain special characters, referred to as metacharacters and operators, help you to work with files more efficiently. Metacharacters can help you match one or more files without completely typing each file name. Operators enable you to direct information from one command or file to another command or file.
Using file-matching metacharacters
To save you some keystrokes and to enable you to refer easily to a group of files, the bash shell lets you use metacharacters. Any time you need to refer to a file or directory, such as to list it, open it, or remove it, you can use metacharacters to match the files you want. Here are some useful metacharacters for matching filenames:
· *—Matches any number of characters.
· ?—Matches any one character.
· [...]—Matches any one of the characters between the brackets, which can include a hyphen-separated range of letters or numbers.
Try out some of these file-matching metacharacters by first going to an empty directory (such as the test directory described in the previous section) and creating some empty files:
$ touch apple banana grape grapefruit watermelon
The touch command creates empty files. The commands that follow show you how to use shell metacharacters with the ls command to match filenames. Try the following commands to see whether you get the same responses:
$ ls a*
apple
$ ls g*
grape grapefruit
$ ls g*t
grapefruit
$ ls *e*
apple grape grapefruit watermelon
$ ls *n*
banana watermelon
The first example matches any file that begins with a (apple). The next example matches any files that begin with g (grape, grapefruit). Next, files beginning with g and ending in t are matched (grapefruit). Next, any file that contains e in the name is matched (apple,grape, grapefruit, watermelon). Finally, any file that contains n is matched (banana, watermelon).
Here are a few examples of pattern matching with the question mark (?):
$ ls ????e
apple grape
$ ls g???e*
grape grapefruit
The first example matches any five-character file that ends in e (apple, grape). The second matches any file that begins with g and has e as its fifth character (grape, grapefruit).
The following examples use braces to do pattern matching:
$ ls [abw]*
apple banana watermelon
$ ls [agw]*[ne]
apple grape watermelon
In the first example, any file beginning with a, b, or w is matched. In the second, any file that begins with a, g, or w and also ends with either n or e is matched. You can also include ranges within brackets. For example:
$ ls [a-g]*
apple banana grape grapefruit
Here, any filenames beginning with a letter from a through g are matched.
Using file-redirection metacharacters
Commands receive data from standard input and send it to standard output. Using pipes (described earlier), you can direct standard output from one command to the standard input of another. With files, you can use less than (<) and greater than (>) signs to direct data to and from files. Here are the file-redirection characters:
· <—Directs the contents of a file to the command. In most cases, this is the default action expected by the command and the use of the character is optional; using less bigfile is the same as less < bigfile.
· >—Directs the standard output of a command to a file. If the file exists, the content of that file is overwritten.
· 2>—Directs standard error (error messages) to the file.
· &>—Directs both standard output and standard error to the file.
· »—Directs the output of a command to a file, adding the output to the end of the existing file.
The following are some examples of command lines where information is directed to and from files:
$ mail root < ~/.bashrc
$ man chmod | col -b > /tmp/chmod
$ echo "I finished the project on $(date)" » ~/projects
In the first example, the content of the .bashrc file in the home directory is sent in a mail message to the computer's root user. The second command line formats the chmod man page (using the man command), removes extra back spaces (col -b), and sends the output to the file /tmp/chmod (erasing the previous /tmp/chmod file, if it exists). The final command results in the following text being added to the user's project file:
I finished the project on Sat Sep 6 13:46:49 EDT 2015
Another type of redirection, referred to as here text (also called a here document), enables you to type text that can be used as standard input for a command. Here documents involve entering two less-than characters («) after a command, followed by a word. All typing following that word is taken as user input until the word is repeated on a line by itself. Here is an example:
$ mail root cnegus rjones bdecker «thetext
> I want to tell everyone that there will be a 10 a.m.
> meeting in conference room B. Everyone should attend.
>
> -- James
> thetext
$
This example sends a mail message to root, cnegus, rjones, and bdecker usernames. The text entered between «thetext and thetext becomes the content of the message. A common use of here text is to use it with a text editor to create or add to a file from within a script:
/bin/ed /etc/resolv.conf <<resendit
a
nameserver 100.100.100.100
.
w
q
resendit
With these lines added to a script run by the root user, the ed text editor adds the IP address of a DNS server to the /etc/resolv.conf file.
Using brace expansion characters
By using curly braces ({}), you can expand out a set of characters across filenames, directory names, or other arguments you give commands. For example, if you want to create a set of files such as memo1 through memo5, you can do that as follows:
$ touch memo{1,2,3,4,5}
$ ls
memo1 memo2 memo3 memo4 memo5
The items that are expanded don't have to be numbers or even single digits. For example, you could use ranges of numbers or digits. You could also use any string of characters, as long as you separate them with commas. Here are some examples:
$ touch {John,Bill,Sally}-{Breakfast,Lunch,Dinner}
$ ls
Bill-Breakfast Bill-Lunch John-Dinner Sally-Breakfast Sally-Lunch
Bill-Dinner John-Breakfast John-Lunch Sally-Dinner
$ rm -f {John,Bill,Sally}-{Breakfast,Lunch,Dinner}
$ touch {a..f}{1..5}
$ ls
a1 a3 a5 b2 b4 c1 c3 c5 d2 d4 e1 e3 e5 f2 f4
a2 a4 b1 b3 b5 c2 c4 d1 d3 d5 e2 e4 f1 f3 f5
In the first example, the use of two sets of braces means John, Bill, and Sally each have filenames associated with Breakfast, Lunch, and Dinner. If I had made a mistake, I could easily recall the command and change touch to rm -f to delete all the files. In the next example, the use of two dots between letters a and f and numbers 1 and 5 specifies the ranges to be used. Notice the files that were created from those few characters.
Listing Files and Directories
The ls command is the most common command used to list information about files and directories. Many options available with the ls command allow you to gather different sets of files and directories, as well as to view different kinds of information about them.
By default, when you type the ls command, the output shows you all non-hidden files and directories contained in the current directory. When you type ls, however, many Linux systems (including Fedora and RHEL) assign an alias ls to add options. To see if ls is aliased, type the following:
$ alias ls
alias ls='ls --color=auto'
The --color=auto option causes different types of files and directories to be displayed in different colors. So, returning to the $HOME/test directory created earlier in the chapter, add a couple of different types of files, and then see what they look like with the lscommand.
$ cd $HOME/test
$ touch scriptx.sh apple
$ chmod 755 scriptx.sh
$ mkdir Stuff
$ ln -s apple pointer_to_apple
$ ls
apple pointer_to_apple scriptx.sh Stuff
Although you can't see it in the preceding code example, the directory docs shows up in blue, pointer_to_apple (a symbolic link) appears as aqua, and scriptx.sh (which is an executable file) appears in green. All other regular files show up in black. Typing ls -l to see a long listing of those files can make these different types of files clearer still:
$ ls -l
total 4
-rw-rw-r--. 1 joe joe 0 Dec 18 13:38 apple
lrwxrwxrwx. 1 joe joe 5 Dec 18 13:46 pointer_to_apple -> apple
-rwxr-xr-x. 1 joe joe 0 Dec 18 13:37 scriptx.sh
drwxrwxr-x. 2 joe joe 4096 Dec 18 13:38 Stuff
As you look at the long listing, notice that the first character of each line shows the type of file. A hyphen (-) indicates a regular file, d indicates a directory, and l (lowercase L) indicates a symbolic link. An executable file (a script or binary file that runs as a command) has execute bits turned on (x). See more on execute bits in the upcoming “Understanding File Permissions and Ownership” section.
You should become familiar with the contents of your home directory next. Use the -l and -a options to ls.
$ ls -la /home/joe
total 158
drwxrwxrwx 2 joe sales 4096 May 12 13:55 .
drwxr-xr-x 3 root root 4096 May 10 01:49 ..
-rw------- 1 joe sales 2204 May 18 21:30 .bash_history
-rw-r--r-- 1 joe sales 24 May 10 01:50 .bash_logout
-rw-r--r-- 1 joe sales 230 May 10 01:50 .bash_profile
-rw-r--r-- 1 joe sales 124 May 10 01:50 .bashrc
drw-r--r-- 1 joe sales 4096 May 10 01:50 .kde
-rw-rw-r-- 1 joe sales 149872 May 11 22:49 letter
^ ^ ^ ^ ^ ^ ^
col 1 col 2 col 3 col 4 col 5 col 6 col 7
Displaying a long list (-l option) of the contents of your home directory shows you more about file sizes and directories. The total line shows the total amount of disk space used by the files in the list (158 kilobytes in this example). Directories such as the current directory (.) and the parent directory (..)—the directory above the current directory—are noted as directories by the letter d at the beginning of each entry. Each directory begins with a d and each file begins with a dash (-).
The file and directory names are shown in column 7. In this example, a dot (.) represents /home/joe and two dots (..) represent /home—the parent directory of /joe. Most of the files in this example are dot (.) files that are used to store GUI properties (.kde directory) or shell properties (.bash files). The only non-dot file in this list is the one named letter. Column 3 shows the directory or file owner. The /home directory is owned by root, and everything else is owned by the user joe, who belongs to the sales group (groups are listed in column 4).
In addition to the d or -, column 1 on each line contains the permissions set for that file or directory. Other information in the listing includes the number of hard links to the item (column 2), the size of each file in bytes (column 5), and the date and time each file was most recently modified (column 6).
Here are a few other facts about file and directory listings:
· The number of characters shown for a directory (4096 bytes in these examples) reflects the size of the file containing information about the directory. Although this number can grow above 4096 bytes for a directory that contains lots of files, this number doesn't reflect the size of files contained in that directory.
· The format of the time and date column can vary. Instead of displaying “May 12,” the date might be displayed as “2011-05-12,” depending upon the distribution and the language setting (LANG variable).
· On occasion, instead of seeing the execute bit (x) set on an executable file, you may see an s in that spot instead. With an s appearing within either the owner (-rwsr-xr-x) or group (-rwxr-sr-x) permissions, or both (-rwsr-sr-x), the application can be run by any user, but ownership of the running process is assigned to the application's user/group instead of that of the user launching the command. This is referred to as a set UID or set GID program, respectively. For example, the mount command has permissions set as -rwsr-xr-x. This allows any user to run mount to list mounted filesystems (although you still have to be root to use mount to actually mount filesystems from the command line, in most cases).
· If a t appears at the end of a directory, it indicates that the sticky bit is set for that directory (for example, drwxrwxr-t). By setting the sticky bit on a directory, the directory's owner can allow other users and groups to add files to the directory, but prevent users from deleting each other's files in that directory. With a set GID assigned to a directory, any files created in that directory are assigned the same group as the directory's group. (If you see a capital S or T instead of the execute bits on a directory, it means that the set GID or stick bit permission, respectively, was set, but for some reason the execute bit was not also turned on.)
· If you see a plus sign at the end of the permission bits (for example, -rw-rw-r--+), it means that extended attributes, such as Access Control Lists (ACLs) or SELinux, are set on the file.
Identifying Directories
When you need to identify your home directory on a shell command line, you can use the following:
· $HOME—This environment variable stores your home directory name.
· ~—The tilde (~) represents your home directory on the command line.
You can also use the tilde to identify someone else's home directory. For example, ~joe would be expanded to the joe home directory (probably /home/joe). So, if I wanted to go to the directory /home/joe/test, I could type cd ~joe/test to get there.
Other special ways of identifying directories in the shell include the following:
· .—A single dot (.) refers to the current directory.
· ..—Two dots (..) refer to a directory directly above the current directory.
· $PWD—This environment variable refers to the current working directory.
· $OLDPWD—This environment variable refers to the previous working directory before you changed to the current one. (Typing cd – returns you to the directory represented by $OLDPWD.)
As I mentioned earlier, there are many useful options for the ls command. Return to the $HOME/test directory you've been working in. Here are some examples of ls options. Don't worry if the output doesn't exactly match what is in your directory at this point.
Any file or directory beginning with a dot (.) is considered a hidden file and is not displayed by default with ls. These dot files are typically configuration files or directories that need to be in your home directory, but don't need to be seen in your daily work. The -alets you see those files.
The -t option displays files in the order in which they were most recently modified. With the -F option, a backslash (/) appears at the end of directory names, an asterisk (*) is added to executable files, and an at sign (@) is shown next to symbolic links.
To show hidden and non-hidden files:
$ ls -a
. apple docs grapefruit pointer_to_apple .stuff watermelon
.. banana grape .hiddendir script.sh .tmpfile
To list all files by time most recently modified:
$ ls -at
.tmpfile .hiddendir .. docs watermelon banana script.sh
. .stuff pointer_to_apple grapefruit apple grape
To list files and append file-type indicators:
$ ls -F
apple banana docs/ grape grapefruit pointer_to_apple@ script.sh*
watermelon
To avoid displaying certain files or directories when you use ls, use the --hide= option. In the next set of examples, any file beginning with g does not appear in the output. Using a -d option on a directory shows information about that directory instead of showing the files and directories the directory contains. The -R option lists all files in the current directory as well as any files or directories that are associated with the original directory. The -S option lists files by size.
To not include any files beginning with the letter g in the list:
$ ls --hide=g*
apple banana docs pointer_to_apple script.sh watermelon
To list info about a directory instead of the files it contains:
$ ls -ld $HOME/test/
drwxrwxr-x. 4 joe joe 4096 Dec 18 22:00 /home/joe/test/
To create multiple directory layers (-p is needed):
$ mkdir -p $HOME/test/documents/memos/
To list all files and directories recursively from current directory down:
$ ls -R
...
To list files by size:
$ ls -S
...
Understanding File Permissions and Ownership
After you've worked with Linux for a while, you are almost sure to get a Permission denied message. Permissions associated with files and directories in Linux were designed to keep users from accessing other users' private files and to protect important system files.
The nine bits assigned to each file for permissions define the access that you and others have to your file. Permission bits for a regular file appear as -rwxrwxrwx. Those bits are used to define who can read, write, or execute the file.
NOTE
For a regular file, a dash appears in front of the nine-bit permissions indicator. Instead of a dash, you might see a d (for a directory), l (for a symbolic link), b (for a block device), c (for a character device), s (for a socket), or p (for a named pipe).
Of the nine-bit permissions, the first three bits apply to the owner's permission, the next three apply to the group assigned to the file, and the last three apply to all others. The r stands for read, the w stands for write, and the x stands for execute permissions. If a dash appears instead of the letter, it means that permission is turned off for that associated read, write, or execute bit.
Because files and directories are different types of elements, read, write, and execute permissions on files and directories mean different things. Table 4.2 explains what you can do with each of them.
Table 4.2 Setting Read, Write, and Execute Permissions
|
Permission |
File |
Directory |
|
Read |
View what's in the file. |
See what files and subdirectories it contains. |
|
Write |
Change the file's content, rename it, or delete it. |
Add files or subdirectories to the directory. Remove files or directories from the directory. |
|
Execute |
Run the file as a program. |
Change to the directory as the current directory, search through the directory, or execute a program from the directory. Access file metadata (file size, time stamps, and so on) of files in that directory. |
As noted earlier, you can see the permission for any file or directory by typing the ls -ld command. The named file or directory appears as those shown in this example:
$ ls -ld ch3 test
-rw-rw-r-- 1 joe sales 4983 Jan 18 22:13 ch3
drwxr-xr-x 2 joe sales 1024 Jan 24 13:47 test
The first line shows that the ch3 file has read and write permission for the owner and the group. All other users have read permission, which means they can view the file but cannot change its contents or remove it. The second line shows the test directory (indicated by the letter d before the permission bits). The owner has read, write, and execute permissions while the group and other users have only read and execute permissions. As a result, the owner can add, change, or delete files in that directory, and everyone else can only read the contents, change to that directory, and list the contents of the directory. (If you had not used the -d options to ls, you would have listed files in the test directory instead of permissions of that directory.)
Changing permissions with chmod (numbers)
If you own a file, you can use the chmod command to change the permission on it as you please. In one method of doing this, each permission (read, write, and execute) is assigned a number—r=4, w=2, and x=1—and you use each set's total number to establish the permission. For example, to make permissions wide open for yourself as owner, you would set the first number to 7 (4+2+1), and then you would give the group and others read-only permission by setting both the second and third numbers to 4 (4+0+0), so that the final number is 744. Any combination of permissions can result from 0 (no permission) through 7 (full permission).
Here are some examples of how to change permission on a file (named file) and what the resulting permission would be:
The following chmod command results in this permission: rwxrwxrwx
# chmod 777 file
The following chmod command results in this permission: rwxr-xr-x
# chmod 755 file
The following chmod command results in this permission: rw-r--r--
# chmod 644 file rw-r--r-
The following chmod command results in this permission: ---------
# chmod 000 file
The chmod command also can be used recursively. For example, suppose you wanted to give an entire directory structure 755 permission (rwxr-xr-x), starting at the $HOME/myapps directory. To do that, you could use the -R option, as follows:
$ chmod -R 755 $HOME/myapps
All files and directories below, and including, the myapps directory in your home directory will have 755 permissions set. Because the numbers approach to setting permission changes all permission bits at once, it's more common to use letters to recursively change permission bits over a large set of files.
Changing permissions with chmod (letters)
You can also turn file permissions on and off using plus (+) and minus (–) signs, respectively, along with letters to indicate what changes and for whom. Using letters, for each file you can change permission for the user (u), group (g), other (o), and all users (a). What you would change includes the read (r), write (w), and execute (x) bits. For example, start with a file that has all permissions open (rwxrwxrwx). Run the following chmod commands using minus sign options. The resulting permissions are shown to the right of each command:
The following chmod command results in this permission: r-xr-xr-x
$ chmod a-w file
The following chmod command results in this permission: rwxrwxrw-
$ chmod o-x file
The following chmod command results in this permission: rwx------
$ chmod go-rwx file
Likewise, the following examples start with all permissions closed (---------). The plus sign is used with chmod to turn permissions on:
The following chmod command results in this permission: rw-------
$ chmod u+rw files
The following chmod command results in this permission: --x--x--x
$ chmod a+x files
The following chmod command results in this permission: r-xr-x---
$ chmod ug+rx files
Using letters to change permission recursively with chmod generally works better than using numbers because you can change bits selectively, instead of changing all permission bits at once. For example, suppose that you want to remove write permission for “other” without changing any other permission bits on a set of files and directories. You could do the following:
$ chmod -R o-w $HOME/myapps
This example recursively removes write permissions for “other” on any files and directories below the myapps directory. If you had used numbers such as 644, execute permission would be turned off for directories; using 755, execute permission would be turned on for regular files. Using o-w, only one bit is turned off and all other bits are left alone.
Setting default file permission with umask
When you create a file as a regular user, it's given permission rw-rw-r-- by default. A directory is given the permission rwxrwxr-x. For the root user, file and directory permission are rw-r--r-- and rwxr-xr-x, respectively. These default values are determined by the value of umask. Type umask to see what your umask value is. For example:
$ umask
0002
If you ignore the leading zero for the moment, the umask value masks what is considered to be fully opened permissions for a file 666 or a directory 777. The umask value of 002 results in permission for a directory of 775 (rwxrwxr-x). That same umask results in a file permission of 644 (rw-rw-r--). (Execute permissions are off by default for regular files.)
To temporarily change your umask value, run the umask command. Then try creating some files and directories to see how the umask value affects how permissions are set. For example:
$ umask 777 ; touch file01 ; mkdir dir01 ; ls -ld file01 dir01
d---------. 2 joe joe 6 Dec 19 11:03 dir01
----------. 1 joe joe 0 Dec 19 11:02 file01
$ umask 000 ; touch file02 ; mkdir dir02 ; ls -ld file02 dir02
drwxrwxrwx. 2 joe joe 6 Dec 19 11:00 dir02/
-rw-rw-rw-. 1 joe joe 0 Dec 19 10:59 file02
$ umask 022 ; touch file03 ; mkdir dir03 ; ls -ld file03 dir03
drwxr-xr-x. 2 joe joe 6 Dec 19 11:07 dir03
-rw-r--r--. 1 joe joe 0 Dec 19 11:07 file03
If you want to permanently change your umask value, add a umask command to the .bashrc file in your home directory (near the end of that file). The next time you open a shell, your umask is set to whatever value you chose.
Changing file ownership
As a regular user, you cannot change ownership of files or directories to have them belong to another user. You can change ownership as the root user. For example, suppose you created a file called memo.txt, while you were root user, in the user joe's home directory. Here's how you could change it to be owned by joe:
# chown joe /home/joe/memo.txt
# ls -l /home/joe/memo.txt
-rw-r--r--. 1 joe root 0 Dec 19 11:23 /home/joe/memo.txt
Notice that the chown command changed the user to joe but left the group as root. To change both user and group to joe, you could type the following instead:
# chown joe:joe /home/joe/memo.txt
# ls -l /home/joe/memo.txt
-rw-r--r--. 1 joe joe 0 Dec 19 11:23 /home/joe/memo.txt
The chown command can be use recursively as well. Using the recursive option (-R) is helpful if you need to change a whole directory structure to ownership by a particular user. For example, if you inserted a USB drive, which is mounted on the /media/myusb directory, and wanted to give full ownership of the contents of that drive to the user joe, you could type the following:
# chown -R joe:joe /media/myusb
Moving, Copying, and Removing Files
Commands for moving, copying, and deleting files are fairly straightforward. To change the location of a file, use the mv command. To copy a file from one location to another, use the cp command. To remove a file, use the rm command. These commands can be used to act on individual files and directories or recursively to act on many files and directories at once. Here are some examples:
$ mv abc def
$ mv abc ~
$ mv /home/joe/mymemos/ /home/joe/Documents/
The first mv command moves the file abc to the file def in the same directory (essentially renaming it), whereas the second moves the file abc to your home directory (~). The next command moves the mymemos directory (and all its contents) to the /home/joe/Documentsdirectory.
By default, the mv command overwrites any existing files if the file you are moving to exists. However, many Linux systems alias the mv command so that it uses the -i option (which causes mv to prompt you before overwriting existing files). Here's how to check if that is true on your system:
$ alias mv
alias mv='mv -i'
Here are some examples of using the cp command to copy files from one location to another:
$ cp abc def
$ cp abc ~
$ cp -r /usr/share/doc/bash-completion* /tmp/a/
$ cp -ra /usr/share/doc/bash-completion* /tmp/b/
The first copy command (cp) copies abc to the new name def in the same directory, whereas the second copies abc to your home directory (~), keeping the name abc. The two recursive (-r) copies copy the bash-completion directory, and all files it contains, first to new/tmp/a/ and /tmp/b/ directories. If you run ls -l on those two directories, you see that for the cp command run with the archive (-a) option, the date/time stamps and permissions are maintained by the copy. Without the -a, current date/time stamps are used and permissions are determined by your unmask.
The cp command typically also is aliased with the -i option, to prevent you from inadvertently overwriting files.
As with the cp and mv commands, rm is also usually aliased to include the -i option. This can prevent the damage that can come from an inadvertent recursive remove (-r) option. Here are some examples of the rm command:
$ rm abc
$ rm *
The first remove command deletes the abc file; the second removes all the files in the current directory (except that it doesn't remove directories or any files that start with a dot). If you want to remove a directory, you need to use the recursive (-r) option to rm or, for an empty directory, you can use the rmdir command. Consider the following examples:
$ rmdir /home/joe/nothing/
$ rm -r /home/joe/bigdir/
$ rm -rf /home/joe/hugedir/
The rmdir command in the preceding code only removes the directory (nothing) if it is empty. The rm -r example removes the directory bigdir and all its contents (files and multiple levels of subdirectories) but prompts you before each is removed. By adding the force option (-f), the hugedir directory and all its contents are immediately removed, without prompting.
CAUTION
When you override the -i option on the mv, cp, and rm commands, you risk removing some (or lots of) files by mistake. Using wildcards (such as *) and no -i makes mistakes even more likely. That said, sometimes you don't want to be bothered to step through each file you delete. You have other options:
· As noted with the -f option, you can force rm to delete without prompting. An alternative is to run rm, cp, or mv with a backslash in front of it (\rm bigdir). The backslash causes any command to run unaliased.
· Another alternative with mv is to use the -b option. With -b, if a file of the same name exists at the destination, a backup copy of the old file is made before the new file is moved there.
Summary
Commands for moving around the filesystem, copying files, moving files, and removing files are among the most basic commands you need to work from the shell. This chapter covers lots of commands for moving around and manipulating files, as well as commands for changing ownership and permission.
The next chapter describes commands for editing and searching for files. These commands include the vim/vi text editors, the find command and the grep command.
Exercises
Use these exercises to test your knowledge of efficient ways to move around the filesystem and work with files and directories. When possible, try to use shortcuts to type as little as possible to get the desired results. These tasks assume you are running a Fedora or Red Hat Enterprise Linux system (although some tasks work on other Linux systems as well). If you are stuck, solutions to the tasks are shown in Appendix B (although in Linux, there are often multiple ways to complete a task).
1. Create a directory in your home directory called projects. In the projects directory, create nine empty files that are named house1, house2, house3, and so on to house9. Assuming there are lots of other files in that directory, come up with a single argument to ls that would list just those nine files.
2. Make the $HOME/projects/houses/doors/ directory path. Create the following empty files within this directory path (try using absolute and relative paths from your home directory):
3. $HOME/projects/houses/bungalow.txt
4. $HOME/projects/houses/doors/bifold.txt
$HOME/projects/outdoors/vegetation/landscape.txt
5. Copy the files house1 and house5 to the $HOME/projects/houses/ directory.
6. Recursively copy the /usr/share/doc/initscripts* directory to the $HOME/projects/ directory. Maintain the current date/time stamps and permissions.
7. Recursively list the contents of the $HOME/projects/ directory. Pipe the output to the less command so you can page through the output.
8. Remove the files house6, house7, and house8 without being prompted.
9. Move house3 and house4 to the $HOME/projects/houses/doors directory.
10.Remove the $HOME/projects/houses/doors directory and its contents.
11.Change the permissions on the $HOME/projects/house2 file so it can be read and written by the user who owns the file, only read by the group, and have no permission for others.
12.Recursively change permissions of the $HOME/projects/ directory so nobody has write permission to any files or directory beneath that point in the filesystem.
All materials on the site are licensed Creative Commons Attribution-Sharealike 3.0 Unported CC BY-SA 3.0 & GNU Free Documentation License (GFDL)
If you are the copyright holder of any material contained on our site and intend to remove it, please contact our site administrator for approval.
© 2016-2025 All site design rights belong to S.Y.A.