Wiley Linux Command Line and Shell Scripting Bible 3rd (2015)
Part I. The Linux Command Line
Chapter 9. Installing Software
In This Chapter
1. Installing software
2. Using Debian packages
3. Working with Red Hat packages
In the old days of Linux, installing software could be a painful experience. Fortunately, the Linux developers have made life a little easier for us by bundling software into pre-built packages that are much easier to install. However, you still have a little work to do to get the software packages installed, especially if you want to do that from the command line. This chapter looks at the various Package Management Systems available in Linux and the command line tools used for software installation, management, and removal.
Package Management Primer
Before diving into the world of Linux software package management, this chapter goes through a few of the basics first. Each of the major Linux distributions utilizes some form of a Package Management System (PMS) to control installing software applications and libraries. A PMS utilizes a database that keeps track of these items:
· What software packages are installed on the Linux system
· What files have been installed for each package
· Versions of each of the software packages installed
Software packages are stored on servers, called repositories, and are accessed across the Internet via PMS utilities running on your local Linux system. You can use the PMS utilities to search for new software packages or even updates to software packages already installed on the system.
A software package often has dependencies or other packages that must be installed first for the software to run properly. The PMS utilities detect these dependencies and offer to install any additionally needed software packages before installing the desired package.
The downside to PMS is that there isn't a single standard utility. Whereas all the bash shell commands discussed so far in this book work no matter which Linux distribution you use, this is not true with software package management.
The PMS utilities and their associated commands are vastly different between the various Linux distributions. The two primary PMS base utilities commonly used in the Linux world are dpkg and rpm.
Debian-based distributions such as Ubuntu and Linux Mint use, at the base of their PMS utilities, the dpkg command. This command interacts directly with the PMS on the Linux system and is used for installing, managing, and removing software packages.
The Red Hat–based distributions, such as Fedora, openSUSE, and Mandriva, use the rpm command at the base of their PMS. Similar to the dpkg command, the rpm command can list installed packages, install new packages, and remove existing software.
Note that these two commands are the core of their respective PMS, not the entire PMS itself. Many Linux distributions that use the dpkg or rpm methods have built additional specialty PMS utilities upon these base commands to help make your life much easier. The following sections walk through various PMS utility commands you'll run into in the popular Linux distributions.
The Debian-Based Systems
The dpkg command is at the core of the Debian-based family of PMS tools. These other tools are included in this PMS:
· apt-get
· apt-cache
· aptitude
By far the most common command line tool is aptitude, and for good reason. The aptitude tool is essentially a front-end for both the apt tools and dpkg. Whereas dpkg is a PMS tool, aptitude is a complete Package Management System.
Using the aptitude command at the command line helps you avoid common software installation problems, such as missing software dependencies, unstable system environments, and just a whole lot of unnecessary hassle. This section looks at how to use theaptitude command tool from the Linux command line.
Managing packages with aptitude
A common task faced by Linux system administrators is to determine what packages are already installed on the system. Fortunately, aptitude has a handy interactive interface that makes this task an easy one.
If you have aptitude installed in your Linux distribution, at the shell prompt just type aptitude and press Enter. You are thrown into aptitude's full-screen mode, as you can see in Figure 9.1.
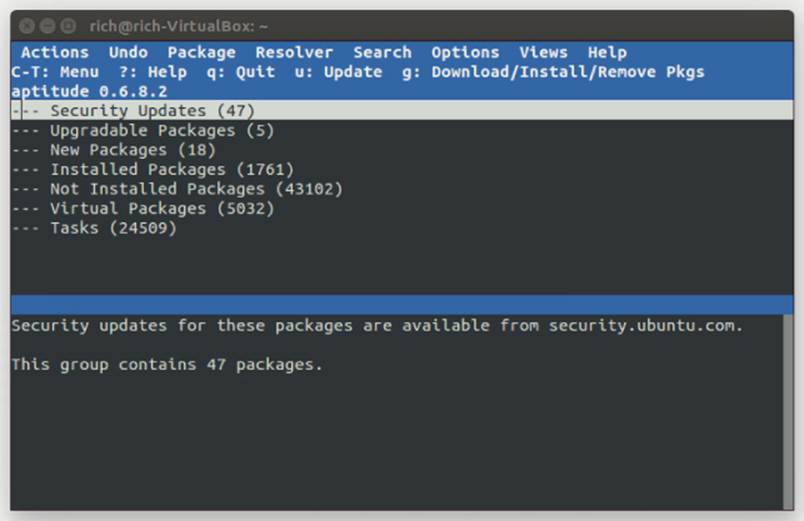
Figure 9.1 The aptitude main window
Use the arrow keys to maneuver around the menu. Select the menu option Installed Packages to see what packages are installed. You will see several groups of software packages, such as editors, and so on. A number in parentheses follows each group, which indicates the number of packages the group contains.
Use the arrow keys to highlight a group, and press Enter to see each subgroup of packages. You then see the individual package names and their version numbers. Press Enter on individual packages to get very detailed information, such as the package's description, home page, size, maintainer, and so on.
When you're finished viewing the installed packages, press q to quit the display. You can then go back to the arrow keys. and use Enter to toggle open or closed the packages and their subgroups. When you are all finished, just press q multiple times until you receive the pop-up screen “Really quit Aptitude?”
If you already know the packages on your system and want to quickly display detailed information about a particular package, you don't need to go into aptitude's interactive interface. You can use aptitude as a single command at the command line:
aptitude show package_name
Here's an example of displaying the details of the package mysql-client:
$ aptitude show mysql-client
Package: mysql-client
State: not installed
Version: 5.5.38-0ubuntu0.14.04.1
Priority: optional
Section: database
Maintainer: Ubuntu Developers <ubuntu-devel-discuss@lists.ubuntu.com>
Architecture: all
Uncompressed Size: 129 k
Depends: mysql-client-5.5
Provided by: mysql-client-5.5
Description: MySQL database client (metapackage depending on the latest version)
This is an empty package that depends on the current ''best'' version of
mysql-client (currently mysql-client-5.5), as determined by the MySQL
maintainers. Install this package if in doubt about which MySQL version you
want, as this is the one considered to be in the best shape by the Maintainers.
Homepage: http://dev.mysql.com/
$
Note
The aptitude show command indicates that the package is not installed on the system. It also shows detailed package information from the software repository.
One detail you cannot get with aptitude is a listing of all the files associated with a particular software package. To get this list, you must go to the dpkg tool itself:
dpkg -L package_name
Here's an example of using dpkg to list all the files installed as part of the vim-common package:
$
$ dpkg -L vim-common
/.
/usr
/usr/bin
/usr/bin/xxd
/usr/bin/helpztags
/usr/lib
/usr/lib/mime
/usr/lib/mime/packages
/usr/lib/mime/packages/vim-common
/usr/share
/usr/share/man
/usr/share/man/ru
/usr/share/man/ru/man1
/usr/share/man/ru/man1/vim.1.gz
/usr/share/man/ru/man1/vimdiff.1.gz
/usr/share/man/ru/man1/xxd.1.gz
/usr/share/man/it
/usr/share/man/it/man1
[...]
$
You can also do the reverse — find what package a particular file belongs to:
dpkg --search absolute_file_name
Note that you need to use an absolute file reference for this to work:
$
$ dpkg --search /usr/bin/xxd
vim-common: /usr/bin/xxd
$
The output shows the /usr/bin/xxd file was installed as part of the vim-common package.
Installing software packages with aptitude
Now that you know more about listing software package information on your system, this section walks through a software package install. First, you'll want to determine the package name to install. How do you find a particular software package? Use the aptitudecommand with the search option:
aptitude search package_name
The beauty of the search option is that you do not need to insert wildcards around package_name. Wildcards are implied. Here's an example of using aptitude to look for the wine software package:
$
$ aptitude search wine
p gnome-wine-icon-theme - red variation of the GNOME- ...
v libkwineffects1-api -
p libkwineffects1a - library used by effects...
p q4wine - Qt4 GUI for wine (W.I.N.E)
p shiki-wine-theme - red variation of the Shiki- ...
p wine - Microsoft Windows Compatibility ...
p wine-dev - Microsoft Windows Compatibility ...
p wine-gecko - Microsoft Windows Compatibility ...
p wine1.0 - Microsoft Windows Compatibility ...
p wine1.0-dev - Microsoft Windows Compatibility ...
p wine1.0-gecko - Microsoft Windows Compatibility ...
p wine1.2 - Microsoft Windows Compatibility ...
p wine1.2-dbg - Microsoft Windows Compatibility ...
p wine1.2-dev - Microsoft Windows Compatibility ...
p wine1.2-gecko - Microsoft Windows Compatibility ...
p winefish - LaTeX Editor based on Bluefish
$
Notice that before each package name is either a p or i. If you see an i u, the package is currently installed on your system. If you see a p or v, it is available but not installed. As you can see from the preceding listing, this system does not have wine currently installed, but the package is available from the software repository.
Installing a software package on a system from a repository using aptitude is as easy as this:
aptitude install package_name
After you find the software package name from the search option, just plug it into the aptitude command using the install option:
$
$ sudo aptitude install wine
The following NEW packages will be installed:
cabextract{a} esound-clients{a} esound-common{a} gnome-exe-thumbnailer
{a}
icoutils{a} imagemagick{a} libaudio2{a} libaudiofile0{a} libcdt4{a}
libesd0{a} libgraph4{a} libgvc5{a} libilmbase6{a} libmagickcore3-extra
{a}
libmpg123-0{a} libnetpbm10{a} libopenal1{a} libopenexr6{a}
libpathplan4{a} libxdot4{a} netpbm{a} ttf-mscorefonts-installer{a}
ttf-symbol-replacement{a} winbind{a} wine wine1.2{a} wine1.2-gecko{a}
0 packages upgraded, 27 newly installed, 0 to remove and 0 not upgraded.
Need to get 0B/27.6MB of archives. After unpacking 121MB will be used.
Do you want to continue? [Y/n/?] Y
Preconfiguring packages ...
[...]
All done, no errors.
All fonts downloaded and installed.
Updating fontconfig cache for /usr/share/fonts/truetype/msttcorefonts
Setting up winbind (2:3.5.4~dfsg-1ubuntu7) ...
* Starting the Winbind daemon winbind
[ OK ]
Setting up wine (1.2-0ubuntu5) ...
Setting up gnome-exe-thumbnailer (0.6-0ubuntu1) ...
Processing triggers for libc-bin ...
ldconfig deferred processing now taking place
$
Note
Before the aptitude command in the preceding listing, the sudo command is used. The sudo command allows you to run a command as the root user. You can use the sudo command to run administrative tasks, such as installing software.
To check if the installation processed properly, just use the search option again. This time you should see an i u listed in front of the wine software package, indicating it is installed.
You may also notice that there are additional packages with the i u in front of them. This is because aptitude automatically resolved any necessary package dependencies for us and installs the needed additional library and software packages. This is a wonderful feature included in many Package Management Systems.
Updating software with aptitude
While aptitude helps protect you from problems installing software, trying to coordinate a multiple-package update with dependencies can get tricky. To safely update all the software packages on a system with any new versions in the repository, use the safe-upgradeoption:
aptitude safe-upgrade
Notice that this command doesn't take a software package name as an argument. That's because the safe-upgrade option upgrades all the installed packages to the most recent version available in the repository, which is safer for system stabilization.
Here's a sample output from running the aptitude safe-update command:
$
$ sudo aptitude safe-upgrade
The following packages will be upgraded:
evolution evolution-common evolution-plugins gsfonts libevolution
xserver-xorg-video-geode
6 packages upgraded, 0 newly installed, 0 to remove and 0 not upgraded.
Need to get 9,312kB of archives. After unpacking 0B will be used.
Do you want to continue? [Y/n/?] Y
Get:1 http://us.archive.ubuntu.com/ubuntu/ maverick/main
libevolution i386 2.30.3-1ubuntu4 [2,096kB]
[...]
Preparing to replace xserver-xorg-video-geode 2.11.9-2
(using .../xserver-xorg-video-geode_2.11.9-3_i386.deb) ...
Unpacking replacement xserver-xorg-video-geode ...
Processing triggers for man-db ...
Processing triggers for desktop-file-utils ...
Processing triggers for python-gmenu ...
[...]
Current status: 0 updates [-6].
$
You can also use less-conservative options for software upgrades:
· aptitude full-upgrade
· aptitude dist-upgrade
These options perform the same task, upgrading all the software packages to the latest versions. Where they differ from safe-upgrade is that they do not check dependencies between packages. The whole package dependency issue can get real ugly. If you're not exactly sure of the dependencies for the various packages, stick with the safe-upgrade option.
Note
Obviously, running aptitude's safe-upgrade option is something you should do on a regular basis to keep your system up to date. However, it is especially important to run it after a fresh distribution installation. Usually, lots of security patches and updates have been released since the last full release of a distribution.
Uninstalling software with aptitude
Getting rid of software packages with aptitude is as easy as installing and upgrading them. The only real choice you have to make is whether to keep the software's data and configuration files around afterward.
To remove a software package, but not the data and configuration files, use the remove option of aptitude. To remove a software package and the related data and configuration files, use the purge option:
$ sudo aptitude purge wine
[sudo] password for user:
The following packages will be REMOVED:
cabextract{u} esound-clients{u} esound-common{u} gnome-exe-thumbnailer
{u}
icoutils{u} imagemagick{u} libaudio2{u} libaudiofile0{u} libcdt4{u}
libesd0{u} libgraph4{u} libgvc5{u} libilmbase6{u} libmagickcore3-extra
{u}
libmpg123-0{u} libnetpbm10{u} libopenal1{u} libopenexr6{u}
libpathplan4{u} libxdot4{u} netpbm{u} ttf-mscorefonts-installer{u}
ttf-symbol-replacement{u} winbind{u} wine{p} wine1.2{u} wine1.2-gecko
{u}
0 packages upgraded, 0 newly installed, 27 to remove and 6 not upgraded.
Need to get 0B of archives. After unpacking 121MB will be freed.
Do you want to continue? [Y/n/?] Y
(Reading database ... 120968 files and directories currently installed.)
Removing ttf-mscorefonts-installer ...
[...]
Processing triggers for fontconfig ...
Processing triggers for ureadahead ...
Processing triggers for python-support ...
$
To see if the package has been removed, you can use the aptitude search option again. If you see a c in front of the package name, it means the software has been removed, but the configuration files have not been purged from the system. A p in front indicates the configuration files have also been removed.
The aptitude repositories
The default software repository locations for aptitude are set up for you when you install your Linux distribution. The repository locations are stored in the file /etc/apt/sources.list.
In many cases, you never need to add/remove a software repository so you don't need to touch this file. However, aptitude pulls software from only these repositories. Also, when searching for software to install or update, aptitude checks only these repositories. If you need to include some additional software repositories for your PMS, this is the place to do it.
Tip
The Linux distribution developers work hard to make sure package versions added to the repositories don't conflict with one another. Usually it's safest to upgrade or install a software package from the repository. Even if a newer version is available elsewhere, you may want to hold off installing it until that version is available in your Linux distribution's repository
The following is an example of a sources.list file from an Ubuntu system:
$ cat /etc/apt/sources.list
#deb cdrom:[Ubuntu 14.04 LTS _Trusty Tahr_ - Release i386 (20140417)]/
trusty main restricted
# See http://help.ubuntu.com/community/UpgradeNotes for how to upgrade to
# newer versions of the distribution.
deb http://us.archive.ubuntu.com/ubuntu/ trusty main restricted
deb-src http://us.archive.ubuntu.com/ubuntu/ trusty main restricted
## Major bug fix updates produced after the final release of the
## distribution.
deb http://us.archive.ubuntu.com/ubuntu/ trusty-updates main restricted
deb-src http://us.archive.ubuntu.com/ubuntu/ trusty-updates main restricted
## N.B. software from this repository is ENTIRELY UNSUPPORTED by the Ubuntu
## team. Also, please note that software in universe WILL NOT receive any
## review or updates from the Ubuntu security team.
deb http://us.archive.ubuntu.com/ubuntu/ trusty universe
deb-src http://us.archive.ubuntu.com/ubuntu/ trusty universe
deb http://us.archive.ubuntu.com/ubuntu/ trusty-updates universe
deb-src http://us.archive.ubuntu.com/ubuntu/ trusty-updates universe
[...]
## Uncomment the following two lines to add software from Canonical's
## 'partner' repository.
## This software is not part of Ubuntu, but is offered by Canonical and the
## respective vendors as a service to Ubuntu users.
# deb http://archive.canonical.com/ubuntu trusty partner
# deb-src http://archive.canonical.com/ubuntu trusty partner
## This software is not part of Ubuntu, but is offered by third-party
## developers who want to ship their latest software.
deb http://extras.ubuntu.com/ubuntu trusty main
deb-src http://extras.ubuntu.com/ubuntu trusty main
$
First, notice that the file is full of helpful comments and warnings. The repository sources specified use the following structure:
deb (or deb-src) address distribution_name package_type_list
The deb or deb-src value indicates the software package type. The deb value indicates it is a source of compiled programs, whereas the deb-src value indicates it is a source of source code.
The address entry is the software repository's web address. The distribution_name entry is the name of this particular software repository's distribution's version. In the example, the distribution name is trusty. This does not necessarily mean that the distribution you are running is Ubuntu's Trusty Tahr; it just means the Linux distribution is using the Ubuntu Trusty Tahr software repositories! For example, in Linux Mint's sources.list file, you see a mix of Linux Mint and Ubuntu software repositories.
Finally, the package_type_list entry may be more than one word and indicates what type of packages the repository has in it. For example, you may see values such as main, restricted, universe, or partner.
When you need to add a software repository to your sources file, you can try to wing it yourself, but that more than likely will cause problems. Often, software repository sites or various package developer sites have an exact line of text that you can copy from their website and paste into your sources.list file. It's best to choose the safer route and just copy/paste.
The front-end interface, aptitude, provides intelligent command line options for working with the Debian-based dpkg utility. Now it's time to look at the Red Hat–based distributions' rpm utility and its various front-end interfaces.
The Red Hat–Based Systems
Like the Debian-based distributions, the Red Hat–based systems have several different front-end tools that are available. These are the common ones:
· yum: Used in Red Hat and Fedora
· urpm: Used in Mandriva
· zypper: Used in openSUSE
These front-ends are all based on the rpm command line tool. The following section discusses how to manage software packages using these various rpm-based tools. The focus is on yum, but information is also included for zypper and urpm.
Listing installed packages
To find out what is currently installed on your system, at the shell prompt, type the following command:
yum list installed
The information will probably whiz by you on the display screen, so it's best to redirect the installed software listing into a file. You can then use the more or less command (or a GUI editor) to look at the list in a controlled manner.
yum list installed > installed_software
To list out the installed packages on your openSUSE or Mandriva distribution, see the commands in Table 9.1. Unfortunately, the urpm tool used in Mandriva cannot produce a currently installed software listing. Thus, you need to revert to the underlying rpm tool.
Table 9.1 How to List Installed Software with zypper and urpm
|
Distribution |
Front-End Tool |
Command |
|
Mandriva |
urpm |
rpm -qa > installed_software |
|
openSUSE |
zypper |
zipper search -I > installed_software |
To find out detailed information for a particular software package, yum really shines. It gives you a very verbose description of the package, and with another simple command, you can see whether the package is installed:
# yum list xterm
Loaded plugins: langpacks, presto, refresh-packagekit
Adding en_US to language list
Available Packages
xterm.i686 253-1.el6
#
# yum list installed xterm
Loaded plugins: refresh-packagekit
Error: No matching Packages to list
#
The commands to list detailed software package information using urpm and zypper are in Table 9.2. You can acquire an even more detailed set of package information from the repository, using the info option on the zypper command.
Table 9.2 How to See Various Package Details with zypper and urpm
|
Detail Type |
Front-End Tool |
Command |
|
Package Information |
urpm |
urpmq -i package_name |
|
Installed? |
urpm |
rpm -q package_name |
|
Package Information |
zypper |
zypper search -s package_name |
|
Installed? |
zypper |
Same command, but look for an i in the Status column |
Finally, if you need to find out what software package provides a particular file on your filesystem, the versatile yum can do that, too! Just enter the command:
yum provides file_name
Here's an example of trying to find what software provided the configuration file /etc/yum.conf:
#
# yum provides /etc/yum.conf
Loaded plugins: fastestmirror, refresh-packagekit, security
Determining fastest mirrors
* base: mirror.web-ster.com
* extras: centos.chi.host-engine.com
* updates: mirror.umd.edu
yum-3.2.29-40.el6.centos.noarch : RPM package installer/updater/manager
Repo : base
Matched from:
Filename : /etc/yum.conf
yum-3.2.29-43.el6.centos.noarch : RPM package installer/updater/manager
Repo : updates
Matched from:
Filename : /etc/yum.conf
yum-3.2.29-40.el6.centos.noarch : RPM package installer/updater/manager
Repo : installed
Matched from:
Other : Provides-match: /etc/yum.conf
#
#
yum checked three separate repositories: base, updates, and installed. From both, the answer is: the yum software package provides this file!
Installing software with yum
Installation of a software package using yum is incredibly easy. The following is the basic command for installing a software package, all its needed libraries, and package dependencies from a repository:
yum install package_name
Here's an example of installing the xterm package that we talked about in Chapter 2:
$ su -
Password:
# yum install xterm
Loaded plugins: fastestmirror, refresh-packagekit, security
Determining fastest mirrors
* base: mirrors.bluehost.com
* extras: mirror.5ninesolutions.com
* updates: mirror.san.fastserv.com
Setting up Install Process
Resolving Dependencies
--> Running transaction check
---> Package xterm.i686 0:253-1.el6 will be installed
--> Finished Dependency Resolution
Dependencies Resolved
[...]
Installed:
xterm.i686 0:253-1.el6
Complete!
#
Note
Before the yum command in the preceding listing, the su - command is used. This command allows you to switch to the root user. On this Linux system, the # denotes you are logged in as root. You should only switch to root user temporarily in order to run administrative tasks, such as installing and updating software. The sudo command is another option as well.
You can also manually download an rpm installation file and install it using yum. This is called a local installation. This is the basic command:
yum localinstall package_name.rpm
You can begin to see that one of yum's strengths is that it uses very logical and user-friendly commands.
Table 9.3 shows how to perform a package install with urpm and zypper. You should note that if you are not logged in as root, you get a “command not found” error message using urpm.
Table 9.3 How to Install Software with zypper and urpm
|
Front-End Tool |
Command |
|
urpm |
urpmi package_name |
|
zypper |
zypper install package_name |
Updating software with yum
In most Linux distributions, when you're working away in the GUI, you get those nice little notification icons telling you that an update is needed. Here at the command line, it takes a little more work.
To see the list of all the available updates for your installed packages, type the following command:
yum list updates
It's always nice to get no response to this command because it means you have nothing to update! However, if you do discover a particular software package needs updating, type the following command:
yum update package_name
If you'd like to update all the packages listed in the update list, just enter the following command:
yum update
Commands for updating software packages on Mandriva and openSUSE are listed in Table 9.4. When urpm is used, the repository database is automatically refreshed as well as software packages updated.
Table 9.4 How to Update Software with zypper and urpm
|
Front-End Tool |
Command |
|
urpm |
urpmi --auto-update --update |
|
zypper |
zypper update |
Uninstalling software with yum
The yum tool also provides an easy way to uninstall software you no longer want on your system. As with aptitude, you need to choose whether to keep the software package's data and configuration files.
To just remove the software package and keep any configuration and data files, use the following command:
yum remove package_name
To uninstall the software and all its files, use the erase option:
yum erase package_name
It is equally easy to remove software using urpm and zypper in Table 9.5. Both of these tools perform a function similar to yum's erase option.
Table 9.5 How to Uninstall Software with zypper and urpm
|
Front-End Tool |
Command |
|
urpm |
urpme package_name |
|
zypper |
zypper remove package_name |
Although life is considerably easier with PMS packages, it's not always problem-free. Occasionally, things do go wrong. Fortunately, there's help.
Dealing with broken dependencies
Sometimes, as multiple software packages get loaded, a software dependency for one package can get overwritten by the installation of another package. This is called a broken dependency.
If this should happen on your system, first try the following command:
yum clean all
Then try to use the update option in the yum command. Sometimes, just cleaning up any misplaced files can help.
If that doesn't solve the problem, try the following command:
yum deplist package_name
This command displays all the package's library dependencies and what software package provides them. After you know the libraries required for a package, you can then install them. Here's an example of determining the dependencies for the xterm package:
# yum deplist xterm
Loaded plugins: fastestmirror, refresh-packagekit, security
Loading mirror speeds from cached hostfile
* base: mirrors.bluehost.com
* extras: mirror.5ninesolutions.com
* updates: mirror.san.fastserv.com
Finding dependencies:
package: xterm.i686 253-1.el6
dependency: libncurses.so.5
provider: ncurses-libs.i686 5.7-3.20090208.el6
dependency: libfontconfig.so.1
provider: fontconfig.i686 2.8.0-3.el6
dependency: libXft.so.2
provider: libXft.i686 2.3.1-2.el6
dependency: libXt.so.6
provider: libXt.i686 1.1.3-1.el6
dependency: libX11.so.6
provider: libX11.i686 1.5.0-4.el6
dependency: rtld(GNU_HASH)
provider: glibc.i686 2.12-1.132.el6
provider: glibc.i686 2.12-1.132.el6_5.1
provider: glibc.i686 2.12-1.132.el6_5.2
dependency: libICE.so.6
provider: libICE.i686 1.0.6-1.el6
dependency: libXaw.so.7
provider: libXaw.i686 1.0.11-2.el6
dependency: libtinfo.so.5
provider: ncurses-libs.i686 5.7-3.20090208.el6
dependency: libutempter.so.0
provider: libutempter.i686 1.1.5-4.1.el6
dependency: /bin/sh
provider: bash.i686 4.1.2-15.el6_4
dependency: libc.so.6(GLIBC_2.4)
provider: glibc.i686 2.12-1.132.el6
provider: glibc.i686 2.12-1.132.el6_5.1
provider: glibc.i686 2.12-1.132.el6_5.2
dependency: libXmu.so.6
provider: libXmu.i686 1.1.1-2.el6
#
If that doesn't solve your problem, you have one last tool:
yum update --skip-broken
The --skip-broken option allows you to just ignore the package with the broken dependency and update the other software packages. This may not help the broken package, but at least you can update the remaining packages on the system!
In Table 9.6, the commands to try for broken dependencies with urpm and zypper are listed. With zypper, there is only the one command to verify and fix a broken dependency. With urpm, if the clean option does not work, you can skip updates on the offensive package. To do this, you must add the name of the offending package to the file /etc/urpmi/skip.list.
Table 9.6 Broken Dependencies with zypper and urpm
|
Front End Tool |
Command |
|
urpm |
urpmi --clean |
|
zypper |
zypper verify |
yum repositories
Just like the aptitude systems, yum has its software repositories set up at installation. For most purposes, these pre-installed repositories work just fine for your needs. But if and when the time comes that you need to install software from a different repository, here are some things you need to know.
Tip
A wise system administrator sticks with approved repositories. An approved repository is one that is sanctioned by the distribution's official site. If you start adding unapproved repositories, you lose the guarantee of stability. And you will be heading into broken dependencies territory
To see what repositories you are currently pulling software from, type the following command:
yum repolist
If you don't find a repository you need software from, you need to do a little configuration file editing. The yum repository definition files are located in /etc/yum.repos.d. You need to add the proper URL and gain access to any necessary encryption keys.
Good repository sites such as rpmfusion.org lay out all the steps necessary to use them. Sometimes, these repository sites offer an rpm file that you can download and install using the yum localinstall command. The installation of the rpm file does all the repository setup work for you. Now that's convenient!
urpm calls its repositories media. The commands for looking at urpm media and zypper's repositories are in Table 9.7. Notice with both of these front-end tools that you do not edit a configuration file. Instead, to add media or a repository, you just type the command.
Table 9.7 zypper and urpm Repositories
|
Action |
Front-End Tool |
Command |
||
|
Display repository |
urpm |
urpmq --list-media |
||
|
Add repository |
urpm |
urpmi.addmedia path_name |
||
|
Display repository |
zypper |
zypper repos |
||
|
Add repository |
zypper |
zypper addrepo path_name |
Both Debian–based and Red Hat–based systems use Package Management Systems to ease the process of managing software. Now we are going to step out of the world of Package Management Systems and look at something a little more difficult: installing directly from source code.
Installing from Source Code
Chapter 4 discussed tarball packages — how to create them using the tar command line command and how to unpack them. Before the fancy rpm and dpkg tools, administrators had to know how to unpack and install software from tarballs.
If you work in the open source software environment much, there's a good chance you will still find software packed up as a tarball. This section walks you through the process of unpacking and installing a tarball software package.
For this example, the software package sysstat is used. The sysstat utility is a very nice software package that provides a variety of system monitoring tools.
First, you need to download the sysstat tarball to your Linux system. You can often find the sysstat package available on different Linux sites, but it's usually best to go straight to the source of the program. In this case, it's the websitehttp://sebastien.godard.pagesperso-orange.fr/.
If you click the Download link, you go to the page that contains the files for downloading. The current version at the time of this writing is 11.1.1, and the distribution file name is sysstat-11.1.1.tar.gz.
Click the link to download the file to your Linux system. After you have downloaded the file, you can unpack it.
To unpack a software tarball, use the standard tar command:
#
# tar -zxvf sysstat-11.1.1.tar.gz
sysstat-11.1.1/
sysstat-11.1.1/cifsiostat.c
sysstat-11.1.1/FAQ
sysstat-11.1.1/ioconf.h
sysstat-11.1.1/rd_stats.h
sysstat-11.1.1/COPYING
sysstat-11.1.1/common.h
sysstat-11.1.1/sysconfig.in
sysstat-11.1.1/mpstat.h
sysstat-11.1.1/rndr_stats.h
[...]
sysstat-11.1.1/activity.c
sysstat-11.1.1/sar.c
sysstat-11.1.1/iostat.c
sysstat-11.1.1/rd_sensors.c
sysstat-11.1.1/prealloc.in
sysstat-11.1.1/sa2.in
#
#
Now that the tarball is unpacked and the files have neatly put themselves into a directory called sysstat-11.1.1, you can dive down into that directory and continue.
First, use the cd command to get into the new directory and list the contents of the directory:
$ cd sysstat-11.1.1
$ ls
activity.c iconfig prealloc.in sa.h
build INSTALL pr_stats.c sar.c
CHANGES ioconf.c pr_stats.h sa_wrap.c
cifsiostat.c ioconf.h rd_sensors.c sysconfig.in
cifsiostat.h iostat.c rd_sensors.h sysstat-11.1.1.lsm
common.c iostat.h rd_stats.c sysstat-11.1.1.spec
common.h json_stats.c rd_stats.h sysstat.in
configure json_stats.h README sysstat.ioconf
configure.in Makefile.in rndr_stats.c sysstat.service.in
contrib man rndr_stats.h sysstat.sysconfig.in
COPYING mpstat.c sa1.in version.in
count.c mpstat.h sa2.in xml
count.h nfsiostat-sysstat.c sa_common.c xml_stats.c
CREDITS nfsiostat-sysstat.h sadc.c xml_stats.h
cron nls sadf.c
FAQ pidstat.c sadf.h
format.c pidstat.h sadf_misc.c
$
In the listing of the directory, you should typically see a README or AAAREADME file. It is very important to read this file. The actual instructions you need to finish the software's installation are in this file.
Following the advice contained in the README file, the next step is to configure sysstat for your system. This checks your Linux system to ensure it has the proper library dependencies, in addition to the proper compiler to compile the source code:
# ./configure
Check programs:
.
checking for gcc... gcc
checking whether the C compiler works... yes
checking for C compiler default output file name... a.out
[...]
checking for ANSI C header files... (cached) yes
checking for dirent.h that defines DIR... yes
checking for library containing opendir... none required
checking ctype.h usability... yes
checking ctype.h presence... yes
checking for ctype.h... yes
checking errno.h usability... yes
checking errno.h presence... yes
checking for errno.h... yes
[...]
Check library functions:
.
checking for strchr... yes
checking for strcspn... yes
checking for strspn... yes
checking for strstr... yes
checking for sensors support... yes
checking for sensors_get_detected_chips in -lsensors... no
checking for sensors lib... no
.
Check system services:
.
checking for special C compiler options needed for large files... no
checking for _FILE_OFFSET_BITS value needed for large files... 64
.
Check configuration:
[...]
Now create files:
[...]
config.status: creating Makefile
Sysstat version: 11.1.1
Installation prefix: /usr/local
rc directory: /etc/rc.d
Init directory: /etc/rc.d/init.d
Systemd unit dir:
Configuration directory: /etc/sysconfig
Man pages directory: ${datarootdir}/man
Compiler: gcc
Compiler flags: -g -O2
#
If anything does go wrong, the configure step displays an error message explaining what's missing. If you don't have the GNU C compiler installed in your Linux distribution, you get a single error message, but for all other issues you should see multiple messages indicating what's installed and what isn't.
The next stage is to build the various binary files using the make command. The make command compiles the source code and then the linker to create the final executable files for the package. As with the configure command, the make command produces lots of output as it goes through the steps of compiling and linking all the source code files:
# make
–gcc -o sadc.o -c -g -O2 -Wall -Wstrict-prototypes -pipe -O2
-DSA_DIR=\"/var/log/sa\" -DSADC_PATH=\"/usr/local/lib/sa/sadc\"
-DUSE_NLS -DPACKAGE=\"sysstat\"
-DLOCALEDIR=\"/usr/local/share/locale\" sadc.c
gcc -o act_sadc.o -c -g -O2 -Wall -Wstrict-prototypes -pipe -O2
-DSOURCE_SADC -DSA_DIR=\"/var/log/sa\"
-DSADC_PATH=\"/usr/local/lib/sa/sadc\"
-DUSE_NLS -DPACKAGE=\"sysstat\"
-DLOCALEDIR=\"/usr/local/share/locale\" activity.c
[...]
#
When make is finished, you have the actual sysstat software program available in the directory! However, it's somewhat inconvenient to have to run it from that directory. Instead, you'll want to install it in a common location on your Linux system. To do that, you need to log in as the root user account (or use the sudo command if your Linux distribution prefers) and then use the install option of the make command:
# make install
mkdir -p /usr/local/share/man/man1
mkdir -p /usr/local/share/man/man5
mkdir -p /usr/local/share/man/man8
rm -f /usr/local/share/man/man8/sa1.8*
install -m 644 -g man man/sa1.8 /usr/local/share/man/man8
rm -f /usr/local/share/man/man8/sa2.8*
install -m 644 -g man man/sa2.8 /usr/local/share/man/man8
rm -f /usr/local/share/man/man8/sadc.8*
[...]
install -m 644 -g man man/sadc.8 /usr/local/share/man/man8
install -m 644 FAQ /usr/local/share/doc/sysstat-11.1.1
install -m 644 *.lsm /usr/local/share/doc/sysstat-11.1.1
#
Now the sysstat package is installed on the system! Although it's not quite as easy as installing a software package via a PMS, installing software using tarballs is not that difficult.
Summary
This chapter discussed how to work with a Package Management Systems (PMS) to install, update, or remove software from the command line. Although most of the Linux distributions use fancy GUI tools for software package management, you can also perform package management from the command line.
The Debian-based Linux distributions use the dpkg utility to interface with the PMS from the command line. A front-end to the dpkg utility is aptitude. It provides simple command line options for working with software packages in the dpkg format.
The Red Hat–based Linux distributions are based on the rpm utility but use different front-end tools at the command line. Red Hat and Fedora use yum for installing and managing software packages. The openSUSE distribution uses zypper for managing software, while the Mandriva distribution uses urpm.
The chapter closed with a discussion on how to install software packages that are only distributed in source code tarballs. The tar command allows you to unpack the source code files from the tarball, and configure and make allow you to build the final executable program from the source code.
The next chapter looks at the different editors available in Linux distributions. As you get ready to start working on shell scripts, it will come in handy to know what editors are available to use!
All materials on the site are licensed Creative Commons Attribution-Sharealike 3.0 Unported CC BY-SA 3.0 & GNU Free Documentation License (GFDL)
If you are the copyright holder of any material contained on our site and intend to remove it, please contact our site administrator for approval.
© 2016-2026 All site design rights belong to S.Y.A.