Wiley Linux Command Line and Shell Scripting Bible 3rd (2015)
Part I. The Linux Command Line
Chapter 10. Working with Editors
In This Chapter
1. Working with the vim editor
2. Exploring nano
3. Understanding emacs
4. Getting comfortable with kwrite
5. Looking at Kate
6. Using the GNOME editor
Before you can start your shell scripting career, you need to know how to use at least one text editor in Linux. The more you know about how to use features such as searching, cutting, and pasting, the quicker you can develop your shell scripts.
You can choose from several editors. Many individuals find a particular editor whose features they love and exclusively use that text editor. This chapter discusses just a few of the text editors you'll see in the Linux world.
Visiting the vim Editor
The vi editor was the original editor used on Unix systems. It used the console graphics mode to emulate a text-editing window, allowing you to see the lines of your file, move around within the file, and insert, edit, and replace text.
Although it was quite possibly the most complicated editor in the world (at least in the opinion of those who hate it), it provides many features that have made it a staple for Unix administrators for decades.
When the GNU Project ported the vi editor to the open source world, they chose to make some improvements to it. Because it no longer resembled the original vi editor found in the Unix world, the developers also renamed it, to vi improved, or vim.
This section walks you through the basics of using the vim editor to edit your text shell script files.
Checking your vim package
Before you begin your exploration of the vim editor, it's a good idea to understand what vim package your Linux system has installed. On some distributions, you will have the full vim package installed and an alias for the vi command, as shown on this CentOS distribution:
$ alias vi
alias vi='vim'
$
$ which vim
/usr/bin/vim
$
$ ls -l /usr/bin/vim
-rwxr-xr-x. 1 root root 1967072 Apr 5 2012 /usr/bin/vim
$
Notice that the program file's long listing does not show any linked files (see Chapter 3 for more information on linked files). If the vim program is linked, it may be linked to a less than full-featured editor. Thus, it's a good idea to check for linked files.
On other distributions, you will find various flavors of the vim editor. Notice on this Ubuntu distribution that not only is there no alias for the vi command, but the /usr/bin/vi program file belongs to a series of file links:
$ alias vi
-bash: alias: vi: not found
$
$ which vi
/usr/bin/vi
$
$ ls -l /usr/bin/vi
lrwxrwxrwx 1 root root 20 Apr 22 12:39
/usr/bin/vi -> /etc/alternatives/vi
$
$ ls -l /etc/alternatives/vi
lrwxrwxrwx 1 root root 17 Apr 22 12:33
/etc/alternatives/vi -> /usr/bin/vim.tiny
$
$ ls -l /usr/bin/vim.tiny
-rwxr-xr-x 1 root root 884360 Jan 2 14:40
/usr/bin/vim.tiny
$
$ readlink -f /usr/bin/vi
/usr/bin/vim.tiny
Thus, when the vi command is entered, the /usr/bin/vim.tiny program is executed. The vim.tiny program provides only a few vim editor features. If you are serious about using the vim editor and have Ubuntu, you should install at least the basic vim package.
Note
Notice in the preceding example that, instead of having to use the ls -l command multiple times to find a series of linked files' final object, you can use the readlink -f command. It immediately produces the linked file series' final object.
Software installations were covered in detail in Chapter 9. Installing the basic vim package on this Ubuntu distribution is fairly straightforward:
$ sudo apt-get install vim
[...]
The following extra packages will be installed:
vim-runtime
Suggested packages:
ctags vim-doc vim-scripts
The following NEW packages will be installed:
vim vim-runtime
[...]
$
$ readlink -f /usr/bin/vi
/usr/bin/vim.basic
$
The basic vim editor is now installed on this Ubuntu distribution, and the /usr/bin/vi program file's link was automatically changed to point to /usr/bin/vim.basic. Thus, when the vi command is entered on this Ubuntu system, the basic vim editor is used instead of tiny vim.
Exploring vim basics
The vim editor works with data in a memory buffer. To start the vim editor, just type the vim command (or vi if there's an alias or linked file) and the name of the file you want to edit:
$ vim myprog.c
If you start vim without a filename, or if the file doesn't exist, vim opens a new buffer area for editing. If you specify an existing file on the command line, vim reads the entire file's contents into a buffer area, where it is ready for editing, as shown in Figure 10.1.
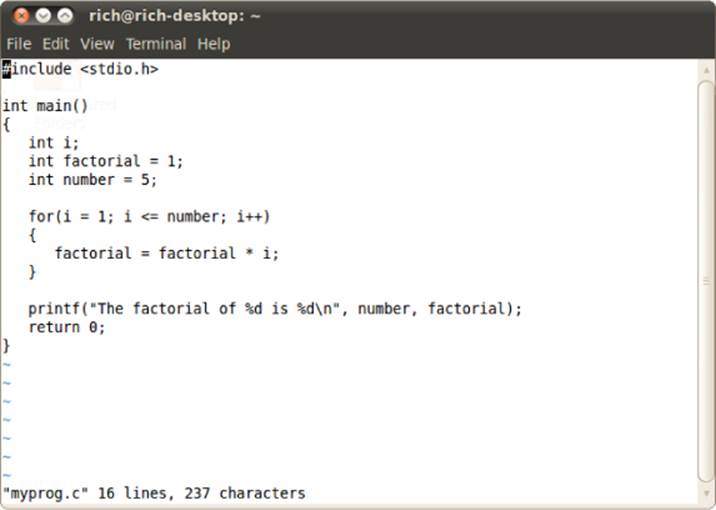
Figure 10.1 The vim main window
The vim editor detects the terminal type for the session (see Chapter 2) and uses a full-screen mode to use the entire console window for the editor area.
The initial vim edit window shows the contents of the file (if there are any) along with a message line at the bottom of the window. If the file contents don't take up the entire screen, vim places a tilde on lines that are not part of the file (as shown in Figure 10.1).
The message line at the bottom indicates information about the edited file, depending on the file's status, and the default settings in your vim installation. If the file is new, the message [New File] appears.
The vim editor has two modes of operation:
· Normal mode
· Insert mode
When you first open a file (or start a new file) for editing, the vim editor enters normal mode. In normal mode, the vim editor interprets keystrokes as commands (more on those later).
In insert mode, vim inserts every key you type at the current cursor location in the buffer. To enter insert mode, press the i key. To get out of insert mode and go back into normal mode, press the Escape key on the keyboard.
In normal mode, you can move the cursor around the text area by using the arrow keys (as long as your terminal type is detected properly by vim). If you happen to be on a flaky terminal connection that doesn't have the arrow keys defined, all hope is not lost. The vim commands include commands for moving the cursor:
· h to move left one character
· j to move down one line (the next line in the text)
· k to move up one line (the previous line in the text)
· l to move right one character
Moving around within large text files line by line can get tedious. Fortunately, vim provides a few commands to help speed things along:
· PageDown (or Ctrl+F) to move forward one screen of data
· PageUp (or Ctrl+B) to move backward one screen of data
· G to move to the last line in the buffer
· num G to move to the line number num in the buffer
· gg to move to the first line in the buffer
The vim editor has a special feature within normal mode called command line mode. The command line mode provides an interactive command line where you can enter additional commands to control the actions in vim. To get to command line mode, press the colon key in normal mode. The cursor moves to the message line, and a colon (:) appears, waiting for you to enter a command.
Within the command line mode are several commands for saving the buffer to the file and exiting vim:
· q to quit if no changes have been made to the buffer data
· q! to quit and discard any changes made to the buffer data
· w filename to save the file under a different filename
· wq to save the buffer data to the file and quit
After seeing just a few basic vim commands, you might understand why some people absolutely hate the vim editor. To be able to use vim to its fullest, you must know plenty of obscure commands. However, after you get a few of the basic vim commands down, you can quickly edit files directly from the command line, no matter what type of environment you're in. Plus, after you get comfortable typing commands, it almost seems second nature to type both data and editing commands, and it becomes odd having to jump back to using a mouse!
Editing data
While in insert mode, you can insert data into the buffer; however, sometimes you need to add or remove data after you've already entered it into the buffer. While in normal mode, the vim editor provides several commands for editing the data in the buffer. Table 10.1 lists some common editing commands for vim.
Table 10.1 vim Editing Commands
|
Command |
Description |
|
x |
Deletes the character at the current cursor position |
|
dd |
Deletes the line at the current cursor position |
|
dw |
Deletes the word at the current cursor position |
|
d$ |
Deletes to the end of the line from the current cursor position |
|
J |
Deletes the line break at the end of the line at the current cursor position (joins lines) |
|
u |
Undoes the previous edit command |
|
a |
Appends data after the current cursor position |
|
A |
Appends data to the end of the line at the current cursor position |
|
r char |
Replaces a single character at the current cursor position with char |
|
R text |
Overwrites the data at the current cursor position with text, until you press Escape |
Some of the editing commands also allow you to use a numeric modifier to indicate how many times to perform the command. For example, the command 2x deletes two characters, starting from the current cursor position, and the command 5dd deletes five lines, starting at the line from the current cursor position.
Note
Be careful when trying to use the keyboard Backspace or Delete keys while in the vim editor's normal mode. The vim editor usually recognizes the Delete key as the functionality of the x command, deleting the character at the current cursor location. Usually, the vim editor doesn't recognize the Backspace key in normal mode
Copying and pasting
A standard editor feature is the ability to cut or copy data and paste it elsewhere in the document. The vim editor provides a way to do this.
Cutting and pasting is relatively easy. You've already seen the commands in Table 10.1 that can remove data from the buffer. However, when vim removes data, it actually keeps it stored in a separate register. You can retrieve that data by using the p command.
For example, you can use the dd command to delete a line of text, move the cursor to the buffer location where you want to place it, and then use the p command. The p command inserts the text after the line at the current cursor position. You can do this with any command that removes text.
Copying text is a little bit trickier. The copy command in vim is y (for yank). You can use the same second character with y as with the d command (yw to yank a word, y$ to yank to the end of a line). After you yank the text, move the cursor to the location where you want to place the text and use the p command. The yanked text now appears at that location.
Yanking is tricky in that you can't see what happened because you're not affecting the text that you yank. You never know for sure what you yanked until you paste it somewhere. But there's another feature in vim that helps you out with yanking.
The visual mode highlights text as you move the cursor. You use visual mode to select text to yank for pasting. To enter visual mode, move the cursor to the location where you want to start yanking, and press v. Notice that the text at the cursor position is now highlighted. Next, move the cursor to cover the text you want to yank (you can even move down lines to yank more than one line of text). As you move the cursor, vim highlights the text in the yank area. After you've covered the text you want to copy, press the y key to activate the yank command. Now that you have the text in the register, just move the cursor to where you want to paste and use the p command.
Searching and substituting
You can easily search for data in the buffer using the vim search command. To enter a search string, press the forward slash (/) key. The cursor goes to the message line, and vim displays a forward slash. Enter the text you want to find, and press the Enter key. The vim editor responds with one of three actions:
· If the word appears after the current cursor location, it jumps to the first location where the text appears.
· If the word doesn't appear after the current cursor location, it wraps around the end of the file to the first location in the file where the text appears (and indicates this with a message).
· It produces an error message stating that the text was not found in the file.
To continue searching for the same word, press the forward slash character and then press the Enter key, or you can use the n key, for next.
The substitute command allows you to quickly replace (substitute) one word for another in the text. To get to the substitute command, you must be in command line mode. The format for the substitute command is:
:s/old/new/
The vim editor jumps to the first occurrence of the text old and replaces it with the text new. You can make a few modifications to the substitute command to substitute more than one occurrence of the text:
· :s/old/new/g to replace all occurrences of old in a line
· :n,ms/old/new/g to replace all occurrences of old between line numbers n and m
· :%s/old/new/g to replace all occurrences of old in the entire file
· :%s/old/new/gc to replace all occurrences of old in the entire file, but prompt for each occurrence
As you can see, for a console mode text editor, vim contains quite a few advanced features. Because every Linux distribution includes it, it's a good idea to at least know the basics of the vim editor so you can always edit scripts, no matter where you are or what you have available.
Navigating the nano Editor
Although vim is a very complicated editor with many powerful features, nano is a very simple editor. For individuals who need a simple console mode text editor that is easy to navigate, nano is the tool to use. It's also a great text editor for kids who are starting on their Linux command line adventure.
The nano text editor is a clone of the Unix systems' Pico editor. Although Pico also is a light and simple text editor, it is not licensed under the GPL. Not only is the nano text editor licensed under the GPL, it is also part of the GNU project.
The nano text editor is installed on most Linux distributions by default. Everything about the nano text editor is simple. To open a file at the command line with nano:
$ nano myprog.c
If you start nano without a filename, or if the file doesn't exist, nano simply opens a new buffer area for editing. If you specify an existing file on the command line, nano reads the entire contents of the file into a buffer area, where it is ready for editing, as shown inFigure 10.2.
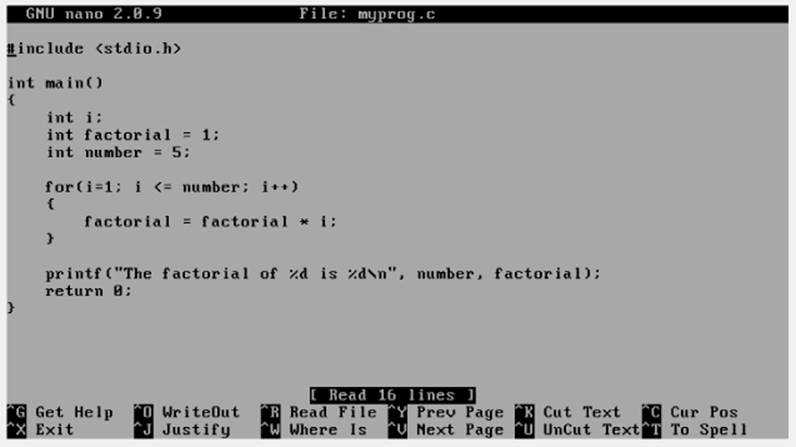
Figure 10.2 The nano editor window
Notice at the bottom of the nano editor window various commands with a brief description are shown. These commands are the nano control commands. The caret (∧) symbol shown represents the Ctrl key. Therefore, ∧X stands for the keyboard sequence Ctrl+X.
Tip
Though the nano control commands list capital letters in the keyboard sequences, you can use either lowercase or uppercase characters for control commands.
Having all the basic commands listed right in front of you is great. No need to memorize what control command does what. Table 10.2 presents the various nano control commands.
Table 10.2 nano Control Commands
|
Command |
Description |
|
CTRL+C |
Displays the cursor's position within the text editing buffer |
|
CTRL+G |
Displays nano's main help window |
|
CTRL+J |
Justifies the current text paragraph |
|
CTRL+K |
Cuts the text line and stores it in cut buffer |
|
CTRL+O |
Writes out the current text editing buffer to a file |
|
CTRL+R |
Reads a file into the current text editing buffer |
|
CTRL+T |
Starts the available spell checker |
|
CTRL+U |
Pastes text stored in cut buffer and places in current line |
|
CTRL+V |
Scrolls text editing buffer to next page |
|
CTRL+W |
Searches for word or phrases within text editing buffer |
|
CTRL+X |
Closes the current text editing buffer, exits nano, and returns to the shell |
|
CTRL+Y |
Scrolls text editing buffer to previous page |
The control commands listed in Table 10.2 are really all you need. However, if you desire more powerful control features than those listed, nano has them. To see more control commands, type Ctrl+G in the nano text editor to display its main help window containing additional control commands.
Note
If you try to use the nano spell checker via the Ctrl+T command and get the error message Spell checking failed: Error invoking ‘Spell’, there are some potential solutions. Install the spell checker software package, aspell, on your Linux distribution using Chapter 9 as a guide.
If installing the aspell software package does not solve the problem, as superuser edit the /etc/nanorc file, using your favorite text editor. Find the line, # set speller “aspell -x -c” and delete the hash mark (#) from the line. Save and exit the file.
Additional powerful features are available at the command line. You can use command line options to control nano editor features, such as creating a backup file before editing. Type man nano to see these additional command line options for starting nano.
The vim and nano text editors offer a choice between powerful and simple console mode text editors. However, neither offers the ability to use graphical features for editing. Some text editors can operate in both worlds, as explored in the next section.
Exploring the emacs Editor
The emacs editor is an extremely popular editor that appeared before even Unix was around. Developers liked it so much that they ported it to the Unix environment, and now it's been ported to the Linux environment. The emacs editor started out life as a console editor, much like vi, but has migrated to the graphical world.
The emacs editor still provides the original console mode editor, and now it also has the ability to use a graphical window to allow editing text in a graphical environment. Typically, when you start the emacs editor from a command line, the editor determines whether you have an available graphical session and starts in graphical mode. If you don't, it starts in console mode.
This section describes both the console mode and graphical mode emacs editors so that you'll know how to use either one if you want (or need) to.
Checking your emacs package
Many distributions do not come with the emacs editor installed by default. You can check your Red Hat-based distribution, by using the which and/or yum list command as shown on this CentOS distribution:
$ which emacs
/usr/bin/which: no emacs in (/usr/lib64/qt-3.3
/bin:/usr/local/bin:/bin:/usr/bin:/usr/local/sbin:
/usr/sbin:/sbin:/home/Christine/bin)
$
$ yum list emacs
[...]
Available Packages
emacs.x86_64 1:23.1-25.el6 base
The emacs editor package is not currently installed on this CentOS distribution. However, it is available to be installed. (For a more thorough discussion on displaying installed software, see Chapter 9).
For a Debian-based distribution, check for the emacs editor package by using the which and/or apt-cache show command as shown on this Ubuntu distribution:
$ which emacs
$
$ sudo apt-cache show emacs
Package: emacs
Priority: optional
Section: editors
Installed-Size: 25
[...]
Description-en: GNU Emacs editor (metapackage)
GNU Emacs is the extensible self-documenting text editor.
This is a metapackage that will always depend on the latest
recommended Emacs release.
Description-md5: 21fb7da111336097a2378959f6d6e6a8
Bugs: https://bugs.launchpad.net/ubuntu/+filebug
Origin: Ubuntu
Supported: 5y
$
The which command operates a little differently here. When it does not find the installed command, it simply returns the bash shell prompt. The emacs editor package is optional for this Ubuntu distribution, but is available to be installed. The following shows the emacs editor being installed on Ubuntu:
$ sudo apt-get install emacs
Reading package lists... Done
Building dependency tree
Reading state information... Done
The following extra packages will be installed:
[...]
Install emacsen-common for emacs24
emacsen-common: Handling install of emacsen flavor emacs24
Wrote /etc/emacs24/site-start.d/00debian-vars.elc
Wrote /usr/share/emacs24/site-lisp/debian-startup.elc
Setting up emacs (45.0ubuntu1) ...
Processing triggers for libc-bin (2.19-0ubuntu6) ...
$
$ which emacs
/usr/bin/emacs
$
Now when the which command is used, it points to the emacs program file. The emacs editor is ready to be used on this Ubuntu distribution.
For the CentOS distribution, install the emacs editor using the yum install command:
$ sudo yum install emacs
[sudo] password for Christine:
[...]
Setting up Install Process
Resolving Dependencies
[...]
Installed:
emacs.x86_64 1:23.1-25.el6
Dependency Installed:
emacs-common.x86_64 1:23.1-25.el6
libotf.x86_64 0:0.9.9-3.1.el6
m17n-db-datafiles.noarch 0:1.5.5-1.1.el6
Complete!
$
$ which emacs
/usr/bin/emacs
$
$ yum list emacs
[...]
Installed Packages
emacs.x86_64 1:23.1-25.el6 @base
$
With the emacs editor successfully installed on your Linux distribution, you can begin to explore its different features, staring with using it on the console.
Using emacs on the console
The console mode version of emacs is another editor that uses lots of key commands to perform editing functions. The emacs editor uses key combinations involving the Control key (the Ctrl key on the keyboard) and the Meta key. In most terminal emulator packages, the Meta key is mapped to the Alt key. The official emacs documents abbreviate the Ctrl key as C- and the Meta key as M-. Thus, if you enter a Ctrl+x key combination, the document shows C-x. This chapter does the same so as not to confuse you.
Exploring the basics of emacs
To edit a file using emacs, from the command line, enter:
$ emacs myprog.c
The emacs console mode window appears with a short introduction and help screen. Don't be alarmed; as soon as you press a key, emacs loads the file into the active buffer and displays the text, as shown in Figure 10.3.
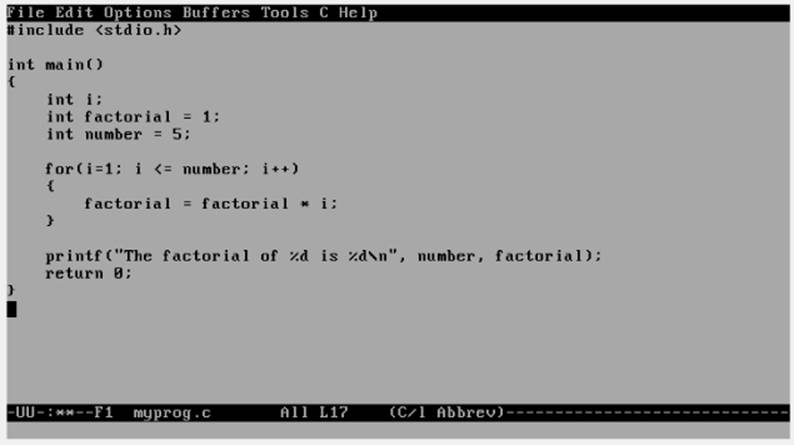
Figure 10.3 Editing a file using the emacs editor in console mode
You'll notice that the top of the console mode window shows a typical menu bar. Unfortunately, you can't use the menu bar in console mode, only in graphical mode.
Note
Some commands in this section work differently than described, if you run emacs in a graphical desktop environment. To use emac's console mode in a graphical desktop environment, use the emacs -nw command. If you want to use emacs' graphical features, see the section “Using emacs in a GUI.”
Unlike the vim editor, where you have to move into and out of insert mode to switch between entering commands and inserting text, the emacs editor has only one mode. If you type a printable character, emacs inserts it at the current cursor position. If you type a command, emacs executes the command.
To move the cursor around the buffer area, you can use the arrow keys and the PageUp and PageDown keys, assuming that emacs detected your terminal emulator correctly. If not, these commands move the cursor around:
· C-p moves up one line (the previous line in the text).
· C-b moves left (back) one character.
· C-f moves right (forward) one character.
· C-n moves down one line (the next line in the text).
These commands make longer jumps with the cursor within the text:
· M-f moves right (forward) to the next word.
· M-b moves left (backward) to the previous word.
· C-a moves to the beginning of the current line.
· C-e moves to the end of the current line.
· M-a moves to the beginning of the current sentence.
· M-e moves to the end of the current sentence.
· M-v moves back one screen of data.
· C-v moves forward one screen of data.
· M-< moves the first line of the text.
· M-> moves to the last line of the text.
You should know these commands for saving the editor buffer back into the file and exiting emacs:
· C-x C-s saves the current buffer contents to the file.
· C-z exits emacs but keeps it running in your session so you can come back to it.
· C-x C-c exits emacs and stops the program.
You'll notice that two of these features require two key commands. The C-x command is called the extend command. This provides yet another whole set of commands to work with.
Editing data
The emacs editor is pretty robust about inserting and deleting text in the buffer. To insert text, just move the cursor to the location where you want to insert the text and start typing. To delete text, emacs uses the Backspace key to delete the character before the current cursor position and the Delete key to delete the character at the current cursor location.
The emacs editor also has commands for killing text. The difference between deleting text and killing text is that when you kill text, emacs places it in a temporary area where you can retrieve it (see the next section, “Copying and pasting”). Deleted text is gone forever.
These commands are for killing text in the buffer:
· M-Backspace kills the word before the current cursor position.
· M-d kills the word after the current cursor position.
· C-k kills from the current cursor position to the end of the line.
· M-k kills from the current cursor position to the end of the sentence.
The emacs editor also includes a fancy way of mass-killing text. Just move the cursor to the start of the area you want to kill, and press either the C-@ or C-Spacebar keys. Then move the cursor to the end of the area you want to kill, and press the C-w command keys. All the text between the two locations is killed.
If you happen to make a mistake when killing text, the C-/ command undoes the kill command and returns the data to the state it was in before you killed it.
Copying and pasting
You've seen how to cut data from the emacs buffer area; now it's time to see how to paste it somewhere else. Unfortunately, if you use the vim editor, this process may confuse you when you use the emacs editor.
In an unfortunate coincidence, pasting data in emacs is called yanking. In the vim editor, copying is called yanking, which is what makes this a difficult thing to remember if you happen to use both editors.
After you kill data using one of the kill commands, move the cursor to the location where you want to paste the data, and use the C-y command. This yanks the text out of the temporary area and pastes it at the current cursor position. The C-y command yanks the text from the last kill command. If you've performed multiple kill commands, you can cycle through them using the M-y command.
To copy text, just yank it back into the same location you killed it from and then move to the new location and use the C-y command again. You can yank text back as many times as you desire.
Searching and Replacing
Searching for text in the emacs editor is done by using the C-s and C-r commands. The C-s command performs a forward search in the buffer area from the current cursor position to the end of the buffer, whereas the C-r command performs a backward search in the buffer area from the current cursor position to the start of the buffer.
When you enter either the C-s or C-r command, a prompt appears in the bottom line, querying you for the text to search. You can perform two types of searches in emacs.
In an incremental search, the emacs editor performs the text search in real-time mode as you type the word. When you type the first letter, it highlights all the occurrences of that letter in the buffer. When you type the second letter, it highlights all the occurrences of the two-letter combination in the text and so on until you complete the text you're searching for.
In a non-incremental search, press the Enter key after the C-s or C-r commands. This locks the search query into the bottom line area and allows you to type the search text in full before searching.
To replace an existing text string with a new text string, you must use the M-x command. This command requires a text command, along with parameters.
The text command is replace-string. After typing the command, press the Enter key, and emacs queries you for the existing text string. After entering that, press the Enter key again and emacs queries you for the new replacement text string.
Using buffers in emacs
The emacs editor allows you to edit multiple files at the same time by having multiple buffer areas. You can load files into a buffer and switch between buffers while editing.
To load a new file into a buffer while you're in emacs, use the C-x C-f key combination. This is the emacs Find a File mode. It takes you to the bottom line in the window and allows you to enter the name of the file you want to start to edit. If you don't know the name or location of the file, just press the Enter key. This brings up a file browser in the edit window, as shown in Figure 10.4.
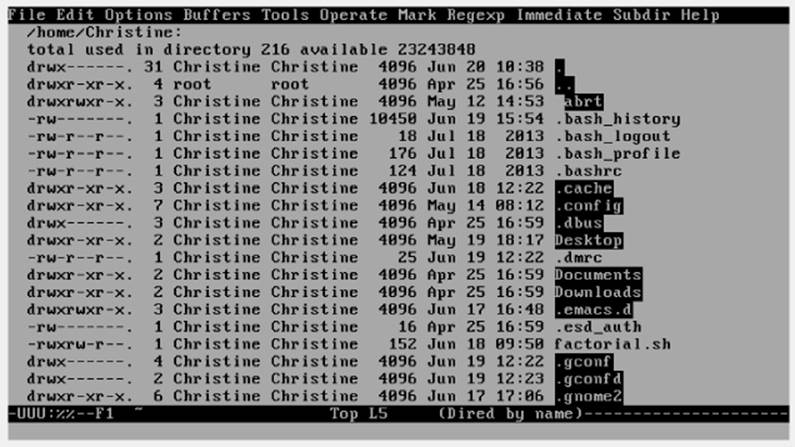
Figure 10.4 The emacs Find a File mode browser
From here, you can browse to the file you want to edit. To traverse up a directory level, go to the double dot entry and press the Enter key. To traverse down a directory, go to the directory entry and press the Enter key. When you've found the file you want to edit, press the Enter key and emacs loads it into a new buffer area.
You can list the active buffer areas by pressing the C-x C-b extended command combination. The emacs editor splits the editor window and displays a list of buffers in the bottom window. emacs provides two buffers in addition to your main editing buffer:
· A scratch area called *scratch*
· A message area called *Messages*
The scratch area allows you to enter LISP programming commands as well as enter notes to yourself. The message area shows messages generated by emacs while operating. If any errors occur while using emacs, they appear in the message area.
You can switch to a different buffer area in the window in two ways:
· Use C-x o to switch to the buffer listing window. Use the arrow keys to move to the buffer area you want and press the Enter key.
· Use C-x b to type in the name of the buffer area you want to switch to.
When you select the option to switch to the buffer listing window, emacs opens the buffer area in the new window area. The emacs editor allows you to have multiple windows open in a single session. The following section discusses how to manage multiple windows in emacs.
Using windows in console mode emacs
The console mode emacs editor was developed many years before the idea of graphical windows appeared. However, it was advanced for its time, in that it could support multiple editing windows within the main emacs window.
You can split the emacs editing window into multiple windows by using one of two commands:
· C-x 2 splits the window horizontally into two windows.
· C-x 3 splits the window vertically into two windows.
To move from one window to another, use the C-x o command. Notice that when you create a new window, emacs uses the buffer area from the original window in the new window. After you move into the new window, you can use the C-x C-f command to load a new file or use one of the commands to switch to a different buffer area in the new window.
To close a window, move to it and use the C-x 0 (that's a zero) command. If you want to close all the windows except the one you're in, use the C-x 1 (that's a numerical one) command.
Using emacs in a GUI
If you use emacs from a GUI environment (such as the Unity or GNOME desktops), it starts in graphical mode, as shown in Figure 10.5.

Figure 10.5 The emacs graphical window
If you've already used emacs in console mode, you should be fairly familiar with the graphical mode. All the key commands are available as menu bar items. The emacs menu bar contains the following items:
· File allows you to open files in the window, create new windows, close windows, save buffers, and print buffers.
· Edit allows you to cut and copy selected text to the clipboard, paste clipboard data to the current cursor position, search for text, and replace text.
· Options provides settings for many more emacs features, such as highlighting, word wrap, cursor type, and setting fonts.
· Buffers lists the current buffers available and allows you to easily switch between buffer areas.
· Tools provides access to the advanced features in emacs, such as the command line interface access, spell checking, comparing text between files (called diff), sending an e-mail message, calendar, and the calculator.
· Help provides the emacs manual online for access to help on specific emacs functions.
In addition to the normal graphical emacs menu bar items, there is often a separate item specific to the file type in the editor buffer. Figure 10.5 shows opening a C program, so emacs provided a C menu item, allowing advanced settings for highlighting C syntax, and compiling, running, and debugging the code from a command prompt.
The graphical emacs window is an example of an older console application making the migration to the graphical world. Now that many Linux distributions provide graphical desktops (even on servers that don't need them), graphical editors are becoming more commonplace. Popular Linux desktop environments (such as KDE and GNOME) have also provided graphical text editors specifically for their environments, which are covered in the rest of this chapter.
Exploring the KDE Family of Editors
If you're using a Linux distribution that uses the KDE desktop (see Chapter 1), you have a couple of options when it comes to text editors. The KDE project officially supports two popular text editors:
· KWrite: A single-screen text-editing package
· Kate: A full-featured, multi-window text-editing package
Both of these editors are graphical text editors that contain many advanced features. The Kate editor provides more advanced features, plus extra niceties not often found in standard text editors. This section describes each of the editors and shows some of the features you can use to help with your shell script editing.
Looking at the KWrite editor
The basic editor for the KDE environment is KWrite. It provides simple word-processing–style text editing, along with support for code syntax highlighting and editing. The default KWrite editing window is shown in Figure 10.6.
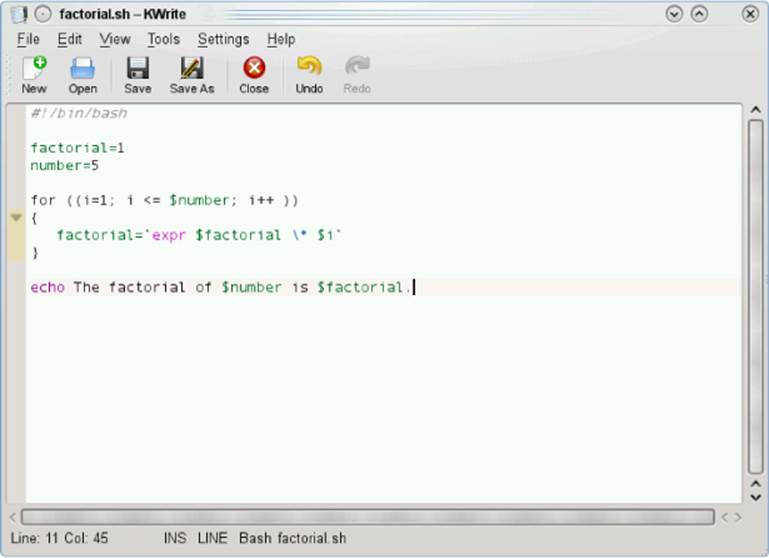
Figure 10.6 The default KWrite window editing a shell script program
You can't tell from Figure 10.6, but the KWrite editor recognizes several types of programming languages and uses color coding to distinguish constants, functions, and comments. Also, notice that the for loop has an icon that links the opening and closing braces. This is called a folding marker. By clicking the icon, you can collapse the function into a single line. This is a great feature when working through large applications.
The KWrite editing window provides full cut and paste capabilities, using the mouse and the arrow keys. As in a word processor, you can highlight and cut (or copy) text anywhere in the buffer area and paste it at any other place.
To edit a file using KWrite, you can either select KWrite from the KDE menu system on your desktop (some Linux distributions even create a Panel icon for it) or start it from the command line prompt:
$ kwrite factorial.sh
The kwrite command has several command line parameters you can use to customize how it starts:
· --stdin causes KWrite to read data from the standard input device instead of a file.
· --encoding specifies a character encoding type to use for the file.
· --line specifies a line number in the file to start at in the editor window.
· --column specifies a column number in the file to start at in the editor window.
The KWrite editor provides both a menu bar and a toolbar at the top of the edit window, allowing you to select features and change configuration settings of the KWrite editor.
The menu bar contains these items:
· File loads, saves, prints, and exports text from files.
· Edit manipulates text in the buffer area.
· View manages how the text appears in the editor window.
· Bookmarks handle pointers to return to specific locations in the text; this option may need to be enabled in the configurations.
· Tools contains specialized features to manipulate the text.
· Settings configures the way the editor handles text.
· Help gives you information about the editor and commands.
The Edit menu bar item provides commands for all your text-editing needs. Instead of having to remember cryptic key commands (which by the way, KWrite also supports), you can just select items in the Edit menu bar, as shown in Table 10.3.
Table 10.3 The KWrite Edit Menu Items
|
Item |
Description |
|
Undo |
Reverses the last action or operation |
|
Redo |
Reverses the last undo action |
|
Cut |
Deletes the selected text and places it in the clipboard |
|
Copy |
Copies the selected text to the clipboard |
|
Paste |
Inserts the current contents of the clipboard at the current cursor position |
|
Select All |
Selects all text in the editor |
|
Deselect |
Deselects any text that is currently selected |
|
Overwrite Mode |
Toggles insert mode to overwrite mode, replacing text with new typed text instead of just inserting the new text |
|
Find |
Produces the Find Text dialog box, which allows you to customize a text search |
|
Find Next |
Repeats the last find operation forward in the buffer area |
|
Find Previous |
Repeats the last find operation backwards in the buffer area |
|
Replace |
Produces the Replace With dialog box, which allows you to customize a text search and replace |
|
Find Selected |
Finds the next occurrence of the selected text |
|
Find Selected Backwards |
Finds the previous occurrence of the selected text |
|
Go to Line |
Produces the Goto dialog box, which allows you to enter a line number. The cursor moves to the specified line |
The Find feature has two modes. Normal mode performs simple text searches and power searches. Replace mode lets you do advanced searching and replacing if necessary. You toggle between the two modes using the green arrow in the Find section, as shown inFigure 10.7.

Figure 10.7 The KWrite Find section
The Find power mode allows you to search not only with words, but with a regular expression (discussed in Chapter 20) for the search. You can use some other options to customize the search as well, indicating, for example, whether or not to perform a case-sensitive search or to look only for whole words instead of finding the text within words.
The Tools menu bar item provides several handy features for working with the text in the buffer area. Table 10.4 describes the tools available in KWrite.
Table 10.4 The KWrite Tools
|
Tool |
Description |
|
Read Only Mode |
Locks the text so no changes can be made while in the editor |
|
Encoding |
Sets the character set encoding used by the text |
|
Spelling |
Starts the spell-check program at the start of the text |
|
Spelling (from cursor) |
Starts the spell-check program from the current cursor position |
|
Spellcheck Selection |
Starts the spell-check program only on the selected section of text |
|
Indent |
Increases the paragraph indentation by one |
|
Unindent |
Decreases the paragraph indentation by one |
|
Clean Indentation |
Returns all paragraph indentation to the original settings |
|
Align |
Forces the current line or the selected lines to return to the default indentation settings |
|
Uppercase |
Sets the selected text, or the character at the current cursor position, to uppercase |
|
Lowercase |
Sets the selected text, or the character at the current cursor position, to lowercase |
|
Capitalize |
Capitalizes the first letter of the selected text or the word at the current cursor position |
|
Join Lines |
Combines the selected lines, or the line at the current cursor position and the next line, into one line |
|
Word Wrap Document |
Enables word wrapping in the text. If a line extends past the editor window edge, the line continues on the next line. |
There are lots of tools for a simple text editor!
The Settings menu includes the Configure Editor dialog box, shown in Figure 10.8.
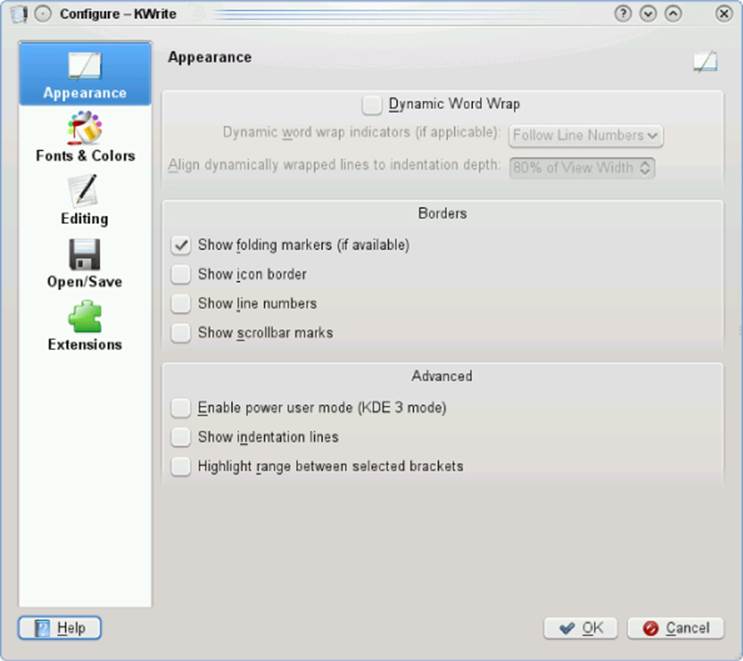
Figure 10.8 The KWrite Configure Editor dialog box
The Configuration dialog box uses icons on the left side for you to select the feature in KWrite to configure. When you select an icon, the right side of the dialog box shows the configuration settings for the feature.
The Appearance feature allows you to set several features that control how the text appears in the text editor window. You can enable word wrap, line numbers (great for programmers), and the folder markers from here. With the Fonts & Colors feature, you can customize the complete color scheme for the editor, determining what colors to make each category of text in the program code.
Looking at the Kate editor
The Kate editor is the flagship editor for the KDE Project. It uses the same text editor as the KWrite application (so most of those features are the same), but it incorporates lots of other features into a single package.
Tip
If you find that the Kate editor has not been installed with your KDE desktop environment, you can easily install it (see Chapter 9). The package name that contains Kate is kdesdk.
When you start the Kate editor from the KDE menu system, the first thing you notice is that the editor doesn't start! Instead, you get a dialog box, as shown in Figure 10.9.
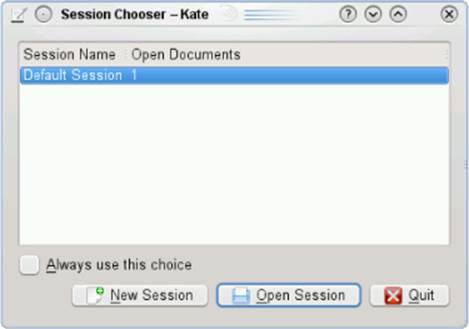
Figure 10.9 The Kate session dialog box
The Kate editor handles files in sessions. You can have multiple files open in a session, and you can have multiple sessions saved. When you start Kate, it provides you with the choice of which session to return to. When you close your Kate session, it remembers the documents you had open and displays them the next time you start Kate. This allows you to easily manage files from multiple projects by using separate workspaces for each project.
After selecting a session, you see the main Kate editor window, shown in Figure 10.10.
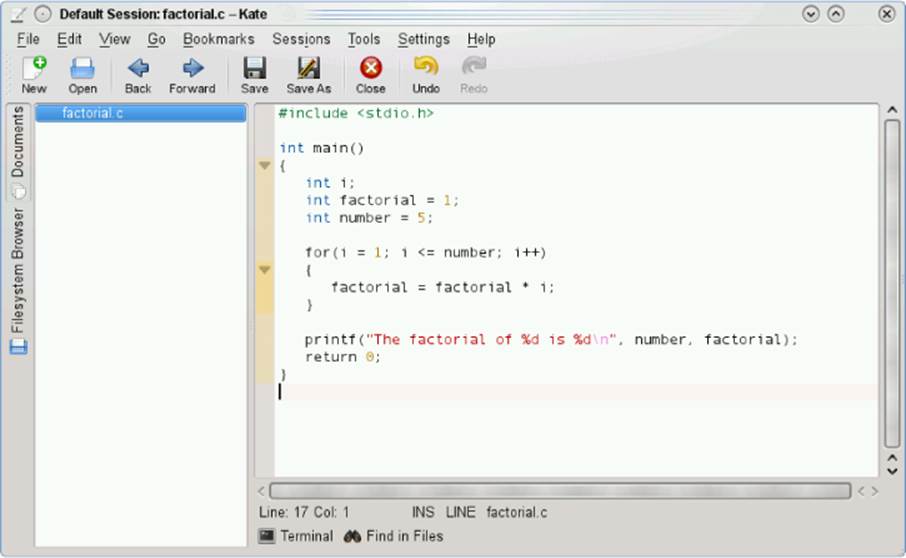
Figure 10.10 The main Kate editing window
The left side frame shows the documents currently open in the session. You can switch between documents just by clicking the document name. To edit a new file, click the Filesystem Browser tab on the left side. The left frame is now a full graphical filesystem browser, allowing you to graphically browse to locate your files.
A great feature of the Kate editor is the built-in terminal window, shown in Figure 10.11.
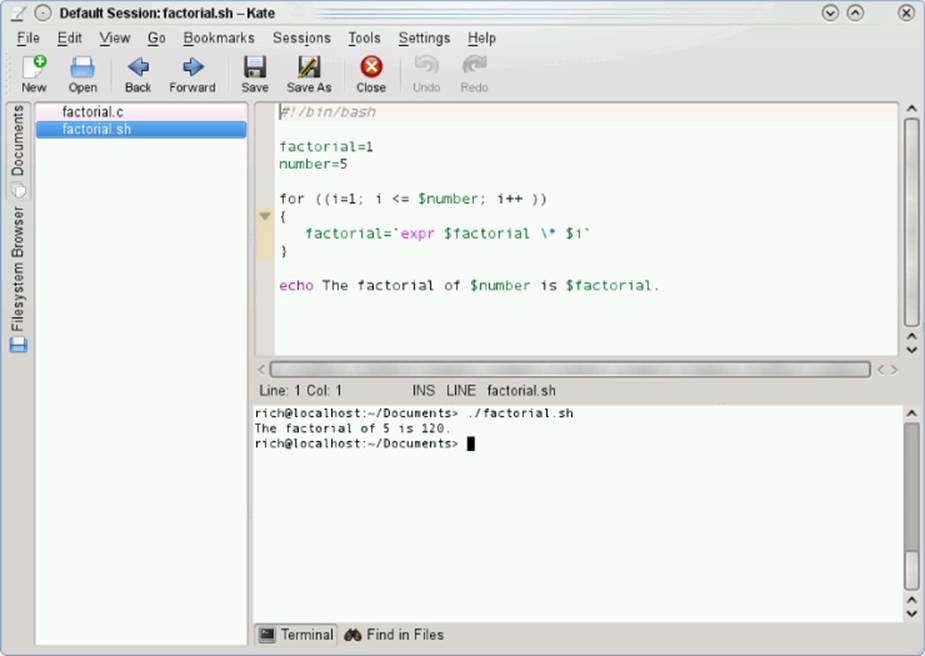
Figure 10.11 The Kate built-in terminal window
The terminal tab at the bottom of the text editor window starts the built-in terminal emulator in Kate (using the KDE Konsole terminal emulator). This feature horizontally splits the current editing window, creating a new window with Konsole running in it. You can now enter command line commands, start programs, or check on system settings without having to leave the editor! To close the terminal window, just type exit at the command prompt.
As you can tell from the terminal feature, Kate also supports multiple windows. The Window menu bar item (View) provides options to perform these tasks:
· Create a new Kate window using the current session
· Split the current window vertically to create a new window
· Split the current window horizontally to create a new window
· Close the current window
To set the configuration settings in Kate, select the Configure Kate item under the Settings menu bar item. The Configuration dialog box, shown in Figure 10.12, appears.
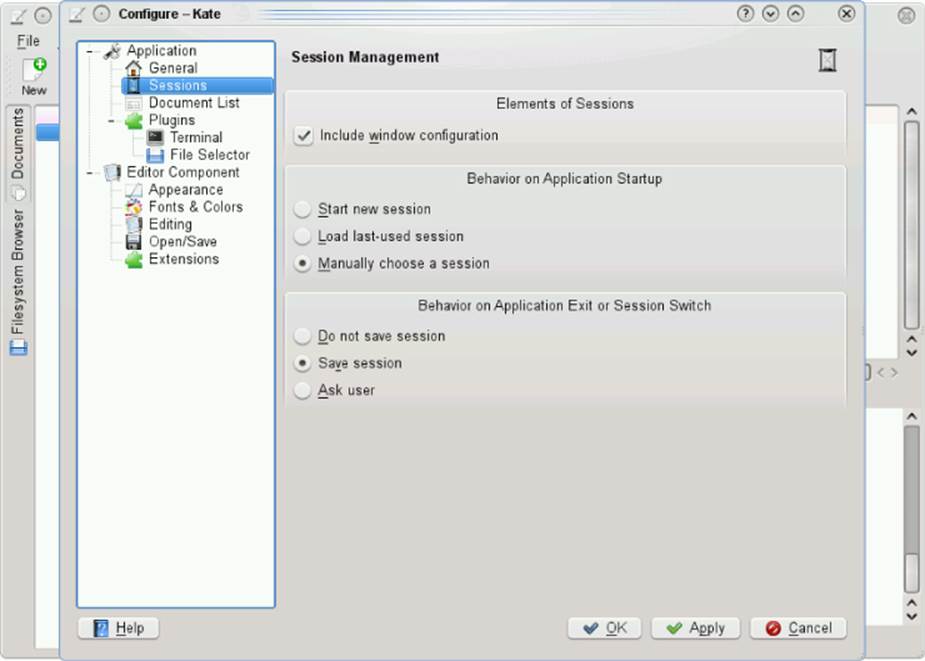
Figure 10.12 The Kate configuration settings dialog box
Notice that the Editor settings area is exactly the same as for KWrite. This is because the two editors share the same text editor engine. The Application settings area allows you to configure settings for the Kate items, such as controlling sessions (shown in Figure 10.12), the documents list, and the filesystem browser. Kate also supports external plug-in applications, which can be activated here.
Exploring the GNOME Editor
If you're working on a Linux system using the GNOME or Unity desktop environment, there's a graphical text editor that you can use as well. The gedit text editor is a basic text editor, with a few advanced features thrown in just for fun. This section walks you through the features of gedit and demonstrates how to use it for your shell script programming.
Starting gedit
Most GNOME desktop environments include gedit in the Accessories Panel menu item. For the Unity desktop environment, go to Dash ⇨ Search and type gedit. If you can't find gedit via the menu system, you can start it from the command line prompt in a GUI terminal emulator:
$ gedit factorial.sh myprog.c
When you start gedit with multiple files, it loads all the files into separate buffers and displays each one as a tabbed window within the main editor window, as shown in Figure 10.13.

Figure 10.13 The gedit main editor window
The left frame in the gedit main editor window shows the documents you're currently editing. If your gedit doesn't show the left frame when started, you can press the F9 function key or enable Side Pane from the View menu.
Note
Different desktops may have gedit options that are available in slightly different menu locations than shown in these figures. Additional options may also be available. Consult your distribution's gedit Help menu for more assistance.
The right side shows the tabbed windows that contain the buffer text. If you hover your mouse pointer over each tab, a dialog box appears, showing the full pathname of the file, the MIME type, and the character set encoding it uses.
Understanding basic gedit features
In addition to the editor windows, gedit uses both a menu bar and toolbar that allow you to set features and configure settings. The toolbar provides quick access to menu bar items. These menu bar items are available:
· File handles new files, saves existing files, and prints files.
· Edit manipulates text in the active buffer area and sets the editor preferences.
· View sets the editor features to display in the window and sets the text highlighting mode.
· Search finds and replaces text in the active editor buffer area.
· Tools accesses plug-in tools installed in gedit.
· Documents manages files open in the buffer areas.
· Help provides access to the full gedit manual.
There shouldn't be anything too surprising here. The Edit menu contains the standard cut, copy, and paste functions, along with a neat feature that allows you to easily enter the date and time in the text in several different formats. The Search menu provides a standard find function, which produces a dialog box where you can enter the text to find, along with the capability to select how the find feature should work (matching case, matching the whole word, and the search direction). It also provides an incremental search feature, which works in real-time mode, finding text as you type the characters of the word.
Setting preferences
The Edit menu contains a Preferences item, which produces the gedit Preferences dialog box, shown in Figure 10.14.
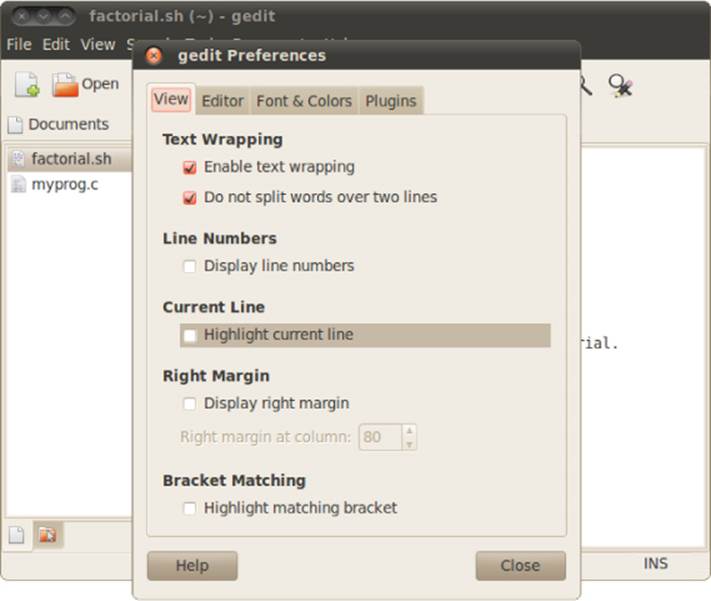
Figure 10.14 The GNOME desktop gedit Preferences dialog box
This is where you can customize the operation of the gedit editor. The Preferences dialog box contains five tabbed areas for setting the features and behavior of the editor.
Setting View preferences
The View tab provides options for how gedit displays the text in the editor window:
· Text Wrapping: Determines how to handle long lines of text in the editor. The Enabling text wrapping option wraps long lines to the next line of the editor. The Do Not Split Words Over Two Lines option prevents the auto-inserting of hyphens into long words, to prevent them being split between two lines.
· Line Numbers: Displays line numbers in the left margin in the editor window.
· Current Line: Highlights the line where the cursor is currently positioned, enabling you to easily find the cursor position.
· Right Margin: Enables the right margin and allows you to set how many columns should be in the editor window. The default value is 80 columns.
· Bracket Matching: When enabled, highlights bracket pairs in programming code, allowing you to easily match brackets in if-then statements, for and while loops, and other coding elements that use brackets.
The line-numbering and bracket-matching features provide an environment for programmers to troubleshoot code that's not often found in text editors.
Setting Editor preferences
The Editor tab provides options for how the gedit editor handles tabs and indentation, along with how files are saved:
· Tab Stops: Sets the number of spaces skipped when you press the Tab key. The default value is eight. This feature also includes a check box that, when selected, inserts spaces instead of a tab skip.
· Automatic Indentation: When enabled, causes gedit to automatically indent lines in the text for paragraphs and code elements (such as if-then statements and loops).
· File Saving: Provides two features for saving files: whether or not to create a backup copy of the file when opened in the edit window, and whether or not to automatically save the file at a preselected interval.
The auto-save feature is a great way to ensure that your changes are saved on a regular basis to prevent catastrophes from crashes or power outages.
Setting Font & Color preferences
The Font & Colors tab allows you to configure (not surprisingly) two items:
· Font: Allows you to select the default font, or to select a customized font and font size from a dialog box.
· Color Scheme: Allows you to select the default color scheme used for text, background, selected text, and selection colors, or choose a custom color for each category.
The default colors for gedit normally match the standard GNOME desktop theme selected for the desktop. These colors will change to match the scheme you select for the desktop.
Managing plug-ins
The Plugins tab provides control over the plug-ins used in gedit. Plug-ins are separate programs that can interface with gedit to provide additional functionality.
Several plug-ins are available for gedit, but not all of them are installed by default. Table 10.5 describes the plug-ins that are currently available in the GNOME desktop's gedit.
Table 10.5 The GNOME desktop gedit Plug-ins
|
Plug-In |
Description |
|
Change Case |
Changes the case of selected text |
|
Document Statistics |
Reports the number of words, lines, characters, and non-space characters |
|
External Tools |
Provides a shell environment in the editor to execute commands and scripts |
|
File Browser Pane |
Provides a simple file browser to make selecting files for editing easier |
|
Indent Lines |
Provides selected lines to be indented or un-indented |
|
Insert Date/Time |
Inserts the current date and time in several formats at the current cursor position |
|
Modelines |
Provides emacs-style message lines at the bottom of the editor window |
|
Python Console |
Provides an interactive console at the bottom of the editor window for entering commands using the Python programming language |
|
Quick Open |
Opens files directly in the gedit edit window |
|
Snippets |
Allows you to store often-used pieces of text for easy retrieval anywhere in the text |
|
Sort |
Quickly sorts the entire file or selected text |
|
Spell Checker |
Provides dictionary spellchecking for the text file |
|
Tag List |
Provides a list of commonly used strings you can easily enter into your text |
Plug-ins that are enabled show a check mark in the check box next to their name. Some plug-ins, such as the External Tools plug-in, also provide additional configuration features after you select them. It allows you to set a shortcut key to start the terminal, where gedit displays output, and the command to use to start the shell session.
Unfortunately, not all plug-ins are installed in the same place in the gedit menu bar. Some plug-ins appear in the Tools menu bar item (such as the Spell Checker and External Tools plug-ins), while others appear in the Edit menu bar item (such as the Change Case and Insert Date/Time plug-ins).
This chapter has covered just a few of the text editors available on Linux. If you find that the text editors described here don't meet your needs, you have options. Many more Linux editors are available, such as geany, Eclipse, jed, Bluefish, and leafpad to name a few. All these editors can help you as you begin your bash shell script writing journey.
Summary
When it comes to creating shell scripts, you need some type of text editor. Several popular text editors are available for the Linux environment. The most popular editor in the Unix world, vi, has been ported to the Linux world as the vim editor. The vim editor provides simple text editing from the console, using a rudimentary full-screen graphical mode. The vim editor provides many advanced editor features, such as text searching and replacement.
Another editor that has been ported from the Unix world to Linux is the nano text editor. The vim editor can be rather complex, but the nano editor offers simplicity. The nano editor allows quick text editing in console mode.
Another popular Unix editor — emacs — has also made its way to the Linux world. The Linux version of emacs has both console and a graphical mode, making it the bridge between the old world and the new. The emacs editor provides multiple buffer areas, allowing you to edit multiple files simultaneously.
The KDE Project created two editors for use in the KDE desktop. The KWrite editor is a simple editor that provides the basic text-editing features, along with a few advanced features, such as syntax highlighting for programming code, line numbering, and code folding. The Kate editor provides more advanced features for programmers. One great feature in Kate is a built-in terminal window. You can open a command line interface session directly in the Kate editor without having to open a separate terminal emulator window. The Kate editor also allows you to open multiple files, providing different windows for each opened file.
The GNOME Project also provides a simple text editor for programmers. The gedit editor is a basic text editor that provides some advanced features such as code syntax highlighting and line numbering, but it was designed to be a bare-bones editor. To spruce up the gedit editor, developers created plug-ins, which expand the features available in gedit. Current plug-ins include a spell-checker, a terminal emulator, and a file browser.
This wraps up the background chapters on working with the command line in Linux. The next part of the book dives into the shell-scripting world. The next chapter starts off by showing you how to create a shell script file and how to run it on your Linux system. It also shows you the basics of shell scripts, allowing you to create simple programs by stringing multiple commands together into a script you can run.
All materials on the site are licensed Creative Commons Attribution-Sharealike 3.0 Unported CC BY-SA 3.0 & GNU Free Documentation License (GFDL)
If you are the copyright holder of any material contained on our site and intend to remove it, please contact our site administrator for approval.
© 2016-2026 All site design rights belong to S.Y.A.