Wiley Linux Command Line and Shell Scripting Bible 3rd (2015)
Part III. Advanced Shell Scripting
Chapter 18. Writing Scripts for Graphical Desktops
In This Chapter
1. Creating text menus
2. Building text window widgets
3. Adding X Window graphics
Over the years, shell scripts have acquired a reputation for being dull and boring. This doesn't have to be the case, however, if you plan on running your scripts in a graphical environment. There are plenty of ways to interact with your script user that don't rely on the read and echo statements. This chapter dives into a few different methods you can use to help add life to your interactive scripts so they don't look so old-fashioned.
Creating Text Menus
The most common way to create an interactive shell script is to utilize a menu. Offering your customers a choice of various options helps guide them through exactly what the script can and can't do.
Menu scripts usually clear the display area and then show a list of options available. The customer can select an option by pressing an associated letter or number assigned to each option. Figure 18.1 shows the layout of a sample menu.
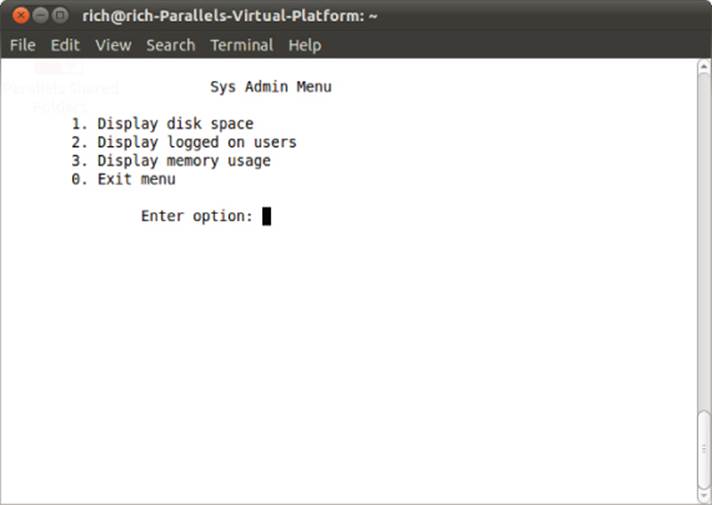
Figure 18.1 Displaying a menu from a shell script
The core of a shell script menu is the case command (see Chapter 12). The case command performs specific commands, depending on what character your customer selects from the menu.
The following sections walk you through the steps you should follow to create a menu-based shell script.
Create the menu layout
The first step in creating a menu is, obviously, to determine what elements you want to appear in the menu and lay them out the way that you want them to appear.
Before creating the menu, it's usually a good idea to clear the monitor display. This enables you to display your menu in a clean environment without distracting text.
The clear command uses the terminfo data of your terminal session (see Chapter 2) to clear any text that appears on the monitor. After the clear command, you can use the echo command to display your menu elements.
By default, the echo command can only display printable text characters. When creating menu items, it's often helpful to use nonprintable items, such as the tab and newline characters. To include these characters in your echo command, you must use the -e option. Thus, the command:
echo -e "1.\tDisplay disk space"
results in the output line:
1. Display disk space
This greatly helps in formatting the layout of the menu items. With just a few echo commands, you can create a reasonable-looking menu:
clear
echo
echo -e "\t\t\tSys Admin Menu\n"
echo -e "\t1. Display disk space"
echo -e "\t2. Display logged on users"
echo -e "\t3. Display memory usage"
echo -e "\t0. Exit menu\n\n"
echo –en "\t\tEnter option: "
The -en option on the last line displays the line without adding the newline character at the end. This gives the menu a more professional look, because the cursor stays at the end of the line waiting for the customer's input.
The last part of creating the menu is to retrieve the input from the customer. This is done using the read command (see Chapter 14). Because we expect only single-character input, the nice thing to do is to use the -n option in the read command to retrieve only one character. This allows the customer to enter a number without having to press the Enter key:
read -n 1 option
Next, you need to create your menu functions.
Create the menu functions
Shell script menu options are easier to create as a group of separate functions. This enables you to create a simple, concise case command that is easy to follow.
To do that, you need to create separate shell functions for each of your menu options. The first step in creating a menu shell script is to determine what functions you want your script to perform and lay them out as separate functions in your code.
It is common practice to create stub functions for functions that aren't implemented yet. A stub function is a function that doesn't contain any commands yet or possibly just an echo statement indicating what should be there eventually:
function diskspace {
clear
echo "This is where the diskspace commands will go"
}
This enables your menu to operate smoothly while you work on the individual functions. You don't have to code all the functions for your menu to work. You'll notice that the function starts out with the clear command. This enables you to start the function on a clean monitor screen, without the menu showing.
One thing that helps out in the shell script menu is to create the menu layout itself as a function:
function menu {
clear
echo
echo -e "\t\t\tSys Admin Menu\n"
echo -e "\t1. Display disk space"
echo -e "\t2. Display logged on users"
echo -e "\t3. Display memory usage"
echo -e "\t0. Exit program\n\n"
echo -en "\t\tEnter option: "
read -n 1 option
}
This enables you to easily redisplay the menu at any time just by calling the menu function.
Add the menu logic
Now that you have your menu layout and your functions, you just need to create the programming logic to put the two together. As mentioned, this requires the case command.
The case command should call the appropriate function according to the character selection expected from the menu. It's always a good idea to use the default case command character (the asterisk) to catch any incorrect menu entries.
The following code illustrates the use of the case command in a typical menu:
menu
case $option in
0)
break ;;
1)
diskspace ;;
2)
whoseon ;;
3)
memusage ;;
*)
clear
echo "Sorry, wrong selection";;
esac
This code first uses the menu function to clear the monitor screen and display the menu. The read command in the menu function pauses until the customer hits a character on the keyboard. After that's been done, the case command takes over. The case command calls the appropriate function based on the returned character. After the function completes, the case command exits.
Putting it all together
Now that you've seen all the parts that make up a shell script menu, let's put them together and see how they all interoperate. Here's an example of a full menu script:
$ cat menu1
#!/bin/bash
# simple script menu
function diskspace {
clear
df -k
}
function whoseon {
clear
who
}
function memusage {
clear
cat /proc/meminfo
}
function menu {
clear
echo
echo -e "\t\t\tSys Admin Menu\n"
echo -e "\t1. Display disk space"
echo -e "\t2. Display logged on users"
echo -e "\t3. Display memory usage"
echo -e "\t0. Exit program\n\n"
echo -en "\t\tEnter option: "
read -n 1 option
}
while [ 1 ]
do
menu
case $option in
0)
break ;;
1)
diskspace ;;
2)
whoseon ;;
3)
memusage ;;
*)
clear
echo "Sorry, wrong selection";;
esac
echo -en "\n\n\t\t\tHit any key to continue"
read -n 1 line
done
clear
$
This menu creates three functions to retrieve administrative information about the Linux system using common commands. It uses a while loop to continually loop through the menu until the customer selects option 0, which uses the break command to break out of the while loop.
You can use this same template to create any shell script menu interface. It provides a simple way to interact with your customers.
Using the select command
You may have noticed that half the challenge of creating a text menu is just creating the menu layout and retrieving the answer that you enter. The bash shell provides a handy little utility for you that does all this work automatically.
The select command allows you to create a menu from a single command line and then retrieve the entered answer and automatically process it. The format of the select command is as follows:
select variable in list
do
commands
done
The list parameter is a space-separated list of text items that build the menu. The select command displays each item in the list as a numbered option and then displays a special prompt, defined by the PS3 environment variable, for the selection.
Here's a simple example of the select command in action:
$ cat smenu1
#!/bin/bash
# using select in the menu
function diskspace {
clear
df -k
}
function whoseon {
clear
who
}
function memusage {
clear
cat /proc/meminfo
}
PS3="Enter option: "
select option in "Display disk space" "Display logged on users"┐
"Display memory usage" "Exit program"
do
case $option in
"Exit program")
break ;;
"Display disk space")
diskspace ;;
"Display logged on users")
whoseon ;;
"Display memory usage")
memusage ;;
*)
clear
echo "Sorry, wrong selection";;
esac
done
clear
$
The select statement must all be on one line in the code file. That's indicated by the continuation character in the listing. When you run the program, it automatically produces the following menu:
$ ./smenu1
1) Display disk space 3) Display memory usage
2) Display logged on users 4) Exit program
Enter option:
When you use the select command, remember that the result value stored in the variable is the entire text string and not the number associated with the menu item. The text string values are what you need to compare in your case statements.
Doing Windows
Using text menus is a step in the right direction, but there's still so much missing in our interactive scripts, especially if we try to compare them to the graphical Windows world. Fortunately for us, some very resourceful people out in the open source world have helped us out.
The dialog package is a nifty little tool originally created by Savio Lam and currently maintained by Thomas E. Dickey. This package recreates standard Windows dialog boxes in a text environment using ANSI escape control codes. You can easily incorporate these dialog boxes in your shell scripts to interact with your script users. This section describes the dialog package and demonstrates how to use it in shell scripts.
Note
The dialog package isn't installed in all Linux distributions by default. If it's not installed by default, because of its popularity it's almost always included in the software repository. Check your specific Linux distribution documentation for how to load the dialog package. For the Ubuntu Linux distribution, the following is the command line command to install it:
1. sudo apt-get install dialog
That package installs the dialog package plus the required libraries for your system.
The dialog package
The dialog command uses command line parameters to determine what type of Windows widget to produce. A widget is the dialog package term for a type of Windows element. The dialog package currently supports the types of widgets shown in Table 18.1.
Table 18.1 The dialog Widgets
|
Widget |
Description |
|
calendar |
Provides a calendar from which to select a date |
|
checklist |
Displays multiple entries where each entry can be turned on or off |
|
form |
Allows you to build a form with labels and text fields to be filled out |
|
fselect |
Provides a file selection window to browse for a file |
|
gauge |
Displays a meter showing a percentage of completion |
|
infobox |
Displays a message without waiting for a response |
|
inputbox |
Displays a single text form box for text entry |
|
inputmenu |
Provides an editable menu |
|
menu |
Displays a list of selections from which to choose |
|
msgbox |
Displays a message and requires the user to select an OK button |
|
pause |
Displays a meter showing the status of a specified pause period |
|
passwordbox |
Displays a single textbox that hides entered text |
|
passwordform |
Displays a form with labels and hidden text fields |
|
radiolist |
Provides a group of menu items where only one item can be selected |
|
tailbox |
Displays text from a file in a scroll window using the tail command |
|
tailboxbg |
Same as tailbox, but operates in background mode |
|
textbox |
Displays the contents of a file in a scroll window |
|
timebox |
Provides a window to select an hour, minute, and second |
|
yesno |
Provides a simple message with Yes and No buttons |
As you can see from Table 18.1, you can choose from lots of different widgets. This can give your scripts a more professional look with very little effort.
To specify a specific widget on the command line, you need to use the double dash format:
dialog --widget parameters
where widget is the widget name as seen in Table 18.1, and parameters defines the size of the widget window and any text required for the widget.
Each dialog widget provides output in two forms:
· Using STDERR
· Using the exit code status
The exit code status of the dialog command determines the button selected by the user. If an OK or Yes button is selected, the dialog command returns a 0 exit status. If a Cancel or No button is selected, the dialog command returns a 1 exit status. You can use the standard $? variable to determine which button was selected in the dialog widget.
If a widget returns any data, such as a menu selection, the dialog command sends the data to STDERR. You can use the standard bash shell technique of redirecting the STDERR output to another file or file descriptor:
dialog --inputbox "Enter your age:" 10 20 2>age.txt
This command redirects the text entered in the textbox to the age.txt file.
The following sections look at some examples of the more common dialog widgets you'll use in your shell scripts.
The msgbox widget
The msgbox widget is the most common type of dialog box. It displays a simple message in a window and waits for the user to click an OK button before disappearing. The following format is required to use a msgbox widget:
dialog --msgbox text height width
The text parameter is any string you want to place in the window. The dialog command automatically wraps the text to fit the size of the window you create, using the height and width parameters. If you want to place a title at the top of the window, you can also use the --title parameter, along with the text of the title. Here's an example of using the msgbox widget:
$ dialog --title Testing --msgbox "This is a test" 10 20
After entering this command, the message box appears on the screen of the terminal emulator session you're using. Figure 18.2 shows what this looks like.
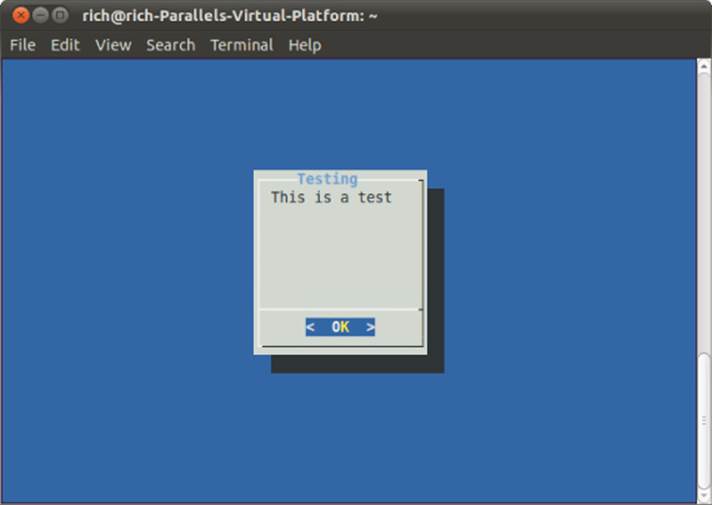
Figure 18.2 Using the msgbox widget in the dialog command
If your terminal emulator supports the mouse, you can click the OK button to close the dialog box. You can also use keyboard commands to simulate a click — just press the Enter key.
The yesno widget
The yesno widget takes the msgbox widget one step further, allowing the user to answer a yes/no question displayed in the window. It produces two buttons at the bottom of the window — one for Yes and another for No. The user can switch between buttons by using the mouse, the tab key, or the keyboard arrow keys. To select the button, the user can either press the spacebar or the Enter key.
Here's an example of using the yesno widget:
$ dialog --title "Please answer" --yesno "Is this thing on?" 10 20
$ echo $?
1
$
This produces the widget shown in Figure 18.3.
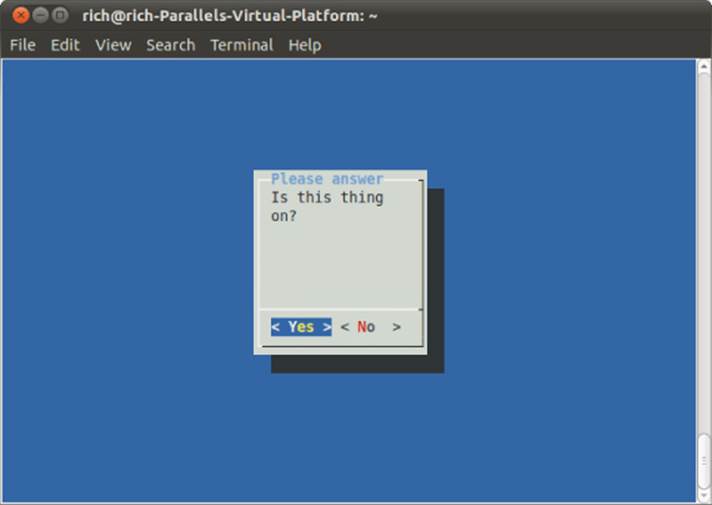
Figure 18.3 Using the yesno widget in the dialog command
The exit status of the dialog command is set depending on which button the user selects. If the No button is selected, the exit status is 1, and if the Yes button is selected, the exit status is 0.
The inputbox widget
The inputbox widget provides a simple textbox area for the user to enter a text string. The dialog command sends the value of the text string to STDERR. You must redirect that to retrieve the answer. Figure 18.4 demonstrates what the inputbox widget looks like.
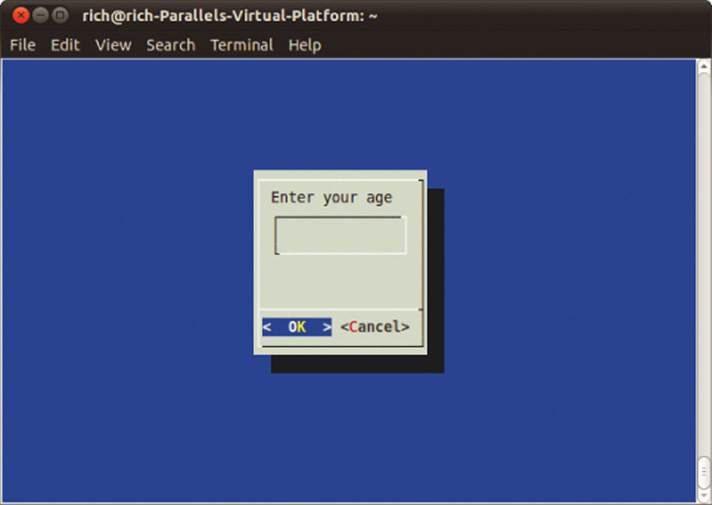
Figure 18.4 The inputbox widget
As you can see in Figure 18.4, the inputbox provides two buttons — OK and Cancel. If the Cancel button is selected, the exit status of the command is 1; otherwise, the exit status is 0:
$ dialog --inputbox "Enter your age:" 10 20 2>age.txt
$ echo $?
0
$ cat age.txt
12$
You'll notice when you use the cat command to display the contents of the text file that there's no newline character after the value. This enables you to easily redirect the file contents to a variable in a shell script to extract the string entered by the user.
The textbox widget
The textbox widget is a great way to display lots of information in a window. It produces a scrollable window containing the text from a file specified in the parameters:
$ dialog --textbox /etc/passwd 15 45
The contents of the /etc/passwd file are shown within the scrollable text window, as illustrated in Figure 18.5.
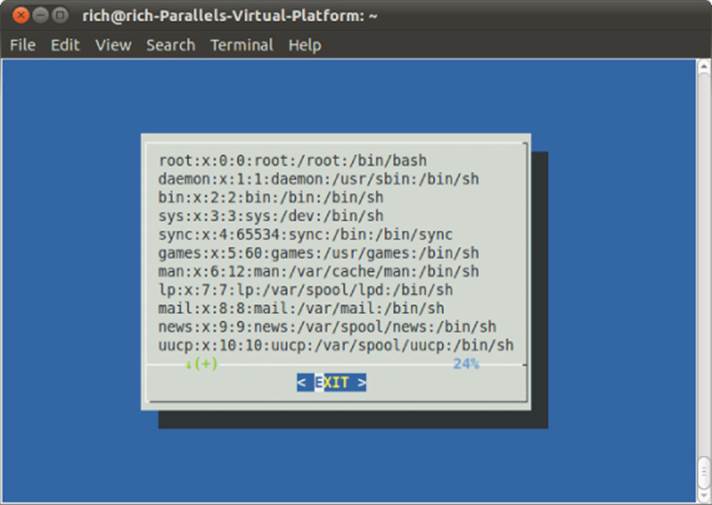
Figure 18.5 The textbox widget
You can use the arrow keys to scroll left and right, as well as up and down in the text file. The bottom line in the window shows the percent location within the file that you're viewing. The textbox contains only a single Exit button, which should be selected to exit the widget.
The menu widget
The menu widget allows you to create a window version of the text menu we created earlier in this chapter. You simply provide a selection tag and the text for each item:
$ dialog --menu "Sys Admin Menu" 20 30 10 1 "Display disk space"
2 "Display users" 3 "Display memory usage" 4 "Exit" 2> test.txt
The first parameter defines a title for the menu. The next two parameters define the height and width of the menu window, while the third parameter defines the number of menu items that appear in the window at one time. If there are more menu items, you can scroll through them using the arrow keys.
Following those parameters, you must add menu item pairs. The first element is the tag used to select the menu item. Each tag should be unique for each menu item and can be selected by pressing the appropriate key on the keyboard. The second element is the text used in the menu. Figure 18.6 demonstrates the menu produced by the example command.
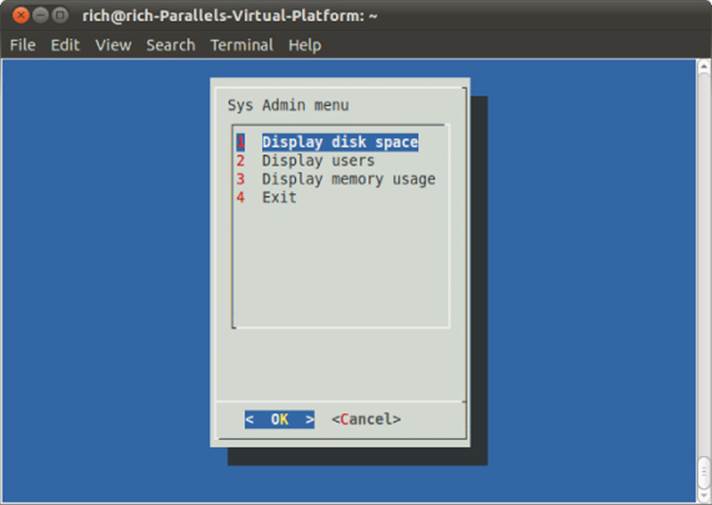
Figure 18.6 The menu widget with menu items
If the user selects a menu item by pressing the appropriate key for the tag, that menu item is highlighted but not selected. A selection isn't made until the OK button is selected by using either the mouse or the Enter key. The dialog command sends the selected menu item text to STDERR, which you can redirect as needed.
The fselect widget
There are several fancy built-in widgets provided by the dialog command. The fselect widget is extremely handy when working with filenames. Instead of forcing the user to type a filename, you can use the fselect widget to browse to the file location and select the file, as shown in Figure 18.7.
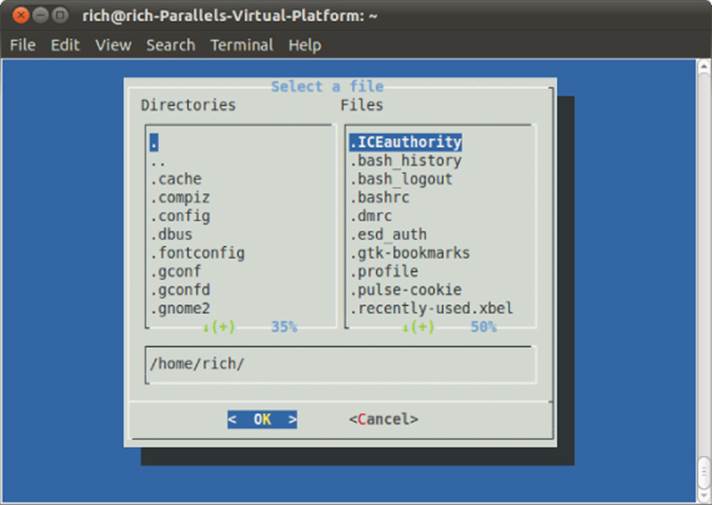
Figure 18.7 The fselect widget
The fselect widget format looks like:
$ dialog --title "Select a file" --fselect $HOME/ 10 50 2>file.txt
The first parameter after the fselect option is the starting folder location used in the window. The fselect widget window consists of a directory listing on the left side, a file listing on the right side that shows all the files in the selected directory, and a simple textbox that contains the currently selected file or directory. You can manually type a filename in the textbox, or you can use the directory and file listings to select one (use the spacebar to select a file to add to the textbox).
The dialog options
In addition to the standard widgets, you can customize lots of different options in the dialog command. You've already seen the --title parameter in action. This allows you to set a title for the widget that appears at the top of the window.
Lots of other options allow you to completely customize both the appearance and the behavior of your windows. Table 18.2 shows the options available for the dialog command.
Table 18.2 The dialog Command Options
|
Option |
Description |
|
--add-widget |
Proceeds to the next dialog unless Esc or the Cancel button has been pressed |
|
--aspect ratio |
Specifies the width/height aspect ratio of the window |
|
--backtitle title |
Specifies a title to display on the background, at the top of the screen |
|
--begin x y |
Specifies the starting location of the top-left corner of the window |
|
--cancel-label label |
Specifies an alternative label for the Cancel button |
|
Option |
Description |
|
--clear |
Clears the display using the default dialog background color |
|
--colors |
Embeds ANSI color codes in dialog text |
|
--cr-wrap |
Allows newline characters in dialog text and forces a line wrap |
|
--create-rc file |
Dumps a sample configuration file to the specified file |
|
--defaultno |
Makes the default of a yes/no dialog No |
|
--default-item string |
Sets the default item in a checklist, form, or menu dialog |
|
--exit-label label |
Specifies an alternative label for the Exit button |
|
--extra-button |
Displays an extra button between the OK and Cancel buttons |
|
--extra-label label |
Specifies an alternative label for the Extra button |
|
--help |
Displays the dialog command help message |
|
--help-button |
Displays a Help button after the OK and Cancel buttons |
|
--help-label label |
Specifies an alternative label for the Help button |
|
--help-status |
Writes the checklist, radiolist, or form information after the help information in the Help button was selected |
|
--ignore |
Ignores options that dialog does not recognize |
|
--input-fd fd |
Specifies an alternative file descriptor, other than STDIN |
|
--insecure |
Changes the password widget to display asterisks when typing |
|
--item-help |
Adds a help column at the bottom of the screen for each tag in a checklist, radiolist, or menu for the tag item |
|
--keep-window |
Doesn't clear old widgets from the screen |
|
--max-input size |
Specifies a maximum string size for the input; default is 2048 |
|
--nocancel |
Suppresses the Cancel button |
|
--no-collapse |
Doesn't convert tabs to spaces in dialog text |
|
--no-kill |
Places the tailboxbg dialog in background and disables SIGHUP for the process |
|
--no-label label |
Specifies an alternative label for the No button |
|
--no-shadow |
Doesn't display shadows for dialog windows |
|
--ok-label label |
Specifies an alternative label for the OK button |
|
--output-fd fd |
Specifies an alternative output file descriptor other than STDERR |
|
--print-maxsize |
Prints the maximum size of dialog windows allowed to the output |
|
--print-size |
Prints the size of each dialog window to the output |
|
--print-version |
Prints the dialog version to output |
|
--separate-output |
Outputs the result of a checklist widget one line at a time with no quoting |
|
--separator string |
Specifies a string that separates the output for each widget |
|
--separate-widget string |
Specifies a string that separates the output for each widget |
|
--shadow |
Draws a shadow to the right and bottom of each window |
|
--single-quoted |
Uses single quoting if needed for the checklist output |
|
--sleep sec |
Delays for the specified number of seconds after processing the dialog window |
|
--stderr |
Sends output to STDERR — the default behavior |
|
--stdout |
Sends output to STDOUT |
|
--tab-correct |
Converts tabs to spaces |
|
--tab-len n |
Specifies the number of spaces a tab character uses; default is 8 |
|
--timeout sec |
Specifies the number of seconds before exiting with an error code if no user input |
|
--title title |
Specifies the title of the dialog window |
|
--trim |
Removes leading spaces and newline characters from dialog text |
|
--visit-items |
Modifies the tab stops in the dialog window to include the list of items |
|
--yes-label label |
Specifies an alternative label for the Yes button |
The --backtitle option is a handy way to create a common title for your menu through the script. If you specify it for each dialog window, it persists throughout your application, creating a professional look to your script.
As you can tell from Table 18.2, you can overwrite any of the button labels in your dialog window. This feature allows you to create just about any window situation you need.
Using the dialog command in a script
Using the dialog command in your scripts is a snap. There are just two things you must remember:
· Check the exit status of the dialog command if there's a Cancel or No button available.
· Redirect STDERR to retrieve the output value.
If you follow these two rules, you'll have a professional-looking interactive script in no time. Here's an example using dialog widgets to reproduce the system admin menu created earlier in the chapter:
$ cat menu3
#!/bin/bash
# using dialog to create a menu
temp=$(mktemp -t test.XXXXXX)
temp2=$(mktemp -t test2.XXXXXX)
function diskspace {
df -k > $temp
dialog --textbox $temp 20 60
}
function whoseon {
who > $temp
dialog --textbox $temp 20 50
}
function memusage {
cat /proc/meminfo > $temp
dialog --textbox $temp 20 50
}
while [ 1 ]
do
dialog --menu "Sys Admin Menu" 20 30 10 1 "Display disk space" 2
"Display users" 3 "Display memory usage" 0 "Exit" 2> $temp2
if [ $? -eq 1 ]
then
break
fi
selection=$(cat $temp2)
case $selection in
1)
diskspace ;;
2)
whoseon ;;
3)
memusage ;;
0)
break ;;
*)
dialog --msgbox "Sorry, invalid selection" 10 30
esac
done
rm -f $temp 2> /dev/null
rm -f $temp2 2> /dev/null
$
The script uses the while loop with a constant true value to create an endless loop displaying the menu dialog. This means that, after every function, the script returns to displaying the menu.
The menu dialog includes a Cancel button, so the script checks the exit status of the dialog command in case the user presses the Cancel button to exit. Because it's in a while loop, exiting is as easy as using the break command to jump out of the while loop.
The script uses the mktemp command to create two temporary files for holding data for the dialog commands. The first one, $temp, is used to hold the output of the df, whoeson, and meminfo commands so they can be displayed in the textbox dialog (see Figure 18.8). The second temporary file, $temp2, is used to hold the selection value from the main menu dialog.
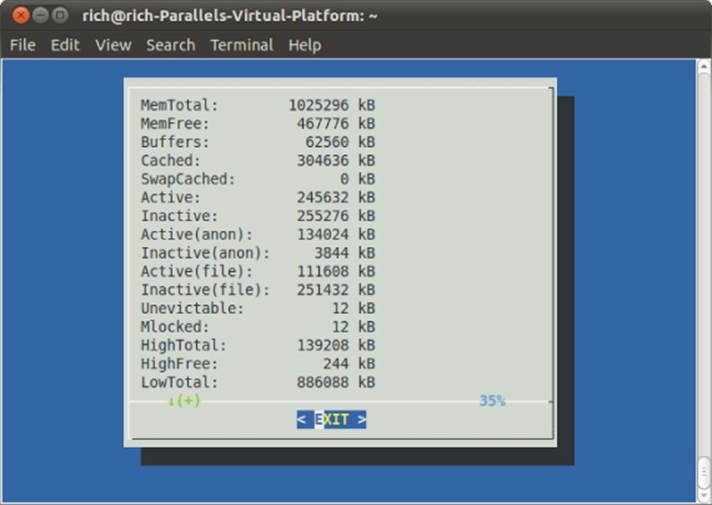
Figure 18.8 The meminfo command output displayed using the textbox dialog option
Now this is starting to look like a real application that you can show off to people!
Getting Graphic
If you're looking for even more graphics for your interactive scripts, you can go one step further. Both the KDE and GNOME desktop environments (see Chapter 1) have expanded on the dialog command idea and include commands that produce X Window graphical widgets for their respective environments.
This section describes the kdialog and zenity packages, which provide graphical window widgets for the KDE and GNOME desktops, respectively.
The KDE environment
The KDE graphical environment includes the kdialog package by default. The kdialog package uses the kdialog command to generate standard windows, similar to the dialog-style widgets, within your KDE desktop. However, instead of having the clunky feel to them, these windows blend right in with the rest of your KDE application windows! This allows you to produce Windows-quality user interfaces directly from your shell scripts!
Note
Just because your Linux distribution uses the KDE desktop doesn't necessarily mean it has the kdialog package installed by default. You may need to manually install it from the distribution repository.
kdialog widgets
Just like the dialog command, the kdialog command uses command line options to specify what type of window widget to use. The following is the format of the kdialog command:
kdialog display-options window-options arguments
The window-options options allow you to specify what type of window widget to use. The available options are shown in Table 18.3.
Table 18.3 kdialog Window Options
|
Option |
Description |
|
--checklist title [tag item status] |
A checklist menu, with status specifying if the item is checked or not |
|
--error text |
Error message box |
|
--inputbox text [init] |
Input textbox where you can specify the default value using the init value |
|
--menu title [tag item] |
Menu selection box title and a list of items identified by a tag |
|
--msgbox text |
Simple message box with specified text |
|
--password text |
Password input textbox that hides user input |
|
--radiolist title [tag item status] |
A radiolist menu, with status specifying if the item is selected or not |
|
--separate-output |
Returns items on separate lines for checklist and radiolist menus |
|
--sorry text |
Sorry message box |
|
--textbox file [width] [height] |
Textbox displaying the contents of file, alternatively specified by width and height |
|
--title title |
Specifies a title for the TitleBar area of the dialog window |
|
--warningyesno text |
Warning message box with Yes and No buttons |
|
--warningcontinuecancel text |
Warning message box with Continue and Cancel buttons |
|
--warningyesnocancel text |
Warning message box with Yes, No, and Cancel buttons |
|
--yesno text |
Question box with Yes and No buttons |
|
--yesnocancel text |
Question box with Yes, No, and Cancel buttons |
As you can see from Table 18.3, all the standard window dialog box types are represented. However, when you use a kdialog window widget, it appears as a separate window in the KDE desktop, not inside the terminal emulator session!
The checklist and radiolist widgets allow you to define individual items in the lists and whether they are selected by default:
$kdialog --checklist "Items I need" 1 "Toothbrush" on 2 "Toothpaste"
off 3 "Hair brush" on 4 "Deodorant" off 5 "Slippers" off
The resulting checklist window is shown in Figure 18.9.

Figure 18.9 A kdialog checklist dialog window
The items specified as “on” are highlighted in the checklist. To select or deselect an item in the checklist, just click it. If you select the OK button, the kdialog sends the tag values to STDOUT:
"1" "3"
$
When you press the Enter key, the kdialog box appears with the selections. When you click the OK or Cancel buttons, the kdialog command returns each tag as a string value to STDOUT (these are the ”1”, and ”3” values you see in the output). Your script must be able to parse the resulting values and match them with the original values.
Using kdialog
You can use the kdialog window widgets in your shell scripts similarly to how you use the dialog widgets. The big difference is that the kdialog window widgets output values using STDOUT instead of STDERR.
Here's a script that converts the sys admin menu created earlier into a KDE application:
$ cat menu4
#!/bin/bash
# using kdialog to create a menu
temp=$(mktemp -t temp.XXXXXX)
temp2=$(mktemp -t temp2.XXXXXX)
function diskspace {
df -k > $temp
kdialog --textbox $temp 1000 10
}
function whoseon {
who > $temp
kdialog --textbox $temp 500 10
}
function memusage {
cat /proc/meminfo > $temp
kdialog --textbox $temp 300 500
}
while [ 1 ]
do
kdialog --menu "Sys Admin Menu" "1" "Display diskspace" "2" "Display
users" "3" "Display memory usage" "0" "Exit" > $temp2
if [ $? -eq 1 ]
then
break
fi
selection=$(cat $temp2)
case $selection in
1)
diskspace ;;
2)
whoseon ;;
3)
memusage ;;
0)
break ;;
*)
kdialog --msgbox "Sorry, invalid selection"
esac
done
$
There isn't much difference in the script from using the kdialog command and the dialog command. The resulting main menu generated is shown in Figure 18.10.
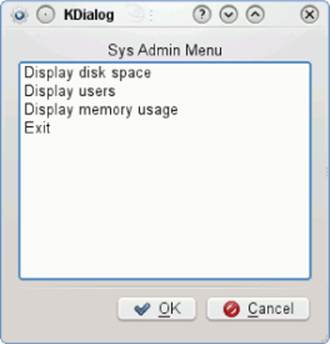
Figure 18.10 The sys admin menu script using kdialog
Now your simple shell script looks just like a real KDE application! There's no limit to what you can do with your interactive scripts now.
The GNOME environment
The GNOME graphical environment supports two popular packages that can generate standard windows:
· gdialog
· zenity
By far, zenity is the most commonly available package found in most GNOME desktop Linux distributions (it's installed by default in both Ubuntu and Fedora). This section describes the features of zenity and demonstrates how to use it in your shell scripts.
zenity Widgets
As you would expect, zenity allows you to create different windows widgets by using command line options. Table 18.4 shows the different widgets that zenity can produce.
Table 18.4 The zenity Windows Widgets
|
Option |
Description |
|
--calendar |
Displays a full month calendar |
|
--entry |
Displays a text entry dialog window |
|
--error |
Displays an error message dialog window |
|
--file-selection |
Displays a full pathname and filename dialog window |
|
--info |
Displays an informational dialog window |
|
--list |
Displays a checklist or radiolist dialog window |
|
--notification |
Displays a notification icon |
|
--progress |
Displays a progress bar dialog window |
|
--question |
Displays a yes/no question dialog window |
|
--scale |
Displays a scale dialog window |
|
--text-info |
Displays a textbox containing text |
|
--warning |
Displays a warning dialog window |
The zenity command line program works somewhat differently than the kdialog and dialog programs. Many of the widget types are defined using additional options on the command line, instead of including them as arguments to an option.
The zenity command does offer some pretty cool advanced dialog windows. The calendar option produces a full month calendar, as shown in Figure 18.11.
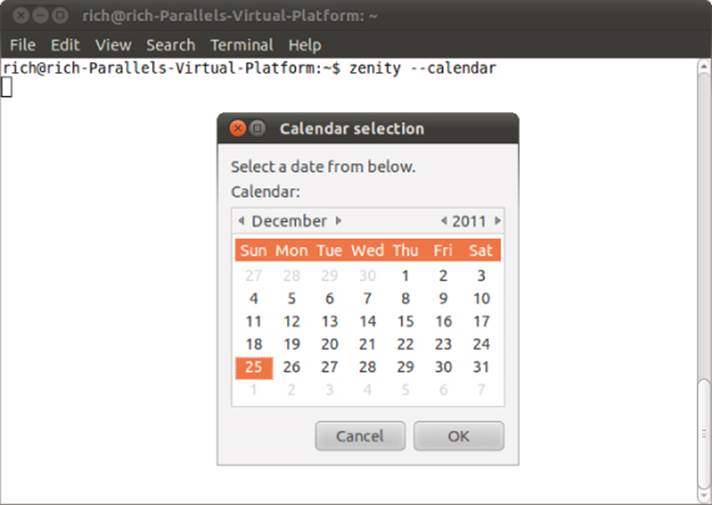
Figure 18.11 The zenity calendar dialog window
When you select a date from the calendar, the zenity command returns the value to STDOUT, just like kdialog:
$ zenity --calendar
12/25/2011
$
Another pretty cool window in zenity is the file selection option, shown in Figure 18.12.
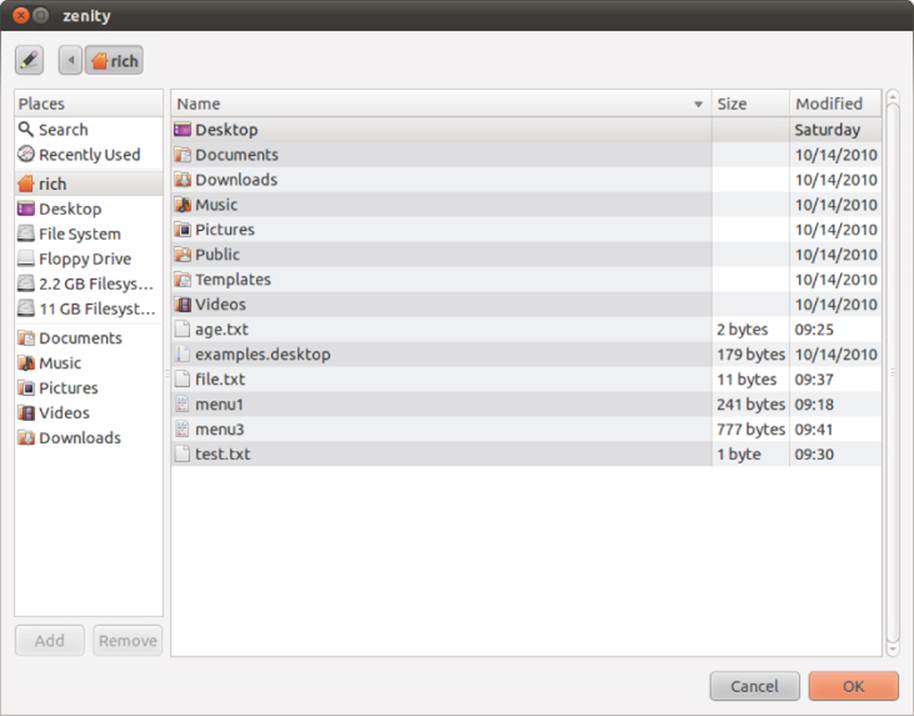
Figure 18.12 The zenity file selection dialog window
You can use the dialog window to browse to any directory location on the system (as long as you have the privileges to view the directory) and select a file. When you select a file, the zenity command returns the full file and pathname:
$ zenity --file-selection
/home/ubuntu/menu5
$
With tools like that at your disposal, the sky's the limit with your shell script creations!
Using zenity in scripts
As you would expect, zenity performs well in shell scripts. Unfortunately, zenity chose not to follow the option convention used in dialog and kdialog, so converting any existing interactive scripts to zenity may prove challenging.
In converting the sys admin menu from kdialog to zenity, we had to do quite a bit of manipulation of the widget definitions:
$cat menu5
#!/bin/bash
# using zenity to create a menu
temp=$(mktemp -t temp.XXXXXX)
temp2=$(mktemp -t temp2.XXXXXX)
function diskspace {
df -k > $temp
zenity --text-info --title "Disk space" --filename=$temp
--width 750 --height 10
}
function whoseon {
who > $temp
zenity --text-info --title "Logged in users" --filename=$temp
--width 500 --height 10
}
function memusage {
cat /proc/meminfo > $temp
zenity --text-info --title "Memory usage" --filename=$temp
--width 300 --height 500
}
while [ 1 ]
do
zenity --list --radiolist --title "Sys Admin Menu" --column "Select"
--column "Menu Item" FALSE "Display diskspace" FALSE "Display users"
FALSE "Display memory usage" FALSE "Exit" > $temp2
if [ $? -eq 1 ]
then
break
fi
selection=$(cat $temp2)
case $selection in
"Display disk space")
diskspace ;;
"Display users")
whoseon ;;
"Display memory usage")
memusage ;;
Exit)
break ;;
*)
zenity --info "Sorry, invalid selection"
esac
done
$
Because zenity doesn't support the menu dialog window, we used a radiolist type window for the main menu, as shown in Figure 18.13.
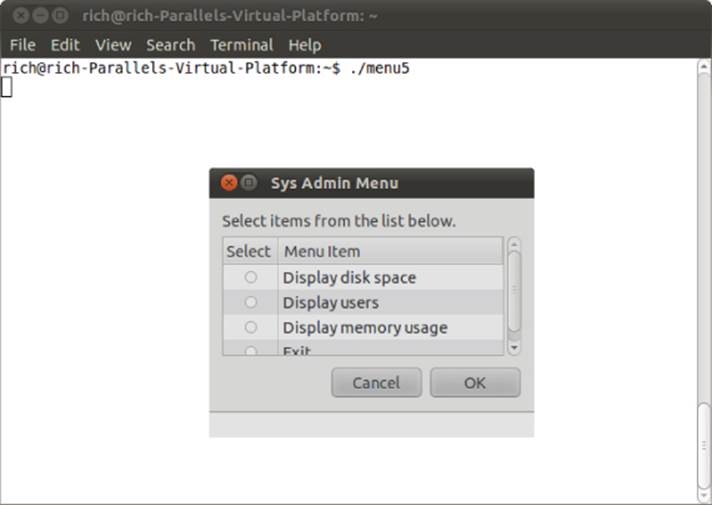
Figure 18.13 The sys admin menu using zenity
The radiolist uses two columns, each with a column heading. The first column includes the radio buttons to select. The second column is the item text. The radiolist also doesn't use tags for the items. When you select an item, the full text of the item is returned toSTDOUT. This makes life a little more interesting for the case command. You must use the full text from the items in the case options. If there are any spaces in the text, you need to use quotation marks around the text.
Using the zenity package, you can add a Windows feel to your interactive shell scripts in the GNOME desktop.
Summary
Interactive shell scripts have a reputation for being dull and boring. You can change that by using a few different techniques and tools available on most Linux systems. First, you can create menu systems for your interactive scripts by using the case command and shell script functions.
The menu command allows you to paint a menu, using the standard echo command, and read a response from the user, using the read command. The case command then selects the appropriate shell script function based on the value entered.
The dialog program provides several prebuilt text widgets for creating Windows-like objects on a text-based terminal emulator. You can create dialog boxes for displaying text, entering text, and choosing files and dates by using the dialog program. This helps bring even more life to your shell script.
If you're running your shell scripts in a graphical X Window environment, you can utilize even more tools in your interactive scripts. For the KDE desktop, there's the kdialog program. This program provides simple commands to create windows widgets for all the basic windows functions. For the GNOME desktop, there are the gdialog and zenity programs. Each of these programs provides window widgets that blend into the GNOME desktop just like a real Windows application.
The next chapter dives into the subject of editing and manipulating text data files. Often the biggest use of shell scripts revolves around parsing and displaying data in text files such as log and error files. The Linux environment includes two very useful tools, sed andgawk, for working with text data in your shell scripts. The next chapter introduces you to these tools, and shows the basics of how to use them.
All materials on the site are licensed Creative Commons Attribution-Sharealike 3.0 Unported CC BY-SA 3.0 & GNU Free Documentation License (GFDL)
If you are the copyright holder of any material contained on our site and intend to remove it, please contact our site administrator for approval.
© 2016-2026 All site design rights belong to S.Y.A.