Wiley Linux Command Line and Shell Scripting Bible 3rd (2015)
Part I. The Linux Command Line
Chapter 2. Getting to the Shell
In This Chapter
1. Accessing the command line
2. Reaching CLI via a Linux console terminal
3. Reaching CLI via a graphical terminal emulator
4. Using the GNOME terminal emulator
5. Using the Konsole terminal emulator
6. Using the xterm terminal emulator
In the old days of Linux, all you had to work with was the shell. System administrators, programmers, and system users all sat at something called a Linux console terminal entering shell commands and viewing text output. These days, with graphical desktop environments, it's getting harder to find a shell prompt on the system in order to enter shell commands. This chapter discusses what is required to reach a command line environment. It walks you through the terminal emulation packages that you may run into in the various Linux distributions.
Reaching the Command Line
Before the days of graphical desktops, the only way to interact with a Unix system was through a text command line interface (CLI) provided by the shell. The CLI allowed text input only and could display only text and rudimentary graphics output.
Because of these restrictions, output devices were not very fancy. Often, you needed only a simple dumb terminal to interact with the Unix system. A dumb terminal was usually nothing more than a monitor and keyboard connected to the Unix system via a communication cable (usually a multi-wire serial cable). This simple combination provided an easy way to enter text data into the Unix system and view text results.
As you well know, things are significantly different in today's Linux environment. Just about every Linux distribution uses some type of graphical desktop environment. However, to enter shell commands, you still need a text display to access the shell's CLI. The problem now is getting to one. Sometimes finding a way to get a CLI in a Linux distribution is not an easy task.
Console Terminals
One way to get to a CLI is to take the Linux system out of graphical desktop mode and place it in text mode. This provides nothing more than a simple shell CLI on the monitor, just like the days before graphical desktops. This mode is called the Linux console because it emulates the old days of a hard-wired console terminal and is a direct interface to the Linux system.
When the Linux system starts, it automatically creates several virtual consoles. A virtual console is a terminal session that runs in Linux system memory. Instead of having several dumb terminals connected to the computer, most Linux distributions start five or six (or sometimes even more) virtual consoles that you can access from a single computer keyboard and monitor.
Graphical Terminals
The alternative to using a virtual console terminal is to use a terminal emulation package from within the Linux graphical desktop environment. A terminal emulation package simulates working on a console terminal, but within a desktop graphical window. Figure 2.1 shows an example of a terminal emulator running in a Linux graphical desktop environment.
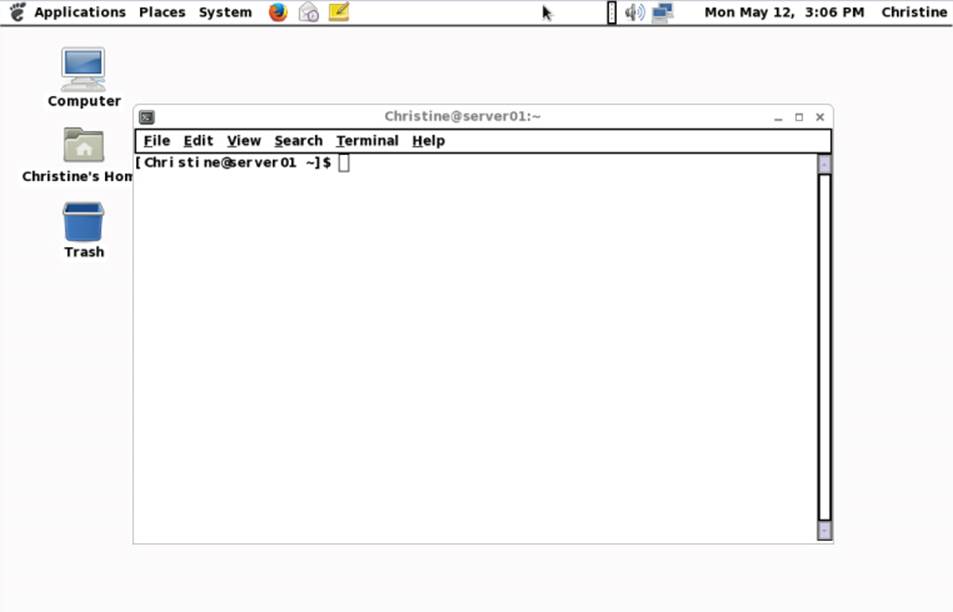
Figure 2.1 A simple terminal emulator running on a Linux desktop
Graphical terminal emulation is responsible only for a portion of the Linux graphical experience. As a whole, the experience is accomplished via several components, including graphical terminal emulation software (called a client). Table 2.1 shows the different components in the Linux graphical desktop environment.
Table 2.1 Graphical Interface Elements
|
Name |
Examples |
Description |
|
Client |
Graphical terminal emulator, desktop environment, network browser |
An application that requests graphical services |
|
Display Server |
Mir, Wayland Compositor, Xserver |
Element that manages the display (screen) and the input devices (keyboard, mouse, touch screen) |
|
Window Manager |
Compiz, Metacity, Kwin |
Element that adds borders to windows and provides features to move and manage windows |
|
Widgets Library |
Athena(Xaw), X Intrinsics |
Element that adds menus and appearance items for desktop environment clients |
For dealing with the command line from the desktop, the focus is on the graphical terminal emulator. You can think of graphical terminal emulators as CLI terminals “in the GUI” and virtual console terminals as CLI terminals “outside the GUI.” Understanding the various terminals and their features can enhance your command line experience.
Accessing CLI via a Linux Console Terminal
In the early days of Linux, when you booted up your system you would see a login prompt on your monitor, and that's all. As mentioned earlier, this is called the Linux console. It was the only place you could enter commands for the system.
Even though several virtual consoles are created at boot time, many Linux distributions switch to a graphical environment after the boot sequence completes. This provides the user with a graphical login and desktop experience. Therefore, in this case, accessing a virtual console is done manually.
In most Linux distributions, you can access one of the Linux virtual consoles using a simple keystroke combination. Usually, you must hold down the Ctrl+Alt key combination and then press a function key (F1 through F7) for the virtual console you want to use. Function key F2 produces virtual console 2, key F3 produces virtual console 3, key F4 produces virtual console 4, and so on.
Note
Linux distributions typically use the Ctrl+Alt key combination with either F1 or F7 to reach the graphical interface. Ubuntu uses F7, while RHEL uses F1. It is best to test and see where your distribution puts the graphical interface.
Text mode virtual consoles use the whole screen and start with the text login screen displayed. An example of a text login screen from a virtual console is shown in Figure 2.2.
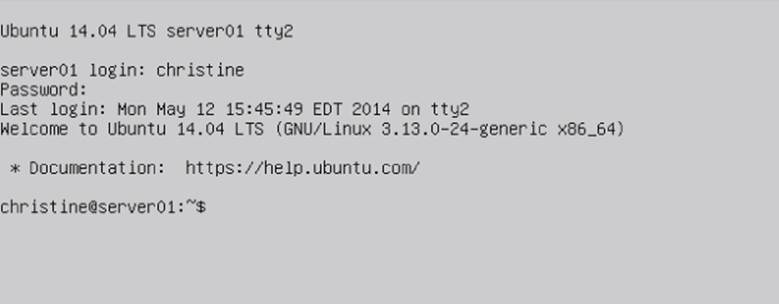
Figure 2.2 Linux virtual console login screen
Notice in Figure 2.2 the words tty2 at the end of the first text line. The 2 in tty2 indicates that it is virtual console 2 and was reached by pressing the Ctrl+Alt+F2 key sequence. tty stands for teletypewriter. Teletypewriter is an old term, indicating a machine used for sending messages.
Note
Not all Linux distributions show the virtual console's tty number at the login screen.
You log into a console terminal by entering your user ID after the login: prompt and typing your password after the Password: prompt. If you have never logged in this way before, be aware that typing your password is a different experience than in a graphical environment. In a graphical environment, you may see dots or asterisks indicating the password characters as you type. However, at the virtual console, nothing is displayed when you type your password.
After logging into a virtual console, you are taken to the Linux CLI. Keep in mind that, within the Linux virtual console, you do not have the ability to run any graphical programs.
After you have logged in to a virtual console, you can keep it active and switch to another virtual console without losing your active session. You can switch between all the virtual consoles, with multiple active sessions running. This feature provides a great deal of flexibility while you work at the CLI.
Additional flexibility deals with the virtual console's appearance. Even though it is a text mode console terminal, you can modify the text and background colors.
For example, it may be easier on your eyes to set the background of the terminal to white and the text to black. After you have logged in, you can accomplish this modification in a couple of ways. One way is to type in the command setterm -inversescreen on and press the Enter key, as shown in Figure 2.3. Notice in the figure that the inversescreen feature is being turned on using the option on. You can also turn it off using the off option.
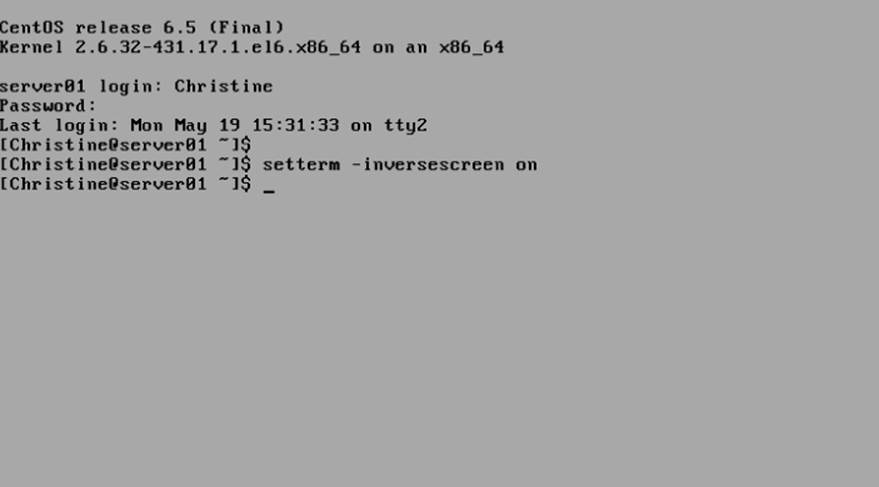
Figure 2.3 Linux virtual console with inversescreen being turned on
Another way is to type two commands, one after the other. Type setterm -background white and press Enter, and then type setterm -foreground black and press Enter. Be careful because, when you change your terminal background first, it may be hard to see the commands you are typing.
With the commands in the preceding paragraph, you are not turning features on and off, as with inversescreen. Instead, you have a choice of eight colors. The choices are black, red, green, yellow, blue, magenta, cyan, and white (which looks gray on some distributions). You can get rather creative with your plain text mode console terminals. Table 2.2 shows some options you can use with the setterm command to help improve your console terminal's readability or appearance.
Table 2.2 setterm Options for Foreground and Background Appearance
|
Option |
Parameter Choices |
Description |
|
-background |
black, red, green, yellow, blue, magenta, cyan, or white |
Changes the terminal's background color to the one specified |
|
-foreground |
black, red, green, yellow, blue, magenta, cyan, or white |
Changes the terminal's foreground color, specifically text, to the one specified |
|
-inversescreen |
on or off |
Switches the background color to the foreground color and the foreground color to the background color |
|
-reset |
None |
Changes the terminal appearance back to its default setting and clears the screen |
|
-store |
None |
Sets the current terminal's foreground and background colors as the values to be used for -reset |
Virtual console terminals are great for accessing the CLI outside the GUI. However, sometimes, you need to access the CLI and run graphical programs. Using a terminal emulation package solves this problem and is a popular way to access the shell CLI from within the GUI. The following sections describe common software packages that provide graphical terminal emulation.
Accessing CLI via Graphical Terminal Emulation
The graphical desktop environment offers a great deal more variety for CLI access than the virtual console terminal does. Many graphical terminal emulator packages are available for the graphical environment. Each package provides its own unique set of features and options. Some popular graphical terminal emulator packages are shown in Table 2.3 along with their websites.
Table 2.3 Popular Graphical Terminal Emulator Packages
|
Name |
Website |
|
Eterm |
http://www.eterm.org |
|
Final Term |
http://finalterm.org |
|
GNOME Terminal |
https://help.gnome.org/users/gnome-terminal/stable |
|
Guake |
https://github.com/Guake/guake |
|
Konsole Terminal |
http://konsole.kde.org |
|
LillyTerm |
http://lilyterm.luna.com.tw/index.html |
|
LXTerminal |
http://wiki.lxde.org/en/LXTerminal |
|
mrxvt |
https://code.google.com/p/mrxvt |
|
ROXTerm |
http://roxterm.sourceforge.net |
|
rxvt |
http://sourceforge.net/projects/rxvt |
|
rxvt-unicode |
http://software.schmorp.de/pkg/rxvt-unicode |
|
Sakura |
https://launchpad.net/sakura |
|
st |
http://st.suckless.org |
|
Terminator |
https://launchpad.net/terminator |
|
Terminology |
http://www.enlightenment.org/p.php?p=about/terminology |
|
tilda |
http://tilda.sourceforge.net/tildaabout.php |
|
UXterm |
http://manpages.ubuntu.com/manpages/gutsy/man1/uxterm.1.html |
|
Wterm |
http://sourceforge.net/projects/wterm |
|
xterm |
http://invisible-island.net/xterm |
|
Xfce4 Terminal |
http://docs.xfce.org/apps/terminal/start |
|
Yakuake |
http://extragear.kde.org/apps/yakuake |
Although many graphical terminal emulator packages are available, the focus in this chapter is on three commonly used ones. Often installed in Linux distributions by default, they are GNOME Terminal, Konsole Terminal, and xterm.
Using the GNOME Terminal Emulator
GNOME Terminal is the GNOME desktop environment's default terminal emulator. Many distributions, such as RHEL, Fedora, and CentOS, use the GNOME desktop environment by default, and therefore use GNOME Terminal by default. However, other desktop environments, such as Ubuntu Unity, also use the GNOME terminal as their default terminal emulator package. It is fairly easy to use and a good terminal emulator for individuals who are new to Linux. This chapter section walks you through the various parts of accessing, configuring and using the GNOME terminal emulator.
Accessing the GNOME Terminal
Each graphical desktop environment has different methods for accessing the GNOME terminal emulator. This section looks at accessing the GNOME Terminal in the GNOME, Unity, and KDE desktop environments.
Note
If you are using a different desktop environment than the ones listed in Table 2.3, you must look through the various menus offered in your environment to find the GNOME terminal emulator. In the menus, it is typically named Terminal
In the GNOME desktop environment, accessing the GNOME Terminal is fairly straightforward. From the menu system in the upper-left corner of the window, click Applications, then select System Tools from the drop-down menu, and finally click Terminal. Written in shorthand, the directions look like the following: Applications⇨System Tools⇨ Terminal.
Refer to Figure 2.1 to see a picture of the GNOME Terminal. It was accessed in a GNOME desktop environment on a CentOS distribution.
In the Unity desktop environment, accessing the GNOME terminal takes a little more effort. The simplest access method is Dash⇨Search and type Terminal. The GNOME terminal shows up in the Dash home area as an application named Terminal. Click that icon to open the GNOME terminal emulator.
Tip
In some Linux distribution desktop environments, such as Ubuntu's Unity, you can quickly access the GNOME terminal using the shortcut key combination Ctrl+Alt+T.
In the KDE desktop environment, the Konsole terminal emulator is the default emulator. Therefore, you must dig down through the menus to access GNOME Terminal. Start with the icon labeled Kickoff Application Launcher in the lower-left corner of the screen and then click Applications⇨Utilities⇨Terminal.
In most desktop environments, you can create a launcher for accessing GNOME Terminal. A launcher is an icon you create on your desktop that allows you to start a chosen application. This is a great feature that allows you to quickly access a terminal emulator in the graphical desktop. It is especially helpful if you do not want to use shortcut keys or the shortcut key feature is not available in your desktop environment of choice.
For example, in the GNOME desktop environment, to create a launcher, right-click your mouse in the middle of the desktop area; a drop-down menu appears. Select Create Launcher... from the menu; the Create Launcher application window opens. In the Type field, select Application. Type a name for your icon in the Name field. In the Command field, type gnome-terminal. Click Ok to save your new launcher. An icon with the name you gave the launcher now appears on your desktop. Double-click it to open the GNOME terminal emulator.
Note
When you type gnome-terminal in the Command field, you are typing the shell command for starting the GNOME terminal emulator. You learn in Chapter 3 how to add special options to commands, such as gnome-terminal, to provide special configuration options, and how to view all the options available to you.
Several configuration options are provided by menus and short-cut keys in the application, which you can apply after you get the GNOME terminal emulation started. Understanding these options can enhance your GNOME Terminal CLI experience.
The Menu Bar
The GNOME Terminal menu bar contains the configuration and customization options you need to make your GNOME Terminal just the way you want it. The following tables briefly describe the different configuration options in the menu bar and shortcut keys associated with the options.
Note
As you read through these GNOME Terminal menu options, keep in mind that your Linux distribution's GNOME Terminal may have slightly different menu options available. This is because several Linux distributions use older versions of GNOME Terminal.
Table 2.4 shows the configuration options available within the GNOME Terminal File menu system. The File menu item contains items to create and manage your overall CLI terminal sessions.
Table 2.4 The File Menu
|
Name |
Shortcut Key |
Description |
|
Open Terminal |
Shift+Ctrl+N |
Starts a new shell session in a new GNOME Terminal window |
|
Open Tab |
Shift+Ctrl+T |
Starts a new shell session in a new tab in the existing GNOME Terminal window |
|
New Profile |
None |
Customizes a session and saves as a profile, which can be recalled for later use |
|
Save Contents |
None |
Saves the scrollback buffer contents to a text file |
|
Close Tab |
Shift+Ctrl+W |
Closes the current tab session |
|
Close Window |
Shift+Ctrl+Q |
Closes the current GNOME Terminal session |
Notice that, as in a network browser, you can open new tabs within the GNOME Terminal session to start a whole new CLI session. Each tab session is considered to be an independent CLI session.
Tip
You do not have to click through the menu to reach options in the File menu. Most of the items are also available by right-clicking in the session area.
The Edit menu contains items, shown in Table 2.5, for handling text within the tabs. You can use your mouse to copy and paste text anywhere within the session window.
Table 2.5 The Edit Menu
|
Name |
Shortcut Key |
Description |
|
Copy |
Shift+Ctrl+C |
Copies selected text to the GNOME clipboard |
|
Paste |
Shift+Ctrl+V |
Pastes text from the GNOME clipboard into a session |
|
Paste Filenames |
Properly pastes copied filenames and their paths |
|
|
Select All |
None |
Selects output in the entire scrollback buffer |
|
Profiles |
None |
Adds, deletes, or modifies GNOME Terminal profiles |
|
Keyboard Shortcuts |
None |
Creates key combinations to quickly access GNOME Terminal features |
|
Profile Preferences |
None |
Edits the current session profile |
The Paste Filenames menu option is available only in later versions of GNOME Terminal. Therefore, you may not see that menu option on your system.
The View menu, shown in Table 2.6, contains items for controlling how the CLI session windows appear. These options can be helpful for individuals with visual impairment.
Table 2.6 The View Menu
|
Name |
Shortcut Key |
Description |
|
Show Menubar |
None |
Toggles on/off the menu bar display |
|
Full Screen |
F11 |
Toggles on/off the terminal window filling the entire desktop |
|
Zoom In |
Ctrl++ |
Enlarges the font size in the window incrementally |
|
Zoom Out |
Ctrl+- |
Reduces the font size in the window incrementally |
|
Normal Size |
Ctrl+0 |
Returns the font size to default |
Be aware that if you toggle off the menu bar display, the session's menu bar disappears. However, you can easily get the menu bar to display again by right-clicking in any terminal session window and toggling on the Show Menubar option.
The Search menu, shown in Table 2.7, contains items for conducting simple searches within the terminal session. These searches are similar to ones you may have conducted in a network browser or word processor.
Table 2.7 The Search Menu
|
Name |
Shortcut Key |
Description |
|
Find |
Shift+Ctrl+F |
Opens Find window to provide designated text search options |
|
Find Next |
Shift+Ctrl+H |
Searches forward from current terminal session location for designated text |
|
Find Previous |
Shift+Ctrl+G |
Searches backward from current terminal session location for designated text |
The Terminal menu, shown in Table 2.8, contains options for controlling the terminal emulation session features. There are no shortcut keys to access these items.
Table 2.8 The Terminal Menu
|
Name |
Description |
|
Change Profile |
Switches to a new profile configuration |
|
Set Title |
Modifies session tab title bar setting |
|
Set Character Encoding |
Selects character set used to send and display characters |
|
Reset |
Sends reset terminal session control code |
|
Reset and Clear |
Sends reset terminal session control code and clears terminal session screen |
|
Window Size List |
Lists window sizes for adjusting the current terminal window size |
The Reset option is extremely useful. One day, you may accidently cause your terminal session to display random characters and symbols. When this occurs, the text is unreadable. It is typically caused by displaying a non-text file to the screen. You can quickly get the terminal session back to normal by selecting Reset or Reset and Clear.
The Tabs menu, shown in Table 2.9, provides items for controlling the location of the tabs and selecting which tab is active. This menu displays only when you have more than one tab session open.
Table 2.9 The Tabs Menu
|
Name |
Shortcut Key |
Description |
|
Next Tab |
Ctrl+Page Down |
Makes the next tab in the list active |
|
Previous Tab |
Ctrl+Page Up |
Makes the previous tab in the list active |
|
Move Tab Left |
Shift+Ctrl+Page Up |
Shuffles the current tab in front of the previous tab |
|
Move Tab Right |
Shift+Ctrl+Page Down |
Shuffles the current tab in front of the next tab |
|
Detach Tab |
None |
Removes the tab and starts a new GNOME Terminal window using this tab session |
|
Tab List |
None |
Lists the currently running tabs (Select a tab to jump to that session.) |
|
Terminal List |
None |
Lists the currently running terminals (Select a terminal to jump to that session. This is displayed only if multiple window sessions are open.) |
Finally, the Help menu contains two menu options. Contents provides a full GNOME Terminal manual so you can research individual GNOME Terminal items and features. The About option shows you the current GNOME Terminal version that's running.
Besides the GNOME terminal emulator package, another commonly used package is Konsole Terminal. In many ways, Konsole Terminal is similar to GNOME Terminal. However, enough differences exist to warrant its own section.
Using the Konsole Terminal Emulator
The KDE Desktop Project created its own terminal emulation package called Konsole Terminal. The Konsole package incorporates basic terminal emulation features, along with more advanced ones expected from a graphical application. This section describes Konsole Terminal features and shows you how to use them.
Accessing the Konsole Terminal
The Konsole Terminal is the default terminal emulator for the KDE desktop environment. You can easily access it via the KDE environment's menu system. In other desktop environments, accessing the Konsole Terminal can be a little more difficult.
In the KDE desktop environment, you can access the Konsole Terminal by clicking the icon labeled Kickoff Application Launcher in the lower-left corner of the screen. Then click Applications⇨System⇨Terminal (Konsole).
Note
You may see two terminal menu options within the KDE menu environment. If you do, the Terminal menu option with the words Konsole beneath it is the Konsole terminal.
In the GNOME desktop environment, the Konsole terminal is typically not installed by default. If Konsole Terminal has been installed, you can access it via the GNOME menu system. In the upper-left corner of the window, click Applications⇨System Tools⇨Konsole.
Note
You may not have the Konsole terminal emulation package installed on your system. If you would like to install it, read through Chapter 9 to learn how to install software via the command line.
In the Unity desktop environment, if Konsole has been installed, you can access it via Dash⇨Search and type Konsole. The Konsole Terminal shows up in the Dash home area as an application named Konsole. Click that icon to open the Konsole terminal emulator.
Figure 2.4 shows the Konsole Terminal. It was accessed on a KDE desktop environment in a CentOS Linux distribution.
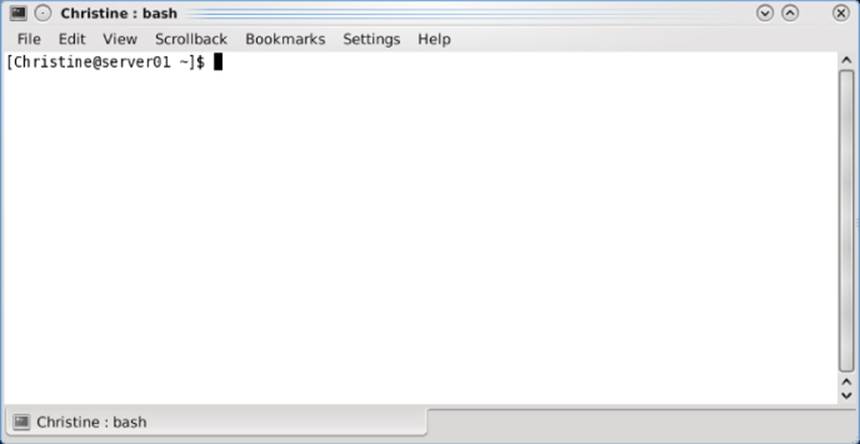
Figure 2.4 The Konsole Terminal
Remember that, in most desktop environments, you can create a launcher to access applications such as the Konsole Terminal. The command you need to type for the launcher to start up the Konsole terminal emulator is konsole. Also, if the Konsole Terminal is installed, you can start it from another terminal emulator by typing konsole and pressing Enter.
The Konsole Terminal, similar to GNOME Terminal, has several configuration options provided by menus and shortcut keys. The following section describes these various options.
The Menu Bar
The Konsole Terminal menu bar contains the configuration and customization options you need to easily view and change features in your terminal emulation session. The following tables briefly describe the menu options and associated shortcut keys.
Tip
The Konsole Terminal provides a simple menu when you right-click in the active session area. Several menu items are available in this easy-to-access menu.
The File menu, shown in Table 2.10, provides options for starting a new tab in the current window or in a new window.
Table 2.10 The File Menu
|
Name |
Shortcut Key |
Description |
|
New Tab |
Ctrl+Shift+N |
Starts a new shell session in a new tab in the existing Konsole Terminal window |
|
New Window |
Ctrl+Shift+M |
Starts a new shell session in a new Konsole Terminal window |
|
Shell |
None |
Opens the default profile, Shell |
|
Open Browser Here |
None |
Opens the default file browser application |
|
Close Tab |
Ctrl+Shift+W |
Closes the current tab session |
|
Quit |
Ctrl+Shift+Q |
Quits the Konsole Terminal emulation application |
When you first start the Konsole Terminal, the only profile listed in the menu is Shell. As more profiles are created and saved, their names appear in the menu list.
Note
As you read through these Konsole Terminal menu options, keep in mind that your Linux distribution's Konsole Terminal may have very different menu options available. This is because some Linux distributions have kept older versions of the Konsole Terminal emulation package.
The Edit menu, shown in Table 2.11, provides options for handling text in the session. Also, managing tab names is in this options list.
Table 2.11 The Edit Menu
|
Name |
Shortcut Key |
Description |
|
Copy |
Ctrl+Shift+C |
Copies selected text to the Konsole clipboard |
|
Paste |
Ctrl+Shift+V |
Pastes text from the Konsole clipboard into a session |
|
Rename Tab |
Ctrl+Alt+S |
Modifies session tab title bar setting |
|
Copy Input To |
None |
Starts/stops session input copies to chosen additional sessions |
|
Clear Display |
None |
Clears the terminal session screen |
|
Clear & Reset |
None |
Clears the terminal session screen and sends the reset terminal session control code |
Konsole provides an excellent method for tracking what function is taking place in each tab session. Using the Rename Tab menu option, you can name a tab to match its current task. This helps in tracking which open tab session is performing what function.
The View menu, shown in Table 2.12, contains items for controlling individual session views in the Konsole Terminal window. In addition, options are available that aid in monitoring terminal session activity.
Table 2.12 The View Menu
|
Name |
Shortcut Key |
Description |
|
Split View |
None |
Controls the multiple tab session display within the current Konsole Terminal window |
|
Detach View |
Ctrl+Shift+H |
Removes a tab session and starts a new Konsole Terminal window using this tab session |
|
Show Menu Bar |
None |
Toggles on/off Menu bar display |
|
Full Screen Mode |
Ctrl+Shift+F11 |
Toggles on/off the terminal window filling the entire monitor display area |
|
Monitor for Silence |
Ctrl+Shift+I |
Toggles on/off a special message for tab silence |
|
Monitor for Activity |
Ctrl+Shift+A |
Toggles on/off a special message for tab activity |
|
Character Encoding |
None |
Selects the character set used to send and display characters |
|
Increase Text Size |
Ctrl++ |
Enlarges the font size in the window incrementally |
|
Decrease Text Size |
Ctrl+- |
Reduces the font size in the window incrementally |
The Monitor for Silence menu option is used for indicating tab silence. Tab silence occurs when no new text appears in the current tab session for 10 seconds. This allows you to switch to another tab while waiting for application output to stop.
Tab activity, toggled by the Monitor for Activity option, issues a special message when new text appears in the tab session. This option allows you to be notified when output from an application occurs.
Konsole retains a history, formally called a scrollback buffer, for each tab. The history contains output text that has scrolled out of the terminal viewing area. By default, the last 1,000 lines in the scrollback buffer are retained. The Scrollback menu, shown in Table 2.13, contains options for viewing this buffer.
Table 2.13 The Scrollback Menu
|
Name |
Shortcut Key |
Description |
|
Search Output |
Ctrl+Shift+F |
Opens the Find window at the bottom of the Konsole Terminal window to provide scrollback text search options |
|
Find Next |
F3 |
Finds the next text match in more recent scrollback buffer history |
|
Find Previous |
Shift+F3 |
Finds the next text match in older scrollback buffer history |
|
Save Output |
None |
Saves scrollback buffer contents to a text or HTML file |
|
Scrollback Options |
None |
Opens the Scrollback Options window to configure scrollback buffer options |
|
Clear Scrollback |
None |
Removes scrollback buffer contents |
|
Clear Scrollback & Reset |
Ctrl+Shift+X |
Removes scrollback buffer contents and resets the terminal window |
You can scroll back through the scrollback buffer by simply using the scrollbar in the viewing area. Also, you can scroll back line by line by pressing the Shift+Up Arrow or scroll back a page (24 lines) at a time by pressing Shift+Page Up.
The Bookmarks menu options, shown in Table 2.14, provide a way to manage bookmarks set in the Konsole Terminal window. A bookmark enables you to save your active session's directory location and then easily return there in either the same session or a new session.
Table 2.14 The Bookmarks Menu
|
Name |
Shortcut Key |
Description |
|
Add Bookmark |
Ctrl+Shift+B |
Creates a new bookmark at the current directory location |
|
Bookmark Tabs as Folder |
None |
Creates a new bookmark for all current terminal tab sessions |
|
New Bookmark Folder |
None |
Creates a new bookmark storage folder |
|
Edit Bookmarks |
None |
Edits existing bookmarks |
The Settings menu, shown in Table 2.15, allows you to customize and manage your profiles. Also, you can add a little more functionality to your current tab session. There are no shortcut keys to access these items.
Table 2.15 The Settings Menu
|
Name |
Description |
|
Change Profile |
Applies to the current tab a selected profile |
|
Edit Current Profile |
Opens the Edit Profile window to provide profile configuration options |
|
Manage Profiles |
Opens the Manage Profile window to provide profile management options |
|
Configure Shortcuts |
Creates Konsole Terminal command keyboard shortcuts |
|
Configure Notifications |
Creates custom Konsole Terminal schemas and sessions |
Configure Notifications allows you to associate specific events that can occur within a session with different actions. When one of the events occurs, the defined action (or actions) is taken.
The Help menu, shown in Table 2.16, provides the full Konsole handbook (if KDE handbooks were installed in your Linux distribution) and the standard About Konsole dialog box.
Table 2.16 The Help Menu
|
Name |
Shortcut Key |
Description |
|
Konsole Handbook |
None |
Contains the full Konsole Handbook |
|
What's This? |
Shift+F1 |
Contains help messages for terminal widgets |
|
Report Bug |
None |
Opens the Submit Bug Report form |
|
Switch Application Language |
None |
Opens the Switch Application's Language form |
|
About Konsole |
None |
Displays the current Konsole Terminal version |
|
About KDE |
Displays the current KDE desktop environment version |
Rather extensive documentation is provided to help you use the Konsole terminal emulator package. In addition to help items, you are provided with a Bug Report form to submit to the Konsole Terminal developers when you encounter a program bug.
The Konsole terminal emulator package is young compared to another popular package, xterm. In the next section, we explore the “old-timer” xterm.
Using the xterm Terminal Emulator
The oldest and most basic of terminal emulation packages is xterm. The xterm package has been around since before the original days of X Window, a popular display server, and it's often included by default in distributions.
Although xterm is a full terminal emulation package, it doesn't require many resources (such as memory) to operate. Because of this, the xterm package is still popular in Linux distributions designed to run on older hardware. Some graphical desktop environments use it as the default terminal emulation package.
Although it doesn't offer many fancy features, the xterm package does one thing extremely well: It emulates older terminals, such as the Digital Equipment Corporation (DEC) VT102, VT220, and Tektronix 4014 terminals. For the VT102 and VT220 terminals, xterm can even emulate the VT series of color control codes, allowing you to use color in your scripts.
Note
The DEC VT102 and VT220 were dumb text terminals popular for connecting to Unix systems in the 1980s and early 1990s. A VT102/VT220 could display text and display rudimentary graphics using block mode graphics. This style of terminal access is still used in many business environments today, thus keeping VT102/VT220 emulation popular.
Figure 2.5 shows what the basic xterm display looks like running on a graphical Linux desktop. You can see it is very basic.
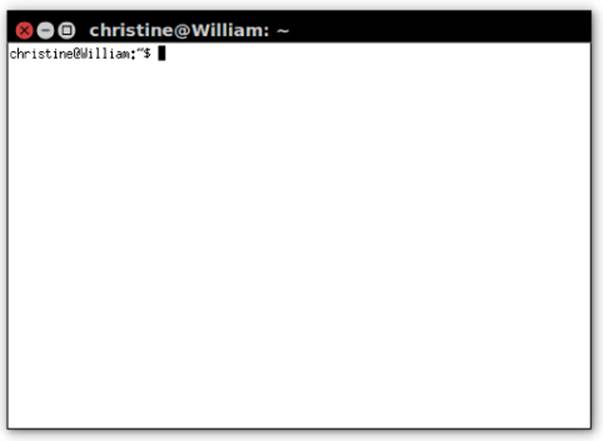
Figure 2.5 The xterm Terminal
The xterm terminal emulator can be tricky to find these days. Often, it is not included in a desktop environment graphical menu arrangement.
Accessing xterm
In Ubuntu's Unity desktop, xterm is installed by default. You can access it via Dash⇨Search and type xterm. xterm shows up in the Dash home area as an application named XTerm. Click that icon to open the xterm terminal emulator.
Note
You may see another terminal called UXTerm when you search for xterm on Ubuntu. This is simply the xterm emulator package with Unicode support.
In the GNOME and KDE desktop environment, xterm is not installed by default. You must install it first (see Chapter 9 for help on installing software packages). After it's installed, you must start xterm from another terminal emulator. Open a terminal emulator for CLI access, type xterm, and press Enter. Also, remember that you can create your own desktop launcher to startup xterm.
The xterm package allows you to set individual features using command line parameters. The following sections discuss these features and how to change them.
Command Line Parameters
The list of xterm command line parameters is extensive. You can control lots of features to customize the terminal emulation features, such as enabling or disabling individual VT emulations.
Note
xterm has a huge number of configuration options — so many that they cannot all be covered here. Extensive documentation is available via the bash manual. Accessing the bash manual is covered in Chapter 3. In addition, the xterm development team provides some excellent help on its website: http://invisible-island.net/xterm/.
You can invoke certain configuration options by adding a parameter to the xterm command. For example, to have the xterm emulate a DEC VT100 terminal, type the command xterm -ti vt100 and press Enter. Table 2.17 shows some parameters you can include when invoking the xterm terminal emulator software.
Table 2.17 xterm Command Line Parameters
|
Parameter |
Description |
|
-bg color |
Specifies the color to use for the terminal background |
|
-fb font |
Specifies the font to use for bold text |
|
-fg color |
Specifies the color to use for the foreground text |
|
-fn font |
Specifies the font to use for text |
|
-fw font |
Specifies the font to use for wide text |
|
-lf filename |
Specifies the filename to use for screen logging |
|
-ms color |
Specifies the color used for the text cursor |
|
-name name |
Specifies the name of the application that appears in the title bar |
|
-ti terminal |
Specifies the terminal type to emulate |
Some xterm command line parameters use a plus sign (+) or minus sign (-) to signify how a feature is set. A plus sign may turn a feature on, while a minus sign turns it off. However, the opposite can be true as well. A plus sign may disable a feature, while a minus sign enables it, such as when using the bc parameter. Table 2.18 lists some of the more common features you can set using the +/- command line parameters.
Table 2.18 xterm +/- Command Line Parameters
|
Parameter |
Description |
|
ah |
Enables/disables highlighted text cursor |
|
aw |
Enables/disables auto-line-wrap |
|
bc |
Enables/disables text cursor blinking |
|
cm |
Enables/disables recognition of ANSI color change control codes |
|
fullscreen |
Enables/disables full screen mode |
|
j |
Enables/disables jump scrolling |
|
l |
Enables/disables logging screen data to a log file |
|
mb |
Enables/disables margin bell |
|
rv |
Enables/disables reverse video colors |
|
t |
Enables/disables Tektronix mode |
It is important to note that not all implementations of xterm support all these command line parameters. You can determine which parameters your xterm implements by using the -help parameter when you start xterm on your system.
Now that you have been introduced to three terminal emulator packages, the big question is which is the best terminal emulator to use? There is no definite answer to that question. Which terminal emulator package you use depends upon your individual needs and desires. But it is great to have so many choices.
Summary
To start learning Linux command line commands, you need access to a CLI. In the world of graphical interfaces, this can sometimes be challenging. This chapter discussed different interfaces you should consider to get to the Linux command line.
First, this chapter discussed the difference between accessing the CLI via a virtual console terminal (a terminal outside the GUI) and a graphical terminal emulation package (a terminal inside the GUI). We took a brief look at the basic differences between these two access methods.
Next, we explored in detail accessing the CLI via a virtual console terminal, including specifics on how to change console terminal configuration options such as background color.
After looking at virtual console terminals, the chapter traveled through accessing the CLI via a graphical terminal emulator. Primarily, we covered three different types of terminal emulators: GNOME Terminal, Konsole Terminal, and xterm.
This chapter also covered the GNOME desktop project's GNOME terminal emulation package. GNOME Terminal is typically installed by default on the GNOME desktop environment. It provides convenient ways to set many terminal features via menu options and shortcut keys.
We also covered the KDE desktop project's Konsole terminal emulation package. The Konsole Terminal is typically installed by default on the KDE desktop environment. It provides several nice features, such as the ability to monitor a terminal for silence.
Finally, we covered the xterm terminal emulator package. xterm was the first terminal emulator available for Linux. It can emulate older terminal hardware such as the VT and Tektronix terminals.
In the next chapter, you start looking at the Linux command line commands. It walks you through the commands necessary to navigate around the Linux filesystem, and to create, delete, and manipulate files.
All materials on the site are licensed Creative Commons Attribution-Sharealike 3.0 Unported CC BY-SA 3.0 & GNU Free Documentation License (GFDL)
If you are the copyright holder of any material contained on our site and intend to remove it, please contact our site administrator for approval.
© 2016-2026 All site design rights belong to S.Y.A.