Wiley Linux Command Line and Shell Scripting Bible 3rd (2015)
Part I. The Linux Command Line
Chapter 3. Basic bash Shell Commands
In This Chapter
1. Interacting with the shell
2. Using the bash manual
3. Traversing the filesystem
4. Listing files and directories
5. Managing files and directories
6. Viewing file contents
The default shell used in many Linux distributions is the GNU bash shell. This chapter describes the basic features available in the bash shell, such as the bash manual, tab auto-completion and how to display a file's contents. You will walk through how to work with Linux files and directories using the basic commands provided by the bash shell. If you're already comfortable with the basics in the Linux environment, feel free to skip this chapter and continue with Chapter 4 to see more advanced commands.
Starting the Shell
The GNU bash shell is a program that provides interactive access to the Linux system. It runs as a regular program and is normally started whenever a user logs in to a terminal. The shell that the system starts depends on your user ID configuration.
The /etc/passwd file contains a list of all the system user accounts, along with some basic configuration information about each user. Here's a sample entry from a /etc/passwd file:
christine:x:501:501:Christine Bresnahan:/home/christine:/bin/bash
Each entry has seven data fields, with fields separated by colons. The system uses the data in these fields to assign specific features for the user. Most of these entries are discussed in more detail in Chapter 7. For now, just pay attention to the last field, which specifies the user's shell program.
Note
Though the focus is on the GNU bash shell, additional shells are reviewed in this book. Chapter 23 covers working with alternative shells, such as dash and tcsh.
In the earlier /etc/passwd sample entry, the user christine has /bin/bash set as her default shell program. This means when christine logs into the Linux system, the bash shell program is automatically started.
Although the bash shell program is automatically started at login, whether a shell command line interface (CLI) is presented depends on which login method is used. If a virtual console terminal is used to log in, the CLI prompt is automatically presented, and you can begin to type shell commands. However, if you log into the Linux system via a graphical desktop environment, you need to start a graphical terminal emulator to access the shell CLI prompt.
Using the Shell Prompt
After you start a terminal emulation package or log in to a Linux virtual console, you get access to the shell CLI prompt. The prompt is your gateway to the shell. This is the place where you enter shell commands.
The default prompt symbol for the bash shell is the dollar sign ($). This symbol indicates that the shell is waiting for you to enter text. Different Linux distributions use different formats for the prompt. On this Ubuntu Linux system, the shell prompt looks like this:
christine@server01:∼$
On the CentOS Linux system, it looks like this:
[christine@server01 ∼]$
Besides acting as your access point to the shell, the prompt can provide additional helpful information. In the two preceding examples, the current user ID name, christine, is shown in the prompt. Also, the name of the system is shown, server01. You learn later in this chapter about additional items shown in the prompt.
Tip
If you are new to the CLI, keep in mind that, after you type in a shell command at the prompt, you need to press the Enter key for the shell to act upon your command.
The shell prompt is not static. It can be changed to suit your needs. Chapter 6, “Using Linux Environment Variables,” covers modifying your shell CLI prompt configuration.
Think of the shell CLI prompt as a helpmate, assisting you with your Linux system, giving you helpful insights, and letting you know when the shell is ready for new commands. Another helpful item in the shell is the bash Manual.
Interacting with the bash Manual
Most Linux distributions include an online manual for looking up information on shell commands, as well as lots of other GNU utilities included in the distribution. You should become familiar with the manual, because it's invaluable for working with commands, especially when you're trying to figure out various command line parameters.
The man command provides access to the manual pages stored on the Linux system. Entering the man command followed by a specific command name provides that utility's manual entry. Figure 3.1 shows an example of looking up the xterm command's manual pages. This page was reached by typing the command man xterm.
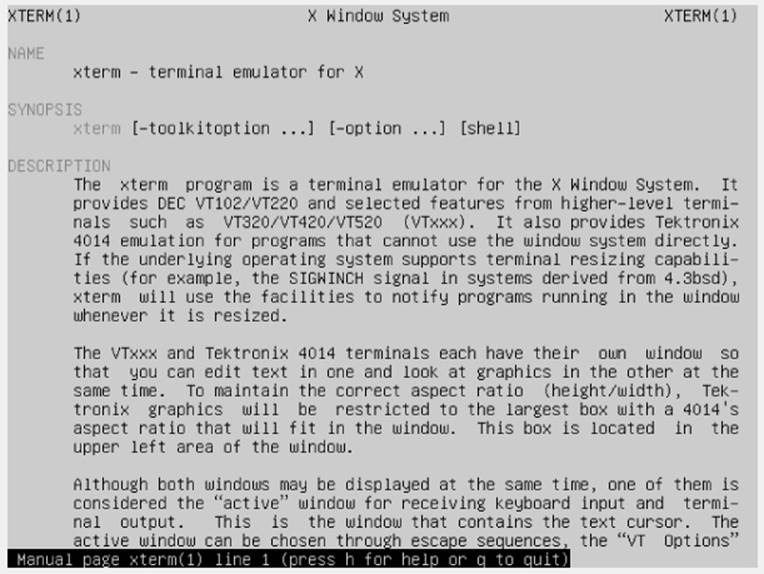
Figure 3.1 Manual pages for the xterm command
Notice the xterm command DESCRIPTION paragraphs in Figure 3.1. They are rather sparse and full of technical jargon. The bash manual is not a step-by-step guide, but instead a quick reference.
Tip
If you are new to the bash shell, you may find that the man pages are not very helpful at first. However, get into the habit of using them, especially to read the first paragraph or two of a command's DESCRIPTION section. Eventually, you will learn the technical lingo, and the man pages will become more helpful to you.
When you use the man command to view a command's manual pages, they are displayed with something called a pager. A pager is a utility that allows you to page through displayed text. Thus, you can page through the man pages by pressing the spacebar, or you can go line by line using the Enter key. In addition, you can use the arrow keys to scroll forward and backward through the man page text (assuming that your terminal emulation package supports the arrow key functions).
When you are finished with the man pages, press the q key to quit. When you quit the man pages, you receive a shell CLI prompt, indicating the shell is waiting for your next command.
Tip
The bash manual even has reference information on itself. Type man man to see manual pages concerning the man pages
The manual page divides information about a command into separate sections. Each section has a conventional naming standard as shown in Table 3.1.
Table 3.1 The Linux man Page Conventional Section Names
|
Section |
Description |
|
Name |
Displays command name and a short description |
|
Synopsis |
Shows command syntax |
|
Configuration |
Provides configuration information |
|
Description |
Describes command generally |
|
Options |
Describes command option(s) |
|
Exit Status |
Defines command exit status indicator(s) |
|
Return Value |
Describes command return value(s) |
|
Errors |
Provides command error messages |
|
Environment |
Describes environment variable(s) used |
|
Files |
Defines files used by command |
|
Versions |
Describes command version information |
|
Conforming To |
Provides standards followed |
|
Notes |
Describes additional helpful command material |
|
Bugs |
Provides the location to report found bugs |
|
Example |
Shows command use examples |
|
Authors |
Provides information on command developers |
|
Copyright |
Defines command code copyright status |
|
See Also |
Refers similar available commands |
Not every command's man page has all the section names described in Table 3.1. Also, some commands have section names that are not listed in the conventional standard.
Tip
What if you can't remember the command name? You can search the man pages using keywords. The syntax is man -k keyword. For example, to find commands dealing with the terminals, you type man -k terminal.
In addition to the conventionally named sections for a man page, there are man page section areas. Each section area has an assigned number, starting at 1 and going to 9; they are listed in Table 3.2.
Table 3.2 The Linux man Page Section Areas
|
Section Number |
Area Contents |
|
1 |
Executable programs or shell commands |
|
2 |
System calls |
|
3 |
Library calls |
|
4 |
Special files |
|
5 |
File formats and conventions |
|
6 |
Games |
|
7 |
Overviews, conventions, and miscellaneous |
|
8 |
Super user and system administration commands |
|
9 |
Kernel routines |
Typically, the man utility provides the lowest numbered content area for the command. For example, looking back to Figure 3.1 where the command man xterm was entered, notice that in the upper-left and upper-right display corners, the word XTERM is followed by a number in parentheses, (1). This means the man pages displayed are coming from content area 1 (executable programs or shell commands).
Occasionally, a command has man pages in multiple section content areas. For example, there is a command called hostname. The man pages contain information on the command as well as an overview section on system hostnames. To see the pages desired, you typeman section# topic. For the command's man pages in section 1, type man 1 hostname. For the overview man pages in section 7, type man 7 hostname.
You can also step through an introduction to the various section content areas by typing man 1 intro to read about section 1, man 2 intro to read about section 2, man 3 intro to read about section 3, and so on.
The man pages are not the only reference. There are also the information pages called info pages. You can learn about the info pages by typing info info.
In addition, most commands accept the -help or --help option. For example, you can type hostname -help to see a help screen. For more information on using help, type help help. (See a pattern here?)
Obviously, several helpful resources are available for reference. However, many basic shell concepts still need detailed explanation. In the next section, we cover navigating through the Linux filesystem.
Navigating the Filesystem
When you log into the system and reach the shell command prompt, you are usually placed in your home directory. Often, you want to explore other areas in the Linux system besides just your home directory. This section describes how to do that using shell commands. To start, you need to take a tour of just what the Linux filesystem looks like so you know where you are going.
Looking at the Linux filesystem
If you're new to the Linux system, you may be confused by how it references files and directories, especially if you're used to the way the Microsoft Windows operating system does that. Before exploring the Linux system, it helps to have an understanding of how it's laid out.
The first difference you'll notice is that Linux does not use drive letters in pathnames. In the Windows world, the physical drives installed on the computer determine the pathname of the file. Windows assigns a letter to each physical disk drive, and each drive contains its own directory structure for accessing files stored on it.
For example, in Windows you may be used to seeing the file paths such as:
c:\Users\Rich\Documents\test.doc
The Windows file path tells you exactly which physical disk partition contains the file named test.doc. For example, if you saved test.doc on a flash drive, designated by the J drive, the file path would be J:∖test.doc. This path indicates that the file is located at the root of the drive assigned the letter J.
This is not the method used by Linux. Linux stores files within a single directory structure, called a virtual directory. The virtual directory contains file paths from all the storage devices installed on the computer, merged into a single directory structure.
The Linux virtual directory structure contains a single base directory, called the root. Directories and files beneath the root directory are listed based on the directory path used to get to them, similar to the way Windows does it.
Tip
You'll notice that Linux uses a forward slash (/) instead of a backward slash (∖) to denote directories in file paths. The backslash character in Linux denotes an escape character and causes all sorts of problems when you use it in a file path. This may take some getting used to if you're coming from a Windows environment.
In Linux, you will see file paths similar to the following:
/home/Rich/Documents/test.doc
This indicates the file test.doc is in the directory Documents, under the directory rich, which is contained in the directory home. Notice that the path doesn't provide any information as to which physical disk the file is stored on.
The tricky part about the Linux virtual directory is how it incorporates each storage device. The first hard drive installed in a Linux system is called the root drive. The root drive contains the virtual directory core. Everything else builds from there.
On the root drive, Linux can use special directories as mount points. Mount points are directories in the virtual directory where you can assign additional storage devices. Linux causes files and directories to appear within these mount point directories, even though they are physically stored on a different drive.
Often system files are physically stored on the root drive. User files are typically stored on a separate drive or drives, as shown in Figure 3.2.
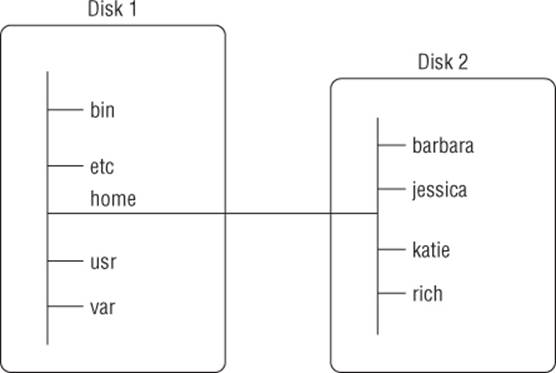
Figure 3.2 The Linux file structure
Figure 3.2 shows two hard drives on the computer. One hard drive is associated with the root of the virtual directory (indicated by a single forward slash). Other hard drives can be mounted anywhere in the virtual directory structure. In this example, the second hard drive is mounted at the location /home, which is where the user directories are located.
The Linux filesystem structure originally evolved from the Unix file structure. In a Linux filesystem, common directory names are used for common functions. Table 3.3 lists some of the more common Linux virtual top-level directory names and their contents.
Table 3.3 Common Linux Directory Names
|
Directory |
Usage |
|
/ |
root of the virtual directory, where normally, no files are placed |
|
/bin |
binary directory, where many GNU user-level utilities are stored |
|
/boot |
boot directory, where boot files are stored |
|
/dev |
device directory, where Linux creates device nodes |
|
/etc |
system configuration files directory |
|
/home |
home directory, where Linux creates user directories |
|
/lib |
library directory, where system and application library files are stored |
|
/media |
media directory, a common place for mount points used for removable media |
|
/mnt |
mount directory, another common place for mount points used for removable media |
|
/opt |
optional directory, often used to store third-party software packages and data files |
|
/proc |
process directory, where current hardware and process information is stored |
|
/root |
root home directory |
|
/sbin |
system binary directory, where many GNU admin-level utilities are stored |
|
/run |
run directory, where runtime data is held during system operation |
|
/srv |
service directory, where local services store their files |
|
/sys |
system directory, where system hardware information files are stored |
|
/tmp |
temporary directory, where temporary work files can be created and destroyed |
|
/usr |
user binary directory, where the bulk of GNU user-level utilities and data files are stored |
|
/var |
variable directory, for files that change frequently, such as log files |
The common Linux directory names are based upon the Filesystem Hierarchy Standard (FHS). Many Linux distributions maintain compliance with FHS. Therefore, you should be able to easily find files on any FHS-compliant Linux systems.
Note
The FHS is occasionally updated. You may find that some Linux distributions are still using an older FHS standard, while other distributions only partially implement the current standard. To keep up to date on the FHS standard, visit its official home athttp://www.pathname.com/fhs/.
When you log in to your system and reach a shell CLI prompt, your session starts in your home directory. Your home directory is a unique directory assigned to your user account. When a user account is created, the system normally assigns a unique directory for the account (see Chapter 7).
You can move around the virtual directory using a graphical interface. However, to move around the virtual directory from a CLI prompt, you need to learn to use the cd command.
Traversing directories
You use the change directory command (cd) to move your shell session to another directory in the Linux filesystem. The cd command syntax is pretty simplistic: cd destination.
The cd command may take a single parameter, destination, which specifies the directory name you want to go to. If you don't specify a destination on the cd command, it takes you to your home directory.
The destination parameter can be expressed using two different methods. One method is using an absolute directory reference. The other method uses a relative directory reference.
The following sections describe each of these methods. The differences between these two methods are important to understand as you traverse the filesystem.
Using absolute directory references
You can reference a directory name within the virtual directory system using an absolute directory reference. The absolute directory reference defines exactly where the directory is in the virtual directory structure, starting at the root. Think of the absolute directory reference as the full name for a directory.
An absolute directory reference always begins with a forward slash (/), indicating the virtual directory system's root. Thus, to reference user binaries, contained within the bin directory stored within the usr directory, you would use an absolute directory reference as follows:
/usr/bin
With the absolute directory reference, there's no doubt as to exactly where you want to go. To move to a specific location in the filesystem using the absolute directory reference, you just specify the full pathname in the cd command:
christine@server01:∼$ cd /usr/bin
christine@server01:/usr/bin$
Notice in the preceding example that the prompt originally had a tilde (∼) in it. After the change to a new directory occurred, the tilde was replaced by /usr/bin. This is where a CLI prompt can help you keep track of where you are in the virtual directory structure. The tilde indicates that your shell session is located in your home directory. After you move out of your home directory, the absolute directory reference is shown in the prompt, if the prompt has been configured to do so.
Note
If your shell CLI prompt does not show your shell session's current location, then it has not been configured to do so. Chapter 6 shows you how to make configuration changes, if you desire modifications to your CLI prompt.
If your prompt has not been configured to show the shell session's current absolute directory location, then you can display the location via a shell command. The pwd command displays the shell session's current directory location, which is called the present working directory. An example of using the pwd command is shown here.
christine@server01:/usr/bin$ pwd
/usr/bin
christine@server01:/usr/bin$
Tip
It is a good habit to use the pwd command whenever you change to a new present working directory. Because many shell commands operate on the present working directory, you always want to make sure you are in the correct directory before issuing a command.
You can move to any level within the entire Linux virtual directory structure from any level using the absolute directory reference:
christine@server01:/usr/bin$ cd /var/log
christine@server01:/var/log$
christine@server01:/var/log$ pwd
/var/log
christine@server01:/var/log$
You can also quickly jump to your home directory from any level within the Linux virtual directory structure:
christine@server01:/var/log$ cd
christine@server01:~$
christine@server01:∼$ pwd
/home/christine
christine@server01:∼$
However, if you're just working within your own home directory structure, often using absolute directory references can get tedious. For example, if you're already in the directory /home/christine, it seems somewhat cumbersome to have to type the command:
cd /home/christine/Documents
just to get to your Documents directory. Fortunately, there's a simpler solution.
Using relative directory references
Relative directory references allow you to specify a destination directory reference relative to your current location. A relative directory reference doesn't start with a forward slash (/).
Instead, a relative directory reference starts with either a directory name (if you're traversing to a directory under your current directory) or a special character. For example, if you are in your home directory and want to move to your Documents subdirectory, you can use the cd command along with a relative directory reference:
christine@server01:∼$ pwd
/home/christine
christine@server01:~$
christine@server01:∼$ cd Documents
christine@server01:∼/Documents$ pwd
/home/christine/Documents
christine@server01:~/Documents$
In the preceding example, note that no forward slash (/) was used. Instead a relative directory reference was used and the present work directory was changed from /home/christine to /home/christine/Documents, with much less typing.
Also notice in the example that if the prompt is configured to display the present working directory, it keeps the tilde in the display. This shows that the present working directory is in a directory under the user's home directory.
Tip
If you are new to the command line and the Linux directory structure, it is recommended that you stick with absolute directory references for a while. After you become more familiar with the directory layout, switch to using relative directory references.
You can use a relative directory reference with the cd command in any directory containing subdirectories. You can also use a special character to indicate a relative directory location.
The two special characters used for relative directory references are:
· The single dot (.) to represent the current directory
· The double dot (..) to represent the parent directory
You can use the single dot, but it doesn't make sense to use it with the cd command. Later in the chapter, you will see how another command uses the single dot for relative directory references effectively.
The double dot character is extremely handy when trying to traverse a directory hierarchy. For example, if you are in the Documents directory under your home directory and need to go to your Downloads directory, also under your home directory, you can do this:
christine@server01:∼/Documents$ pwd
/home/christine/Documents
christine@server01:∼/Documents$ cd ../Downloads
christine@server01:∼/Downloads$ pwd
/home/christine/Downloads
christine@server01:∼/Downloads$
The double dot character takes you back up one level to your home directory; then the /Downloads portion of the command takes you back down into the Downloads directory. You can use as many double dot characters as necessary to move around. For example, if you are in your home directory (/home/christine) and want to go to the /etc directory, you could type the following:
christine@server01:∼$ cd ../../etc
christine@server01:/etc$ pwd
/etc
christine@server01:/etc$
Of course, in a case like this, you actually have to do more typing rather than just typing the absolute directory reference, /etc. Thus, use a relative directory reference only if it makes sense to do so.
Note
It's helpful to have a long informative shell CLI prompt, as used in this chapter section. However, for clarity purposes, a simple $ prompt is used in the rest of the book's examples.
Now that you know how to traverse the directory system and confirm your present working directory, you can start to explore what's contained within the various directories. The next section takes you through the process of looking at files within the directory structure.
Listing Files and Directories
To see what files are available on the system, use the list command (ls). This section describes the ls command and options available to format the information it can display.
Displaying a basic listing
The ls command at its most basic form displays the files and directories located in your current directory:
$ ls
Desktop Downloads Music Pictures Templates Videos
Documents examples.desktop my_script Public test_file
$
Notice that the ls command produces the listing in alphabetical order (in columns rather than rows). If you're using a terminal emulator that supports color, the ls command may also show different types of entries in different colors. The LS_COLORS environment variable controls this feature. (Environment variables are covered in Chapter 6). Different Linux distributions set this environment variable depending on the capabilities of the terminal emulator.
If you don't have a color terminal emulator, you can use the -F parameter with the ls command to easily distinguish files from directories. Using the -F parameter produces the following output:
$ ls -F
Desktop/ Downloads/ Music/ Pictures/ Templates/ Videos/
Documents/ examples.desktop my_script* Public/ test_file
$
The -F parameter flags the directories with a forward slash (/), to help identify them in the listing. Similarly, it flags executable files (like the my_script file in the preceding code) with an asterisk (*), to help you more easily find files that can be run on the system.
The basic ls command can be somewhat misleading. It shows the files and directories contained in the current directory, but not necessarily all of them. Linux often uses hidden files to store configuration information. In Linux, hidden files are files with filenames starting with a period (.). These files don't appear in the default ls listing. Thus, they are called hidden files.
To display hidden files along with normal files and directories, use the -a parameter. Here is an example of using the -a parameter with the ls command.
$ ls -a
. .compiz examples.desktop Music test_file
.. .config .gconf my_script Videos
.bash_history Desktop .gstreamer-0.10 Pictures .Xauthority
.bash_logout .dmrc .ICEauthority .profile .xsession-errors
.bashrc Documents .local Public .xsession-errors.old
.cache Downloads .mozilla Templates
$
All the files beginning with a period, hidden files, are now shown. Notice that three files begin with .bash. These are hidden files that are used by the bash shell environment. These features are covered in detail in Chapter 6.
The -R parameter is another option the ls command can use. Called the recursive option, it shows files that are contained within subdirectories in the current directory. If you have lots of subdirectories, this can be quite a long listing. Here's a simple example of what the -R parameter produces. The -F option was tacked on to help you see the file types:
$ ls -F -R
.:
Desktop/ Downloads/ Music/ Pictures/ Templates/ Videos/
Documents/ examples.desktop my_script* Public/ test_file
./Desktop:
./Documents:
./Downloads:
./Music:
ILoveLinux.mp3*
./Pictures:
./Public:
./Templates:
./Videos:
$
Notice that the -R parameter shows the contents of the current directory, which are the files from a user's home directory shown in earlier examples. It also shows each subdirectory in the user's home directory and their contents. The only subdirectory containing a file is the Music subdirectory, and it contains the executable file, ILoveLinux.mp3.
Tip
Option parameters don't have to be entered separately as shown in the nearby example: ls -F -R. They can often be combined as follows: ls -FR.
In the previous example, there were no subdirectories within subdirectories. If there had been further subdirectories, the -R parameter would have continued to traverse those as well. As you can see, for large directory structures, this can become quite a large output listing.
Displaying a long listing
In the basic listings, the ls command doesn't produce much information about each file. For listing additional information, another popular parameter is -l. The -l parameter produces a long listing format, providing more information about each file in the directory:
$ ls -l
total 48
drwxr-xr-x 2 christine christine 4096 Apr 22 20:37 Desktop
drwxr-xr-x 2 christine christine 4096 Apr 22 20:37 Documents
drwxr-xr-x 2 christine christine 4096 Apr 22 20:37 Downloads
-rw-r--r-- 1 christine christine 8980 Apr 22 13:36 examples.desktop
-rw-rw-r-- 1 christine christine 0 May 21 13:44 fall
-rw-rw-r-- 1 christine christine 0 May 21 13:44 fell
-rw-rw-r-- 1 christine christine 0 May 21 13:44 fill
-rw-rw-r-- 1 christine christine 0 May 21 13:44 full
drwxr-xr-x 2 christine christine 4096 May 21 11:39 Music
-rw-rw-r-- 1 christine christine 0 May 21 13:25 my_file
-rw-rw-r-- 1 christine christine 0 May 21 13:25 my_scrapt
-rwxrw-r-- 1 christine christine 54 May 21 11:26 my_script
-rw-rw-r-- 1 christine christine 0 May 21 13:42 new_file
drwxr-xr-x 2 christine christine 4096 Apr 22 20:37 Pictures
drwxr-xr-x 2 christine christine 4096 Apr 22 20:37 Public
drwxr-xr-x 2 christine christine 4096 Apr 22 20:37 Templates
-rw-rw-r-- 1 christine christine 0 May 21 11:28 test_file
drwxr-xr-x 2 christine christine 4096 Apr 22 20:37 Videos
$
The long listing format lists each file and subdirectory on a single line. In addition to the filename, the listing shows additional useful information. The first line in the output shows the total number of blocks contained within the directory. After that, each line contains the following information about each file (or directory):
· The file type — such as directory (d), file (-), linked file (l), character device (c), or block device (b)
· The file permissions (see Chapter 6)
· The number of file hard links (See the section “Linking Files” in Chapter 7.)
· The file owner username
· The file primary group name
· The file byte size
· The last time the file was modified
· The filename or directory name
The -l parameter is a powerful tool to have. Armed with this parameter, you can see most of the information you need for any file or directory.
The ls command has lots of parameters that can come in handy as you do file management. If you type at the shell prompt man ls, you see several pages of available parameters for you to use to modify the ls command output.
Don't forget that you can also combine many of the parameters. You can often find a parameter combination that not only displays the desired output, but also is easy to remember, such as ls -alF.
Filtering listing output
As you've seen in the examples, by default the ls command lists all the non-hidden directory files. Sometimes, this can be overkill, especially when you're just looking for information on a few files.
Fortunately, the ls command also provides a way for you to define a filter on the command line. It uses the filter to determine which files or directories it should display in the output.
The filter works as a simple text-matching string. Include the filter after any command line parameters you want to use:
$ ls -l my_script
-rwxrw-r-- 1 christine christine 54 May 21 11:26 my_script
$
When you specify the name of a specific file as the filter, the ls command only shows that file's information. Sometimes, you might not know the exact filename you're looking for. The ls command also recognizes standard wildcard characters and uses them to match patterns within the filter:
· A question mark (?) to represent one character
· An asterisk (*) to represent any number of characters
The question mark can be used to replace exactly one character anywhere in the filter string. For example:
$ ls -l my_scr?pt
-rw-rw-r-- 1 christine christine 0 May 21 13:25 my_scrapt
-rwxrw-r-- 1 christine christine 54 May 21 11:26 my_script
$
The filter my_scr?pt matched two files in the directory. Similarly, the asterisk can be used to match zero or more characters:
$ ls -l my*
-rw-rw-r-- 1 christine christine 0 May 21 13:25 my_file
-rw-rw-r-- 1 christine christine 0 May 21 13:25 my_scrapt
-rwxrw-r-- 1 christine christine 54 May 21 11:26 my_script
$
Using the asterisk finds three different files, starting with the name my. As with the question mark, you can place the asterisks anywhere in the filter:
$ ls -l my_s*t
-rw-rw-r-- 1 christine christine 0 May 21 13:25 my_scrapt
-rwxrw-r-- 1 christine christine 54 May 21 11:26 my_script
$
Using the asterisk and question mark in the filter is called file globbing. File globbing is the processing of pattern matching using wildcards. The wildcards are officially called metacharacter wildcards. You can use more metacharacter wildcards for file globbing than just the asterisk and question mark. You can also use brackets:
$ ls -l my_scr[ai]pt
-rw-rw-r-- 1 christine christine 0 May 21 13:25 my_scrapt
-rwxrw-r-- 1 christine christine 54 May 21 11:26 my_script
$
In this example, we used the brackets along with two potential choices for a single character in that position, a or i. The brackets represent a single character position and give you multiple options for file globbing. You can list choices of characters, as shown in the preceding example, and you can specify a range of characters, such as an alphabetic range [a - i]:
$ ls -l f[a-i]ll
-rw-rw-r-- 1 christine christine 0 May 21 13:44 fall
-rw-rw-r-- 1 christine christine 0 May 21 13:44 fell
-rw-rw-r-- 1 christine christine 0 May 21 13:44 fill
$
Also, you can specify what should not be included in the pattern match by using the exclamation point (!):
$ ls -l f[!a]ll
-rw-rw-r-- 1 christine christine 0 May 21 13:44 fell
-rw-rw-r-- 1 christine christine 0 May 21 13:44 fill
-rw-rw-r-- 1 christine christine 0 May 21 13:44 full
$
File globbing is a powerful feature when searching for files. It can also be used with other shell commands besides ls. You find out more about this later in the chapter.
Handling Files
The shell provides many file manipulation commands on the Linux filesystem. This section walks you through the basic shell commands you need to handle files.
Creating files
Every once in a while you run into a situation where you need to create an empty file. For example, sometimes applications expect a log file to be present before they can write to it. In these situations, you can use the touch command to easily create an empty file:
$ touch test_one
$ ls -l test_one
-rw-rw-r-- 1 christine christine 0 May 21 14:17 test_one
$
The touch command creates the new file you specify and assigns your username as the file owner. Notice in the preceding example that the file size is zero because the touch command just created an empty file.
The touch command can also be used to change the modification time. This is done without changing the file contents:
$ ls -l test_one
-rw-rw-r-- 1 christine christine 0 May 21 14:17 test_one
$ touch test_one
$ ls -l test_one
-rw-rw-r-- 1 christine christine 0 May 21 14:35 test_one
$
The modification time of test_one is now updated to 14:35 from the original time, 14:17. To change only the access time, use the -a parameter with the touch command:
$ ls -l test_one
-rw-rw-r-- 1 christine christine 0 May 21 14:35 test_one
$ touch -a test_one
$ ls -l test_one
-rw-rw-r-- 1 christine christine 0 May 21 14:35 test_one
$ ls -l --time=atime test_one
-rw-rw-r-- 1 christine christine 0 May 21 14:55 test_one
$
In the preceding example, notice that by using only the ls -l command, the access time does not display. This is because the modification time is shown by default. To see a file's access time, you need to add an additional parameter, --time=atime. After we add that parameter in the preceding example, the file's altered access time is displayed.
Creating empty files and altering file timestamps is not something you will do on a Linux system daily. However, copying files is an action you will do often while using the shell.
Copying files
Copying files and directories from one location in the filesystem to another is a common practice for system administrators. The cp command provides this feature.
In its most basic form, the cp command uses two parameters — the source object and the destination object: cp source destination.
When both the source and destination parameters are filenames, the cp command copies the source file to a new destination file. The new file acts like a brand new file, with an updated modification time:
$ cp test_one test_two
$ ls -l test_*
-rw-rw-r-- 1 christine christine 0 May 21 14:35 test_one
-rw-rw-r-- 1 christine christine 0 May 21 15:15 test_two
$
The new file test_two shows a different modification time than the test_one file. If the destination file already exists, the cp command may not prompt you to this fact. It is best to add the -i option to force the shell to ask whether you want to overwrite a file:
$ ls -l test_*
-rw-rw-r-- 1 christine christine 0 May 21 14:35 test_one
-rw-rw-r-- 1 christine christine 0 May 21 15:15 test_two
$
$ cp -i test_one test_two
cp: overwrite 'test_two'? n
$
If you don't answer y, the file copy does not proceed. You can also copy a file into a pre-existing directory:
$ cp -i test_one /home/christine/Documents/
$
$ ls -l /home/christine/Documents
total 0
-rw-rw-r-- 1 christine christine 0 May 21 15:25 test_one
$
The new file is now under the Documents subdirectory, using the same filename as the original.
Note
The preceding example uses a trailing forward slash (/) on the destination directory name. Using the slash indicates Documents is a directory and not a file. This is helpful for clarity purposes and is important when copying single files. If the forward slash is not used and the subdirectory /home/christine/Documents does not exist, problems can occur. In this case, attempting to copy a single file to the Documents subdirectory creates a file named Documents instead, and no error messages display!
This last example used an absolute directory reference, but you can just as easily use a relative directory reference:
$ cp -i test_one Documents/
cp: overwrite 'Documents/test_one'? y
$
$ ls -l Documents
total 0
-rw-rw-r-- 1 christine christine 0 May 21 15:28 test_one
$
Earlier in this chapter, you read about the special symbols that can be used in relative directory references. One of them, the single dot (.), is great to use with the cp command. Remember that the single dot represents your present working directory. If you need to copy a file with a long source object name to your present working directory, the single dot can simplify the task:
$ cp -i /etc/NetworkManager/NetworkManager.conf .
$
$ ls -l NetworkManager.conf
-rw-r--r-- 1 christine christine 76 May 21 15:55 NetworkManager.conf
$
It's hard to see that single dot! If you look closely, you'll see it at the end of the first example code line. Using the single dot symbol is much easier than typing a full destination object name, when you have long source object names.
Tip
There are many more cp command parameters than those described here. Remember that you can see all the different available parameters available for the cp command, by typing man cp.
The -R parameter is a powerful cp command option. It allows you to recursively copy the contents of an entire directory in one command:
$ ls -Fd *Scripts
Scripts/
$ ls -l Scripts/
total 25
-rwxrw-r-- 1 christine christine 929 Apr 2 08:23 file_mod.sh
-rwxrw-r-- 1 christine christine 254 Jan 2 14:18 SGID_search.sh
-rwxrw-r-- 1 christine christine 243 Jan 2 13:42 SUID_search.sh
$
$ cp -R Scripts/ Mod_Scripts
$ ls -Fd *Scripts
Mod_Scripts/ Scripts/
$ ls -l Mod_Scripts
total 25
-rwxrw-r-- 1 christine christine 929 May 21 16:16 file_mod.sh
-rwxrw-r-- 1 christine christine 254 May 21 16:16 SGID_search.sh
-rwxrw-r-- 1 christine christine 243 May 21 16:16 SUID_search.sh
$
The directory Mod_Scripts did not exist prior to the cp -R command. It was created with the cp -R command, and the entire Scripts directory's contents were copied into it. Notice that all the files in the new Mod_Scripts directory have new dates associated with them. Now Mod_Scripts is a complete copy of the Scripts directory.
Note
In the preceding example, the options -Fd were added to the ls command. You read about the -F option earlier in this chapter. However, the -d option may be new to you. The -d option lists a directory's information but not its contents.
You can also use wildcard metacharacters in your cp commands:
$ cp *script Mod_Scripts/
$ ls -l Mod_Scripts
total 26
-rwxrw-r-- 1 christine christine 929 May 21 16:16 file_mod.sh
-rwxrw-r-- 1 christine christine 54 May 21 16:27 my_script
-rwxrw-r-- 1 christine christine 254 May 21 16:16 SGID_search.sh
-rwxrw-r-- 1 christine christine 243 May 21 16:16 SUID_search.sh
$
This command copied any files that ended with script to Mod_Scripts. In this case, only one file needed to be copied: my_script.
When copying files, another shell feature can help you besides the single dot and wildcard metacharacters. It is called tab auto-complete.
Using tab auto-complete
When working at the command line, you can easily mistype a command, directory name, or filename. In fact, the longer a directory reference or filename, the greater the chance that you will mistype it.
This is where tab auto-complete can be a lifesaver. Tab auto-complete allows you to start typing a filename or directory name and then press the tab key to have the shell complete it for you:
$ ls really*
really_ridiculously_long_file_name
$
$ cp really_ridiculously_long_file_name Mod_Scripts/
ls -l Mod_Scripts
total 26
-rwxrw-r-- 1 christine christine 929 May 21 16:16 file_mod.sh
-rwxrw-r-- 1 christine christine 54 May 21 16:27 my_script
-rw-rw-r-- 1 christine christine 0 May 21 17:08
really_ridiculously_long_file_name
-rwxrw-r-- 1 christine christine 254 May 21 16:16 SGID_search.sh
-rwxrw-r-- 1 christine christine 243 May 21 16:16 SUID_search.sh
$
In the preceding example, we typed the command cp really and pressed the tab key, and the shell auto-completed the rest of the filename! Of course, the destination directory had to be typed, but still tab auto-complete saved the command from several potential typographical errors.
The trick to using tab auto-complete is to give the shell enough filename characters so it can distinguish the desired file from other files. For example, if another filename started with really, pressing the tab key would not auto-complete the filename. Instead, you would hear a beep. If this happens, you can press the tab key again, and the shell shows you all the filenames starting with really. This feature allows you to see what needs to be typed for tab auto-complete to work properly.
Linking files
Linking files is a great option available in the Linux filesystem. If you need to maintain two (or more) copies of the same file on the system, instead of having separate physical copies, you can use one physical copy and multiple virtual copies, called links. A link is a placeholder in a directory that points to the real location of the file. Two types of file links are available in Linux:
· A symbolic link
· A hard link
A symbolic link is simply a physical file that points to another file somewhere in the virtual directory structure. The two symbolically linked together files do not share the same contents.
To create a symbolic link to a file, the original file must pre-exist. We can then use the ln command with the -s option to create the symbolic link:
$ ls -l data_file
-rw-rw-r-- 1 christine christine 1092 May 21 17:27 data_file
$
$ ln -s data_file sl_data_file
$
$ ls -l *data_file
-rw-rw-r-- 1 christine christine 1092 May 21 17:27 data_file
lrwxrwxrwx 1 christine christine 9 May 21 17:29 sl_data_file -> data_file
$
In the preceding example, notice that the name of the symbolic link, sl_data_file, is listed second in the ln command. The —> symbol displayed after the symbolic link file's long listing shows that it is symbolically linked to the file data_file.
Also note the symbolic link's file size versus the data file's file size. The symbolic link, sl_data_file, is only 9 bytes, whereas the data_file is 1092 bytes. This is because sl_data_file is only pointing to data_file. They do not share contents and are two physically separate files.
Another way to tell that these linked files are separate physical files is by viewing their inode number. The inode number of a file or directory is a unique identification number that the kernel assigns to each object in the filesystem. To view a file or directory's inode number, add the -i parameter to the ls command:
$ ls -i *data_file
296890 data_file 296891 sl_data_file
$
The example shows that the data file's inode number is 296890, while the sl_data_file inode number is different. It is 296891. Thus, they are different files.
A hard link creates a separate virtual file that contains information about the original file and where to locate it. However, they are physically the same file. When you reference the hard link file, it's just as if you're referencing the original file. To create a hard link, again the original file must pre-exist, except that this time no parameter is needed on the ln command:
$ ls -l code_file
-rw-rw-r-- 1 christine christine 189 May 21 17:56 code_file
$
$ ln code_file hl_code_file
$
$ ls -li *code_file
296892 -rw-rw-r-- 2 christine christine 189 May 21 17:56
code_file
296892 -rw-rw-r-- 2 christine christine 189 May 21 17:56
hl_code_file
$
In the preceding example, we used the ls -li command to show both the inode numbers and a long listing for the *code_files. Notice that both files, which are hard linked together, share the name inode number. This is because they are physically the same file. Also notice that the link count (the third item in the listing) now shows that both files have two links. In addition, their file size is exactly the same size as well.
Note
You can only create a hard link between files on the same physical medium. To create a link between files under separate physical mediums, you must use a symbolic link.
Be careful when copying linked files. If you use the cp command to copy a file that's linked to another source file, all you're doing is making another copy of the source file. This can quickly get confusing. Instead of copying the linked file, you can create another link to the original file. You can have many links to the same file with no problems. However, you also don't want to create soft links to other soft-linked files. This creates a chain of links that can be confusing — and easily broken — causing all sorts of problems.
You may find symbolic and hard links difficult concepts. Fortunately, renaming files in the next section is a great deal easier to understand.
Renaming files
In the Linux world, renaming files is called moving files. The mv command is available to move both files and directories to another location or a new name:
$ ls -li f?ll
296730 -rw-rw-r-- 1 christine christine 0 May 21 13:44 fall
296717 -rw-rw-r-- 1 christine christine 0 May 21 13:44 fell
294561 -rw-rw-r-- 1 christine christine 0 May 21 13:44 fill
296742 -rw-rw-r-- 1 christine christine 0 May 21 13:44 full
$
$ mv fall fzll
$
$ ls -li f?ll
296717 -rw-rw-r-- 1 christine christine 0 May 21 13:44 fell
294561 -rw-rw-r-- 1 christine christine 0 May 21 13:44 fill
296742 -rw-rw-r-- 1 christine christine 0 May 21 13:44 full
296730 -rw-rw-r-- 1 christine christine 0 May 21 13:44 fzll
$
Notice that moving the file changed the name from fall to fzll, but it kept the same inode number and timestamp value. This is because mv affects only a file's name.
You can also use mv to change a file's location:
$ ls -li /home/christine/fzll
296730 -rw-rw-r-- 1 christine christine 0 May 21 13:44
/home/christine/fzll
$
$ ls -li /home/christine/Pictures/
total 0
$ mv fzll Pictures/
$
$ ls -li /home/christine/Pictures/
total 0
296730 -rw-rw-r-- 1 christine christine 0 May 21 13:44 fzll
$
$ ls -li /home/christine/fzll
ls: cannot access /home/christine/fzll: No such file or directory
$
In the preceding example, we moved the file fzll from /home/christine to /home/christine/Pictures using the mv command. Again, there were no changes to the file's inode number or timestamp value.
Tip
Like the cp command, you can use the -i option on the mv command. Thus, you are asked before the command attempts to overwrite any pre-existing files.
The only change was to the file's location. The fzll file no longer exists in /home/christine, because a copy of it was not left in its original location, as the cp command would have done.
You can use the mv command to move a file's location and rename it, all in one easy step:
$ ls -li Pictures/fzll
296730 -rw-rw-r-- 1 christine christine 0 May 21 13:44
Pictures/fzll
$
$ mv /home/christine/Pictures/fzll /home/christine/fall
$
$ ls -li /home/christine/fall
296730 -rw-rw-r-- 1 christine christine 0 May 21 13:44
/home/christine/fall
$
$ ls -li /home/christine/Pictures/fzll
ls: cannot access /home/christine/Pictures/fzll:
No such file or directory
For this example, we moved the file fzll from a subdirectory, Pictures, to the home directory, /home/christine, and renamed it to fall. Neither the timestamp value nor the inode number changed. Only the location and name were altered.
You can also use the mv command to move entire directories and their contents:
$ ls -li Mod_Scripts
total 26
296886 -rwxrw-r-- 1 christine christine 929 May 21 16:16
file_mod.sh
296887 -rwxrw-r-- 1 christine christine 54 May 21 16:27
my_script
296885 -rwxrw-r-- 1 christine christine 254 May 21 16:16
SGID_search.sh
296884 -rwxrw-r-- 1 christine christine 243 May 21 16:16
SUID_search.sh
$
$ mv Mod_Scripts Old_Scripts
$
$ ls -li Mod_Scripts
ls: cannot access Mod_Scripts: No such file or directory
$
$ ls -li Old_Scripts
total 26
296886 -rwxrw-r-- 1 christine christine 929 May 21 16:16
file_mod.sh
296887 -rwxrw-r-- 1 christine christine 54 May 21 16:27
my_script
296885 -rwxrw-r-- 1 christine christine 254 May 21 16:16
SGID_search.sh
296884 -rwxrw-r-- 1 christine christine 243 May 21 16:16
SUID_search.sh
$
The directory's entire contents are unchanged. The only thing that changes is the name of the directory.
After you know how to rename...err...move files with the mv command, you realize how simple it is to accomplish. Another easy, but potentially dangerous, task is deleting files.
Deleting files
Most likely at some point you'll want to be able to delete existing files. Whether it's to clean up a filesystem or to remove a software package, you always have opportunities to delete files.
In the Linux world, deleting is called removing. The command to remove files in the bash shell is rm. The basic form of the rm command is simple:
$ rm -i fall
rm: remove regular empty file 'fall'? y
$
$ ls -l fall
ls: cannot access fall: No such file or directory
$
Notice that the -i command parameter prompts you to make sure that you're serious about removing the file. The shell has no recycle bin or trashcan. After you remove a file, it's gone forever. Therefore, a good habit is to always tack on the -i parameter to the rmcommand.
You can also use wildcard metacharacters to remove groups of files. However, again, use that -i option to protect yourself:
$ rm -i f?ll
rm: remove regular empty file 'fell'? y
rm: remove regular empty file 'fill'? y
rm: remove regular empty file 'full'? y
$
$ ls -l f?ll
ls: cannot access f?ll: No such file or directory
$
One other feature of the rm command, if you're removing lots of files and don't want to be bothered with the prompt, is to use the -f parameter to force the removal. Just be careful!
Managing Directories
Linux has a few commands that work for both files and directories (such as the cp command), and some that work only for directories. To create a new directory, you need to use a specific command, which is covered in this section. Removing directories can get interesting, so that is covered in this section as well.
Creating directories
Creating a new directory in Linux is easy — just use the mkdir command:
$ mkdir New_Dir
$ ls -ld New_Dir
drwxrwxr-x 2 christine christine 4096 May 22 09:48 New_Dir
$
The system creates a new directory named New_Dir. Notice in the new directory's long listing that the directory's record begins with a d. This indicates that New_Dir is not a file, but a directory.
You can create directories and subdirectories in “bulk” if needed. However, if you attempt this with just the mkdir command, you get the following error message:
$ mkdir New_Dir/Sub_Dir/Under_Dir
mkdir: cannot create directory 'New_Dir/Sub_Dir/Under_Dir':
No such file or directory
$
To create several directories and subdirectories at the same time, you need to add the -p parameter:
$ mkdir -p New_Dir/Sub_Dir/Under_Dir
$
$ ls -R New_Dir
New_Dir:
Sub_Dir
New_Dir/Sub_Dir:
Under_Dir
New_Dir/Sub_Dir/Under_Dir:
$
The -p option on the mkdir command makes any missing parent directories as needed. A parent directory is a directory that contains other directories at the next level down the directory tree.
Of course, after you make something, you need to know how to delete it. This is especially useful if you created a directory in the wrong location.
Deleting directories
Removing directories can be tricky, and for good reason. There are lots of opportunities for bad things to happen when you start deleting directories. The shell tries to protect us from accidental catastrophes as much as possible. The basic command for removing a directory is rmdir:
$ touch New_Dir/my_file
$ ls -li New_Dir/
total 0
294561 -rw-rw-r-- 1 christine christine 0 May 22 09:52 my_file
$
$ rmdir New_Dir
rmdir: failed to remove 'New_Dir': Directory not empty
$
By default, the rmdir command works only for removing empty directories. Because we created a file, my_file, in the New_Dir directory, the rmdir command refuses to remove it.
To fix this, we must remove the file first. Then we can use the rmdir command on the now empty directory:
$ rm -i New_Dir/my_file
rm: remove regular empty file 'New_Dir/my_file'? y
$
$ rmdir New_Dir
$
$ ls -ld New_Dir
ls: cannot access New_Dir: No such file or directory
The rmdir has no -i option to ask if you want to remove the directory. This is one reason it is helpful that rmdir removes only empty directories.
You can also use the rm command on entire non-empty directories. Using the -r option allows the command to descend into the directory, remove the files, and then remove the directory itself:
$ ls -l My_Dir
total 0
-rw-rw-r-- 1 christine christine 0 May 22 10:02 another_file
$
$ rm -ri My_Dir
rm: descend into directory 'My_Dir'? y
rm: remove regular empty file 'My_Dir/another_file'? y
rm: remove directory 'My_Dir'? y
$
$ ls -l My_Dir
ls: cannot access My_Dir: No such file or directory
$
This also works for descending into multiple subdirectories and is especially useful when you have lots of directories and files to delete:
$ ls -FR Small_Dir
Small_Dir:
a_file b_file c_file Teeny_Dir/ Tiny_Dir/
Small_Dir/Teeny_Dir:
e_file
Small_Dir/Tiny_Dir:
d_file
$
$ rm -ir Small_Dir
rm: descend into directory 'Small_Dir'? y
rm: remove regular empty file 'Small_Dir/a_file'? y
rm: descend into directory 'Small_Dir/Tiny_Dir'? y
rm: remove regular empty file 'Small_Dir/Tiny_Dir/d_file'? y
rm: remove directory 'Small_Dir/Tiny_Dir'? y
rm: descend into directory 'Small_Dir/Teeny_Dir'? y
rm: remove regular empty file 'Small_Dir/Teeny_Dir/e_file'? y
rm: remove directory 'Small_Dir/Teeny_Dir'? y
rm: remove regular empty file 'Small_Dir/c_file'? y
rm: remove regular empty file 'Small_Dir/b_file'? y
rm: remove directory 'Small_Dir'? y
$
$ ls -FR Small_Dir
ls: cannot access Small_Dir: No such file or directory
$
Although this works, it's somewhat awkward. Notice that you still must verify each and every file that gets removed. For a directory with lots of files and subdirectories, this can become tedious.
Note
For the rm command, the -r parameter and the -R parameter work exactly the same. When used with the rm command, the -R parameter also recursively traverses through the directory removing files. It is unusual for a shell command to have different cased parameters with the same function.
The ultimate solution for throwing caution to the wind and removing an entire directory, contents and all, is the rm command with both the -r and -f parameters:
$ tree Small_Dir
Small_Dir
├ a_file
├ b_file
├ c_file
├ Teeny_Dir
| └e_file
└Tiny_Dir
└d_file
2 directories, 5 files
$
$ rm -rf Small_Dir
$
$ tree Small_Dir
Small_Dir [error opening dir]
0 directories, 0 files
$
The rm -rf command gives no warnings and no fanfare. This, of course, is an extremely dangerous tool to have, especially if have superuser privileges. Use it sparingly, and only after triple checking to make sure that you're doing exactly what you want to do!
Note
Notice in the preceding example that we used the tree utility. It nicely displays directories, subdirectories, and their files. It's a useful utility when you need to understand a directory structure, especially before removing it. This utility may not be installed by default in your Linux distribution. See Chapter 9 for learning about installing software
In the last few sections, you looked at managing both files and directories. So far we covered everything you need to know about files, except for how to peek inside of them.
Viewing File Contents
You can use several commands for looking inside files without having to pull out a text editor utility (see Chapter 10). This section demonstrates a few of the commands you have available to help you examine files.
Viewing the file type
Before you go charging off trying to display a file, try to get a handle on what type of file it is. If you try to display a binary file, you get lots of gibberish on your monitor and may even lock up your terminal emulator.
The file command is a handy little utility to have around. It can peek inside of a file and determine just what kind of file it is:
$ file my_file
my_file: ASCII text
$
The file in the preceding example is a text file. The file command determined not only that the file contains text but also the character code format of the text file, ASCII.
This following example shows a file that is simply a directory. Thus, the file command gives you another method to distinguish a directory:
$ file New_Dir
New_Dir: directory
$
This third file command example shows a file, which is a symbolic link. Note that the file command even tells you to which file it is symbolically linked:
$ file sl_data_file
sl_data_file: symbolic link to 'data_file'
$
The following example shows what the file command returns for a script file. Although the file is ASCII text, because it's a script file, you can execute (run) it on the system:
$ file my_script
my_script: Bourne-Again shell script, ASCII text executable
$
The final example is a binary executable program. The file command determines the platform that the program was compiled for and what types of libraries it requires. This is an especially handy feature if you have a binary executable program from an unknown source:
$ file /bin/ls
/bin/ls: ELF 64-bit LSB executable, x86-64, version 1 (SYSV),
dynamically linked (uses shared libs), for GNU/Linux 2.6.24,
[...]
$
Now that you know a quick method for viewing a file's type, you can start displaying and viewing files.
Viewing the whole file
If you have a large text file on your hands, you may want to be able to see what's inside of it. Linux has three different commands that can help you here.
Using the cat command
The cat command is a handy tool for displaying all the data inside a text file:
$ cat test1
hello
This is a test file.
That we'll use to test the cat command.
$
Nothing too exciting, just the contents of the text file. However, the cat command has a few parameters that can help you out.
The -n parameter numbers all the lines for you:
$ cat -n test1
1 hello
2
3 This is a test file.
4
5
6 That we'll use to test the cat command.
$
That feature will come in handy when you're examining scripts. If you just want to number the lines that have text in them, the -b parameter is for you:
$ cat -b test1
1 hello
2 This is a test file.
3 That we'll use to test the cat command.
$
Finally, if you don't want tab characters to appear, use the -T parameter:
$ cat -T test1
hello
This is a test file.
That we'll use to∧Itest the cat command.
$
The -T parameter replaces any tabs in the text with the ∧I character combination.
For large files, the cat command can be somewhat annoying. The text in the file just quickly scrolls off the display without stopping. Fortunately, we have a simple way to solve this problem.
Using the more command
The main drawback of the cat command is that you can't control what's happening after you start it. To solve that problem, developers created the more command. The more command displays a text file, but stops after it displays each page of data. We typed the command more /etc/bash.bashrc to produce the sample more screen shown in Figure 3.3.
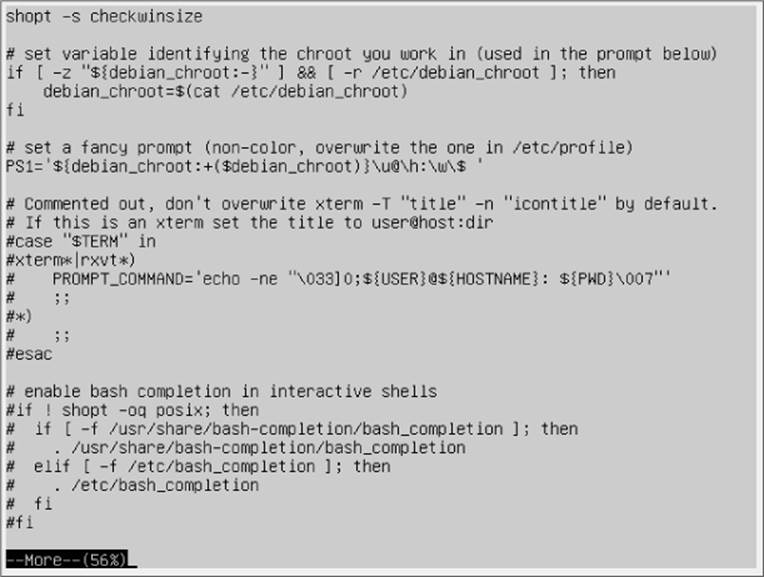
Figure 3.3 Using the more command to display a text file
Notice at the bottom of the screen in Figure 3.3 that the more command displays a tag showing that you're still in the more application and how far along (56%) in the text file you are. This is the prompt for the more command.
The more command is a pager utility. Remember from earlier in this chapter a pager utility displays selected bash manual pages when you use the man command. Similarly to navigating through the man pages, you can use more to navigate through a text file by pressing the spacebar or you can go forward line by line using the Enter key. When you are finished navigating through the file using more, press the q key to quit.
The more command allows some rudimentary movement through the text file. For more advanced features, try the less command.
Using the less command
From its name, it sounds like it shouldn't be as advanced as the more command. However, the less command name is actually a play on words and is an advanced version of the more command (the less command name comes from the phrase “less is more”). It provides several very handy features for scrolling both forward and backward through a text file, as well as some pretty advanced searching capabilities.
The less command can also display a file's contents before it finishes reading the entire file. The cat and more commands cannot do this.
The less command operates much the same as the more command, displaying one screen of text from a file at a time. It supports the same command set as the more command, plus many more options.
Tip
To see all the options available for the less command, view its man pages by typing man less. You can do the same for the more command to see the reference material concerning its various options as well.
One set of features is that the less command recognizes the up and down arrow keys as well as the Page Up and Page Down keys (assuming that you're using a properly defined terminal). This gives you full control when viewing a file.
Viewing parts of a file
Often the data you want to view is located either right at the top or buried at the bottom of a text file. If the information is at the top of a large file, you still need to wait for the cat or more commands to load the entire file before you can view it. If the information is located at the bottom of a file (such as a log file), you need to wade through thousands of lines of text just to get to the last few entries. Fortunately, Linux has specialized commands to solve both of these problems.
Using the tail command
The tail command displays the last lines in a file (the file's “tail”). By default, it shows the last 10 lines in the file.
For these examples, we created a text file containing 20 text lines. It is displayed here in its entirety using the cat command:
$ cat log_file
line1
line2
line3
line4
line5
Hello World - line 6
line7
line8
line9
line10
line11
Hello again - line 12
line13
line14
line15
Sweet - line16
line17
line18
line19
Last line - line20
$
Now that you have seen the entire text file, you can see the effect of using tail to view the file's last 10 lines:
$ tail log_file
line11
Hello again - line 12
line13
line14
line15
Sweet - line16
line17
line18
line19
Last line - line20
$
You can change the number of lines shown using tail by including the -n parameter. In this example, only the last two lines of the file are displayed, by adding -n 2 to the tail command:
$ tail -n 2 log_file
line19
Last line - line20
$
The -f parameter is a pretty cool feature of the tail command. It allows you to peek inside a file as the file is being used by other processes. The tail command stays active and continues to display new lines as they appear in the text file. This is a great way to monitor the system log files in real-time mode.
Using the head command
The head command does what you'd expect; it displays a file's first group of lines (the file's “head”). By default, it displays the first 10 lines of text:
$ head log_file
line1
line2
line3
line4
line5
Hello World - line 6
line7
line8
line9
line10
$
Similar to the tail command, the head command supports the -n parameter so you can alter what's displayed. Both commands also allow you to simply type a dash along with the number of lines to display, as shown here:
$ head -5 log_file
line1
line2
line3
line4
line5
$
Usually the beginning of a file doesn't change, so the head command doesn't support the -f parameter feature as the tail command does. The head command is a handy way to just peek at the beginning of a file.
Summary
This chapter covered the basics of working with the Linux filesystem from a shell prompt. We began with a discussion of the bash shell and showed you how to interact with the shell. The command line interface (CLI) uses a prompt string to indicate when it's ready for you to enter commands.
The shell provides a wealth of utilities you can use to create and manipulate files. Before you start playing with files, you should understand how Linux stores them. This chapter discussed the basics of the Linux virtual directory and showed you how Linux references storage media devices. After describing the Linux filesystem, the chapter walked you through using the cd command to move around the virtual directory.
After showing you how to get to a directory, the chapter demonstrated how to use the ls command to list the files and subdirectories. Lots of parameters can customize the output of the ls command. You can obtain information on files and directories by using the lscommand.
The touch command is useful for creating empty files and for changing the access or modification times on an existing file. The chapter also discussed using the cp command to copy existing files from one location to another. It walked you through the process of linking files instead of copying them, providing an easy way to have the same file in two locations without making a separate copy. The ln command provides this linking ability.
Next, you learned how to rename files (called moving) in Linux using the mv command and saw how to delete files (called removing) using the rm command. This chapter also showed you how to perform the same tasks with directories, using the mkdir and rmdircommands.
Finally, the chapter closed with a discussion on viewing the contents of files. The cat, more, and less commands provide easy methods for viewing the entire contents of a file, while the tail and head commands are great for peeking inside a file to just see a small portion of it.
The next chapter continues the discussion on bash shell commands. We'll look at more advanced administrator commands that come in handy as you administer your Linux system.
All materials on the site are licensed Creative Commons Attribution-Sharealike 3.0 Unported CC BY-SA 3.0 & GNU Free Documentation License (GFDL)
If you are the copyright holder of any material contained on our site and intend to remove it, please contact our site administrator for approval.
© 2016-2026 All site design rights belong to S.Y.A.