Wiley Linux Command Line and Shell Scripting Bible 3rd (2015)
Part I. The Linux Command Line
Chapter 5. Understanding the Shell
In This Chapter
1. Investigating Shell Types
2. Understanding the Parent/Child Shell Relationship
3. Using Subshells Creatively
4. Investigating Built-in Shell Commands
Now that you know a few shell basics, such as reaching the shell and rudimentary shell commands, it is time to explore the actual shell process. To understand the shell, you need to understand a few CLI basics.
A shell is not just a CLI. It is a complicated interactive running program. Entering commands and using the shell to run scripts can raise some interesting and confusing issues. Understanding the shell process and its relationships helps you resolve these issues or avoid them altogether.
This chapter takes you through learning about the shell process. You see how subshells are created and their relationship to the parent shell. The varied commands that create child processes are explored as well as built-in commands. You even read about some shell tips and tricks to try.
Exploring Shell Types
The shell program that the system starts depends on your user ID configuration. In the /etc/passwd file, the user ID has its default shell program listed in field #7 of its record. The default shell program is started whenever the user logs into a virtual console terminal or starts a terminal emulator in the GUI.
In the following example, user christine has the GNU bash shell as her default shell program:
$ cat /etc/passwd
[...]
Christine:x:501:501:Christine B:/home/Christine:/bin/bash
$
The bash shell program resides in the /bin directory. A long listing reveals /bin/bash (the bash shell) is an executable program:
$ ls -lF /bin/bash
-rwxr-xr-x. 1 root root 938832 Jul 18 2013 /bin/bash*
$
Several other shell programs are on this particular CentOS distribution. They include tcsh, which is based off the original C shell:
$ ls -lF /bin/tcsh
-rwxr-xr-x. 1 root root 387328 Feb 21 2013 /bin/tcsh*
$
Also, the Debian based version of the ash shell, dash, is included:
$ ls -lF /bin/dash
-rwxr-xr-x. 1 root root 109672 Oct 17 2012 /bin/dash*
$
Finally, a soft link (see Chapter 3) of the C shell points to the tcsh shell:
$ ls -lF /bin/csh
lrwxrwxrwx. 1 root root 4 Mar 18 15:16 /bin/csh -> tcsh*
$
Each of these different shell programs could be set as a user's default shell. However, due to the bash shell's popularity, it's rare to use any other shell as a default shell.
Note
A brief description of various shells was included in Chapter 1. You may be interested in learning even more about shells other than the GNU bash shell. Additional alternative shell information is in Chapter 23.
The default interactive shell starts whenever a user logs into a virtual console terminal or starts a terminal emulator in the GUI. However, another default shell, /bin/sh, is the default system shell. The default system shell is used for system shell scripts, such as those needed at startup.
Often, you see a distribution with its default system shell set to the bash shell using a soft link as shown here on this CentOS distribution:
$ ls -l /bin/sh
lrwxrwxrwx. 1 root root 4 Mar 18 15:05 /bin/sh -> bash
$
However, be aware that on some distributions, the default system shell is different than the default interactive shell, such as on this Ubuntu distribution:
$ cat /etc/passwd
[...]
christine:x:1000:1000:Christine,,,:/home/christine:/bin/bash
$
$ ls -l /bin/sh
lrwxrwxrwx 1 root root 4 Apr 22 12:33 /bin/sh -> dash
$
Note that the user, christine, has her default interactive shell set to /bin/bash, the bash shell. But the default system shell, /bin/sh, is set to the dash shell.
Tip
For bash shell scripts, these two different shells, default interactive shell and default system shell, can cause problems. Be sure to read about the important syntax needed for a bash shell script's first line in Chapter 11 to avoid these issues.
You are not forced to stick with your default interactive shell. You can start any shell available on your distribution, simply by typing its filename. For example, to start the dash shell, you can run it directly by typing the command /bin/dash:
$ /bin/dash
$
It doesn't look like anything happened, but the dash shell program started. The $ prompt is a CLI prompt for the dash shell. You can leave the dash shell program by typing the command exit:
$ exit
exit
$
Again, it looks like nothing happened. However, the dash shell program was exited. To understand this process, the next section explores the relationship between a login shell program and a newly started shell program.
Exploring Parent and Child Shell Relationships
The default interactive shell started when a user logs into a virtual console terminal or starts a terminal emulator in the GUI is a parent shell. As you have read so far in this book, a parent shell process provides a CLI prompt and waits for commands to be entered.
When the /bin/bash command or the equivalent bash command is entered at the CLI prompt, a new shell program is created. This is a child shell. A child shell also has a CLI prompt and waits for commands to be entered.
Because you do not see any relevant messages when you type bash and spawn a child shell, another command can help bring clarity. The ps command was covered in Chapter 4. Using this with the -f option before and after entering a child shell is useful:
$ ps -f
UID PID PPID C STIME TTY TIME CMD
501 1841 1840 0 11:50 pts/0 00:00:00 -bash
501 2429 1841 4 13:44 pts/0 00:00:00 ps -f
$
$ bash
$
$ ps -f
UID PID PPID C STIME TTY TIME CMD
501 1841 1840 0 11:50 pts/0 00:00:00 -bash
501 2430 1841 0 13:44 pts/0 00:00:00 bash
501 2444 2430 1 13:44 pts/0 00:00:00 ps -f
$
The first use of ps -f shows two processes. One process has a process ID of 1841 (second column) and is running the bash shell program (last column). The second process (process ID 2429) is the actual ps -f command running.
Note
A process is a running program. The bash shell is a program, and when it runs, it is a process. A running shell is simply one type of process. Therefore, when reading about running a bash shell, you often see the word “shell” and the word “process” used interchangeably
After the command bash is entered, a child shell is created. The second ps -f is executed from within the child shell. From this display, you can see that two bash shell programs are running. The first bash shell program, the parent shell process, has the original process ID (PID) of 1841. The second bash shell program, the child shell process, has a PID of 2430. Note that the child shell has a parent process ID (PPID) of 1841, denoting that the parent shell process is its parent. Figure 5.1 diagrams this relationship.
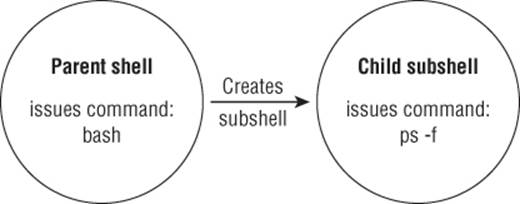
Figure 5.1 Parent and child bash shell processes
When a child shell process is spawned, only some of the parent's environment is copied to the child shell environment. This can cause problems with items such as variables, and it is covered in Chapter 6.
A child shell is also called a subshell. A subshell can be created from a parent shell, and a subshell can be created from another subshell:
$ ps -f
UID PID PPID C STIME TTY TIME CMD
501 1841 1840 0 11:50 pts/0 00:00:00 -bash
501 2532 1841 1 14:22 pts/0 00:00:00 ps -f
$
$ bash
$
$ bash
$
$ bash
$
$ ps --forest
PID TTY TIME CMD
1841 pts/0 00:00:00 bash
2533 pts/0 00:00:00 \_ bash
2546 pts/0 00:00:00 \_ bash
2562 pts/0 00:00:00 \_ bash
2576 pts/0 00:00:00 \_ ps
$
In the preceding example, the bash shell command was entered three times. Effectively, this created three subshells. The ps --forest command shows the nesting of these subshells. Figure 5.2 also shows this subshell nesting.
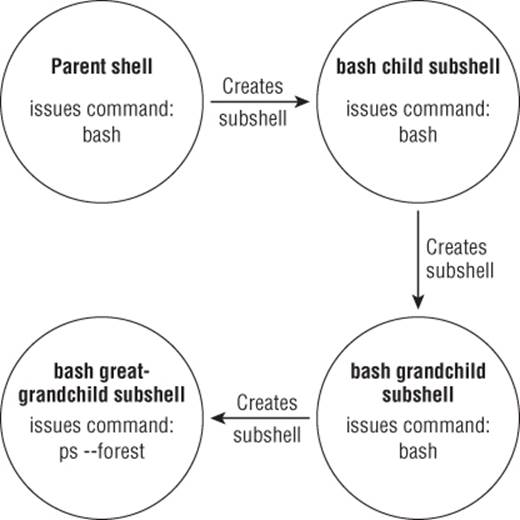
Figure 5.2 Subshell nesting
The ps -f command can be useful in subshell nesting, because it displays who is whose parent via the PPID column:
$ ps -f
UID PID PPID C STIME TTY TIME CMD
501 1841 1840 0 11:50 pts/0 00:00:00 -bash
501 2533 1841 0 14:22 pts/0 00:00:00 bash
501 2546 2533 0 14:22 pts/0 00:00:00 bash
501 2562 2546 0 14:24 pts/0 00:00:00 bash
501 2585 2562 1 14:29 pts/0 00:00:00 ps -f
$
The bash shell program can use command line parameters to modify the shell start. Table 5.1 lists the command line parameters available in bash.
Table 5.1 The bash Command Line Parameters
|
Parameter |
Description |
|
-c string |
Reads commands from string and processes them |
|
-i |
Starts an interactive shell, allowing input from the user |
|
-l |
Acts as if invoked as a login shell |
|
-r |
Starts a restricted shell, limiting the user to the default directory |
|
-s |
Reads commands from the standard input |
You can find more help on the bash command and even more command line parameters by typing man bash. The bash --help command provides additional assistance as well.
You can gracefully exit out of each subshell by entering the exit command:
$ exit
exit
$
$ ps --forest
PID TTY TIME CMD
1841 pts/0 00:00:00 bash
2533 pts/0 00:00:00 \_ bash
2546 pts/0 00:00:00 \_ bash
2602 pts/0 00:00:00 \_ ps
$
$ exit
exit
$
$ exit
exit
$
$ ps --forest
PID TTY TIME CMD
1841 pts/0 00:00:00 bash
2604 pts/0 00:00:00 \_ ps
$
Not only does the exit command allow you to leave child subshells, but you can also log out of your current virtual console terminal or terminal emulation software as well. Just type exit in the parent shell, and you gracefully exit the CLI.
Another time a subshell can be created is when you run a shell script. You learn more about that topic in Chapter 11.
Also, you can spawn subshells without using the bash shell command or running a shell script. One way is by using a process list.
Looking at process lists
On a single line, you can designate a list of commands to be run one after another. This is done by entering a command list using a semicolon (;) between commands:
$ pwd ; ls ; cd /etc ; pwd ; cd ; pwd ; ls
/home/Christine
Desktop Downloads Music Public Videos
Documents junk.dat Pictures Templates
/etc
/home/Christine
Desktop Downloads Music Public Videos
Documents junk.dat Pictures Templates
$
In the preceding example, the commands all executed one after another with no problems. However, this is not a process list. For a command list to be considered a process list, the commands must be encased in parentheses:
$ (pwd ; ls ; cd /etc ; pwd ; cd ; pwd ; ls)
/home/Christine
Desktop Downloads Music Public Videos
Documents junk.dat Pictures Templates
/etc
/home/Christine
Desktop Downloads Music Public Videos
Documents junk.dat Pictures Templates
$
Though the parentheses addition may not appear to be a big difference, they do cause a very different effect. Adding parentheses and turning the command list into a process list created a subshell to execute the commands.
Note
A process list is a command grouping type. Another command grouping type puts the commands between curly brackets and ends the command list with a semicolon (;). The syntax is as follows: { command; }. Using curly brackets for command grouping does not create a subshell as a process list does.
To indicate if a subshell was spawned, a command using an environment variable is needed here. (Environment variables are covered in detail in Chapter 6). The command needed is echo $BASH_SUBSHELL. If it returns a 0, then there is no subshell. If it returns 1 or more, then there is a subshell.
First, the example using just a command list is executed with the echo $BASH_SUBSHELL tacked onto the end:
$ pwd ; ls ; cd /etc ; pwd ; cd ; pwd ; ls ; echo $BASH_SUBSHELL
/home/Christine
Desktop Downloads Music Public Videos
Documents junk.dat Pictures Templates
/etc
/home/Christine
Desktop Downloads Music Public Videos
Documents junk.dat Pictures Templates
0
At the very end of the commands' output, you can see the number zero (0) is displayed. This indicates a subshell was not created to execute these commands.
The results are different using a process list. The list is executed with echo $BASH_SUBSHELL tacked onto the end:
$ (pwd ; ls ; cd /etc ; pwd ; cd ; pwd ; ls ; echo $BASH_SUBSHELL)
/home/Christine
Desktop Downloads Music Public Videos
Documents junk.dat Pictures Templates
/etc
/home/Christine
Desktop Downloads Music Public Videos
Documents junk.dat Pictures Templates
1
In this case, the number one (1) displayed at the output's end. This indicates a subshell was indeed created and used for executing these commands.
Thus, a process list is a command grouping enclosed with parentheses, which creates a subshell to execute the command(s). You can even create a grandchild subshell by embedding parentheses within a process list:
$ ( pwd ; echo $BASH_SUBSHELL)
/home/Christine
1
$ ( pwd ; (echo $BASH_SUBSHELL))
/home/Christine
2
Notice in the first process list, the number one (1) is displayed indicating a child subshell as you would expect. However in the example's second process list, additional parentheses were added around the echo $BASH_SUBSHELL command. These additional parentheses caused a grandchild subshell to be created for the command's execution. Thus, a number two (2) was displayed indicating a subshell within a subshell.
Subshells are often used for multi-processing in shell scripts. However, entering into a subshell is an expensive method and can significantly slow down processing. Subshell issues exist also for an interactive CLI shell session. It is not truly multi-processing, because the terminal gets tied up with the subshell's I/O.
Creatively using subshells
At the interactive shell CLI, you have more productive ways to use subshells. Process lists, co-processes, and pipes (covered in Chapter 11) use subshells. They all can be used effectively within the interactive shell.
One productive subshell method in the interactive shell uses background mode. Before discussing how to use background mode and subshells together, you need to understand background mode itself.
Investigating background mode
Running a command in background mode allows the command to be processed and frees up your CLI for other use. A classic command to demonstrate background mode is the sleep command.
The sleep command accepts as a parameter the number of seconds you want the process to wait (sleep). This command is often used to introduce pauses in shell scripts. The command sleep 10 causes the session to pause for 10 seconds and then return a shell CLI prompt:
$ sleep 10
$
To put a command into background mode, the & character is tacked onto its end. Putting the sleep command into background mode allows a little investigation with the ps command:
$ sleep 3000&
[1] 2396
$ ps -f
UID PID PPID C STIME TTY TIME CMD
christi+ 2338 2337 0 10:13 pts/9 00:00:00 -bash
christi+ 2396 2338 0 10:17 pts/9 00:00:00 sleep 3000
christi+ 2397 2338 0 10:17 pts/9 00:00:00 ps -f
$
The sleep command was told to sleep for 3000 seconds (50 minutes) in the background (&). When it was put into the background, two informational items were displayed before the shell CLI prompt was returned. The first informational item is the background job's number (1) displayed in brackets. The second item is the background job's process ID (2396).
The ps command was used to display the various processes. Notice that the sleep 3000 command is listed. Also note that its process ID (PID) in the second column is the same PID displayed when the command went into the background, 2396.
In addition to the ps command, you can use the jobs command to display background job information. The jobs command displays any user's processes (jobs) currently running in background mode:
$ jobs
[1]+ Running sleep 3000 &
$
The jobs command shows the job number (1) in brackets. It also displays the job's current status (running) as well as the command itself, (sleep 3000 &).
You can see even more information by using the -l (lowercase L) parameter on the jobs command. The -l parameter displays the command's PID in addition to the other information:
$ jobs -l
[1]+ 2396 Running sleep 3000 &
$
When the background job is finished, its completion status is displayed:
[1]+ Done sleep 3000 &
$
Tip
Be aware that a background job's completion status won't necessarily wait till a convenient time to display itself. Don't let it surprise you when a job's completion status just suddenly appears on your screen.
Background mode is very handy. And it provides a method for creating useful subshells at the CLI.
Putting process lists into the background
As stated earlier, a process list is a command or series of commands executed within a subshell. Using a process list including sleep commands and displaying the BASH_SUBSHELL variable operates as you would expect:
$ (sleep 2 ; echo $BASH_SUBSHELL ; sleep 2)
1
$
In the preceding example, a two-second pause occurs, the number one (1) is displayed indicating a single subshell level (child subshell), and then another two-second pause occurs before the prompt returns. Nothing too dramatic here.
Putting the same process list into background mode can cause a slightly different effect with command output:
$ (sleep 2 ; echo $BASH_SUBSHELL ; sleep 2)&
[2] 2401
$ 1
[2]+ Done ( sleep 2; echo $BASH_SUBSHELL; sleep 2 )
$
Putting the process list into the background causes a job number and process ID to appear, and the prompt returns. However, the odd event is that the displayed number one (1), indicating a single-level subshell, is displayed by the prompt! Don't let this confuse you. Simply press the Enter key, and you get another prompt back.
Using a process list in background mode is one creative method for using subshells at the CLI. You can do large amounts of processing within a subshell and not have your terminal tied up with the subshell's I/O.
Of course, the process list of sleep and echo commands are just for example purposes. Creating backup files with tar (see Chapter 4) is a more practical example of using background process lists effectively:
$ (tar -cf Rich.tar /home/rich ; tar -cf My.tar /home/christine)&
[3] 2423
$
Putting a process list in background mode is not the only way to use subshells creatively at the CLI. Co-processing is another method.
Looking at co-processing
Co-processing does two things at the same time. It spawns a subshell in background mode and executes a command within that subshell.
To perform co-processing, the coproc command is used along with the command to be executed in the subshell:
$ coproc sleep 10
[1] 2544
$
Co-processing performs almost identically to putting a command in background mode, except for the fact that it creates a subshell. You'll notice that when the coproc command and its parameters were entered, a background job was started. The background job number (1) and process ID (2544) were displayed on the screen.
The jobs command allows you to display the co-processing status:
$ jobs
[1]+ Running coproc COPROC sleep 10 &
$
From the preceding example, you can see the background command executing in the subshell is coproc COPROC sleep 10. The COPROC is a name given to the process by the coproc command. You can set the name yourself by using extended syntax for the command:
$ coproc My_Job { sleep 10; }
[1] 2570
$
$ jobs
[1]+ Running coproc My_Job { sleep 10; } &
$
By using the extended syntax, the co-processing name was set to My_Job. Be careful here, because the extended syntax is a little tricky. You have to make sure that a space appears after the first curly bracket ({) and before the start of your command. Also, you have to make sure the command ends with a semicolon (;). And you have to ensure that a space appears after the semicolon and before the closing curly bracket (}).
Note
Co-processing allows you to get very fancy and send/receive information to the process running in the subshell. The only time you need to name a co-process is when you have multiple co-processes running, and you need to communicate with them all. Otherwise, just let the coproc command set the name to the default, COPROC.
You can be really clever and combine co-processing with process lists creating nested subshells. Just type your process list and put the command coproc in front of it:
$ coproc ( sleep 10; sleep 2 )
[1] 2574
$
$ jobs
[1]+ Running coproc COPROC ( sleep 10; sleep 2 ) &
$
$ ps --forest
PID TTY TIME CMD
2483 pts/12 00:00:00 bash
2574 pts/12 00:00:00 \_ bash
2575 pts/12 00:00:00 | \_ sleep
2576 pts/12 00:00:00 \_ ps
$
Just remember that spawning a subshell can be expensive and slow. Creating nested subshells is even more so!
Using subshells can provide flexibility at the command line as well as convenience. Understanding their behavior is important to obtaining this flexibility and convenience. Command behavior is also important to understand. In the next section, the behavior differences between built-in and external commands are explored.
Understanding Shell Built-In Commands
While learning about the GNU bash shell, you likely have heard the term built-in command. It is important to understand both shell built-in and non-built-in (external) commands. Built-in commands and non-built-in commands operate very differently.
Looking at external commands
An external command, sometimes called a filesystem command, is a program that exists outside of the bash shell. They are not built into the shell program. An external command program is typically located in /bin, /usr/bin, /sbin, or /usr/sbin.
The ps command is an external command. You can find its filename by using both the which and the type commands:
$ which ps
/bin/ps
$
$ type -a ps
ps is /bin/ps
$
$ ls -l /bin/ps
-rwxr-xr-x 1 root root 93232 Jan 6 18:32 /bin/ps
$
Whenever an external command is executed, a child process is created. This action is termed forking. Conveniently, the external command ps displays its current parent as well as its own forked child processes:
$ ps -f
UID PID PPID C STIME TTY TIME CMD
christi+ 2743 2742 0 17:09 pts/9 00:00:00 -bash
christi+ 2801 2743 0 17:16 pts/9 00:00:00 ps -f
$
Because it is an external command, when the ps command executes, a child process is created. In this case, the ps command's PID is 2801 and the parent PID is 2743. The bash shell process, which is the parent, has a PID of 2743. Figure 5.3 illustrates the forking that occurs when an external command is executed.
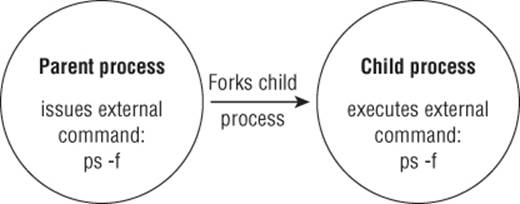
Figure 5.3 External command forking
Whenever a process must fork, it takes time and effort to set up the new child process's environment. Thus, external commands can be a little expensive.
Note
If you fork a child process or create a subshell, you can still communicate with it via signaling, which is extremely helpful in both the command line and in writing shell scripts. Signaling allows process communication via signals. Signals and signaling are covered in Chapter 16.
When using a built-in command, no forking is required. Therefore, built-in commands are less expensive.
Looking at built-in commands
Built-in commands are different in that they do not need a child process to execute. They were compiled into the shell and thus are part of the shell's toolkit. No external program file exists to run them.
Both the cd and exit commands are built into the bash shell. You can tell a command is built-in by using the type command:
$ type cd
cd is a shell builtin
$
$ type exit
exit is a shell builtin
$
Because they do not need to fork a child process to execute or open a program file, built-in commands are faster and more efficient. A list of GNU bash shell built-in commands is provided in Appendix A.
Be aware that some commands have multiple flavors. For example, both echo and pwd have a built-in command flavor as well as an external command flavor. These flavors are slightly different. To see multiple flavors for commands, use the -a option on the typecommand:
$ type -a echo
echo is a shell builtin
echo is /bin/echo
$
$ which echo
/bin/echo
$
$ type -a pwd
pwd is a shell builtin
pwd is /bin/pwd
$
$ which pwd
/bin/pwd
$
Using the type -a command shows both types for each of the two commands. Note that the which command shows only the external command file.
Tip
To use the external command for a command that has multiple flavors, directly reference the file. For example, to use the pwd external command, type /bin/pwd.
Using the history command
A useful built-in command is the history command. The bash shell keeps track of the commands you have used. You can recall these commands and even reuse them.
To see a recently used commands list, just type the history command with no options:
$ history
1 ps -f
2 pwd
3 ls
4 coproc ( sleep 10; sleep 2 )
5 jobs
6 ps --forest
7 ls
8 ps -f
9 pwd
10 ls -l /bin/ps
11 history
12 cd /etc
13 pwd
14 ls
15 cd
16 type pwd
17 which pwd
18 type echo
19 which echo
20 type -a pwd
21 type -a echo
22 pwd
23 history
In this example, only the last 23 commands are shown. Typically, the last 1,000 commands are kept in history. That is lots of commands!
Tip
You can set the number of commands to keep in the bash history. To do so, you need to modify an environment variable called HISTSIZE (see Chapter 6).
You can recall and reuse the last command in your history list. This can save time and typing. To recall and reuse your last command, type !! and press the Enter key:
$ ps --forest
PID TTY TIME CMD
2089 pts/0 00:00:00 bash
2744 pts/0 00:00:00 \_ ps
$
$ !!
ps --forest
PID TTY TIME CMD
2089 pts/0 00:00:00 bash
2745 pts/0 00:00:00 \_ ps
$
When !! was entered, the bash shell first displayed the command it was recalling from the shell's history. After the command was displayed, it was executed.
Command history is kept in the hidden .bash_history file, which is located in the user's home directory. Be careful here. The bash command history is stored in memory and then written out into the history file when the shell is exited:
$ history
[...]
25 ps --forest
26 history
27 ps --forest
28 history
$
$ cat .bash_history
pwd
ls
history
exit
$
Notice when the history command is run, 28 commands are listed. In the example, the listing is snipped for brevity. However, when the .bash_history file is displayed, only four commands are listed, and they don't match the history command's list.
You can force the command history to be written to the .bash_history file before leaving a shell session. In order to force this write, use the -a option on the history command:
$ history -a
$
$ history
[...]
25 ps --forest
26 history
27 ps --forest
28 history
29 ls -a
30 cat .bash_history
31 history -a
32 history
$
$ cat .bash_history
[...]
ps --forest
history
ps --forest
history
ls -a
cat .bash_history
history -a
This time both listings need to be snipped because they are so long. Notice that contents from both the history command and the .bash_history file match, except for the very last command listed for the history command, because it came after the history -a command was issued.
Note
If you have multiple terminal sessions open, you can still append the .bash_history in each open session using the history -a command. However, the histories are not automatically updated for your other open terminal sessions. This is because the.bash_history file is read only when a terminal session is first started. To force the .bash_history file to be reread and a terminal session's history to be updated, use the history -n command.
You can recall any command from the history list. Just enter an exclamation point and the command's number from the history list:
$ history
[...]
13 pwd
14 ls
15 cd
16 type pwd
17 which pwd
18 type echo
19 which echo
20 type -a pwd
21 type -a echo
[...]
32 history -a
33 history
34 cat .bash_history
35 history
$
$ !20
type -a pwd
pwd is a shell builtin
pwd is /bin/pwd
$
Command number 20 was pulled from command history. Notice that similar to executing the last command in history, the bash shell first displays the command it is recalling from the shell's history. After the command is displayed, it is executed.
Using bash shell command history can be a great timesaver. You can do even more with the built-in history command. Be sure to view the bash manual pages for history, by typing man history.
Using command aliases
The alias command is another shell built-in command. A command alias allows you to create an alias name for common commands (along with their parameters) to help keep your typing to a minimum.
Most likely, your Linux distribution has already set some common command aliases for you. To see a list of the active aliases, use the alias command with the -p parameter:
$ alias -p
[...]
alias egrep='egrep --color=auto'
alias fgrep='fgrep --color=auto'
alias grep='grep --color=auto'
alias l='ls -CF'
alias la='ls -A'
alias ll='ls -alF'
alias ls='ls --color=auto'
$
Notice that, on this Ubuntu Linux distribution, an alias is used to override the standard ls command. It automatically provides the --color parameter, indicating that the terminal supports color mode listings.
You can create your own aliases using the alias command:
$ alias li='ls -li'
$
$ li
total 36
529581 drwxr-xr-x. 2 Christine Christine 4096 May 19 18:17 Desktop
529585 drwxr-xr-x. 2 Christine Christine 4096 Apr 25 16:59 Documents
529582 drwxr-xr-x. 2 Christine Christine 4096 Apr 25 16:59 Downloads
529586 drwxr-xr-x. 2 Christine Christine 4096 Apr 25 16:59 Music
529587 drwxr-xr-x. 2 Christine Christine 4096 Apr 25 16:59 Pictures
529584 drwxr-xr-x. 2 Christine Christine 4096 Apr 25 16:59 Public
529583 drwxr-xr-x. 2 Christine Christine 4096 Apr 25 16:59 Templates
532891 -rwxrw-r--. 1 Christine Christine 36 May 30 07:21 test.sh
529588 drwxr-xr-x. 2 Christine Christine 4096 Apr 25 16:59 Videos
$
After you define an alias value, you can use it at any time in your shell, including in shell scripts. Be aware that because command aliases are built-in commands, an alias is valid only for the shell process in which it is defined:
$ alias li='ls -li'
$
$ bash
$
$ li
bash: li: command not found
$
$ exit
exit
$
Fortunately, you can make an alias value permanent across subshells. The next chapter covers how to do that, along with environment variables.
Summary
This chapter discussed the complicated interactive program, the GNU bash shell. It covered understanding the shell process and its relationships, including how subshells are spawned and their relationship to the parent shell. We also explored commands that create child processes and commands that don't.
The default interactive shell is normally started whenever a user logs in to a terminal. The shell that the system starts depends upon a user ID configuration. Typically, it is /bin/bash. The default system shell, /bin/sh, is used for system shell scripts, such as those needed at startup.
A subshell or child shell can be spawned using the bash command. They are also created when a process list or the coproc command is used. Using subshells at the command line can allow for creative and productive use of the CLI. Subshells can be nested, spawning grandchild shells and great-grandchild shells. Creating a subshell is an expensive process as a new environment for the shell must be created as well.
Finally, the chapter looked at two different types of shell commands: built-in and external commands. External commands create a child process with a new environment, but a built-in command does not. This causes external commands to be more expensive to use. Because a new environment is not needed, built-in commands are more efficient and not affected by any environment changes.
Shells, subshells, processes, and forked processes are all affected by environment variables. How the variables affect and can be used within these different contexts are explored in the next chapter.
All materials on the site are licensed Creative Commons Attribution-Sharealike 3.0 Unported CC BY-SA 3.0 & GNU Free Documentation License (GFDL)
If you are the copyright holder of any material contained on our site and intend to remove it, please contact our site administrator for approval.
© 2016-2026 All site design rights belong to S.Y.A.