Wiley Linux Command Line and Shell Scripting Bible 3rd (2015)
Part I. The Linux Command Line
Chapter 7. Understanding Linux File Permissions
In This Chapter
1. Understanding Linux security
2. Decoding the permissions
3. Working with Linux groups
No system is complete without some form of security. There must be a mechanism available to protect files from unauthorized viewing or modification. The Linux system follows the Unix method of file permissions, allowing individual users and groups access to files based on a set of security settings for each file and directory. This chapter discusses how to use the Linux file security system to protect data when necessary and share data when desired.
Linux Security
The core of the Linux security system is the user account. Each individual who accesses a Linux system should have a unique user account assigned. The users' permissions to objects on the system depend on the user account they log in with.
User permissions are tracked using a user ID (often called a UID), which is assigned to an account when it's created. The UID is a numerical value, unique for each user. However, you don't log in to a Linux system using your UID. Instead, you use a login name. The login name is an alphanumeric text string of eight characters or fewer that the user uses to log in to the system (along with an associated password).
The Linux system uses special files and utilities to track and manage user accounts on the system. Before we can discuss file permissions, we need to discuss how Linux handles user accounts. This section describes the files and utilities required for user accounts so that you can understand how to use them when working with file permissions.
The /etc/passwd file
The Linux system uses a special file to match the login name to a corresponding UID value. This file is the /etc/passwd file. The /etc/passwd file contains several pieces of information about the user. Here's what a typical /etc/passwd file looks like on a Linux system:
$ cat /etc/passwd
root:x:0:0:root:/root:/bin/bash
bin:x:1:1:bin:/bin:/sbin/nologin
daemon:x:2:2:daemon:/sbin:/sbin/nologin
adm:x:3:4:adm:/var/adm:/sbin/nologin
lp:x:4:7:lp:/var/spool/lpd:/sbin/nologin
sync:x:5:0:sync:/sbin:/bin/sync
shutdown:x:6:0:shutdown:/sbin:/sbin/shutdown
halt:x:7:0:halt:/sbin:/sbin/halt
mail:x:8:12:mail:/var/spool/mail:/sbin/nologin
news:x:9:13:news:/etc/news:
uucp:x:10:14:uucp:/var/spool/uucp:/sbin/nologin
operator:x:11:0:operator:/root:/sbin/nologin
games:x:12:100:games:/usr/games:/sbin/nologin
gopher:x:13:30:gopher:/var/gopher:/sbin/nologin
ftp:x:14:50:FTP User:/var/ftp:/sbin/nologin
nobody:x:99:99:Nobody:/:/sbin/nologin
rpm:x:37:37::/var/lib/rpm:/sbin/nologin
vcsa:x:69:69:virtual console memory owner:/dev:/sbin/nologin
mailnull:x:47:47::/var/spool/mqueue:/sbin/nologin
smmsp:x:51:51::/var/spool/mqueue:/sbin/nologin
apache:x:48:48:Apache:/var/www:/sbin/nologin
rpc:x:32:32:Rpcbind Daemon:/var/lib/rpcbind:/sbin/nologin
ntp:x:38:38::/etc/ntp:/sbin/nologin
nscd:x:28:28:NSCD Daemon:/:/sbin/nologin
tcpdump:x:72:72::/:/sbin/nologin
dbus:x:81:81:System message bus:/:/sbin/nologin
avahi:x:70:70:Avahi daemon:/:/sbin/nologin
hsqldb:x:96:96::/var/lib/hsqldb:/sbin/nologin
sshd:x:74:74:Privilege-separated SSH:/var/empty/sshd:/sbin/nologin
rpcuser:x:29:29:RPC Service User:/var/lib/nfs:/sbin/nologin
nfsnobody:x:65534:65534:Anonymous NFS User:/var/lib/nfs:/sbin/nologin
haldaemon:x:68:68:HAL daemon:/:/sbin/nologin
xfs:x:43:43:X Font Server:/etc/X11/fs:/sbin/nologin
gdm:x:42:42::/var/gdm:/sbin/nologin
rich:x:500:500:Rich Blum:/home/rich:/bin/bash
mama:x:501:501:Mama:/home/mama:/bin/bash
katie:x:502:502:katie:/home/katie:/bin/bash
jessica:x:503:503:Jessica:/home/jessica:/bin/bash
mysql:x:27:27:MySQL Server:/var/lib/mysql:/bin/bash
$
The root user account is the administrator for the Linux system and is always assigned UID 0. As you can see, the Linux system creates lots of user accounts for various functions that aren't actual users. These are called system accounts. A system account is a special account that services running on the system use to gain access to resources on the system. All services that run in background mode need to be logged in to the Linux system under a system user account.
Before security became a big issue, these services often just logged in using the root user account. Unfortunately, if an unauthorized person broke into one of these services, he instantly gained access to the system as the root user. To prevent this, now just about every service that runs in background on a Linux server has its own user account to log in with. This way, if a troublemaker compromises a service, he still can't necessarily get access to the whole system.
Linux reserves UIDs below 500 for system accounts. Some services even require specific UIDs to work properly. When you create accounts for normal users, most Linux systems assign the first available UID starting at 500 (although this is not necessarily true for all Linux distributions).
You probably noticed that the /etc/passwd file contains much more than just the login name and UID for the user. The fields of the /etc/passwd file contain the following information:
· The login username
· The password for the user
· The numerical UID of the user account
· The numerical group ID (GID) of the user account
· A text description of the user account (called the comment field)
· The location of the HOME directory for the user
· The default shell for the user
The password field in the /etc/passwd file is set to an x. This doesn't mean that all the user accounts have the same password. In the old days of Linux, the /etc/passwd file contained an encrypted version of the user's password. However, because lots of programs need to access the /etc/passwd file for user information, this became a security problem. With the advent of software that could easily decrypt encrypted passwords, the bad guys had a field day trying to break user passwords stored in the /etc/passwd file. Linux developers needed to rethink that policy.
Now, most Linux systems hold user passwords in a separate file (called the shadow file, located at /etc/shadow). Only special programs (such as the login program) are allowed access to this file.
The /etc/passwd file is a standard text file. You can use any text editor to manually perform user management functions (such as adding, modifying, or removing user accounts) directly in the /etc/passwd file. However, this is an extremely dangerous practice. If the/etc/passwd file becomes corrupt, the system can't read it, and it prevents anyone (even the root user) from logging in. Instead, it's safer to use the standard Linux user management utilities to perform all user management functions.
The /etc/shadow file
The /etc/shadow file provides more control over how the Linux system manages passwords. Only the root user has access to the /etc/shadow file, making it more secure than the /etc/passwd file.
The /etc/shadow file contains one record for each user account on the system. A record looks like this:
rich:$1$.FfcK0ns$f1UgiyHQ25wrB/hykCn020:11627:0:99999:7:::
There are nine fields in each /etc/shadow file record:
· The login name corresponding to the login name in the /etc/passwd file
· The encrypted password
· The number of days since January 1, 1970, that the password was last changed
· The minimum number of days before the password can be changed
· The number of days before the password must be changed
· The number of days before password expiration that the user is warned to change the password
· The number of days after a password expires before the account will be disabled
· The date (stored as the number of days since January 1, 1970) since the user account was disabled
· A field reserved for future use
Using the shadow password system, the Linux system has much finer control over user passwords. It can control how often a user must change his or her password and when to disable the account if the password hasn't been changed.
Adding a new user
The primary tool used to add new users to your Linux system is useradd. This command provides an easy way to create a new user account and set up the user's HOME directory structure all at once. The useradd command uses a combination of system default values and command line parameters to define a user account. The system defaults are set in the /etc/default/useradd file. To see the system default values used on your Linux distribution, enter the useradd command with the -D parameter:
# /usr/sbin/useradd -D
GROUP=100
HOME=/home
INACTIVE=-1
EXPIRE=
SHELL=/bin/bash
SKEL=/etc/skel
CREATE_MAIL_SPOOL=yes
#
Note
Some Linux distributions place the Linux user and group utilities in the /usr/sbin directory, which may not be in your PATH environment variable. If that's the case in your Linux distribution, either add the directory to your PATH or use the absolute file path to run it.
The -D parameter shows what defaults the useradd command uses if you don't specify them in the command line when creating a new user account. This example shows the following default values:
· The new user is added to a common group with group ID 100.
· The new user has a HOME account created in the directory /home/loginname.
· The account can't be disabled when the password expires.
· The new account can't be set to expire at a set date.
· The new account uses the bash shell as the default shell.
· The system copies the contents of the /etc/skel directory to the user's HOME directory.
· The system creates a file in the mail directory for the user account to receive mail.
The penultimate value is interesting. The useradd command allows an administrator to create a default HOME directory configuration and then uses that as a template to create the new user's HOME directory. This allows you to place default files for the system in every new user's HOME directory automatically. In the Ubuntu Linux system, the /etc/skel directory has the following files:
$ ls -al /etc/skel
total 32
drwxr-xr-x 2 root root 4096 2010-04-29 08:26 .
drwxr-xr-x 135 root root 12288 2010-09-23 18:49 ..
-rw-r--r-- 1 root root 220 2010-04-18 21:51 .bash_logout
-rw-r--r-- 1 root root 3103 2010-04-18 21:51 .bashrc
-rw-r--r-- 1 root root 179 2010-03-26 08:31 examples.desktop
-rw-r--r-- 1 root root 675 2010-04-18 21:51 .profile
$
You should recognize these files from Chapter 6. These are the standard startup files for the bash shell environment. The system automatically copies these default files into every user's HOME directory you create.
You can test this by creating a new user account using the default system parameters and then looking at the HOME directory for the new user:
# useradd -m test
# ls -al /home/test
total 24
drwxr-xr-x 2 test test 4096 2010-09-23 19:01 .
drwxr-xr-x 4 root root 4096 2010-09-23 19:01 ..
-rw-r--r-- 1 test test 220 2010-04-18 21:51 .bash_logout
-rw-r--r-- 1 test test 3103 2010-04-18 21:51 .bashrc
-rw-r--r-- 1 test test 179 2010-03-26 08:31 examples.desktop
-rw-r--r-- 1 test test 675 2010-04-18 21:51 .profile
#
By default, the useradd command doesn't create a HOME directory, but the –m command line option tells it to create the HOME directory. As you can see in the example, the useradd command created the new HOME directory, using the files contained in the /etc/skel directory.
Note
To run the user account administration commands in this chapter, you either need to be logged in as the special root user account or use the sudo command to run the commands as the root user account.
If you want to override a default value or behavior when creating a new user, you can do that with command line parameters. These are shown in Table 7.1.
Table 7.1 The useradd Command Line Parameters
|
Parameter |
Description |
|
-c comment |
Adds text to the new user's comment field |
|
-d home_dir |
Specifies a different name for the HOME directory other than the login name |
|
-e expire_date |
Specifies a date, in YYYY-MM-DD format, when the account will expire |
|
-f inactive_days |
Specifies the number of days after a password expires when the account will be disabled. A value of 0 disables the account as soon as the password expires; a value of -1 disables this feature. |
|
-g initial_group |
Specifies the group name or GID of the user's login group |
|
-G group . . . |
Specifies one or more supplementary groups the user belongs to |
|
-k |
Copies the /etc/skel directory contents into the user's HOME directory (must use -m as well) |
|
-m |
Creates the user's HOME directory |
|
-M |
Doesn't create a user's HOME directory (used if the default setting is to create one) |
|
-n |
Creates a new group using the same name as the user's login name |
|
-r |
Creates a system account |
|
-p passwd |
Specifies a default password for the user account |
|
-s shell |
Specifies the default login shell |
|
-u uid |
Specifies a unique UID for the account |
As you can see, you can override all the system default values when creating a new user account just by using command line parameters. However, if you find yourself having to override a value all the time, it's easier to just change the system default value.
You can change the system default new user values by using the -D parameter, along with a parameter representing the value you need to change. These parameters are shown in Table 7.2.
Table 7.2 The useradd Change Default Values Parameters
|
Parameter |
Description |
|
-b default_home |
Changes the location where users' HOME directories are created |
|
-e expiration_date |
Changes the expiration date on new accounts |
|
-f inactive |
Changes the number of days after a password has expired before the account is disabled |
|
-g group |
Changes the default group name or GID used |
|
-s shell |
Changes the default login shell |
Changing the default values is a snap:
# useradd -D -s /bin/tsch
# useradd -D
GROUP=100
HOME=/home
INACTIVE=-1
EXPIRE=
SHELL=/bin/tsch
SKEL=/etc/skel
CREATE_MAIL_SPOOL=yes
#
Now, the useradd command uses the tsch shell as the default login shell for all new user accounts you create.
Removing a user
If you want to remove a user from the system, the userdel command is what you need. By default, the userdel command removes only the user information from the /etc/passwd file. It doesn't remove any files the account owns on the system.
If you use the -r parameter, userdel removes the user's HOME directory, along with the user's mail directory. However, other files owned by the deleted user account may still be on the system. This can be a problem in some environments.
Here's an example of using the userdel command to remove an existing user account:
# /usr/sbin/userdel -r test
# ls -al /home/test
ls: cannot access /home/test: No such file or directory
#
After using the -r parameter, the user's old /home/test directory no longer exists.
Caution
Be careful when using the -r parameter in an environment with lots of users. You never know if a user had important files stored in his or her HOME directory that are used by someone else or another program. Always check before removing a user's HOMEdirectory!
Modifying a user
Linux provides a few different utilities for modifying the information for existing user accounts. Table 7.3 shows these utilities.
Table 7.3 User Account Modification Utilities
|
Command |
Description |
|
usermod |
Edits user account fields, as well as specifying primary and secondary group membership |
|
passwd |
Changes the password for an existing user |
|
chpasswd |
Reads a file of login name and password pairs, and updates the passwords |
|
chage |
Changes the password's expiration date |
|
chfn |
Changes the user account's comment information |
|
chsh |
Changes the user account's default shell |
Each of these utilities provides a specific function for changing information about user accounts. The following sections describe each of these utilities.
usermod
The usermod command is the most robust of the user account modification utilities. It provides options for changing most of the fields in the /etc/passwd file. To do that, you just need to use the command line parameter that corresponds to the value you want to change. The parameters are mostly the same as the useradd parameters (such as -c to change the comment field, -e to change the expiration date, and -g to change the default login group). However, a couple of additional parameters might come in handy:
· -l changes the login name of the user account.
· -L locks the account so the user can't log in.
· -p changes the password for the account.
· -U unlocks the account so the user can log in.
The -L parameter is especially handy. Use this to lock an account so a user can't log in without having to remove the account and the user's data. To return the account to normal, just use the -U parameter.
passwd and chpasswd
A quick way to change just the password for a user is the passwd command:
# passwd test
Changing password for user test.
New UNIX password:
Retype new UNIX password:
passwd: all authentication tokens updated successfully.
#
If you just use the passwd command by itself, it changes your own password. Any user in the system can change his or her own password, but only the root user can change someone else's password.
The -e option is a handy way to force a user to change the password on the next log in. This allows you to set the user's password to a simple value and forces them to change it to something harder that they can remember.
If you ever need to do a mass password change for lots of users on the system, the chpasswd command can be a lifesaver. The chpasswd command reads a list of login name and password pairs (separated by a colon) from the standard input, automatically encrypts the password, and sets it for the user account. You can also use the redirection command to redirect a file of userid:password pairs into the command:
# chpasswd < users.txt
#
chsh, chfn, and chage
The chsh, chfn, and chage utilities are specialized for specific account modification functions. The chsh command allows you to quickly change the default login shell for a user. You must use the full pathname for the shell, and not just the shell name:
# chsh -s /bin/csh test
Changing shell for test.
Shell changed.
#
The chfn command provides a standard method for storing information in the comments field in the /etc/passwd file. Instead of just inserting random text, such as names or nicknames, or even just leaving the comment field blank, the chfn command uses specific information used in the Unix finger command to store information in the comment field. The finger command allows you to easily find information about people on your Linux system:
# finger rich
Login: rich Name: Rich Blum
Directory: /home/rich Shell: /bin/bash
On since Thu Sep 20 18:03 (EDT) on pts/0 from 192.168.1.2
No mail.
No Plan.
#
Note
Because of security concerns, many Linux system administrators disable the finger command on their systems, and many Linux distributions don't even install it by default.
If you use the chfn command with no parameters, it queries you for the appropriate values to enter in to the comment field:
# chfn test
Changing finger information for test.
Name []: Ima Test
Office []: Director of Technology
Office Phone []: (123)555-1234
Home Phone []: (123)555-9876
Finger information changed.
# finger test
Login: test Name: Ima Test
Directory: /home/test Shell: /bin/csh
Office: Director of Technology Office Phone: (123)555-1234
Home Phone: (123)555-9876
Never logged in.
No mail.
No Plan.
#
If you now look at the entry in the /etc/passwd file, it looks like this:
# grep test /etc/passwd
test:x:504:504:Ima Test,Director of Technology,(123)555-
1234,(123)555-9876:/home/test:/bin/csh
#
All the finger information is neatly stored away in the /etc/passwd file entry.
Finally, the chage command helps you manage the password aging process for user accounts. You need to set several parameters to individual values, shown in Table 7.4.
Table 7.4 The chage Command Parameters
|
Parameter |
Description |
|
-d |
Sets the number of days since the password was last changed |
|
-E |
Sets the date the password expires |
|
-I |
Sets the number of days of inactivity after the password expires to lock the account |
|
-m |
Sets the minimum number of days between password changes |
|
-W |
Sets the number of days before the password expires that a warning message appears |
The chage date values can be expressed using one of two methods:
· A date in YYYY-MM-DD format
· A numerical value representing the number of days since January 1, 1970
One neat feature of the chage command is that it allows you to set an expiration date for an account. Using this feature, you can create temporary user accounts that automatically expire on a set date, without your having to remember to delete them! Expired accounts are similar to locked accounts. The account still exists, but the user can't log in with it.
Using Linux Groups
User accounts are great for controlling security for individual users, but they aren't so good at allowing groups of users to share resources. To accomplish this, the Linux system uses another security concept, called groups.
Group permissions allow multiple users to share a common set of permissions for an object on the system, such as a file, directory, or device (more on that later in the “Decoding File Permissions” section).
Linux distributions differ somewhat on how they handle default group memberships. Some Linux distributions create just one group that contains all the user accounts as members. You need to be careful if your Linux distribution does this, because your files may be readable by all other users on the system. Other distributions create a separate group account for each user to provide a little more security.
Each group has a unique GID, which, like UIDs, is a unique numerical value on the system. Along with the GID, each group has a unique group name. You can use some group utilities to create and manage your own groups on the Linux system. This section discusses how group information is stored and how to use the group utilities to create new groups and modify existing groups.
The /etc/group file
Just like user accounts, group information is stored in a file on the system. The /etc/group file contains information about each group used on the system. These are examples from a typical /etc/group file on a Linux system:
root:x:0:root
bin:x:1:root,bin,daemon
daemon:x:2:root,bin,daemon
sys:x:3:root,bin,adm
adm:x:4:root,adm,daemon
rich:x:500:
mama:x:501:
katie:x:502:
jessica:x:503:
mysql:x:27:
test:x:504:
Like UIDs, GIDs are assigned using a special format. Groups used for system accounts are assigned GIDs below 500, and user groups are assigned GIDs starting at 500. The /etc/group file uses four fields:
· The group name
· The group password
· The GID
· The list of user accounts that belong to the group
The group password allows a non-group member to temporarily become a member of the group by using the password. This feature is not used all that commonly, but it does exist.
You should never add users to groups by editing the /etc/group file. Instead, use the usermod command (discussed earlier in the “Linux Security” section) to add a user account to a group. Before you can add users to different groups, you must create the groups.
Note
The list of user accounts is somewhat misleading. You'll notice that there are several groups in the list that don't have any users listed. This isn't because they don't have any members. When a user account uses a group as the default group in the/etc/passwd file, the user account doesn't appear in the /etc/group file as a member. This has caused confusion for more than one system administrator over the years!
Creating new groups
The groupadd command allows you to create new groups on your system:
# /usr/sbin/groupadd shared
# tail /etc/group
haldaemon:x:68:
xfs:x:43:
gdm:x:42:
rich:x:500:
mama:x:501:
katie:x:502:
jessica:x:503:
mysql:x:27:
test:x:504:
shared:x:505:
#
When you create a new group, no users are assigned to it by default. The groupadd command doesn't provide an option for adding user accounts to the group. Instead, to add new users, use the usermod command:
# /usr/sbin/usermod -G shared rich
# /usr/sbin/usermod -G shared test
# tail /etc/group
haldaemon:x:68:
xfs:x:43:
gdm:x:42:
rich:x:500:
mama:x:501:
katie:x:502:
jessica:x:503:
mysql:x:27:
test:x:504:
shared:x:505:rich, test
#
The shared group now has two members, test and rich. The -G parameter in usermod appends the new group to the list of groups for the user account.
Note
If you change the user groups for an account that is currently logged into the system, the user must log out and then log back in for the group changes to take effect.
Caution
Be careful when assigning groups for user accounts. If you use the -g parameter, the group name you specify replaces the default group for the user account. The -G parameter adds the group to the list of groups the user belongs to, keeping the default group intact.
Modifying groups
As you can see from the /etc/group file, you don't need to modify much information about a group. The groupmod command allows you to change the GID (using the -g parameter) or the group name (using the -n parameter) of an existing group:
# /usr/sbin/groupmod -n sharing shared
# tail /etc/group
haldaemon:x:68:
xfs:x:43:
gdm:x:42:
rich:x:500:
mama:x:501:
katie:x:502:
jessica:x:503:
mysql:x:27:
test:x:504:
sharing:x:505:test,rich
#
When changing the name of a group, the GID and group members remain the same, only the group name changes. Because all security permissions are based on the GID, you can change the name of a group as often as you wish without adversely affecting file security.
Decoding File Permissions
Now that you know about users and groups, it's time to decode the cryptic file permissions you've seen when using the ls command. This section describes how to decipher the permissions and where they come from.
Using file permission symbols
If you remember from Chapter 3, the ls command allows you to see the file permissions for files, directories, and devices on the Linux system:
$ ls -l
total 68
-rw-rw-r-- 1 rich rich 50 2010-09-13 07:49 file1.gz
-rw-rw-r-- 1 rich rich 23 2010-09-13 07:50 file2
-rw-rw-r-- 1 rich rich 48 2010-09-13 07:56 file3
-rw-rw-r-- 1 rich rich 34 2010-09-13 08:59 file4
-rwxrwxr-x 1 rich rich 4882 2010-09-18 13:58 myprog
-rw-rw-r-- 1 rich rich 237 2010-09-18 13:58 myprog.c
drwxrwxr-x 2 rich rich 4096 2010-09-03 15:12 test1
drwxrwxr-x 2 rich rich 4096 2010-09-03 15:12 test2
$
The first field in the output listing is a code that describes the permissions for the files and directories. The first character in the field defines the type of the object:
· - for files
· d for directories
· l for links
· c for character devices
· b for block devices
· n for network devices
After that, you see three sets of three characters. Each set of three characters defines an access permission triplet:
· r for read permission for the object
· w for write permission for the object
· x for execute permission for the object
If a permission is denied, a dash appears in the location. The three sets relate the three levels of security for the object:
· The owner of the object
· The group that owns the object
· Everyone else on the system
This is broken down in Figure 7.1.
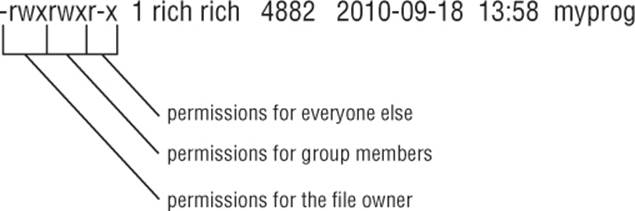
Figure 7.1 The Linux file permissions
The easiest way to discuss this is to take an example and decode the file permissions one by one:
-rwxrwxr-x 1 rich rich 4882 2010-09-18 13:58 myprog
The file myprog has the following sets of permissions:
· rwx for the file owner (set to the login name rich)
· rwx for the file group owner (set to the group name rich)
· r-x for everyone else on the system
These permissions indicate that the user login name rich can read, write, and execute the file (considered full permissions). Likewise, members in the group rich can also read, write, and execute the file. However, anyone else not in the rich group can only read and execute the file; the w is replaced with a dash, indicating that write permissions are not assigned to this security level.
Default file permissions
You may be wondering about where these file permissions come from. The answer is umask. The umask command sets the default permissions for any file or directory you create:
$ touch newfile
$ ls -al newfile
-rw-r--r-- 1 rich rich 0 Sep 20 19:16 newfile
$
The touch command created the file using the default permissions assigned to my user account. The umask command shows and sets the default permissions:
$ umask
0022
$
Unfortunately, the umask command setting isn't overtly clear, and trying to understand exactly how it works makes things even muddier. The first digit represents a special security feature called the sticky bit. We'll talk more about that later on in this chapter in the “Sharing Files” section.
The next three digits represent the octal values of the umask for a file or directory. To understand how umask works, you first need to understand octal mode security settings.
Octal mode security settings take the three rwx permission values and convert them into a 3-bit binary value, represented by a single octal value. In the binary representation, each position is a binary bit. Thus, if the read permission is the only permission set, the value becomes r--, relating to a binary value of 100, indicating the octal value of 4. Table 7.5 shows the possible combinations you'll run into.
Table 7.5 Linux File Permission Codes
|
Permissions |
Binary |
Octal |
Description |
|
--- |
000 |
0 |
No permissions |
|
--x |
001 |
1 |
Execute-only permission |
|
-w- |
010 |
2 |
Write-only permission |
|
-wx |
011 |
3 |
Write and execute permissions |
|
r-- |
100 |
4 |
Read-only permission |
|
r-x |
101 |
5 |
Read and execute permissions |
|
rw- |
110 |
6 |
Read and write permissions |
|
rwx |
111 |
7 |
Read, write, and execute permissions |
Octal mode takes the octal permissions and lists three of them in order for the three security levels (user, group, and everyone). Thus, the octal mode value 664 represents read and write permissions for the user and group, but read-only permission for everyone else.
Now that you know about octal mode permissions, the umask value becomes even more confusing. The octal mode shown for the default umask on my Linux system is 0022, but the file I created had an octal mode permission of 644. How did that happen?
The umask value is just that, a mask. It masks out the permissions you don't want to give to the security level. Now we have to dive into some octal arithmetic to figure out the rest of the story.
The umask value is subtracted from the full permission set for an object. The full permission for a file is mode 666 (read/write permission for all), but for a directory it's 777 (read/write/execute permission for all).
Thus, in the example, the file starts out with permissions 666, and the umask of 022 is applied, leaving a file permission of 644.
The umask value is normally set in the /etc/profile startup file in most Linux distributions (see Chapter 6), but some prefer to set it in the /etc/login.defs file (such as in Ubuntu). You can specify a different default umask setting using the umask command:
$ umask 026
$ touch newfile2
$ ls -l newfile2
-rw-r----- 1 rich rich 0 Sep 20 19:46 newfile2
$
By setting the umask value to 026, the default file permissions become 640, so the new file now is restricted to read-only for the group members, and everyone else on the system has no permissions to the file.
The umask value also applies to making new directories:
$ mkdir newdir
$ ls -l
drwxr-x--x 2 rich rich 4096 Sep 20 20:11 newdir/
$
Because the default permissions for a directory are 777, the resulting permissions from the umask are different from those of a new file. The 026 umask value is subtracted from 777, leaving the 751 directory permission setting.
Changing Security Settings
If you've already created a file or directory and need to change the security settings on it, Linux has a few different utilities available for this. This section shows you how to change the existing permissions, the default owner, and the default group settings for a file or directory.
Changing permissions
The chmod command allows you to change the security settings for files and directories. The format of the chmod command is:
chmod options mode file
The mode parameter allows you to set the security settings using either octal or symbolic mode. The octal mode settings are pretty straightforward; just use the standard three-digit octal code you want the file to have:
$ chmod 760 newfile
$ ls -l newfile
-rwxrw---- 1 rich rich 0 Sep 20 19:16 newfile
$
The octal file permissions are automatically applied to the file indicated. The symbolic mode permissions are not so easy to implement.
Instead of using the normal string of three sets of three characters, the chmod command takes a different approach. The following is the format for specifying a permission in symbolic mode:
[ugoa...][[+-=][rwxXstugo...]
Makes perfectly good sense, doesn't it? The first group of characters defines to whom the new permissions apply:
· u for the user
· g for the group
· o for others (everyone else)
· a for all of the above
Next, a symbol is used to indicate whether you want to add the permission to the existing permissions (+), subtract the permission from the existing permission (−), or set the permissions to the value (=).
Finally, the third symbol is the permission used for the setting. You may notice that there are more than the normal rwx values here. These are the additional settings:
· X assigns execute permissions only if the object is a directory or if it already had execute permissions.
· s sets the UID or GID on execution.
· t saves program text.
· u sets the permissions to the owner's permissions.
· g sets the permissions to the group's permissions.
· o sets the permissions to the other's permissions.
Using these permissions looks like this:
$ chmod o+r newfile
$ ls -lF newfile
-rwxrw-r-- 1 rich rich 0 Sep 20 19:16 newfile*
$
The o+r entry adds the read permission to whatever permissions the everyone security level already had.
$ chmod u-x newfile
$ ls -lF newfile
-rw-rw-r-- 1 rich rich 0 Sep 20 19:16 newfile
$
The u-x entry removes the execute permission that the user already had. Note that the –F option for the ls command indicates whether a file has execution permissions by adding an asterisk to the filename.
The options parameters provide a few additional features to augment the behavior of the chmod command. The -R parameter performs the file and directory changes recursively. You can use wildcard characters for the filename specified, changing the permissions on multiple files with just one command.
Changing ownership
Sometimes, you need to change the owner of a file, such as when someone leaves an organization or a developer creates an application that needs to be owned by a system account when it's in production. Linux provides two commands for doing that. The chowncommand makes it easy to change the owner of a file, and the chgrp command allows you to change the default group of a file.
The format of the chown command is:
chown options owner[.group] file
You can specify either the login name or the numeric UID for the new owner of the file:
# chown dan newfile
# ls -l newfile
-rw-rw-r-- 1 dan rich 0 Sep 20 19:16 newfile
#
Simple. The chown command also allows you to change both the user and group of a file:
# chown dan.shared newfile
# ls -l newfile
-rw-rw-r-- 1 dan shared 0 Sep 20 19:16 newfile
#
If you really want to get tricky, you can just change the default group for a file:
# chown .rich newfile
# ls -l newfile
-rw-rw-r-- 1 dan rich 0 Sep 20 19:16 newfile
#
Finally, if your Linux system uses individual group names that match user login names, you can change both with just one entry:
# chown test. newfile
# ls -l newfile
-rw-rw-r-- 1 test test 0 Sep 20 19:16 newfile
#
The chown command uses a few different option parameters. The -R parameter allows you to make changes recursively through subdirectories and files, using a wildcard character. The -h parameter also changes the ownership of any files that are symbolically linked to the file.
Note
Only the root user can change the owner of a file. Any user can change the default group of a file, but the user must be a member of the groups the file is changed from and to.
The chgrp command provides an easy way to change just the default group for a file or directory:
$ chgrp shared newfile
$ ls -l newfile
-rw-rw-r-- 1 rich shared 0 Sep 20 19:16 newfile
$
The user account must own the file, and be a member of the new group as well to be able to change the group. Now any member in the shared group can write to the file. This is one way to share files on a Linux system. However, sharing files among a group of people on the system can get tricky. The next section discusses how to do this.
Sharing Files
As you've probably already figured out, creating groups is the way to share access to files on the Linux system. However, for a complete file-sharing environment, things are more complicated.
As you've already seen in the “Decoding File Permissions” section, when you create a new file, Linux assigns the file permissions of the new file using your default UID and GID. To allow others access to the file, you need to either change the security permissions for the everyone security group or assign the file a different default group that contains other users.
This can be a pain in a large environment if you want to create and share documents among several people. Fortunately, there's a simple solution for how to solve this problem.
There are three additional bits of information that Linux stores for each file and directory:
· The set user id (SUID): When a file is executed by a user, the program runs under the permissions of the file owner.
· The set group id (SGID): For a file, the program runs under the permissions of the file group. For a directory, new files created in the directory use the directory group as the default group.
· The sticky bit: The file remains (sticks) in memory after the process ends.
The SGID bit is important for sharing files. By enabling the SGID bit, you can force all new files created in a shared directory to be owned by the directory's group and now the individual user's group.
The SGID is set using the chmod command. It's added to the beginning of the standard three-digit octal value (making a four-digit octal value), or you can use the symbol s in symbolic mode.
If you're using octal mode, you'll need to know the arrangement of the bits, shown in Table 7.6.
Table 7.6 The chmod SUID, SGID, and Sticky Bit Octal Values
|
Binary |
Octal |
Description |
|
000 |
0 |
All bits are cleared. |
|
001 |
1 |
The sticky bit is set. |
|
010 |
2 |
The SGID bit is set. |
|
011 |
3 |
The SGID and sticky bits are set. |
|
100 |
4 |
The SUID bit is set. |
|
101 |
5 |
The SUID and sticky bits are set. |
|
110 |
6 |
The SUID and SGID bits are set. |
|
111 |
7 |
All bits are set. |
So, to create a shared directory that always sets the directory group for all new files, all you need to do is set the SGID bit for the directory:
$ mkdir testdir
$ ls -l
drwxrwxr-x 2 rich rich 4096 Sep 20 23:12 testdir/
$ chgrp shared testdir
$ chmod g+s testdir
$ ls -l
drwxrwsr-x 2 rich shared 4096 Sep 20 23:12 testdir/
$ umask 002
$ cd testdir
$ touch testfile
$ ls -l
total 0
-rw-rw-r-- 1 rich shared 0 Sep 20 23:13 testfile
$
The first step is to create a directory that you want to share using the mkdir command. Next, use the chgrp command to change the default group for the directory to a group that contains the members who need to share files (you must be a member of that group for this to work). Finally, set the SGID bit for the directory to ensure that any files created in the directory use the shared group name as the default group.
For this environment to work properly, all the group members must have their umask values set to make files writable by group members. In the preceding example, the umask is changed to 002 so the files are writable by the group.
After all that's done, any member of the group can go to the shared directory and create a new file. As expected, the new file uses the default group of the directory, not the user account's default group. Now any user in the shared group can access this file.
Summary
This chapter discussed the command line commands you need to know to manage the Linux security on your system. Linux uses a system of user IDs and group IDs to protect access to files, directories, and devices. Linux stores information about user accounts in the/etc/passwd file and information about groups in the /etc/group file. Each user is assigned a unique numeric user ID, along with a text login name to identify the user in the system. Groups are also assigned unique numerical group IDs and text group names. A group can contain one or more users to allowed shared access to system resources.
Several commands are available for managing user accounts and groups. The useradd command allows you to create new user accounts, and the groupadd command allows you to create new group accounts. To modify an existing user account, use the usermodcommand. Similarly, use the groupmod command to modify group account information.
Linux uses a complicated system of bits to determine access permissions for files and directories. Each file contains three security levels of protection: the file's owner, a default group that has access to the file, and a level for everyone else on the system. Each security level is defined by three access bits: read, write, and execute. The combination of three bits is often referred to by the symbols rwx, for read, write, and execute. If a permission is denied, its symbol is replaced with a dash (such as r-- for read-only permission).
The symbolic permissions are often referred to as octal values, with the three bits combined into one octal value and three octal values representing the three security levels. Use the umask command to set the default security settings for files and directories created on the system. The system administrator normally sets a default umask value in the /etc/profile file, but you can use the umask command to change your umask value at any time.
Use the chmod command to change security settings for files and directories. Only the file's owner can change permissions for a file or directory. However, the root user can change the security settings for any file or directory on the system. You can use the chown andchgrp commands to change the default owner and group of the file.
The chapter closed with a discussion on how to use the set GID bit to create a shared directory. The SGID bit forces any new files or directories created in a directory to use the default group name of the parent directory, not that of the user who created them. This provides an easy way to share files between users on the system.
Now that you're up to speed with file permissions, it's time to take a closer look at how to work with the actual filesystem in Linux. The next chapter shows you how to create new partitions in Linux from the command line and then how to format the new partitions so that they can be used in the Linux virtual directory.
All materials on the site are licensed Creative Commons Attribution-Sharealike 3.0 Unported CC BY-SA 3.0 & GNU Free Documentation License (GFDL)
If you are the copyright holder of any material contained on our site and intend to remove it, please contact our site administrator for approval.
© 2016-2026 All site design rights belong to S.Y.A.