Beginning the Linux Command Line, Second edition (2015)
CHAPTER 3. Administering the Linux File System
In Chapter 2, you’ve read about some of the basic tasks that you may want to accomplish when working with a Linux system. In this chapter, you’ll read about some of the more advanced tasks. Typically, these are tasks that you would use to administer and tune your Linux computer. First, you’ll learn how to mount devices on your computer and how to make sure that devices are mounted automatically when booting. Next, you’ll read how to create backups of files and directories with the tar utility, and of complete devices using dd. At the end of this chapter, you’ll discover the benefits of working with links.
Mounting Disks
On a Linux computer, devices are not always mounted automatically. Therefore, you must know how to mount a device manually. Especially if you are a server administrator who needs to connect his or her computer to external storage, knowledge about the mount procedure is very important. This also holds true for more common situations, for instance, when you have to connect a USB key and it doesn’t mount automatically.
Using the mount Command
To mount devices manually, you use the mount command. The basic syntax of this command is easy to understand:
mount /what /where
For the what part, you specify a device name, and, for the where part, you provide a directory. In principle, any directory can be used, but it doesn’t make sense to mount a device just anywhere (for example, on /usr) because doing so will temporarily make all other files in that directory unavailable.
Therefore, on Linux, two directories are created as default mount points. These are the directories that you would typically use to mount devices. The first of these is the directory /mnt. This is typically the directory that you would use for a mount that happens only occasionally, such as if you want to test whether some device is really mountable. The second of these directories is /media, where you would mount devices that are connected on a more regular basis. You would mount a CD or DVD in that directory with the following command:
mount /dev/cdrom /media/
If a graphical user interface is used, mounts are created automatically when devices are inserted. If for instance you’re inserting an optical drive on a computer that has a GNOME graphical interface that is currently running, it will be mounted under /media, in a directory that corresponds with the name of the label on the optical drive. On newer distributions, these mounts are created in /run/$USER/media/$LABEL, which makes it easier to distnguish between mounts created by different users.
The mount command lets you mount devices like CDs or DVDs, but network shares can also be mounted with this command. You just have to be more specific. If, for example, you want to mount a share named myshare that is offered by a Windows computer named lor, you would use the following command:
mount -t cifs -o username=yourname //lor/myshare /mnt
![]() Note The syntax in the preceding command can be used to access a share that is offered by a Windows computer, but you can also use it to access a share that is offered by a Samba file server. Samba is a service that you can run on top of any Linux computer to offer Windows-like file services.
Note The syntax in the preceding command can be used to access a share that is offered by a Windows computer, but you can also use it to access a share that is offered by a Samba file server. Samba is a service that you can run on top of any Linux computer to offer Windows-like file services.
You’ll notice in this last example that some extra options were used:
· First, the file system to be used is mentioned. The mount command is perfectly capable of determining the file system for local devices by just looking at the administration that exists in the beginning of every file system. But, if you’re trying to mount a share that is offered by a computer on the network, you really need to specify the file system. This is because the mount command needs to know what type of file system it is before being able to access it. In the example of the share on a Windows machine, because you want to mount on a Windows file system, the cifs file system type is used. You can use this file system type also to access shares on a Samba server.
· The next option you need to access a share on a Samba file computer is the name of the user who performs the mount. This must be the name of a valid user account on the other system.
· Third, the name of the share is given. In the prior example, a computer name (lor) is used, but, if your system has problems working with computer names, an IP address can be used just as well. The computer name is followed by the name of the share.
· Finally, the name of the directory where the mount has to be created is given. In this example, I’ve mounted it on /mnt, because this is a mount that you would perform only occasionally. If it were a mount you used on a more regular basis, you would create a mount point anywhere in the file system. The directory /srv is often used for this purpose. In this case, it would make sense to use the directory /srv/lor.
In Table 3-1, you can see a list of some of the most popular devices that you typically want to mount on a regular basis.
Table 3-1. Mounting Popular Devices
|
Device |
Address As |
Remarks |
|
Floppy disk |
/dev/fd0 |
Because modern computers rarely have more than one floppy device drive, the floppy drive (if present) will be fd0. If more than one drive is available, use fd1, and so on. |
|
Hard drives |
/dev/sdX |
Depending on the bus the hard drive is installed on, you will see it as /dev/hdX (legacy IDE) or /dev/sdX (SCSI and SATA). X is replaced by “a” for the first drive, “b” for the second drive, and so on. Notice that normally you don’t mount a complete hard drive, but a file system on a partition on the hard drive. The partition on the drive is referred to by a number, /dev/sda1 for the first partition on an SCSI hard drive, and so on. In Chapter 5, you’ll find more information about partitions and ways to lay out your hard drive. |
|
USB drives |
/dev/sdX |
USB drives (including USB keys) appear on the SCSI bus. Typically, you’ll see them as “the next” SCSI disk. So, if you already have an sda, the USB device will appear as sdb. The USB drive normally has a partition on it. To mount it, you must mount this partition. The numbering of partitions on USB drives works like the numbering of partitions on normal hard drives (from the Linux kernel perspective, there isn’t really a difference between these two different device types). So to mount the partition on a USB drive that has become available as /dev/sdb, you would typically use mount /dev/sdb1 /somewhere (don’t forget to replacesomewhere with the name of an existing directory). |
|
Optical drives |
/dev/sr0 |
On modern computers, you’ll find the optical drive as /dev/sr0. To make it easier for you, your distribution will create a symbolic link (you can compare this to a shortcut) with the name /dev/cdrom or /dev/dvd. By addressing this symbolic link, you can address the real name of the device. |
|
Tape drives |
/dev/st0 |
Typically, a tape drive is installed at the SCSI bus and can be mounted as /dev/st0. |
|
Hard disks in virtual machines |
/dev/vdX |
In Linux KVM virtual machines, the hard drive is presented by the /dev/vdX device. Naming conventions follow those of /dev/sdX. |
|
Windows shares |
//computer/share |
Use // followed by the computer name, followed by the share. Additional options are required, such as -t cifs to indicate the type of file system to be used and -o username=yourusername to specify the name of the user account that you want to use. |
|
NFS shares |
computer:/share |
Add -t nfs to indicate that it is an NFS (Network File System) server. |
Options for the mount Command
The mount command offers many options, and some of these are rather advanced. One of the most important options for mount is the -t option, which specifies the file system type you want to use. Your computer normally would detect what file system to use by itself, but sometimes you need to help it because this file system self-check isn’t working properly. Table 3-2 lists some file systems that you may encounter on your computer (or other Linux systems).
Table 3-2. Linux File System Types
|
Type |
Description |
|
minix |
This is the mother of all Linux file systems. It was used in the earliest Linux version. Because it has some serious limitations, like the inability to work with partitions greater than 32MB, it isn’t used much anymore. Occasionally, it can still be seen on very small media, like boot diskettes or devices that are using embedded Linux. |
|
ext2 |
This has been the default Linux file system for a very long time, and it was first developed in the early 1990s. The Ext2 file system is a completely POSIX-compliant file system, which means it supports all the properties of a typical UNIX environment. However, it has one serious drawback: it doesn’t support journaling, and therefore had been replaced a long time ago. |
|
ext3 |
Basically, Ext3 is Ext2 with a journal added to it. The major advantage of Ext3 is that it is completely backward-compatible with Ext2. Its major disadvantage is that it is based on Ext2, an elderly file system that was never designed for a world in which partitions of several hundreds of gigabytes are used. |
|
btrfs |
btrfs (to be pronounced as butterfs) is the next generation Linux file system. It offers many new features such as multiple devices file systems, versioning and subvolumes, but at the time this book was written, wasn’t considered a stable file system yet by many distributions. Chances are that by the time you’re reading this, btrfs is the default file system though. |
|
Reiser |
ReiserFS is another journaling file system. It was developed by Hans Reiser as a completely new file system in the late 1990s. ReiserFS was only used as the default file system on SUSE Linux, but even SUSE has changed to Ext3 as its default because there just isn’t enough community support for ReiserFS. |
|
ext4 |
Ext4 is the successor to Ext3, and it fixes some of the most important shortcomings of Ext3. For example, Ext4 will use a strong indexing system that helps you work with lots of files in one single directory. At the time of writing, Ext4 is still experimental, so I will not discuss it in this book. |
|
Xfs |
The XFS file system was created as an open source file system by supercomputer manufacturer SGI. It has some excellent tuning options, which makes it a very good file system for storing your data. You’ll read some more about this file system and its options later in this chapter. As the btrfs file system isn[t stable yet, xfs is used as the default file system by enterprise Linux distributions such as SUSE and Red Hat. |
|
Msdos |
If, for example, you need to read a floppy disk with files on it that were created on a computer using MS-DOS, you can mount it with the msdos file system type. This is, however, something of a legacy file system that has been replaced with vfat. |
|
Vfat |
The vfat file system is used for all Windows and DOS file systems that use a FAT file system. Use it for accessing files from a Windows-formatted diskette or optical media. |
|
ntfs |
On Windows systems, NTFS is now the default file system. Not so long ago, Linux didn’t have a stable open source solution for writing to NTFS. On older distributions, write support for NTFS is still missing. Modern distributions, however, offer complete read/ write support. You’ll also find some excellent NTFS tools on live cds like Knoppix. On enterprise Linux distributions such as Red Hat Enterprise Linux, you won’t find support for NTFS though. |
|
iso9660 |
This is the file system that is used to mount CDs. Normally, you don’t need to specify that you want to use this file system, as it will be detected automatically when you insert a CD. |
|
Cifs |
When working on a network, the cifs file system is very important. This file system allows you to make a connection over the network to a share that is offered by a Windows computer, as in the previous example. Linux computers also can offer shares that use this protocol, by using the Samba service (see Chapter 12 for more details). In the past, the smbfsfile system type was used to address these shares, but, because cifs offers a better solution, it has replaced smbfs on modern Linux distributions. In case mounting a Samba share doesn’t work with cifs, try smbfs. |
|
Nfs |
NFS is used to make connections between UNIX computers. See Chapter 12 for more information about NFS and Samba. |
Apart from -t, the mount command has many other options as well, which can be prefixed by using the -o option. Most of these options are file-system dependent, so no generic list of these options is provided here. You’ll find information that is specific for your file system in the manpage of the mount command.
Getting an Overview of Mounted Devices
Every device that is mounted is recorded in the configuration file /etc/mtab. You can browse the content of this file with a utility like cat or less. You can also use the mount command to get an overview of file systems that are currently mounted. If this command is used without any other parameters, it reads the contents of /etc/mtab and displays a list of all mounted file systems that it can find, as shown in Listing 3-1.
Listing 3-1. The mount Command Gives an Overview of All Devices Currently Mounted
nuuk:/ # mount
/dev/sda2 on / type ext3 (rw,acl,user_xattr)
proc on /proc type proc (rw)
sysfs on /sys type sysfs (rw)
debugfs on /sys/kernel/debug type debugfs (rw)
udev on /dev type tmpfs (rw)
devpts on /dev/pts type devpts (rw,mode=0620,gid=5)
/dev/sda1 on /boot type ext2 (rw,acl,user_xattr)
securityfs on /sys/kernel/security type securityfs (rw)
nfsd on /proc/fs/nfsd type nfsd (rw)
/dev/sr0 on /media/VMware_Tools type iso9660 (ro,nosuid,nodev,utf8,uid=0)
/dev/sdc1 on /media/disk type vfat
rw,noexec,nosuid,nodev,flush,fmask=0133,shortname=lower,utf8,uid=0)
As you can see in Listing 3-1, mount gives you information not only about mounted partitions, but also about system devices. On modern Linux distributions, this list of mounted system devices can be long.
For now, I’ll ignore all lines about these system devices and just focus on the two lines where /dev/sda1 and /dev/sda2 are mounted. In these lines, you can see the name of the device first. Next, they show the name of the directory on which they are mounted. Following that, the file system type is mentioned, and lastly, the options that were used when mounting the device are listed. You can see that both sda1 and sda2 are mounted with the rw option, which means they are accessible for reads and writes. Also, these two file systems have the acl anduser_xattr options. These options, which are on by default on most distributions, allow you to use some advanced security on the file system. You’ll learn more about these options in Chapter 7, which discusses working with permissions.
In Listing 3-1 you can also see a /dev/sr0, which is mounted. If you see this device, chances are that it refers to your optical disk device, which is also the case here. You can also see that by the file system type that is used, iso9660, which typically is the file system used on CD devices.
The last two lines (they read as one line, but due to printing limitations are displayed as two lines) show the /dev/sdc1 device that is mounted. This is a USB key that was inserted into the system. The Linux kernel has recognized it automatically at the moment it was connected and mounted it, using all the options needed to do so. Don’t worry about the specific meaning of these options; the Linux kernel has detected automatically what exactly was needed to mount this device.
Apart from the /etc/mtab file, Linux offers more options to see which file systems currently are mounted. The /proc/mounts file offers direct information provided by the kernel about currently existing mounts. In fact, the contents of /etc/mtab comes directly from this file. For an overview of real file systems that are mounted, you can use the df -h command. Listing 3-2 shows how this command displays real file systems only, and doesn’t provide any information about mounted kernel interfaces.
Listing 3-2. The df -h command gives information about mounted file systems
[root@server1 ~]# df -h
Filesystem Size Used Avail Use% Mounted on
/dev/mapper/centos-root 6.7G 1.4G 5.4G 20% /
devtmpfs 237M 0 237M 0% /dev
tmpfs 245M 54M 191M 22% /dev/shm
tmpfs 245M 25M 221M 10% /run
tmpfs 245M 0 245M 0% /sys/fs/cgroup
/dev/vda1 497M 138M 360M 28% /boot
/dev/sdb1 1020M 33M 988M 4% /srv/gluster
/dev/drbd0 1021M 34M 988M 4% /var/lib/mysql
Unmounting Devices
On a Linux system, when you want to disconnect a device from your computer, you have to unmount it first. Unmounting devices ensures that all of the data that is still in cache and has not yet been written to the device is written to the file system before it is disconnected. You’ll use theumount command to do this. The command can take two arguments: either the name of the device or the name of the directory where the device is mounted. So umount /dev/cdrom and umount /mnt will both work for a CD device that is mounted on the directory /mnt.
When using the umount command, you may get the message “Device is busy,” and the dismount fails. This is likely because a file on the device is open, and the reason you’re not allowed to disconnect the device is probably obvious: disconnecting a mounted device may lead to data loss. So first make sure that the device has no open files. The solution is sometimes simple: if you want to dismount a CD, but you are currently in the directory /media/cdrom, it is not possible to disconnect the device. Browse to another directory and try again. Sometimes, however, the situation can be more complex, and you’ll need to first find out which processes are currently using the device.
To do this, you can use the fuser command. This command displays the IDs of processes (PIDs) using specified files or file systems. For example, fuser -m /media displays a list of all processes that currently have open files in /media. Based on these PIDs, you can now manually terminate the processes using the kill command. Listing 3-3 shows you how you can use fuser to list the PIDs of processes that have files open in /media, and how you can use the kill command next to terminate these processes. For much more information about process management, read Chapter 9.
Listing 3-3. With fuser and kill, You Can Trace and Terminate Processes That Prevent Dismounting a Device
nuuk:~ # fuser /media
/media: 13061c
nuuk:~ # kill 13061
The fuser command also allows you to kill these open files automatically. For open files on /media/cdrom, use fuser -km /media/cdrom. Be careful when using the option: if you are root, it may blindly kill important processes and make your computer unreadable.
As an alternative to the fuser command, you can use lsof as well. This also provides a list of all processes that currently are using files on a given file system, but it provides more information about these processes. Whereas fuser just gives the PID of a process, lsof also gives information like the name of the process and the user who owns the process. Listing 3-4 shows what the result of lsof looks like.
Listing 3-4. If You Need More Details About Processes Preventing You from Performing a Dismount, Use lsof
nuuk:/media # lsof /media
COMMAND PID USER FD TYPE DEVICE SIZE NODE NAME
Lsof 10230 root cwd DIR 22,0 4096 1856 /media
Lsof 10231 root cwd DIR 22,0 4096 1856 /media
Bash 13061 root cwd DIR 22,0 4096 1856 /media
The example from Listing 3-4 was taken on a computer where a Bash shell was open and had its current prompt set to the /media directory. As you can see, this starts different processes, of which the PID number is in the second column. You’ll need this PID to manage the process; more on that is in Chapter 9.
After using fuser with the -k switch on the /media directory to kill active processes, you should always make sure that the processes are really terminated by using fuser -m /media again, as this will show you whether there are still processes with open files.
Another way of forcing the umount command to do its work is to use the -f option as follows: umount -f /somemount. This option is especially intended for use on an NFS network mount that has become unreachable and does not work on other file systems, so you will not have much success if you try it on a local file system.
If you want to minimize the impact of unmounting a device, you can use umount with the -l option, which performs a “lazy unmount” by detaching the file system from the file system hierarchy and cleaning up all references to the file system as soon as it is no longer busy. Using this option lets you do an unmount right away, even if the file system is busy. But it may take some time to complete. This option allows you to unmount a busy file system in a very safe way, as it won’t shut down any processes immediately.
![]() Tip The eject command is a very easy way to dismount and eject optical media. This command will open the CD or DVD drive and eject the optical media that is currently in the drive. All you have to do is remove it. And then you can use eject -t to close the optical drive drawer.
Tip The eject command is a very easy way to dismount and eject optical media. This command will open the CD or DVD drive and eject the optical media that is currently in the drive. All you have to do is remove it. And then you can use eject -t to close the optical drive drawer.
EXERCISE 3-1: MOUNTING FILE SYSTEMS
To perform this exercise, you’ll need to connect a USB thumb drive to your computer system.
1. Type cat /proc/partitions. This provides an overview of all devices that are currently known on your system.
2. Insert a USB thum drive to your computer. Type cat /proc/partitions again. You’ll notice a new device that has appeared. For the remainder of this exercise, I’ll assume the name of the device is /dev/sdb1. Change this device name if a different name shows on your computer.
3. Type mount /dev/sdb1 /mnt to mount the device on the /mnt directory.
4. Type mount. You’ll see the /dev/sdb1 device in the last line of the command output.
5. Type df -h. This also shows the mounted device, as well as available disk space on the device.
6. Type cd /mnt.
7. Type umount /mnt. You’ll see a “device busy” error message.
8. Type lsof /mnt and read the output of the command.
9. Type cd without any arguments. This will bring you to your home directory.
10.Type umount /mnt. You’ll now be able to unmount the device.
11.You can now safely remove the USB thumb drive from your computer.
Automating Mounts with /etc/fstab
When starting your computer, some mounts need to be issued automatically. For this purpose, Linux uses the /etc/fstab file to specify how and where these file systems must be mounted. This file contains a list of all mounts that have to occur on a regular basis. In /etc/fstab, you can state per mount whether it has to happen automatically when your system starts. Listing 3-4 shows the contents of a sample /etc/fstab file.
Listing 3-4. The /etc/fstab File Makes Sure That File Systems Are Mounted During System Boot
nuuk:/media # cat /etc/fstab
/dev/sda2 / ext4 acl,user_xattr 1 1
LABEL=boot /boot ext4 acl,user_xattr 1 2
/dev/sda3 swap swap defaults 0 0
proc /proc proc defaults 0 0
sysfs /sys sysfs noauto 0 0
debugfs /sys/kernel/debug debugfs noauto 0 0
usbfs /proc/bus/usb usbfs noauto 0 0
devpts /dev/pts devpts mode=0620,gid=5 0 0
![]() Note Some distributions use advanced features like a universal unique ID (UUID) or LVM logical volumes to mount devices from fstab. In this section, I explain fstab based on regular partitions. You can find more information about these advanced features in Chapter 6 of this book.
Note Some distributions use advanced features like a universal unique ID (UUID) or LVM logical volumes to mount devices from fstab. In this section, I explain fstab based on regular partitions. You can find more information about these advanced features in Chapter 6 of this book.
In the listing, you can see that not only real file systems are specified in /etc/fstab. Some system file systems are listed as well. You don’t have to include these file systems as an administrator, they’ll be added automatically when you’re installing your server.
![]() Note The /etc/fstab file is used at system boot, but you can also use it from the command line: enter the mount -a command to mount all file systems in /etc/fstab that are currently not mounted and have the option set to mount them automatically. Also, if a device is defined in /etc/fstab with its most common mount options, you don’t need to specify all mount options on the command line. For example, if the /dev/cdrom device is in /etc/fstab, you can mount it by using a shortened mount /dev/cdrom command instead of the completemount /dev/cdrom /media/cdrom command.
Note The /etc/fstab file is used at system boot, but you can also use it from the command line: enter the mount -a command to mount all file systems in /etc/fstab that are currently not mounted and have the option set to mount them automatically. Also, if a device is defined in /etc/fstab with its most common mount options, you don’t need to specify all mount options on the command line. For example, if the /dev/cdrom device is in /etc/fstab, you can mount it by using a shortened mount /dev/cdrom command instead of the completemount /dev/cdrom /media/cdrom command.
In fstab, each file system is described on a separate line, and the fields in these lines are separated by tabs or spaces. The following fields are always present:
· File system: This first field describes the device or the remote file system to be mounted. Typically, you will see names like /dev/sda1 or computer:/mount on this line. The former is used to refer to a local partition, whereas the latter is used to refer to a network share that is offered by another computer.
· Mount point: The second field is used to describe the mount point for the file system. This is normally a directory where the file system must be mounted. Some file systems (such as the swap file system) don’t work with a specific directory as their mount point. In the case of swap partitions, just swap is used as the mount point instead.
![]() Tip On most file systems, the device name can be replaced with a label, like “ROOT”. On an Ext4 file system, these labels can be created with the tune2fs -L command, or with xfs_admin on an XFS system. Using labels makes the system more robust and avoids the situation in which adding a SCSI disk adds all the device names. Labels are static and are not changed automatically when a disk is added. Nowadays, an alternative system, using UUIDs, allows you to use unique device naming. In Chapter 5 you can read more about UUIDs. They have one disadvantage though, UUID are long and hard to read. The benefit of using labels, is that as an administrator, they allow you to assign a human readble device name.
Tip On most file systems, the device name can be replaced with a label, like “ROOT”. On an Ext4 file system, these labels can be created with the tune2fs -L command, or with xfs_admin on an XFS system. Using labels makes the system more robust and avoids the situation in which adding a SCSI disk adds all the device names. Labels are static and are not changed automatically when a disk is added. Nowadays, an alternative system, using UUIDs, allows you to use unique device naming. In Chapter 5 you can read more about UUIDs. They have one disadvantage though, UUID are long and hard to read. The benefit of using labels, is that as an administrator, they allow you to assign a human readble device name.
· File system type: The third field is used to specify the file system type you can use. As you learned earlier, many file systems are available for use on Linux. No specific kernel configuration is needed to use them, as most file systems can be activated as a kernel module that is loaded automatically when needed. Instead of the name of a file system, you can also use ignore in this field. This is useful to show a disk partition that is currently not in use. To determine the file system type automatically, use the option auto. This is what you want to use on removable media like CDs and diskettes. Don’t use it, however, on fixed media like partitions and logical volumes because it may lead to a failure in mounting the file system when booting your computer.
· Mount options: The fourth field is used to specify the options that should be used when mounting the file system. Many options are available, and of these, many are filesystem specific. For most file systems, the option default is used, which makes sure the file system is mounted automatically when the computer boots and prohibits normal users from disconnecting the mount. Also, the options rw, suid, dev, exec, and async are used. The following list describes some of the most used options. Note that you can also use these options as arguments when using the mount command:
· async: Does not write to the file system synchronously but through the write cache mechanism. This ensures that file writes are performed in the most efficient way, but you risk losing data if contact with the file system is suddenly lost.
· dev: Treats block and character devices on the file system as devices and not as regular files. For security reasons, it’s a good idea to avoid using this option on devices that can be mounted by ordinary users.
· exec: Permits execution of binary files.
· hotplug: Does not report errors for this device if it does not currently exist. This makes sense for hot-pluggable devices like USB media.
· noatime: Does not update the access times on this file system every time a file is opened. This option makes your file system somewhat faster if many reads are performed on it. It is a good idea to switch this option on as a default for all file systems your computer is mounting, unless you want to use an accounting system to keep track of which files are accessed by which user at which specific moment.
· noauto: Does not mount the file system automatically when the system boots or if a user uses the mount -a command to mount everything in /etc/fstab automatically.
· mode: Sets a permission mode (see Chapter 7) for new files that are created on the file system.
· remount: Remounts a file system that is already mounted. It only makes sense to use this option from the command line.
· user: Allows a user to mount the file system. This option is normally used only for removable devices like diskettes and CDs.
· sync: Makes sure the content of the file system is synchronized with the medium before the device is dismounted.
· Dump status: This field is for use of the dump command, which is a way of making backups of your file system. The field determines which file systems need to be dumped when the dump command is called. If the value of this field is set to 0, it will not be dumped; if set to 1, it will be dumped when dump is invoked. Make sure that the value is set to 1 on all file systems that contain important data that should always be included when making backups with dump.
![]() Note You may never use the dump command yourself to create backups, but some backup utilities do. So if you want to make sure that your backup utilities are successful, give all file systems that contain important data the value 1 in this column.
Note You may never use the dump command yourself to create backups, but some backup utilities do. So if you want to make sure that your backup utilities are successful, give all file systems that contain important data the value 1 in this column.
· Fsck status: This last field in fstab determines how a file system needs to be checked with the fsck command. At boot time, the boot loader will always check whether a file system has to be checked with fsck or not. If this is the case, the root file system must always be checked first and therefore has the value 1. Other file systems should have the number 2. If the file systems have the same fsck number, they will be checked sequentially. If the files are on different drives, they can be checked in parallel. If the value is set to 0, no automatic check will occur.
Warning! When a file system is configured for an automatic file system check upon boot, the automatic file system check may fail. If it does, your system will start booting and display the message “Enter root password for maintenance mode”. If this happens to you, you should start checking the integrity of the file system. Alternatively, you can change the last column in /etc/fstab to a 0 to switch off the automatic file system check (which may lead to file system corruption at some point in time).
Checking File System Integrity
When a system crashes unexpectedly, any file systems that are open can be damaged, which may prevent you from using these file systems in a normal way. If this happens, the consistency of these file systems needs to be checked, and you’d do this with the fsck command. While booting, Linux always will perform a quick check of your file systems automatically. In some cases, this will fail, and you will need to do a manual check of your computer file systems. If this happens, the boot procedure will stop, and you will see a text-based login shell. This section assumes that you work from such a text-based login shell to repair your file systems.
![]() Caution Never use fsck on a mounted file system, as it may severely damage the file system! If a file system has no open files, you can remount it as read-only using the -o remount,ro option with mount. For instance, to remount the file system on /usr as read-only, use mount -o remount, ro /usr.
Caution Never use fsck on a mounted file system, as it may severely damage the file system! If a file system has no open files, you can remount it as read-only using the -o remount,ro option with mount. For instance, to remount the file system on /usr as read-only, use mount -o remount, ro /usr.
You can start the fsck command with the name of the device you want to check as its argument: for example, use fsck /dev/sda1 to check files on /dev/sda1. If you run the command without any options, fsck will check all file systems in /etc/fstab one by one, according to the setting in the fsck status field in /etc/fstab. Normally, this will always happen when booting your system.
Nowadays, a system administrator does not have to regularly use fsck because most modern file systems are journaling file systems. The journal is used to write transactions on files to a specific log file. Having such a journal makes it possible to recover a damaged file system very fast. If a journaling file system gets damaged, the journal is checked, and all incomplete transactions can easily be rolled back. To offer some protection, an Ext or Ext file system is checked automatically every once in a while.
![]() Tip On a nonjournaling file system, the fsck command can take a very long time to complete. In this case, the -C option can be used when performing a manual check. This option displays a progress bar— which doesn’t, of course, make it go any faster, but it at least lets you know how long you still have to wait for the process to complete. Currently, the -C option is supported only on Ext file systems.
Tip On a nonjournaling file system, the fsck command can take a very long time to complete. In this case, the -C option can be used when performing a manual check. This option displays a progress bar— which doesn’t, of course, make it go any faster, but it at least lets you know how long you still have to wait for the process to complete. Currently, the -C option is supported only on Ext file systems.
Creating Backups
One thing always seems to be true about computers: one day they’ll fail. If the computer in question is an important server, the failure can cause huge problems. Companies have gone bankrupt because their vital data was lost. Therefore, making decent backups of your data is essential. In this section, I’ll cover two different methods of creating backups, both of which are native Linux solutions: making file backups with tar and making device backups using dd.
Making File Backups with tar
The command-line utility tar is probably the most popular Linux backup utility. It functions as a stand-alone utility for writing backups to an archive. This archive can be tape (hence the name “tar” which stands for tape archiver), but it can also be anything else. For instance, tar-based backups are often written to a file instead of a tape, and, if this file is compressed with a compression utility like bzip2 or gzip, you’ll get the famous tarball, which is a common method of delivering software installation archives. In this section, you’ll learn how to create tar archives and how to extract files from them. I’ll also provide some tips and tricks to help you get the most out of the tar utility.
![]() Note The tar command is not used for backup and restore only; on the Internet you’ll find tar packaged software archives as well. Even when working in an environment where a package manager such as yum or apt is used, you’ll find that occasionally you need to unpack tararchives as well.
Note The tar command is not used for backup and restore only; on the Internet you’ll find tar packaged software archives as well. Even when working in an environment where a package manager such as yum or apt is used, you’ll find that occasionally you need to unpack tararchives as well.
Creating an Archive File
In its most basic form, tar is used to create an archive file. The following command would help you do this for the directory /home:
tar -cvf /tmp/home.tar /home
This command will create a backup of /home and put that in the file /tmp/home.tar. This archive contains relative path names, which means that while restoring it, it will always restore files in the directory where you’re running the tar command. This method is useful if you want to create a backup of important system files and directories. For instance, the following command would create a backup of the directories /home, /srv, /root, and /var and write that to the file /tmp/system-backup:
tar -cvf /tmp/system-backup.tar /home /srv /root /var
![]() Note When using the tar command, you can put a - before the options, but you don’t have to. You will encounter both syntax styles, and to help you getting used to that, I will use both in this book.
Note When using the tar command, you can put a - before the options, but you don’t have to. You will encounter both syntax styles, and to help you getting used to that, I will use both in this book.
This tar command has a few arguments. First, you need to indicate what you want to do with the tar command. In this case, you want to create an archive. (That’s why the option c is used; the “c” stands for create.)
After that, I’ve used the option v (verbose). Although it’s not required, it often comes in handy because verbose output lets you see what the tar command is actually doing. I recommend always using this option because sometimes a tar job can take a really long time. (For instance, imagine creating a complete archive of everything that’s on your hard drive.) In cases such as these, it’s nice to be able to monitor what exactly happens, and that’s what the option v is meant to do.
Next, you need to specify where you want the tar command to send its output. If you don’t specify anything here, tar defaults to the standard output. In other words, it simply dumps all the data to your computer’s console. This doesn’t accomplish much, so you should use the option f(file) to specify what file or device the output should be written to.
In this example, I’ve written the output to a regular file, but, alternatively, you can write output to a device file as well. For example, the following command makes a backup of /home and writes that to the /dev/mt0 device, which typically refers to a tape drive:
tar -cvf /dev/mt0 /home
The last part of the tar command specifies exactly what you want to put into your tar archive. In the example, the directory /home is archived. It’s easy to forget this option, but, if you do, tar will complain that it is “cowardly refusing to create an empty archive.”
You should know a couple of other things about tar. First, the order of arguments does matter. So, for example, there is a difference between tar -cvf /somefile /somedir and tar -f /somefile -vc /somedir. The order is wrong in the last part, and tar won’t know what you want it to do. So, in all cases, first specify what you want tar to do. In most cases, it’s either c (to create an archive), x (to extract an archive), or t (to list the contents of the archive). Then specify how you want tar to do that; for example, you can use v to tell tar that it should be verbose. Next, use the f option to indicate where you want tar to write the backup, and then specify what exactly you want to back up. The following example line demonstrates this tar syntax:
tar { create | extract} [options] <destination file> <source files or directories>
Creating an archive with tar is useful, but you should be aware that tar doesn’t compress one single bit of your archive. This is because tar was originally conceived as a tape streaming utility. It streams data to a file or (typically) a tape device. If you want tar to compress the contents of an archive as well, you must tell it to do so. tar has two options to compress the archive file:
· z: Use this option to compress the tar file with the gzip utility. This is the most popular compression utility, because it has a pretty decent compression ratio. This means it would gain quite a lot of disk space when compressing files. Also, it doesn’t take too long to create a compressed file.
· j: Use this option to compress the tar file with the bzip2 utility. This utility compresses 10 to 20% better than gzip, but at a cost: it takes as twice as long.
So, if you want to create a compressed archive of the directory /home and write that backup to a file with the name home.tar.gz, you would use the following command:
tar -czvf home.tar.gz /home
![]() Note Of course, you can use the bzip2 and gzip utilities from the command line as well. Use gzip file.tar to compress file.tar. This command produces file.tar.gz as its result. To decompress that file, use gunzip file.tar.gz, which gives you the originalfile.tar back. If you want to do the same with bzip2, use bzip2 file.tar to create the compressed file. This creates a file with the name file.tar.bz2, which you can decompress using the command bunzip2 file.tar.bz2.
Note Of course, you can use the bzip2 and gzip utilities from the command line as well. Use gzip file.tar to compress file.tar. This command produces file.tar.gz as its result. To decompress that file, use gunzip file.tar.gz, which gives you the originalfile.tar back. If you want to do the same with bzip2, use bzip2 file.tar to create the compressed file. This creates a file with the name file.tar.bz2, which you can decompress using the command bunzip2 file.tar.bz2.
Path Names in tar
When creating an archive with tar, you should be careful about the directory from which you’re creating the archive. To start with, do realize that all path names in a tar archive are stored as relative pathnames - this shows in code listing 3-5, where the command mentions that the leading / is removed from file names.
Apart from the leading / in the file name, the complete path name will stay in the tar archive. That means that if you’re using tar -cvf /tmp/all.tar /. file names are stored as etc/hosts, not as /etc/hosts.
Listing 3-5. Using tar to Create an Archive That Contains Absolute File Names
nuuk:/ # tar cvf /tmp/old.tar /old
tar: Removing leading `/' from member names
/old/
/old/hosts
/old/shadow
/old/passwd
If you create the tar archive with the purpose of extracting it later at any location you like, it is not the best idea to use complete file names in the archive. This would, for example, be the case if you are a developer who wants to distribute his or her new program to users. In such a case, it is good if the user can extract the archive anywhere he or she wants. To do this, you have two options:
· Use cd to go to the target directory before creating the backup.
· Use the tar option -C to tell tar that it should create an archive file containing relative file names.
Of these two, I recommend using the latter, as it is more clear and makes it possible to create an archive that contains files from more than one directory as well. When you create a backup that has relative file names, you should always put a dot at the end of the tar command. This dot tells tar to make a backup of the contents of the current directory. Without the dot, tar tells you that it doesn’t want to create an empty archive. In Listing 3-6, you can see how an archive is created in this way of the same directory (/old) that was used in the example command fromListing 3-5.
Listing 3-6. Creating an Archive Containing Relative File Names
nuuk:/ # tar cvf /tmp/old.tar -C /old .
./
./hosts
./shadow
./passwd
Extracting an Archive File
Now that you know how to create an archive file, it’s rather easy to extract it. Basically, the command-line options that you use to extract an archive file look a lot like the ones you needed to create it in the first place. The important difference is that, to extract a file, you need the option x(extract), instead of c (create). Here are some examples:
· tar -xvf /file.tar: Extracts the contents of file.tar to the current directory
· tar -zxvf /file.tar.gz: Extracts the contents of the compressed file.tar to the current directory
· tar -xvf /file.tar C /somedir: Extracts the contents of /file.tar to a directory with the name /somedir
Moving a Complete Directory
Most of the time, tar is used to write a backup of one or more directories to a file. Because of its excellent handling of special files (such as stale files that are used quite often in databases), tar is also quite often used to move the contents of one directory to another. Let’s assume that you want to move the contents of the directory /old to the directory /new. Some people perform this task by first creating a temporary file and then extracting the temporary file into the new directory. This would involve the following commands:
tar cvf /tmp/old.tar -C /old .
tar xvf /tmp/old.tar -C /new
This is not the easiest way because you need twice the disk space taken by the directory whose contents you want to move: the size of the original directory plus the space needed for the temporary file. The good news is that you don’t have to do it this way. Use a pipe, and you can directly copy the contents of one directory to another directory.
To understand how this works, first try the command tar -cC /old .. In this command, the option c is used to tell tar that it should create an archive. The option C is used to archive the contents of the directory /old using relative path names. Now, as you may have noticed, in thetar -cC /var example, the option f /tmp/old.tar isn’t used to specify where the output goes, and so all the output is sent to STDOUT, which is your console. This means that if you press Enter now, you will see the contents of all files scrolling through the console of your computer, which is not very useful.
So that’s the first half of the command, and you ended up with a lot of output dumped on the console. Now, in the second part of the command, you’ll use a pipe to redirect all that output to another command, which is tar -xC /new. This command will capture the tar archive from STDOUT and extract it to the directory /new (make sure that new exists before you run this command). You’ll see that this method allows you to create a perfect copy of one directory to another. So the complete command that you need in this case looks like this:
tar -cC /old . | tar -xC /new
Creating Incremental Backups
Based on the information in the previous section, you can probably see how to create a backup of one or more directories. For instance, the tar -cvf /backup.tar /var /home /srv command creates a backup of three directories: /home, /var, and /srv. Depending on the size of these directories, this command may take some time. Because such large backups can take so long, it’s often useful to make incremental backups; in an incremental backup, the only files that get written to the backup are those that have changed since the last backup. To do this, you need the option g to create a snapshot file.
An incremental backup always follows a full backup, and so you have to create the full backup first. In this full backup, you should create a snapshot file, which contains a list of all files that have been written to the backup. The following command does this for you (make sure that the directory /backup exists before running the command):
tar -czvg /backup/snapshot-file -f /backup/full-backup.tar.gz /home
The interesting thing about the snapshot file is that it contains a list of all files that have been written to the backup. If, two days after the full backup, you want to make a backup of only the files that have been changed in those two days, you can repeat essentially the same command. This time, the command will check the snapshot file to find out what files have changed since the last full backup, and it’ll back up only those changed files. So your Monday backup would be created by the following command:
tar -czvg /backup/snapshot-file -f /backup/monday-backup.tar.gz /home
These two commands created two files: a small file that contains the incremental backup and a large file that contains the full backup. In an incremental backup scheme, you’ll need to make sure that at some point in time a full backup is created. To do this, just remove the snapshot file that was used in the preceding example. Since tar doesn’t find a snapshot file, it will assume that you need to make a full backup and create the new snapshot file for you.
If you want to restore all files from an incremental backup, you need to restore every single file, starting with the first file that was created (typically the full backup) and ending with the last incremental backup. So, in this example, the following two commands would restore the file system back to the status at the time that the last incremental backup was created:
tar -xzvf /backup/full-backup.tar.gz
tar -xzvf /backup/monday-backup.tar.gz
In this section you’ve read about different options that you can use with tar. For your convenience, the most relevant options are listed here:
· -c: Use this option to create an archive.
· -v: Use this option to let tar display output verbosely. Useful for longer tar commands so that you show what they are doing.
· -f: Use this option to specify the name of the output file that tar should write to.
· -C: Use this option followed by a directory name to change to this directory before starting the tar job.
· -x: Use this option to extract files from an archive.
· -g: Use this option to make an incremental or a differential backup.
· -z: Use this option to compress the tar file using gzip compression.
· -j: Use this option to compress the tar file using bzip2 compression.
In exercise 3.2 you’ll learn how to work with the tar command.
EXERCISE 3-2: WORKING WITH TAR
1. Open a root shell.
2. Type tar -cvf /tmp/etc.tar /etc
3. Type tar -tvf /tmp/etc.tar to show the contents of the tar archive.
4. Type mkdir /temp to create a temporary directory to work with.
5. Type tar xvf /tmp/etc.tar -C /temp. This extracts the contents of the etc.tar file relative to the /temp directory.
6. Type rm -rf /temp to remove the /temp directory and all of its contents.
Making Device Backups Using dd
You won’t find a more versatile utility than tar to create a file system–based backup. In some cases, however, you don’t need a backup based on a file system; instead, you want to create a backup of a complete device or parts of it. This is where the dd command comes in handy.
![]() Tip This may sound rather abstract. You can, however, do very useful things with the dd command. For example, imagine the option to clone the entire contents of your hard disk to an external USB hard disk. I do it every Friday night, just to make sure that if something happens to my hard drive, I just have to install the cloned hard drive to get my data back. That’s not more than five minutes of work (and a couple of hours of waiting before all the data is copied)!
Tip This may sound rather abstract. You can, however, do very useful things with the dd command. For example, imagine the option to clone the entire contents of your hard disk to an external USB hard disk. I do it every Friday night, just to make sure that if something happens to my hard drive, I just have to install the cloned hard drive to get my data back. That’s not more than five minutes of work (and a couple of hours of waiting before all the data is copied)!
The basic use of the dd command is rather easy because it takes just two arguments: if= to specify the input file, and of= to specify the output file. The arguments to those options can be either files or block devices. So, the command dd if=/etc/hosts of=/home/somefilecan be used as a complicated way to copy a file. I would, however, not recommend using dd to copy files; cp does that in a much simpler way. However, cloning a hard disk, which you would do with the command dd if=/dev/sda of=/dev/sdb bs=4096, is something that only ddcan do. (The option bs=4096 specifies that dd should work on 4K blocks, which offers a much better performance.)
![]() Note dd is, strangely enough, short for “convert and copy.” Unfortunately, the cc command was already being used by something else, so the developers choose to use dd instead.
Note dd is, strangely enough, short for “convert and copy.” Unfortunately, the cc command was already being used by something else, so the developers choose to use dd instead.
Or what would you think, for example, of the command dd if=/dev/cdrom of=/mycd.iso? It helps you create an ISO file of the CD that’s in the drive at that moment. You may wonder why not just copy the contents of your CD to a file with the name /mycd.iso? Well, the reason is, a CD, like most other devices, typically contains information that cannot be copied by a mere file copy. For example, how would you handle the boot sector of a CD? You can’t find that as a file on the device because it’s just the first sector. Because dd copies sector by sector, on the other hand, it will copy that information as well.
![]() Tip Did you know that it’s not hard to mount an ISO file that you created with dd? The only thing that you need to know is that you have to use the -o loop option, which allows you to mount a file like any normal device. So, to mount /mycd.iso on the /mnt directory, you would need mount -o loop /mycd.iso /mnt.
Tip Did you know that it’s not hard to mount an ISO file that you created with dd? The only thing that you need to know is that you have to use the -o loop option, which allows you to mount a file like any normal device. So, to mount /mycd.iso on the /mnt directory, you would need mount -o loop /mycd.iso /mnt.
Working with Links
A very useful Linux feature—although one that is often misunderstood—is the link. A link can be compared to a shortcut: it’s basically a pointer to another file. On Linux (as on any UNIX system), two different kinds of links are supported: the hard link and the symbolic link.
Why Use Links?
Basically, a link makes it easier to find files you need. You can create links for the operating system and program files that you use on that operating system, and you can use them to make life easier for users as well. Imagine that some users belong to the group account and you want the group members to create files that are readable by all other group members in the directory /home/groups/account. To do this, you can ask the users to change to the proper directory every time they want to save a file. Or you can create a link for each user in his or her home directory. Such a link can have the name account and can be placed in the home directory of all users who need to save work in the shared directory for the group account, and it’s easy to see how this link makes it a lot easier for the users to save their files to the proper location.
Another example of why links can be useful comes from the world of FHS, the Filesystem Hierarchy Standard. This standard prescribes in which directory a Linux system should store files of a particular kind. In the old days, the X Windowing System had all its binaries installed in the/usr/X11 directory. Later, the name of the directory where the X Windowing System stored its configuration files was changed to /usr/X11R6. Now imagine what would happen if an application referred to the /usr/X11 directory after this change. It would naturally fail because that directory no longer exists. A link is the solution here as well. If the administrator just creates a link with the name /usr/X11 that points to the /usr/X11R6 directory, all applications that refer to /usr/X11 can still be used.
On a Linux system, links are everywhere. After Linux is installed, several links already exist, and, as an administrator, it’s easy for you to add new ones. To do so, you should understand the difference between a symbolic link and a hard link, which is explained in the next two sections, “Working with Symbolic Links” and “Working with Hard Links.”
Working with Symbolic Links
As mentioned previously, a link can refer to two different things: a symbolic link (also referred to as a soft link) and a hard link. A symbolic link is a link that refers to the name of a file. Its most important advantage is that it can be used to refer to a file that is anywhere, even on a computer on the other side of the world. The symbolic link will still work. However, the biggest disadvantage is that the symbolic link is naturally dependent on the original file. If the original file is removed, the symbolic link will no longer work.
To create a symbolic link, use the ln command with the option -s. When using the ln command, make sure that you first refer to the name of the original file and then to the name of the link you want to create. If, for example, you want to create a symbolic link with the namecomputers in your home directory that refers to the file /etc/hosts, use the following command:
ln -s /etc/hosts ~/computers
As a result, a shortcut with the name ~/computers will be created in your home directory. This shortcut refers to /etc/hosts. Therefore, any time you open the ~/computers file, you would really be working in the /etc/hosts file. Listing 3-7 shows you that in the output ofls -l, you can actually see that the resulting file is not a file by itself, but a symbolic link. This is indicated by the letter l in the first position of the ls -l output and also by the arrow at the end of the listing, which indicates the file the name is referring to.
Listing 3-7. With ls -l You Can See That the File Actually Is a Symbolic Link
nuuk:~ # ln -s /etc/hosts computers
nuuk:~ # ls -l computers
lrwxrwxrwx 1 root root 10 Jan 19 01:37 computers -> /etc/hosts
Understanding Inodes
To understand the difference between a hard link and a symbolic link, you should understand the role of inodes on a Linux file system. Every Linux file or directory (from a technical point of view, there’s no real difference between them) has an inode, and this inode contains all of the file’s metadata (that is, all the administrative data needed to read a file is stored in its inode). For example, the inode contains a list of all the blocks in which a file is stored, the owner information for that file, permissions, and all other attributes that are set for the file. In a sense, you could say that a file really is the inode, and names are attached to these inodes to make it easier for humans to work with them.
If you want to have a look at inodes, on an Ext file system you can use the (potentially dangerous!) command debugfs. This opens a low-level file system debugger from which you can issue advanced repair commands. You can also just check the properties of the file system and files that are used in it (which is not dangerous at all). The following procedure shows how to display the inode for a given file using this file system debugger on Ext4. Notice that this procedure only works on Ext file systems.
![]() Note Only the Ext2/Ext3 command debugfs offers you the possibility to show inodes. The fact that this file system has powerful utilities like this one helps in making it a very popular file system.
Note Only the Ext2/Ext3 command debugfs offers you the possibility to show inodes. The fact that this file system has powerful utilities like this one helps in making it a very popular file system.
1. Use the command ls -il to find the inode number of the file /etc/hosts. As you can see in Listing 3-8, the inode number is the first item mentioned in the output of this command.
Listing 3-8. The Command ls -il Shows the Inode Number of a File
sander@ubuntu:/$ ls -il /etc/hosts
15024138 -rw-r--r-- 1 root root 253 2007-06-05 00:20 /etc/hosts
2. As root, open the file system debugger. While starting it, use as an argument the name of the Ext4 file system on which your file resides. For example, our example file /etc/hosts is on a partition with the name /dev/sda3, so the command would be sudo debugfs /dev/sda3. This opens the debugfs interactive prompt.
3. Now use the debugfs command stat to display the contents of the inode that you want to examine. For example, in this case you would type stat <15024138>. The result of this command is similar to what you see in Listing 3-9.
Listing 3-9. Showing the Contents of an Inode
Inode: 13 Type: regular Mode: 0644 Flags: 0x0 Generation: 5
84821287
User: 0 Group: 0 Size: 1763308
File ACL: 0 Directory ACL: 0
Links: 1 Blockcount: 3460
Fragment: Address: 0 Number: 0 Size: 0
ctime: 0x4664e51e -- Tue Jun 5 00:22:54 2007
atime: 0x4664e51e -- Tue Jun 5 00:22:54 2007
mtime: 0x4621e007 -- Sun Apr 15 04:19:19 2007
BLOCKS:
(0-11):5716-5727, (IND):5728, (12-267):5729-5984, (DIND):5985, (IND):
5986, (268-523):5987-6242, (IND):6243, (524-779):6244-6499, (IND):650
0, (780-1035):6501-6756, (IND):6757, (1036-1291):6758-7013, (IND):701
4, (1292-1547):7015-7270, (IND):7271, (1548-1721):7272-7445
TOTAL: 1730
(END)
4. Use the quit command to close the debugfs interface.
Understanding the Differences Between hard and Symbolic Links
When comparing the symbolic link and the original file, you will notice a clear difference between them. First, the symbolic link and the original file have different inodes: the original file is just a name that is connected directly to the inode, and the symbolic link refers to the name. The latter can be seen from the output of ls -il (-i displays the inode number): after the name of the symbolic link, an arrow is used to indicate what file you are really working on. Also, you can see that the size of the symbolic link is significantly different from the size of the real file. The size of the symbolic link is the number of bytes in the name of the file it refers to, because no other information is available in the symbolic link. As well, you can see that the permissions on the symbolic link are completely open. This is because the permissions are not managed here, but on the original file instead. Finally, you can see that the file type of the symbolic link is set to l, which indicates that it is a symbolic link (see Listing 3-10).
Listing 3-10. Showing the Differences Between Symbolic and Hard Links
root@ubuntu:~# ln -s /etc/hosts symhosts
root@ubuntu:~# ln /etc/hosts hardhosts
root@ubuntu:~# ls -il /etc/hosts hardhosts symhosts
15024138 -rw-r--r-- 2 root root 253 2007-06-05 00:20 /etc/hosts
15024138 -rw-r--r-- 2 root root 253 2007-06-05 00:20 hardhosts
13500422 lrwxrwxrwx 1 root root 10 2007-07-02 05:45 symhosts -> /etc/hosts
You may ask what happens to the symbolic link when the original file is removed. Well, that isn’t hard to predict! The symbolic link fails. Linux will show this when displaying file properties with the ls command; you’ll get a “File not found” error message when you try to open it.
Working with Hard Links
Every file on a Linux file system has an inode. As explained earlier, all of a file’s administrative data is kept in its inode. Your computer actually works entirely with inodes, and the file names are only a convenience for people who are not too good at remembering numbers. Every name that is connected to an inode can be considered a hard link. So, when you create a hard link for a file, all you really do is add a new name to an inode. To do this, use the ln command. The interesting thing about hard links is that there is no difference between the original file and the link: they are just two names connected to the same inode. The disadvantage of using them is that hard links must exist on the same device, which is rather limiting. But, if possible, you should always create a hard link instead of a symbolic link because they are faster.
Figure 3-1 depicts the relationship between inodes, hard links, and symbolic links.
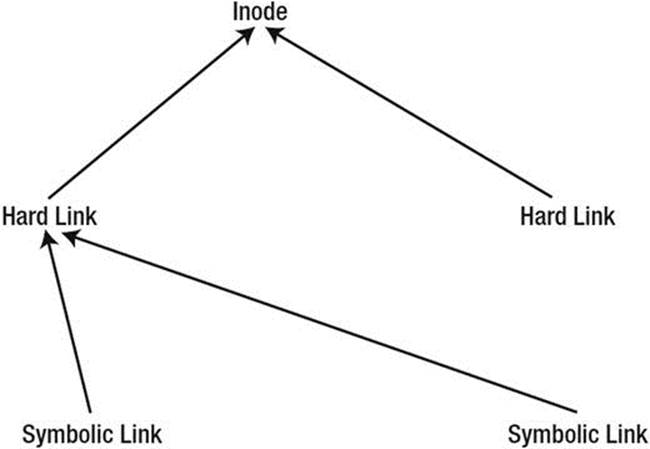
Figure 3-1. Relationship between inodes, hard links, and symbolic links
Links Recap
If you really want to understand what a link is all about, you do need to know about the role of the inodes. If you just want a basic knowledge of links, remember the following:
· A symbolic link is like a shortcut. It points to the original file and helps you find it easily. However, it breaks if you remove the original file.
· A hard link is like a copy of the file that is synchronized continuously. There is no difference between the original file and the hard link; they both refer to the same blocks.
Now that you’ve learned about hard and symbolic links, it’s time to do an exercise with them.
EXERCISE 3-3: WORKING WITH LINKS
1. Open a root shell.
2. Type ln -s /etc/hosts ~/computers. This creates a symbolic link with the name computers in your home directory.
3. Type ls -il /etc/hosts ~/computers. This shows properties of both files. Notice that the inode number on both files is different.
4. Type ln /etc/hosts /root/machines.
5. Type ls -il /etc/hosts /root/machines /root/computers. You’ll notice that /etc/hosts and /root/machines have the same properties.
6. Type echo hello > /etc/hosts. This adds a line to the /etc/hosts file.
7. Repeat command 5. You’ll notice that both hard links show updated file size.
8. Type rm /etc/hosts.
9. Type echo /root/machines. You’ll still see the contents of the previous /etc/hosts file.
10.Type echo /root/computers. You’ll see an error message: the file the link refers to doesn’t exist anymore.
11.Type ln /root/machines /etc/hosts. This repairs the original /etc/hosts file.
Summary
In this chapter, you have learned about some of the more advanced features and maintenance tasks on the Linux file systems. You have read how to use the mount command to access devices. You’ve also learned how to automate mounting of devices by using the /etc/fstab file. Next, the fsck command was discussed to teach you how to check and, if necessary, repair a file system. Following that, you’ve read how to create backups of files and complete devices, using tar and dd. In the last part of this chapter, you’ve seen how to work with links to make your Linux file system more versatile. The following commands and configuration files were discussed in this chapter:
· mount: Mounts a device to a directory. Mounting devices is mandatory in Linux; without mounting a device, you can’t use it.
· fstab: Indicates a configuration file in /etc that is used to automate mounting of devices on system startup.
· mtab: Indicates a configuration file in /etc that keeps track of the current mount status of devices.
· umount: Disconnects a mounted device.
· fuser: Shows you what files are currently open in a directory.
· lsof: Like fuser, but shows more detail.
· fsck: Checks the integrity of the file system.
· tar: Archives files. This means that it puts together multiple files into one big file.
· gzip: Compresses files. Often used in conjunction with tar.
· gunzip: Decompresses files that were compressed with gzip. Often used in conjunction with tar.
· bzip2: Alternative for gzip.
· bunzip2: Alternative for gunzip.
· dd: Utility that helps you in cloning devices.
· ln: Creates links.
In the next chapter, you’ll learn how to work with text files.
All materials on the site are licensed Creative Commons Attribution-Sharealike 3.0 Unported CC BY-SA 3.0 & GNU Free Documentation License (GFDL)
If you are the copyright holder of any material contained on our site and intend to remove it, please contact our site administrator for approval.
© 2016-2026 All site design rights belong to S.Y.A.