Beginning the Linux Command Line, Second edition (2015)
CHAPTER 5. Managing Partitions and Logical Volumes
To work with files, you need to store them. In most situations, you’ll need to create a logical storage unit before you do so. Creating such a storage unit makes it easier to configure your hard drive in a flexible way. In Linux, you can choose between two of those logical storage units: partitions and logical volumes. Choose partitions if you want to work easily and you don’t have very specific needs for what you do with your hard drive. If, however, you need maximal flexibility and easy resizing, working with logical volumes is a better solution. In this chapter, you’ll read how to create partitions as well as logical volumes, how to make a file system on them, and how to manage that file system.
Addressing Storage Devices
Up to now, you’ve read how to address devices based on device names such as /dev/sda and /dev/vda. There is a problem though with these device names: they are not guaranteed to be unique. This is because normally the device name is determined at the moment the kernel finds out that a new device has been attached to the system. The following example explains the problem.
Imagine that your computer currently has a local hard disk as the only storage device. The name of this hard disk will most likely be /dev/sda. Imagine that you have two USB drives, a 1GB USB key and an 80GB USB hard disk. Say you attach the 1GB USB key first to your computer. The computer will give it the device name /dev/sdb, as the devices are named in sequential order. If after that you attach the 80GB USB hard disk, it becomes /dev/sdc. Now imagine you do the opposite and first attach the 80GB hard disk. You can probably guess what happens—it becomes /dev/sdb instead of /dev/sdc, which it was before. So you cannot be sure that these device names are always unique.
To guarantee uniqueness of device names, there are two solutions. When creating the file system with mkfs, you can put a label in the file system. You can also work with the unique device names that are created automatically in the /dev/disk directory. The next two sections give more details about both.
File System Labels
The oldest method to refer to devices in always the same way is by adding a file system label. This label is stored in the file system and not in the metadata. Using file system labels is useful for mounting devices, as the mount command will check for a label. However, you cannot depend on it in situations where you need to address the device itself and not the file system that is in it.
Typically, you will add a label to a file system when formatting it. For instance, to add a label to an Ext4 file system, you would use the following command:
mkfs.ext4 -L mylabel /dev/sda2
On most file systems, you can also set a label to an existing file system. On Ext file systems, you would do this using the tune2fs utility:
tune2fs -L mylabel /dev/sda2
There is more information on the use of these commands later in this chapter.
Once the file system label is set, you can use it when mounting the device. Just replace the name of the device by LABEL=labelname to do this. For instance, the following command would mount the file system that has the label mylabel:
mount LABEL=mylabel /mnt
udev Device Names
File system labels are useful, but only in situations where you need to address the file system that is on the device. If you need to address the device itself, they will not do. Modern Linux distributions have an alternative. This alternative is created by the udev process, which is started on all modern Linux distributions automatically. udev is the process that detects device changes on the hardware bus and is responsible for creating device names. Not only does it create the device names /dev/sdb and so on, but for each storage device it also creates a unique device name in the directory /dev/disk. In Listing 5-1, you can see an example of these device names.
Listing 5-1. udev Creates Unique Device Names for All Storage Devices
xen:~ # ls -Rl /dev/disk
/dev/disk:
total 0
drwxr-xr-x 2 root root 280 Jan 13 10:36 by-id
drwxr-xr-x 2 root root 140 Jan 13 10:36 by-path
drwxr-xr-x 2 root root 80 Jan 13 12:16 by-uuid
/dev/disk/by-id:
total 0
lrwxrwxrwx 1 root root 10 Jan 13 10:36 ata--part1 -> ../../sda1
lrwxrwxrwx 1 root root 10 Jan 13 10:36 ata--part2 -> ../../sda2
lrwxrwxrwx 1 root root 10 Jan 13 10:36 ata--part3 -> ../../sda3
lrwxrwxrwx 1 root root 9 Jan 13 10:36 ata-WDC_WD5002ABYS-18B1B0_WD-WMASY5022406
-> ../../sda
lrwxrwxrwx 1 root root 9 Jan 13 10:36 edd-int13_dev80 -> ../../sda
lrwxrwxrwx 1 root root 10 Jan 13 10:36 edd-int13_dev80-part1 -> ../../sda1
lrwxrwxrwx 1 root root 10 Jan 13 10:36 edd-int13_dev80-part2 -> ../../sda2
lrwxrwxrwx 1 root root 10 Jan 13 10:36 edd-int13_dev80-part3 -> ../../sda3
lrwxrwxrwx 1 root root 9 Jan 13 10:36 scsi-SATA_WDC_WD5002ABYS-_WD-WMASY5022406
-> ../../sda
lrwxrwxrwx 1 root root 10 Jan 13 10:36 scsi-SATA_WDC_WD5002ABYS-_WD-WMASY5022406
-part1 -> ../../sda1
lrwxrwxrwx 1 root root 10 Jan 13 10:36 scsi-SATA_WDC_WD5002ABYS-_WD-WMASY5022406
-part2 -> ../../sda2
lrwxrwxrwx 1 root root 10 Jan 13 10:36 scsi-SATA_WDC_WD5002ABYS-_WD-WMASY5022406
-part3 -> ../../sda3
/dev/disk/by-path:
total 0
lrwxrwxrwx 1 root root 9 Jan 13 10:36 pci-0000:00:1f.2-scsi-0:0:0:0 -> ../../sda
lrwxrwxrwx 1 root root 10 Jan 13 10:36 pci-0000:00:1f.2-scsi-0:0:0:0-part1
-> ../../sda1
lrwxrwxrwx 1 root root 10 Jan 13 10:36 pci-0000:00:1f.2-scsi-0:0:0:0-part2
-> ../../sda2
lrwxrwxrwx 1 root root 10 Jan 13 10:36 pci-0000:00:1f.2-scsi-0:0:0:0-part3
-> ../../sda3
lrwxrwxrwx 1 root root 9 Jan 13 10:36 pci-0000:00:1f.2-scsi-0:0:1:0 -> ../../sr0
/dev/disk/by-uuid:
total 0
lrwxrwxrwx 1 root root 10 Jan 13 10:36 4e77311a-ce39-473c-80c4-caf6e53ef0c5
-> ../../dm-0
lrwxrwxrwx 1 root root 10 Jan 13 10:36 cd200dac-4466-4a1f-a713-64e6208b5d6d
-> ../../sda2
As you can see in Listing 5-1, under /dev/disk are three subdirectories; there could be more, depending on the hardware you are using, and depending on what exactly you have done so far with the disks. These subdirectories are by-path, by-id, and by-uuid, and each of them provides a unique way of addressing the device. The by-path devices refer to the hardware path the device is using. The devices in the subdirectory by-id use the unique hardware ID of the device, and the devices in by-uuid use the universal unique ID that is assigned to the device. If you want to use a file system–independent way to refer to a device, a way that also will never change, pick one of these device names. In case of doubt, to find out which device is which, you can use ls -l; the udev device names are all symbolic links, and ls -l shows you what device these links are referring to, as you can see in Listing 5-1.
Working with UUID
When creating a file system on a disk device, a Universal Unique ID (UUID) is assigned as well. This UUID provides another method that allows you to refer to disk devices and that will survive changes in the storage topology. The UUID is unique, but it has the disadvantage that it is hard to read. To get an overview of UUIDs that are currently assigned, you can use the blkid command. Listing 5-2 shows the output of this command.
Listing 5-2. Displaying UUIDs with blkid
[root@server1 ~]# blkid
/dev/block/252:2: UUID="SZ4HOM-LSMe-li0R-Nq2d-fgtS-n7rn-zq3trw" TYPE="LVM2_member"
/dev/block/253:1: UUID="55031bda-353a-4151-9851-4bf34d00ce7c" TYPE="xfs"
/dev/block/252:1: UUID="d806f86e-8475-498c-abb8-b5140a5424ee" TYPE="xfs"
/dev/block/253:0: UUID="ff356bed-7a9a-4cae-b5fa-08d0b9e09cbe" TYPE="swap"
/dev/sda: UUID="c4abbe88289c3531" TYPE="drbd"
/dev/sdb1: UUID="7ac0d799-5cca-47c2-ab99-fed34787eaf2" TYPE="xfs"
/dev/drbd0: UUID="1be88a0a-6177-438f-b2bc-4bd2eefce41f" TYPE="xfs"
To mount a file system using UUID, you can use UUID=“nnnn-nnnn” instead of the device name while using the mount command. For instance, the /dev/sdb1 device that is displayed in Listing 5-2, can be mounted using mount UUID="7ac0d799-5cca-47c2-ab99-fed34787eaf2" /mnt.
Even if a UUID is not easy to read and reproduce, you’ll see them as the default solution for mounting devices on most current Linux distributions.
Creating Partitions
The partition is the basic building block on a computer hard drive. As an alternative to using partitions, you could use logical volumes as well to create your computer’s file systems. But, even when using logical volumes, you should create partitions on the disk device first. In this section, you’ll learn everything you need to know about partitions. First, you’ll see how partitions are used on the computer’s hard drive. Following that, you’ll learn how to create them using fdisk, the most important partition management utility. As the last part in this section, you’ll learn how to recover lost partitions.
Understanding Partitions
Compare the hard disk in your computer to a pizza. To do something with it, you’ll need a file system on the hard drive. You can put the file system directly on the hard drive, which is like cooking a pepperoni pizza: the ingredients are the same throughout. On Linux, different file systems have to be used on the same hard drive, which is basically like cooking a pizza quattro stagioni, four different pizzas in one—you don’t want everything mixed together. To make it easier to make such a pizza, you could consider cutting the pizza into slices. The same goes for computer hard drives, but rather than slices, you divide a drive into partitions. In this section, you’ll learn how your computer works with partitions from the moment it boots.
If you were to put just one file system on your computer hard drive, there would be no need to create partitions. You can do this, for instance, with a USB key. If there is just one hard drive in your computer, however, you normally need to create different file systems on it. The least you would need is a swap file system and a “normal” file system. Therefore, you will need to create partitions on your hard drive.
Note: From a technical perspective, it is possible to create a file system directly on a disk device, without creating partitions first. This is very bad habit though. Other operating systems - such as Windows - won’t see that a file system is used if it hasn’t been created on top of a partition. They will just report a disk device that is not initialized and tell you that it needs to be initialized - after which you’ll loose all data on it.
Understanding MBR and GPT Disks
For a very long time, hard disks have been using Master Boot Record (MBR) to initialize the boot procedure. In the MBR, 64 bytes disk space are reserved to store partitions. This allows for the creation of a total of 4 partitions, on disks with a maximum size of 2 Terabytes.
For a couple of years, disks with sizes beyond 2TB have become common. These disks cannot be adressed with MBR anymore. For that reason, a new partition table type has been introduced: GUID Partition Table (GPT). Using GTP, the address space to create paritions has been increased, which allows for the creation of a maximum amount of 256 partitions. Also, the 2 TB disk size limitation has been eliminated. You’ll read how to work with GPT partitions later in this chapter.
Creating MBR Partitions
When a computer boots, it reads the Master Boot Record (MBR) from the hard drive that is marked as primary in the BIOS. From the MBR, it starts the boot loader, which is typically GRUB2. Next, it checks the partition table, which is also in the MBR, to find out about the file systems that it can use. In the MBR, 64 bytes are reserved for partitions. This is 16 bytes per partition, just enough to store the begin and end cylinders, the partition type, and info indicating whether the partition is active. You can also display this information by issuing the command fdisk -l on your hard drive; for instance, fdisk -l /dev/sda shows a list of all partitions that have been created on hard drive /dev/sda. Listing 5-3 shows what the result of this command looks like.
Listing 5-3. With fdisk -l, You Can Show Basic Properties of Your Partitions
[root@localhost ~]# fdisk -l /dev/sda
Disk /dev/sda: 8589 MB, 8589934592 bytes, 16777216 sectors
Units = sectors of 1 * 512 = 512 bytes
Sector size (logical/physical): 512 bytes / 512 bytes
I/O size (minimum/optimal): 512 bytes / 512 bytes
Disk label type: dos
Disk identifier: 0x000a9dbd
Device Boot Start End Blocks Id System
/dev/sda1 * 2048 1026047 512000 83 Linux
/dev/sda2 1026048 10283007 4628480 8e Linux LVM
A special role is played by the active partition. The boot loader will check the 512-byte boot sector that it finds at the beginning of this partition to find out whether a boot loader is stored in it. For the rest, all you need to access a partition is the start and end cylinders. This tells the kernel of the operating system where exactly it has to look to find the file system within the partition.
In the 64 bytes that are allocated in the MBR to create partitions, you can create four partitions only. As this may not be enough, you can create one of these partitions as an extended partition. In an extended partition, you can create logical partitions. These have the same role as normal partitions, with one exception only: they are not stored in the MBR, but in the boot sectors of the four primary partitions. You can create a maximum of 56 logical partitions.
Every partition has a specific partition type. This partition type is used to indicate what type of data is found in it. As an administrator, you should make sure that the partition types are correct, because some utilities depend on the correct partition type being set and will refuse services if this is not the case. Four partition types are of particular interest in a Linux environment:
· 83 (Linux): This is the native Linux partition type. You can use it for any Linux file system.
· 82 (Linux swap): Use this partition type for Linux swap partitions.
· 8e (Linux LVM): Use this partition type for working with LVM logical volumes (see the section “Creating Logical Volumes” later in this chapter).
· 5 (Extended): Use this for extended partitions.
Managing Partitions with fdisk
Still the most common, though rather old, utility for creating partitions on Linux is fdisk. fdisk offers a command-line interface that allows you to perform all partition manipulations that you can think of. In the following procedure description, you’ll read how to work with fdisk.
While working with fdisk, you’ll create primary as well as extended partitions. This is because the Master Boot Record has only 64 bytes to store partitions, which is enough to create 4 partitions. If you need to go beyond a total of 4 partitions, one of these partitions is created as an extended partition. Within the extended partition, you’ll create logical partitions.
Creating Partitions
In this procedure, you’ll see how to create partitions with fdisk. This procedure assumes that you are working on a hard drive that is completely available and contains no important data. If you want to test the steps as described in this procedure, I recommend using an empty USB key. After attaching it to your computer, it will show up as /dev/sdb in most cases.
Since making a mistake about the hard drive on which you create partitions would be fatal, let’s have a look first at how to recognize which drive is which on your computer. If you’ve just attached an external medium like a USB drive to your computer and want to find out the device name of this medium, use the dmesg utility. In Listing 5-4, you can see the last part of its output, right after I’ve attached a USB key to my computer. As you can see, the kernel recognizes the USB key and initializes it as /dev/sdc.
Listing 5-4. Using dmesg, It Is Easy to Find Out How the Kernel Recognizes Your USB Key
usb 1-1: new device found, idVendor=0951, idProduct=1603
usb 1-1: new device strings: Mfr=1, Product=2, SerialNumber=3 usb 1-1: Product: DataTraveler 2.0
usb 1-1: Manufacturer: Kingston
usb 1-1: SerialNumber: 899000000000000000000049
usb 1-1: configuration #1 chosen from 1 choice
scsi2 : SCSI emulation for USB Mass Storage devices
usb-storage: device found at 3
usb-storage: waiting for device to settle before scanning
Vendor: Kingston Model: DataTraveler 2.0 Rev: 1.00
Type: Direct-Access ANSI SCSI revision: 02
SCSI device sdc: 15769600 512-byte hdwr sectors (8074 MB)
sdc: Write Protect is off sdc: Mode Sense: 23 00 00 00
sdc: assuming drive cache: write through
SCSI device sdc: 15769600 512-byte hdwr sectors (8074 MB)
sdc: Write Protect is off
sdc: Mode Sense: 23 00 00 00
sdc: assuming drive cache: write through
sdc: sdc1
sd 2:0:0:0: Attached scsi removable disk sdc
sd 2:0:0:0: Attached scsi generic sg2 type 0
usb-storage: device scan complete
After connecting the USB key to your system, it will have multiple drives attached. There are multiple ways of getting an overview of all of them. If you are using a modern system that has sd devices only and no hd devices (which refer to old parallel ATA IDE drives), you can uselsscsi. This command lists all drives that are using the SCSI driver. This includes not only SCSI drives (which are pretty rare in end-user computers), but also SATA drives and USB drives. Listing 5-5 gives an overview of what the result of this command could look like.
Listing 5-5. Use lsscsi to Get an Overview of All SCSI, SATA, and USB Disks on Your Computer
nuuk:~ # lsscsi
[0:0:0:0] disk VMware, VMware Virtual S 1.0 /dev/sda
[0:0:1:0] disk VMware, VMware Virtual S 1.0 /dev/sdb
[2:0:0:0] disk Kingston DataTraveler 2.0 1.00 /dev/sdc
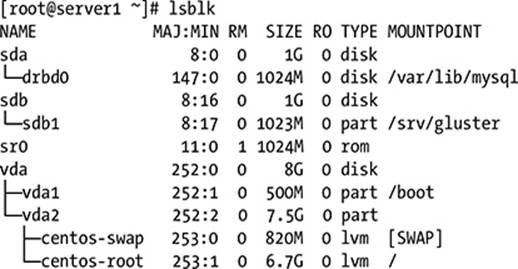
Another way to display the block devices on your computer, is by using the lsblk command. This command gives a convenient overview of all storage devices that are available on your computer. Listing 5-6 gives an overview of the output of this command.
Listing 5-6. Use lsblk for an overview of available block devices
At this point you should be able to find out which is which on your computer hard drives. Time to start configuring partitions. The next procedure describes how to do this with fdisk. In this procedure, I’ll assume that you are working on a USB disk that is attached as /dev/sdb. If needed, replace /dev/sdb with the actual name of the disk you are working on.
1. Before you start creating partitions, check whether your disk already contains some partitions. To do this, open fdisk on the disk by using the fdisk /dev/sdb command. Next, type p to print the current partition table. This gives you a result such as the one inListing 5-7. The error messages are returned because this is a completely empty disk device, on which not even a partition table exists.
Listing 5-7. Displaying Partition Information with fdisk
[root@localhost ~]# fdisk /dev/sdb
Welcome to fdisk (util-linux 2.23.2).
Changes will remain in memory only, until you decide to write them.
Be careful before using the write command.
Device does not contain a recognized partition table
Building a new DOS disklabel with disk identifier 0x68b876f1.
Command (m for help): p
Disk /dev/sdb: 1073 MB, 1073741824 bytes, 2097152 sectors
Units = sectors of 1 * 512 = 512 bytes
Sector size (logical/physical): 512 bytes / 512 bytes
I/O size (minimum/optimal): 512 bytes / 512 bytes
Disk label type: dos
Disk identifier: 0x68b876f1
Device Boot Start End Blocks Id System
2. As you can see in Listing 5-7, no partitions exist yet. To create a new partition, press n now. fdisk will first ask you what type of partition you want to create. As no partitions exist yet, you can type p to create a primary partition. Next, provide the partition number that you want to create. Since nothing exists yet, type 1 to create the first partition. Now fdisk asks for the start sector. By default, the first partition on a new device starts at sector 2048, this leaves place for the first MB on the device to be used for metadata Next, it asks what you want to use as the last sector. You can enter a sector number here, but it is more convenient to enter the size of the partition that you want to create. Start this size with a + sign, next specify the amount, and following that use M or G for megabytes or gigabytes; for instance, entering +1G would create a 1GB partition. In Listing 5-8, you can see the code for this procedure.
Listing 5-8. Creating a New Partition in fdisk
Command (m for help): n
Partition type:
p primary (0 primary, 0 extended, 4 free)
e extended
Select (default p): p
Partition number (1-4, default 1): 1
First sector (2048-2097151, default 2048):
Using default value 2048
Last sector, +sectors or +size{K,M,G} (2048-2097151, default 2097151): +500M
Partition 1 of type Linux and of size 500 MiB is set:
3. As fdisk doesn’t show you the result, it is a good idea to use the p command now; this will give you an overview of currently existing partitions.
4. When you have finished creating partitions, you would normally write the partitions to the partition table. Before doing so, I will first show you how to create an extended partition with a logical partition inside, and how to change the partition type. So with the fdiskinterface still open, type n now to create another new partition. Next, type e to create an extended partition. You would normally use an extended partition to fill up the rest of the available disk space with logical partitions; therefore, you can press Enter twice now to use all remaining disk space for the extended partition.
5. After creating the extended partition, you can now create logical partitions inside it. To do this, type n again to start creating a new partition. fdisk now asks whether you want to create a logical or a primary partition. Type l now for logical partition. Next, as when creating a normal partition, you need to specify the start sector and size of the partition. When you have done that, type p again for the partition overview. You’ll now see that the first logical partition is created as /dev/sdb5, and it has the Linux partition type.
6. In some cases, you have to change the default partition type. Every partition that you create is automatically defined as type 83 (Linux). For instance, if you need to create a swap partition, you have to change this partition type. In most cases, however, the default Linux partition type works well, as you can format any Linux file system on it.
Let’s have a look now at how to change the default partition type. To do this, from within fdisk, enter the l command to display a list of all supported partition types. This shows you that for a Linux swap, you have to use partition type 82. To apply this partition type, use the t command now. Next, enter the partition number and the partition type you want to use on that partition to change it. fdisk will now tell you that it has sucessfully changed the partition type (see Listing 5-9).
Listing 5-9. In Some Situations, You Need to Change the Partition Type
Command (m for help): t
Partition number (1-5): 5
Hex code (type L to list codes): 82
Changed system type of partition 5 to 82 (Linux swap / Solaris)
Command (m for help):
7. Once you have made all changes that you want to apply to your partitions, it’s time to write the changes if you are happy with them, or just quit if you are not sure about the parameters you have changed. Before doing anything, use the p command again.
This shows you the current changes in the partition table. Are they what you wanted?
Use w to write the changes to disk. If you’ve made an error and don’t want to mess up the current partitioning on your hard drive, use q to bail out safely. When using q, nothing is changed, and the drive remains as it existed before you started working with fdisk.
Telling the Kernel about the New Partitions
You have now written the new partition table to the MBR. If you changed partitions on a device that was in use at the moment you changed the partition parameters, you will have seen an error message indicating the device was busy and that you have to reboot to apply the changes you’ve made to the partition table. This is because fdisk has updated the partition table, but by default it doesn’t tell the kernel about the updated partition table. You can check this in the file /proc/partitions, which contains a list of all the partitions that the kernel knows about (see Listing 5-10).
Listing 5-10. The File /proc/partitions Contains a List of All Partitions That the Kernel Knows About
nuuk:~ # cat /proc/partitions
major minor #blocks name
8 0 8388608 sda
8 1 104391 sda1
8 2 7534485 sda2
8 3 747022 sda3
8 16 8388608 sdb
8 17 987966 sdb1
8 18 1 sdb2
8 21 1959898 sdb5
253 0 4194304 dm-0
253 1 131072 dm-1
If the device on which you have changed partitions has mounted partitions on it, the /proc/partitions file doesn’t get updated automatically. Fortunately, there is a command that you can use to force an update: partprobe. Issuing this command tells the kernel about updated partitions, even for devices that were in use when you were manipulating the partition table.
![]() Caution The partprobe utility works very well for adding new partitions. It doesn’t work so well if you’ve also removed partitions. To make sure that your computer knows that some partitions have disappeared, you better reboot your computer after removing partitions.
Caution The partprobe utility works very well for adding new partitions. It doesn’t work so well if you’ve also removed partitions. To make sure that your computer knows that some partitions have disappeared, you better reboot your computer after removing partitions.
Deleting Partitions
If you know how to create a partition, deleting a partition is not hard. You use the same fdisk interface, only with a different command. There is only one thing that you should be aware of: when deleting a logical partition, you risk changing the order of the remaining logical partitions. Assume that you have partitions /dev/sdb5 and /dev/sdb6. After deleting /dev/sdb5, the partition /dev/sdb6 will be renumbered to /dev/sdb5, and all partitions after /dev/sdb6 will also get renumbered. This will cause problems accessing the remaining partitions, so be very careful when removing logical partitions! Fortunately, this problem only exists for logical partitions; the number that is assigned to a primary or an extended partition will never change.
The next procedure shows you how to delete a partition.
1. Open fdisk on the device where you want to delete a partition; for instance, use /dev/sdb if you want to delete a partition from the sdb device. Next, use p to display a list of all partitions that exist on the device.
2. Determine the number of the partition that you want to delete, and enter that number to delete it from your hard disk.
3. Use the p command again to verify that you have deleted the right partition. If so, use w to write the changes to disk. If not, use q to quit without saving changes.
![]() Tip If you have deleted the wrong partition, it doesn’t necessarily mean that all your data is lost. As long as you haven’t created another file system at this partition, just re-create it with the same parameters—this allows you to access the data in that partition again without any problems.
Tip If you have deleted the wrong partition, it doesn’t necessarily mean that all your data is lost. As long as you haven’t created another file system at this partition, just re-create it with the same parameters—this allows you to access the data in that partition again without any problems.
Fixing the Partition Order
In some cases, you will need to use some of the advanced partition options to change partition parameters. You might, for instance, have to change the order of partitions. By deleting and recreating logical partitions, you may accidentally change the partition order. In Listing 5-11, you can see an example in which this has happened.
Listing 5-11. Occasionally, You Will See Problems Like a Wrong Partition Order
Command (m for help): p
Disk /dev/sdb: 1073 MB, 1073741824 bytes, 2097152 sectors
Units = sectors of 1 * 512 = 512 bytes
Sector size (logical/physical): 512 bytes / 512 bytes
I/O size (minimum/optimal): 512 bytes / 512 bytes
Disk label type: dos
Disk identifier: 0x68b876f1
Device Boot Start End Blocks Id System
/dev/sdb1 2048 1026047 512000 83 Linux
/dev/sdb2 1026048 2097151 535552 5 Extended
/dev/sdb5 1234944 1439743 102400 83 Linux
/dev/sdb6 1028096 1234943 103424 83 Linux
Partition table entries are not in disk order
The fact that the partitions are out of order will severely disturb some utilities. Therefore, this is a problem that you should fix. fdisk makes this possible through some of its advanced options. The following procedure describes how to fix this problem:
1. Start fdisk on the hard disk where you want to modify the partition table.
2. Type x to enter fdisk expert mode. In this mode, you’ll have access to some advanced options. Listing 5-12 gives an overview of the options in expert mode.
Listing 5-12. In fdisk Expert Mode, You Will Get Access to Advanced Options
v verify the partition table
w write table to disk and exit
x extra functionality (experts only)
Command (m for help): x
Expert command (m for help): m
Command action
b move beginning of data in a partition
c change number of cylinders
d print the raw data in the partition table
e list extended partitions
f fix partition order
g create an IRIX (SGI) partition table
h change number of heads
m print this menu
p print the partition table
q quit without saving changes
r return to main menu
s change number of sectors/track
v verify the partition table
w write table to disk and exit
Expert command (m for help):
3. From the expert interface, use f to fix the partition order. fdisk replies with a simple “done” to tell you that it has finished doing so. You can now use r to return to the main menu, and from there, use p to print the current partition layout. If you are happy with the changes, use w to write them to disk and exit fdisk.
Creating GPT Partitions with gdisk
On modern hard disks, you’ll need to use GPT partitions instead of MBR partitions. Using GPT partitions helps you overcome some limitations that exist for MBR environments.
· In GPT, a total of 128 partitions can be created
· In GTP, a backup partition table is stored on disk as well
· All partitions can be created as primary partitions
· GTP allows you to work with disk that have a size beyond 2TB
To create GPT partitions, you’ll need the gdisk utility. If you know how to work with fdisk, working with gdisk is easy, as the interface it offers is very similar to the fdisk interface, and similar commands are used. The gdisk utility offers one important item though: it allows you to convert MBR partition tables to GPT partition tables. Don’t ever use this option, because it is likely to make all data that are stored on the MBR partition inaccessible. Listing 5-13 shows the message that gdisk shows when it is used on a disk that currently contains an MBR partition table.
Listing 5-13. Using gdisk on MBR disks is a very bad idea
[root@localhost ~]# gdisk /dev/sda
GPT fdisk (gdisk) version 0.8.6
Partition table scan:
MBR: MBR only
BSD: not present
APM: not present
GPT: not present
***************************************************************
Found invalid GPT and valid MBR; converting MBR to GPT format.
THIS OPERATION IS POTENTIALLY DESTRUCTIVE! Exit by typing 'q' if
you don’t want to convert your MBR partitions to GPT format!
***************************************************************
Command (? for help):
Working with cfdisk
If you don’t like the fdisk interface, another partitioning utility is available for you to try as well: cfdisk. This utility is not as advanced as fdisk and lacks several options, but if you just want to perform basic partition operations, you may like it, particularly as it is using a menu-driven interface that makes creating partitions a bit easier. Listing 5-14 shows the cfdisk interface.
Listing 5-14. cfdisk Offers an Easier Interface to Perform Basic Partitioning Actions
cfdisk (util-linux 2.23.2)
Disk Drive: /dev/sda
Size: 8589934592 bytes, 8589 MB
Heads: 255 Sectors per Track: 63 Cylinders: 1044
Name Flags Part Type FS Type [Label] Size (MB)
------------------------------------------------------------------------------
Pri/Log Free Space 1.05*
sda1 Boot Primary xfs 524.29*
sda2 Primary LVM2_member 4739.57*
Pri/Log Free Space 3325.04*
[ Help ] [ New ] [ Print ] [ Quit ] [ Units ]
[ Write ]
Create new partition from free space
cfdisk offers a menu interface that gives you different options that are context sensitive. That is, based on the current partition type that you have selected by manipulating the arrow keys, you’ll see different options. To navigate between the different options, use the Tab key. Following are short descriptions of these options:
· Bootable: Use this option to mark a partition as bootable. This is equivalent to the fdisk option to mark the active partition.
· New: Use this option to create a new partition in unallocated disk space.
· Delete: Use this option to remove a partition.
· Help: This option shows usage information about cfdisk.
· Maximize: With this option, you can increase the size of a partition on a disk where unallocated cylinders are still available. Note that after using this option, you should increase the file system in that partition also.
· Print: This option gives you three different choices for printing partition information; you can print the raw partition information, information about partitions sectors, and the contents of the partition table.
· Quit: Use this option to close the cfdisk interface.
· Type: With this option, you can change the partition type.
· Units: This option changes the units in which the partition sizes are displayed.
· Write: Use this option to write changes to the partition table to disk and exit.
Recovering Lost Partitions with gpart
Occasionally, something may go terribly wrong, and you may lose all partitions on your hard disk. The good news is that a partition is just a marker for the start and end of a file system that exists within the partition. If you lose the information in the partition table, it doesn’t necessarily mean that you also lose the file system that exists in it. Therefore, in many cases, if you re-create the lost partition with the same partition boundaries, you will be able to access the file systems that existed in the partition as well. So if you have good documentation of how the partition table once was structured, you can just re-create it accordingly.
On the other hand, if you have no documentation that shows you how the partitioning on your hard disk once was, you can use the gpart utility. This utility analyzes the entire hard disk to see whether it can recognize the start of a file system. By finding the start of a file system, it automatically also finds the partition in which the file system was created. However, gpart doesn’t always succeed in its work, especially on extended partitions, where it may fail to detect the original partitioning. Let’s have a look at how well it does its work based on the partition table inListing 5-15.
Listing 5-15. The Original Partition Table for This Example
nuuk:~ # fdisk -l /dev/sdb
Disk /dev/sdb: 8589 MB, 8589934592 bytes
255 heads, 63 sectors/track, 1044 cylinders
Units = cylinders of 16065 * 512 = 8225280 bytes
Device Boot Start End Blocks Id System
/dev/sdb1 1 123 987966 83 Linux
/dev/sdb2 124 367 1959930 83 Linux
/dev/sdb3 368 1044 5438002+ 5 Extended
/dev/sdb5 368 490 987966 83 Linux
/dev/sdb6 491 856 2939863+ 83 Linux
gpart does have some options, but you may find that those options don’t really add much to its functionality. It just tries to read what it finds on your hard drive, and that’s it. In Listing 5-16, you can see how well it did in trying to find the partition table from Listing 5-15.
Listing 5-16. gpart Results
nuuk:~ # gpart /dev/sdb
Begin scan...
Possible partition(Linux ext2), size(964mb), offset(0mb)
Possible partition(Linux ext2), size(1913mb), offset(964mb)
Possible extended partition at offset(2878mb)
Possible partition(Linux ext2), size(964mb), offset(2878mb)
Possible partition(Linux ext2), size(2870mb), offset(3843mb)
End scan.
Checking partitions...
Partition(Linux ext2 filesystem): primary
Partition(Linux ext2 filesystem): primary
Partition(Linux ext2 filesystem): logical
Partition(Linux ext2 filesystem): logical
Ok.
Guessed primary partition table:
Primary partition(1)
type: 131(0x83)(Linux ext2 filesystem)
size: 964mb #s(1975928) s(63-1975990)
chs: (0/1/1)-(122/254/59)d (0/1/1)-(122/254/59)r
Primary partition(2)
type: 131(0x83)(Linux ext2 filesystem)
size: 1913mb #s(3919856) s(1975995-5895850)
chs: (123/0/1)-(366/254/59)d (123/0/1)-(366/254/59)r
Primary partition(3)
type: 015(0x0F)(Extended DOS, LBA)
size: 3835mb #s(7855785) s(5895855-13751639)
chs: (367/0/1)-(855/254/63)d (367/0/1)-(855/254/63)r
Primary partition(4)
type: 000(0x00)(unused)
size: 0mb #s(0) s(0-0)
chs: (0/0/0)-(0/0/0)d (0/0/0)-(0/0/0)r
As you can see, gpart did a pretty good job in this case, but you can’t just take the information as is when re-creating the partitions. When using gpart, you should start by analyzing the first part of the gpart output. This part gives you a list of all partitions that it has found, including their sizes. As fdisk works primarily on cylinders, you may find the end of the gpart output more usable. The four Primary partition indicators refer to either primary or extended partitions that are normally stored in the MBR. Also very useful: it gives you chs (cylinder/ head/sector) information, telling you exactly the first cylinder and the last cylinder used by the partition. By using the chs information, gpart tells you exactly on which cylinder, head, and sector the partition started, which helps you in re-creating the partition. Be aware, however, thatfdisk calls the first cylinder on a disk cylinder 1, whereas gpart calls it cylinder 0. Therefore, when re-creating the partitions, add 1 to the list of cylinders as displayed by gpart to re-create the right partition sizes.
EXERCISE 5-1: CREATING PARTITIONS WITH FDISK
To apply the steps in this exercise, you’ll need a dedicated disk device. Don’t perform these steps on an existing disk device! If you’re working on a physical computer, you can use a USB thumb drive as external disk device - make sure it does not contain any important data though. If you’re using a virtual machine, you can add an additional disk device through the virtualization software. I’ll use /dev/sdb as the name for this new additional disk device throughout the exercise, make sure to replace /dev/sdb with the name of the disk device that applies to your environment.
1. Type cat /proc/partitions to get a list of devices and partitions that the kernel currently is aware of.
2. If you haven’t attached the additional disk device yet, you can do it now. After attaching it to your computer, type dmesg to show kernel messages which show that the device has been detected and added. Also type cat /proc/partitions again and compare the results with the results of step 1. Use the disk device name that has just been added in the rest of this exercise. I’m using /dev/sdb as the name of this device, your device name might be different! If that is the case, make sure to use your device name and not /dev/sdb.
3. Type fdisk /dev/sdb. Next, type p to show the current partitioning on the device. It will most likely show some partitions.
4. Type d to delete all partitions that currently are existing on the device. Enter the partition number, and proceed until you have removed all partitions.
5. If you are sure that you’re okay with removing all partitions, type w to write the changes to disk and close fdisk. If you are not sure you really want to destroy all partitions, type q to quit and write nothing to disk.
6. Type fdisk /dev/sdb again. Now, type n to create a new partition.
7. When asked if you want to create a primary or an extended partition, type p to create a primary partition.
8. Press Enter when fdisk asks for the start sector of the new partition. Type +200M to make this a 200MB partition.
9. Type w to write the changes to disk and quit fdisk.
10.Type proc /cat/partitions to see the contents of the kernel partition table. If you do not see the newly created partition, type partprobe to have the kernel probe for the new partitions and update the kernel partition table.
Creating Logical Volumes
In the first part of this chapter, you have read about using partitions to allocate disk space. Working with partitions is fine if you have a simple setup without any special requirements. However, if you need more flexibility, you may need another solution. Such a solution is offered by the Logical Volume Manager (LVM) system. Some distributions, such as Red Hat and derived distributions, even use LVM as their default hard disk layout. Working with LVM offers some benefits, of which the most important are listed here:
· You can resize logical volumes easily.
· Using logical volumes allows multiple physical disk devices to be combined into one logical entity.
· By using the snapshot feature, it is easy to freeze the state of a logical volume, which makes it possible to make a stable backup of a versatile file system.
· Logical volumes offer support for use in a cluster environment, where multiple nodes may access the same volumes.
· The number of logical volumes that you can create is much higher than the number of traditional partitions.
In the next sections, you’ll read about the way logical volumes are organized and the management of logical volumes.
Understanding Logical Volumes
The Linux LVM uses a three-layer architecture. At the bottom layer are the storage devices. In LVM terminology, these are referred to as physical volumes. These can be hard disks, RAID arrays, and partitions, and you can even use sparse files (these are files that are completely filled with zeroes to have them occupy disk space) as the storage back end. In order to use the storage back end in an LVM setup, you need to run the pvcreate command, which tells the LVM subsystem that it can use this device to create logical volumes. If you want to put a partition in an LVM setup, you need to create that partition is type 8e as well. The section “Understanding Partitions” earlier in the chapter described how to do so with fdisk.
Based on the physical volumes, you can create the second level, which consists of volume groups. These are just collections of storage devices. You can use a one-on-one solution in which one physical volume represents one volume group. You can also use a multiple-on-one solution, which means you can put multiple storage devices in one volume group and create multiple volume groups on one storage device. However, the former solution is not such a good idea. If you have multiple storage devices in one volume group, the volume group will break if one of the devices in it fails. So better not to do it that way, and make sure that you have some redundancy at this level.
The third level consists of the logical volumes. These are the flexible storage units that you are going to create and on which you are going to put a file system. A logical volume is always created on top of a volume group, and you can create multiple logical volumes from one volume group or just one logical volume on each volume group—whichever you prefer. In the next section, you’ll learn how to set up an LVM environment.
Setting Up a Disk with Logical Volume Manager
Setting up an environment that uses logical volumes is a three-step procedure. First you need to set up the physical volumes. Next, you have to create the volume group. Finally, you need to create the logical volumes themselves.
Creating Physical Volumes
Creating the physical volume is not too hard—you just need to run the pvcreate command on the storage device that you want to use. If this storage device is a partition, don’t forget to change its partition type to 8e before you start. Next, use the pvcreate command, followed by the name of the storage device. The following line creates a physical volume for the partition /dev/sdb2:
pvcreate /dev/sdb2
After creating it, you can use pvdisplay /dev/sdb2 to show the properties of the physical volume that you’ve just created. Listing 5-17 shows the results of both commands.
Listing 5-17. Creating a Physical Volume and Showing Its Properties
nuuk:~ # pvcreate /dev/sdb2
Physical volume "/dev/sdb2" successfully created
nuuk:~ # pvdisplay /dev/sdb2
--- NEW Physical volume ---
PV Name /dev/sdb2
VG Name
PV Size 7.06 GB
Allocatable NO
PE Size (KByte) 0
Total PE 0
Free PE 0
Allocated PE 0
PV UUID MH3Nlh-TR27-tPmk-5lWi-jZrH-NKwb-rBN3WY
The pvdisplay command shows information about the different properties of the physical volume:
· PV Name: The name of the physical volume.
· VG Name: The name of the volume group, if any, that is already using this physical volume.
· PV Size: The size of the physical volume.
· Allocatable: Indicator of whether this physical volume is usable or not.
· PE Size: The size of the physical extents. Physical extents are the building blocks of physical volumes, as blocks are the building blocks on a computer hard drive.
· Total PE: The total number of physical extents that is available.
· Free PE: The number of physical extents that is still unused.
· Allocated PE: The number of physical extents that is already in use.
· PV UUID: A random generated unique ID for the physical volume.
Instead of using pvdisplay, you can also use the pvs command. This command just gives a brief summary of the physical volumes that exist on a computer without too much details.
Creating Volume Groups
Now that you have created the physical volume, you can use it in a volume group. To do this, you need the vgcreate command. This command does have some options that you will normally never use; to create the volume group, it’s usually enough to specify the name of the volume group and the name of the physical volume(s) that you want to use for them. If you’re using vgcreate against a partition that hasn’t been marked as a logical volume yet, the vgcreat command will take care of that automatically for you.
Also, you can specify the size of the physical extents that are used in building the volume. Physical extents are the building blocks for logical volumes, and you set the size of these building blocks when creating the volume group. The default size of the physical extent is 4MB, which allows you to create LVM volumes with a maximal size of 256GB. If you need bigger volumes, you need bigger physical extents. For example, to create an LVM volume with a size of 1TB, you would need a physical extent size of 16MB. In the following example, you can see how to create a volume group that uses a physical extent size of 16MB:
vgcreate -s 16M volgroup /dev/sdb2
After creating your volume group, you may want to verify its properties. You can do this by using the vgdisplay command. Listing 5-18 shows the result of this command. Alternatively, you can use the vgs command to show just a brief summary og volume groups that are currently existing on your system.
Listing 5-18. Showing Properties of a Volume Group with vgdisplay
nuuk:~ # vgdisplay /dev/volgroup
--- Volume group ---
VG Name volgroup
System ID
Format lvm2
Metadata Areas 2
Metadata Sequence No 1
VG Access read/write
VG Status resizable
MAX LV 0
Cur LV 0
Open LV 0
Max PV 0
Cur PV 2
Act PV 2
VG Size 7.05 GB
PE Size 4.00 MB
Total PE 1805
Alloc PE / Size 0 / 0
Free PE / Size 1805 / 7.05 GB
VG UUID O11soU-FK0u-oafC-3KxU-HuLH-cBpf-VoK9eO
As you can see, the vgdisplay command shows you what size is allocated currently to the volume group. Since it is a new volume group, this size is set to 0 (Alloc PE / Size). It also shows you how many physical volumes are assigned to this volume group (Cur PV). To get more details about which physical volumes these are, use the pvdisplay command again with- out arguments. This will show all available physical volumes, and also to which volume group they currently are assigned.
Creating Logical Volumes
Now that you have created the physical volumes as well as the volume group, it’s time to create the logical volumes. As shown when issuing lvcreate --help (see Listing 5-19), there are many options that you can use with lvcreate.
Listing 5-19. When Creating Logical Volumes, There Are Many Options You Can Use
nuuk:~ # lvcreate --help
lvcreate: Create a logical volume
lvcreate
[-A|--autobackup {y|n}]
[--addtag Tag]
[--alloc AllocationPolicy]
[-C|--contiguous {y|n}]
[-d|--debug]
[-h|-?|--help]
[-i|--stripes Stripes
[-I|--stripesize StripeSize]]
{-l|--extents LogicalExtentsNumber |
-L|--size LogicalVolumeSize[kKmMgGtTpPeE]}
[-M|--persistent {y|n}] [--major major] [--minor minor]
[-m|--mirrors Mirrors [--nosync] [--corelog]]
[-n|--name LogicalVolumeName]
[-p|--permission {r|rw}]
[-r|--readahead ReadAheadSectors]
[-R|--regionsize MirrorLogRegionSize]
[-t|--test]
[--type VolumeType]
[-v|--verbose]
[-Z|--zero {y|n}]
[--version]
VolumeGroupName [PhysicalVolumePath...]
For example, you can use the --readahead parameter to configure read-ahead, an option that will enhance the performance of file reads on the logical volume. There are, however, only a few options that are really useful:
· -L: Use this option to specify the size that you want to assign to the logical volume. You can do this in kilobytes, megabytes, gigabytes, terabytes, petabytes, or exabytes, as well as bits. Alternatively, you can use -l to specify the volume size in extents, the building blocks for logical volumes. Typically, these extents have a size of 4MB, which is set when creating the volume group. It is mandatory to use either -L or -l.
· -n: The optional option -n allows you to specify a name for the logical volume. If you don’t specify a name, the volume will get its name automatically, and typically, this name will be lv1 for the first volume you create, lv2 for the second volume, and so on. To use a name that has more meaning, use -n name.
· VolumeGroupName: This is a mandatory parameter that has you specify in which volume group you want to create the logical volume.
· PhysicalVolumePath: This optional parameter allows you to specify exactly on which physical volume you want to create the logical volume. This option is useful if your volume group has more than one physical volume. By using this option, you can ensure that the logical volume still works if the physical volume that doesn’t contain the logical volume goes down.
Based on this information, you can create a logical volume. For example, if you want to create a logical volume that has the name data, uses the physical volume /dev/sdb2, and is created in the volume group volgroup with a size of 500MB, you would use the following command:
lvcreate -n data -L 500M volgroup /dev/sdb2
After creating a logical volume, you can display its properties using lvdisplay. or lvs if you just want to see a short summary.To do this, you need to use the complete device name of the logical volume. In this device name, you’ll first use the name of the device directory /dev, followed by the name of the volume group, which in turn is followed by the name of the logical volume. For instance, the logical volume data in volume group volgroup would use the device name /dev/volgroup/data. In Listing 5-20, you can see an example of the output of this command.
Listing 5-20. Showing the Properties of a Logical Volume with lvdisplay
nuuk:~ # lvcreate -n data -L 500M volgroup /dev/sdb2 Logical volume "data" created
nuuk:~ # lvdisplay /dev/volgroup/data
--- Logical volume ---
LV Name /dev/volgroup/data
VG Name volgroup
LV UUID PvZLFz-W6fX-Vrma-BLYM-rCN1-YnTn-ZUTpTf
LV Write Access read/write
LV Status available
# open 0
LV Size 500.00 MB
Current LE 125
Segments 1
Allocation inherit
Read ahead sectors 0
Block device 253:2
In Listing 5-20, the following information is provided:
· LV Name: The name of the logical volume.
· VG Name: The name of the volume group.
· LV UUID: A unique ID that is given to the volume.
· LV Write Access: The read/write status of the volume. As you can see, users who have enough file system permissions can write to this volume.
· LV Status: The current status of the volume. This should read available; otherwise, the volume cannot be used.
· open: The number of files that are open on the volume.
· LV Size: The size of the volume.
· Current LE: The number of logical extents. A logical extent is the logical representation of the physical extent in the volume.
· Segments: The number of physical devices on which this volume is contained.
· Allocation: The current allocation status. This parameter should be set to inherit.
· Read Ahead Sectors: The number of sectors the operating system should read ahead on a volume. For performance optimization, you can set this number. That is, if the operating system asks for the information in section 13 and the Read Ahead Sectorsparameter is set to 4, it would read sectors 13 to 17. Although this sounds like something you would want to do, on modern hardware the controller of the storage device takes care of this, so there is no need to set this parameter.
· Block Device: The address that the kernel uses to find this volume.
At this point, you have logical volumes. As the next step, you need to create file systems on them. Read the section “Working with File Systems” later in this chapter for information how to do that.
Working with Snapshots
Among the many things you can do with logical volumes is the option to work with snapshots. For instance, snapshots can be useful when creating a backup of a volume that has many open files. Normally, backup software will fail to back up a file that is open. Working with snapshots allows the backup software to back up the snapshot instead of the actual files, and by doing this it will never fail on open files.
A snapshot freezes the current status of a volume. It does so by initially copying the metadata of the volume into the snapshot volume. This metadata tells the file system driver where it can find the blocks in which the files are stored. When the snapshot is initially created, the metadata redirects the file system to the original blocks that the file system uses. This means that by reading the snapshot, you follow pointers to the original volume to read the blocks of this volume. Only when a file gets changed do the original blocks get copied to the snapshot volume, which at that moment grows. This also means that the longer the snapshot volume exists, the bigger it will grow. Therefore, you should make sure to use snapshots as a temporary measure only; otherwise they may trash your original volume as well.
![]() Caution A snapshot is meant to be a temporary solution, not a permanent solution. Make sure that you remove it after some time, or it may trash the associated volume.
Caution A snapshot is meant to be a temporary solution, not a permanent solution. Make sure that you remove it after some time, or it may trash the associated volume.
Before creating a snapshot, you have to determine the approximate size that it’s going to have. Ultimately, this depends on the time you think the snapshot is going to be around and the amount of data that you expect will change within that time frame. A good starting point is to create it with a size that is 10% larger than the original volume. However, if you think it’s going to be around longer, make sure that it is bigger so that it can keep all data that changes on the original volume from the moment that you have created the snapshot.
Creating a snapshot volume works basically the same as creating a normal volume. There are two differences though: you need to use the option -s to indicate that it is a snapshot volume, and you need to indicate the original volume that you want to make the snapshot for.
The next line shows how you can create a snapshot with the name data_snap for the volume
/dev/volgroup/data:
lvcreate -s -L 50M -n data_snap /dev/volgroup/data
After creating the snapshot, you can access it like any other volume device. This means you can mount it or have your backup software take a copy of it. Don’t forget that when you are done with it and don’t need it anymore, you have to remove it. To do that for a snapshot with the namedata_snap, use the following command:
lvremove /dev/volgroup/data_snap
![]() Caution Failing to remove your snapshot volume may make the original volume inaccessible. So never forget to remove your snapshot after usage!
Caution Failing to remove your snapshot volume may make the original volume inaccessible. So never forget to remove your snapshot after usage!
EXERCISE 5-2: CREATING AN LVM LOGICAL VOLUME
This exercise assumes that you’ve completed exercise 5-2. It continues on the partitioning layout that you have created on the /dev/sdb device in exercise 5-2.
1. From a root shell, type fdisk /dev/sdb.
2. Type n to create a new parition. Type p to make it a primary partition.
3. When asked for the starting sector, press Enter to accept the default suggestion. Next, type +200M to make this a 200MB partition.
4. Type t to change the partition type. Next, type 8e to set it to the LVM partition type.
5. Press w to write the changes to disk and type partprobe to update the kernel partition table.
6. Type cat /proc/partitions to verify that the new /dev/sdb2 partition has been added.
7. Now use pvcreate /dev/sdb2 to mark the newly created partition as an LVM physical volume.
8. Use vgcreate vgdata /dev/sdb2 to create a volume group with the name vgdata, that is using the /dev/sdb2 partition.
9. Type lvcreate -n lvdata -l 100%FREE vgdata. This command creates a logical volume with the name lvdata, that uses all available disk space in the vgdata volume group.
10.Type lvs to verify the succesfull creation of the logical volume.
Basic LVM Troubleshooting
Occasionally, you may run into trouble when working with LVM. The first problem arises when the computer fails to initialize the logical volumes when booting. This may occur when the service that scans for logical volumes comes up when your devices are not all connected yet. If that happens, you need to initialize the logical volumes manually. In the following procedure, to show you how to fix this problem, I have attached a device containing logical volumes after booting the computer. First, I will show you that the device is not activated as a physical volume automatically, and following that, you’ll read how you can activate it manually.
1. If you have just attached the device that contains logical volumes, use the dmesg command. This command shows you kernel messages and will display which device was connected last. Listing 5-21 shows you the last part of its output.
Listing 5-21. Use dmesg to Show the Name of the Device That You’ve Just Connected
usb 2-1: Manufacturer: Kingston
usb 2-1: SerialNumber: 5B7A12860AFC
usb 2-1: configuration #1 chosen from 1 choice
Initializing USB Mass Storage driver...
scsi1 : SCSI emulation for USB Mass Storage devices
usb-storage: device found at 2
usb-storage: waiting for device to settle before scanning
usbcore: registered new driver usb-storage
USB Mass Storage support registered.
Vendor: Kingston Model: DataTraveler 2.0 Rev: PMAP
Type: Direct-Access ANSI SCSI revision: 00
SCSI device sdc: 8060928 512-byte hdwr sectors (4127 MB)
sdc: Write Protect is off
sdc: Mode Sense: 23 00 00 00
sdc: assuming drive cache: write through
SCSI device sdc: 8060928 512-byte hdwr sectors (4127 MB)
sdc: Write Protect is off
sdc: Mode Sense: 23 00 00 00
sdc: assuming drive cache: write through
sdc: sdc1 < sdc5 sdc6 > sdc2
sd 1:0:0:0: Attached scsi removable disk sdc
sd 1:0:0:0: Attached scsi generic sg2 type 0
susb-storage: device scan complete
As you can see from the dmesg output, I have connected a 4GB USB key to the system that has obtained the device name /dev/sdc.
2. Use the pvs command to show a list of all physical volumes that the system knows about at the moment. This gives a result like the one in Listing 5-22.
Listing 5-22. Use pvs to Show a List of All Known Physical Volumes
nuuk:~ # pvs
PV VG Fmt Attr PSize PFree
/dev/sda2 system lvm2 a- 7.18G 3.06G
/dev/sda3 vm1 lvm2 a- 728.00M 728.00M
/dev/sdb2 volgroup lvm2 a- 2.77G 2.28G
/dev/sdb3 volgroup lvm2 a- 4.28G 4.28G
As you can see, some physical volumes are known to the system, but /dev/sdc is not among them.
3. At this point, you should tell the LVM subsystem to scan for physical volumes. To do this, use the pvscan command. This command will check all currently connected storage devices and show you all physical volumes that it has found on them. As a result, it will now also see the /dev/sdc device. Listing 5-23 shows you what the result looks like.
Listing 5-23. With pvscan You Scan All Storage Devices for the Occurence of Physical Volumes
nuuk:~ # pvscan
PV /dev/sdc2 VG group lvm2 [956.00 MB / 156.00 MB free]
PV /dev/sdb2 VG volgroup lvm2 [2.77 GB / 2.28 GB free]
PV /dev/sdb3 VG volgroup lvm2 [4.28 GB / 4.28 GB free]
PV /dev/sda3 VG vm1 lvm2 [728.00 MB / 728.00 MB free]
PV /dev/sda2 VG system lvm2 [7.18 GB / 3.06 GB free]
Total: 5 [15.88 GB] / in use: 5 [15.88 GB] / in no VG: 0 [0 ]
4. Now that the physical volumes have been initialized, it’s time to go up in the stack and see what volume groups your computer knows about. For this purpose, use the vgs command (see Listing 5-24).
Listing 5-24. The vgs Command Gives a List of All Available Volume Groups
nuuk:~ # vgs
VG #PV #LV #SN Attr VSize VFree
group 1 2 1 wz--n- 956.00M 156.00M
system 1 2 0 wz--n- 7.18G 3.06G
vm1 1 0 0 wz--n- 728.00M 728.00M
5. At this point, if you don’t see all the volume groups that you’ve expected, use the vgscan command to tell your computer to scan all physical volumes for volume groups. Listing 5-24 shows you what the result of this command looks like. For instance, the volume volgroup is not listed. Running vgscan will fix this problem, as you can see in Listing 5-25.
Listing 5-25. The vgscan Command Scans All Physical Devices for Volume Groups
nuuk:~ # vgscan
Reading all physical volumes. This may take a while...
Found volume group "group" using metadata type lvm2
Found volume group "volgroup" using metadata type lvm2
Found volume group "vm1" using metadata type lvm2
Found volume group "system" using metadata type lvm2
6. Now that all volume groups are available, it’s time for the last task: to see whether you can access the logical volumes that exist in them. To do this, first use the lvs command (see Listing 5-26).
Listing 5-26. Use the lvs Command for a List of All Logical Volumes
nuuk:~ # lvs
LV VG Attr LSize Origin Snap% Move Log Copy%
one group owi--- 300.00M
one_snap group swi--- 100.00M one
two group -wi--- 400.00M
root system -wi-ao 4.00G
swap system -wi-ao 128.00M
data volgroup -wi-a- 500.00M
7. In case there are missing logical volumes, use lvscan to scan all devices for logical volumes. This should now activate all volumes that you’ve got.
8. At this point, all logical volumes are available, but they probably are not activated yet. To confirm if this is the case, use the lvdisplay command on the volume group that you’ve just activated. For instance, if the name of the volume group is group, lvdisplay group shows you the current status of the volumes in it. As you can see in Listing 5-27, all logical volumes have the status inactive.
Listing 5-27. After Scanning for Volumes Manually, They Still Are in an Inactive State
nuuk:~ # lvdisplay group
--- Logical volume ---
LV Name /dev/group/one
VG Name group
LV UUID bYvwJU-8e3O-lUmW-xWCK-v8nE-pIqT-CUYkO9
LV Write Access read/write
LV snapshot status source of
/dev/group/one_snap [INACTIVE]
LV Status NOT available
LV Size 300.00 MB
Current LE 75
Segments 1
Allocation inherit
Read ahead sectors 0
--- Logical volume ---
LV Name /dev/group/two
VG Name group
LV UUID yBxTuU-mHvh-3HCb-MIoU-D2ic-6257-hVH9xI
LV Write Access read/write
LV Status NOT available
LV Size 400.00 MB
Current LE 100
Segments 2
Allocation inherit
Read ahead sectors 0
--- Logical volume ---
LV Name /dev/group/one_snap
VG Name group
LV UUID DCBU5O-w4SD-HPEu-J32S-pnVH-inen-Y0Mc0U
LV Write Access read/write
LV snapshot status INACTIVE destination for /dev/group/one
LV Status NOT available
LV Size 300.00 MB
Current LE 75
COW-table size 100.00 MB
COW-table LE 25
Snapshot chunk size 8.00 KB
Segments 1
Allocation inherit
Read ahead sectors 0
9. At this point, you need to activate the logical volumes. You can do that by using the vgchange command to change the status of the volume group the volumes are in. So if the name of the volume group is group, use vgchange -a y group to change the group status to active (see Listing 5-28).
Listing 5-28. Use vgchange to Change the Group Status to Active
nuuk:~ # vgchange -a y group
2 logical volume(s) in volume group "group" now active
10.Using vgchange has activated all logical volumes. At this point, you can mount them and use the file systems that are on them.
Working with File Systems
Working with file systems is a very important task for the Linux administrator. Different file systems are available; you have to choose the best file system for the tasks that you want to perform, and make sure that it is available and performing well. In this section, you’ll learn about the different file systems and how to format them. Next, you will find information on maintaining, tuning, and resizing them. At the end of this section, you will also find information on how to work with Windows file systems.
Understanding File Systems
A file system is the structure that is used to access logical blocks on a storage device. For Linux, different file systems are available, of which Ext4, XFS and the relatively new Btrfs are the most important ones. What they have in common is that all organize logical blocks on the storage device in a certain way. All also have in common that inodes and directories play a key role in allocating files. Other distinguishing features play a role as well. In the following sections, you’ll learn about common elements and distinguishing features that file systems are using.
About Inodes and Directories
The basic building block of a file system is the block. This is a storage allocation unit on disk your file system is using. Typically, it exists on a logical volume or a traditional partition. To access these data blocks, the file system collects information on where the blocks of any given file are stored. This information is written to the inode. Every file on a Linux file system has an inode, and the inode almost contains the complete administration of your files. To give you an impression, in Listing 5-29 you can see the contents of an inode as it exists on an Ext4 file system, as shown with the debugfs utility. Use the following procedure to display this information:
1. Locate an Ext4 file system on your machine. Make sure files on the file system cannot be accessed while working in debugfs. You should consider remounting the file system using mount -o remount /yourfilesystem.
2. Open a directory on the device that you want to monitor and use the ls -i command to display a list of all file names and their inode numbers. Every file has one inode that contains its complete administration. Make sure that you’ll remember the inode number later, as you will need it in step 4 of this procedure.
3. Use the debugfs command to access the file system on your device in debug mode. For example, if your file system is /dev/sda1, you would use debugfs /dev/sda1.
4. Use the stat command that is available in the file system debugger to show the contents of the inode. When done, use exit to close the debugfs environment.
Listing 5-29. The Ext debugfs Tool Allows You to Show the Contents of an Inode
root@mel:/boot# debugfs /dev/sda1
debugfs 1.40.8 (13-Mar-2015)
debugfs: stat <19>
Inode: 19 Type: regular Mode: 0644 Flags: 0x0 Generation: 2632480000
User: 0 Group: 0 Size: 8211957
File ACL: 0 Directory ACL: 0
Links: 1 Blockcount: 16106
Fragment: Address: 0 Number: 0 Size: 0
ctime: 0x48176267 -- Tue Apr 29 14:01:11 2008
atime: 0x485ea3e9 -- Sun Jun 22 15:11:37 2008
mtime: 0x48176267 -- Tue Apr 29 14:01:11 2008
BLOCKS:
(0-11):22749-22760, (IND):22761, (12-267):22762-23017, (DIND):23018, (IND):23019,
(268-523):23020-23275, (IND):23276, (524-779):23277-23532, (IND):23533, (780-1035
):23534-23789, (IND):23790, (1036-1291):23791-24046, (IND):24047, (1292-1547):
24048-24303,(IND):24304, (1548-1803):24305-24560, (IND):24561, (1804-1818):24562
-24576, (1819-2059):25097-25337, (IND):25338, (2060-2315):25339-25594, (IND):
25595, (2316-2571):25596-25851, (IND):25852, (2572-2827):25853-26108, (IND):
26109, (2828-3083):26110-26365,(IND):26366, (3084-3339):26367-26622, (IND):26623,
(3340-3595):26624-26879, (IND):26880,(3596-3851):26881-27136, (IND):27137, (3852
-4107):27138-27393, (IND):27394, (4108-4363):27395-27650, (IND):27651, (4364-4619)
:27652-27907, (IND):27908, (4620-4875):27909-28164, (IND):28165, (4876-5131):28166
-28421, (IND):28422, (5132-5387):28423-28678,(IND):28679, (5388-5643):28680-28935,
(IND):28936, (5644-5899):28937-29192, (IND):29193,(5900-6155):29194-29449, (IND)
:29450, (6156-6411):29451-29706, (IND):29707, (6412-6667):29708-29963, (IND):
29964, (6668-6923):29965-30220, (IND):30221, (6924-7179):30222-30477, (IND):
If you look hard enough at the information that is displayed by using the stat command in debugfs, you’ll recognize some of the information that is displayed when using ls -l on a give file. For instance, the mode parameter tells you what permissions are set, and the user andgroup parameters give information about the user and group that are owners of the file. The debugfs utility adds some information to that. For instance, in its output you can see the blocks that are in use by your file as well, and that may come handy when restoring a file that has been deleted by accident.
The interesting thing about the inode is that within the inode, there is no information about the name of the file. This is because from the perspective of the operating system, the name is not important. Names are for users who normally can’t handle inodes too well. To store names, Linux uses a directory tree.
A directory is a special kind of file, containing a list of files that are in the directory, plus the inode that is needed to access these files. Directories themselves have an inode number as well; the only directory that has a fixed location is /. This guarantees that your file system can always start locating files.
If, for example, a user wants to read the file /etc/hosts, the operating system will first look in the root directory (which always is found at the same location) for the inode of the directory /etc. Once it has the inode for /etc, it can check what blocks are used by this inode. Once the blocks of the directory are found, the file system can see what files are in the directory. Next, it checks what inode it needs to open the /etc/hosts file and will present the data to the user. This procedure works the same for every file system that can be used.
In a very basic file system such as Ext2, it works exactly in the way just described. Advanced file systems may offer options to make the process of allocating files somewhat easier. For instance, the file system can work with extents which is a default part of the Ext4 file system. An extent is a large number of contiguous blocks that are allocated by the file system as one unit. This makes handling large files a lot easier. Using extents makes file system management a lot more efficient. Listing 5-30 shows how block allocation is organized in an extent based file system.
Listing 5-30. A File System That Supports Extents Has Fewer Individual Blocks to Manage and Therefore Is Faster
root@mel:/# debugfs /dev/system/root
debugfs 1.40.8 (13-Mar-2008)
debugfs: stat <24580>
Inode: 24580 Type: regular Mode: 0644 Flags: 0x0 Generation: 2026345315
User: 0 Group: 0 Size: 8211957
File ACL: 0 Directory ACL: 0
Links: 1 Blockcount: 16064
Fragment: Address: 0 Number: 0 Size: 0
ctime: 0x487238ee -- Mon Jul 7 11:40:30 2008
atime: 0x487238ee -- Mon Jul 7 11:40:30 2008
mtime: 0x487238ee -- Mon Jul 7 11:40:30 2008 BLOCKS:
(0-11):106496-106507, (IND):106508, (12-1035):106509-107532, (DIND):107533,
(IND):107534, (1036-2004):107535-108503
TOTAL: 2008 (END)
A file system may use other techniques to work faster as well, such as allocation groups. By using allocation groups, a file system divides the available space into chunks and manages each chunk of disk space individually. By doing this, the file system can achieve a much higher I/O performance. All Linux file systems use this technique; some even use the allocation group to store backups of vital file system administration data.
About Superblocks, Inode Bitmaps, and Block Bitmaps
To mount a file system, you need a file system superblock. Typically, this is the first block on a file system, and it contains generic information about the file system. You can make it visible using the stats command from a debugfs environment. In Listing 5-31, the logical volume/dev/system/root is first opened with debugfs, and next the stats utility is used to display information from the file system superblock.
Listing 5-31. Example of an Ext3 Superblock
root@mel:~# debugfs /dev/system/root
debugfs 1.40.8 (13-Mar-2008)
debugfs: stats
Filesystem volume name: <none>
Last mounted on: <not available>
Filesystem UUID: d40645e2-412e-485e-9225-8e7f87b9f568
Filesystem magic number: 0xEF53
Filesystem revision #: 1 (dynamic)
Filesystem features: has_journal ext_attr resize_inode dir_index filetype needs
_recovery sparse_super large_file
Filesystem flags: signed_directory_hash
Default mount options: (none)
Filesystem state: clean
Errors Continue
Filesystem OS type: Linux
Inode count: 6553600
Block count: 26214400
Reserved block count: 1310720
Free blocks: 23856347
Free inodes: 6478467
First block: 0
Block size: 4096
Fragment size: 4096
Reserved GDT blocks: 1017
Blocks per group: 32768
Fragments per group: 32768
Without the superblock, you cannot mount the file system, and therefore most file systems keep backup superblocks at different locations in the file system. If the real file system gets broken, you can mount using the backup superblock and still access the file system anyway.
Apart from the superblocks, the file system contains an inode bitmap and a block bitmap.
By using these bitmaps, the file system driver can determine easily whether a given block or inode is available. When creating a file, the inode and blocks used by the file are marked as in use; when deleting a file, they will be marked as available and can be overwritten by new files.
After the inode and block bitmaps, the inode table is stored. This contains the administration of all files on your file system. Since it normally is big (an inode is at least 128 bytes), there is no backup of the inode table.
Journaling
For modern computers, journaling is an important feature. With the exception of Ext2, all current Linux file systems support journaling. The journal is used to track changes. This concerns changes to files and changes to metadata as well. The goal of using a journal is to make sure that transactions are processed properly. This is especially the case for situations involving a power outage. In those cases, the file system will check the journal when it comes back up again, and depending on the journaling style that is configured, do a rollback of the original data or a check on the data that was open while the computer crashed. Using a journal is essential on large file systems where lots of files get written to. Only if a file system is very small or writes hardly ever occur on the file system can you configure the file system without a journal.
When using journaling, you can specify three different journaling modes for the file system. All of these are specified as options while mounting the file system, which allows you to use different journaling modes on different file systems.
First, there is the data=ordered option, which you can use by adding the -o option to mount. To activate it, use a command like the following:
mount -o data=ordered /dev/sda3 /data
When using this option, only metadata is journaled, and barriers are enabled by default. This way, data is forced to be written to hard disk as fast as possible, which reduces chances of things going wrong. This journaling mode uses the optimal balance between performance and data security.
In case you want the best possible performance, use the data=writeback option. This option only journals metadata, but does not guarantee data integrity. This means that based on the information in the journal, when your computer crashes, the file system can try to repair the data but may fail, in which case you will end up with the old data after a system crash. At least it guarantees fast recovery after a system crash, and for many environments, that is good enough.
If you want the best guarantees for your data, use the data=journal option. When using this option, data and metadata are journaled. This ensures the best data integrity, but gives bad performance because all data has to be written twice—first to the journal, and then to the disk when it is committed to disk. If you need this journaling option, you should always make sure that the journal is written to a dedicated disk. Every file system has options to accomplish that.
Indexing
When file systems were still small, no indexing was used. You don’t need an index to get a file from a list of a couple of hundreds of files. Nowadays, directories can contain many thousands, sometimes even millions of files, and to manage these amounts of files, you can’t do without an index.
Basically, there are two approaches to indexing. The easiest approach, directory indexing, is used by the Ext3 file system; it adds an index to all directories and thus makes the file system faster when many files exist in a directory. This, however, is not the best way of performing indexing, because it doesn’t offer any significant increase of performance if your file system uses many directories and subdirectories.
For optimal performance, it is better to work with a balanced tree (also referred to as b-tree), which is integrated in the heart of the file system itself. In such a balanced tree, every file is a node in the tree, and every node can have child nodes. Because of this method where every file is represented in the indexing tree, the file system is capable of finding files in a very fast way, no matter how many files there are in a directory. Using a b-tree for indexing makes the file system also a lot more complicated. If things go wrong, the risk exists that you have to rebuild the entire file system, and that can take a lot of time. In this process, you even risk losing all data on your file system. Therefore, when choosing a file system that is built on top of a b-tree index, make sure it is a stable file systemModern Linux file systems are using b-tree indexing to make the file system faster. Only all file systems from the Ext family are based on the older h-tree index, which is the reason why on modern Linux systems Ext4 isn’t used as the default file system anymore.
Btrfs
Since 2008 developer Chris Mason is working on the next generation Linux file system: Btrfs. This file system is developed as a Copy on Write (CoW) file system, which means that old versions of files can be maintained while working on them. When writing block, the old block is copied to a new location, so that two different versions of the data block exist, which helps preventing issues on the file system. In 2009 Btrfs was accepted in the Linux kernel and since then it is available in several Linux distributions.
Apart from being a CoW file system, Btrfs has many other useful features. Amongst these features are the subvolumes. A subvolume can be seen as something that sits between a volume or logical partition and a directory. It is not a different device, but subvolumes can be mounted with their own specific mount options. This makes working with file systems completely different: where on old Linux file systems you needed a dedicated device if you needed to mount a file system with specific options, in Btrfs you can just keep it all on the same subvolume.
Another important feature of Btrfs, are snapshots. A snapshot freezes the state of the file system at a specific moment, which can be useful if you need to be able to revert to an old state of the file system, or if you need to make a backup of the file system.
Because Btrfs is a CoW file system, snapshots are very easy to create. While modifying files a copy is made of the old file. That means that the state of the old file is still available, and only new data blocks have to be added to that. From the metadata perspective it is very easy to deal with both of these, which is why it is easy to create snapshots and revert files to an earlier version.
Snapshots are useful if you want to revert to a previous version of a file, but they also come in handy for making backups. Files in a snapshot will never have a status of open. That means that files in a snapshot always have a stable state that can be used to create a backup.
Btrfs Tools and Features
As mentioned before, the Btrfs file system introduces many new features. Some of the Btrfs features make working with LVM unnecessary and some new features have also been introduced. The key new features in Btrfs is that it is a copy on write file system. Because of that, it supports snapshots by itself, allowing users and administrators an easy rollback to a previous situation.
Also, Btrfs has support for multiple volumes. That means that when running out of disk space on a particular Btrfs volume, another volume can be added. Also, after adding or removing a volume from a Btrfs file system, online shrinking and growth of the file system is supported. The Btrfs file system also supports meta data balancing. That means that depending on the amount of volumes that is used, the file system metadata can be spread in the most efficient way. Apart from that, there are Btrfs subvolumes.
Understanding Subvolumes
A Btrfs subvolume is a namespace that can be mounted independently with specific mount options. Multiple subvolumes can reside on the same file system and allow administrators from creating different mount points for specific needs. By default, all file systems have at least one subvolume, which is the file system device root but additional subvolumes can also be created. Apart from the support of per-subvolume mount options, snapshots are created on subvolumes. After unmounting a subvolume, a roll-back of the snapshot can be effected.
Listing 5-32. Btrfs subvolumes
UUID=c7997ed8-2568-49c3-bb84-3d231978707c / btrfs defaults 0 0
UUID=c7997ed8-2568-49c3-bb84-3d231978707c /boot/grub2/i386-pc btrfs subvol=@/boot/grub2/i386-pc 0 0
UUID=c7997ed8-2568-49c3-bb84-3d231978707c /boot/grub2/x86_64-efi btrfs subvol=@/boot/grub2/x86_64-efi 0 0
UUID=c7997ed8-2568-49c3-bb84-3d231978707c /home btrfs subvol=@/home 0 0
UUID=c7997ed8-2568-49c3-bb84-3d231978707c /opt btrfs subvol=@/opt 0 0
UUID=c7997ed8-2568-49c3-bb84-3d231978707c /srv btrfs subvol=@/srv 0 0
UUID=c7997ed8-2568-49c3-bb84-3d231978707c /tmp btrfs subvol=@/tmp 0 0
UUID=c7997ed8-2568-49c3-bb84-3d231978707c /usr/local btrfs subvol=@/usr/local 0 0
UUID=c7997ed8-2568-49c3-bb84-3d231978707c /var/crash btrfs subvol=@/var/crash 0 0
UUID=c7997ed8-2568-49c3-bb84-3d231978707c /var/lib/mailman btrfs subvol=@/var/lib/mailman 0 0
UUID=c7997ed8-2568-49c3-bb84-3d231978707c /var/lib/named btrfs subvol=@/var/lib/named 0 0
UUID=c7997ed8-2568-49c3-bb84-3d231978707c /var/lib/pgsql btrfs subvol=@/var/lib/pgsql 0 0
UUID=c7997ed8-2568-49c3-bb84-3d231978707c /var/log btrfs subvol=@/var/log 0 0
UUID=c7997ed8-2568-49c3-bb84-3d231978707c /var/opt btrfs subvol=@/var/opt 0 0
UUID=c7997ed8-2568-49c3-bb84-3d231978707c /var/spool btrfs subvol=@/var/spool 0 0
UUID=c7997ed8-2568-49c3-bb84-3d231978707c /var/tmp btrfs subvol=@/var/tmp 0 0
UUID=c7997ed8-2568-49c3-bb84-3d231978707c /.snapshots btrfs subvol=@/.snapshots
Using subvolumes allows administrators to treat the most common directories that have been created with their own mount options, and create snapshots for them as well if so required. The subvolumes are created on mount by including the btrfs specific subvol=@/some/name option. Subvolumes can only be created if the parent volume is mounted first. You can see that in the first list of output in Listing 5-32 , where the /dev/sda2 device is mounted as a Btrfs device. For each subvolume after creation, specific mount options can be added to the mount options column in /etc/fstab.
From a shell prompt, you can request a list of subvolumes that are currently being used. Use the command btrfs subvolume list / to do so, this will give you a result like in Listing 5-33.
Listing 5-33. Requesting a list of current subvolumes
linux-ia9r:~ # btrfs subvolume list /
ID 257 gen 48 top level 5 path @
ID 258 gen 39 top level 257 path boot/grub2/i386-pc
ID 259 gen 39 top level 257 path boot/grub2/x86_64-efi
ID 260 gen 42 top level 257 path home
ID 261 gen 28 top level 257 path opt
ID 262 gen 39 top level 257 path srv
ID 263 gen 45 top level 257 path tmp
ID 264 gen 39 top level 257 path usr/local
ID 265 gen 39 top level 257 path var/crash
ID 266 gen 39 top level 257 path var/lib/mailman
ID 267 gen 39 top level 257 path var/lib/named
ID 268 gen 39 top level 257 path var/lib/pgsql
ID 269 gen 48 top level 257 path var/log
ID 270 gen 39 top level 257 path var/opt
ID 271 gen 48 top level 257 path var/spool
ID 272 gen 41 top level 257 path var/tmp
ID 276 gen 39 top level 257 path .snapshots
Apart from the subvolumes that are created by default, an administrator can add new subvolumes manually. To do this, the command btrfs subvolume create is used, followed by the path of the desired subvolume. Use for instance the command btrfs subvolume create /root to create a subvolume for the home directory of the user root.
After creating a subvolume, snapshots can be created. To do this, use the command btrfs subvolume snapshot followed by the name of the subvolume and the name of the snapshot. Notice that it is good practice, but not mandatory to create snapshots within the same name space as the subvolume. In exercise 3-2 you’ll apply these commands to work with snapshots yourself.
EXERCISE 5-3: WORKING WITH BTRFS SUBVOLUMES
In this exercise you’ll create a subvolume. You’ll next put some files in the subvolume and create a snapshot in it. After that, you’ll learn how to perform a roll-back to the original state, using the snapshot you’ve just created.
1. On an existing Btrfs file system, type btrfs subvolume create /test.
2. Type btrfs subvolume list /, this will show all currently existing snapshots including the snapshot you have just created.
3. Copy some files to /test, using the command cp /etc/[abc]* /test.
4. At this point, it’s time to create a snapshot, using btrfs subvolume snapshot /test /test/snap.
5. Remove all files from /test.
6. To get back to the original state of the /test subvolume, use mv /test/snap/* /test.
Working with multiple devices in Btrfs
Another benefit of the Btrfs file system is that it allows you to work with multiple devices. By doing this, Btrfs offers a new approach to creating RAID volumes. To create a Btrfs volume that consists of multiple devices, type a command like mkfs.btrfs /dev/sda1 /dev/sda2 /dev/sda3. To mount a composed device through /etc/fstab, you’ll need to take a special approach. You’ll have to refer to the first device in the composed device, and specify the names of the other devices as a btrfs mount option, as in the following example line:
/dev/sda1 /somewhere btrfs device=/dev/sda1,device=/dev/sda2,device=/dev/sda3 0 0
Btrfs also allows you to add devices to a file system that is already created. Use btrfs device add /dev/sda4 /somewhere to do so. Notice that the device add command works on the name of the mount point and not the name of the volume. After adding a device to a Btrfs file system, you should rebalance the device metadata, using btrfs filesystem balance /somewhere. You can request the current status of a multi-device Btrfs volume by using the btrfs device stats /somewhere command.
A multi-volume device as just described, is just a device that consists of multiple volumes. If one of the devices in the volume gets damaged, there’s no easy option to repair. If you do want an easy option to repair, you should create a Btrfs RAID volume. The command mkfs.btrfs -m raid1 /dev/sdb /dev/sdc /dev/sdd /dev/sde will do that for you. If one of the devices in the RAID setup gets missing, you’ll first need to mount it in degraded state. That’s for metadata consistency and it allows you to remove the failing device. If for instance /dev/sdb is showing errors, you would use the command mount -o degraded /dev/sdb /mnt. Notice that it must be mounted on a temporary mount and not on the mount point of the Btrfs RAID device. After mounting it, you can use btrfs device delete missing /mnt to remove it.
Formatting File Systems
Now that you know more about the different file systems and their properties, you can make a choice for the file system that best addresses your needs. After making that choice, you can format the file system. In the next sections, you will read how to do this for the different file systems.
The basic utility to create a file system is mkfs. This utility works with modules to address different file systems. You can choose the module that you want to employ by using the -t option, followed by the file system type that you want to create. Alternatively, you can use mkfs, followed by a dot and the name of the file system that you want to create. In this way, you can create every file system that is supported; for instance, mkfs.ext4 is used to create an Ext4 file system, and mkfs.xfs is used to create an XFS file system.
Maintaining File Systems
Normally, your file systems will work just fine. Occasionally, you may run into problems, and instead of mounting the file system properly, you’ll get a message indicating that there is a problem that you have to fix. If this happens, different tools are at your disposal, depending on the file system that you are using. Ext offers the most extensive tools, but there are options for XFS and Btrfs as well.
Analyzing and Repairing Ext
In some situations, problems will occur on your Ext2/Ext3 file system. If that happens, the file system offers some commands that can help you in analyzing and repairing the file system. The first command is e2fsck, the file system check utility that works on all Ext4 file systems.
If you think that anything may be wrong with your file system, run e2fsck. You should make sure though that the file system on which you run it is not currently mounted. Since this is hard to accomplish if you want to run it on your root file system, it is not a bad idea to use the automatic check that occurs every once in a while when mounting an Ext file system. This check is on by default, so don’t switch it off!
When running e2fsck on an Ext3 or Ext4 file system, the utility will check the journal and repair any inconsistencies. Only if the superblock indicates that there is a problem with the file system will the utility check data as well. On Ext2 it will always check data, since this is the only option. Normally, it will automatically repair all errors it finds, unless a certain error requires human intervention. In that case, e2fsck will notify you, and you can use one of the advanced options. Table 5-1 gives an overview of the most useful options that e2fsck has to offer.
Table 5-1. Most Useful e2fsck Options
|
Option |
Description |
|
-b superblock |
Use this option to read one of the backup superblocks. Contrary to the mount command, you can refer to the normal block position where the file system can find the backup superblock, which will be block 32768 in most cases. |
|
-c |
This option lets e2fsck check for bad blocks. If it finds them, it will write them to a specific inode reserved for this purpose. In the future, the file system will avoid using any of these blocks. Be aware though that bad blocks are often an indication of real problems on your hard drive. Use the -c option with e2fsck as a temporary solution until you replace your hard drive. |
|
-f |
This option forces checking, even if the file system seems to be without problems. |
|
-jexternal_journal |
Use this option to specify where the external journal can be found. You’ll need this option if your file system uses an external journal. |
|
-p |
This option automatically repairs everything that can be repaired without human intervention. |
|
-y |
Use this to have e2fsck assume an answer of yes to all questions. This goes further than default -p behavior and will also automatically enter yes on questions that normally require human intervention. |
In some situations, e2fsck may not do its work properly. If that is the case, there are two useful utilities to analyze a little bit further what is happening. The first of them is dumpe2fs. This utility dumps the contents of the superblock and also the information about all block group descriptors. The latter is information that you will hardly ever find useful at all; therefore I recommend you use dumpe2fs with the -h option, which makes it more readable. In Listing 5-34, you can see what the output of this command looks like.
Listing 5-34. The dumpe2fs Utility Shows the Contents of the Superblock and All Group Descriptors
Filesystem volume name: <none>
Last mounted on: <not available>
Filesystem UUID: 3babfd35-de36-4c81-9fb9-1a988d548927
Filesystem magic number: 0xEF53
Filesystem revision #: 1 (dynamic)
Filesystem features: filetype sparse_super
Default mount options: (none)
Filesystem state: not clean
Errors Continue
Filesystem OS type: Linux
Inode count: 490560
Block count: 979933
Reserved block count: 48996
Free blocks: 898773
Free inodes: 490529
First block: 1
Block size: 1024
Fragment size: 1024
Blocks per group: 8192
Fragments per group: 8192
Inodes per group: 4088
Inode blocks per group: 511
Last mount time: Tue Jul 8 02:58:33 2008
Last write time: Tue Jul 8 02:58:33 2008
Mount count: 1
Maximum mount count: 30
Last checked: Tue Jul 8 02:58:16 2008
Check interval: 0 (<none>)
Reserved blocks uid: 0 (user root)
Reserved blocks gid: 0 (group root)
First inode: 11
Inode size: 128
Group 0: (Blocks 1-8192)
Primary superblock at 1, Group descriptors at 2-5
Block bitmap at 6 (+5), Inode bitmap at 7 (+6)
Inode table at 8-518 (+7)
2029 free blocks, 4070 free inodes, 2 directories
Free blocks: 532-2560
Free inodes: 17, 20-4088
Group 1: (Blocks 8193-16384)
Backup superblock at 8193, Group descriptors at 8194-8197
Block bitmap at 8198 (+5), Inode bitmap at 8199 (+6)
Inode table at 8200-8710 (+7)
2095 free blocks, 4088 free inodes, 0 directories
Free blocks: 14290-16384
Free inodes: 4089-8176
Group 2: (Blocks 16385-24576)
Block bitmap at 16385 (+0), Inode bitmap at 16386 (+1)
Inode table at 16392-16902 (+7)
5749 free blocks, 4088 free inodes, 0 directories
Free blocks: 16387-16391, 16903-22646
Free inodes: 8177-12264
If you see a parameter that you don’t like when using dumpe2fs, you can use tune2fs to change it. Basically, tune2fs works on the same options as mkfs.ext3, so you won’t have a hard time understanding its options. For instance, in the preceding listing, the maximum mount count is set to 30. That means that after being mounted 30 times, on the next mount the file system will be checked automatically, which may take a lot of time. To change this, use the -C option with tune2fs. For instance, the following command would set the maximum mount count to60 on /dev/sda1:
tune2fs -C 60 /dev/sda1
If you really are ready for a deep dive into your file system, debugfs is the utility you need.
Before starting with it, make sure that you use it on an unmounted file system. The debugfs tool is working at a very deep level and may severely interfere with other processes that try to access files while you are debugging them. So if necessary, take your live CD and use debugfsfrom there.
After starting debugfs, you’ll find yourself in the debugfs interface. In this environment, some specific commands are available for you. You will also recognize some generic Linux commands that you know from a Bash environment, but as you will find out, they work a bit differently in a debugfs environment. For example, the ls command in debugfs will not only show you file names, but also the number in blocks in use by this item and the inode of this item, which is very useful information if you really need to start troubleshooting. In Listing 5-35, you can see what happens when using the ls command from the debugfs interface.
Listing 5-35. The ls Command in debugfs Gives Information Other Than What You Are Used to from It
root@mel:/# debugfs /dev/system/root
debugfs 1.40.8 (13-Mar-2008)
debugfs: ls
2 (12) . 2 (12) .. 11 (20) lost+found 6135809 (12) var
4202497 (12) boot 5095425 (12) srv 335873 (12) etc
2924545 (16) media 24577 (16) cdrom 24578 (20) initrd.img
5808129 (12) lib 1073153 (12) usr 1417217 (12) bin
5865473 (12) dev 1966081 (12) home 1572865 (12) mnt
6168577 (12) proc 6086657 (12) root 2277377 (12) sbin
4947969 (12) tmp 360449 (12) sys 5586945 (12) opt
1302529 (16) initrd 24579 (16) vmlinuz 4808705 (16) tftpboot
2949121 (20) clonezilla 1785857 (12) isos
24580 (36) initrd.img-2.6.24-16-server 24581 (3692) 335873
(END)
In case you wonder how this information may be useful to you, imagine a situation where you can’t access one of the directories in the root file system anymore. This information gives you the inode that contains the administration of the item. Next, you can dump the inode from thedebugfs interface to a normal file. For instance, the command dump <24580> /24580 would create a file with the name 24580 in the root of your file system and fill that with the contents of inode 24580. That allows you to access the data that file occupies again and may help in troubleshooting.
This information may also help when recovering deleted files. Imagine that a user comes to see you and tells you that he or she has created a few files, of which one has been lost. Say the names of these files are /home/user/file1, /home/user/file2, and/home/user/file3.
Imagine that file2 was deleted by accident and no matter what, the user needs to get it back. The first thing you can do is use the lsdel command from the debugfs interface. Chances are it gives you a list of deleted inodes, including their original size and deletion time; see Listing 5-36 for an example.
Listing 5-36. debugfs' lsdel Can Give You an Overview of Deleted Files
root@mel:/# debugfs /dev/sda1
debugfs 1.40.8 (13-Mar-2015)
debugfs: lsdel
Inode Owner Mode Size Blocks Time deleted
233029 0 100644 16384 17/ 17 Sun Jul 6 11:27:49 2008
233030 0 100644 16384 17/ 17 Sun Jul 6 15:41:01 2008
17 0 100644 814 1/ 1 Tue Jul 8 06:33:45 2008
3 deleted inodes found.
(END)
As you can see, the information that lsdel gives you includes the inode number, original owner, size in blocks and—most important—the time the file was deleted. Based on that, it’s easy to recover the original file. If it was the file in inode 233030, from the debugfs interface, usedump <233030> /originalfile to recover it. Unfortunately, due to some differences between Ext2 and Ext3/4, lsdel works well on Ext2 and rarely on Ext3/4.
Given the fact that the user in our example has created some files, it may be interesting to see what inodes were used. Let’s say file1 still uses inode 123, file2 uses 127, and file3 is removed, so you can’t find that information anymore. Chances are, however, that the inode thatfile3 has used was not too far away from inode 127, so you can try and dump all inodes between inode 128 and 140. This likely allows you to recover the original file, thanks to dumpe2fs.
There are many other commands available from debugfs as well. I recommend you at least take a look at these commands. The help command from within the debugfs interface will give you a complete list. Have a look at these commands, and try to get an impression of the possibilities they offer—you may need them some day.
Analyzing and Repairing XFS File Systems
Since it is a completely different file system, the XFS file system offers options that are totally different from the Ext options. There are four commands that are useful when getting into trouble with XFS. The first and most important of them is xfs_check. As its name suggests, this command will check you XFS file system and report whether it has found any errors. Before running xfs_check, you must unmount the file system on which you want to run it.
Next, just run the command without additional arguments; it will tell you whether some serious errors were found. For instance, the following command would check the XFS file system that has been created in /dev/sdb1:
xfs_check /dev/sdb1
If no problems were found, xfs_check will report nothing. If problems were found, it will indicate what problems these are and try to give an indication of what you can do about them as well. The next step would then be to run the xfs_repair utility. Again, you can run this utility on an unmounted file system only. This utility does have some advanced options, which you would use in specific situations only. Normally, by just running xfs_repair on the device that you want to check, you should be able to fix most issues. For instance, the following example command would try to repair all issues on the XFS file system in /dev/sdb1:
xfs_repair /dev/sdb1
Basically, if with these commands you can’t fix the issue, you are lost. But XFS also has an advanced option to dump the file system metadata to a file, which you can send over for support. However, this is not an option that you are very likely to use, as it requires extensive knowledge of the file system that normally only one of the file system developers would have.
Resizing File Systems
When resizing file systems, you should be aware that the procedure always involves two steps. You have to resize the storage device on which you have created the file system as well as the file system itself. It is possible to resize logical volumes. If you want to resize a partition, you have to use a special utility with the name GParted. I will first explain how to resize a file system that is in a logical volume. All file systems can be resized without problems.
Resizing a File System in a Logical Volume
The following procedure details how the volume is first brought offline and then the file system that sits on the volume is resized. It is presumed that the volume you want to shrink is called data, and it is using an Ext4 file system. It is mounted on the directory /data.
![]() Caution Online resizing of a file system is possible in some cases. For example, the command ext2online makes it possible to resize a live file system. However, because resizing file systems is very labor intensive, I wouldn’t recommend doing it this way. There’s always a risk that it won’t work out simply because of all of the work that has to be done. So, to stay on the safe side, umount your volume before resizing it.
Caution Online resizing of a file system is possible in some cases. For example, the command ext2online makes it possible to resize a live file system. However, because resizing file systems is very labor intensive, I wouldn’t recommend doing it this way. There’s always a risk that it won’t work out simply because of all of the work that has to be done. So, to stay on the safe side, umount your volume before resizing it.
Several utilities exist to resize file systems. You could consider resizing the file system and the underlying logical volume apart. This is not a very smart procedure though. If you want to resize filesystems in an efficient way, you better use the lvresize tool with the -r option. This option resizes the logical volume, and at the same time resizes the file system that resides on the logical volume. Use for instance lvresize -L +1G -r /dev/vgdata/lvdata to add 1GB of disk space to the /dev/vgdata/lvdata file system. This will work provided that the disk space you want to add it available in the LVM volume group.
Resizing Partitions with GParted
This book is about command-line administration. GParted is not a command-line administration tool, and therefore I will not cover it in a step-by-step description. It does need to be mentioned though, as it offers an easy-to-use interface that helps you in resizing partitions. You can install it locally on your Linux computer, but to unleash its full power, it’s better to download the GParted live CD at http://gparted.sourceforge.net. Reboot your computer from this live CD and start GParted to resize any partition on your computer, Windows as well as Linux partitions. As you can see in Figure 5-1, GParted shows a graphical representation of all partitions on your computer. To resize a partition, click the partition border, and drag it to the new intended size.
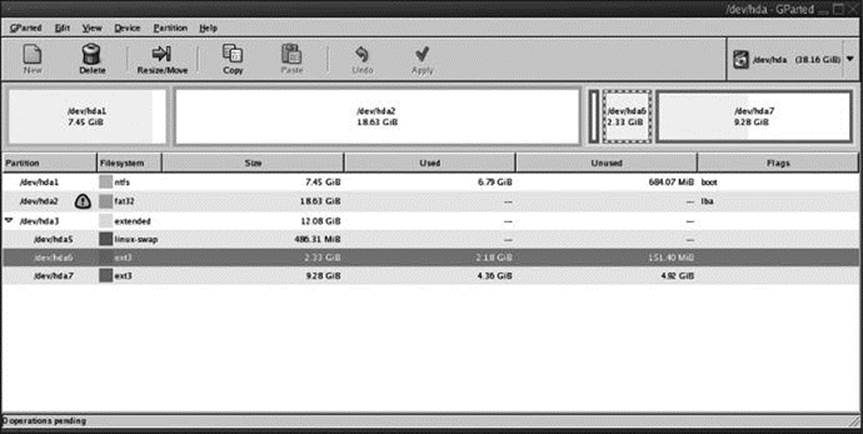
Figure 5-1. GParted helps you to resize partitions from an easy-to-use graphical interface
Working with Windows File Systems
On Linux, you can work with Windows file systems as well. For all FAT-based needs, the vfat file system is the best option. Almost all Linux distributions have support for this file system built in by default. This means that if you connect a USB key that is formatted with FAT32 to your system, for instance, it will mount automatically, and you will be able to read and write files on it.
The support for NTFS is a different story. Until recently, most Linux distributions did include only the read-only ntfs driver, because stable write support for NTFS is a recent development. Therefore, if you can’t write to an NTFS device, make sure to upgrade to the latest driver that is available. Also, with the new version of NTFS, some cool utilities have become available. Following is a short list of the most important of these utilities:
· mkntfs: This is the utility you need to create an NTFS file system.
· ntfsresize: Use this utility to resize an NTFS file system. Using this, you can resize an NTFS partition on Windows as well.
· ntfsclone: Use this to clone an NTFS partition. This utility makes sure that the cloned partition has a unique ID, which is required for all NTFS file systems.
· ntfsfix: Use this tool to fix issues on an NTFS file system. This also works to repair Windows file systems that have errors.
· ntfsundelete: Use this to recover files that you have deleted by accident from an NTFS file system.
· ntfswipe: This utility cleans out all data from an NTFS file system. Use it if you want to make sure that recovery of your NTFS data is never possible.
Cloning Devices
If you need to clone a device, you can use dd. For instance, you can use it to write the contents of an optical drive to an ISO file or to make an exact copy of one disk to another. The dd command has two mandatory options. Use if= to specify the input device. Next, by using of=, you specify what output device to use. For optimal efficiency, it is a good idea to add the parameter bs=4096. Most file systems work with 4K blocks, and this option makes sure that the copy is made block by block instead of byte by byte. It will offer you a performance that is about four times better than without using the bs= option.
To clone an entire hard drive with dd, use the following:
dd if=/dev/sda of=/dev/sdb bs=4096
This command assumes that there is a second hard drive available in your computer, which has the name /dev/sdb. It will completely overwrite all data on this /dev/sdb with data from /dev/sda. Because this command will make an exact copy of /dev/sda, you must make sure that the drive you are writing to is as least as big as the original drive. If the destination drive is bigger, you’ll later have to resize the file systems on that drive.
Using dd, you can also write the contents of an optical disk to an ISO file (or make boot floppies in the old days). The following command shows how to do this, assuming that your optical disk is available via the /dev/cdrom device:
dd if=/dev/cdrom of=/mycd.iso bs=4096
Summary
In this chapter, you have read all about management of the information on your hard disk. You have read how to manage partitions, volumes, and file systems. Based on this information, you will be able to use the best possible configuration on your disk. The following commands have been covered:
· fdisk: Creates partitions.
· cfdisk: Creates partitions. This is not as easy to use as fdisk, but it does have an interface that is easier to use.
· pvcreate: Creates LVM physical volumes.
· pvdisplay: Displays properties of LVM physical volumes.
· vgcreate: Creates LVM volume groups.
· vgdisplay: Displays properties of LVM volume groups.
· lvcreate: Creates LVM logical volumes.
· lvdisplay: Displays the properties of an LVM logical volume.
· pvs: Shows a short list of all present LVM physical volumes.
· pvscan: Scans storage devices for the presence of LVM physical volumes.
· vgscan: Scans storage devices for the presence of LVM volume groups.
· vgs: Shows a list of LVM volume groups.
· lvscan: Scans storage devices for the presence of LVM logical volumes.
· lvs: Shows a list of LVM logical volumes.
· vgchange: Changes the status from LVM volume groups and the volumes in it from active to inactive and vice versa.
· debugfs: Serves as an advanced debugger for the Ext2/Ext3 file systems.
· e2fsck: Checks the integrity of the Ext2/Ext3 file systems.
· tune2fs: Changes the properties of the Ext2/Ext3 file systems.
· dumpe2fs: Shows the properties of the Ext2/Ext3 file systems.
· reiserfsck: Checks the integrity of a ReiserFS file system.
· reiserfstune: Changes the properties of a ReiserFS file system.
· resize_reiserfs: Resizes a ReiserFS file system.
· debugreiserfs: Shows the properties of the ReiserFS file system.
· mkfs: Creates file systems.
· xfs_check: Checks the integrity of an XFS file system.
· xfs_repair: Repairs an XFS file system that has errors.
· ext2online: Resizes an Ext2/Ext3 file system without taking it offline.
· resize2fs: Serves as an offline Ext2/Ext3 resizing utility.
· lvextend: Extends the size of an LVM logical volume.
· mkntfs: Creates an NTFS file system.
· ntfsresize: Resizes an NTFS file system.
· ntfsclone: Clones an NTFS file system.
· ntfsfix: Fixes the integrity of a damaged NTFS file system.
· ntfsundelete: Undeletes a file in an NTFS file system.
· ntfswipe: Wipes all data in an NTFS file system, without the possibility to undelete the data.
In the next chapter, you’ll learn how to manage users and groups.
All materials on the site are licensed Creative Commons Attribution-Sharealike 3.0 Unported CC BY-SA 3.0 & GNU Free Documentation License (GFDL)
If you are the copyright holder of any material contained on our site and intend to remove it, please contact our site administrator for approval.
© 2016-2026 All site design rights belong to S.Y.A.