The Linux Command Line (2012)
Part I. Learning the Shell
Chapter 9. Permissions
Operating systems in the Unix tradition differ from those in the MS-DOS tradition in that they are not only multitasking systems but also multiuser systems.
What exactly does this mean? It means that more than one person can use the computer at the same time. While a typical computer will likely have only one keyboard and monitor, it can still be used by more than one user. For example, if a computer is attached to a network or the Internet, remote users can log in via ssh (secure shell) and operate the computer. In fact, remote users can execute graphical applications and have the graphical output appear on a remote display. The X Window System supports this as part of its basic design.
The multiuser capability of Linux is not a recent “innovation” but rather a feature that is deeply embedded into the design of the operating system. Considering the environment in which Unix was created, this makes perfect sense. Years ago, before computers were “personal,” they were large, expensive, and centralized. A typical university computer system, for example, consisted of a large central computer located in one building and terminals located throughout the campus, each connected to the large central computer. The computer would support many users at the same time.
In order to make this practical, a method had to be devised to protect the users from each other. After all, the actions of one user could not be allowed to crash the computer, nor could one user interfere with the files belonging to another user.
In this chapter we are going to look at this essential part of system security and introduce the following commands:
· id—Display user identity.
· chmod—Change a file’s mode.
· umask—Set the default file permissions.
· su—Run a shell as another user.
· sudo—Execute a command as another user.
· chown—Change a file’s owner.
· chgrp—Change a file’s group ownership.
· passwd—Change a user’s password.
Owners, Group Members, and Everybody Else
When we were exploring the system back in Chapter 4, we may have encountered the following problem when trying to examine a file such as /etc/shadow:
[me@linuxbox ˜]$ file /etc/shadow
/etc/shadow: regular file, no read permission
[me@linuxbox ˜]$ less /etc/shadow
/etc/shadow: Permission denied
The reason for this error message is that, as regular users, we do not have permission to read this file.
In the Unix security model, a user may own files and directories. When a user owns a file or directory, the user has control over its access. Users can, in turn, belong to a group consisting of one or more users who are given access to files and directories by their owners. In addition to granting access to a group, an owner may also grant some set of access rights to everybody, which in Unix terms is referred to as the world. To find out information about your identity, use the id command:
[me@linuxbox ˜]$ id
uid=500(me) gid=500(me) groups=500(me)
Let’s look at the output. When user accounts are created, users are assigned a number called a user ID, or uid. This is then, for the sake of the humans, mapped to a username. The user is assigned a primary group ID, or gid, and may belong to additional groups. The previous example is from a Fedora system. On other systems, such as Ubuntu, the output may look a little different.
[me@linuxbox ˜]$ id
uid=1000(me) gid=1000(me)
groups=4(adm),20(dialout),24(cdrom),25(floppy),29(audio),30(dip),
44(video),46(plugdev),108(lpadmin),114(admin),1000(me)
As we can see, the uid and gid numbers are different. This is simply because Fedora starts its numbering of regular user accounts at 500, while Ubuntu starts at 1000. We can also see that the Ubuntu user belongs to a lot more groups. This has to do with the way Ubuntu manages privileges for system devices and services.
So where does this information come from? Like so many things in Linux, it comes from a couple of text files. User accounts are defined in the /etc/passwd file, and groups are defined in the /etc/group file. When user accounts and groups are created, these files are modified along with/etc/shadow, which holds information about the user’s password. For each user account, the /etc/passwd file defines the user (login) name, the uid, the gid, the account’s real name, the home directory, and the login shell. If you examine the contents of /etc/passwd and /etc/group, you will notice that besides the regular user accounts there are accounts for the superuser (uid 0) and various other system users.
In Chapter 10, when we cover processes, you will see that some of these other “users” are, in fact, quite busy.
While many Unix-like systems assign regular users to a common group such as users, modern Linux practice is to create a unique, single-member group with the same name as the user. This makes certain types of permission assignment easier.
Reading, Writing, and Executing
Access rights to files and directories are defined in terms of read access, write access, and execution access. If we look at the output of the ls command, we can get some clue as to how this is implemented:
[me@linuxbox ˜]$ > foo.txt
[me@linuxbox ˜]$ ls -l foo.txt
-rw-rw-r-- 1 me me 0 2012-03-06 14:52 foo.txt
The first 10 characters of the listing are the file attributes (see Figure 9-1). The first of these characters is the file type. Table 9-1 lists the file types you are most likely to see (there are other, less common types too).
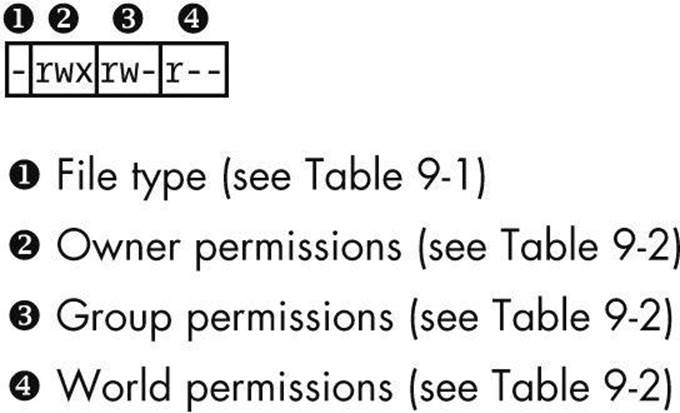
Figure 9-1. Breakdown of file attributes
The remaining nine characters of the file attributes, called the file mode, represent the read, write, and execute permissions for the file’s owner, the file’s group owner, and everybody else.
When set, the r, w, and x mode attributes have certain effects on files and directories, as shown in Table 9-2.
Table 9-1. File Types
|
Attribute |
File Type |
|
- |
A regular file. |
|
d |
A directory. |
|
l |
A symbolic link. Notice that with symbolic links, the remaining file attributes are always rwxrwxrwx and are dummy values. The real file attributes are those of the file the symbolic link points to. |
|
c |
A character special file. This file type refers to a device that handles data as a stream of bytes, such as a terminal or modem. |
|
b |
A block special file. This file type refers to a device that handles data in blocks, such as a hard drive or CD-ROM drive. |
Table 9-2. Permission Attributes
|
Attribute |
Files |
Directories |
|
r |
Allows a file to be opened and read. |
Allows a directory’s contents to be listed if the execute attribute is also set. |
|
w |
Allows a file to be written to or truncated; however, this attribute does not allow files to be renamed or deleted. The ability to delete or rename files is determined by directory attributes. |
Allows files within a directory to be created, deleted, and renamed if the execute attribute is also set. |
|
x |
Allows a file to be treated as a pro-gram and executed. Program files written in scripting languages must also be set as readable to be executed. |
Allows a directory to be entered; e.g., cd directory. |
Table 9-3 shows some examples of file attribute settings.
Table 9-3. Permission Attribute Examples
|
File Attributes |
Meaning |
|
-rwx------ |
A regular file that is readable, writable, and executable by the file’s owner. No one else has any access. |
|
-rw------- |
A regular file that is readable and writable by the file’s owner. No one else has any access. |
|
-rw-r--r-- |
A regular file that is readable and writable by the file’s owner. Members of the file’s owner group may read the file. The file is world readable. |
|
-rwxr-xr-x |
A regular file that is readable, writable, and executable by the file’s owner. The file may be read and executed by everybody else. |
|
-rw-rw---- |
A regular file that is readable and writable by the file’s owner and members of the file’s owner group only. |
|
Lrwxrwxrwx |
A symbolic link. All symbolic links have “dummy” permissions. The real permissions are kept with the actual file pointed to by the symbolic link. |
|
drwxrwx--- |
A directory. The owner and the members of the owner group may enter the directory and create, rename, and remove files within the directory. |
|
drwxr-x--- |
A directory. The owner may enter the directory and create, rename, and delete files within the directory. Members of the owner group may enter the directory but cannot create, delete, or rename files. |
chmod—Change File Mode
To change the mode (permissions) of a file or directory, the chmod command is used. Be aware that only the file’s owner or the superuser can change the mode of a file or directory. chmod supports two distinct ways of specifying mode changes: octal number representation and symbolic representation. We will cover octal number representation first.
Octal Representation
With octal notation we use octal numbers to set the pattern of desired permissions. Since each digit in an octal number represents three binary digits, this maps nicely to the scheme used to store the file mode. Table 9-4 shows what we mean.
Table 9-4. File Modes in Binary and Octal
|
Octal |
Binary |
File Mode |
|
0 |
000 |
--- |
|
1 |
001 |
--x |
|
2 |
010 |
-w- |
|
3 |
011 |
-wx |
|
4 |
100 |
r-- |
|
5 |
101 |
r-x |
|
6 |
110 |
rw- |
|
7 |
111 |
rwx |
What the Heck Is Octal?
Octal (base 8) and its cousin hexadecimal (base 16) are number systems often used to express numbers on computers. We humans, owing to the fact that we (or at least most of us) were born with 10 fingers, count using a base 10 number system. Computers, on the other hand, were born with only one finger and thus do all all their counting in binary (base 2). Their number system has only two numerals, zero and one. So in binary, counting looks like this: 0, 1, 10, 11, 100, 101, 110, 111, 1000, 1001, 1010, 1011 . . .
In octal, counting is done with the numerals zero through seven, like so: 0, 1, 2, 3, 4, 5, 6, 7, 10, 11, 12, 13, 14, 15, 16, 17, 20, 21 . . .
Hexadecimal counting uses the numerals zero through nine plus the letters A through F: 0, 1, 2, 3, 4, 5, 6, 7, 8, 9, A, B, C, D, E, F, 10, 11, 12, 13 . . .
While we can see the sense in binary (since computers have only one finger), what are octal and hexadecimal good for? The answer has to do with human convenience. Many times, small portions of data are represented on computers as bit patterns. Take for example an RGB color. On most computer displays, each pixel is composed of three color components: 8 bits of red, 8 bits of green, and 8 bits of blue. A lovely medium blue would be a 24-digit number: 010000110110111111001101.
How would you like to read and write those kinds of numbers all day? I didn’t think so. Here’s where another number system would help. Each digit in a hexadecimal number represents four digits in binary. In octal, each digit represents three binary digits. So our 24-digit medium blue could be condensed to a 6-digit hexadecimal number: 436FCD. Since the digits in the hexadecimal number “line up” with the bits in the binary number, we can see that the red component of our color is 43, the green 6F, and the blue CD.
These days, hexadecimal notation (often called hex) is more common than octal, but as we shall soon see, octal’s ability to express three bits of binary is very useful.
By using three octal digits, we can set the file mode for the owner, group owner, and world.
[me@linuxbox ˜]$ > foo.txt
[me@linuxbox ˜]$ ls -l foo.txt
-rw-rw-r-- 1 me me 0 2012-03-06 14:52 foo.txt
[me@linuxbox ˜]$ chmod 600 foo.txt
[me@linuxbox ˜]$ ls -l foo.txt
-rw------- 1 me me 0 2012-03-06 14:52 foo.txt
By passing the argument 600, we were able to set the permissions of the owner to read and write while removing all permissions from the group owner and world. Though remembering the octal-to-binary mapping may seem inconvenient, you will usually have to use only a few common ones: 7 (rwx), 6 (rw-), 5 (r-x), 4 (r--), and 0 (---).
Symbolic Representation
chmod also supports a symbolic notation for specifying file modes. Symbolic notation is divided into three parts: whom the change will affect, which operation will be performed, and which permission will be set. To specify who is affected, a combination of the characters u, g, o, and a is used, as shown in Table 9-5.
Table 9-5. chmod Symbolic Notation
|
Symbol |
Meaning |
|
u |
Short for user but means the file or directory owner. |
|
g |
Group owner. |
|
o |
Short for others but means world. |
|
a |
Short for all; the combination of u, g, and o. |
If no character is specified, all will be assumed. The operation may be a + indicating that a permission is to be added, a - indicating that a permission is to be taken away, or a = indicating that only the specified permissions are to be applied and that all others are to be removed.
Permissions are specified with the r, w, and x characters. Table 9-6 lists some examples of symbolic notation.
Table 9-6. chmod Symbolic Notation Examples
|
Notation |
Meaning |
|
u+x |
Add execute permission for the owner. |
|
u-x |
Remove execute permission from the owner. |
|
+x |
Add execute permission for the owner, group, and world. Equivalent to a+x. |
|
o-rw |
Remove the read and write permissions from anyone besides the owner and group owner. |
|
go=rw |
Set the group owner and anyone besides the owner to have read and write permission. If either the group owner or world previously had execute permissions, remove them. |
|
u+x,go=rx |
Add execute permission for the owner and set the permissions for the group and others to read and execute. Multiple specifications may be separated by commas. |
Some people prefer to use octal notation; some folks really like the symbolic. Symbolic notation does offer the advantage of allowing you to set a single attribute without disturbing any of the others.
Take a look at the chmod man page for more details and a list of options. A word of caution regarding the --recursive option: It acts on both files and directories, so it’s not as useful as one would hope because we rarely want files and directories to have the same permissions.
Setting File Mode with the GUI
Now that we have seen how the permissions on files and directories are set, we can better understand the permission dialogs in the GUI. In both Nautilus (GNOME) and Konqueror (KDE), right-clicking a file or directory icon will expose a properties dialog. Figure 9-2 is an example from KDE 3.5.
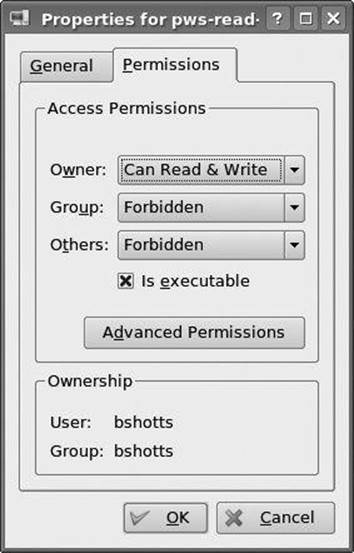
Figure 9-2. KDE 3.5 File Properties dialog
Here we can see the settings for the owner, group, and world. In KDE, clicking the Advanced Permissions button brings up another dialog that allows you to set each of the mode attributes individually. Another victory for understanding brought to us by the command line!
umask—Set Default Permissions
The umask command controls the default permissions given to a file when it is created. It uses octal notation to express a mask of bits to be removed from a file’s mode attributes.
Let’s take a look:
[me@linuxbox ˜]$ rm -f foo.txt
[me@linuxbox ˜]$ umask
0002
[me@linuxbox ˜]$ > foo.txt
[me@linuxbox ˜]$ ls -l foo.txt
-rw-rw-r-- 1 me me 0 2012-03-06 14:53 foo.txt
We first removed any existing copy of foo.txt to make sure we were starting fresh. Next, we ran the umask command without an argument to see the current value. It responded with the value 0002 (the value 0022 is another common default value), which is the octal representation of our mask. We then created a new instance of the file foo.txt and observed its permissions.
We can see that both the owner and group get read and write permissions, while everyone else gets only read permission. World does not have write permission because of the value of the mask. Let’s repeat our example, this time setting the mask ourselves:
[me@linuxbox ˜]$ rm foo.txt
[me@linuxbox ˜]$ umask 0000
[me@linuxbox ˜]$ > foo.txt
[me@linuxbox ˜]$ ls -l foo.txt
-rw-rw-rw- 1 me me 0 2012-03-06 14:58 foo.txt
When we set the mask to 0000 (effectively turning it off), we see that the file is now world writable. To understand how this works, we have to look at octal numbers again. If we expand the mask into binary and then compare it to the attributes, we can see what happens:
|
Original file mode |
--- rw- rw- rw- |
|
Mask |
000 000 000 010 |
|
Result |
--- rw- rw- r-- |
Ignore for the moment the leading 0s (we’ll get to those in a minute) and observe that where the 1 appears in our mask, an attribute was removed—in this case, the world write permission. That’s what the mask does. Everywhere a 1 appears in the binary value of the mask, an attribute is unset. If we look at a mask value of 0022, we can see what it does:
|
Original file mode |
--- rw- rw- rw- |
|
Mask |
000 000 000 010 |
|
Result |
--- rw- rw- r-- |
Again, where a 1 appears in the binary value, the corresponding attribute is unset. Play with some values (try some 7s) to get used to how this works. When you’re done, remember to clean up:
[me@linuxbox ˜]$ rm foo.txt; umask 0002
Most of the time you won’t have to change the mask; the default pro-vided by your distribution will be fine. In some high-security situations, however, you will want to control it.
Some Special Permissions
Though we usually see an octal permission mask expressed as a three-digit number, it is more technically correct to express it in four digits. Why? Because, in addition to read, write, and execute permissions, there are some other, less-used permission settings.
The first of these is the setuid bit (octal 4000). When applied to an executable file, it sets the effective user ID from that of the real user (the user actually running the program) to that of the program’s owner. Most often this is given to a few programs owned by the superuser. When an ordinary user runs a program that is setuid root, the program runs with the effective privileges of the superuser. This allows the program to access files and directories that an ordinary user would normally be prohibited from accessing. Clearly, because this raises security concerns, the number of setuid programs must be held to an absolute minimum.
The second less-used setting is the setgid bit (octal 2000). This, like the setuid bit, changes the effective group ID from that of the real group ID of the user to that of the file owner. If the setgid bit is set on a directory, newly created files in the directory will be given the group ownership of the directory rather the group ownership of the file’s creator. This is useful in a shared directory when members of a common group need access to all the files in the directory, regardless of the file owner’s primary group.
The third is called the sticky bit (octal 1000). This is a holdover from ancient Unix, where it was possible to mark an executable file as “not swappable.” On files, Linux ignores the sticky bit, but if applied to a directory, it prevents users from deleting or renaming files unless the user is either the owner of the directory, the owner of the file, or the superuser. This is often used to control access to a shared directory, such as /tmp.
Here are some examples of using chmod with symbolic notation to set these special permissions. First, assign setuid to a program:
chmod u+s program
Next, assign setgid to a directory:
chmod g+s dir
Finally, assign the sticky bit to a directory:
chmod +t dir
By viewing the output from ls, you can determine the special permissions. Here are some examples. First, a program that is setuid:
-rwsr-xr-x
Now, a directory that has the setgid attribute:
drwxrwsr-x
Finally, a directory with the sticky bit set:
drwxrwxrwt
Changing Identities
At various times, we may find it necessary to take on the identity of another user. Often we want to gain superuser privileges to carry out some administrative task, but it is also possible to “become” another regular user to perform such tasks as testing an account. There are three ways to take on an alternate identity:
· Log out and log back in as the alternate user.
· Use the su command.
· Use the sudo command.
We will skip the first technique because we know how to do it and it lacks the convenience of the other two. From within your own shell session, the su command allows you to assume the identity of another user and either start a new shell session with that user’s ID or issue a single command as that user. The sudo command allows an administrator to set up a configuration file called /etc/sudoers and define specific commands that particular users are permitted to execute under an assumed identity. The choice of which command to use is largely determined by which Linux distribution you use. Your distribution probably includes both commands, but its configuration will favor either one or the other. We’ll start with su.
su—Run a Shell with Substitute User and Group IDs
The su command is used to start a shell as another user. The command syntax looks like this:
su [-[l]] [user]
If the -l option is included, the resulting shell session is a login shell for the specified user. This means that the user’s environment is loaded and the working directory is changed to the user’s home directory. This is usually what we want. If the user is not specified, the superuser is assumed. Notice that (strangely) the -l may be abbreviated as -, which is how it is most often used. To start a shell for the superuser, we would do this:
[me@linuxbox ˜]$ su-
Password:
[root@linuxbox ˜]#
After entering the command, we are prompted for the superuser’s password. If it is successfully entered, a new shell prompt appears indicating that this shell has superuser privileges (the trailing # rather than a $) and that the current working directory is now the home directory for the superuser (normally /root). Once in the new shell, we can carry out commands as the superuser. When finished, enter exit to return to the previous shell:
[root@linuxbox ˜]# exit
[me@linuxbox ˜]$
It is also possible to execute a single command rather than starting a new interactive command by using su this way:
su -c 'command'
Using this form, a single command line is passed to the new shell for execution. It is important to enclose the command in quotes, as we do not want expansion to occur in our shell but rather in the new shell:
[me@linuxbox ˜]$ su -c 'ls -l /root/*'
Password:
-rw------- 1 root root 754 2011-08-11 03:19 /root/anaconda-ks.cfg
/root/Mail:
total 0
[me@linuxbox ˜]$
sudo—Execute a Command as Another User
The sudo command is like su in many ways but has some important additional capabilities. The administrator can configure sudo to allow an ordinary user to execute commands as a different user (usually the superuser) in a very controlled way. In particular, a user may be restricted to one or more specific commands and no others. Another important difference is that the use of sudo does not require access to the superuser’s password. To authenticate using sudo, the user enters his own password. Let’s say, for example, that sudo has been configured to allow us to run a fictitious backup program called backup_script, which requires superuser privileges.
With sudo it would be done like this:
[me@linuxbox ˜]$ sudo backup_script
Password:
System Backup Starting...
After entering the command, we are prompted for our password (not the superuser’s), and once the authentication is complete, the specified command is carried out. One important difference between su and sudo is that sudo does not start a new shell, nor does it load another user’s environment. This means that commands do not need to be quoted any differently than they would be without using sudo. Note that this behavior can be overridden by specifying various options. See the sudo man page for details.
To see what privileges are granted by sudo, use the -l option to list them:
[me@linuxbox ˜]$ sudo -l
User me may run the following commands on this host:
(ALL) ALL
Ubuntu and sudo
One of the recurrent problems for regular users is how to perform certain tasks that require superuser privileges. These tasks include installing and updating software, editing system configuration files, and accessing devices. In the Windows world, this is often done by giving users administrative privileges. This allows users to perform these tasks. However, it also enables programs executed by the user to have the same abilities. This is desirable in most cases, but it also permits malware (malicious software) such as viruses to have free run of the computer.
In the Unix world, there has always been a larger division between regular users and administrators, owing to the multiuser heritage of Unix. The approach taken in Unix is to grant superuser privileges only when needed. To do this, the su and sudo commands are commonly used.
Up until a few of years ago, most Linux distributions relied on su for this purpose. su didn’t require the configuration that sudo required, and having a root account is traditional in Unix. This introduced a problem. Users were tempted to operate as root unnecessarily. In fact, some users operated their systems as the root user exclusively, because it does away with all those annoying “permission denied” messages. This is how you reduce the security of a Linux system to that of a Windows system. Not a good idea.
When Ubuntu was introduced, its creators took a different tack. By default, Ubuntu disables logins to the root account (by failing to set a password for the account) and instead uses sudo to grant superuser privileges. The initial user account is granted full access to superuser privileges via sudo and may grant similar powers to subsequent user accounts.
chown—Change File Owner and Group
The chown command is used to change the owner and group owner of a file or directory. Superuser privileges are required to use this command. The syntax of chown looks like this:
chown [owner][:[group]] file...
chown can change the file owner and/or the file group owner depending on the first argument of the command. Table 9-7 lists some examples.
Table 9-7. chown Argument Examples
|
Argument |
Results |
|
bob |
Changes the ownership of the file from its current owner to user bob. |
|
bob:users |
Changes the ownership of the file from its current owner to user bob and changes the file group owner to group users. |
|
:admins |
Changes the group owner to the group admins. The file owner is unchanged. |
|
bob: |
Change the file owner from the current owner to user bob and changes the group owner to the login group of user bob. |
Let’s say that we have two users: janet, who has access to superuser privileges, and tony, who does not. User janet wants to copy a file from her home directory to the home directory of user tony. Since user janet wants tony to be able to edit the file, janet changes the ownership of the copied file from janet to tony:
[janet@linuxbox ˜]$ sudo cp myfile.txt ˜tony
Password:
[janet@linuxbox ˜]$ sudo ls -l ˜tony/myfile.txt
-rw-r--r-- 1 root root 8031 2012-03-20 14:30 /home/tony/myfile.txt
[janet@linuxbox ˜]$ sudo chown tony: ˜tony/myfile.txt
[janet@linuxbox ˜]$ sudo ls -l ˜tony/myfile.txt
-rw-r--r-- 1 tony tony 8031 2012-03-20 14:30 /home/tony/myfile.txt
Here we see user janet copy the file from her directory to the home directory of user tony. Next, janet changes the ownership of the file from root (a result of using sudo) to tony. Using the trailing colon in the first argument, janet also changed the group ownership of the file to the login group of tony, which happens to be group tony.
Notice that after the first use of sudo, janet was not prompted for her password? This is because sudo, in most configurations, “trusts” you for several minutes (until its timer runs out).
chgrp—Change Group Ownership
In older versions of Unix, the chown command changed only file ownership, not group ownership. For that purpose a separate command, chgrp, was used. It works much the same way as chown, except for being more limited.
Exercising Your Privileges
Now that we have learned how this permissions thing works, it’s time to show it off. We are going to demonstrate the solution to a common problem—setting up a shared directory. Let’s imagine that we have two users named bill and karen. They both have music CD collections and wish to set up a shared directory, where they will each store their music files as Ogg Vorbis or MP3. User bill has access to superuser privileges via sudo.
The first thing that needs to happen is the creation of a group that will have both bill and karen as members. Using GNOME’s graphical user management tool, bill creates a group called music and adds users bill and karen to it, as shown in Figure 9-3.
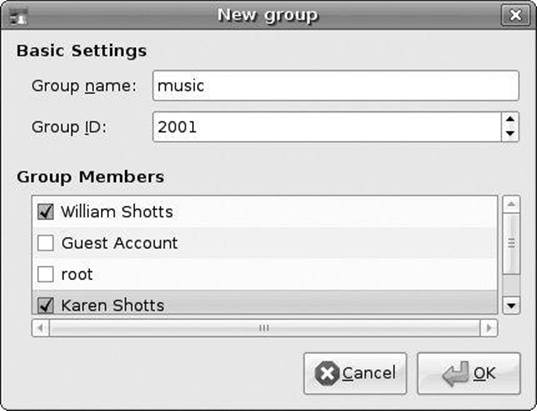
Figure 9-3. Creating a new group with GNOME
Next, bill creates the directory for the music files:
[bill@linuxbox ˜]$ sudo mkdir /usr/local/share/Music
Password:
Since bill is manipulating files outside his home directory, superuser privileges are required. After the directory is created, it has the following ownerships and permissions:
[bill@linuxbox ˜]$ ls -ld /usr/local/share/Music
drwxr-xr-x 2 root root 4096 2012-03-21 18:05 /usr/local/share/Music
As we can see, the directory is owned by root and has 755 permissions. To make this directory shareable, bill needs to change the group ownership and the group permissions to allow writing:
[bill@linuxbox ˜]$ sudo chown :music /usr/local/share/Music
[bill@linuxbox ˜]$ sudo chmod 775 /usr/local/share/Music
[bill@linuxbox ˜]$ ls -ld /usr/local/share/Music
drwxrwxr-x 2 root music 4096 2012-03-21 18:05 /usr/local/share/Music
So what does this all mean? It means that we now have a directory /usr/local/share/Music that is owned by root and allows read and write access to group music. Group music has members bill and karen; thus bill and karen can create files in directory /usr/local/share/Music. Other users can list the contents of the directory but cannot create files there.
But we still have a problem. With the current permissions, files and directories created within the Music directory will have the normal permissions of the users bill and karen:
[bill@linuxbox ˜]$ > /usr/local/share/Music/test_file
[bill@linuxbox ˜]$ ls -l /usr/local/share/Music
-rw-r--r-- 1 bill bill 0 2012-03-24 20:03 test_file
Actually there are two problems. First, the default umask on this system is 0022, which prevents group members from writing files belonging to other members of the group. This would not be a problem if the shared directory contained only files, but since this directory will store music and music is usually organized in a hierarchy of artists and albums, members of the group will need the ability to create files and directories inside directories created by other members. We need to change the umask used by bill and karen to 0002 instead.
Second, each file and directory created by one member will be set to the primary group of the user, rather than the group music. This can be fixed by setting the setgid bit on the directory:
[bill@linuxbox ˜]$ sudo chmod g+s /usr/local/share/Music
[bill@linuxbox ˜]$ ls -ld /usr/local/share/Music
drwxrwsr-x 2 root music 4096 2012-03-24 20:03 /usr/local/share/Music
Now we test to see if the new permissions fix the problem. bill sets his umask to 0002, removes the previous test file, and creates a new test file and directory:
[bill@linuxbox ˜]$ umask 0002
[bill@linuxbox ˜]$ rm /usr/local/share/Music/test_file
[bill@linuxbox ˜]$ > /usr/local/share/Music/test_file
[bill@linuxbox ˜]$ mkdir /usr/local/share/Music/test_dir
[bill@linuxbox ˜]$ ls -l /usr/local/share/Music
drwxrwsr-x 2 bill music 4096 2012-03-24 20:24 test_dir
-rw-rw-r-- 1 bill music 0 2012-03-24 20:22 test_file
[bill@linuxbox ˜]$
Both files and directories are now created with the correct permissions to allow all members of the group music to create files and directories inside the Music directory.
The one remaining issue is umask. The necessary setting lasts only until the end of the session and then must be reset. In Chapter 11, we’ll look at making the change to umask permanent.
Changing Your Password
The last topic we’ll cover in this chapter is setting passwords for yourself (and for other users if you have access to superuser privileges). To set or change a password, the passwd command is used. The command syntax looks like this:
passwd [user]
To change your password, just enter the passwd command. You will be prompted for your old password and your new password:
[me@linuxbox ˜]$ passwd
(current) UNIX password:
New UNIX password:
The passwd command will try to enforce use of “strong” passwords. This means it will refuse to accept passwords that are too short, are too similar to previous passwords, are dictionary words, or are too easily guessed:
[me@linuxbox ˜]$ passwd
(current) UNIX password:
New UNIX password:
BAD PASSWORD: is too similar to the old one
New UNIX password:
BAD PASSWORD: it is WAY too short
New UNIX password:
BAD PASSWORD: it is based on a dictionary word
If you have superuser privileges, you can specify a username as an argument to the passwd command to set the password for another user. Other options are available to the superuser to allow account locking, password expiration, and so on. See the passwd man page for details.
All materials on the site are licensed Creative Commons Attribution-Sharealike 3.0 Unported CC BY-SA 3.0 & GNU Free Documentation License (GFDL)
If you are the copyright holder of any material contained on our site and intend to remove it, please contact our site administrator for approval.
© 2016-2026 All site design rights belong to S.Y.A.