The Linux Command Line (2012)
Part III. Common Tasks and Essential Tools
Chapter 21. Formatting Output
In this chapter, we continue our look at text-related tools, focusing on programs that are used to format text output rather than change the text itself. These tools are often used to prepare text for printing, a subject that we will cover in the next chapter. The programs that we will cover in this chapter include the following:
· nl—Number lines.
· fold—Wrap each line to a specified length.
· fmt—A simple text formatter.
· pr—Format text for printing.
· printf—Format and print data.
· groff—A document formatting system.
Simple Formatting Tools
We’ll look at some of the simple formatting tools first. These are mostly single-purpose programs, and a bit unsophisticated in what they do, but they can be used for small tasks and as parts of pipelines and scripts.
nl—Number Lines
The nl program is a rather arcane tool used to perform a simple task: It numbers lines. In its simplest use, it resembles cat -n:
[me@linuxbox ˜]$ nl distros.txt | head
1 SUSE 10.2 12/07/2006
2 Fedora 10 11/25/2008
3 SUSE 11.0 06/19/2008
4 Ubuntu 8.04 04/24/2008
5 Fedora 8 11/08/2007
6 SUSE 10.3 10/04/2007
7 Ubuntu 6.10 10/26/2006
8 Fedora 7 05/31/2007
9 Ubuntu 7.10 10/18/2007
10 Ubuntu 7.04 04/19/2007
Like cat, nl can accept either multiple filenames as command-line arguments or standard input. However, nl has a number of options and supports a primitive form of markup to allow more complex kinds of numbering.
nl supports a concept called logical pages when numbering. This allows nl to reset (start over) the numerical sequence when numbering. Using options, it is possible to set the starting number to a specific value and, to a limited extent, set its format. A logical page is further broken down into a header, body, and footer. Within each of these sections, line numbering may be reset and/or be assigned a different style. If nl is given multiple files, it treats them as a single stream of text. Sections in the text stream are indicated by the presence of some rather odd-looking markup added to the text, as shown in Table 21-1.
Table 21-1. nl Markup
|
Markup |
Meaning |
|
\:\:\: |
Start of logical-page header |
|
\:\: |
Start of logical-page body |
|
\: |
Start of logical-page footer |
Each of the markup elements in Table 21-1 must appear alone on its own line. After processing a markup element, nl deletes it from the text stream.
Table 21-2 lists the common options for nl.
Table 21-2. Common nl Options
|
Option |
Meaning |
|
-b style |
Set body numbering to style, where style is one of the following: · a Number all lines. · t Number only non-blank lines. This is the default. · n None. · pregexp Number only lines matching basic regular expression regexp. |
|
-f style |
Set footer numbering to style. Default is n (none). |
|
-h style |
Set header numbering to style. Default is n (none). |
|
-i number |
Set page numbering increment to number. Default is 1. |
|
-n format |
Set numbering format to format, where format is one of the following: · ln Left justified, without leading zeros. · rn Right justified, without leading zeros. This is the default. · rz Right justified, with leading zeros. |
|
-p |
Do not reset page numbering at the beginning of each logical page. |
|
-s string |
Add string to the end of each line number to create a separator. Default is a single tab character. |
|
-v number |
Set first line number of each logical page to number. Default is 1. |
|
-w width |
Set width of the line number field to width. Default is 6. |
Admittedly, we probably won’t be numbering lines that often, but we can use nl to look at how we can combine multiple tools to perform more complex tasks. We will build on our work in the previous chapter to produce a Linux distributions report. Since we will be using nl, it will be useful to include its header/body/footer markup. To do this, we will add it to the sed script from the last chapter. Using our text editor, we will change the script as follows and save it as distros-nl.sed:
# sed script to produce Linux distributions report
1 i\
\\:\\:\\:\
\
Linux Distributions Report\
\
Name Ver. Released\
---- ---- --------\
\\:\\:
s/\([0-9]\{2\}\)\/\([0-9]\{2\}\)\/\([0-9]\{4\}\)$/\3-\1-\2/
$ a\
\\:\
\
End Of Report
The script now inserts the nl logical-page markup and adds a footer at the end of the report. Note that we had to double up the backslashes in our markup, because sed normally interprets them as escape characters.
Next, we’ll produce our enhanced report by combining sort, sed, and nl:
[me@linuxbox ˜]$ sort -k 1,1 -k 2n distros.txt | sed -f distros-nl.sed | nl
Linux Distributions Report
Name Ver. Released
---- ---- --------
1 Fedora 5 2006-03-20
2 Fedora 6 2006-10-24
3 Fedora 7 2007-05-31
4 Fedora 8 2007-11-08
5 Fedora 9 2008-05-13
6 Fedora 10 2008-11-25
7 SUSE 10.1 2006-05-11
8 SUSE 10.2 2006-12-07
9 SUSE 10.3 2007-10-04
10 SUSE 11.0 2008-06-19
11 Ubuntu 6.06 2006-06-01
12 Ubuntu 6.10 2006-10-26
13 Ubuntu 7.04 2007-04-19
14 Ubuntu 7.10 2007-10-18
15 Ubuntu 8.04 2008-04-24
16 Ubuntu 8.10 2008-10-30
End Of Report
Our report is the result of our pipeline of commands. First, we sort the list by distribution name and version (fields 1 and 2), and then we process the results with sed, adding the report header (including the logical page markup for nl) and footer. Finally, we process the result with nl, which, by default, numbers only the lines of the text stream that belong to the body section of the logical page.
We can repeat the command and experiment with different options for nl. Some interesting ones are
nl -n rz
and
nl -w 3 -s ' '
fold—Wrap Each Line to a Specified Length
Folding is the process of breaking lines of text at a specified width. Like our other commands, fold accepts either one or more text files or standard input. If we send fold a simple stream of text, we can see how it works:
[me@linuxbox ˜]$ echo "The quick brown fox jumped over the lazy dog." | fold -w 12
The quick br
own fox jump
ed over the
lazy dog.
Here we see fold in action. The text sent by the echo command is broken into segments specified by the -w option. In this example, we specify a line width of 12 characters. If no width is specified, the default is 80 characters. Notice that the lines are broken regardless of word boundaries. The addition of the -s option will cause fold to break the line at the last available space before the line width is reached:
[me@linuxbox ˜]$ echo "The quick brown fox jumped over the lazy dog." | fold -w 12 -s
The quick
brown fox
jumped over
the lazy
dog.
fmt—A Simple Text Formatter
The fmt program also folds text, plus a lot more. It accepts either files or standard input and performs paragraph formatting on the text stream. Basically, it fills and joins lines in text while preserving blank lines and indentation.
To demonstrate, we’ll need some text. Let’s lift some from the fmt info page:
`fmt' reads from the specified FILE arguments (or
standard input if none are given), and writes to standard output.
By default, blank lines, spaces between words, and indentation
are preserved in the output; successive input lines with different
indentation are not joined; tabs are expanded on input and introduced on output.
`fmt' prefers breaking lines at the end of a sentence, and tries
to avoid line breaks after the first word of a sentence or before the last
word of a sentence. A "sentence break" is defined as either the end of a
paragraph or a word ending in any of `.?!', followed by two spaces or end
of line, ignoring any intervening parentheses or quotes. Like TeX, `fmt' reads
entire "paragraphs" before choosing line breaks; the algorithm is a variant of
that given by Donald E. Knuth and Michael F. Plass in
"Breaking Paragraphs Into Lines", `Software--Practice &
Experience' 11, 11 (November 1981), 1119-1184.
We’ll copy this text into our text editor and save the file as fmt-info.txt. Now, let’s say we wanted to reformat this text to fit a 50-character-wide column. We could do this by processing the file with fmt and the -w option:
[me@linuxbox ˜]$ fmt -w 50 fmt-info.txt | head
`fmt' reads from the specified FILE arguments
(or standard input if
none are given), and writes to standard output.
By default, blank lines, spaces between words,
and indentation are
preserved in the output; successive input lines
with different indentation are not joined; tabs
are expanded on input and introduced on output.
Well, that’s an awkward result. Perhaps we should actually read this text, since it explains what’s going on:
By default, blank lines, spaces between words, and indentation are preserved in the output; successive input lines with different indentation are not joined; tabs are expanded on input and introduced on output.
So, fmt is preserving the indentation of the first line. Fortunately, fmt provides an option to correct this:
[me@linuxbox ˜]$ fmt -cw 50 fmt-info.txt
`fmt' reads from the specified FILE arguments
(or standard input if none are given), and writes
to standard output.
By default, blank lines, spaces between words,
and indentation are preserved in the output;
successive input lines with different indentation
are not joined; tabs are expanded on input and
introduced on output.
`fmt' prefers breaking lines at the end of a
sentence, and tries to avoid line breaks after
the first word of a sentence or before the
last word of a sentence. A "sentence break"
is defined as either the end of a paragraph
or a word ending in any of `.?!', followed
by two spaces or end of line, ignoring any
intervening parentheses or quotes. Like TeX,
`fmt' reads entire "paragraphs" before choosing
line breaks; the algorithm is a variant of
that given by Donald E. Knuth and Michael F.
Plass in "Breaking Paragraphs Into Lines",
`Software--Practice & Experience' 11, 11
(November 1981), 1119-1184.
Much better. By adding the -c option, we now have the desired result.
fmt has some interesting options, as shown in Table 21-3.
Table 21-3. fmt Options
|
Option |
Description |
|
-c |
Operate in crown margin mode. This preserves the indentation of the first two lines of a paragraph. Subsequent lines are aligned with the indentation of the second line. |
|
-pstring |
Format only those lines beginning with the prefix string. After formatting, the contents of string are prefixed to each reformatted line. This option can be used to format text in source code comments. For example, any programming language or configuration file that uses a #character to delineate a comment could be formatted by specifying -p '# ' so that only the comments will be formatted. See the example below. |
|
-s |
Split-only mode. In this mode, lines will be split only to fit the specified column width. Short lines will not be joined to fill lines. This mode is useful when formatting text, such as code, where joining is not desired. |
|
-u |
Perform uniform spacing. This will apply traditional “typewriter-style” formatting to the text. This means a single space between words and two spaces between sentences. This mode is useful for removing justification, that is, forced alignment to both the left and right margins. |
|
-wwidth |
Format text to fit within a column width characters wide. The default is 75 characters. Note: fmt actually formats lines slightly shorter than the specified width to allow for line balancing. |
The -p option is particularly interesting. With it, we can format selected portions of a file, provided that the lines to be formatted all begin with the same sequence of characters. Many programming languages use the hash mark (#) to indicate the beginning of a comment and thus can be formatted using this option. Let’s create a file that simulates a program that uses comments:
[me@linuxbox ˜]$ cat > fmt-code.txt
# This file contains code with comments.
# This line is a comment.
# Followed by another comment line.
# And another.
This, on the other hand, is a line of code.
And another line of code.
And another.
Our sample file contains comments, which begin with the string # (a # followed by a space), and lines of “code,” which do not. Now, using fmt, we can format the comments and leave the code untouched:
[me@linuxbox ˜]$ fmt -w 50 -p '# ' fmt-code.txt
# This file contains code with comments.
# This line is a comment. Followed by another
# comment line. And another.
This, on the other hand, is a line of code.
And another line of code.
And another.
Notice that the adjoining comment lines are joined, while the blank lines and the lines that do not begin with the specified prefix are preserved.
pr—Format Text for Printing
The pr program is used to paginate text. When printing text, it is often desirable to separate the pages of output with several lines of whitespace to provide a top and bottom margin for each page. Further, this whitespace can be used to insert a header and footer on each page.
We’ll demonstrate pr by formatting our distros.txt file into a series of very short pages (only the first two pages are shown):
[me@linuxbox ˜]$ pr -l 15 -w 65 distros.txt
2012-12-11 18:27 distros.txt Page 1
SUSE 10.2 12/07/2006
Fedora 10 11/25/2008
SUSE 11.0 06/19/2008
Ubuntu 8.04 04/24/2008
Fedora 8 11/08/2007
2012-12-11 18:27 distros.txt Page 2
SUSE 10.3 10/04/2007
Ubuntu 6.10 10/26/2006
Fedora 7 05/31/2007
Ubuntu 7.10 10/18/2007
Ubuntu 7.04 04/19/2007
In this example, we employ the -l option (for page length) and the -w option (page width) to define a “page” that is 65 characters wide and 15 lines long. pr paginates the contents of the distros.txt file, separates each page with several lines of whitespace, and creates a default header containing the file modification time, filename, and page number. The pr program provides many options to control page layout. We’ll take a look at more of them in Chapter 22.
printf—Format and Print Data
Unlike the other commands in this chapter, the printf command is not used for pipelines (it does not accept standard input), nor does it find frequent application directly on the command line (it’s used mostly in scripts). So why is it important? Because it is so widely used.
printf (from the phrase print formatted) was originally developed for the C programming language and has been implemented in many programming languages, including the shell. In fact, in bash, printf is a built-in.
printf works like this:
printf "format" arguments
The command is given a string containing a format description, which is then applied to a list of arguments. The formatted result is sent to standard output. Here is a trivial example:
[me@linuxbox ˜]$ printf "I formatted the string: %s\n" foo
I formatted the string: foo
The format string may contain literal text (like I formatted the string:); escape sequences (such as \n, a newline character); and sequences beginning with the % character, which are called conversion specifications. In the example above, the conversion specification %s is used to format the string foo and place it in the command’s output. Here it is again:
[me@linuxbox ˜]$ printf "I formatted '%s' as a string.\n" foo
I formatted 'foo' as a string.
As we can see, the %s conversion specification is replaced by the string foo in the command’s output. The s conversion is used to format string data. There are other specifiers for other kinds of data. Table 21-4 lists the commonly used data types.
Table 21-4. Common printf Data-Type Specifiers
|
Specifier |
Description |
|
d |
Format a number as a signed decimal integer. |
|
f |
Format and output a floating point number. |
|
o |
Format an integer as an octal number. |
|
s |
Format a string. |
|
x |
Format an integer as a hexadecimal number using lowercase a–f where needed. |
|
X |
Same as x, but use uppercase letters. |
|
% |
Print a literal % symbol (i.e., specify “%%”). |
We’ll demonstrate the effect each of the conversion specifiers on the string 380:
[me@linuxbox ˜]$ printf "%d, %f, %o, %s, %x, %X\n" 380 380 380 380 380 380
380, 380.000000, 574, 380, 17c, 17C
Since we specified six conversion specifiers, we must also supply six arguments for printf to process. The six results show the effect of each specifier.
Several optional components may be added to the conversion specifier to adjust its output. A complete conversion specification may consist of the following:
%[flags][width][.precision]conversion_specification
Multiple optional components, when used, must appear in the order specified above to be properly interpreted. Table 21-5 describes each component.
Table 21-5. printf Conversion-Specification Components
|
Component |
Description |
|
flags |
There are five different flags: · # Use the alternate format for output. This varies by data type. For o (octal number) conversion, the output is prefixed with 0 (zero). For x and X (hexadecimal number) conversions, the output is prefixed with 0x or 0X respectively. · 0 (zero) Pad the output with zeros. This means that the field will be filled with leading zeros, as in 000380. · -(dash) Left-align the output. By default, printf right-aligns output. · (space) Produce a leading space for positive numbers. · +(plus sign) Sign positive numbers. By default, printf signs only negative numbers. |
|
width |
A number specifying the minimum field width |
|
.precision |
For floating-point numbers, specify the number of digits of precision to be output after the decimal point. For string conversion, precision specifies the number of characters to output. |
Table 21-6 lists some examples of different formats in action.
Table 21-6. print Conversion Specification Examples
|
Argument |
Format |
Result |
Notes |
|
380 |
"%d" |
380 |
Simple formatting of an integer |
|
380 |
"%#x" |
0x17c |
Integer formatted as a hexadecimal number using the alternate format flag |
|
380 |
"%05d" |
00380 |
Integer formatted with leading zeros (padding) and a minimum field width of five characters |
|
380 |
"%05.5f" |
380.00000 |
Number formatted as a floating-point number with padding and 5 decimal places of precision. Since the specified minimum field width (5) is less than the actual width of the formatted number, the padding has no effect. |
|
380 |
"%010.5f" |
0380.00000 |
Increasing the minimum field width to 10 makes the padding visible. |
|
380 |
"%+d" |
+380 |
The + flag signs a positive number. |
|
380 |
"%-d" |
380 |
The - flag left-aligns the formatting. |
|
abcdefghijk |
"%5s" |
abcedfghijk |
A string is formatted with a minimum field width. |
|
abcdefghijk |
"%.5s" |
abcde |
By applying precision to a string, it is truncated. |
Again, printf is used mostly in scripts, where it is employed to format tabular data, rather than on the command line directly. But we can still show how it can be used to solve various formatting problems. First, let’s output some fields separated by tab characters:
[me@linuxbox ˜]$ printf "%s\t%s\t%s\n" str1 str2 str3
str1 str2 str3
By inserting \t (the escape sequence for a tab), we achieve the desired effect. Next, some numbers with neat formatting:
[me@linuxbox ˜]$ printf "Line: %05d %15.3f Result: %+15d\n" 1071 3.14156295 32589
Line: 01071 3.142 Result: +32589
This shows the effect of minimum field width on the spacing of the fields. Or how about formatting a tiny web page?
[me@linuxbox ˜]$ printf "<html>\n\t<head>\n\t\t<title>%s</title>\n\
t</head> \n\t<body>\n\t\t<p>%s</p>\n\t</body>\n</html>\n" "Page Title" "Page Content"
<html>
<head>
<title>Page Title</title>
</head>
<body>
<p>Page Content</p>
</body>
</html>
Document Formatting Systems
So far, we have examined the simple text-formatting tools. These are good for small, simple tasks, but what about larger jobs? One of the reasons that Unix became a popular operating system among technical and scientific users (aside from providing a powerful multitasking, multiuser environment for all kinds of software development) is that it offered tools that could be used to produce many types of documents, particularly scientific and academic publications. In fact, as the GNU documentation describes, document preparation was instrumental to the development of Unix:
The first version of UNIX was developed on a PDP-7 which was sitting around Bell Labs. In 1971 the developers wanted to get a PDP-11 for further work on the operating system. In order to justify the cost for this system, they proposed that they would implement a document formatting system for the AT&T patents division. This first formatting program was a reimplementation of McIllroy’s roff, written by J.F. Ossanna.
The roff Family and TEX
Two main families of document formatters dominate the field: those descended from the original roff program, including nroff and troff, and those based on Donald Knuth’s TEX (pronounced “tek”) typesetting system. And yes, the dropped “E” in the middle is part of its name.
The name roff is derived from the term run off as in, “I’ll run off a copy for you.” The nroff program is used to format documents for output to devices that use monospaced fonts, such as character terminals and typewriter-style printers. At the time of its introduction, this included nearly all printing devices attached to computers. The later troff program formats documents for output on typesetters, devices used to produce “camera-ready” type for commercial printing. Most computer printers today are able to simulate the output of typesetters. The roff family also includes some other programs that are used to prepare portions of documents. These include eqn (for mathematical equations) and tbl (for tables).
The TEX system (in stable form) first appeared in 1989 and has, to some degree, displaced troff as the tool of choice for typesetter output. We won’t be covering TEX here, due both to its complexity (there are entire books about it) and to the fact that it is not installed by default on most modern Linux systems.
Note
For those interested in installing TEX, check out the texlive package, which can be found in most distribution repositories, and the LyX graphical content editor.
groff—A Document Formatting System
groff is a suite of programs containing the GNU implementation of troff. It also includes a script that is used to emulate nroff and the rest of the roff family as well.
While roff and its descendants are used to make formatted documents, they do it in a way that is rather foreign to modern users. Most documents today are produced using word processors that are able to perform both the composition and layout of a document in a single step. Prior to the advent of the graphical word processor, documents were often produced in a two-step process involving the use of a text editor to perform composition and a processor, such as troff, to apply the formatting. Instructions for the formatting program were embedded in the composed text through the use of a markup language. The modern analog for such a process is the web page, which is composed using a text editor of some kind and then rendered by a web browser using HTML as the markup language to describe the final page layout.
We’re not going to cover groff in its entirety, as many elements of its markup language deal with rather arcane details of typography. Instead we will concentrate on one of its macro packages that remains in wide use. These macro packages condense many of its low-level commands into a smaller set of high-level commands that make using groff much easier.
For a moment, let’s consider the humble man page. It lives in the /usr/share/man directory as a gzip-compressed text file. If we were to examine its uncompressed contents, we would see the following (the man page for ls in section 1 is shown):
[me@linuxbox ˜]$ zcat /usr/share/man/man1/ls.1.gz | head
.\" DO NOT MODIFY THIS FILE! It was generated by help2man 1.35.
.TH LS "1" "April 2008" "GNU coreutils 6.10" "User Commands"
.SH NAME
ls \- list directory contents
.SH SYNOPSIS
.B ls
[\fIOPTION\fR]... [\fIFILE\fR]...
.SH DESCRIPTION
.\" Add any additional description here
.PP
Compared to the man page in its normal presentation, we can begin to see a correlation between the markup language and its results:
[me@linuxbox ˜]$ man ls | head
LS(1) User Commands LS(1)
NAME
ls - list directory contents
SYNOPSIS
ls [OPTION]... [FILE]...
This is of interest because man pages are rendered by groff, using the mandoc macro package. In fact, we can simulate the man command with this pipeline.
[me@linuxbox ˜]$ zcat /usr/share/man/man1/ls.1.gz | groff -mandoc -T ascii | head
LS(1) User Commands LS(1)
NAME ls - list directory contents
SYNOPSIS
ls [OPTION]... [FILE]...
Here we use the groff program with the options set to specify the mandoc macro package and the output driver for ASCII. groff can produce output in several formats. If no format is specified, PostScript is output by default:
[me@linuxbox ˜]$ zcat /usr/share/man/man1/ls.1.gz | groff -mandoc | head
%!PS-Adobe-3.0
%%Creator: groff version 1.18.1
%%CreationDate: Thu Feb 2 13:44:37 2012
%%DocumentNeededResources: font Times-Roman
%%+ font Times-Bold
%%+ font Times-Italic
%%DocumentSuppliedResources: procset grops 1.18 1
%%Pages: 4
%%PageOrder: Ascend
%%Orientation: Portrait
PostScript is a page-description language that is used to describe the contents of a printed page to a typesetter-like device. We can take the output of our command and store it to a file (assuming that we are using a graphical desktop with a Desktop directory):
[me@linuxbox ˜]$ zcat /usr/share/man/man1/ls.1.gz | groff -mandoc > ˜/Desktop
/foo.ps
An icon for the output file should appear on the desktop. By double-clicking the icon, a page viewer should start up and reveal the file in its rendered form (Figure 21-1).
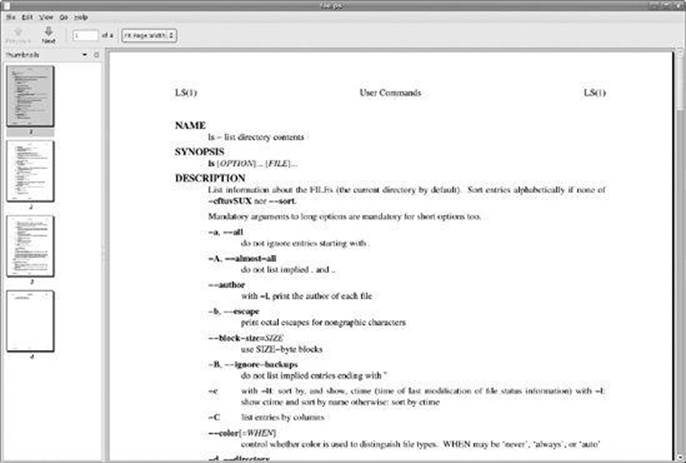
Figure 21-1. Viewing PostScript output with a page viewer in GNOME
What we see is a nicely typeset man page for ls! In fact, it’s possible to convert the PostScript file into a PDF (Portable Document Format) file with this command:
[me@linuxbox ˜]$ ps2pdf ˜/Desktop/foo.ps ˜/Desktop/ls.pdf
The ps2pdf program is part of the ghostscript package, which is installed on most Linux systems that support printing.
Note
Linux systems often include many command line-programs for file-format conversion. They are often named using the convention format2format. Try using the command ls /usr/bin/*[[:alpha:]]2[[:alpha:]]* to identify them. Also try searching for programs named formattoformat.
For our last exercise with groff, we will revisit our old friend distros.txt. This time, we will use the tbl program, which is used to format tables, to typeset our list of Linux distributions. To do this, we are going to use our earlier sed script to add markup to a text stream that we will feed togroff.
First, we need to modify our sed script to add the necessary requests that tbl requires. Using a text editor, we will change distros.sed to the following:
# sed script to produce Linux distributions report
1 i\
.TS\
center box;\
cb s s\
cb cb cb\
l n c.\
Linux Distributions Report\
=\
Name Version Released\
_
s/\([0-9]\{2\}\)\/\([0-9]\{2\}\)\/\([0-9]\{4\}\)$/\3-\1-\2/
$ a\
.TE
Note that for the script to work properly, care must been taken to see that the words Name Version Released are separated by tabs, not spaces. We’ll save the resulting file as distros-tbl.sed. tbl uses the .TS and .TE requests to start and end the table. The rows following the .TS request define global properties of the table, which, for our example, are centered horizontally on the page and surrounded by a box. The remaining lines of the definition describe the layout of each table row. Now, if we run our report-generating pipeline again with the new sed script, we’ll get the following :
[me@linuxbox ˜]$ sort -k 1,1 -k 2n distros.txt | sed -f distros-tbl.sed | groff
-t -T ascii 2>/dev/null
+------------------------------+
|Linux Distributions Report
|+------------------------------+
| Name Version Released|
+------------------------------+
|Fedora 5 2006-03-20 |
|Fedora 6 2006-10-24 |
|Fedora 7 2007-05-31 |
|Fedora 8 2007-11-08 |
|Fedora 9 2008-05-13 |
|Fedora 10 2008-11-25 |
|SUSE 10.1 2006-05-11 |
|SUSE 10.2 2006-12-07 |
|SUSE 10.3 2007-10-04 |
|SUSE 11.0 2008-06-19 |
|Ubuntu 6.06 2006-06-01 |
|Ubuntu 6.10 2006-10-26 |
|Ubuntu 7.04 2007-04-19 |
|Ubuntu 7.10 2007-10-18 |
|Ubuntu 8.04 2008-04-24 |
|Ubuntu 8.10 2008-10-30 |
+------------------------------+
Adding the -t option to groff instructs it to preprocess the text stream with tbl. Likewise, the -T option is used to output to ASCII rather than to the default output medium, PostScript.
The format of the output is the best we can expect if we are limited to the capabilities of a terminal screen or typewriter-style printer. If we specify PostScript output and graphically view the resulting output, we get a much more satisfying result (see Figure 21-2).
[me@linuxbox ˜]$ sort -k 1,1 -k
2n distros.txt | sed -f distros-tbl.sed | groff -t > ˜/Desktop/foo.ps
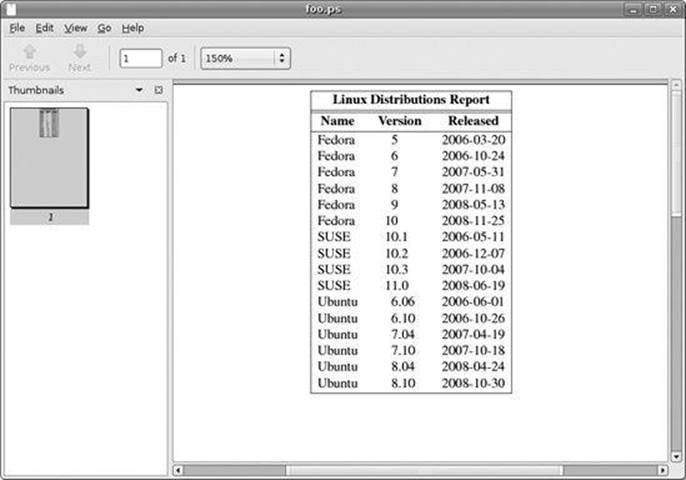
Figure 21-2. Viewing the finished table
Final Note
Given that text is so central to the character of Unix-like operating systems, it makes sense that there would be many tools that are used to manipulate and format text. As we have seen, there are! The simple formatting tools like fmt and pr will find many uses in scripts that produce short documents, while groff (and friends) can be used to write books. We may never write a technical paper using command-line tools (though many people do!), but it’s good to know that we could.
All materials on the site are licensed Creative Commons Attribution-Sharealike 3.0 Unported CC BY-SA 3.0 & GNU Free Documentation License (GFDL)
If you are the copyright holder of any material contained on our site and intend to remove it, please contact our site administrator for approval.
© 2016-2025 All site design rights belong to S.Y.A.