CompTIA Linux+ / LPIC-1 Cert Guide (Exams LX0-103 & LX0-104/101-400 & 102-400) (2016)
Chapter 14. Configuring User Interfaces and Desktops
This chapter covers the following topics:
![]() Quick Overview of X
Quick Overview of X
![]() The Xorg System
The Xorg System
![]() X Display Managers
X Display Managers
![]() Into and Out of X
Into and Out of X
![]() Accessibility Options
Accessibility Options
![]() Remote Clients
Remote Clients
This chapter covers the following objectives:
![]() Install and configure X11: 106.1
Install and configure X11: 106.1
![]() Set up a display manager: 106.2
Set up a display manager: 106.2
![]() Accessibility: 106.3
Accessibility: 106.3
Although it may not be a routine task, at times you need to be able to configure the graphical user interface (GUI). Before making such changes, it is important to understand the components of the GUI, including the X Window Server, display managers, and desktops.
This chapter focuses on these components while also addressing the issues regarding GUI security and accessibility.
“Do I Know This Already?” Quiz
The “Do I Know This Already?” quiz enables you to assess whether you should read this entire chapter or simply jump to the “Exam Preparation Tasks” section for review. If you are in doubt, read the entire chapter. Table 14-1 outlines the major headings in this chapter and the corresponding “Do I Know This Already?” quiz questions. You can find the answers in Appendix A, “Answers to the ‘Do I Know This Already?’ Quizzes and Review Questions.”
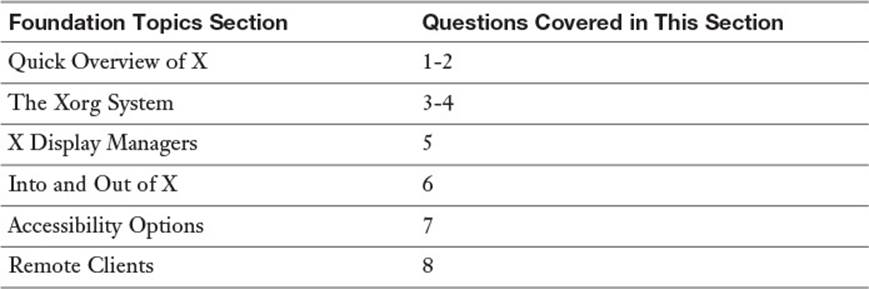
Table 14-1 “Do I Know This Already?” Foundation Topics Section-to-Question Mapping
1. A primary function of a display manager is to?
a. Manage hardware, such as the mouse and keyboard
b. Allow X clients to connect to the X server
c. Facilitate the login process
d. None of the above
2. Which of the following is most likely to provide a program like a file manager:
a. The X server
b. A display manager
c. A window manager
d. A desktop
3. Where is the location of the Xorg server configuration file?
a. /etc/xorg.conf
b. /etc/X11/xorg.conf
c. /etc/x11/config/xorg.conf
d. /etc/xconfig/xorg.xonf
4. Which section of the Xorg configuration file is used to define the fonts location?
a. Module
b. Screen
c. Files
d. Fonts
5. Which of the following display managers is a part of the Xorg software set?
a. lightdm
b. kdm
c. gdm
d. xdm
6. To go from the GUI to virtual terminal 3 (/dev/tty3), which keystroke combination would you use?
a. Ctrl+Alt+F3
b. Ctrl+F3
c. Alt+F3
d. F3
7. Which accessibility feature plays a sound when a user presses a modifier key, like the Ctrl key?
a. Slow Keys
b. Toggle Keys
c. Repeat Keys
d. Bounce Keys
8. Which command allows users from other systems to access your X server?
a. xdisplay
b. xsecure
c. xserver
d. xhost
Foundation Topics
Quick Overview of X
The X Window System (or simply X) is a set of software that provides the basis for a graphical user interface (GUI). To understand the function of X, it is helpful to provide a list of what X does as well as what it does not do:
![]() X provides basic window features, such as drawing graphical programs, moving graphical programs, and resizing graphical programs.
X provides basic window features, such as drawing graphical programs, moving graphical programs, and resizing graphical programs.
![]() X provides the means to interface with hardware, such as the mouse, video card, and monitor.
X provides the means to interface with hardware, such as the mouse, video card, and monitor.
![]() X does not provide a means to log in to the system graphically. This is handled by another software tool called a display manager.
X does not provide a means to log in to the system graphically. This is handled by another software tool called a display manager.
![]() X does not provide “desktop” features such as background images, window-based menus (to launch applications), or right-click menus. These features are provided by software tools called desktops.
X does not provide “desktop” features such as background images, window-based menus (to launch applications), or right-click menus. These features are provided by software tools called desktops.
![]() X does not provide the standard functionality that you have come to expect from GUI programs. For example, you expect each program to have a title bar, a close box, and scrollbars. This functionality is provided by a software tool called a window manager, not by X.
X does not provide the standard functionality that you have come to expect from GUI programs. For example, you expect each program to have a title bar, a close box, and scrollbars. This functionality is provided by a software tool called a window manager, not by X.
The best way to conceptualize X is to consider what you would see on your screen if you were to start only the X server. This can be accomplished by executing the X command. The screen would appear blank with the exception of a large X icon that represents your mouse location. No login screen would be provided, and no graphical programs would be running. To launch graphical programs you would have to switch to a command line environment and execute the program from there.
While X is a key component to a GUI environment, it is only one piece of the puzzle.

How X Works
The X system uses a client/server model; each system has an X server that interacts with and handles access to the system’s hardware. The X server makes it possible for an X client (a GUI program) to display data or graphics on the screen. The X client requests an action, and the X server performs the action.
Server, in this case, is defined as the computer that provides needed functionality for clients requesting services.
Another interesting feature of this model is the capability for an X server to handle X clients from either local or remote sources. In short, an X client executed from the local system displays along with X clients that have been invoked and run on a remote system and displays locally. Figure 14-1 shows the local workstation displaying both local and remote applications.
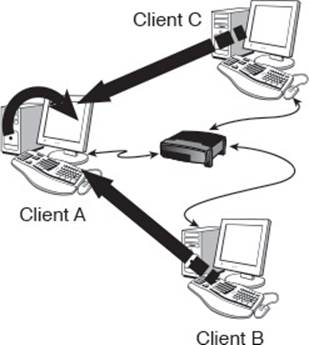
Figure 14-1 Displaying remote and local X clients
This flexibility opens up immense opportunities for centralizing your application code on a single server or set of servers and having clients attach and run the applications. Disadvantages include network bandwidth usage and troubleshooting the connections.
Note
Although the X environment allows for many lovely graphical utilities to be run, such as complex and colorful screensavers, you might find that these drag down the performance of your X server dramatically. Run with caution.
Window Managers
It might seem odd to mention and work with window managers before desktops such as KDE and GNOME, but you need a window manager, while a desktop is not mandatory.
X window managers have one main purpose: When the X server draws a window on the screen, the window manager puts the scrollbars, minimize and maximize buttons, and all the garnish on that X client window. Some window managers are more full-featured than others and can provide the previous features plus virtual desktops, toolbars, wallpaper options, menus, and so on.
Note
Knowledge of window managers is not required for the LPIC certification exam.
Linux Desktops
KDE was the first Linux desktop environment, and GNOME was primarily invented because its author wasn’t happy with the licensing of the libraries used for the KDE desktop.
It doesn’t really matter which one you use, but many people feel that KDE is more aesthetically pleasing, whereas GNOME does things from an architecturally correct perspective. Both get the job done.
A desktop environment can be defined by the following common criteria (to name a few):
![]() File manager
File manager
![]() Control Panel/Center
Control Panel/Center
![]() Window manager
Window manager
![]() Common look and feel
Common look and feel
![]() Integrated office suite
Integrated office suite
![]() Media players
Media players
The Xorg System
Although the X Window System was developed at MIT, the Linux version of X is a freely redistributable open-source version of the original and is maintained by the X.org Foundation.
The Xorg implementation of the X Window System is similar in function to the original and provides an abstraction layer that allows applications to be either run and displayed locally or run remotely and displayed locally.
The Xorg Configuration File
Although you’ll probably never have to construct an X configuration file by hand, you do need to know the overall structure, sections, and some of the entries for the exam. The configuration file for Xorg is /etc/X11/xorg.conf; a partial output is shown in Example 14-1.
Example 14-1 Example Xorg Configuration File
Section "Files"
ModulePath "/usr/lib/xorg/modules"
FontPath "catalogue:/etc/X11/fontpath.d"
FontPath "built-ins"
EndSection
Section "Module"
Load "glx"
EndSection
Section "InputDevice"
Identifier "Keyboard0"
Driver "kbd"
EndSection
Section "InputDevice"
Identifier "Mouse0"
Driver "mouse"
Option "Protocol" "auto"
Option "Device" "/dev/input/mice"
Option "ZAxisMapping" "4 5 6 7"
EndSection
Section "Monitor"
Identifier "Monitor0"
VendorName "Monitor Vendor"
ModelName "Monitor Model"
EndSection
Section "Screen"
Identifier "Screen0"
Device "Card0"
Monitor "Monitor0"
SubSection "Display"
Viewport 0 0
Depth 1
EndSubSection
SubSection "Display"
Viewport 0 0
Depth 4
EndSubSection
SubSection "Display"
Viewport 0 0
Depth 8
EndSubSection
SubSection "Display"
Viewport 0 0
Depth 15
EndSubSection
SubSection "Display"
Viewport 0 0
Depth 16
EndSubSection
SubSection "Display"
Viewport 0 0
Depth 24
EndSubSection
EndSection
A detailed understanding of these sections is not required for the LPIC certification exam. However, you should understand what is stored in each section:
![]() Files—This section provides information about files used by the X server. For example, fonts are stored in files and need to be accessed by the X server.
Files—This section provides information about files used by the X server. For example, fonts are stored in files and need to be accessed by the X server.
![]() Module—This section associates devices (such as your keyboard) with module files. A module file is like a device driver.
Module—This section associates devices (such as your keyboard) with module files. A module file is like a device driver.
![]() InputDevice—This section defines your input devices, such as your mouse and keyboard.
InputDevice—This section defines your input devices, such as your mouse and keyboard.
![]() Monitor—This section is used to describe the monitor.
Monitor—This section is used to describe the monitor.
![]() Screen—This describes the features of the screen, including the color depth permitted.
Screen—This describes the features of the screen, including the color depth permitted.
On modern Linux distributions, you rarely need to modify the /etc/X11/xorg.conf file. In fact, on some distributions the Xorg server runs without a configuration file. Instead of relying on a configuration file, these servers probe hardware and autoconfigure themselves.
If you do need to create a /etc/X11/xorg.conf file, make sure you are in a command-line environment and execute the X –configure command.
Note
Keep in mind that different distributions may include additional utilities to accomplish the creation of an xorg.conf file. If the previous command doesn’t work, you may also try Xorg -configure.
Fonts in X
X comes complete with a set of fonts referenced in the /etc/X11/xorg.conf file’s Files section, under FontPath. On machines that don’t use the X font server (called xfs), the font path is configured either as a set of directories and remote paths or as an entry that indicates a local path. The following entries for the FontPath are parsed in memory and put together to form a single font path for the system:
FontPath "/usr/X11R6/lib/X11/fonts/100dpi"
FontPath "/usr/X11R6/lib/X11/fonts/75dpi"
FontPath "tcp/somepc.example.com:7100"
On some newer systems, a single font directory that contains links to other fonts may be used:
FontPath "catalogue:/etc/X11/fontpath.d"
This directory should contain symbolic links to additional fonts:
ls -l /etc/X11/fontpath.d
total 0
lrwxrwxrwx. 1 root root 36 Jul 7 2012 default-ghostscript -> /usr/
share/fonts/default/ghostscript
lrwxrwxrwx. 1 root root 30 Jul 7 2012 fonts-default -> /usr/share/
fonts/default/Type1
lrwxrwxrwx. 1 root root 27 Jul 7 2012 liberation-fonts -> /usr/
share/fonts/liberation
lrwxrwxrwx. 1 root root 27 Jul 7 2012 xorg-x11-fonts-
100dpi:unscaled:pri=30 -> /usr/share/X11/fonts/100dpi
lrwxrwxrwx. 1 root root 25 Jul 7 2012 xorg-x11-fonts-
misc:unscaled:pri=10 -> /usr/share/X11/fonts/misc
lrwxrwxrwx. 1 root root 26 Jul 7 2012 xorg-x11-fonts-Type1 -> /usr/
share/X11/fonts/Type1
Be aware that some systems use a font server called xfs. An advantage of xfs is speed when rendering fonts because large sets of complex fonts can make the system freeze up while rendering. xfs is multithreaded, so it can handle simultaneous requests, whereas the X server doesn’t handle multiple requests well.
If you choose to use the X font server, you have to start it before running X or have it started in the system runlevels; otherwise, X won’t start.
Using the xfs server (locally, pointing to local files) requires the following line in the /etc/X11/xorg.conf:
FontPath "unix/:7100" [or "unix/:-1")
Note
The exam requires an awareness of the xfs server but does not require you to have a detailed understanding of this server.
Tuning X
Several programs exist to help you get the most out of your display and monitor with X. These are typically included with X or are a package closely related to X.
For example, some monitors don’t display the screen correctly, with part of the output being cut off or off-center. To fix some of these problems, you can use the xvidtune command. Running xvidtune from within X shows the interface in Figure 14-2.
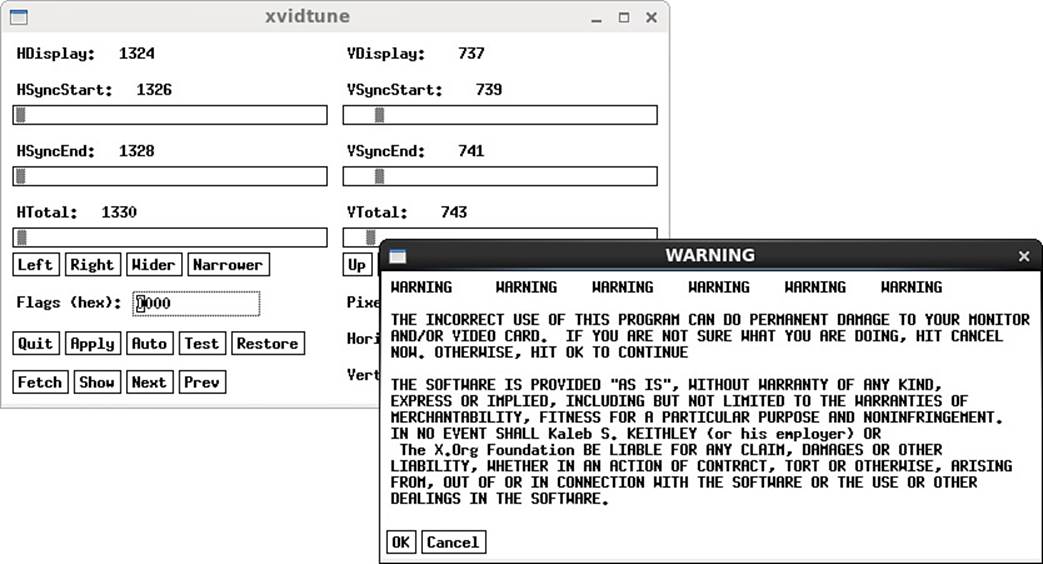
Figure 14-2 The xvidtune program
This program comes with some dire warnings, and with good reason. You can damage your monitor, and when the tube goes, you will see (and smell) the “magic blue smoke” from the ruined tube. The best thing about the xvidtune program is that it tells you the display resolution and lets you adjust the image on your monitor to stretch properly from edge to edge and be centered properly.
Note
The xvidtune program should only be used on CRT (traditional monitors) as it will not function properly on LED or LCD screens.
Another interesting program is the xwininfo tool for querying a window and getting a listing of its geometry and, particularly, the color depth.
Running the xwininfo command causes little to happen onscreen; the mouse pointer changes to a plus sign (+) and a message tells you to select the window you want to get information about.
The output shown in Example 14-2 is typical of the tool.
Example 14-2 Example of xwininfo Output
xwininfo: Window id: 0x260000a "xeyes"
Absolute upper-left X: 1046
Absolute upper-left Y: 108
Relative upper-left X: 2
Relative upper-left Y: 26
Width: 150
Height: 100
Depth: 24
Visual: 0x21
Visual Class: TrueColor
Border width: 0
Class: InputOutput
Colormap: 0x20 (installed)
Bit Gravity State: NorthWestGravity
Window Gravity State: NorthWestGravity
Backing Store State: NotUseful
Save Under State: no
Map State: IsViewable
Override Redirect State: no
Corners: +1046+108 -128+108 -128-529 +1046-529
-geometry 150x100+1044+82
The exam tests your knowledge of particular tools, such as what shows the current color depth, what can be used to adjust a screen’s video image, and so on.
X Display Managers
The X display managers are for managing logins and sessions on an X server. Their design is such that remote and local logins are handled equally well. The user enters her username and password; then the session is started, transferring control from the display manager to the user’s session manager.
For the exam you should be aware of the following display managers:
![]() XDM—This display manager is part of the Xorg software collection. Its executable is /usr/bin/xdm, and its configuration files are stored in the /etc/X11/xdm directory. Typically this display manager is not used except on servers where full desktops are not installed. On such machines, only a basic X server is installed, and the GUI is only started for specific purposes.
XDM—This display manager is part of the Xorg software collection. Its executable is /usr/bin/xdm, and its configuration files are stored in the /etc/X11/xdm directory. Typically this display manager is not used except on servers where full desktops are not installed. On such machines, only a basic X server is installed, and the GUI is only started for specific purposes.
![]() KDM—This display manager is part of the KDE software suite. Its executable is /usr/bin/kdm, and its configuration files are stored in the /etc/kde/kdm directory. If you install the KDE software suite, the default display manager will likely be KDM.
KDM—This display manager is part of the KDE software suite. Its executable is /usr/bin/kdm, and its configuration files are stored in the /etc/kde/kdm directory. If you install the KDE software suite, the default display manager will likely be KDM.
![]() GDM—This display manager is part of the Gnome software suite. Its executable is /usr/sbin/gdm, and its configuration files are stored in the /etc/gdm directory. If you install the Gnome software suite, the default display manager will likely be Gnome.
GDM—This display manager is part of the Gnome software suite. Its executable is /usr/sbin/gdm, and its configuration files are stored in the /etc/gdm directory. If you install the Gnome software suite, the default display manager will likely be Gnome.
In addition to these display managers, you should be aware of the Lightdm. This display manager is designed to be a replacement for the KDM (and, to some extent, the GDM). To configure this display manager, modify the configuration files located in the /etc/lightdm directory. Note: Often the default installation of Lightdm does not include a configuration file in the /etc/lightdm directory. While there is no man page for lightdm.conf, there is a sample file in the /usr/share/doc/lightdm directory.
Regardless of which display manager you choose to use on your system, you should be aware of the following:
![]() One of the primary functions of the display manager is to provide a means for users to log in.
One of the primary functions of the display manager is to provide a means for users to log in.
![]() A display manager should be able to log a user into any desktop. In other words, KDM provides an option for users to log in to a Gnome desktop, while GDM provides an option for users to log in to a KDE desktop (provided, of course, the appropriate software is installed).
A display manager should be able to log a user into any desktop. In other words, KDM provides an option for users to log in to a Gnome desktop, while GDM provides an option for users to log in to a KDE desktop (provided, of course, the appropriate software is installed).
![]() Many configuration options are available for display managers, including the ability to start multiple display managers (allowing for multiple desktops). Another commonly changed configuration option is the ability to create a custom “greeter” message. This is the message that appears to users when they see the login window.
Many configuration options are available for display managers, including the ability to start multiple display managers (allowing for multiple desktops). Another commonly changed configuration option is the ability to create a custom “greeter” message. This is the message that appears to users when they see the login window.
![]() Which display manager your system uses by default depends on which distribution you are using. Additionally, how you specify the display manager on the system can vary depending on your distribution.
Which display manager your system uses by default depends on which distribution you are using. Additionally, how you specify the display manager on the system can vary depending on your distribution.
Into and Out of X
One of the topics that crops up now and then on the exam, and often enough in real life, is how to fix a frozen X display or do anything if X freezes up.
Let’s review: Linux configures, by default, the keys F1–F6 as virtual consoles, mapped to /dev/tty1 through /dev/tty6. You can switch back and forth among these virtual consoles using the Alt and F keys, each one being an entirely different login session. Typically F7 represents the GUI (although on some systems, such as Red Hat, F1 may be the GUI and F2-F6 the virtual consoles).
Sometimes you need to get from the GUI to the text mode consoles. The Alt and F keys are mapped inside X, so an additional keystroke is required to escape the surly bonds of a broken X environment. For example, if you’re in X, you would press Ctrl+Alt+F2 to reach a login screen that would drop you to the shell prompt in /dev/tty2.
After you’re out of X, you can use the Alt+F key combinations to switch to any configured virtual console. Most sysadmins just save energy by using the Ctrl key all the time when switching virtual consoles—it doesn’t hurt anything.
Let’s say you’ve fixed the problem, killed a program, and freed up X. To get back into X, you press Alt+F7 or Ctrl+Alt+F7 to return to /dev/tty7, which is configured for X by default.
Remember that, while you’re in text mode
![]() Alt+F1–F6 switches text terminals.
Alt+F1–F6 switches text terminals.
![]() Alt+F7 switches to X if running.
Alt+F7 switches to X if running.
While you’re in an X session
![]() Ctrl+Alt+F1–F6 switches to that session.
Ctrl+Alt+F1–F6 switches to that session.
![]() Alt+F7 or Ctrl+Alt+F7 switches back to X.
Alt+F7 or Ctrl+Alt+F7 switches back to X.
Another useful key combination is Ctrl+Alt+<Backspace>. This restarts the X server.
Accessibility Options
Many features are available on desktops that allow users to have a richer experience. These features cater to many individuals who would benefit from such accessibility options. The following sections describe the most common of these features/utilities.
Sticky/Repeat Keys
Sticky Keys is a feature that allows the user to perform keyboard combinations, such as Ctrl+c, without having to hold down the modifier button while pressing the combination. For example, instead of holding down the Ctrl button while pressing the c key, the user can press the Ctrl button once and then press the c key.
Repeat Keys is a feature that continuously inserts a key value when a user holds down a key on the keyboard. For example, if you hold down the key a while in a word processing program, you continue to see a’s inputted on the screen. In Figure 14-3, the Repeat Keys feature of Gnome’s Assistive Technologies program is displayed.
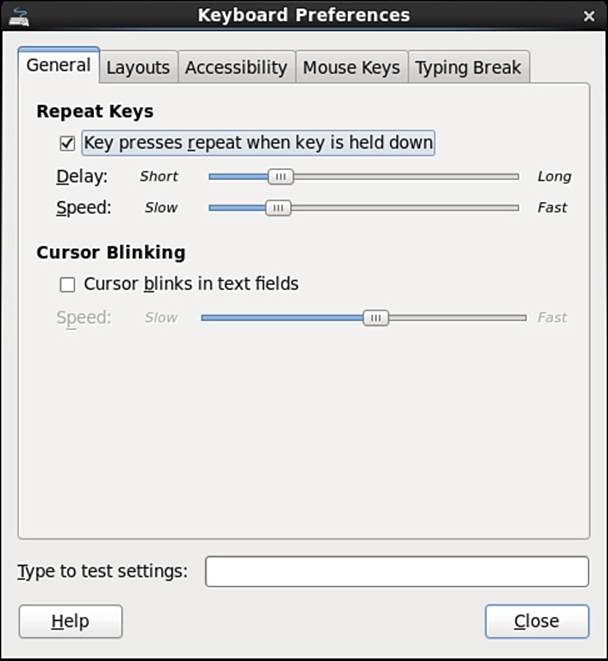
Figure 14-3 Repeat Keys settings
Slow/Bounce/Toggle Keys
Slow Keys are a feature for people who have “heavy hands” when typing on a keyboard. Often they find that extra (unwanted) keys appear when they move their hands from one key to another and accidently press another key. With Slow Keys, a key only results in a displayed character if the key is held down for a short period of time.
If a user has “shaky hands” and accidentally types keys repeatedly, Bounce Keys prevents this from happening. This does make it more difficult to type words like “difficult” because of the repeating f keys.
The Toggle Keys feature is used to provide a sound when modifier keys, such as the Shift key, are pressed. This makes it easier for users to know whether they have pressed a modifier key.
Mouse Keys
When Mouse Keys are enabled, the user can move the mouse cursor by using keys on the keyboard. On the number pad, keys 1-4 and 6-8 represent directions to move the mouse. Pressing on the 5 key represents clicking the mouse once. Double pressing 5 represents double-clicking. For this to work, the Num Lock feature must be turned off. In Figure 14-4, the Mouse Keys feature of Gnome’s Assistive Technologies program is displayed.
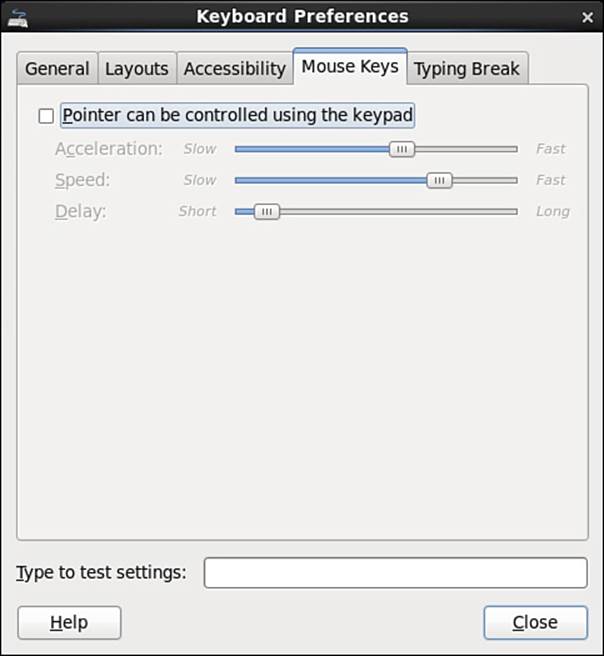
Figure 14-4 Mouse Keys settings
High Contrast/Large Print Desktop Themes
Most desktops provide different themes that allow for easier viewing. A High Contrast theme provides solid colors (typically black and white) to make the display more distinctive. In Figure 14-5, the Theme tab of Gnome’s Appearance program is displayed.
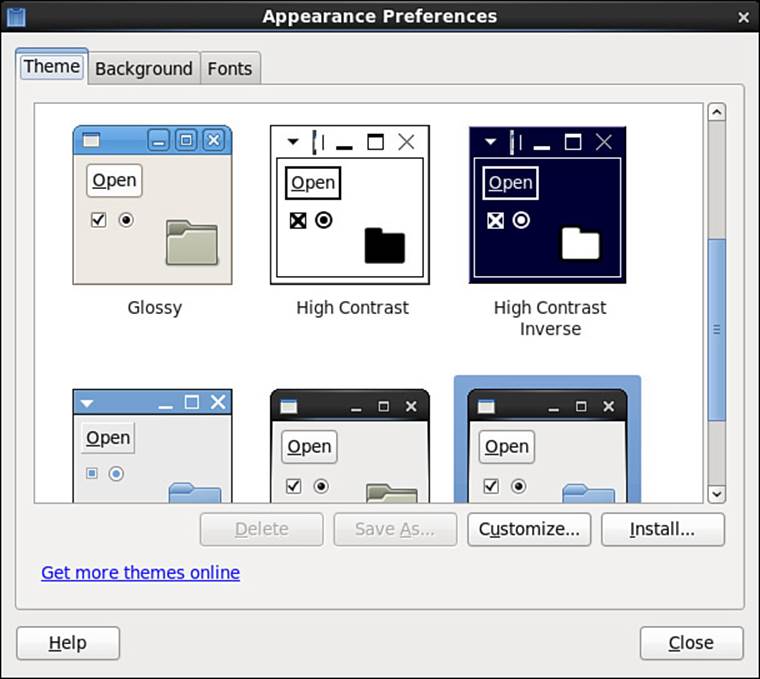
Figure 14-5 Theme settings
Large Print themes are used to display fonts in a larger font than normal. Typically this doesn’t require an actual theme but can be changed in the Fonts section of the Desktop settings.
Screen Reader
A screen reader verbalizes the text shown on the screen. Several screen readers are available, including
![]() Orca
Orca
![]() emacspeak
emacspeak
![]() espeak
espeak
![]() festival
festival
Braille Display
A Braille Display is a “monitor” that provides Braille output.
Screen Magnifier
A screen magnifier allows the user to better see the screen by magnifying a portion of the screen. An example of a screen magnifier is Kmagnifier, a program available on KDE desktops.
Onscreen Keyboard
An onscreen keyboard provides the user with the ability to “type” using a mouse with a virtual keyboard or on a touch-enabled screen. An example of an onscreen keyboard is Gnome’s GOK.
Note
Although the LPI Exam Objectives list a weight of 1 for the entire Accessibility section, it will seem like you spend an inordinate amount of time on this topic. When budgeting your mental resources, keep in mind that you only get a single question on the exam regarding this topic.
Remote Clients
Remotely displaying X client applications is a strength of X, making a centralized application server with multiple thin or slim clients a possibility. If all the client machine does is boot and connect to run applications, it can be replaced in short order, reducing user downtime significantly.
Allowing remote machines to connect to your X server indiscriminately isn’t a good security plan, so configuring the hosts access is accomplished with the xhost command.
The xhost command has three modes:
![]() xhost—Shows the current state.
xhost—Shows the current state.
![]() xhost -—Enables security; only those that are authorized can connect.
xhost -—Enables security; only those that are authorized can connect.
![]() xhost +—Disables security; anyone can connect.
xhost +—Disables security; anyone can connect.
First, run the xhost command to determine the state of the security mechanism, like so:
xhost
access control enabled, only authorized hosts can connect
You now know the machine isn’t accepting connections from just anyone, but you have a decision to make; do you want to block everyone and allow a few, or do you want to allow everyone and block just a few?
To leave the system in a secure state and allow just two hosts to connect and run applications, run the following command:
xhost +host1 host2
host1 being added to the access control list
host2 being added to the access control list
Now these hosts can connect via Telnet (unsecure) or ssh (secure). When they execute an X client, the display output is sent over the network to the client machine’s X display. This requires the correct setting of the $HOST variable. For example, if you connect to the host1 system and try to run an X client, the command may fail unless the $HOST variable is set to the machine that you just connected from:
setenv HOST "server1:0.0"
Say another system doesn’t have much on it, but you don’t want to spend time messing with the security. Your users are technically literate and it’s not a problem to have an open X server, so you run the command shown here:
xhost +
access control disabled, clients can connect from any host
The machine is wide open. If, at this point, you discover a couple of users who are being ridiculous with the open system, you can block just their systems with this command:
xhost –host3 host4
The exam focuses on scenarios for X security, including how to disable, enable, and display the status, and how to configure the access list.
Summary
In this chapter you learned about GUI-based components including the Xorg server, desktops and display managers. You also learned about basic Xorg and display manager configuration. Finally, you learned about tools associated with GUI-based components, including commands that display information, allow access from remote hosts, and provide accessibility features.
Exam Preparation Tasks
As mentioned in the section “How to Use This Book” in the Introduction, you have a few choices for exam preparation: the exercises here, Chapter 21, “Final Preparation,” and the practice exams on the DVD.
Review All Key Topics
Review the most important topics in this chapter, noted with the Key Topics icon in the outer margin of the page. Table 14-2 lists a reference of these key topics and the page numbers on which each is found.

Table 14-2 Key Topics for Chapter 14
Define Key Terms
Define the following key terms from this chapter and check your answers in the glossary:
graphical user interface
display manager
desktop
window manager
GNOME
KDE
Xorg
accessibility options
Review Questions
The answers to these review questions are in Appendix A.
1. You installed a new default Linux workstation, and the mouse works in text mode. When X is started, the mouse won’t work. Which section of the /etc/X11/xorg.conf file would you look at as part of the process to solve this problem?
a. Protocol
b. Mode
c. Device
d. Mapping
e. Emulation
2. When updating an older X system, you decide to install and use the xfs X font server. Which of the following entries should be included in the Files section of the Xorg file to have X use xfs?
a. Fontpath “/usr/X11R6/bin/xfs”
b. FontPath “unix/:7100”
c. FontServer “xfs”
d. export FSERVER=/usr/sbin/xfs
3. You want to sign on to a remote system via ssh, have an application execute on the remote machine, and be shown on your local system’s screen. Which command switches can you use to accomplish this? (Choose two.)
a. -X
b. -Y
c. -R
d. -T
4. There is a program that provides scrollbars, widgets, menus, background wallpaper, and virtual desktops for the X environment. Which phrase best describes this program?
a. Desktop
b. X server
c. Window manager
d. X client
5. The ___________ command controls access to the local X server’s resources. Fill in the blank with just the program name:
____________________________________________________________
6. You need to modify a feature of the lightdm display manager. In which directory would you store this custom configuration file?
a. /etc/dm
b. /etc/X11/lightdm
c. /etc/lightdm
d. /etc/lightdm-config
7. Which of the following accessibility features is used to verbally read text displayed on the screen?
a. Speaknow
b. Orca
c. Speakit
d. text-to-speech
8. Which accessibility program allows you to move your mouse cursor with keyboard keys?
a. Toggle Keys
b. Keyboard Keys
c. Mouse Keys
d. Slow Keys
9. A theme that provides a distinctive display by using solid colors (typically black and white) is called a _______ theme?
____________________________________________________________
10. Which of the following programs is a valid onscreen keyboard program?
a. OSK
b. on-screen-keyboard
c. GOK
d. oc-key
All materials on the site are licensed Creative Commons Attribution-Sharealike 3.0 Unported CC BY-SA 3.0 & GNU Free Documentation License (GFDL)
If you are the copyright holder of any material contained on our site and intend to remove it, please contact our site administrator for approval.
© 2016-2026 All site design rights belong to S.Y.A.