CompTIA Linux+ / LPIC-1 Cert Guide (Exams LX0-103 & LX0-104/101-400 & 102-400) (2016)
Chapter 1. Installing Linux
This chapter covers the following topics:
![]() Understanding Your Hardware
Understanding Your Hardware
![]() Laying Out the Hard Drive
Laying Out the Hard Drive
![]() Working with Boot Managers
Working with Boot Managers
The exam objectives covered in this chapter are
![]() Understanding your hardware: 101.1
Understanding your hardware: 101.1
![]() Laying out the hard drive: 102.1
Laying out the hard drive: 102.1
![]() Working with boot managers: 102.2
Working with boot managers: 102.2
Becoming proficient with Linux starts with understanding the hardware that runs the operating system. Linux has a long and bumpy past with hardware support because it was originally written with no help from the manufacturers. Over time hardware support has become better and compatibility information is easier to find. This author remembers long nights poring over message boards to find someone else running the same video card! Thankfully these problems are becoming rarer.
In general you can expect excellent compatibility on server hardware and the last generation of desktop hardware. If you buy only the newest and most expensive desktop equipment, you may find that you’re doing a bit of extra reading to get things to work.
The LPI exam isn’t concerned with the exact procedure to install Linux as this varies between Linux distributions and is constantly changing. The exam is more focused on the topics that are consistent between different Linux installations such as the hardware, disk layout, and boot loaders.
“Do I Know This Already?” Quiz
The “Do I Know This Already?” quiz enables you to assess whether you should read this entire chapter or simply jump to the “Exam Preparation Tasks” section for review. If you are in doubt, read the entire chapter. Table 1-1 outlines the major headings in this chapter and the corresponding “Do I Know This Already?” quiz questions. You can find the answers in Appendix A, “Answers to the ‘Do I Know This Already?’ Quizzes and Review Questions.”

Table 1-1 “Do I Know This Already?” Foundation Topics Section-to-Question Mapping
1. Which one of the following is not used for peripherals to communicate with the CPU and other peripherals?
a. IO ports
b. Direct memory access channels
c. Interrupt requests
d. TCP/IP ports
2. Which command gives an overview of all the hardware and drivers in the system including the ports they use to talk to the CPU?
a. lspci
b. lsdev
c. lsusb
d. sysinfo
3. /dev/sda3 refers to a
a. Partition
b. Flash drive
c. Filesystem
d. Disk
4. Which LVM component would be formatted with a filesystem and mounted?
a. Physical volume
b. Volume group
c. Physical extent
d. Logical volume
5. Which of the following is not commonly placed on its own partition?
a. /sbin
b. /home
c. /usr
d. /tmp
6. The first stage of the boot manager is typically stored in
a. The BIOS
b. /boot
c. The partition table
d. The master boot record
7. The configuration file for GRUB2 is
a. menu.lst
b. grub.cfg
c. grub.conf
d. bootloader.conf
Foundation Topics
Understanding Your Hardware
Hardware refers to the entire computer your Linux operating system will run on while the peripherals are the hardware bits that are removable or otherwise talk with the world. Video cards can be part of the motherboard or separate cards, they’re still considered peripherals. To get more technical the peripherals talk to the CPU over some kind of bus, which is what starts to complicate Linux support. Peripherals are also called devices.
An operating system refers to the system as a whole, including all the application software you use. Linux is an operating system. The kernel of an operating system is just the part that manages the interactions between the hardware and the applications. The Linux kernel runs on the CPU and memory that’s on the motherboard. To write something to disk, display something on the screen, or talk to a web server in Brazil, the kernel must send messages over the bus that connects the CPU to the peripherals. Think of the kernel as an air traffic controller that coordinates all the airplanes, runways, and ground crew.
Every hardware manufacturer manipulates data differently, which makes support difficult for any operating system. The solution is to get the kernel to speak a common language and have the peripheral manufacturers provide a driver that allows their specific hardware to speak that common language. In the old days manufacturers didn’t want to spend the time to write Linux drivers so this had to be done by the community. If the vendor didn’t offer enough information for the Linux community to write a driver, the hardware would often go unsupported.
Note
Linux is not written by a single company; it’s written by a community of people like you who want to make Linux better. People make fixes, called patches, and submit them for inclusion into the Linux kernel and associated utilities. Core members of the Linux project work with the submitter to make sure the patch follows the direction of the project and are of sufficient quality. Some of these people are hobbyists who like solving difficult problems, and some people are hired by companies that use Linux and want to contribute their improvements.
As Linux gains support, more and more hardware has Linux drivers provided directly by the manufacturer or as a result of an increasingly large community that’s willing to spend the time to make things work.
Peripheral Compatibility
Your interest in peripheral compatibility will come in one of two forms:
![]() You need to buy some hardware and want to select gear that’s Linux compatible
You need to buy some hardware and want to select gear that’s Linux compatible
![]() You already have the hardware and need to get it to work.
You already have the hardware and need to get it to work.
The easiest way to find out what hardware is supported is to check your distribution’s list of supported equipment and consult your favorite search engine to find out what other people have done. Not all distributions provide these hardware compatibility lists, especially for newer gear. Therefore you will find yourself most often looking at forums or trusting the vendor.
Most peripheral devices work in some capacity; what you are looking for is how to activate the advanced features. That expensive new 3D video card may boot and give you a decent display but without all the acceleration you paid for.
If you can boot a machine into Linux that has the hardware, even if it’s through a Live DVD that runs Linux inside memory instead of overwriting the operating system, you can use some of the following techniques.
Note
Live DVDs are a way to use Linux without making any changes to your existing operating system. To use a Live DVD, you download an image that is burned to a DVD or USB stick and then boot your computer from that image. You get a full installation of Linux that runs out of your computer’s memory without touching your existing operating system. If you like what you see you can usually jump into the installation process, or you can reboot your computer to get back to your old operating system.
All major Linux distributions have some kind of Live DVD image that can be downloaded. It’s a low effort way to try a new distribution without the hassles of trying to boot multiple operating systems.
Enumerating Your Peripherals
Peripherals talk to the CPU and other peripherals on a shared resource called a bus. To uniquely identify hardware, the CPU needs to be able to address the peripheral through one or more of several means:

![]() IO port—An address, or range of addresses, identifying the device; e.g., 0080, 1000-107f.
IO port—An address, or range of addresses, identifying the device; e.g., 0080, 1000-107f.
![]() IRQ—Interrupt requests (IRQs) signal the processor that an event has happened and that the CPU is requested to come check on the resource. It a limited resource that can sometimes be shared.
IRQ—Interrupt requests (IRQs) signal the processor that an event has happened and that the CPU is requested to come check on the resource. It a limited resource that can sometimes be shared.
![]() DMA—Direct memory access (DMA) allows a peripheral to access system memory directly rather than having the CPU intervene.
DMA—Direct memory access (DMA) allows a peripheral to access system memory directly rather than having the CPU intervene.
The two methods of viewing the current hardware list on a Linux system are
![]() Viewing the contents of the /proc filesystem
Viewing the contents of the /proc filesystem
![]() Using one of the hardware listing tools
Using one of the hardware listing tools
The Proc Filesystem
Unix has a philosophy that “everything is a file,” and part of that means that hardware information and state information for both the system and processes are exposed on the filesystem. In Linux this started off as the procfs, which is usually mounted on /proc. In this directory you find that each process on the system has a directory containing information about itself. Features that must keep state to work, such as a firewall that tracks network connections being handled by the system, also expose their information through /proc.
Additionally, procfs contains details about the hardware in the system. Such files as /proc/ioports, /proc/dma, and /proc/interrupts can show the investigating user or sysadmin a lot of pertinent information about the system’s configuration.
Incidentally, procfs is called a pseudofilesystem. It looks like a device but doesn’t exist on any real hardware. It’s simply a way of exposing kernel information to the user in a well-defined format.
When errors or conflicts occur, the following commands are essential to resolving the conflicts shown in the output. Viewing that information straight from the /proc directory is accomplished with the following commands:
cat /proc/interrupts
cat /proc/ioports
cat /proc/dma
cat /proc/usb
cat /proc/pci
There is also a series of commands beginning with ls* that gather the same information and present it in more human readable format.
The pertinent commands are
![]() lsmod—Shows the kernel modules loaded, along with any dependencies for those modules. Helpful for double checking that the driver is loaded for a peripheral. If the module is not present then use the modprobe command to load it, such as with modprobe bluetooth.
lsmod—Shows the kernel modules loaded, along with any dependencies for those modules. Helpful for double checking that the driver is loaded for a peripheral. If the module is not present then use the modprobe command to load it, such as with modprobe bluetooth.
![]() lscpu—Provides details about your CPU, such as the number and speed of each socket and core.
lscpu—Provides details about your CPU, such as the number and speed of each socket and core.
![]() lspci—Shows a lot of information about your PCI bus and devices. This can identify devices on the bus that the kernel doesn’t know about and provides addressing information for configuring them.
lspci—Shows a lot of information about your PCI bus and devices. This can identify devices on the bus that the kernel doesn’t know about and provides addressing information for configuring them.
![]() lsscsi—Shows information about the SCSI devices on your system, if the system supports SCSI. This tells you if the system can see the disk.
lsscsi—Shows information about the SCSI devices on your system, if the system supports SCSI. This tells you if the system can see the disk.
![]() lsdev—Shows the devices recognized by your system.
lsdev—Shows the devices recognized by your system.
![]() lsraid—Displays the Redundant Array of Inexpensive Disks (RAID) devices on the system.
lsraid—Displays the Redundant Array of Inexpensive Disks (RAID) devices on the system.
![]() lsusb—Displays the USB information and devices for your system.
lsusb—Displays the USB information and devices for your system.
![]() lsblk—Displays the block devices (disks) attached to your system.
lsblk—Displays the block devices (disks) attached to your system.
Note
Expect to get questions about the output of these programs, such as which one will show the most comprehensive information about your system’s IO ports, DMA, and IRQs. The lsdev command shows the most definitive set of information in one stream of output.
Example 1-1 shows the lsdev command in action.
Example 1-1 lsdev Command
[root@bob ~]# lsdev
Device DMA IRQ I/O Ports
------------------------------------------------
0000:00:1f.0 1000-107f 1180-11bf
acpi 9
cascade 4
e100 2000-203f
eth0 20
eth1 16
[root@bob ~]# lspci | grep 00:1f.0
00:1f.0 ISA bridge: Intel Corporation 82801BA ISA Bridge (LPC) (rev 12)
In Example 1-1 you can see that the first device shown occupies two ranges of IO ports and has a numeric ID, which is a PCI address. The second command in the example searches for that address in the lspci command’s output, showing that it’s a bridge to the legacy ISA bus.
The next device is the advanced configuration and power interface (ACPI), which lets the hardware and software talk together for managing power usage. This communicates to the CPU with interrupt number 9.
Next is a DMA device called cascade, which is used by the hardware to let two DMA controllers talk to each other. It has DMA channel 4.
The last 3 entries are for the network peripherals. The first is the network driver, which has some IO ports reserved. The last two are for the cards, each has an IRQ.
Friends of procfs
procfs is the most popular way to expose kernel information to users, but there are more. The files under /proc are unstructured and contain both information about processes and devices. The goal of sysfs is to solve some of these shortcomings by migrating device data to /sys. Data still can exist on both, and the device tools such as lspci still use /proc.
udev is the Linux kernel’s device manager. It manages the device files under /dev using information about the device from sysfs. Every accessible device on the system will have a corresponding device file under /dev. If a device is plugged in to the computer while it is running, udev can configure it and make it available to the system. Devices that support being plugged in at runtime are also called hotplug devices, as opposed to coldplug devices that require the computer to be rebooted for them to be used.
Another loosely related service is called D-Bus. This is a distributed software bus that lets desktop applications send messages to each other and receive messages from the kernel. The D-Bus could be used for an email client to notify the window manager that an email has been received so that it can display an icon. It could also be used by udev to notify the window manager when a DVD has been inserted into the system.
Dealing with Integrated Peripherals
Motherboards, the component that houses the CPU and RAM, often comes with integrated peripherals, which are peripherals built into the motherboard. Video cards and network adapters are the most frequent integrated peripherals, but sound cards, RAID adapters, or special external peripheral ports could also be present.
Manufacturers include the hardware drivers with the motherboard, but these drivers may not support Linux. To make matters worse, integrated peripherals often require software support from the operating system to work properly. For example, some motherboards duplicate data across multiple disks for redundancy using a feature called a Redundant Array of Independent Disks (RAID) by supplying an integrated RAID adapter. This adapter may do some of the necessary parity calculations on the computer’s CPU instead of on the adapter to lower the price of the motherboard. This means that the Linux driver needs to support both the hardware and the software features.
If an integrated peripheral is not supported in Linux, your first step should be to see whether it works in a reduced capacity. A video card that shares memory with the system may not work in 3D accelerated mode but may work fine for regular use.
If the peripheral is not supported at all, your best course of action is to disable it entirely so that you can replace it with something that works. To do so
Step 1. Reboot your computer and enter BIOS setup mode. This involves pressing a special key while the computer boots. Your computer’s BIOS displays a message such as “PRESS F12 TO ENTER BIOS SETUP.”
Step 2. Navigate the setup menu to find the hardware section corresponding to the device you want to disable.
Step 3. Select the option to disable the peripheral.
Step 4. Exit the BIOS menu, making sure to select the option to save. This last part is important as the usual default is to discard all changes and reboot!
Laying Out the Hard Drive
Storage comes in many different flavors—hard drives, Universal Serial Bus (USB) flash drives, floppy and compact discs, DVDs, and network attached drives. Linux treats all these mass storage devices similarly and expects the administrator to fill in the details. This might mean entering a network or port address for a network file share, or identifying a particular hard drive. But to the user, these details are hidden from view.
Partitions and Devices
A single disk drive is divided up into one or more partitions that logically separate the disk. This logical separation allows you to assign space on the same drive for different uses. For example, a 3TB drive may be split up with the first 500GB for the operating system and applications, 1TB for database files, and 1.5TB for users’ home directories.
A partition is then formatted with a filesystem that allows it to store files. The operating system uses the filesystem to map files to the actual blocks on disk and manage directories and permissions.
Partitioning allows you to limit the scope of disk problems and to tune according to the intended use. For example, you may not want to track the last time a file was looked at on system binaries and database files but track the time on users’ files. Breaking out user files onto its own partition means you can use a different set of options for user files than you use for system binaries.
The problems encountered in an unexpected reboot are also reduced through partitioning. When a system is improperly shut down, files that were opened for writing may not have all their data persisted to disk. As the operating system files are rarely open for writing, that partition can usually survive an unclean shutdown. You can then get the computer up and running and tackle the problem of validating the consistency of user files in a separate action.

Linux uses device names to refer to the drives and partitions. The drives or devices are given a letter and a number is appended for the partition as follows:
![]() /dev/sda is the first hard drive (a) in the system.
/dev/sda is the first hard drive (a) in the system.
![]() /dev/sda1 is the first partition (1) on the first hard drive (a) in the system.
/dev/sda1 is the first partition (1) on the first hard drive (a) in the system.
![]() /dev/sdb3 is the third partition (3) on the second drive (b) in the system.
/dev/sdb3 is the third partition (3) on the second drive (b) in the system.
Caution: The first partition is partition 1, but in most other situations 0 (zero) is the first device. /dev/md0 is the first RAID volume and /dev/scd0 is the first CD drive.
The Root Filesystem
Linux has many differences from Microsoft operating systems, but the one that seems to stand out the most is the single filesystem. In Windows, if you have three disk drives, they will probably be called C:, D:, and E:. Add a DVD drive and that is called F:. In Linux, just like other Unixes, there’s just one filesystem, and drives are grafted onto directories by mounting the filesystem at a particular point in the parent filesystem. The parent filesystem could be the root filesystem or it could be a descendant.
Figure 1-1 shows a typical configuration where directories are split among multiple drives and partitions.
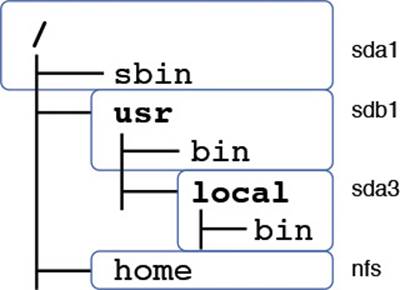
Figure 1-1 A typical set of mounted directories showing two hard-drive mounts and one network mount
In Unix, the system starts off with a single root filesystem called /. In Figure 1-1 this is on device sda1. The /usr partition is mounted from sdb1, and on top of that, sda3 is mounted on /usr/local. Given this system, these statements are all true:
![]() Directories with bolded names are mount points—their contents come from a different device than their parent.
Directories with bolded names are mount points—their contents come from a different device than their parent.
![]() Files in / go on sda1; it is the root partition.
Files in / go on sda1; it is the root partition.
![]() Files in /sbin go on sda1; it is still part of the root filesystem.
Files in /sbin go on sda1; it is still part of the root filesystem.
![]() Files in /usr go on sdb1; it is mounted off the root filesystem on /usr.
Files in /usr go on sdb1; it is mounted off the root filesystem on /usr.
![]() Files in /usr/bin go on sdb1; it is part of the same filesystem as /usr.
Files in /usr/bin go on sdb1; it is part of the same filesystem as /usr.
![]() Files in /usr/local go on sda3; it is mounted on /usr/local/.
Files in /usr/local go on sda3; it is mounted on /usr/local/.
![]() Files in /usr/local/bin go on sda3; the /usr/local/mount is more specific than the /usr mount.
Files in /usr/local/bin go on sda3; the /usr/local/mount is more specific than the /usr mount.
![]() Files in /home go over a network file system (NFS) share and are stored on a completely different computer.
Files in /home go over a network file system (NFS) share and are stored on a completely different computer.
Each partition has a filesystem on it, and the operating system stitches everything together to look like one big filesystem even though it may span multiple devices or even separate computers.
The user of a Linux system doesn’t have to worry about where one disk begins and another one ends—that’s the unfortunate job of the administrator. This layer of abstraction means that disks can be moved around, resized, put on the network, or cloned without any changes. Think of what would happen in Windows if your D: drive suddenly became E:! This just doesn’t happen in Linux.
The single filesystem also applies when accessing removable devices. When you plug in a USB flash drive you need to mount it somehow so that you can access the files stored on the drive. The software running your desktop environment may mount it for you or you may need to type commands, but in either case it’s treated as if it were a fixed hard drive.
When deciding how to lay out your disks, a useful acronym to remember for real-world needs is PIBS:
![]() Performance—Performance increases if the system’s heavy usage directory trees are put on another disk. Good candidates for a move to another disk are the /home directory or the swap partition.
Performance—Performance increases if the system’s heavy usage directory trees are put on another disk. Good candidates for a move to another disk are the /home directory or the swap partition.
![]() Integrity—Integrity improves by having critical files in their own partition. If disk resources become corrupted or damaged, such as from a sudden power outage, the computer can be down for hours to complete a filesystem check. Distancing risky partitions such as an FTP uploadfolder from the traditional root of the system is a good idea; otherwise, an FTP user that fills up the system partition would cause the system to crash.
Integrity—Integrity improves by having critical files in their own partition. If disk resources become corrupted or damaged, such as from a sudden power outage, the computer can be down for hours to complete a filesystem check. Distancing risky partitions such as an FTP uploadfolder from the traditional root of the system is a good idea; otherwise, an FTP user that fills up the system partition would cause the system to crash.
![]() Backup—Separate partitions give you more control over backups. For example, you may only want to back up files that change often in /home and conduct less frequent backups for files that do not change often within /usr. The tar command is used to back up sets of files and directory trees. It can be used to back up an entire file system, but there are more efficient tools for backup up partitions and complete disks like dump or dd.
Backup—Separate partitions give you more control over backups. For example, you may only want to back up files that change often in /home and conduct less frequent backups for files that do not change often within /usr. The tar command is used to back up sets of files and directory trees. It can be used to back up an entire file system, but there are more efficient tools for backup up partitions and complete disks like dump or dd.
![]() Security—When placing partitions and directory trees on the system, be aware that it’s much easier to isolate or jail a risky portion of your server if it’s contained on a separate partition or disk. This is accomplished through options that are set at mount time, such as not allowing people to execute files with increased privilege or write to the filesystem. Mount options are discussed thoroughly in Chapter 9, “Partitions and Filesystems.”
Security—When placing partitions and directory trees on the system, be aware that it’s much easier to isolate or jail a risky portion of your server if it’s contained on a separate partition or disk. This is accomplished through options that are set at mount time, such as not allowing people to execute files with increased privilege or write to the filesystem. Mount options are discussed thoroughly in Chapter 9, “Partitions and Filesystems.”
Logical Volume Manager (LVM)
Over time the shuffling of physical disk partitions to keep up with demand gets tiring. What happens if you need a /home drive that’s bigger than a single disk? Do you just throw away your older disks when you add more space?
You could use the RAID system to create a virtual volume out of smaller disks, but that gets messy, especially if you want to use RAID’s fault tolerance.
Enterprise Unixes solve this problem with something called Logical Volume Management (LVM). Linux took ideas from enterprise Unixes and implemented the LVM feature. With LVM, system physical disks are combined into smaller sets of pools, and the partitions themselves are built from those pools.
Figure 1-2 shows the basic components of LVM and how they fit together.
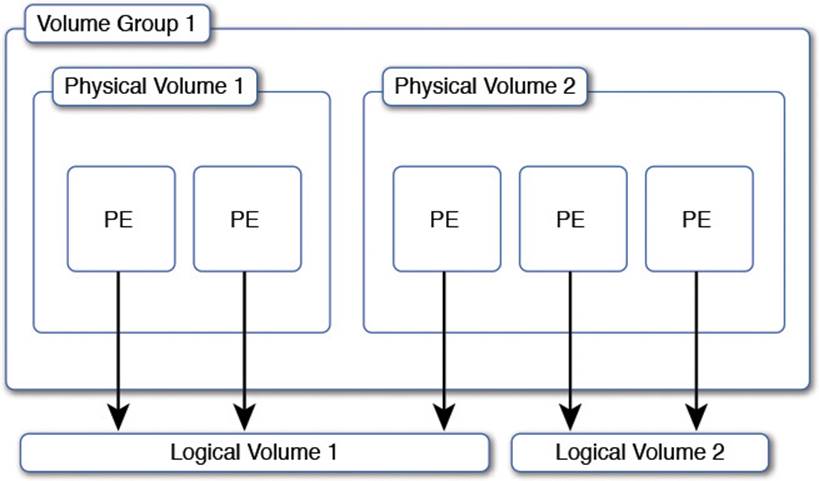
Figure 1-2 Logical volume concepts
The base unit of storage in LVM is the physical volume (PV). A PV corresponds to a hard disk partition such as /dev/sda1 or some kind of block storage device coming from a dedicated storage system called a Storage Area Network (SAN). One or more physical volumes are combined to form a pool of storage called a volume group (VG). Under the hood the physical volume is chopped up into a series of physical extents (PE) to make allocations easier.
The administrator then carves up the volume group into a series of logical volumes (LV). Each logical volume holds a filesystem that is used by the operating system.
Many interesting things can happen now that the filesystem on the logical volume is thoroughly abstracted from the exact placement on disk. If you need more disk space on a logical volume you can take it from anywhere in the volume group. If the volume group is low on space simply add another physical volume to the volume group and the new physical extents are available to any logical volume.
Filesystems can be grown and shrunk by adjusting the size of their underlying logical volume as long as the filesystem supports it. The LVM system takes care of allocating the physical extents to the logical volume so you don’t have to worry about shuffling around partitions on disk anymore.
Snapshotting is now possible in an LVM enhanced system. A snapshot takes a point in time copy of a logical volume and makes it available as another disk while still allowing writes to happen to the original filesystem. This allows you to back up the snapshot image without needing to take the files or database offline; you can continue to work and change the files for later backup.
Commonly Used Mounts
A filesystem can be mounted on almost any directory as needed. You could mount a filesystem on top of /usr and then another one onto /usr/local if you wanted. Just because you can do it doesn’t mean you should, however. With experience, you’ll find a few common ways for administrators to lay out their filesystems.
The first option is to put everything on a single root partition. With LVM and large hard drives this isn’t a bad option.
The two most common places that a new partition is added is in /home and /var. Home is for the user’s home directories, which includes their work in progress and saved files. In a larger environment this may even be a network file share so that all computers share a common home directory system.
The other common mount point on which to split off another filesystem is /var, which is typically used for system log and data files. A database may store its files in /var/lib/mysql, system logs usually go under /var/log, and so forth.
When considering whether to split a directory off to another partition think about the activity on the disk: Do you expect the use of the partition to grow over time? What is the balance of reads and writes? Does the partition contain important system files, including the utilities to mount other partitions?
Both /home and /var are good candidates for separate filesystems because they grow the most and have the most write activity. The flexibility offered through separate partitions, even if they are backed by the same LVM volume group, is usually worth the added complexity.
Other lesser candidates for separate partitions are /tmp and /usr. The former is used for temporary file storage and can often grow, or need to be supported by a faster disk, and the latter can grow over time or may be shared across multiple systems.
A final partition you may run into is /boot. This is a small partition used to contain files necessary for loading the kernel.
Swap Files
Most partitions you encounter store files. There is another kind of partition, called a swap partition, that stores memory instead of files.
The operating system uses virtual memory, which means that the kernel presents a contiguous memory space to each application but can store the bytes wherever it needs to. If an application isn’t using all its memory, it doesn’t really matter whether the bytes are in RAM or stored on disk. Thus the kernel can swap memory pages to disk as needed, allowing the system to behave as if it has more memory than it actually does.
Access to disk data is much slower than access to RAM data, so it’s vital to avoid the need to constantly swap memory to and from disk or thrashing will happen. When your disks start to thrash, the system becomes painfully slow. Consider swap to be a safety net more than anything else.
Working with Boot Managers
The final piece of the installation puzzle is the boot manager. The boot manager’s job is to take the computer from power up to a functioning Linux kernel.
When a computer boots up, it doesn’t know how to talk to all its peripherals or load applications. But each computer has a Basic Input-Output System (BIOS) that gives it just enough intelligence to read and write to local disks and write some text to the screen.
Once the computer boots up it transfers control to the BIOS, which initializes the hardware and reads the first block—512 bytes—from the boot disk. This block contains the first part of the boot loader that loads the boot manager from disk and runs it. This special sector on the disk is called the master boot record (MBR).
The Linux boot block can be placed in the first block of the Linux partition itself in cases where an existing operating system already occupies the MBR. In this case the first boot manager needs to be told to pass control over to the Linux boot manager. It’s complicated, but this multi-bootingallows two different operating systems to coexist on the same computer.
The boot manager displays a menu offering different operating system choices. Usually a default is chosen if no input is received within a short period of time, which allows a computer to boot unattended. Boot managers can also pass parameters to the kernel such as to initialize hardware differently, disable problematic features, or alter the boot sequence.
Several boot managers are available though most distributions have standardized on the Grand Unified Boot Loader (GRUB).
GRUB Legacy
In the early days of Linux the boot manager was simple. You would either boot a kernel from an existing Microsoft DOS system through LOADLIN.EXE or directly with the Linux Loader (LILO). The latter was fairly inflexible. While you had a basic menu system, any changes needed to be made by rewriting the boot manager to disk. Even the location of the kernel blocks on disk needed to be known beforehand! LILO would have to generate a list of blocks containing a kernel and write them to a known place so that it could piece the kernel back together on boot.
Eventually the GNU Foundation started work on GRUB. This boot manager is more flexible than others because it offers an interactive menu that can be easily change and adapt to boot many operating systems. GRUB understands different filesystems, which allows it to read the kernel from disk as if it were a file instead of needing to know where the individual blocks are.
GRUB uses a temporary boot volume, /boot by default, on which to store kernels and the GRUB configuration. Some BIOSes can’t see the whole disk, so putting the boot manager in a safe area means that it can boot a kernel that has the functionality to read the entire disk.
GRUB2
GRUB2 is the version of GRUB currently in use. The software was rewritten to allow plugins and expand features available in the menu system. GRUB legacy and GRUB2 are otherwise fairly similar.
Installing GRUB2
The first step to getting GRUB2 installed is to have the tool write itself to the master boot record as follows:
[root@localhost ~]# grub2-install /dev/sda
Installing for i386-pc platform.
Installation finished. No error reported.
This copies the boot sector image to disk and the remaining files to /boot. If your bootable partition is not /boot you can override this default setting, such as /mnt/tmpboot in Example 1-2.
Example 1-2 Installing GRUB2 to an Alternate Location
[root@localhost ~]# grub2-install --boot-directory=/mnt/tmpboot /dev/sda
Installing for i386-pc platform.
Installation finished. No error reported.
[root@localhost ~]# tree -d /mnt/tmpboot/
/mnt/tmpboot/![]() grub2
grub2
![]() fonts
fonts
![]() i386-pc
i386-pc
![]() locale
locale
4 directories
In Example 1-2 the GRUB2 files are installed to /mnt/tmpboot and the tree command shows the directories created for the boot manager. The GRUB2 image and related modules are found inside the i386-pc directory.
This alternate boot disk option is most often used if you’re making your own boot disks on an existing system, where you will have an image of the disk temporarily mounted.
Using the GRUB2 Command Line
Your first interaction with the GRUB2 command line is during the boot process. When you boot a computer you see the GRUB2 menu offering a list of kernels to boot and also an option to enter the “c” character to get to the command line. Pressing this gets you to a simple command prompt:
grub>
If you can’t boot normally you can use the GRUB2 command line to inspect your running system and get a kernel booted. Look at the list of devices with the ls command:
grub> ls
(proc) (hd0) (hd0,msdos2) (hd0,msdos1)
The syntax of the partitions is similar to the Linux way of naming partitions. It’s important to remember that disks are counted from zero, but partitions are counted from one. So the first partition on the first disk is hd0,msdos1, which corresponds to sda1 in Linux. It is often difficult to know which partition contains the files you want, so you can inspect each. The shell does not provide wildcards, though the TAB key can be used as a substitute:
grub> ls (hd0,msdos1)/vml<TAB>
Possible files are
vmlinuz-0-rescue-bc31f38de2ee4e2cab0ad674986cee12
vmlinuz-3.17.6-300.fc21.x86_64
If you are new to Linux, you may find these naming inconsistencies confusing. Linux tools are developed by different people with different ways of doing things. Devices in the Linux kernel are fairly consistently named, but GRUB is developed by a completely different set of people with a different set of goals. GRUB was designed to boot different operating systems so some concepts don’t line up directly to the way it’s done in Linux.
The Tab key looks for any files beginning with vml, which are kernel files, on the device. Two are shown here. Knowing that the second one is the kernel to boot because of the name, you can give GRUB enough information to boot it by supplying the name of the kernel and the name of the corresponding initial RAM disk. The initial RAM disk, abbreviated initrd, contains extra drivers necessary to boot the kernel on the specific hardware the kernel is running on.
grub> linux (hd0,msdos1)/vmlinuz-3.17.6-300.fc21.x86_64 root=/dev/
mapper/fedora-root ro
grub> initrd (hd0,msdos1)/initramfs-3.17.6-300.fc21.x86_64.img
grub> boot
While several parameters are involved in booting the kernel, they are already in the grub.cfg file, which can be viewed with the cat command or searched for on the Internet. The kernel can take many parameters, but it is important to pass the path to the root filesystem (root=) and that the filesystem should initially be booted read-only (ro).
In the early days of Linux a problem with your boot manager meant that you needed to find a CD or floppy disk that had Linux so that you could boot and begin recovery. GRUB2’s command line means that you can still get into your system and fix it up more quickly.
Configuring GRUB2
GRUB2’s configuration file is called grub.cfg. In this, you find the configuration that sets up the menus you see when the system boots.
Note
GRUB legacy uses menu.lst and grub.conf for configuration. The syntax changed between versions, and your distribution’s default may look more like code than a configuration file.
Configuring GRUB2 has become more complicated than GRUB legacy (unnecessarily so in this author’s humble opinion). While previously you would edit grub.conf and be done, the new grub.cfg is generated with a script so you must look to the scripts to see how to make your changes.
The grub-mkconfig command generates the configuration file for you, optionally receiving a path to the output file. If you don’t specify a file, the output goes to your screen.
# grub-mkconfig -o /boot/grub/grub.cfg
Generating grub configuration file ...
Found linux image: /boot/vmlinuz-3.13.0-32-generic
Found initrd image: /boot/initrd.img-3.13.0-32-generic
Found memtest86+ image: /memtest86+.elf
Found memtest86+ image: /memtest86+.bin
done
The inputs to grub-mkconfig are /etc/default/grub and the files in /etc/grub.d/. The former sets various defaults; the latter is a series of shell scripts:
# ls /etc/grub.d/
00_header 20_linux_xen 30_uefi-firmware README
05_debian_theme 20_memtest86+ 40_custom
10_linux 30_os-prober 41_custom
Each one is run in order and their outputs are all concatenated into the master output. If you want to add a custom section to your boot manager menu, look at the files marked custom and either extend them or add your own.
Summary
In this chapter you learned how the Linux kernel interacts with hardware. Peripheral devices talk to the kernel through a combination of IO ports, direct memory access channels, and interrupt requests. Commands such as lsdev and lspci allow you to inspect the exact resources that the peripherals are using.
Block storage devices store permanent data for the system. Disks that attach to your system have a name, such as /dev/sda, and a partition number that is appended to that name such as /dev/sda1. A filesystem is applied to a partition so that the kernel knows how to place files on the disk blocks, and these filesystems are then mounted in a tree structure onto the root filesystem.
Finally, a boot loader is responsible for taking the computer from power on to a running kernel. The most common boot loader is the Grand Unified Boot Loader, which is split across two versions: GRUB Legacy and GRUB2.
Exam Preparation Tasks
As mentioned in the section “How to Use This Book” in the Introduction, you have a couple of choices for exam preparation: the exercises here, Chapter 21, “Final Preparation,” and the practice exams on the DVD.
Review All Key Topics
Review the most important topics in this chapter, noted with the Key Topics icon in the outer margin of the page. Table 1-2 lists a reference of these key topics and the page numbers on which each is found.

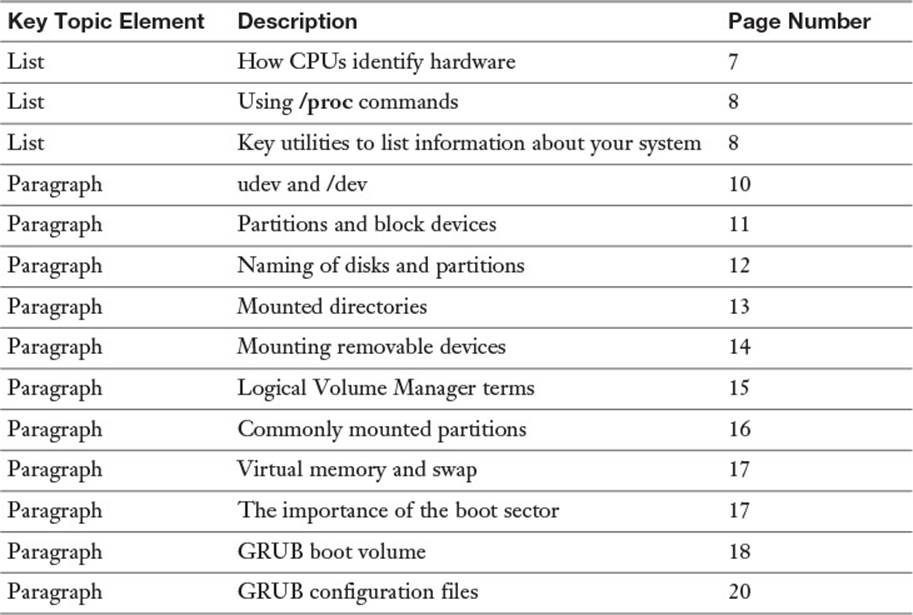
Table 1-2 Key Topics for Chapter 1
Define Key Terms
Define the following key terms from this chapter and check your answers in the glossary:
hardware
peripherals
bus
driver
pseudofilesystem
coldplug
hotplug
integrated peripherals
partitions
filesystem
root filesystem
mount points
Redundant Array of Independent Disks (RAID)
Logical Volume Manager (LVM)
physical volume (PV)
volume group (VG)
physical extents (PE)
logical volumes (LV)
swap partition
swap
thrashing
boot manager
Basic Input Output System (BIOS)
master boot record (MBR)
Grand Unified Boot Loader (GRUB)
multi-booting
initial RAM disk
virtual memory
Review Questions
The answers to these review questions are in Appendix A.
1. Which acronym refers to a feature that allows a peripheral to access system memory without needing to use the CPU?
a. IRQ
b. DMA
c. TCP
d. MEMCP
2. What does the lsdev command do?
a. Shows PCI devices
b. Shows IO ports
c. Shows DMA channels
d. All of the above
3. How does a peripheral notify the CPU that there is an event that needs its attention?
a. Contacts the CPU over an IO port
b. Initiates a direct memory access channel
c. Issues an interrupt request
d. Modifies the program counter of the CPU to execute code on the device
4. A pseudo-filesystem containing information about the system is
a. /dev
b. /proc
c. /usr
d. /sbin
5. What subsystem manages entries under /dev?
a. systemd
b. init
c. procfs
d. udev
6. A hotplug device:
a. Doesn’t need a driver
b. Can be inserted and removed without rebooting the system
c. Can’t be removed without rebooting the system
d. Is another name for a hard drive
7. Which of the following are not mass storage devices?
a. Network attached drive
b. Flash drive
c. RAM
d. CD-ROM
8. /dev/sda2 is
a. A hard drive
b. A logical volume
c. A network adapter
d. A partition on a hard drive
9. A filesystem is applied to
a. A hard drive
b. A partition
c. A physical volume
d. A volume group
10. Your root volume is /dev/sda1. You mount /dev/sda2 on /usr and then /dev/sdb1 on /usr/local/. Files in /usr/bin are then stored on:
a. /dev/sda2
b. /dev/sdb1
c. /dev/sda1
d. You can’t nest mounts.
11. When laying out hard drive partitions, which of the following is not a primary consideration?
a. Performance
b. Integration
c. Backup
d. Security
12. In the Logical Volume Manager, the hard drive partitions themselves are
a. Logical volumes
b. Volume groups
c. Physical extents
d. Physical volumes
13. The Logical Volume Manager lets you resize disks without rebooting:
a. True
b. False
14. When the kernel is under pressure to give memory to a process, and there is another process that hasn’t used its memory in a while, the kernel will
a. Swap the old memory to disk
b. Give the memory to the new process knowing it’s not being used
c. Compress the memory pages and give the reclaimed space to the new process
d. Refuse to give memory to the new process
15. The first block on the disk is called (the):
a. GRUB
b. Bootloader
c. Master boot record
d. Index
16. GRUB2’s configuration file is called:
a. /etc/grub2/menu.lst
b. /etc/grub2/grub.conf
c. /etc/grub2/grub2.conf
d. /etc/grub2/grub.cfg
All materials on the site are licensed Creative Commons Attribution-Sharealike 3.0 Unported CC BY-SA 3.0 & GNU Free Documentation License (GFDL)
If you are the copyright holder of any material contained on our site and intend to remove it, please contact our site administrator for approval.
© 2016-2026 All site design rights belong to S.Y.A.