CompTIA Linux+ / LPIC-1 Cert Guide (Exams LX0-103 & LX0-104/101-400 & 102-400) (2016)
Chapter 2. Boot Process and Runlevels
This chapter covers the following topics:
![]() The Linux Boot Process
The Linux Boot Process
![]() Boot Sequence from BIOS to Fully Running System
Boot Sequence from BIOS to Fully Running System
![]() systemd
systemd
![]() Shut Down and Reboot from the Command Line
Shut Down and Reboot from the Command Line
![]() Properly Terminating Processes
Properly Terminating Processes
![]() Logging Boot Events
Logging Boot Events
This chapter covers the following objectives:
![]() Boot the system: 101.2
Boot the system: 101.2
![]() Change runlevels/boot targets and shut down or reboot the system: 101.3
Change runlevels/boot targets and shut down or reboot the system: 101.3
In this chapter we discuss the Linux boot process, runlevels, boot logging, and how to manage the boot process.
“Do I Know This Already?” Quiz
The “Do I Know This Already?” quiz enables you to assess whether you should read this entire chapter or simply jump to the “Exam Preparation Tasks” section for review. If you are in doubt, read the entire chapter. Table 2-1 outlines the major headings in this chapter and the corresponding “Do I Know This Already?” quiz questions. You can find the answers in Appendix A, “Answers to the ‘Do I Know This Already?’ Quizzes and Review Questions.”

Table 2-1 “Do I Know This Already?” Foundation Topics Section-to-Question Mapping
1. Write on the following line the exact text to specify at the GRUB prompt to cause a default install of a Linux distribution to boot directly to runlevel 2 after system initialization:
_________________________________________________________
2. When using the GRUB boot loader, which of the answers describes the first logical partition on the first hard disk in a GRUB configuration?
a. /dev/sda5
b. (hd0,4)
c. c:8000:6
d. /dev/dsk/c0d0s3
3. Which of the following commands would allow you to make changes to parameters for a configured GRUB menu choice, before booting the system?
a. c (change)
b. b (boot menu)
c. e (edit)
d. a (alter)
4. Which of the following commands shows messages read from the kernel ring buffer to standard output?
a. cat /var/log/messages/kernel
b. dmesg
c. kernring
d. lastlog
5. Which of the following commands are symlinks to the reboot command? (Choose two.)
a. shutdown
b. halt
c. poweroff
d. init 6
6. Which of the following are a part of the systemd utilities or commands? (Choose all that apply.)
a. servicectl
b. haltd
c. journald
d. shutdownd
e. systemctl
7. If you wanted to remove all running instances of the foobar application, which of the following commands would accomplish this?
a. pskill foobar
b. halt foobar
c. kill foobar*
d. killall foobar
e. pstree foobar
Foundation Topics
The Linux Boot Process
Booting your Linux system isn’t just a matter of turning on your system and having it eventually present you with a login prompt. It’s more a set of events that results, if all goes well, in your being presented with that login prompt.
In this section we look at the boot process as a set of tasks performed to get the system to the point where it can enter the default runlevel, where things can become complex due to the various methods of configuring, starting, and managing system services or processes.
What Is the Boot Process?
The boot process for Linux is how a system progresses from the power-on of the hardware (or virtual hardware in some cases) until the chosen operating system is at the desired state of functionality. With the popularity of systemd, Upstart, and other initialization methods, a number of pathways to achieving a running system can be taken.
The Linux boot process can be broken up into four distinct stages. They are typically:
1. Boot loader phase
2. Kernel phase
3. Early user space
4. Init process
Boot Loaders
Before we run through the different possible scenarios for the available/tested system initialization choices, a quick note about boot loaders is necessary.
Historically, you would find systems that either ran LILO, the Linux Loader, or early versions of GRUB, the Grand Unified Boot Loader. In this and future decades you’ll likely encounter GRUB Version 1 and increasingly GRUB Version 2 bootloaders on systems.
Note
The installation of GRUB and other boot loader topics are covered in Chapter 1, “Installing Linux.”
Possible boot loaders include the following:
![]() LILO—A much older and less-configurable system for booting systems. LILO-booted machines still exist in some production environments, but LILO is definitely not the best or most up-to-date choice available.
LILO—A much older and less-configurable system for booting systems. LILO-booted machines still exist in some production environments, but LILO is definitely not the best or most up-to-date choice available.
![]() GRUB—Grand Unified Boot Loader is the default boot loader for nearly all production and almost all user instances of Linux these days. Its superior configurability, boot options for just about any desired action, and the capability to change the boot process while it’s happening make it the boot loader of choice.
GRUB—Grand Unified Boot Loader is the default boot loader for nearly all production and almost all user instances of Linux these days. Its superior configurability, boot options for just about any desired action, and the capability to change the boot process while it’s happening make it the boot loader of choice.
![]() SYSLINUX—Seldom seen on systems these days, SYSLINUX was primarily used for boot or rescue disk options, to boot Linux from live USB devices and other types of nontraditional Linux systems. In addition, SYSLinux was used extensively to load Linux systems from a FAT file system on a DOS or early Windows system.
SYSLINUX—Seldom seen on systems these days, SYSLINUX was primarily used for boot or rescue disk options, to boot Linux from live USB devices and other types of nontraditional Linux systems. In addition, SYSLinux was used extensively to load Linux systems from a FAT file system on a DOS or early Windows system.
![]() Loadlin—Another method of booting from a non-Linux system, Loadlin literally swaps out or replaces a running non-Linux operating system with a running version of Linux.
Loadlin—Another method of booting from a non-Linux system, Loadlin literally swaps out or replaces a running non-Linux operating system with a running version of Linux.

A Linux computer typically has the boot loader in one of two places: the master boot record (MBR) or the first sector of one of the Linux partitions. Because many other operating systems use the same methodology—particularly Windows claiming the exact same MBR location as Linux—conflicts can occur.
Dual-booting Linux and Windows can be a challenge, but if you install them in the correct order and use GRUB to manage the boot loader environment, it’s not difficult. I recommend installing the Windows product first because it’s pickier about the MBR. Then, after the final reboot, install the Linux system in the prepared free space, allowing GRUB to notice and configure the Windows partition in the boot loader setup.
Note
When you install Windows, it typically uses the entire disk, so when installing a distribution of Linux as a dual-boot, be prepared to use the gparted or installation partitioning tool to shrink the Windows partition to allow for enough space for the Linux partitions.
Common Commands at Boot Time
When booting Linux, you often want to change an option at the beginning of the process, such as changing the default runlevel, disabling or enabling specific hardware capabilities, or setting a particular mode for hardware that allows Linux to load properly.
Note
The parameters typed on the command prompt or boot options prompt are passed directly to the Kernel upon initialization. These prompts are typically at the beginning of the boot process and are the first opportunity to enter any parameters. Some distributions are configured to show a splash screen or logo, and you have to find out what keystroke allows for the entry of boot parameters.
Some common Linux boot options are
![]() vga—Allows the setting of the framebuffer’s resolution to a given mode, such as “vga=2”, historically used for difficult laptop LCDs
vga—Allows the setting of the framebuffer’s resolution to a given mode, such as “vga=2”, historically used for difficult laptop LCDs
![]() apm—APM or Automated Power Management is on by default. Declaring apm=off or noapm at the beginning of the boot process enhances the system’s compatibility. This should be done only when indicated by a vendor or FAQ from a distribution provider.
apm—APM or Automated Power Management is on by default. Declaring apm=off or noapm at the beginning of the boot process enhances the system’s compatibility. This should be done only when indicated by a vendor or FAQ from a distribution provider.
![]() init—Specifying init at the start causes the /sbin/init process to be the first process run on the system. This may not work properly on initialization schemes where init is not present.
init—Specifying init at the start causes the /sbin/init process to be the first process run on the system. This may not work properly on initialization schemes where init is not present.
![]() panic=#seconds—The kernel does not reboot by default after a panic error occurs, which can cause a system to sit disabled until a technician can reach it physically. If a panic occurs, the kernel waits the specified number of seconds and then reboots and attempts to load normally.
panic=#seconds—The kernel does not reboot by default after a panic error occurs, which can cause a system to sit disabled until a technician can reach it physically. If a panic occurs, the kernel waits the specified number of seconds and then reboots and attempts to load normally.
![]() single or 1—These options cause the system to skip a full initialization to a default runlevel, instead putting the system into a troubleshooting or simple root-level state, where you are the root user and have minimal processes running.
single or 1—These options cause the system to skip a full initialization to a default runlevel, instead putting the system into a troubleshooting or simple root-level state, where you are the root user and have minimal processes running.
![]() 2,3,4,5—These options when entered at the GRUB prompt cause the system to initialize and then move to the specified runlevel, or in the case of systemd, the specified target that matches the runlevel number indicated.
2,3,4,5—These options when entered at the GRUB prompt cause the system to initialize and then move to the specified runlevel, or in the case of systemd, the specified target that matches the runlevel number indicated.
![]() ro or rw—The ro option causes the root filesystem to be mounted in a read-only mode so that fsck can be run on the root filesystem in the case of possible errors. The rw parameter is to make sure the root filesystem is mounted read-write, which is the default state.
ro or rw—The ro option causes the root filesystem to be mounted in a read-only mode so that fsck can be run on the root filesystem in the case of possible errors. The rw parameter is to make sure the root filesystem is mounted read-write, which is the default state.
![]() mem=xxxxM—This is an old chestnut of a system boot parameter, and it simply sets the amount of memory that can be accessed by the about-to-be-booted system. This is used when you suspect a memory bank is bad, or to test a system with a specific amount of memory, such as when testing a set-top box configuration or other limited-hardware device.
mem=xxxxM—This is an old chestnut of a system boot parameter, and it simply sets the amount of memory that can be accessed by the about-to-be-booted system. This is used when you suspect a memory bank is bad, or to test a system with a specific amount of memory, such as when testing a set-top box configuration or other limited-hardware device.
Note
You have to look at the boot parameter documentation for your given distribution and boot manager to find out exactly which ones are appropriate.
Boot Sequence from BIOS to Fully Running System
The Linux system’s boot steps are relatively similar across distributions, except maybe for Slackware and the BSD variants. The following steps show the boot process if you are using the SysVinit system initialization method. systemd and Upstart are covered in the following sections.
SysVinit
The SysVinit bootup process is outlined in the following steps:
1. Turn on the system power.
2. The basic input/output system (BIOS) code loads and looks for a valid boot sector.
3. The BIOS loads the boot sector from a floppy disk, HD, or CD-ROM according to the seek order.
4. The master boot record (MBR) is read; it’s contained in the first 512 bytes of the first sector of the first or active hard disk.
5. Any boot loader code found is executed.
6. GRUB or the installed boot loader starts.
7. The user selects or types in a choice, or the boot loader times out and begins to load the default entry.
8. If you select a Linux image/choice, the path to load the Linux kernel is read and the compressed kernel is executed.
9. When the Linux kernel is loading, it initializes the devices, loads any necessary modules, looks for the initial RAM disk (initrd), and loads that if necessary. Then it mounts the root filesystem, as defined by the root=/dev/XXX information in the entry.
10. The /sbin/init program is loaded and becomes PID 1, the grandparent of all other processes on the system.
11. The init process then reads the /etc/inittab file and runs the /etc/init.d/rcS script for Debian systems and the /etc/rc.d/init.d/ rc.sysinit script for Red Hat systems.
12. The system initialization script loads the necessary modules, checks the root file system, mounts the local file systems, starts the network devices, and then mounts the remote file systems (if configured to do so).
13. The init process reads the /etc/inittab again and changes the system to the default runlevel by executing the scripts in the appropriate directory.
14. The runlevel scripts are executed, with the SXXservice scripts in the default runlevel directory being run in standard numeric sorting order. (This is easy to see in most boot situations because a long scrolling list of [OK] notations appear in green on the right of the system’s screen indicating the service loaded properly.)
15. The mingetty sessions laid out in /etc/inittab are loaded, and the system (and login) shows the login prompt and waits for the user to log in.
systemd
systemd is both a new method of system initialization and one vaguely familiar to those who have historically used SysVinit as their initialization method.
systemd was specifically written to replace the SysVinit system, while keeping some connection to the methodology of SysVinit as well as some command compatibility.
Although controversial at its introduction, often predicted to increase the likelihood of broken system dependencies, and just generally hated-upon because, well, it’s new, systemd has nonetheless become the default system initialization method for most modern distributions.
The hallmarks or major features of systemd are
![]() It’s not SysVinit.
It’s not SysVinit.
![]() It’s considered more efficient and parallel in operation than SysVinit.
It’s considered more efficient and parallel in operation than SysVinit.
![]() It’s less dependency-driven than other methods.
It’s less dependency-driven than other methods.
![]() It allows for more prioritization of what services start first and have precedence over system resources.
It allows for more prioritization of what services start first and have precedence over system resources.
![]() It can dramatically reduce system startup times.
It can dramatically reduce system startup times.
Similar to the init daemon from the SysVinit method, the systemd daemon is linked to by a symlink from /sbin/init. There are 60+ binaries included in the entire systemd suite, with the following being its core components:
![]() systemd—The systems and services manager for the operating system
systemd—The systems and services manager for the operating system
![]() systemctl—The systemd state inspection and state controlling utility
systemctl—The systemd state inspection and state controlling utility
![]() systemd-analyze—The utility that allows you to inspect performance statistics regarding system bootup as well as view trace and current state information
systemd-analyze—The utility that allows you to inspect performance statistics regarding system bootup as well as view trace and current state information
A number of additional daemons and libraries make up the core functionality of systemd; they include
![]() journald—The logging system for systemd by default. journald uses binary files for its logging, and it can be replaced by more traditional logging mechanisms such as rsyslog and syslog-ng.
journald—The logging system for systemd by default. journald uses binary files for its logging, and it can be replaced by more traditional logging mechanisms such as rsyslog and syslog-ng.
![]() consoled—A console daemon for use as a user console, this replaces the more traditional virtual terminal system with what can be a more system-friendly component.
consoled—A console daemon for use as a user console, this replaces the more traditional virtual terminal system with what can be a more system-friendly component.
![]() networkd—The daemon that provides networking support for systemd’s network access.
networkd—The daemon that provides networking support for systemd’s network access.
![]() logind—A daemon designed to replace Consolekit, logind supports X display managers, user logins, and so on.
logind—A daemon designed to replace Consolekit, logind supports X display managers, user logins, and so on.
Additional features that recommend systemd to administrators include
![]() Logging capabilities—The system’s entire set of log messages are stored securely in systemd’s journal, reducing message loss and increasing reliability of troubleshooting.
Logging capabilities—The system’s entire set of log messages are stored securely in systemd’s journal, reducing message loss and increasing reliability of troubleshooting.
![]() Service activation—systemd’s way of dealing with services frees them from a given runlevel and allows them to be more on-demand in nature, activated by a number of hardware and software events.
Service activation—systemd’s way of dealing with services frees them from a given runlevel and allows them to be more on-demand in nature, activated by a number of hardware and software events.
![]() Component groups—A Cgroup is similar in structure and function to the historical SysVinit runlevels in that they have a hierarchy of what starts when and before or after what other service. Cgroups help system memory space cleanliness dramatically by using a group tag for processes that allows the precise and total removal of groups of processes from memory.
Component groups—A Cgroup is similar in structure and function to the historical SysVinit runlevels in that they have a hierarchy of what starts when and before or after what other service. Cgroups help system memory space cleanliness dramatically by using a group tag for processes that allows the precise and total removal of groups of processes from memory.
![]() System resource allocation—Since you can determine exactly what Cgroup a service is associated with, it’s possible to more precisely control what system resources a service or group of services can consume. Whereas before you could only control a runaway or hog process with nice/renice, systemd now allows the exact setting of a limited set of resources per service. An example of this would be an Apache server that gets hit by an extreme amount of visitors and would traditionally grow its processes to take over a majority of the system’s resources. Now that service or group of services can be controlled exactly.
System resource allocation—Since you can determine exactly what Cgroup a service is associated with, it’s possible to more precisely control what system resources a service or group of services can consume. Whereas before you could only control a runaway or hog process with nice/renice, systemd now allows the exact setting of a limited set of resources per service. An example of this would be an Apache server that gets hit by an extreme amount of visitors and would traditionally grow its processes to take over a majority of the system’s resources. Now that service or group of services can be controlled exactly.
Units in systemd
When using systemd instead of SysVinit, you swap out the concept of “init scripts” and replace them with systemd “units.” Effectively, a unit is a file that represents the configuration of a system service, much like the init scripts did in SysVinit.
systemd units come in a number of types, with the name of the service as the prefix of the filename, followed by a “.” and then the type of service as the postfix of the filename, such as blahwoof.service.
systemd units are typically located in the following directories and have precedence over each other:
![]() /usr/lib/systemd/system/—Units that have been installed with the distribution
/usr/lib/systemd/system/—Units that have been installed with the distribution
![]() /run/systemd/system—Units that have been created at runtime; may have precedence over non-runtime or installed units
/run/systemd/system—Units that have been created at runtime; may have precedence over non-runtime or installed units
![]() /etc/systemd/system—Units that are controlled by the sysadmin and have ultimate precedence over all the other units
/etc/systemd/system—Units that are controlled by the sysadmin and have ultimate precedence over all the other units
Table 2-2 displays the type of service, lists the extension for the service, and describes the service.
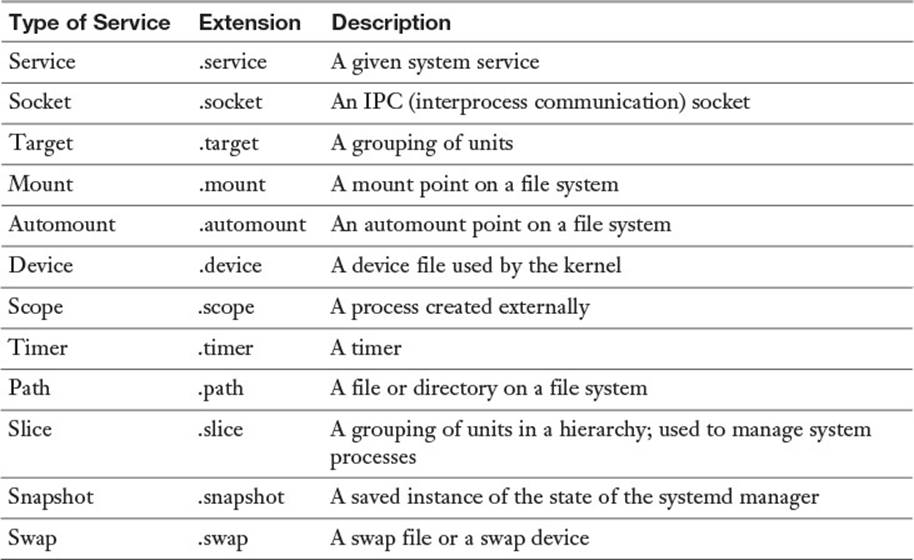
Table 2-2 systemd Unit Types
systemd Targets and Runlevels
In SysVinit systems, you had a defined but configurable set of runlevels numbered from 0 to 6. A runlevel is essentially a set of capabilities or running services that you can predefine and set the system to boot to so you have a predictable set of services.
In systemd, targets are the new runlevels. For example, the default.target file is typically a symbolic link to another target file such as the graphical.target file. Targets directly correspond to the SysVinit runlevels in that you can match them up as shown in Table 2-3.
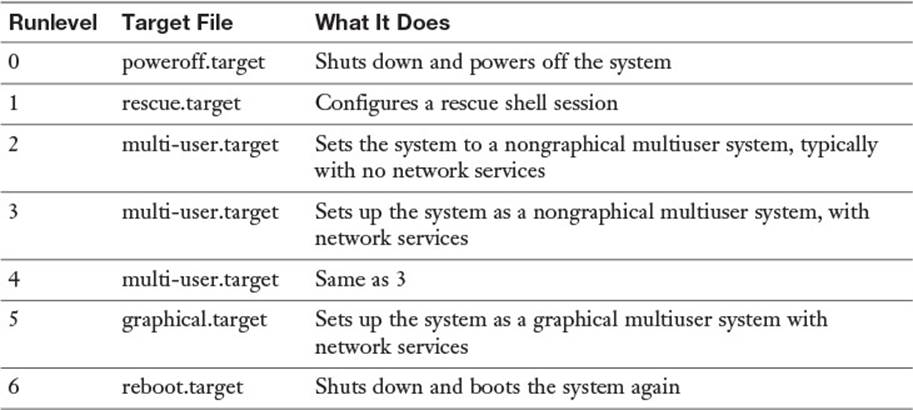
Table 2-3 What Happens When Runlevels and Targets Are Initiated
Table 2-3 shows the correlation between runlevels, targets, and the files and describes what action occurs when that runlevel or target is initiated.
Note
The targets also have another designation, that of runlevel#.target where the “#” character would be 0-6. This is for compatibility.
Wants and Requires
The systemd procedure uses a set of options or requirements called “wants” and “requires” to indicate dependencies between units and groups of units.
For example, if you were to look at the typical contents of the graphical.target file, you might find the following lines:
Requires=multi-user.target
After=multi-user.target
Wants=display-manager.service
The Requires statement means that before the graphical.target can be processed, all the items listed in the multi-user.target must be started, which means that all the linked services in the /usr/lib/systemd/multi-user.target directory must be started.
Only after that requirement is met will the Wants statement be processed (which again means the starting of linked services in the appropriate directory, this time the /usr/lib/systemd/multi-user.target.wants directory), after which the graphical.target will be used.
Booting with systemd
When booting a system that uses systemd, the same set of steps outlined previously are true, except for when the system starts systemd/init from GRUB, there is a structure overlaid on the system reminiscent of SysVinit’s init script structure.
The file that is read after the kernel and initramdisk is typically the default.target file. This file is simply a link to the multi-user.target file.
This is where it gets pretty strange, because while the boot process may look simple, like that shown in Example 2-1, it’s not.
Example 2-1 Theoretical Hierarchy of the Boot Process
Kernel
|
V
multi-user.target
|
V
graphical.target
The reality of the situation is that the graphical.target requires multi-user.target, which requires basic.target, which in turn requires the sysinit.target. All these must load their configured services successfully to move on to the other, so the real order of bootup is shown in Example 2-2.
Example 2-2 Actual Hierarchy of the Boot Process
local-fs-pre.target
|
V
sysinit.target -- wants local-fs.target and swap.target
|
V
basic.target -- wants
|
V
multi-user.target -- wants
|
V
graphical.target -- wants
It takes a while to bend your consciousness around the way systemd works, but in practice, it’s not that different from SysVinit and its dozens of links in multiple directories.
Upstart
Of particular note is the Upstart system initialization scheme, in that its design goals are simple:
![]() Asynchronous operation—Upstart handles the starting of services during boot and stopping of services during shutdown, as well as their running during normal system operations.
Asynchronous operation—Upstart handles the starting of services during boot and stopping of services during shutdown, as well as their running during normal system operations.
![]() Ease of implementation—Upstart is easy to transition to due to its compatibility with sysinit.
Ease of implementation—Upstart is easy to transition to due to its compatibility with sysinit.
![]() Backward compatibility—Upstart runs unaltered sysvinit scripts and can perform well in a mixed system initialization environment.
Backward compatibility—Upstart runs unaltered sysvinit scripts and can perform well in a mixed system initialization environment.
![]() Extensibility—Upstart is eminently extensible to allow for more inputs, events, custom tasks and services, and much more.
Extensibility—Upstart is eminently extensible to allow for more inputs, events, custom tasks and services, and much more.
Unfortunately for Upstart, the world of Linux distributions has been moving toward systemd as a rule, or staying with SysVinit, with the most public defection being Ubuntu, to maintain compatibility with the upstream Debian code bases and methodologies.
Note
Chrome OS, from Google and the OS on Chromebooks features Upstart, so a growing base of systems take advantage of Upstart’s features.
Managing System Runlevels
Being able to properly manage your system’s runlevels means you will be able to predictably run the system in the appropriate mode with the correct services enabled and ready for use.
Determining the Default Runlevel
On a SysVinit system, determining the runlevel is simple: You execute the runlevel command and it returns the following command output:
N 2
The first column, (containing the character N) shows you that there was No previous runlevel, so the system has been booted and has arrived at Runlevel 2 (column 2 in the output) without any intervening steps such as Runlevel 1.
Note
If you see a previous runlevel such as “1” and then the current runlevel, in this case “2,” you should be certain that you or another valid sysadmin were responsible for taking that system to a single-user mode for a good reason, or else the system may have been tampered with.
In addition, you might be able to run the who -r command to get additional and more English-sentence-like output:
run-level 2 2015-03-01 10:14
On a running systemd system, you can use systemctl get-default to determine what the default target is. The output is the resolved name of the target that the symbolic link points to, such as
multi-user.target
Note
Runlevels are exclusive, and targets are not. In other words, only a single runlevel can be the current runlevel, whereas you can actually have multiple active targets.
To determine all the targets that are active, use the systemctl list-units --type=target command. The output is the names of the target files that are active, such as
multi-user.target
graphical.target
Setting the Default Runlevels
On a SysVinit system, setting the default runlevel is as simple as choosing what runlevel you want and then editing the /etc/inittab file and changing id:5:initdefault: to reflect the number of the runlevel you want (replacing the number 5 with the desired number from 0-6).
On a systemd machine, you change the default runlevel by specifying a given target via a symlink. For example, to make your system default to the graphical.target runlevel, you would create a symlink named default.target that points to the appropriate location of the graphical.target file.
ln -sf /usr/lib/systemd/system/graphical.target
/etc/systemd/system/default.target
Changing Runlevels
On a SysVinit system, changing the current runlevel involves two commands, either the init or telinit command.
Note
The /sbin/telinit command is a symbolic link to the /sbin/init command, so they are not exactly two commands; telinit is there for historical purposes, or if you have a lot of old scripts that use it, anti-hysterical purposes, aka those who still use telinit, or have it in their scripts.
To set the current runlevel to 3, execute the command as root or using sudo:
init 3
On a systemd machine, you can set the current target(s) to a single target only by executing the command:
systemctl isolate runlevel5.target
or
systemctl isolate graphical.target
Shut Down and Reboot from the Command Line
Shutting down a system properly, without any unnecessary loss of unwritten data in filesystem buffers or corruption of disk is important. Current versions of Linux filesystems are much more flexible and forgiving than in decades past, but dropping the power on a running system is almost guaranteed to cause an issue or many issues.
On a SysVinit system, you can use several commands to shut down the system properly, starting with
halt –p
This halts the system and then powers it off using hardware calls.
The more common command to be used is the shutdown command, which offers multiple useful options:
![]() -H, --halt—Halts the machine, but doesn’t power it off.
-H, --halt—Halts the machine, but doesn’t power it off.
![]() -P, --poweroff—Halts and powers off the machine.
-P, --poweroff—Halts and powers off the machine.
![]() -r, --reboot—Reboots the machine after shutting it down properly.
-r, --reboot—Reboots the machine after shutting it down properly.
![]() -k—Does not power off, halt, or reboot, but just writes a wall message (otherwise known as -Kidding). This option is to hopefully scare the users off the system so critical tasks can be performed.
-k—Does not power off, halt, or reboot, but just writes a wall message (otherwise known as -Kidding). This option is to hopefully scare the users off the system so critical tasks can be performed.
Shutting down a systemd machine can be done as outlined previously with the SysVinit commands and options, or you can use the systemctl command as follows:
![]() systemctl halt—Does exactly what it says: halts the system; doesn’t power it off.
systemctl halt—Does exactly what it says: halts the system; doesn’t power it off.
![]() systemctl poweroff—Shuts down the system (halts) and powers it off.
systemctl poweroff—Shuts down the system (halts) and powers it off.
![]() systemctl reboot—Shuts down the system (halts) and then reboots the system.
systemctl reboot—Shuts down the system (halts) and then reboots the system.
Note
On systems where you are not the root, or the root user account isn’t used for normal administration, prefix the systemctl commands with the sudo command. The sudo command must be set up for your account to use, but once done, you can run the systemcel commands such as
sudo systemctl reboot
Alerting Users
No section on powering off, halting, or rebooting systems can be complete without a discussion of how to notify users who will be affected by the change in the system’s state.
Since a shutdown is by definition an orderly shutdown, there is ample warning to the system’s processes that it’s going down, but often users would appreciate a little more time and ability to wrap up their current work.
Note
The shutdown command contains just about anything you need to properly notify users of the impending shutdown, including the ability to disable new user logins shortly before the shutdown commences.
For example, you can schedule a system shutdown for 7:00 p.m. of the current day with the absolute command:
shutdown 19:00
You can also use a relative notation to specify when to shut down the system, say 20 minutes in the future, with the command
shutdown +20
You can mix a time specification with a notice to all logged-in users (those logged in to a console, not a network share connection) with the command:
shutdown +30 "System going down in 30 minutes, save your work and log
off!"
Note
The KDE desktop features a daemon to watch for system reboots for logged-in graphical user interface (GUI) users. All you need to do is issue the proper shutdown command, and the KDE system notifies users of the shutdown.
If you have scheduled a shutdown in the future, you can cancel it by issuing the shutdown command with the -c option:
shutdown -c
Properly Terminating Processes
Sysadmins frequently have to terminate processes that either can’t or won’t end properly or on demand from their parent processes. Being able to find the processes in the process table and kill them individually by the PID (process ID) or in groups based on the process name are critical.
kill and killall
Controlling daemons can also include using the kill and killall commands, which work on the PID and command name, respectively.
kill and killall use the same signals; other than using PIDs and names, they are functionally similar. The kill command is simple, but you need to find the PID or Process ID of the process you want to kill first to find that out. To find the PID(s) of the smb processes on your system, run the command:
ps aux | grep smb
This returns the output shown here:
root 388 0.0 0.9 7324 2460 ? S 00:38 /usr/sbin/smbd -D
You then take the number from the second column, the PID, and supply it as the argument to the kill command:
kill 388
If the program doesn’t respond, or it is the parent process of a zombie process (a process that is so far gone it can’t respond to a valid kill or SIGTERM command), use an absolute kill or the kill command with a -9 option to send the SIGKILL signal, such as
kill -9 388
The killall command works similarly. You can name the runaway or undesired processes by the actual command that is running, which is the last column of the ps output.
To kill all running instances of the Mozilla browser on your machine, as root you enter
killall mozilla-bin
If, for some reason, the browser doesn’t respond, use the kill command with the -9 option to send a SIGKILL or absolute kill, like so:
killall -9 mozilla-bin
This forcibly removes the processes from memory without even allowing them time to clean up memory and disk processes. So be aware that using the kill and killall commands to abruptly terminate processes can cause issues with memory usage over time and can even cause you to spend some quality time with fsck.
Reloading or “Hanging Up” Processes
When you are running a server with many system services active and providing multiple clients with access to resources, it’s not always possible to reboot the system to make sure all the changes to configuration files are taken into account.
A convenient way to restart a system process, such as Apache, Samba, or Syslog and make it reload its configuration file is to use the SIGHUP signal. Essentially, this signal causes the process to simply reload its configuration file as a result, thereby making any new configuration options active without any interruption in connections or client access.
Sending a process the SIGHUP signal looks like this:
kill -HUP 2112
Additionally, you can also use the -1 numeric signal to accomplish the same reloading of the process’s configuration file.
Logging Boot Events
When you are running a SysVinit system, the boot logging is relatively simple: You can use the dmesg command to see the output from the last system’s boot. This output will also be mixed in with the other entries in the main system’s log, typically /var/log/messages or /var/log/syslog.
When you are using the dmesg command, what you are really viewing isn’t a log file, but the messages generated by the kernel ring buffer, a section of the running kernel.
Note
On some distributions, initialization scripts may send these kernel ring buffer messages to the configured logging system and log files such as /var/log/messages.
By contrast, a systemd machine keeps all the logging information in the systemd/journald binary log journal. To view a particular boot log, you can use the journalctl command and specify the boot you want.
For example, to list out the boot logs available under systemd, issue the following command:
journalctl --list-boots
This returns a number of logs or “journals” that you can choose from, with the format as follows:
-1 cadadcadadffldkljadlalwdkfjpadlk Tue 2015-03-22 MDT-Tue 12:12:37
2015-03-22 12:13:01 MDT
0 aekdaldkadslufadmfadadwwetsdasgad Tue 2015-03-23 MDT-Tue 08:00:22
2015-03-23 08:01:13 MDT
The log that starts with the reference ID of 0 is the current boot of the system; the previous one is notated with a -1, and so on. If there were 34 previous boots, there would be the 0 entry and -1 to -34 entries listed.
To view the previous system boot log, you would use the command:
journalctl -boot=cadadcadadffldkljadlalwdkfjpadlk
Exam Preparation Tasks
As mentioned in the section “How to Use This Book” in the Introduction, you have a few choices for exam preparation: the exercises here, Chapter 21, “Final Preparation,” and the practice exams on the DVD.
Review All Key Topics
Review the most important topics in this chapter, noted with the Key Topics icon in the outer margin of the page. Table 2-4 lists a reference of these key topics and the page numbers on which each is found.
Table 2-4 Key Topics for Chapter 2
Define Key Terms
Define the following key terms from this chapter and check your answers in the glossary:
boot process
BIOS
boot loader
init process
systemd
Upstart
boot logging
runlevels
shut down
reboot
Review Questions
The answers to these review questions are in Appendix A.
1. When attempting to boot your Linux system, you see an error message and the system will not complete a normal boot. Which of the following could you type at the GRUB menu to enter a system administrator mode for troubleshooting? Choose all that apply.
a. 1
b. 2
c. 5
d. s
e. S
2. In which of the following locations are you most likely to find the boot loader code on a Linux system?
a. Master boot record
b. /boot/vmlinuz
c. /dev/d0/s0
d. First sector of partition
e. /grub/boot.msg
3. Which feature listed below helps in the orderly removal of processes and groups of processes when the system is using the systemd initialization process?
a. /etc/group
b. group tag
c. groupmod
d. gkill
4. Which of the follow commands simulate a shutdown event on the system, but do not actually take the system down?
a. shutdown -h
b. shutdown -k
c. shutdown -r
d. shutdown -c
5. You have edited the configuration file of the service named daemon1 and need that service to reread the configuration and continue serving its attached client processes. Which of the following will accomplish this? Choose all that apply.
a. kill –s SIGHUP daemon1
b. kill -15 daemon1
c. kill -9 daemon1
d. kill –HUP daemon1
e. kill -1 daemon1
6. During your last system boot, you noticed several error messages that quickly scrolled off the screen and could not be viewed. You are not sure which system initialization scheme is in place. Which of the following commands will likely show you just the messages from the most recent system boot? (Choose three.)
a. systemctl --viewboot
b. journalctl -b
c. syslog --boot
d. dmesg
e. cat /var/log/boot.msg
All materials on the site are licensed Creative Commons Attribution-Sharealike 3.0 Unported CC BY-SA 3.0 & GNU Free Documentation License (GFDL)
If you are the copyright holder of any material contained on our site and intend to remove it, please contact our site administrator for approval.
© 2016-2026 All site design rights belong to S.Y.A.