CompTIA Linux+ / LPIC-1 Cert Guide (Exams LX0-103 & LX0-104/101-400 & 102-400) (2016)
Chapter 3. Package Install and Management
This chapter covers the following topics:
![]() Software in a Linux System
Software in a Linux System
![]() Debian Package Management
Debian Package Management
![]() RPM and YUM Package Management
RPM and YUM Package Management
The exam objectives covered in this chapter are
![]() Manage shared libraries: 102.3
Manage shared libraries: 102.3
![]() Use Debian package management: 102.4
Use Debian package management: 102.4
![]() Use RPM and YUM package management: 102.5
Use RPM and YUM package management: 102.5
The purpose of a Linux system should be to do something useful such as reading email, browsing the Web, or being some kind of application server. The Linux kernel is great, but by itself it doesn’t do much—for that you need software.
A lot of software is available for Linux; you just need to install it. You can install software in a few ways depending on your distribution and how the software was packaged.
At one point software was distributed in source format, which needed to be compiled into something that could run on the computer. That’s still around, but as a community we’ve moved on to distributing binary packages that are much easier to install. Not only do the binary packages avoid the compilation step, but also dependencies, libraries, configuration, and documentation are automatically managed. There are a few different formats of these packages, but for the most part two are most prevalent: Debian style and Red Hat style.
In the past the LPIC exam was offered in two flavors, corresponding to Debian and Red Hat. Now you’re expected to know both. The concepts are the same; the commands differ.
“Do I Know This Already?” Quiz
The “Do I Know This Already?” quiz enables you to assess whether you should read this entire chapter or simply jump to the “Exam Preparation Tasks” section for review. If you are in doubt, read the entire chapter. Table 3-1 outlines the major headings in this chapter and the corresponding “Do I Know This Already?” quiz questions. You can find the answers in Appendix A, “Answers to the ‘Do I Know This Already?’ Quizzes and Review Questions.”

Table 3-1 “Do I Know This Already?” Foundation Topics Section-to-Question Mapping
1. libjpg.so.8.0.3 is probably a
a. Static library
b. Shared library
c. Binary
d. Shell script
2. The dynamic linker is called ______ and is configured in ______.
a. ld.so, /etc/ld.so.conf
b. so.linux, /etc/ld.so.conf
c. ld.so, /etc/so.linux.conf
d. so.linux, /etc/so.linux.conf
3. How would you install a package called foo-1.2.3.deb?
a. yum install foo-1.2.3.deb
b. rpm -i foo-1.2.3.deb
c. dpkg --install foo-1.2.3.deb
d. apt-get install foo-1.2.3.deb
4. How would you query your Debian system to see whether the bulldozer package was installed?
a. dpkg --info bulldozer
b. apt-cache search bulldozer
c. rpm -q bulldozer
d. dpkg --list bulldozer
5. After updating your list of remote Debian repository files you should run:
a. dpkg update
b. apt-cache fetch
c. apt-cache update
d. apt-get update
6. If you want to install a local Debian package and ignore any dependency errors, what do you need to do?
a. Nothing, this is the default.
b. Add --force-depends (dpkg -i pkg.deb --force-depends)
c. Add --force-conflicts (dpkg -i pkg.deb --force-conflicts)
d. Add --force-reinstreq (dpkg -i pkg.deb --force-reinstreq)
7. An RPM package’s long name does not contain:
a. Name of the package
b. Version
c. Distribution version
d. Architecture
8. To check the signatures on a directory full of RPM files, use
a. rpm -K *
b. rpm -qk *
c. rpm --check-sig *
d. rpm-sig *
9. How would you check for the presence of an installed package called foobar?
a. rpm -qV foobar
b. rpm -qVp foobar
c. rpm -q foobar
d. rpm -qp foobar
Foundation Topics
Software in a Linux System
A typical piece of software is comprised of five pieces:
![]() Binaries
Binaries
![]() Libraries
Libraries
![]() Configuration
Configuration
![]() Documentation
Documentation
![]() Data
Data
Binaries are the things that you run like programs or applications. The kernel loads them into memory and starts running the instructions. Libraries are shared components such as methods to read files from a disk or display a certain graphical widget. Configuration is usually in the form of one or more files that direct the application to behave properly. Documentation provides instructions on how to use the software, and the data stores your information.
These five pieces may be spread about your filesystem according to the Filesystem Hierarchy Standard (FHS). If you want to upgrade your software you generally have to reinstall the new version on top of the old one, but this can leave older versions of some files lying around. Eventually you end up with several outdated pieces that you’re not sure whether you can delete and your system gets messy. The same problem happened if you needed to delete some software.
The FHS describes where particular types of files are to be placed, which helps maintain consistency across different distributions. The FHS is covered in Chapter 5, “File Management.”
Package managers were invented to solve these types of problems. A package manager keeps track of which files belong to which package, which packages depend on which other packages, and where the different types of files are stored. All modern distributions of Linux use package managers in some fashion.
Shared Libraries
Much of what a software developer needs to do has already been done. Writing files to disk, displaying windows, even talking over the network—Linux has libraries that handle all of these. Libraries are reusable components that a software developer can link to an application so that the library’s functionality can be used. Applications themselves may offer libraries for other applications to use, such as a database providing code for other applications to query it.

A library can either be statically or dynamically linked to an application. In the static linking process, a copy of the library is placed into the resulting application. With dynamic linking, the application only needs a series of stubs that later point to a systemwide copy of the library.
Figure 3-1 shows this concept in more detail.
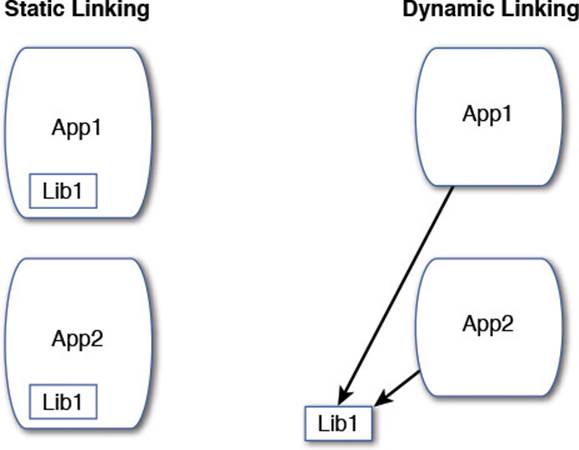
Figure 3-1 The difference between a statically linked application and a dynamically linked application
Figure 3-1 shows two applications, App1 and App2; both use a library called Lib1. The statically linked versions have a copy of Lib1 inside each application, while the dynamically linked versions point to a common Lib1 and are therefore smaller.
With static linking you don’t need to worry whether the system has the library installed because the library is built into the application. As a result the files are much bigger. Dynamic linking results in smaller applications, but the appropriate shared libraries must be present.
The best reason for dynamic linking is ease of upgrades. Every application with a built-in static library needs to be recompiled and linked if you need to upgrade the library. With dynamic linking, one update works across all the binaries.
Dynamic linking is used in almost all cases because it saves disk space and eases upgrades.
Working with Shared Libraries
An application that needs to use a shared library asks a service called ld.so, otherwise known as the dynamic linker. The dynamic linker knows where all the shared libraries are stored and loads the library for the application.
Libraries are typically stored in /lib or /usr/lib for 32-bit libraries, and /lib64 or /usr/lib64 for 64-bit binaries. A 64-bit system can load 32-bit applications, so you will likely see both. A 64-bit system relies on newer hardware that supports more memory, while 32-bit is for older hardware. Even though 64-bit machines have been around since the early 2000s, 32-bit code is still widely used.
Distributions are free to store application-specific shared libraries anywhere, so you may find /lib is just a link to /usr/lib and that particular applications may store its libraries in a separate directory.
You can recognize a shared library because it ends with or contains a .so extension, short for shared object. The files usually have a version number in them like so:
[sean@localhost lib64]$ ls -l libcrypt*
-rwxr-xr-x 1 root root 36752 Sep 27 11:48 libcrypt-2.20.so
lrwxrwxrwx 1 root root 25 Sep 27 11:45 libcrypt.so -> libcrypt.
so.1
lrwxrwxrwx 1 root root 16 Sep 27 11:45 libcrypt.so.1 ->
libcrypt-2.20.so
You can see in this example that the actual library file is libcrypt-2.20.so and that there are two symbolic links: libcrypt.so points to libcrypt.so.1, which itself is a link to libcrypt-2.20.so. Each one of these files represents a version number, depending on who or what is asking, but all go to the same file. This allows multiple incompatible versions of a shared library to exist on the same system. Applications simply need to ask for the version they were originally linked with.
The dynamic loader is taking care of this linking for you. It does this by querying the binaries as they are run.
Determining Required Libraries
When you find a program and want to know whether the libraries it relies on are present, either run it and see what breaks (the unsafe way) or query the program for the necessary libraries with the ldd command:
$ ldd /usr/bin/passwd
...
libc.so.6 => /lib64/libc.so.6 (0x00007fa7a3bae000)
libcrypt.so.1 => /lib64/libcrypt.so.1 (0x00007fa7a3773000)
/lib64/ld-linux-x86-64.so.2 (0x00007fa7a55be000)
The output tells you that the passwd command needs access to libc (the C library, which is a basic set of functionality for all applications), the libcrypt, and a peculiarly named shared library that’s actually the dynamic linker itself.
Looking for Libraries in Other Places
Some library files might not have enough header or internal information to be correctly identified by the linker when it builds the links in the library directories.
The ldconfig program reads the headers of all the libraries in the /lib and /usr/lib directories and any directories noted in the /etc/ld.so.conf file. From those headers and the filenames of the libraries, ldconfig makes the proper links to the libraries.
Note
ld.so.conf might include a line similar to ld.so.conf.d/*.conf. In this case, the files specified there are also read and processed by ldconfig. This system lets packages drop in the locations of their libraries without having to edit a shared file.
The ldconfig program also builds the /etc/ld.so.cache file, a binary file that is an ordered list of the libraries on the system. This file is not readable as text but is used as a quick reference by the system linker ld.so.
Libraries must be accessible to the dynamic linker or added into in a variable called LD_LIBRARY_PATH, which contains the library path(s) separated by colons (:). This provides a hint to the dynamic linker that it should look in a place other than what it was told about earlier.
To set the LD_LIBRARY_PATH variable, you can declare it on the command line, like so:
export LD_LIBRARY_PATH=/some/path/name
Or, you can edit the /etc/profile or ~/.bash_profile file and copy the same command there. Chapter 11, “Customizing Shell Environments,” investigates these files in more depth.
Caution
Although this must be known for the exam, the LD_LIBRARY_PATH is considered to be a security risk because it might allow unauthorized programs access to system libraries accidentally or otherwise expose system library paths to unauthorized users.
Debian Package Management
Debian, and Debian derived systems such as Ubuntu, have a powerful package management system that provides a way for administrators to find, install, query, and remove packages. The package tracks the parts of an application and helps you figure out which other packages are needed to install a given package, and if any packages rely on another.
The basic unit of Debian package management is a file with a .deb extension, for example, application.deb. This is a Debian package: It contains the application, any default configuration files and documentation, instructions to the system on how to install and remove it, and a list of any dependencies the package has.
You install, remove, and query packages with the dpkg tool. But that only works if you have the package, so the Advanced Package Tool (APT) contains a series of utilities that help you find the packages on remote servers. The apt-* tools download a package you want along with any dependencies and then install them all using dpkg.
Graphical and text-based interfaces such as aptitude and synaptic are layered on top of the APT tools. These give you a nicer interface to use instead of having to remember commands.
So, to recap: Local packages are .deb files and are installed with dpkg. APT handles searching remote package repositories and downloading packages. Aptitude and the like provide a graphical interface to APT.
Managing Local Debian Packages
The dpkg tool manipulates packages on your system and can process the .deb packages you may download. If you have a package on your system, you can find out what’s inside it with the --info option as shown in Example 3-1.
Example 3-1 Finding Out What’s Inside a .deb File
# dpkg --info acct_6.5.5-1_amd64.deb
new debian package, version 2.0.
size 120424 bytes: control archive=1899 bytes.
79 bytes, 4 lines conffiles
746 bytes, 18 lines control
1766 bytes, 27 lines md5sums
507 bytes, 30 lines * postinst #!/bin/sh
370 bytes, 26 lines * postrm #!/bin/sh
163 bytes, 7 lines * prerm #!/bin/sh
Package: acct
Version: 6.5.5-1
Architecture: amd64
Maintainer: Mathieu Trudel-Lapierre <mathieu.tl@gmail.com>
Installed-Size: 380
Depends: dpkg (>= 1.15.4) | install-info, libc6 (>= 2.3)
Section: admin
Priority: optional
Homepage: http://www.gnu.org/software/acct/
Description: The GNU Accounting utilities for process and login accounting
...
The information about the package is contained inside the .deb file; the dpkg command is just displaying it nicely for you. The top section describes the control files that provide the metadata for dpkg to use. The file itself is 120424 bytes and inside it is an archive of control files totaling 1899 bytes. Inside that archive are
![]() conffiles—A list of files used to configure the package after it’s installed. These are treated differently than other files in the package; for example, they are not removed when the package is removed.
conffiles—A list of files used to configure the package after it’s installed. These are treated differently than other files in the package; for example, they are not removed when the package is removed.
![]() control—The file containing all the metadata about the packages such as dependencies.
control—The file containing all the metadata about the packages such as dependencies.
![]() md5sums—A list of files and a checksum so that you can verify the file hasn’t changed at any point.
md5sums—A list of files and a checksum so that you can verify the file hasn’t changed at any point.
![]() postinst—A shell script that is run after (post) the installation.
postinst—A shell script that is run after (post) the installation.
![]() postrm—A shell script that is run after the removal of the package.
postrm—A shell script that is run after the removal of the package.
![]() prerm—A shell script that is run just before the package is removed.
prerm—A shell script that is run just before the package is removed.
After the control information you see various pieces of information about the package, such as the name, version, which hardware it is meant to go on, and the dependencies.
Installing Packages with dpkg
The most common way to install packages is using the command line from the current directory using one of the following commands:
dpkg --install gcc-4.7-base_4.7.2-5_amd64.deb
dpkg -i gcc-4.7-base_4.7.2-5_amd64.deb
This returns output similar to the following:
Selecting previously unselected package gcc-4.7-base:amd64.
(Reading database ... 142987 files and directories currently
installed.)
Unpacking gcc-4.7-base:amd64 (from gcc-4.7-base_4.7.2-5_amd64.deb) ...
Setting up gcc-4.7-base:amd64 (4.7.2-5) ...
Sometimes you need to install dependencies for a package. Either install the dependency first or specify all the necessary packages on the same command line. The command for the latter option looks like this:
dpkg -i gcc-4.7-base_4.7.2-5_amd64.deb libgcc1_1%3a4.7.2-5_amd64.deb
Removing Packages
When you need to remove a package with the dpkg command, you can use one of two methods: remove or purge. The -r or --remove option removes the package’s files but leaves any configuration files intact on the disk. The other option for getting rid of packages is the -P or --purgeoption, which removes all the package’s files, including any configuration files.
To remove a package but leave its configuration files in place, use one of the following:
dpkg --remove package_name
dpkg -r package_name
To purge a package, including its configuration files, use one of the following:
dpkg --purge package_name
dpkg -P package_name
When a package is installed, any configuration files are noted in the conffiles file. This is used to determine which files are left in place during a remove action and which files should also be purged in a purge action.
Dependency Issues
When you are working with packages, a desired package installation often finds entries in the package database that conflict with the files it is attempting to install. Also, sometimes during a removal, a package has a file that other packages depend on.
In keeping with the sturdy and less-than-verbose nature of Debian, using the package tools --force option can lead to some truly unpleasant circumstances for your machine. Take great care when removing packages that have dependencies, and read in detail the man page for dpkg’s forcesection. For the exam, you need to know how to force an action, but not all the 20 or so forcing options.
To force the removal of a broken package marked in the database as requiring reinstallation, use the following:
dpkg --force-reinstreq packagename
The --force-reinstreq is used on packages marked as requiring reinstallation, and it allows dpkg to remove that package.
Additionally, you can use the --force-depends option after --install to turn all those nasty error messages into dire warnings, but the tool then allows you to do whatever inadvisable action you’re about to perform. Here’s an example:
dpkg --install --force-depends packagename
Finally, you can also use the --force-remove-essential option. Be warned, however, overriding the dependency recommendations might leave your system in a broken state.
If you positively must (usually on direction from the vendor or a nearby Debian guru), you can force the installation of a package, regardless of the conflicts generated with the command and options, like so:
dpkg --install new_pkg.deb --force-conflicts
If you have problems with the package or other packages after forcing past any conflicts, remember that you were warned.
Querying Packages
Packages currently installed can be queried for a plethora of information. In particular, you can list the existence, version, name, and a description of the package by using the -l or --list option:
dpkg --list krb*
dpkg -l krb*
You can use either a singular package name, such as krb5-user for the Kerberos-related package, or use the previous filename to see the listing shown in the following output.
# dpkg --list krb*
Desired=Unknown/Install/Remove/Purge/Hold
| Status=Not/Inst/Conf-files/Unpacked/halF-conf/Half-inst/trig-aWait/
Trig-pend
|/ Err?=(none)/Reinst-required (Status,Err: uppercase=bad)
||/ Name Version Architecture Description
+++-=================-===============-===============-
==============================
un krb5-doc <none> (no description
available)
ii krb5-locales 1.10.1+dfsg-5+d all Internationalization support
for MIT Kerberos
un krb5-user <none> (no description
available)
After some headers, the output shows that there are three packages starting with krb5. Two of them, with lines beginning with the string un are uninstalled, while krb5-locales is installed as version 1.10.1. The Debian package system shows you packages previously installed in your system, which is different from other systems.
You can check the status of a particular package or packages by using the -s or --status option:
dpkg --status krdc
The output returned is an abbreviated version of the --info option.
You can see the files that were installed by a package by using the -L or --listfiles option:
dpkg --listfiles coreutils
This results in output similar to that shown in the following output (output truncated to fit):
/.
/bin
/bin/cat
/bin/chgrp
/bin/chmod
/bin/chown
The use of either the -S or --search option lets you search the installed files on disk via the package database, such as
dpkg -S apt.conf
The following output contains the various places an apt.conf file was found from the database entries:
apt: /etc/apt/apt.conf.d/01autoremove
unattended-upgrades: /etc/apt/apt.conf.d/50unattended-upgrades
apt: /usr/share/man/ja/man5/apt.conf.5.gz
apt: /usr/share/man/pt/man5/apt.conf.5.gz
apt: /usr/share/doc/apt/examples/apt.conf
apt-listchanges: /etc/apt/apt.conf.d/20listchanges
aptdaemon: /etc/apt/apt.conf.d/20dbus
aptdaemon: /etc/dbus-1/system.d/org.debian.apt.conf
The output lists all the packages that contain a file with apt.conf in the name. The package name is on the left and the filename is on the right. Note that the search string can happen anywhere within the filename, even if it’s a directory name.
Reconfiguring Packages
Some packages include a configuration tool executed when you install the package. This tool makes it easy to set the initial setup of the software you are installing. If a package includes such a configuration tool you can run that utility again with the dpkg-reconfigure command followed by the name of the package.

Figure 3-2 shows the output of running the Postfix mail server configuration with this command:
dpkg-reconfigure postfix
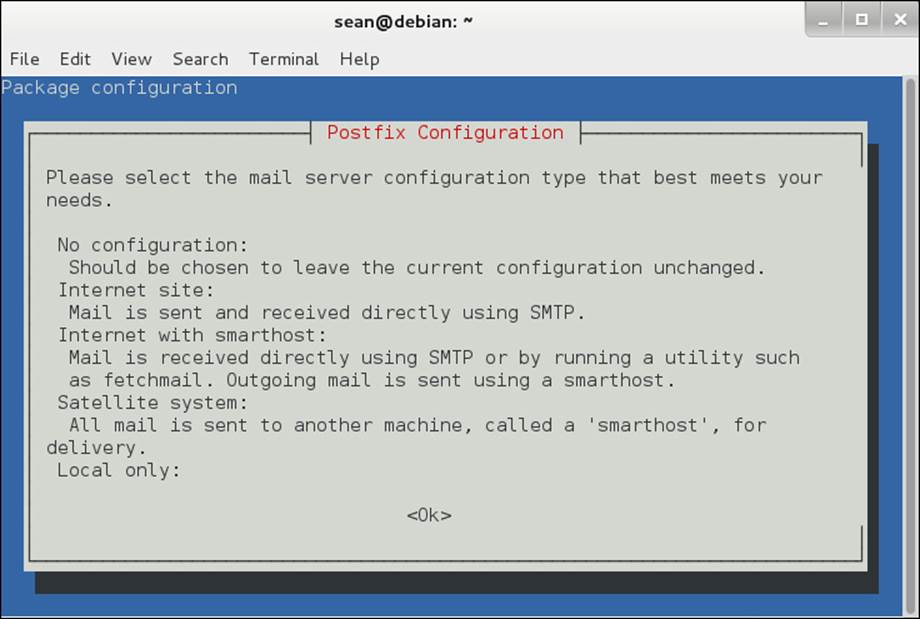
Figure 3-2 Reconfiguring Postfix with dpkg-reconfigure
Using Remote Repositories
Downloading packages before installing them gets tiresome especially when you forget a dependency and have to go back and download more packages. The Debian project made apt—the Advanced Package Tool—to help out. APT is a series of tools that build on dpkg to add more features. The two utilities that are important for the exam are apt-get and apt-cache.
Installing Remote Packages
The apt-get utility is responsible for most remote software installation operations. Every apt-get invocation is followed by a command that indicates what to do. Use the install command to install a package, as shown in Example 3-2.
Example 3-2 Installing a Remote Package
# apt-get install nginx-light
Reading package lists... Done
Building dependency tree
Reading state information... Done
The following extra packages will be installed:
nginx-common
The following NEW packages will be installed:
nginx-common nginx-light
0 upgraded, 2 newly installed, 0 to remove and 63 not upgraded.
Need to get 392 kB of archives.
After this operation, 863 kB of additional disk space will be used.
Do you want to continue [Y/n]? y
Get:1 http://cdn.debian.net/debian/ wheezy/main nginx-common all
1.2.1-2.2+wheezy3 [72.8 kB]
Get:2 http://cdn.debian.net/debian/ wheezy/main nginx-light amd64
1.2.1-2.2+wheezy3 [320 kB]
Fetched 392 kB in 1s (373 kB/s)
Selecting previously unselected package nginx-common.
(Reading database ... 156200 files and directories currently installed.)
Unpacking nginx-common (from .../nginx-common_1.2.1-2.2+wheezy3_all.
deb) ...
Selecting previously unselected package nginx-light.
Unpacking nginx-light (from .../nginx-light_1.2.1-2.2+wheezy3_amd64.
deb) ...
Processing triggers for man-db ...
Setting up nginx-common (1.2.1-2.2+wheezy3) ...
Setting up nginx-light (1.2.1-2.2+wheezy3) ...
Example 3-2 installs the nginx-light package through apt-get install nginx-light. The program determines that the nginx-common package is also required, so both are downloaded and installed. Any setup scripts, including the dpkg-reconfigure, are run at this time too.
Finally, pay attention to the differences between the apt-get and dpkg commands, especially with regards to the first option. apt-get commands do not have a leading dash or dashes, while dpkg does. For example, dpkg -i installs a local package, but apt-get install installs a remote package. Don’t get tripped up on any questions that try to conflate the two, such as with apt-get --install pkgname.
Working with the Cache
The apt tools work by maintaining a local cache of what packages are available on remote servers including the dependencies. You can then search your local cache much more quickly than if you had to query remote servers.
The list of remote package repositories is stored in /etc/apt/sources.list and in individual files under /etc/apt/sources.list.d. Each line represents one repository.
A sources.list file may look like that shown in Example 3-3.
Example 3-3 A Default Sources List File
deb http://cdn.debian.net/debian/ wheezy main
deb-src http://cdn.debian.net/debian/ wheezy main
deb http://security.debian.org/ wheezy/updates main
deb-src http://security.debian.org/ wheezy/updates main
# wheezy-updates, previously known as 'volatile'
deb http://cdn.debian.net/debian/ wheezy-updates main
deb-src http://cdn.debian.net/debian/ wheezy-updates main
The first field is either deb or deb-src, representing binary and source package installations, respectively. Next is a path to the repository of packages to be installed, which can be a local file, a CD-ROM, or a remote server on the Internet. After the location is the name of the distribution, which is named after the version of Debian that you are running, and sometimes an indicator such as testing or stable. Finally, the line has one or more components. The final column, main, refers to these packages as being part of the core Debian distribution rather than a third-party repository.
You must update the package cache after modifying sources.list or to fetch any upstream changes. This is done by running apt-get update.
Now that the APT cache is up to date you can investigate packages with the apt-cache command.
![]() apt-cache search term—Searches for packages matching the term
apt-cache search term—Searches for packages matching the term
![]() apt-cache show packagename—Shows information about a given package name including a description and dependencies
apt-cache show packagename—Shows information about a given package name including a description and dependencies
![]() apt-cache showpkg packagename—Shows more technical details about the package such as what depends on it, what it depends on, and what services it provides
apt-cache showpkg packagename—Shows more technical details about the package such as what depends on it, what it depends on, and what services it provides
Upgrading the System
Your system has many packages installed—hundreds, if not thousands. Each one of these packages may have updates at some point in time. Updates take the form of
![]() Security updates that fix problems in a package that could lead to bad guys doing bad things on your machine
Security updates that fix problems in a package that could lead to bad guys doing bad things on your machine
![]() Bug fixes to correct problems in software that cause it to perform incorrectly, crash, or even lose data
Bug fixes to correct problems in software that cause it to perform incorrectly, crash, or even lose data
![]() Feature improvements by updating to the latest version of some software
Feature improvements by updating to the latest version of some software
To update a specific package you reinstall that package, as shown in the following output:
# apt-get install cpio
Reading package lists... Done
Building dependency tree
Reading state information... Done
Suggested packages:
libarchive1
The following packages will be upgraded:
cpio
The last two lines of the output show that apt-get upgrades the package rather than installs it fresh. If cpio weren’t installed, it would be installed. If it’s important that the package is not installed if it is missing, add the --only-upgrade long option.
Updating package by package is tedious. You can run apt-get dist-upgrade to upgrade all the packages on your system at once. If you are running a more conservative system, apt-get upgrade is a safer choice. The difference between the two upgrade options is the dist-upgrade may remove some minor packages to handle dependency problems while the upgrade would rather fail than remove a package.
Removing Packages
The time will come when you want to get rid of a package entirely. The apt-get command has two options: remove and purge. The difference is that remove leaves configuration files behind, while purge gets rid of them entirely.
Graphical Managers
Even the grayest of beards among us sometimes long for an interface where we can look at packages graphically instead of working on a command line.
Debian offers two graphical package managers: aptitude and synaptic. They both are front ends to the APT tools. Aptitude has a text mode interface while synaptic is fully graphical. Figure 3-3 shows the two next to each other. Synaptic is running on the left, and aptitude is running inside aterminal window on the right.
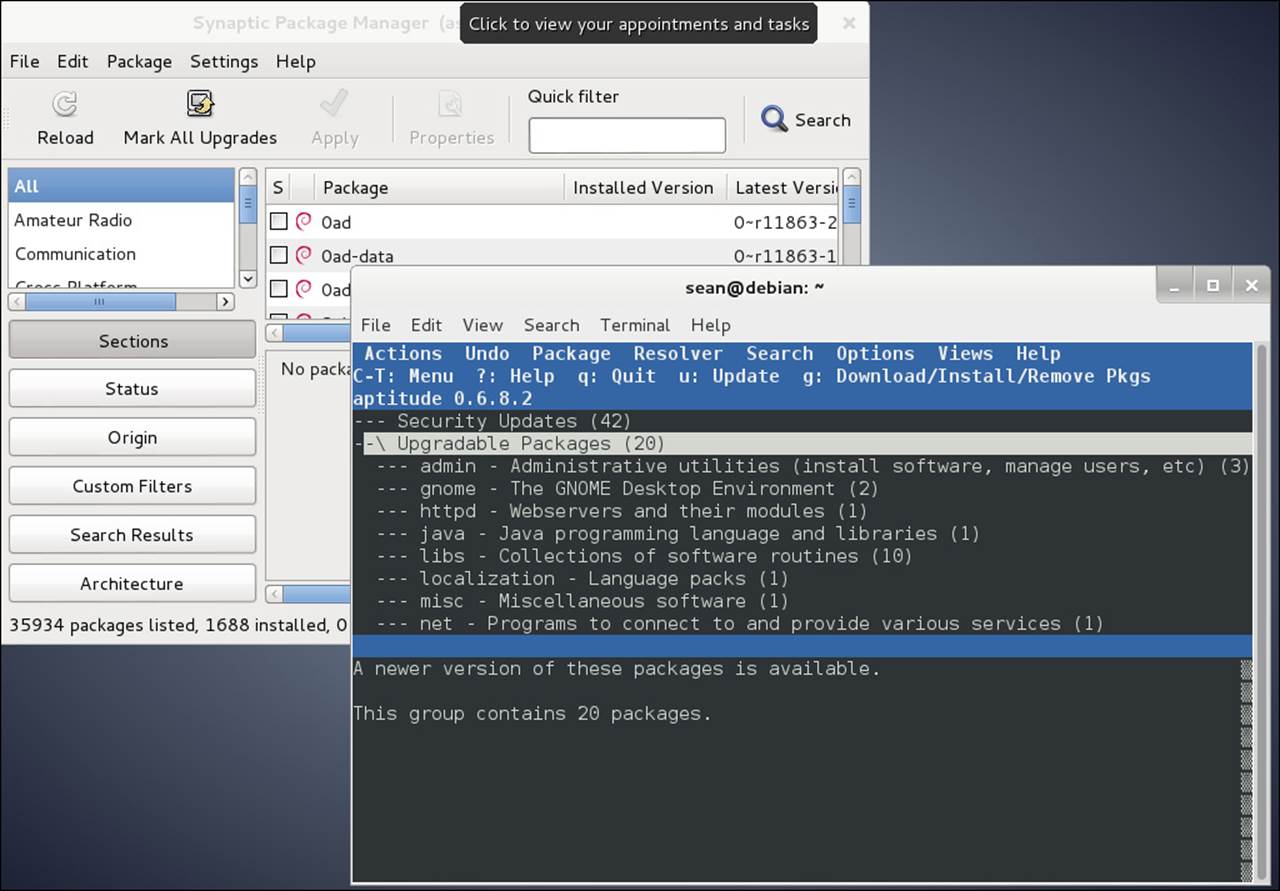
Figure 3-3 A look at graphical package managers
RPM and YUM Package Management
RPM refers not only to the package format, but the rpm command and the RPM database. The components of the RPM package management style are
![]() The RPM database—A collection of files that manage the RPMs on a system
The RPM database—A collection of files that manage the RPMs on a system
![]() Package files—The packages in RPM format that are distributed with the .rpm extension
Package files—The packages in RPM format that are distributed with the .rpm extension
![]() The rpm command—Used for all package installation, removal, and query tasks
The rpm command—Used for all package installation, removal, and query tasks
Graphical package management tools such as gnorpm or the RPM-handling routines built in to the various file managers (Nautilus and Konqueror) are typically just a front end to the text-mode rpm command and provide a friendly interface for installing packages.
Incidentally, RPM originally stood for Red Hat Package Manager before it became more widely used in other distributions. Referring to the system as RPM Package Manager will draw the ire of the graybeards in your office, almost as if you called an automated teller at your bank an “ATM machine.”
The RPM Database
The RPM database is a collection of Berkeley database files that together make up the database of packages and files installed by those packages on the system.
The RPM database is located in the /var/lib/rpm directory. In that directory are many files in a binary format that are used by the rpm command. Thankfully, you don’t need to know all the files in the directory and their purposes, just that they are there and exist in an uncorrupted state.
Modifications to the RPM database are restricted to the root user. Unprivileged users can query and verify installed packages against this database.
The RPM database can become outdated or corrupted with heavy usage and needs to be rebuilt. To rebuild the database from the installed package’s headers, you use the following command as the root user:
rpm --rebuilddb
This command does not produce any output unless errors are found, and even then the errors are purely informational and not of much use for fixing the problem.
Only one user can use the database at a time. This prevents corruption of the data itself and also prevents two people from installing software on top of each other. If you accidentally try to run two rpm commands while one has the database locked, you see the following:
warning: waiting for transaction lock on /var/lib/rpm/.rpm.lock
This message simply conveys that the database is in use and cannot be locked for additional tasks at this time. This keeps multiple sysadmins from causing corruption by performing incompatible tasks simultaneously.
RPM Package Files
RPM packages come in two types: source and binary. A binary RPM file is a discrete package that, when installed, copies the compiled binary files, other associated files such as documentation and configuration, along with any other files needed to run that package to specified locations.
A source RPM file is a collection of the source files needed for installing the package, plus some instructions for building the binary RPM from the source.
An important distinction must be made between installed packages and uninstalled package files. Information about an installed package comes from the RPM database, whereas information about an uninstalled package comes from the RPM file itself. After an RPM file has been installed, the original RPM is no longer required.
RPM packages contain a set of files and configuration scripts that comprise a software program or application in most instances. Notable exceptions are packages strictly for placing text configuration files, such as files in the /etc directory. RPM packages should contain at least the following:
![]() Compressed binary application files
Compressed binary application files
![]() The name and version of the package’s software
The name and version of the package’s software
![]() The build date and host on which it was built
The build date and host on which it was built
![]() A description of the package and its purpose
A description of the package and its purpose
![]() The checksums and dependencies required
The checksums and dependencies required
Package Name Conventions
Installed packages are known by a short name, although some operations require the long names be used. Typically, long package names are needed for deletions when multiple packages whose short names match exist.
Here’s an example of a short package name:
wireshark
Here’s an example of a long package name:
wireshark-1.12.2-2.fc31
An example of two packages installed with different versions of the same software is as follows:
rpm -q kernel
This returns the output:
# rpm -q kernel
kernel-3.17.7-300.fc21.x86_64
kernel-3.17.8-300.fc21.x86_64
This makes viewing a particular package’s information difficult if you use the -l and -i options for file listings and info pages. This is fine if you want to compare the differences, but it’s maddening when you really need to see just the latest version’s information. You need to use the long name (kernel-3.17.7-300.fc21) to get just that package’s information.
The rpm Command
The text-mode .rpm package tool is used to perform all operations on packages on the system, either installed and in the RPM database, or uninstalled and on disk.
Common operations that use the rpm command include
![]() Installing packages
Installing packages
![]() Upgrading packages
Upgrading packages
![]() Removing and uninstalling packages
Removing and uninstalling packages
![]() Querying the RPM database for information
Querying the RPM database for information
![]() Verifying the package file
Verifying the package file
![]() Checking installed files
Checking installed files
The rpm command keywords and options come in several formats. The common options are short and use a single letter—for example, -i is the installation option. There are almost always long options that match, and some options occur only in the long format.
Note
On the exam you might see long options in several locations, either right after a short option or on the end of the entire command. The important thing is to have tried the long options and to know that you can tack them on the end, as long as something else doesn’t depend on that option’s placement.
Validation of Packages
For purposes of security it’s important that you validate or check the signatures of packages that are downloaded from any source other than the distribution vendor’s site; otherwise, you could be installing malware. RPM has two checks it uses to ensure the integrity of a package: MD5 and PGP (which might also be seen by its open source variant, GPG).
The MD5 acts as a checksum to make sure that the package contents have not changed since the package was created. The PGP or GPG signature is tied to a particular person or organization and indicates that the person or organization created the package.
Validating packages typically takes place when the package is accessed or installed, although it can be triggered explicitly. To check the MD5 checksum and GPG signatures for the R statistics environment you use the following command:
rpm -K R-3.1.2-1.fc22.x86_64.rpm
This returns the following output:
R-3.1.2-1.fc22.x86_64.rpm: RSA sha1 ((MD5) PGP) md5 NOT OK (MISSING
KEYS: (MD5) PGP#8e1431d5)
The presence of NOT OK shows that the signatures could not be verified. Importing the key from the distribution site fixes the problem. For example, if you are working on a Fedora system you could execute:
# rpm --import https://getfedora.org/static/8E1431D5.txt
# rpm -K R-3.1.2-1.fc22.x86_64.rpm
R-3.1.2-1.fc22.x86_64.rpm: rsa sha1 (md5) pgp md5 OK
Knowing that signatures come in md5 and gpg varieties, plus the --checksig and -K options, is plenty for the exam. The key is to be sure that the package you have is the original from the maintainer, not one full of Trojan horses and rootkits.
Installation of Packages
Installing software via packages requires root access, the rpm command, and a package(s). Prior to installation, the rpm command checks the following:
![]() That enough free disk space exists for the package
That enough free disk space exists for the package
![]() That existing files will not be overwritten
That existing files will not be overwritten
![]() That all dependencies listed in the package are met
That all dependencies listed in the package are met
You install packages with at least the -i option, (or the --install long option), often including other options that improve the experience. To install the R package, get a progress bar (consisting of hash marks printed onscreen) and verbose messages on the installation; then use the command:
# rpm -ivh R-3.1.2-1.fc21.x86_64.rpm
Preparing... ###############################
## [100%]
Updating / installing...
1:R-3.1.2-1.fc21 ###############################
## [100%]
These options work well for installing groups of packages, too. Instead of specifying a singular package as shown previously, specify a file glob instead:
rpm -ivh *.rpm
Wildcards can be used for installing and upgrading but not removing packages because the glob operator, *, expands to match files in the current directory, not packages in the RPM database. Wildcards are more thoroughly described in Chapter 5, but for now understand that *.rpm means “any file that ends in .rpm”.
Additional Installation Options
Whenever you install RPM packages, keep in mind that there will be extenuating circumstances such as files that exist on the system that RPM doesn’t know about but that will be overwritten by a package’s contents. Sometimes this happens when someone installs software manually or if a previous package operation fails.
These can be handled with the --replacefiles or --force options. (The force option overrides a variety of these safeguards, including replacefiles, which just overrides the duplicate file safeguard.) For example, if you try to install a package named tarfoo-1.2-3.i386.rpm and it finds a file on the system that will be overwritten by a file in the package, you get an error message stating so and the installation fails:
rpm -ivh tarfoo-1.2-3.i386.rpm
tarfoo /etc/tarfoo.conf conflicts with file from snafu-1.1
The solution is to check the offending file and either remove it if it’s unnecessary or use this command to force it:
rpm -ivh --force tarfoo-1.2-3.i386.rpm
If the package won’t install due to unresolved dependencies, you can (somewhat foolishly!) use the --nodeps option to have the rpm command ignore dependencies. Using --nodeps without a clear fix in mind or an understanding of where the dependencies will come from will almost certainly cause problems when you try to use the software that the package provides.
For example, if you try to install the pebkac package and it has dependency issues, it might look like this:
rpm -ivh R-3.1.2-1.fc22.x86_64.rpm
This returns output such as
error: Failed dependencies:
R-devel = 3.1.2-1.fc22 is needed by R-3.1.2-1.fc22.x86_64
R-java = 3.1.2-1.fc22 is needed by R-3.1.2-1.fc22.x86_64
libRmath-devel = 3.1.2-1.fc22 is needed by R-3.1.2-1.fc22.x86_64
You have the possibility of seriously munging your system if you use the --nodeps option outside a recommendation from the distribution vendor or a support professional. You might so severely damage the software that a full reinstall is the only option.
Verifying a Package’s Integrity
There may be situations where you need to verify that the package is working properly. For example, if users are complaining about problems with running the software that came with the package, or you suspect that someone has been tampering with your computer, you may want to verify the package.
Verify an installed RPM with the -V option (or --verify) like so:
# rpm -V logrotate
S.5....T. c /etc/logrotate.conf
The status of the package is returned as a series of nine characters indicating the results of nine different tests:
![]() S—The file size differs.
S—The file size differs.
![]() M—The mode differs (permissions or type of file).
M—The mode differs (permissions or type of file).
![]() 5—The MD5 sum differs; this is also seen by --checksig.
5—The MD5 sum differs; this is also seen by --checksig.
![]() D—The device’s major/minor number doesn’t match.
D—The device’s major/minor number doesn’t match.
![]() L—A readLink(2) path problem exists.
L—A readLink(2) path problem exists.
![]() U—The user ownership was altered.
U—The user ownership was altered.
![]() G—The group ownership was altered.
G—The group ownership was altered.
![]() T—The modification time is different from the original.
T—The modification time is different from the original.
![]() P—The capabilities set on the file differs.
P—The capabilities set on the file differs.
Following the nine tests is an attribute marker that helps you understand if the file should change as part of normal operations. The most common option is a configuration file, indicated by the letter c.
The output shown indicates that /etc/logrotate.conf is a configuration file that has changed in size, content, and modification time, since the RPM was installed.
Change is not always a bad thing. Configuration files change often because the defaults provided by the distribution may not line up with your needs. Email configurations, log cleanup policies, and web server configurations are all things that get customized frequently and therefore show up as changes. If you expect them to change, you can ignore the output, which is why configuration files have the separate attribute marker. If you see a change to binaries, such as /bin/ls, you should be suspicious.
To verify the state of all the packages on the system, you add an -a instead of specifying a package name, as such:
# rpm -Va
If you want to log the state of your configuration files for comparison against a future date, you can check the condition of every configuration file on the system and write it to a file with this command:
rpm -Vac > /root/somelog.txt
Freshening Versus Upgrading
The daily maintenance of your newly installed system will likely involve updates and fixes downloaded as package updates. Properly applying these to the system takes some finesse, particularly when you have a system that must stay as stable as possible or not have new software added to it without strict testing.
The -U and --upgrade options are designed to install or upgrade versions of packages to the latest version. An interesting side effect of these options is the removal of all other versions of the targeted package, leaving just the latest version installed.
As an example, the following command upgrades the system to the latest version of the RPMs in a particular directory of patches and fixes downloaded from the distribution vendor:
rpm -U *.rpm
The -U and --upgrade options upgrade packages that are already installed and install packages that aren’t.
Freshening your system is different in one important aspect: If a package isn’t installed and you try to freshen it with a new RPM, the installation will be skipped. If the package is installed already, freshening behaves the same as upgrading.
As an example, you use the following to apply a directory full of .rpm files that contains security patches and fixes to a firewall or other security server:
rpm -Fvh *.rpm
This feature is useful for local package cache updates, where you’ve downloaded the latest patches and fixes to a local network resource and want to run scripts on your machines to update them to the latest security releases.
Removing Packages
Removing a package or set of packages consists of using the -e or --erase option and requires root access. Removal of packages can be even more fraught with dependency problems than installation because a package can be deeply buried in a tree of dependencies over time.
Removing a package without dependencies is easy. To remove the tarfoo package, you use the following command:
rpm -e tarfoo
There’s usually no output, the package is removed, and the system returns to the prompt.
The trouble begins when you have multiple packages that all have the same short name, such as a kernel. With two versions of the kernel package on a system, querying the database for the package as shown here returns both packages’ long format names:
# rpm -q kernel
kernel-3.17.7-300.fc21.x86_64
kernel-3.17.8-300.fc21.x86_64
If you attempt to remove the package by its short name, you get this error:
# rpm -e kernel
error: "kernel" specifies multiple packages:
kernel-3.17.7-300.fc21.x86_64
kernel-3.17.8-300.fc21.x86_64
Instead, use the long name of the package:
# rpm -e kernel-3.17.7-300.fc21
To remove both packages with one command, you use
rpm -e kernel --allmatches
No output is returned if all is successful; you just get a return to the prompt. If you don’t want to remove both of the packages, the only choice is to specify the long package name of the package you want to remove.
Other Removal Options
At times you need to force the removal of a package or remove one regardless of the broken dependencies. A good example of this is fixing a broken package by forcibly removing it and reinstalling it to refresh the files and links that were broken. This usually takes place on the recommendation of support professionals, not some thread you found on a six-year-old forum!
To remove a package that has other packages depending on it, use the following command:
rpm -e foobar --nodeps
Be careful removing packages you can’t replace or don’t have the original package file to reinstall from. You need to find the original package or rebuild it from source. If you remove a package that is depended on by other packages, those packages will not be able to run.
Removing packages can also leave behind altered or customized configuration files. For example, if you alter a package’s main configuration file and then remove the package, the configuration file is saved with its original name suffixed with .rpmsave. This configuration file can be archived for future use or, if the package is to be upgraded with the -U option, a complex set of algorithms goes into play to ensure the configuration is properly applied.
Querying Packages
Querying for package data is only one of the steps that take place when you manage packages, although it has arguably the most options of all the tasks RPM performs.
It’s important that you understand the difference between packages installed on the system (that appear in the RPM database) and packages that exist simply as files on the disk or other resource. The chief difference in the rpm command’s usage is the addition of the -p option to specify that the package being acted on is a file on disk.
The most basic of all queries is to check to see whether a particular package is installed:
# rpm -q cogl
cogl-1.18.2-9.fc21.x86_64
Simply by adding a few modifier characters to this query, you can gather much more information about any package. The first modifier I usually recommend is to get information on the package, as shown in Example 3-4.
Example 3-4 Querying a Package for Information
# rpm -qi cogl
Name : cogl
Version : 1.18.2
Release : 9.fc21
Architecture: x86_64
Install Date: Wed 03 Dec 2014 02:38:45 PM CST
Group : Development/Libraries
Size : 1404466
License : LGPLv2+
Signature : RSA/SHA256, Mon 17 Nov 2014 06:11:24 PM CST, Key ID
89ad4e8795a43f54
Source RPM : cogl-1.18.2-9.fc21.src.rpm
Build Date : Sun 16 Nov 2014 10:36:50 AM CST
Build Host : buildvm-19.phx2.fedoraproject.org
Relocations : (not relocatable)
Packager : Fedora Project
Vendor : Fedora Project
URL : http://www.clutter-project.org/
Summary : A library for using 3D graphics hardware to draw pretty
pictures
Description :
Cogl is a small open source library for using 3D graphics hardware to
draw
pretty pictures. The API departs from the flat state machine style of
OpenGL and is designed to make it easy to write orthogonal components
that
can render without stepping on each others toes.
As well aiming for a nice API, we think having a single library as
opposed
to an API specification like OpenGL has a few advantages too; like
being
able to paper over the inconsistencies/bugs of different OpenGL
implementations in a centralized place, not to mention the myriad of
OpenGL
extensions. It also means we are in a better position to provide
utility
APIs that help software developers since they only need to be
implemented
once and there is no risk of inconsistency between implementations.
Having other backends, besides OpenGL, such as drm, Gallium or D3D are
options we are interested in for the future.
To get information about a package’s files, use both the -q (query) option and the -l (file listing) option, as shown in the following output:
# rpm -ql cogl
...
/usr/lib64/libcogl-path.so.20
/usr/lib64/libcogl-path.so.20.2.0
/usr/lib64/libcogl.so.20
/usr/lib64/libcogl.so.20.2.0
/usr/share/doc/cogl
/usr/share/doc/cogl/COPYING
When you get questions about listing package files or information, remember the difference between listing the contents of a package in the database and doing the same for a package on disk:
![]() rpm -qil package_name—Used for installed packages by specifying a short or long name
rpm -qil package_name—Used for installed packages by specifying a short or long name
![]() rpm -qilp package_name.rpm—Used for uninstalled packages by specifying a file
rpm -qilp package_name.rpm—Used for uninstalled packages by specifying a file
In addition, remember that you can specify these options in any order, as long as they are all there. In effect, rpm -qipl, rpm -qlip, and rpm -pliq all work.
To see a revision history or changelog for the package, use the command shown in the following output:
# rpm -q --changelog cogl
* Sun Nov 16 2014 Kalev Lember <kalevlember@gmail.com> - 1.18.2-9
- Obsolete compat-cogl116 from rhughes-f20-gnome-3-12 copr
* Thu Nov 13 2014 Kalev Lember <kalevlember@gmail.com> - 1.18.2-8
- Disable cogl-gst as long as we don't have clutter-gst3 (#1158676)
This output is similar to the release notes found in most software package source code repositories describing the history of the package’s changes.
This is the sort of thing that LPI loves to put on the exam. If you’ve never used rpm to this level, the questions will get the best of you. Don’t forget that you must use the -q and --changelog options together; otherwise, you get a syntax error.
To find all the configuration files for a package, you use the query and config options like that shown in Example 3-5.
Example 3-5 Finding a Package’s Configuration Files
# rpm -qc postfix
/etc/pam.d/smtp.postfix
/etc/postfix/access
/etc/postfix/canonical
/etc/postfix/generic
/etc/postfix/header_checks
/etc/postfix/main.cf
/etc/postfix/master.cf
/etc/postfix/relocated
/etc/postfix/transport
/etc/postfix/virtual
/etc/sasl2/smtpd.conf
This shows only the files marked by the package as configuration files. If you want the whole list of files inside the package, you need rpm -ql.
To see other capabilities or package dependencies use the --requires or -R option (remember it’s a package on disk, so use -p), as shown in Example 3-6.
Example 3-6 Querying the Dependencies of a Package File
# rpm -qRp tree-1.7.0-3.fc21.x86_64.rpm
libc.so.6()(64bit)
libc.so.6(GLIBC_2.14)(64bit)
libc.so.6(GLIBC_2.2.5)(64bit)
libc.so.6(GLIBC_2.3)(64bit)
libc.so.6(GLIBC_2.3.4)(64bit)
libc.so.6(GLIBC_2.4)(64bit)
rpmlib(CompressedFileNames) <= 3.0.4-1
rpmlib(FileDigests) <= 4.6.0-1
rpmlib(PayloadFilesHavePrefix) <= 4.0-1
rtld(GNU_HASH)
This method of finding the dependencies tells you which files or packages are needed without having to install the package. You can track the dependencies back to a package, such as to find out which package provides the libc.so.6 file required by tree.
# rpm -qf /usr/lib64/libc.so.6
glibc-2.20-8.fc21.x86_64
What about the problem of finding the package from which a particular file was installed? For example, if the /etc/krb.conf file were somehow damaged, you could find the package it came from with this command:
# rpm -qf /etc/krb5.conf
krb5-libs-1.12.2-9.fc21.x86_64
Package Management with YUM
YUM, the Yellowdog Updater Modified, is a front end to RPM. Just like the apt-* series of tools makes working with dpkg and remote repositories easier, YUM brings rpm and remote repositories together for you and packages it in an interface with far fewer options to remember.
Installing Packages
Install a package, such as the R statistical language, with yum install, as shown in Example 3-7.
Example 3-7 Installing a Package from a Remote Repository
# yum install R
Loaded plugins: langpacks
Resolving Dependencies
--> Running transaction check
---> Package R.x86_64 0:3.1.2-1.fc21 will be installed
--> Processing Dependency: R-devel = 3.1.2-1.fc21 for package: R-3.1.2-
1.fc21.x86_64
--> Running transaction check
---> Package R-devel.x86_64 0:3.1.2-1.fc21 will be installed
--> Processing Dependency: R-core-devel = 3.1.2-1.fc21 for package:
R-devel-3.1.2-1.fc21.x86_64
--> Running transaction check
---> Package R-core-devel.x86_64 0:3.1.2-1.fc21 will be installed
--> Processing Dependency: R-core = 3.1.2-1.fc21 for package: R-core-
devel-3.1.2-1.fc21.x86_64
--> Running transaction check
---> Package R-core.x86_64 0:3.1.2-1.fc21 will be installed
--> Finished Dependency Resolution
Dependencies Resolved
=======================================================================
==============
Package Arch Version Repository
Size
=======================================================================
==============
Installing:
R x86_64 3.1.2-1.fc21 updates
27 k
Installing for dependencies:
R-core x86_64 3.1.2-1.fc21 updates
48 M
R-core-devel x86_64 3.1.2-1.fc21 updates
99 k
R-devel x86_64 3.1.2-1.fc21 updates
26 k
Transaction Summary
=======================================================================
==============
Install 1 Package (+3 Dependent packages)
Total size: 48 M
Total download size: 48 M
Installed size: 74 M
Is this ok [y/d/N]: y
Downloading packages:
Running transaction check
Running transaction test
Transaction test succeeded
Running transaction (shutdown inhibited)
Warning: RPMDB altered outside of yum.
Installing : R-core-3.1.2-1.fc21.x86_ 64
Installing : R-core-devel-3.1.2-1.fc21.x86_64
Installing : R-devel-3.1.2-1.fc21.x86_64
Installing : R-3.1.2-1.fc21.x86_64
Verifying : R-devel-3.1.2-1.fc21.x86_64
Verifying : R-3.1.2-1.fc21.x86_64
Verifying : R-core-devel-3.1.2-1.fc21.x86_64
Verifying : R-core-3.1.2-1.fc21.x86_64
Installed:
R.x86_64 0:3.1.2-1.fc21
Dependency Installed:
R-core.x86_64 0:3.1.2-1.fc21 R-core-devel.x86_64 0:3.1.2-1.fc21
R-devel.x86_64 0:3.1.2-1.fc21
Complete!
The command in Example 3-7 shows that yum calculated the dependencies, downloaded all needed packages, and installed them.
yum commands do not take dashes or double dashes; the rpm commands do. Use yum install, rpm -i, or rpm --install, but don’t mix them up on the exam!
If you want to skip the step where you confirm the installation, simply add -y such as yum -y install foo.
It is possible to just download the packages instead of installing them. There are several ways to accomplish this:
![]() At the y/d/N prompt above, answer d (download) instead of y (yes).
At the y/d/N prompt above, answer d (download) instead of y (yes).
![]() Use yum install --downloadonly instead of the plain yum install.
Use yum install --downloadonly instead of the plain yum install.
![]() Use yumdownloader instead of yum.
Use yumdownloader instead of yum.
The yumdownloader command behaves similarly to yum install except that you have a few more options available to you:
![]() --source downloads the source RPM instead of binary RPMs.
--source downloads the source RPM instead of binary RPMs.
![]() --urls display the URLs of the files instead of downloading them.
--urls display the URLs of the files instead of downloading them.
![]() --resolve modifies the command to also include any missing dependencies.
--resolve modifies the command to also include any missing dependencies.
![]() --destdir specifies the location the files will be stored.
--destdir specifies the location the files will be stored.
Fetching Updates
YUM knows where to get new packages and what’s currently on your system, so it can also calculate which packages are out of date. Upgrading a package is just yum update packagename, so yum update tcpdump updates the tcpdump package along with any dependencies.
You can check for any out-of-date packages with yum check-update and upgrade the whole system with yum update all by itself.
Finding Packages to Install
You can search remote repositories in different ways. If you know the name of the package you can use yum list:
# yum list tomcat
Loaded plugins: langpacks
Available Packages
tomcat.noarch 7.0.54-3.fc21 fedora
Packages that can be split into separate components are usually distributed as separate packages sharing a common prefix. Suppose you want to see what components you could add to Tomcat. You could use a wildcard operator with the previous command, as shown in Example 3-8.
Example 3-8 Listing Packages That Match a Wildcard
# yum list tomcat*
Loaded plugins: langpacks
Available Packages
tomcat.noarch 7.0.54-3.fc21 fedora
tomcat-admin-webapps.noarch 7.0.54-3.fc21 fedora
tomcat-docs-webapp.noarch 7.0.54-3.fc21 fedora
tomcat-el-2.2-api.noarch 7.0.54-3.fc21 fedora
tomcat-javadoc.noarch 7.0.54-3.fc21 fedora
tomcat-jsp-2.2-api.noarch 7.0.54-3.fc21 fedora
tomcat-jsvc.noarch 7.0.54-3.fc21 fedora
Finally, if you knew you needed a web server but weren’t sure what to pick, a general search is available, as shown in Example 3-9.
Example 3-9 Searching YUM Repositories for Packages That Match a Concept
# yum search "web server"
Loaded plugins: langpacks
================= N/S matched: web server =================
boa.x86_64 : Single-tasking HTTP server
mongoose.x86_64 : An easy-to-use self-sufficient web server
rubygem-thin.x86_64 : A thin and fast web server
tlssled.noarch : An evaluation tool for SSL/TLS (HTTPS) web server
implementations
undertow.noarch : Java web server using non-blocking IO
xsp.x86_64 : A small web server that hosts ASP.NET
Spawning.noarch : A HTTP server for hosting WSGI python web
applications
apache-rat.noarch : Apache Release Audit Tool (RAT)
apache-scout.noarch : JSR 93 (JAXR) implementation
aws.i686 : Ada Web Server
... output omitted ...
Configuring Yum
The main configuration file for yum is /etc/yum.conf. In it are the global options for yum and some defaults for all the repositories. You will rarely have to edit this file, but it does contain helpful information if you’re trying to figure out where files are kept. Example 3-10 shows a default Fedora configuration.
Example 3-10 A Default yum.conf Configuration for Fedora
[main]
cachedir=/var/cache/yum/$basearch/$releasever
keepcache=0
debuglevel=2
logfile=/var/log/yum.log
exactarch=1
obsoletes=1
gpgcheck=1
plugins=1
installonly_limit=3
From the example you can see that all the cached files are stored under /var/cache/yum, and the log file is /var/log/yum.log. A full list of the options is in the man page for yum.conf.
The repository configuration files are stored in /etc/yum.repos.d. Each file may contain multiple repositories though you will find that the repositories are grouped according to function. For example, the main distribution repository is in one file along with the repository for the source packages and a repository for the debugging symbols. Another file contains the repositories for the updates, source for the updates, and the debugging symbols for the updates.
A single repository configuration looks like that shown in Example 3-11.
Example 3-11 An Individual Repository’s Configuration from Fedora
[updates]
name=Fedora $releasever - $basearch - Updates
failovermethod=priority
#baseurl=http://download.fedoraproject.org/pub/fedora/linux/
updates/$releasever/$basearch/
metalink=https://mirrors.fedoraproject.org/metalink?repo=updates-
released-f$releasever&arch=$basearch
enabled=1
metadata_expire=6h
gpgcheck=1
gpgkey=file:///etc/pki/rpm-gpg/RPM-GPG-KEY-fedora-$releasever-$basearch
skip_if_unavailable=False
You may have noticed several options starting with a dollar sign ($). These are placeholders that are expanded when yum is invoked. The $releasever becomes the Fedora version, and the $basearch becomes the hardware architecture such as x86_64.
The name of the repository in Example 3-11 is updates. A repository either has a baseurl, which is a link to the repository, or it has a metalink, which returns a list of mirrors for the repository. (A mirror spreads the load across many different servers hosted by different companies.)
An important directive in the configuration is enabled. When you run a yum command only the enabled repositories are searched. You can enable a repository in a yum command by adding --enablerepo reponame.
Hiding repositories is helpful because it gives you access to a wider variety of packages without needing to configure the repository. You can use this to hide the debugging symbol repository unless you actually need debugging symbols, such as when trying to track down crashes. You can also have access to bleeding edge software when you need it, but install more trusted software by default.
Summary
In this chapter you learned about Red Hat (RPM) and Debian packages. Packages solve the problem of needing to compile software before using it, provide for easier uninstallation and upgrading, and maintain lists of dependencies.
The Debian dpkg series of tools operate only on local packages. You can layer on apt-get and apt-cache, whose job is to connect to remote repositories and download necessary packages. In the RPM world you use rpm for local packages and yum for remote packages.
Each tool has its own command line parameters that involve you passing a command to the tool, such as to indicate an installation or deletion. dpkg and rpm expect the commands to be in dashed or double dashed format, such as -i or --install. yum and apt-get use commands that are bare words such as install.
Exam Preparation Tasks
As mentioned in the section “How to Use This Book” in the Introduction, you have a couple of choices for exam preparation: the exercises here, Chapter 21, “Final Preparation,” and the practice exams on the DVD.
Review All Key Topics
Review the most important topics in this chapter, noted with the Key Topics icon in the outer margin of the page. Table 3-2 lists a reference of these key topics and the page numbers on which each is found.


Table 3-2 Key Topics for Chapter 3
Define Key Terms
Define the following key terms from this chapter and check your answers in the glossary:
Source format
binary packages
package managers
libraries
link
static linking
dynamic linking
dynamic linker (ld.so)
shared object
Advanced Package Tool (APT)
source RPM
Review Questions
The answers to these review questions are in Appendix A.
1. Which of the following commands shows the revision history for a software application from the package file on disk?
a. rpm --revision tree-1.2-7.i386.rpm
b. rpm -qp tree-1.2-7.i386.rpm --changelog
c. rpm -qc tree-1.2-7.i386.rpm
d. rpm -qlp tree-1.2-7.i386.rpm --showrev
2. Which of the following identifies the file produced by the ldconfig program after it is run and has processed all the library files on the machine:
a. /etc/ld.so.conf
b. /etc/ld.so.cache
c. /var/cache/ld.so.cache
d. /etc/ld.cache.d
3. What is the purpose of running the ldd program?
a. Rebuilding links to library files
b. Creating a link to a library file
c. Displaying a program’s required libraries
d. Reading a program’s library capabilities
4. Which environment variable is used to provide additional library support and is also considered to be a security risk?
a. LIBC_EXTRA
b. LD_SO_ETC
c. LD_LIBRARY
d. LD_LIBRARY_PATH
5. Which of the following is a valid cause to receive the error message? (Choose all that apply.)
error: cannot get exclusive lock on /var/lib/rpm/Packages?
a. Attempting an rpm install command as non-root
b. Performing multiple remove commands simultaneously
c. Performing multiple verification commands simultaneously
d. Performing multiple install commands simultaneously
6. You need to remove all instances of the package woohoo, regardless of the version, with a single command. Which of the following accomplishes this task? (Choose all that apply.)
a. rpm -e woohoo*
b. rpm -ea woohoo
c. rpm -a woohoo --remove
d. rpm -e woohoo --allmatches
7. You are the system administrator of two firewalls and want to apply updates from a set of packages in the current directory, but you don’t want to install any new packages on the systems. Which command will do this?
a. rpm -F *.rpm
b. rpm -Uvh *.rpm
c. rpm -qp *.rpm
d. rpm -Fp *.rpm
8. To view the list of required capabilities that a package needs to function properly, which command and options display this for an installed package?
a. rpm -qi
b. rpm -qR
c. rpm --whatrequires
d. rpm -qa
9. How would you see whether you have installed the iceweasel package?
a. apt-cache search iceweasel
b. apt-get --list iceweasel
c. dpkg --info iceweasel
d. dpkg --list iceweasel
10. How would you upgrade the iceweasel package to the latest version?
a. apt-get install iceweasel
b. apt-get update iceweasel
c. apt-get upgrade iceweasel
d. dpkg --install --upgrade iceweasel
All materials on the site are licensed Creative Commons Attribution-Sharealike 3.0 Unported CC BY-SA 3.0 & GNU Free Documentation License (GFDL)
If you are the copyright holder of any material contained on our site and intend to remove it, please contact our site administrator for approval.
© 2016-2026 All site design rights belong to S.Y.A.