Ansible for DevOps: Server and configuration management for humans (2015)
Chapter 4 - Ansible Playbooks
Power plays
Like many other configuration management solutions, Ansible uses a metaphor to describe its configuration files. They are called ‘playbooks’, and they list a set of tasks (‘plays’ in Ansible parlance) that will be run against a particular server or set of servers.
Playbooks are written in YAML, a human-readable data format that is very popular for defining configuration in a simple text format. They can be included within other playbooks, and certain metadata and options can cause different plays or playbooks to be run in different scenarios on different servers. Think of a football (American, not the game played with your feet) playbook; there are many different plays that can be run, and the coaches will pick the plays appropriate for a given situation. You will write many different plays, and you can use some on all servers, some on a few types of servers, and some on just one or two servers—as the current situation requires.
Ad-hoc commands alone can make Ansible a powerful tool; playbooks turn Ansible into a top-notch server provisioning and configuration management tool.
What attracts most DevOps personnel to Ansible is the fact that it is easy to convert shell scripts (or one-off shell commands) directly into Ansible plays. Consider the following script, which installs Apache on a RHEL/CentOS server:
Shell Script
1 # Install Apache.
2 yum install --quiet -y httpd httpd-devel
3 # Copy configuration files.
4 cp /path/to/config/httpd.conf /etc/httpd/conf/httpd.conf
5 cp /path/to/config/httpd-vhosts.conf /etc/httpd/conf/httpd-vhosts.conf
6 # Start Apache and configure it to run at boot.
7 service httpd start
8 chkconfig httpd on
To run the shell script (in this case, a file named shell-script.sh with the contents as above), you would call it directly from the command line:
# (From the same directory in which the shell script resides).
$ ./shell-script.sh
Ansible Playbook
1 ---
2 - hosts: all
3 tasks:
4 - name: Install Apache.
5 command: yum install --quiet -y httpd httpd-devel
6 - name: Copy configuration files.
7 command: >
8 cp /path/to/config/httpd.conf /etc/httpd/conf/httpd.conf
9 - command: >
10 cp /path/to/config/httpd-vhosts.conf /etc/httpd/conf/httpd-vhosts.conf
11 - name: Start Apache and configure it to run at boot.
12 command: service httpd start
13 - command: chkconfig httpd on
To run the Ansible Playbook (in this case, a file named playbook.yml with the contents as above), you would call it using the ansible-playbook command:
# (From the same directory in which the playbook resides).
$ ansible-playbook playbook.yml
Ansible is powerful in that you can quickly transition to using playbooks if you know how to write standard shell commands—the same commands you’ve been using for years—and then rebuild your configuration to be more robust and take advantage of Ansible’s features as you get time.
In the above playbook, we use Ansible’s command module to run standard shell commands. We’re also giving each play a ‘name’, so when we run the playbook, the play has human-readable output on the screen or in the logs. The command module has some other tricks up its sleeve (which we’ll see later), but for now, you can be assured that shell scripts can be translated directly into Ansible playbooks without much hassle.
|
|
The greater-than sign (>) immediately following the command: module directive tells YAML “automatically quote the next set of indented lines as one long string, with each line separated by a space”. It helps improve task readability in some cases. There are different ways of describing configuration using valid YAML syntax, and these methods are discussed in-depth in the YAML Conventions and Best Practices section in Appendix B. This book uses three different task-formatting techniques: For tasks which require one or two simple parameters, Ansible’s shorthand syntax (e.g. yum: name=apache2 state=installed) is used. For most uses of command or shell, where longer commands are entered, the > technique mentioned above is used. For tasks which require many parameters, YAML object notation is used—placing each key and variable on its own line. This assists with readability and allows for version control systems to easily distinguish changes line-by-line. |

The above playbook will perform exactly like the shell script, but we can improve things greatly by using some of Ansible’s built-in modules to handle the heavy lifting:
Revised Ansible Playbook - Now with idempotence!
1 ---
2 - hosts: all
3 sudo: yes
4 tasks:
5 - name: Install Apache.
6 yum: name={{ item }} state=present
7 with_items:
8 - httpd
9 - httpd-devel
10 - name: Copy configuration files.
11 copy:
12 src: "{{ item.src }}"
13 dest: "{{ item.dest }}"
14 owner: root
15 group: root
16 mode: 644
17 with_items:
18 - {
19 src: "/path/to/config/httpd.conf",
20 dest: "/etc/httpd/conf/httpd.conf"
21 }
22 - {
23 src: "/path/to/config/httpd-vhosts.conf",
24 dest: "/etc/httpd/conf/httpd-vhosts.conf"
25 }
26 - name: Make sure Apache is started and configure it to run at boot.
27 service: name=httpd state=started enabled=yes
Now we’re getting somewhere. Let me walk you through this simple playbook:
1. The first line, ---, is how we mark this document as using YAML syntax (like using <html> at the top of an HTML document, or <?php at the top of a block of PHP code).
2. The second line, - hosts: all defines the first (and in this case, only) play, and tells Ansible to run the play on all hosts that it knows about.
3. The third line, sudo: yes tells Ansible to run all the commands through sudo, so the commands will be run as the root user.
4. The fourth line, tasks:, tells Ansible that what follows is a list of tasks to run as part of this playbook.
5. The first task begins with name: Install Apache.. name is not a module that does something to your server; rather, it’s a way of giving a human-readable description to the play that follows. Seeing “Install Apache” is more relevant than seeing “yum name=httpd state=installed”… but if you drop the name line completely, that won’t cause any problem.
o We use the yum module to install Apache. Instead of the command yum -y install httpd httpd-devel, we can describe to Ansible exactly what we want. Ansible will take the items array we pass in ({{ variable }}references a variable in Ansible’s playbooks). We tell yum to make sure the packages we define are installed with state=present, but we could also use state=latest to ensure the latest version is installed, or state=absent if we want to make sure the package is not installed.
o Ansible allows simple lists to be passed into tasks using with_items: Define a list of items below, and each line will be passed into the play, one by one. In this case, each of the items will be substituted for the {{ item }} variable.
6. The second task again starts with a human-readable name (which could be left out if you’d like).
o We use the copy module to copy files from a source (on our local workstation) to a destination (the server being managed). We can also pass in more variables, like file metadata including ownership and permissions (owner, group, and mode).
o In this case, we are using an array with multiple elements for variable substitution; you use the syntax {var1: value, var2: value} to define each element (it can have as many variables as you want within, or even nested levels of variables!). When you reference the variables in the play, you use a dot to access the variable within the item, so {{ item.var1 }} would access the first variable. In our example, item.src accesses the src in each item.
7. The third task also uses a name to describe it in a human-readable format.
o We use the service module to describe the desired state of a particular service, in this case httpd, Apache’s http daemon. We want it to be running, so we set state=started, and we want it to run at system startup, so we say enabled=yes (the equivalent of running chkconfig httpd on).
The great thing about the way we’ve reformatted this list of commands Ansible can keep track of the state of everything on all our servers. If you run the playbook the first time, it will provision the server by ensuring Apache is installed and running, and your custom configuration is in place.
Even better, the second time you run it, it won’t actually do anything—besides telling you nothing has changed—as long as the server is in the correct state. So, with this one short playbook, we’re able to provision and ensure the proper configuration for an Apache web server. Additionally, you will could run the playbook with the --check option (see the next section below) to ensure that the configuration matches what’s defined in the playbook, without actually running the tasks on the server.
If you ever want to update your configuration, or install another httpd package, you can update the file locally, or add the package to the with_items list, and run the playbook again. Whether you have one or a thousand servers, all of their configurations will be updated to match your playbook—and Ansible will tell you if anything ever changes (you’re not making ad-hoc changes on individual production servers, are you?).
Running Playbooks with ansible-playbook
If we run the playbooks in the examples above (which are set to run on all hosts), then the playbook would be run against every host defined in your Ansible inventory file (see Chapter 1’s basic inventory file example).
Limiting playbooks to particular hosts and groups
You can limit a playbook to specific groups or individual hosts by changing the hosts: definition. It can be set to a all hosts, a group of hosts defined in your inventory, multiple groups of hosts (e.g. webservers,dbservers), individual hosts (e.g. atl.example.com), or a mixture of hosts. You can even do wildcard matches, like *.example.com, to match all subdomains of a top-level domain.
You can also limit the hosts on which the playbook is run via the ansible-playbook command:
$ ansible-playbook playbook.yml --limit webservers
In this case (assuming your inventory file contains a webservers group), even if the playbook is set to hosts: all, or includes hosts in addition to what’s defined in the webservers group, it will only be run on the hosts defined in webservers.
You could also limit the playbook to one particular host:
$ ansible-playbook playbook.yml --limit xyz.example.com
If you want to see a list of hosts that would be affected by your playbook before you actually run it, use --list-hosts:
$ ansible-playbook playbook.yml --list-hosts
Running this should give output like:
playbook: playbook.yml
play #1 (all): host count=4
127.0.0.1
192.168.24.2
foo.example.com
bar.example.com
(Where count is the count of servers defined in your inventory, and following is a list of all the hosts defined in your inventory).
Setting user and sudo options with ansible-playbook
If no user is defined alongside the hosts in a playbook, Ansible assumes you’ll connect as the user defined in your inventory file for a particular host, and then will fall back to your local user account name. You can explicitly define a remote user to use for remote plays using the --remote-user (-u) option:
$ ansible-playbook playbook.yml --remote-user=johndoe
In some situations, you will need to pass along your sudo password to the remote server to perform commands via sudo. In these situations, you’ll need use the --ask-sudo-pass (-K) option. You can also explicitly force all tasks in a playbook to use sudo with --sudo. Finally, you can define the sudo user for tasks run via sudo (the default is root) with the --sudo-user (-U) option.
For example, the following command will run our example playbook with sudo, performing the tasks as the sudo user janedoe, and Ansible will prompt you for the sudo password:
$ ansible-playbook playbook.yml --sudo --sudo-user=janedoe --ask-sudo-pass
If you’re not using key-based authentication to connect to your servers (read my warning about the security implications of doing so in Chapter 1), you can use --ask-pass.
Other options for ansible-playbook
The ansible-playbook command also allows for some other common options:
· --inventory=PATH (-i PATH): Define a custom inventory file (default is the default Ansible inventory file, usually located at /etc/ansible/hosts).
· --verbose (-v): Verbose mode (show all output, including output from successful options). You can pass in -vvvv to give every minute detail.
· --extra-vars=VARS (-e VARS): Define variables to be used in the playbook, in "key=value,key=value" format.
· --forks=NUM (-f NUM): Number for forks (integer). Set this to a number higher than 5 to increase the number of servers on which Ansible will run tasks concurrently.
· --connection=TYPE (-c TYPE): The type of connection which will be used (this defaults to ssh; you might sometimes want to use local to run a playbook on your local machine, or on a remote server via cron).
· --check: Run the playbook in Check Mode (‘Dry Run’); all tasks defined in the playbook will be checked against all hosts, but none will actually be run.
There are some other options and configuration variables that are important to get the most out of ansible-playbook, but this should be enough to get you started running the playbooks in this chapter on your own servers or virtual machines.
|
|
The rest of this chapter uses more realistic Ansible playbooks. All the examples in this chapter can be found in Jeff Geerling’s Ansible for DevOps GitHub repository, and you can clone that repository to your computer (or browse the code online) to follow along more easily. |

Real-world playbook: CentOS Node.js app server
The first example, while being helpful for someone who might want to post a simple static web page to a clunky old Apache server, is not a good representation of a real-world scenario. I’m going to run through some more complex playbooks that do many different things, most of which are actually being used to manage production infrastructure today.
The first playbook will configure a CentOS server with Node.js, and install and start a simple Node.js application. The server will have a very simple architecture:
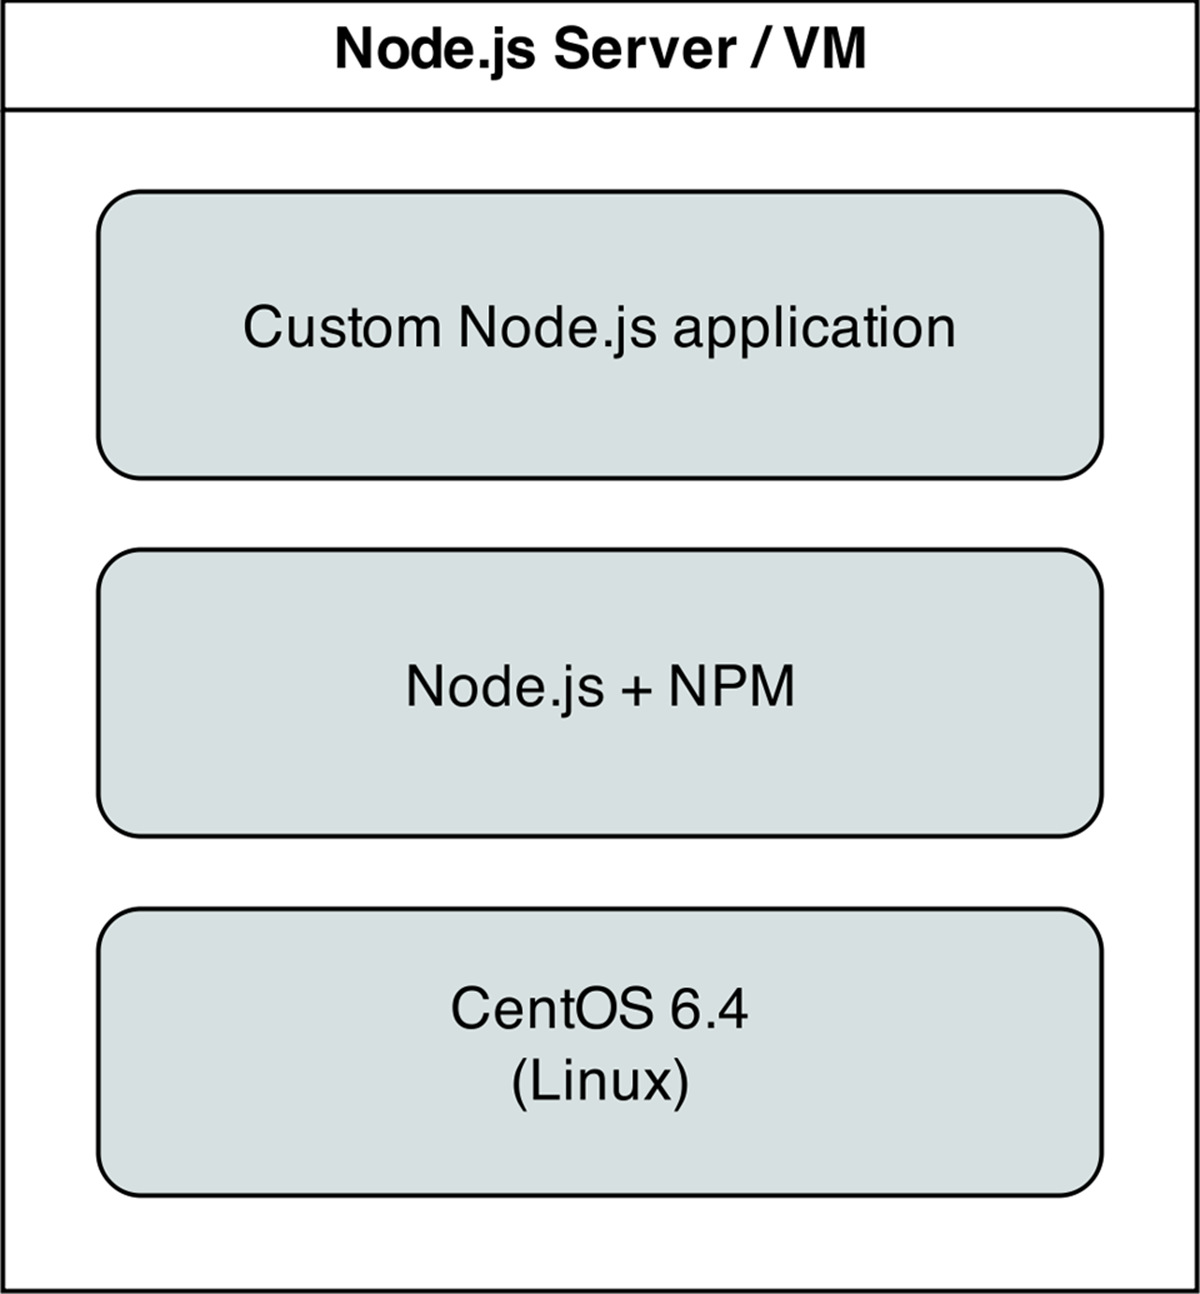
Node.js app on CentOS.
To start things off, we need to create a YAML file (playbook.yml in this example) to contain our playbook. Let’s keep things simple:
1 - hosts: all
2
3 tasks:
First, define a set of hosts (all) on which this playbook will be run (see the section above about limiting the playbook to particular groups and hosts), then tell ansible that what follows will be a list of tasks to run on the hosts.
Add extra repositories
Adding extra package repositories (yum or apt) is one thing many admins will do before any other work on a server to ensure that certain packages are available, or are at a later version than the ones in the base installation.
In the shell script below, we want to add both the EPEL and Remi repositories, so we can get some packages like Node.js or later versions of other necessary software (these examples presume you’re running RHEL/CentOS 6.x):
1 # Import EPEL GPG Key - see: https://fedoraproject.org/keys
2 wget https://fedoraproject.org/static/0608B895.txt \
3 -O /etc/pki/rpm-gpg/RPM-GPG-KEY-EPEL-6
4 rpm --import /etc/pki/rpm-gpg/RPM-GPG-KEY-EPEL-6
5
6 # Import Remi GPG key - see: http://rpms.famillecollet.com/RPM-GPG-KEY-remi
7 wget http://rpms.famillecollet.com/RPM-GPG-KEY-remi \
8 -O /etc/pki/rpm-gpg/RPM-GPG-KEY-remi
9 rpm --import /etc/pki/rpm-gpg/RPM-GPG-KEY-remi
10
11 # Install EPEL and Remi repos.
12 rpm -Uvh --quiet \
13 http://dl.fedoraproject.org/pub/epel/6/x86_64/epel-release-6-8.noarch.rpm
14 rpm -Uvh --quiet \
15 http://rpms.famillecollet.com/enterprise/remi-release-6.rpm
16
17 # Install Node.js (npm plus all its dependencies).
18 yum --enablerepo=epel install node
This shell script uses the rpm command to import the EPEL and Remi repository GPG keys, then adds the repositories, and finally installs Node.js. It works okay for a simple deployment (or by hand), but it’s silly to run all these commands (some of which could take time or stop your script entirely if your connection is flaky or bad) if the result has already been achieved (namely, two repositories and their GPG keys have been added).
|
|
If you wanted to skip a couple steps, you could skip adding the GPG keys, and just run your commands with --nogpgcheck (or, in Ansible, set the disable_gpg_check parameter of the yum module to yes), but it’s a good idea to leave this enabled. GPG stands for GNU Privacy Guard, and it’s a way that developers and package distributors can sign their packages (so you know it’s from the original author, and hasn’t been modified or corrupted). Unless you really know what you’re doing, don’t disable security settings like GPG key checks. |
Ansible can make things a little more robust. Even though the following is slightly more verbose, it performs the same actions in a more structured way, which is simpler to understand, and can work with variables other nifty Ansible features we’ll discuss later:
4 - name: Import EPEL and Remi GPG keys.
5 rpm_key: "key={{ item }} state=present"
6 with_items:
7 - "https://fedoraproject.org/static/0608B895.txt"
8 - "http://rpms.famillecollet.com/RPM-GPG-KEY-remi"
9
10 - name: Install EPEL and Remi repos.
11 command: "rpm -Uvh --force {{ item.href }} creates={{ item.creates }}"
12 with_items:
13 - {
14 href: "http://download.fedoraproject.org/pub/epel/6/i386/epel-release-6-8.no\
15 arch.rpm",
16 creates: "/etc/yum.repos.d/epel.repo"
17 }
18 - {
19 href: "http://rpms.famillecollet.com/enterprise/remi-release-6.rpm",
20 creates: "/etc/yum.repos.d/remi.repo"
21 }
22
23 - name: Disable firewall (since this is a dev environment).
24 service: name=iptables state=stopped enabled=no
25
26 - name: Install Node.js and npm.
27 yum: name=npm state=present enablerepo=epel
28
29 - name: Install forever (to run our Node.js app).
30 npm: name=forever global=yes state=latest
Let’s walk through this playbook step-by-step:
1. rpm_key is a very simple Ansible module that takes and imports an RPM key from a URL or file, or the keyid of an key that is already present, and can ensure the key is either present or absent (the state parameter). We want to import two keys—one for EPEL from the Fedora project, and one for the Remi Repository.
2. Since Ansible doesn’t have a built-in rpm module, we use the rpm command, but we use Ansible’s command module, which allows us to do two things:
1. Use the creates parameter to tell Ansible when to not run the command (in this case, we tell Ansible what file is present after the rpm command successfully completes).
2. Use an multidimensional array of items (with_items) so we can define URLs and the resulting file that can be checked with creates.
3. yum installs Node.js (along with all the required packages for npm, Node’s package manager) if it’s not present, and allows the EPEL repo to be searched via the enablerepo parameter (you could also explicitly disable a repository using disablerepo).
4. Since NPM is now installed, we can use Ansible’s npm module to install a Node.js utility, forever, so we can easily launch our app and keep it running. Setting global to yes tells NPM to install the forever node module in /usr/lib/node_modules/ so it will be available to all users and Node.js apps on the system.
We’re beginning to have a nice little Node.js app server set up. Let’s set up a little Node.js app that responds to HTTP requests on port 80.
Deploy a Node.js app
The next step is to install a simple Node.js app on our server. First, we’ll create a really simple Node.js app by creating a new folder, app, in the same folder as your playbook.yml. Create a new file, app.js, in this folder, with the following contents:
1 // Load the express module.
2 var express = require('express'),
3 app = express.createServer();
4
5 // Respond to requests for / with 'Hello World'.
6 app.get('/', function(req, res){
7 res.send('Hello World!');
8 });
9
10 // Listen on port 80 (like a true web server).
11 app.listen(80);
12 console.log('Express server started successfully.');
Don’t worry about the syntax or the fact that this is Node.js. We just need a quick example to deploy. This example could’ve been written in Python, Perl, Java, PHP, or another language, but since Node is a very simple language (JavaScript) that runs in a very simple and lightweight environment, it’s a nice (and easy) language to use when testing things or prodding your server.
Since this little app is dependent on Express (a simple http framework for Node), we also need to tell NPM about this dependency via a package.json file in the same folder as app.js:
1 {
2 "name": "examplenodeapp",
3 "description": "Example Express Node.js app.",
4 "author": "Jeff Geerling <geerlingguy@mac.com>",
5 "dependencies": {
6 "express": "3.x.x"
7 },
8 "engine": "node >= 0.10.6"
9 }
Now, add the following to your playbook, to copy the entire app to the server, and then have NPM download the required dependencies (in this case, express):
31 - name: Ensure Node.js app folder exists.
32 file: "path={{ node_apps_location }} state=directory"
33
34 - name: Copy example Node.js app to server.
35 copy: "src=app dest={{ node_apps_location }}"
36
37 - name: Install app dependencies defined in package.json.
38 npm: path={{ node_apps_location }}/app
First, we ensure the directory where our app will be installed exists, using the file module. The {{ node_apps_location }} variable used in each command can be defined under a vars section at the top of our playbook, in your inventory, or on the command line when calling ansible-playbook.
Second, we copy the entire app folder up to the server, using Ansible’s copy command, which intelligently distinguishes between a single file or a directory of files, and recurses through the directory, similar to recursive scp or rsync.
|
|
Ansible’s copy module works very well for single or small groups of files, and recurses through directories automatically. If you are copying hundreds of files, or deeply-nested directory structures, copy will get bogged down. In these situations, consider using the synchronizemodule if you need to copy a full directory, or unarchive if you want to copy up an archive and have it expanded in place on the server. |
Third, we use npm again, this time, with no extra arguments besides the path to the app. This tells NPM to parse the package.json file and ensure all the dependencies are present.
We’re almost finished! The last step is to start the app.
Launch a Node.js app
We’ll now use forever (which we installed earlier) to start the app.
39 - name: Check list of running Node.js apps.
40 command: forever list
41 register: forever_list
42 changed_when: false
43
44 - name: Start example Node.js app.
45 command: "forever start {{ node_apps_location }}/app/app.js"
46 when: "forever_list.stdout.find('{{ node_apps_location}}/app/app.js') == -1"
In the first play, we’re doing two new things:
1. register creates a new variable, forever_list, to be used in the next play to determine when to run the play. register stashes the output (stdout, stderr) of the defined command in the variable name passed to it.
2. changed_when tells Ansible explicitly when this play results in a change to the server. In this case, we know the forever list command will never change the server, so we just say false—the server will never be changed when the command is run.
The second play actually starts the app, using forever. We could also start the app by calling node {{ node_apps_location }}/app/app.js, but we would not be able to control the process easily, and we would also need to use nohupand & to avoid Ansible hanging on this play.
Forever tracks the Node apps it manages, and we use Forever’s list option to print a list of running apps. The first time we run this playbook, the list will obviously be empty—but on future runs, if the app is running, we don’t want to start another instance of it. To avoid that situation, we tell Ansible when we want to start the app with when. Specifically, we tell Ansible to start the app only when the app’s path in not in the forever list output.
Node.js app server summary
At this point, you have a complete playbook that will install a simple Node.js app which responds to HTTP requests on port 80 with “Hello World!”.
To run the playbook on a server (in our case, we could just set up a new VirtualBox VM for testing, either via Vagrant or manually), use the following command (pass in the node_apps_location variable via the command):
$ ansible-playbook playbook.yml \
--extra-vars="node_apps_location=/usr/local/opt/node"
Once the playbook has finished configuring the server and deploying your app, visit http://hostname/ in a browser (or use curl or wget to request the site), and you should see the following:

Node.js Application home page.
Simple, but very powerful. We’ve configured an entire Node.js application server In fewer than fifty lines of YAML!
|
|
You can find the entire example Node.js app server playbook in this book’s code repository at https://github.com/geerlingguy/ansible-for-devops, in the nodejs directory. |
Real-world playbook: Ubuntu LAMP server with Drupal
At this point, you should be getting comfortable with Ansible playbooks and the YAML syntax used to define them. Up to this point, most examples have assumed you’re working with a CentOS, RHEL, or Fedora server. Ansible plays nicely with other flavors of Linux and BSD-like systems as well. In the following example, we’re going to set up a traditional LAMP (Linux, Apache, MySQL, and PHP) server using Ubuntu 12.04 to run a Drupal website.
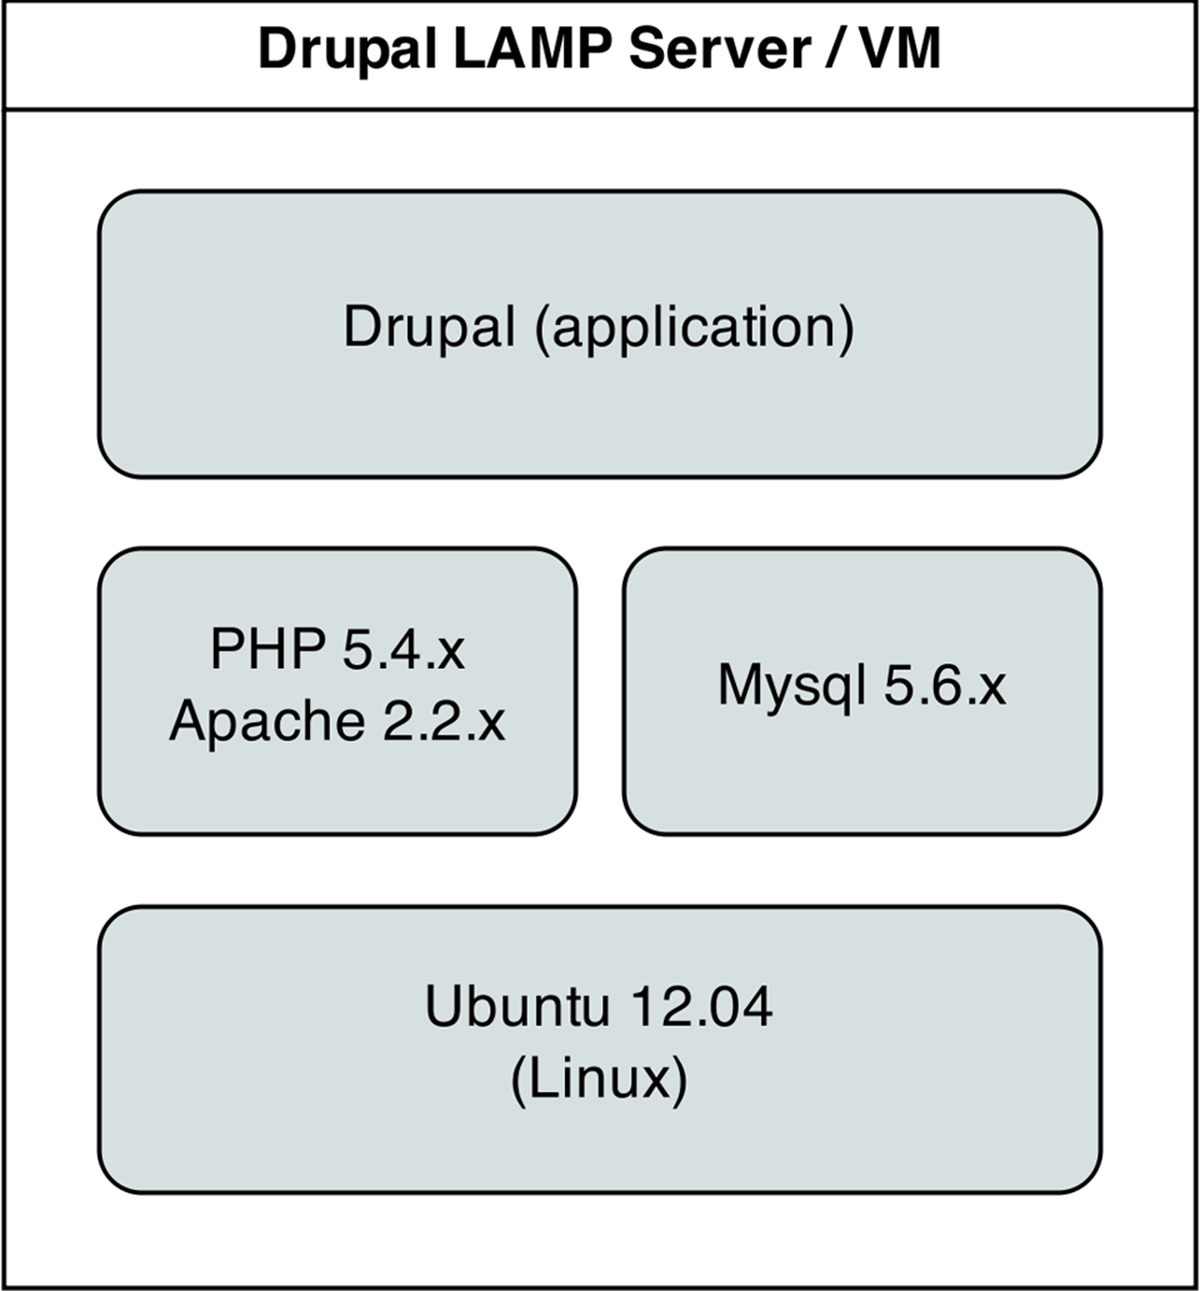
Drupal LAMP server.
Include a variables file, and discover pre_tasks and handlers
For this playbook, we’re going to start organizing our playbook a little more efficiently. Instead of defining any requiring variables be passed in via the command line, let’s begin the playbook by telling Ansible our variables are stored in a separate vars.yml file:
1 - hosts: all
2
3 vars_files:
4 - vars.yml
Using one or more variable files, rather than defining everything inline, cleans up your main playbook file, and lets you organize all your configurable variables in one place. For now, we don’t have any variables to add; we’ll define the contents of vars.yml later. For now, create the empty file, and continue on to the next section of the playbook, pre_tasks:
5 pre_tasks:
6 - name: Update apt cache if needed.
7 apt: update_cache=yes cache_valid_time=3600
Ansible lets you run tasks before or after the main set of tasks using pre_tasks and post_tasks. In this case, we need to ensure that our apt cache is updated before we run the rest of the playbook, so we have the latest package versions on our server. We use Ansible’s apt module and tell it to update the cache if it’s been more than 3600 seconds (1 hour) since the last update.
With that out of the way, we’ll add another new section to our playbook, handlers:
8 handlers:
9 - name: restart apache
10 service: name=apache2 state=restarted
handlers are special kinds of tasks that you can run at the end of a group of tasks by adding the notify option to any of the tasks in that group. The handler will only be called if one of the tasks notifying the handler makes a change to the server (and doesn’t fail), and it will only be notified at the end of the group of tasks.
To call this handler, add the option notify: restart apache after defining the rest of a play. We’ve defined this handler so we can restart the apache2 service after a configuration change, which will be explained below.
|
|
Just like variables, handlers and tasks may be placed in separate files and included in your playbook to keep things tidy (we’ll discuss this in chapter 6). For simplicity’s sake, though, the examples in this chapter are shown as in a single playbook file. We’ll discuss different playbook organization methods later. |
|
|
By default, Ansible will stop all playbook execution when a task fails, and won’t even notify any handlers that may need to be triggered. In some cases, this can lead to unintended side effects. If you want to make sure handlers always run after a task uses notify to call the handler, even in case of playbook failure, add --force-handlers to your ansible-playbook command. |
Basic LAMP server setup
The first step towards building an application server that depends on the LAMP stack is to build the actual LAMP part of it. This is the simplest process, but still requires a little extra work for our particular server. We want to install Apache, MySQL and PHP, but we’ll also need a couple other dependencies, and we want a particular version of PHP (5.5), which is only available in an extra apt repository.
11 tasks:
12 - name: Get software for apt repository management.
13 apt: name={{ item }} state=installed
14 with_items:
15 - python-apt
16 - python-pycurl
17
18 - name: Add ondrej repository for later versions of PHP.
19 apt_repository: repo='ppa:ondrej/php5' update_cache=yes
20
21 - name: "Install Apache, MySQL, PHP, and other dependencies."
22 apt: name={{ item }} state=installed
23 with_items:
24 - git
25 - curl
26 - sendmail
27 - apache2
28 - php5
29 - php5-common
30 - php5-mysql
31 - php5-cli
32 - php5-curl
33 - php5-gd
34 - php5-dev
35 - php5-mcrypt
36 - php-apc
37 - php-pear
38 - python-mysqldb
39 - mysql-server
40
41 - name: Disable the firewall (since this is for local dev only).
42 service: name=ufw state=stopped
43
44 - name: "Start Apache, MySQL, and PHP."
45 service: "name={{ item }} state=started enabled=yes"
46 with_items:
47 - apache2
48 - mysql
In this playbook, I’ve decided to add a simple prefix to each named play, so I can more easily follow the playbook’s progress when it’s running. I’ve begun with the common LAMP setup:
1. Install a couple helper libraries which allow Python to manage apt more precisely (python-apt and python-pycurl are required for the apt_repository module to do its work).
2. Since the default apt repositories for Ubuntu 12.04 don’t include PHP 5.4.x (or any later versions), install ondrej’s PHP5-oldstable repository, containing PHP 5.4.25 (at the time of this writing) and other associated PHP packages.
3. Install all the required packages for our LAMP server (including all the php5 extensions we need to run Drupal).
4. Disable the firewall entirely, for testing purposes. If on a production server or any server exposed to the Internet, you should instead have a restrictive firewall only allowing access on ports 22, 80, 443, and other necessary ports.
5. Start up all the required services, and make sure they’re enabled to start on system boot.
Configure Apache
The next step is configuring Apache so it will work correctly with Drupal. Out of the box, Apache doesn’t have mod_rewrite enabled on Ubuntu 12.04. To remedy that situation, you can use the command sudo a2enmod rewrite, but Ansible has a handy apache2_module module that will simplify the task.
Additionally, we need to add a VirtualHost entry to tell Apache where the site’s document root is, and any other options for the site.
50 - name: Enable Apache rewrite module (required for Drupal).
51 apache2_module: name=rewrite state=present
52 notify: restart apache
53
54 - name: Add Apache virtualhost for Drupal 8 development.
55 template:
56 src: "templates/drupal.dev.conf.j2"
57 dest: "/etc/apache2/sites-available/{{ domain }}.dev.conf"
58 owner: root
59 group: root
60 mode: 0644
61 notify: restart apache
62
63 - name: Symlink Drupal virtualhost to sites-enabled.
64 file:
65 src: "/etc/apache2/sites-available/{{ domain }}.dev.conf"
66 dest: "/etc/apache2/sites-enabled/{{ domain }}.dev.conf"
67 state: link
68 notify: restart apache
69
70 - name: Remove default virtualhost file.
71 file:
72 path: "/etc/apache2/sites-enabled/000-default"
73 state: absent
74 notify: restart apache
The first command enables all the required Apache modules by symlinking them from /etc/apache2/mods-available to /etc/apache2/mods-enabled.
The second command copies a Jinja2 template we define inside the templates folder to Apache’s sites-available folder, with the correct owner and permissions. Additionally, we notify the restart apache handler, because copying in a new VirtualHost means Apache needs to be restarted to pick up the change.
Let’s look at our Jinja2 template (denoted by the extra .j2 on the end of the filename), drupal.dev.conf.j2:
1 <VirtualHost *:80>
2 ServerAdmin webmaster@localhost
3 ServerName {{ domain }}.dev
4 ServerAlias www.{{ domain }}.dev
5 DocumentRoot {{ drupal_core_path }}
6 <Directory "{{ drupal_core_path }}">
7 Options FollowSymLinks Indexes
8 AllowOverride All
9 </Directory>
10 </VirtualHost>
This is a fairly standard Apache VirtualHost definition, but we have a few Jinja2 template variables mixed in. The syntax for printing a variable in a Jinja2 template is the same syntax we use in our Ansible playbooks—two brackets around the variable’s name (like so: {{ variable }}).
There are three variables we will need (drupal_core_version, drupal_core_path, and domain), so we can add them to the empty vars.yml file we created earlier:
1 ---
2 # The core version you want to use (e.g. 6.x, 7.x, 8.0.x).
3 drupal_core_version: "8.0.x"
4
5 # The path where Drupal will be downloaded and installed.
6 drupal_core_path: "/var/www/drupal-{{ drupal_core_version }}-dev"
7
8 # The resulting domain will be [domain].dev (with .dev appended).
9 domain: "drupaltest"
Now, when Ansible reaches the play that copies this template into place, the Jinja2 template will have the variable names replaced with the values 8.0.x and drupaltest (or whatever values you’d like!).
The last two tasks (lines 12-19) enable the VirtualHost we just added, and remove the default VirtualHost definition, which we no longer need.
At this point, you could start the server, but Apache will likely throw an error since the VirtualHost you’ve defined doesn’t yet exist (there’s no directory at {{ drupal_core_path }} yet!). This is why using notify is important—instead of adding a play after these three steps to restart Apache, which will fail the first time you run the playbook, notify will wait until after we’ve finished all the other steps in our main group of tasks (giving us time to finish setting up the server), then restart Apache.
Configure PHP with lineinfile
We briefly mentioned lineinfile earlier in the book, when discussing file management and ad-hoc task execution. Modifying PHP’s configuration is a perfect way to demonstrate lineinfile’s simplicity and usefulness:
74 - name: Enable upload progress via APC.
75 lineinfile:
76 dest: "/etc/php5/apache2/conf.d/20-apcu.ini"
77 regexp: "^apc\.rfc1867"
78 line: "apc.rfc1867 = 1"
79 state: present
80 notify: restart apache
Ansible’s lineinfile module does a simple task: ensures that a particular line of text exists (or doesn’t exist) in a file.
In this example, we need to enable APC’s rfc1867 option so Drupal can use APC’s file upload progress tracking (there are better ways of doing this, but for our simple server, this will suffice).
First, we tell lineinfile the location of the file, in the dest parameter. Then, we give a regular expression (Python-style) to define what the line looks like (in this case, the line starts with the exact phrase “apc.rfc1867”—we had to escape the period since it is a special character in regular expressions). Next, we tell lineinfile exactly how the resulting line should look. Finally, we explicitly state that we want this line to be present (with the state parameter).
Ansible will take the regular expression, and see if there’s a matching line. If there is, Ansible will make sure the line matches the line parameter. If not, Ansible will add the line as defined in the line parameter. Ansible will only report a change if it had to add or change the line to match line.
Configure MySQL
The next step is to remove MySQL’s default test database, and create a database (named for the domain we specified earlier) for our Drupal installation to use.
80 - name: Remove the MySQL test database.
81 mysql_db: db=test state=absent
82
83 - name: Create a database for Drupal.
84 mysql_db: "db={{ domain }} state=present"
MySQL installs a database named test by default, and it is recommended that you remove the database as part of MySQL’s included mysql_secure_installation tool. The first step in configuring MySQL is removing this database. Next, we create a database named {{ domain }}—the database is named the same as the domain we’re using for the Drupal site.
|
|
Ansible works with many databases out of the box (MongoDB, MySQL, PostgreSQL, Redis and Riak as of this writing). In MySQL’s case, Ansible uses the MySQLdb Python package (python-mysqldb) to manage a connection to the database server, and assumes the default root account credentials (‘root’ as the username with no password). Obviously, leaving this default would be a bad idea! On a production server, one of the first steps should be to change the root account password, limit the root account to localhost, and delete any nonessential database users. If you use different credentials, you can add a .my.cnf file to your remote user’s home directory containing the database credentials so Ansible can connect to the MySQL database without leaving passwords in your Ansible playbooks or variable files. Otherwise, you can prompt the user running the Ansible playbook for a MySQL username and password. This option, using prompts, will be discussed later in the book. |
Install Composer and Drush
Drupal has a command-line companion in the form of Drush. Drush is developed independently of Drupal, and provides a full suite of CLI commands to manage Drupal. Drush, like most modern PHP tools, integrates with external dependencies defined in a composer.json file which describes the dependencies to Composer.
We could just download Drupal and perform some setup in the browser by hand at this point, but the goal of this playbook is to have a fully-automated and idempotent Drupal installation. So, we need to install Composer, then Drush:
85 - name: Install Composer into the current directory.
86 shell: >
87 curl -sS https://getcomposer.org/installer | php
88 creates=/usr/local/bin/composer
89
90 - name: Move Composer into globally-accessible location.
91 shell: >
92 mv composer.phar /usr/local/bin/composer
93 creates=/usr/local/bin/composer
The first command runs Composer’s php-based installer, which generates a ‘composer.phar’ PHP application archive. This archive is then copied (using the mv shell command) to the location /usr/local/bin/composer so we can use the simple composer command to install all of Drush’s dependencies. Both commands are set to only run if the /usr/local/bin/composer file doesn’t already exist (using the creates parameter).
|
|
Why use shell instead of command? Ansible’s command module is the preferred option for running commands on a host (when an Ansible module won’t suffice), and it works in most scenarios. However, command doesn’t run the command via the remote shell /bin/sh, so options like <, >, |, and &, and local environment variables like $HOME won’t work. shell allows you to pipe command output to other commands, access the local environment, etc. There are two other modules which assist in executing shell commands remotely: script executes shell scripts (though it’s almost always a better idea to convert shell scripts into idempotent Ansible playbooks!), and raw executes raw commands via SSH (it should only be used in circumstances where you can’t use one of the other options). It’s best to use an Ansible module for every task. If you have to resort to a regular command-line command, try the the command module first. If you require the options mentioned above, use shell. Use of script or raw should be exceedingly rare, and won’t be covered in this book. |
Now, we’ll install Drush using the latest version from GitHub:
94 - name: Check out drush master branch.
95 git:
96 repo: https://github.com/drush-ops/drush.git
97 dest: /opt/drush
98
99 - name: Install Drush dependencies with Composer.
100 shell: >
101 /usr/local/bin/composer install
102 chdir=/opt/drush
103 creates=/opt/drush/vendor/autoload.php
104
105 - name: Create drush bin symlink.
106 file:
107 src: /opt/drush/drush
108 dest: /usr/local/bin/drush
109 state: link
Earlier in the book, we cloned a git repository using an ad-hoc command. In this case, we’re defining a play that uses the git module to clone Drush from its repository URL on GitHub. Since we want the master branch, pass in the repo (repository URL) and dest (destination path) parameters.
After drush is downloaded to /opt/drush, we use Composer to install all the required dependencies. In this case, we want Ansible to run composer install in the directory /opt/drush (this is so Composer can find drush’s composer.json file automatically), so we pass along the parameter chdir=/opt/drush. Once Composer is finished, the file /opt/drush/vendor/autoload.php will be created, so we use the creates parameter to tell Ansible to skip this step if the file already exists (for idempotency).
Finally, we create a symlink from /usr/local/bin/drush to the executable at /opt/drush/drush, so we can call the drush command anywhere on the system.
Install Drupal with Git and Drush
We’ll use git again to clone Drupal to the apache document root we defined earlier in our virtual host configuration, then we’ll run Drupal’s installation via drush, and fix a couple other file permissions issues so Drupal loads correctly within our VM.
108 - name: Check out Drupal Core to the Apache docroot.
109 git:
110 repo: http://git.drupal.org/project/drupal.git
111 version: "{{ drupal_core_version }}"
112 dest: "{{ drupal_core_path }}"
113
114 - name: Install Drupal.
115 command: >
116 drush si -y --site-name="{{ drupal_site_name }}" --account-name=admin
117 --account-pass=admin --db-url=mysql://root@localhost/{{ domain }}
118 chdir={{ drupal_core_path }}
119 creates={{ drupal_core_path }}/sites/default/settings.php
120 notify: restart apache
121
122 # SEE: https://drupal.org/node/2121849#comment-8413637
123 - name: Set permissions properly on settings.php.
124 file:
125 path: "{{ drupal_core_path }}/sites/default/settings.php"
126 mode: 0744
127
128 - name: Set permissions on files directory.
129 file:
130 path: "{{ drupal_core_path }}/sites/default/files"
131 mode: 0777
132 state: directory
133 recurse: yes
First, we cloned Drupal’s git repository, using the version defined in our vars.yml file as drupal_core_version. The git module’s version parameter defines the branch (master, 8.0.x, etc.), tag (1.0.1, 7.24, etc.), or individual commit hash (50a1877, etc.) to clone.
Next, we used Drush’s si command (short for site-install) to run Drupal’s installation (which configures the database, runs some maintenance, and sets some default configuration settings for the site). We passed in a few variables, like the drupal_core_version and domain; we also added a drupal_site_name, so add that variable to your vars.yml file:
10 # Your Drupal site name.
11 drupal_site_name: "D8 Test"
Also, Drupal’s installation process results in the creation of a ‘settings.php’ file, so we use the location of that file with the creates parameter to let Ansible know if the site’s already installed (so we don’t accidentally try installing it again!). Once the site is installed, we also restart Apache for good measure (using notify again, like we did when updating Apache’s configuration).
The final two tasks set permissions on Drupal’s settings.php and files folder to 744 and 777, respectively.
Drupal LAMP server summary
At this point, if you access the server at http://drupaltest.dev/ (assuming you’ve pointed drupaltest.dev to your server or VM’s IP address), you’ll see Drupal’s default home page, and you could login with ‘admin’/’admin’. (Obviously, you’d set a secure password on a production server!).
A similar server configuration, running Apache, MySQL, and PHP, can be used to run many popular web frameworks and CMSes besides Drupal, including Symfony, Wordpress, Joomla, Laravel, etc.
|
|
You can find the entire example Drupal LAMP server playbook in this book’s code repository at https://github.com/geerlingguy/ansible-for-devops, in the drupal directory. |
Real-world playbook: Ubuntu Apache Tomcat server with Solr
Apache Solr is a fast and scalable search server optimized for full-text search, word highlighting, faceted search, fast indexing, and more. It’s a very popular search server, and it’s pretty easy to install and configure using Ansible. In the following example, we’re going to set up Apache Solr using Ubuntu 12.04 and Apache Tomcat.
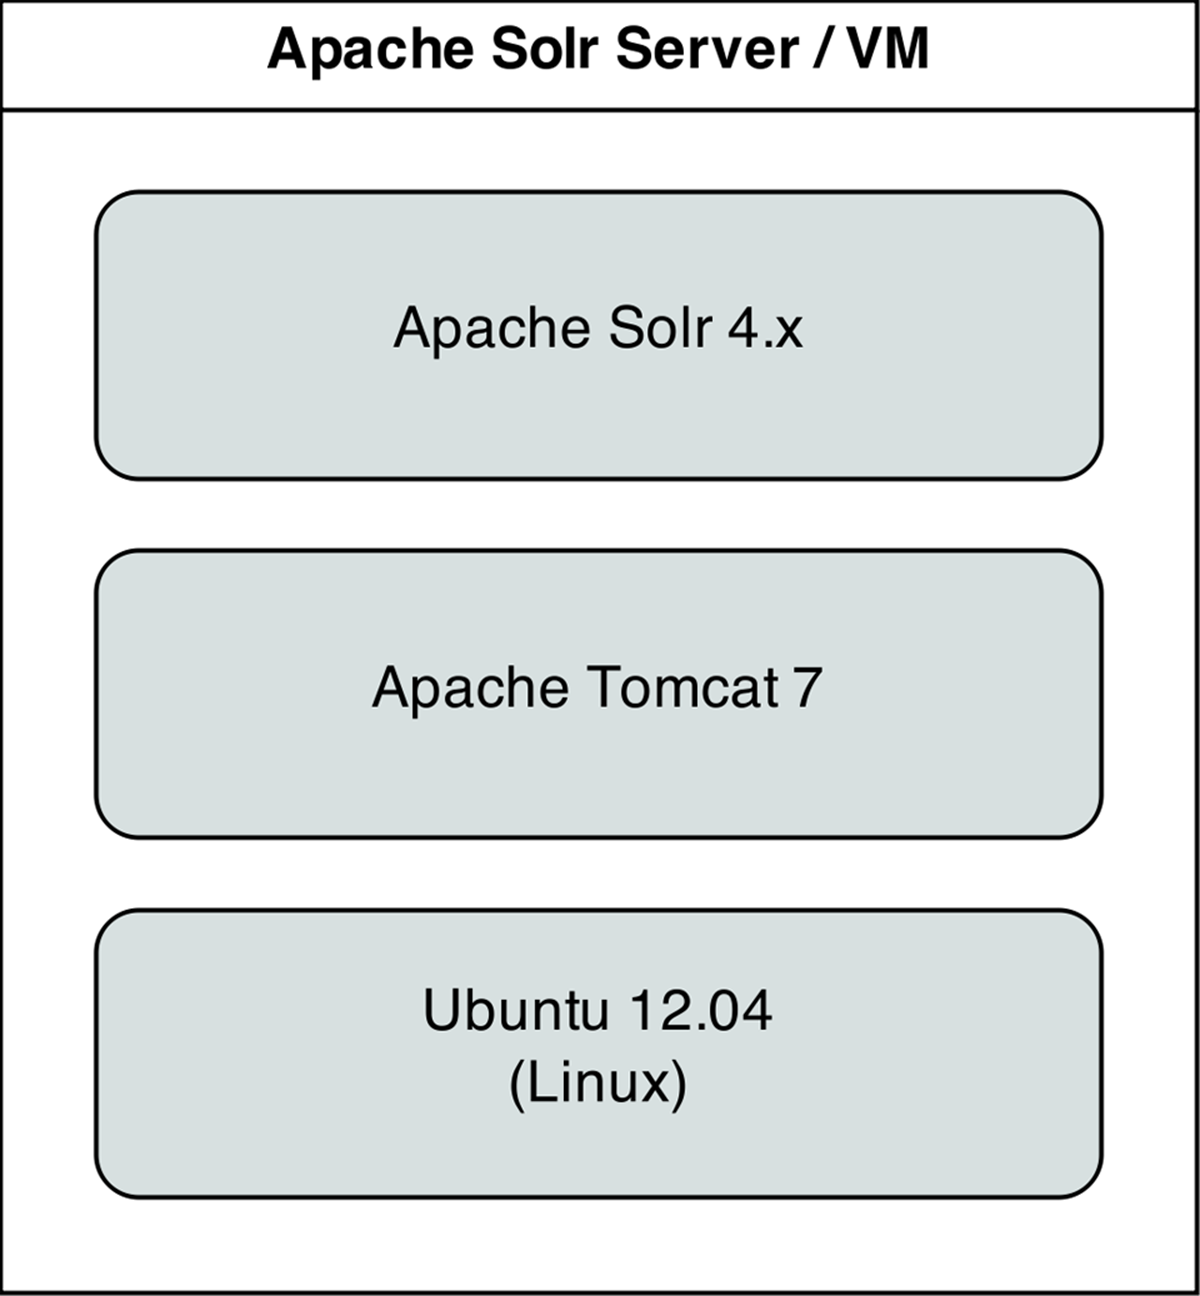
Apache Solr Server.
Include a variables file, and discover pre_tasks and handlers
Just like the previous LAMP server example, we’ll begin this playbook by telling Ansible our variables will be in a separate vars.yml file:
1 - hosts: all
2
3 vars_files:
4 - vars.yml
Let’s quickly create the vars.yml file, while we’re thinking about it. Create the file in the same folder as your Solr playbook, and add the following contents:
1 download_dir: /tmp
2 solr_dir: /opt/solr
These two variables define two paths we’ll use while downloading and installing Apache Solr.
Back in our playbook, after the vars_files, we also need to make sure the apt cache is up to date, using pre_tasks like the previous example:
5 pre_tasks:
6 - name: Update apt cache if needed.
7 apt: update_cache=yes cache_valid_time=3600
Like the Drupal playbook, we again use handlers to define certain tasks that are notified by tasks in the tasks section. This time, we just need a handler to restart tomcat7, the Java servlet container that powers Apache Solr:
8 handlers:
9 - name: restart tomcat
10 service: name=tomcat7 state=restarted
We can call this handler with the option notify: restart tomcat in any play in our playbook.
Install Apache Tomcat 7
It’s easy enough to install Tomcat 7 on an Ubuntu Precise server; there are packages in the default apt repositories, so we just need to make sure they’re installed, and that the tomcat7 service is enabled and started:
11 tasks:
12 - name: Install Tomcat 7.
13 apt: "name={{ item }} state=installed"
14 with_items:
15 - tomcat7
16 - tomcat7-admin
17
18 - name: Ensure Tomcat 7 is started and enabled on boot.
19 service: name=tomcat7 state=started enabled=yes
That was easy enough! We used the apt module to install two packages, tomcat7 and tomcat7-admin (so we can log into Tomcat’s administrative backend), then started tomcat7 and set it to start when the system boots.
Install Apache Solr
Ubuntu 12.04 includes a package for Apache Solr, but it installs a very old version, so we’ll install the latest version of Solr from source. The first step is downloading the source:
20 - name: Download Solr.
21 get_url:
22 url: http://apache.osuosl.org/lucene/solr/4.9.1/solr-4.9.1.tgz
23 dest: "{{ download_dir }}/solr-4.9.1.tgz"
24 sha256sum: 4a546369a31d34b15bc4b99188984716bf4c0c158c0e337f3c1f98088aec70ee
We’re installing Apache Solr 4.9.1, a recent stable version. When downloading files from remote servers, the get_url module provides more flexibility and convenience than raw wget or curl commands.
You have to pass get_url a url (the source of the file to be downloaded), and a dest (the location where the file will be downloaded). If you pass a directory to the dest parameter, Ansible will place the file inside, but will always re-download the file on subsequent runs of the playbook (and overwrite the existing download if it has changed). To avoid this extra overhead, we give the full path to the downloaded file.
We also use sha256sum, an optional parameter, for peace of mind; if you are downloading a file or archive that’s critical to the functionality and security of your application, it’s a good idea to check the file to make sure it is exactly what you’re expecting. sha256sum compares a hash of the data in the downloaded file to a 256-bit hash that you specify (use shasum -a 256 /path/to/file to get the sha256sum of a file). If the checksum doesn’t match the supplied hash, Ansible will fail and discard the freshly-downloaded (and invalid) file.
25 - name: Expand Solr.
26 command: >
27 tar -C /tmp -xvzf {{ download_dir }}/solr-4.9.1.tgz
28 creates={{ download_dir }}/solr-4.9.1/dist/solr-4.9.1.war
29
30 - name: Copy Solr into place.
31 command: >
32 cp -r {{ download_dir }}/solr-4.9.1 {{ solr_dir }}
33 creates={{ solr_dir }}/dist/solr-4.9.1.war
We need to expand the Apache Solr archive, then copy it into place. For both of these steps, use the built-in tar and cp utilities (with the appropriate options) to do the work. Setting creates tells Ansible to skip these steps in subsequent runs, since the Solr war file will already be in place.
34 # Use shell so commands are passed in correctly.
35 - name: Copy Solr components into place.
36 shell: >
37 cp -r {{ item.src }} {{ item.dest }}
38 creates={{ item.creates }}
39 with_items:
40 # Solr example configuration and war file.
41 - {
42 src: "{{ solr_dir }}/example/webapps/solr.war",
43 dest: "{{ solr_dir }}/solr.war",
44 creates: "{{ solr_dir }}/solr.war"
45 }
46 - {
47 src: "{{ solr_dir }}/example/solr/*",
48 dest: "{{ solr_dir }}/",
49 creates: "{{ solr_dir }}/solr.xml"
50 }
51 # Solr log4j logging configuration.
52 - {
53 src: "{{ solr_dir }}/example/lib/ext/*",
54 dest: "/var/lib/tomcat7/shared/",
55 creates: "/var/lib/tomcat7/shared/log4j-1.2.16.jar"
56 }
57 - {
58 src: "{{ solr_dir }}/example/resources/log4j.properties",
59 dest: "/var/lib/tomcat7/shared/classes",
60 creates: "/var/lib/tomcat7/shared/classes/log4j.properties"
61 }
62 notify: restart tomcat
The next task copies into place certain directories and files required to run Apache Solr.
Nothing too special here, but this example illustrates how you can use comments within with_items lists to help clarify the items in the list. We could’ve added each command as its own task, but doing it this way reduces the total number of Ansible tasks and allows us to move the with_items list to an external variable if desired.
63 - name: Ensure solr example directory is absent.
64 file:
65 path: "{{ solr_dir }}/example"
66 state: absent
67
68 - name: Set up solr data directory.
69 file:
70 path: "{{ solr_dir }}/data"
71 state: directory
72 owner: tomcat7
73 group: tomcat7
The latest version of Apache Solr searches through all the directories inside {{ solr_dir }} recursively, loading any potential search configuration it finds. Since we copied over one of the examples to use as the server’s default search core, Solr would see it as a duplicate of one of the examples and crash. So, we can use the file module with a path to the example directory to make sure the directory is gone (state=absent).
After removing the example directory (and in future runs, ensuring it’s still gone), we set up the data directory where Solr will store index data, ensuring it exists as a directory, and is owned by the tomcat7 user and group.
73 - name: Configure solrconfig.xml for new data directory.
74 lineinfile:
75 dest: "{{ solr_dir }}/collection1/conf/solrconfig.xml"
76 regexp: "^.*<dataDir.+$"
77 line: "<dataDir>${solr.data.dir:{{ solr_dir }}/data}</dataDir>"
78 state: present
As we found earlier, lineinfile is a helpful module for ensuring consistent configuration file settings with idempotence. In this case, we need to make sure the <dataDir> line in our default search core’s configuration file is set to a specific value.
79 - name: Set permissions for solr home.
80 file:
81 path: "{{ solr_dir }}"
82 recurse: yes
83 owner: tomcat7
84 group: tomcat7
To set ownership options on the entire contents of the {{ solr_dir }} correctly, we use the file module with the recurse parameter set to yes. This is equivalent to the shell command chown -R tomcat7:tomcat7 {{ solr_dir }}.
84 - name: Add Catalina configuration for solr.
85 template:
86 src: templates/solr.xml.j2
87 dest: /etc/tomcat7/Catalina/localhost/solr.xml
88 owner: root
89 group: tomcat7
90 mode: 0644
91 notify: restart tomcat
The final task copies a template file (solr.xml.j2) to the remote host, substituting variables via Jinja2 syntax, and sets the file’s ownership and permissions as needed for Tomcat.
Before the task can run, the local template file will need to be created. Create a ‘templates’ folder in the same directory as your Apache Solr playbook, and create a new file named solr.xml.j2 inside, with the following contents:
1 <?xml version="1.0" encoding="utf-8"?>
2 <Context docBase="{{ solr_dir }}/solr.war" debug="0" crossContext="true">
3 <Environment name="solr/home" type="java.lang.String" \
4 value="{{ solr_dir }}" override="true"/>
5 </Context>
You can run the playbook with $ ansible-playbook [playbook-name.yml], and after a few minutes (depending on your server’s Internet connection speed), you should be able to access the Solr admin interface at http://example.com:8080/solr (where ‘example.com’ is your server’s hostname or IP address).
Apache Solr server summary
The configuration we used when deploying Apache Solr allows for a multicore setup, so you could add more ‘search cores’ via the admin interface (as long as the directories and core schema configuration is in place in the filesystem), and have multiple indexes for multiple websites and applications.
A playbook similar to the one above is used as part of the infrastructure for Hosted Apache Solr, a service run by the author which runs a hosted version of Apache Solr particularly for Drupal search indexes.
|
|
You can find the entire example Apache Solr server playbook in this book’s code repository at https://github.com/geerlingguy/ansible-for-devops, in the solr directory. |
Summary
At this point, you should be getting comfortable with Ansible’s modus operandi. Playbooks are the heart of Ansible’s configuration management and provisioning functionality, and the same modules and similar syntax can be used with ad-hoc commands for deployments and general server management.
Now that you’re familiar with playbooks, we’ll explore more advanced concepts in building playbooks, like organization of tasks, conditionals, variables, and more. Later, we’ll explore how we can use playbooks within roles to make them infinitely more flexible, and save time setting up and configuring your infrastructure.
_________________________________________
/ If everything is under control, you are \
\ going too slow. (Mario Andretti) /
-----------------------------------------
\ ^__^
\ (oo)\_______
(__)\ )\/\
||----w |
|| ||
All materials on the site are licensed Creative Commons Attribution-Sharealike 3.0 Unported CC BY-SA 3.0 & GNU Free Documentation License (GFDL)
If you are the copyright holder of any material contained on our site and intend to remove it, please contact our site administrator for approval.
© 2016-2026 All site design rights belong to S.Y.A.