Linux All-in-One For Dummies, 5th Edition (2014)
Book I. Getting Started with Linux
Chapter 3. Troubleshooting and Configuring Linux
In This Chapter
![]() Troubleshooting the installation
Troubleshooting the installation
![]() Configuring the X Window System
Configuring the X Window System
![]() Resolving installation problems
Resolving installation problems
![]() Setting up your printers
Setting up your printers
![]() Managing your DVDs and CD-ROMs
Managing your DVDs and CD-ROMs
![]() Installing additional software packages
Installing additional software packages
During the installation of Linux, the installer attempts to detect key hardware components, such as the SCSI controller and network card. According to what it detects, the installer takes you through a sequence of installation steps. For example, if the installer can’t detect the network card, it skips the network configuration step. This is okay if you don’t, in fact, have a network card — but if you do have one and the installer mistakenly insists that you don’t, you have an installation problem on your hands.
Another installation problem can occur when you restart the PC and see not the graphical login screen but a text terminal. This error means that something is wrong with the X Window System configuration.
In addition, the Linux installation typically doesn’t include configuration procedures for every piece of hardware on your PC system. For example, most installations don’t set up printers during installation.
In this chapter, I show you some ways to troubleshoot installation problems. You find out how to configure X Window System to start with a GUI screen and how to configure a printer.
You may also have to install additional software packages; this chapter also walks through how you can install packages in different formats, such as the Red Hat Package Manager (RPM) and Debian package — the two formats in which most Linux software is distributed.
Using Text Mode Installation
Most Linux installers attempt to use the X Window System (X) to display the graphical installation screens. If, for instance, the installer fails to detect a video card, X does not start. If — for this reason or any other reason — the installer fails to start X, you can always fall back on a text mode installation. Then you can specify the video card manually or configure X later by using a separate configuration program. You can also configure X by editing its text configuration file.
Table 3-1 lists how you can get to the text mode installation screen. Typically, the text mode installation sequence is similar to that of the graphical installation outlined in Chapter 2 of this minibook. You respond to the prompts and perform the installation.
Table 3-1 Text Mode Installation in Some Linux Distributions
|
Distribution |
How to Get to the Text Mode Installer |
|
Debian |
Runs in text mode by default. |
|
Fedora |
Type text at the boot: prompt after you start the PC from the Fedora CD or DVD. |
|
Knoppix |
Start Knoppix in text mode by typing knoppix 2 at the boot: prompt (because Knoppix is a Live distribution, you don’t have to install it). |
|
SUSE |
At the first installation screen, press F3, use the arrow keys to select the text mode option, and then press Enter. |
|
Ubuntu |
Runs in text mode by default. |
|
Xandros |
Hold down the Shift key while booting the CD and select Rescue Console. When the bash-3.00# prompt appears, type quick_install and follow the instructions. |
Troubleshooting X
Every time I installed Linux on an older PC, the GUI installation worked fine during installation, but then the graphical login screen didn’t appear when I rebooted the PC for the first time after installation. Instead, I ended up with a text login screen or a black screen with a small X in the middle, or the boot process seemed to hang with a gray screen. If this problem happens to you, here’s how you can troubleshoot it:
1. Press Ctrl+Alt+Delete to reboot the PC.
The PC starts to boot. You get to a screen where GRUB (GRand Unified Bootloader) prompts you for the operating system to boot. (If the distribution uses LILO as the boot loader, you get a text prompt.)
2. For GRUB, press the A key to add an option that tells the Linux kernel to boot to a prompt. For LILO, skip this step.
The GRUB boot loader then displays a command line for the Linux kernel and prompts you to add what you want.
3. For GRUB, type a space followed by the word single and press Enter. For LILO, type linux single and press Enter.
The Linux kernel boots in a single-user mode and displays a prompt that looks like the following:
sh-3.00#
Now you’re ready to configure X.
X uses a configuration file (XF86Config-4 or xorg.conf, depending on the distribution) to figure out your display card, your monitor, and the kind of screen resolution you want. The Linux installer prepares the configuration file, but sometimes the configuration isn’t correct.
To quickly create a working configuration file, follow these steps:
1. Type the following command:
X -configure
The X server runs and creates a configuration file. The screen goes blank and then the X server exits after displaying some messages. In Fedora, the last line of the message says the following:
To test the server, run 'X -config ///etc/xorg.conf.new'
2. Use a text editor, such as vi, to edit the ///etc/xorg.conf.new file and insert the following line after the line Section "Files":
FontPath "unix/:7100"
In Fedora, you must also change /dev/mouse to /dev/input/mice.
3. Type xfs & to start the X font server.
4. Try the new configuration file by typing the following line:
X -config ///etc/xorg.conf.new
If you see a blank screen with an X-shaped cursor, the configuration file is working fine.
5. Press Ctrl+Alt+Backspace to kill the X server.
6. Copy the new configuration file to the /etc/X11 directory with the following command:
cp ///etc/xorg.conf.new /etc/X11/xorg.conf
7. Reboot the PC by pressing Ctrl+Alt+Delete or typing reboot.
If all goes well, you should get the graphical login screen.
 The X configuration file created by using the -configure option of the X server does not display at the best resolution. To fine-tune the configuration file, you have to run a utility to adjust the display settings after you reboot the system. Which utility you use depends on the Linux distribution, but most distributions include a utility that enables you to configure the video card, monitor, and display settings through a graphical user interface.
Resolving Other Installation Problems
I’m sure I haven’t exhausted all the installation problems lurking out there. No one can. So many components in Intel x86 PCs exist that Murphy’s Law practically requires that there be some combination of hardware that the installation program can’t handle. In this section, I list a few known problems. For others, I advise you to go to Google Groups (http://groups.google.com) and type some of the symptoms of the trouble. Assuming that others are running into similar problems, you can get some indication of how to troubleshoot your way out of your particular predicament.
Using Knoppix boot commands
The Knoppix Live CD can be a great troubleshooting tool because Knoppix is good at detecting hardware and can be run directly from the boot medium (CD/DVD/USB).
If you have trouble starting Knoppix, try entering Knoppix boot commands at the boot: prompt. For example, if Knoppix seems to hang when trying to detect a SCSI card, you can disable SCSI probing by typing knoppix noscsi at the boot: prompt. Or, if you want the X server to load the nv module (for graphics cards based on the NVIDIA chipset), you can type knoppix xmodule=nv at the boot: prompt.
Table 3-2 lists some commonly used Knoppix boot commands.
Table 3-2 Some Common Knoppix Boot Commands
|
Boot Command |
What It Does |
|
expert |
Starts in expert mode, which enables the user to interactively set up and configure Knoppix. |
|
failsafe |
Boots without attempting to detect hardware (except for the bare minimum needed to start Linux). |
|
fb1280x1024 |
Uses fixed framebuffer graphics at the specified resolution (specify the resolution you want, such as 1024 x 768 or 800 x 600). |
|
knoppix 1 |
Starts Knoppix in run level 1 (single-user mode), which you can use to perform rescue operations. |
|
knoppix 2 |
Starts at run level 2, which provides a text-mode shell prompt only. |
|
knoppix acpi=off |
Disables ACPI (Advanced Configuration and Power Interface) completely. |
|
knoppix atapicd |
Uses the ATAPI CD-ROM interface instead of emulating a SCSI interface for IDE CD-ROM drives. |
|
knoppix desktop=wmname |
Uses the specified Window Manager instead of the default KDE desktop=wmname (where wmname is fluxbox, icewm, kde, larswm, twm, wmaker, or xfce). |
|
knoppix dma |
Enables direct memory access (DMA) for all IDE drives. |
|
knoppix floppyconfig |
Runs the shell script named knoppix.sh from a floppy. (The shell script contains Linux commands that you want to run.) |
|
knoppix fromhd=/dev/hda1 |
Boots from a previously copied image of Live CD that’s in the specified hard drive partition. |
|
knoppix hsync=80 |
Uses an 80-kHz horizontal refresh rate for X. (Enter the horizontal refresh rate you want X to use.) |
|
knoppix lang=xx |
Sets the keyboard language as specified by the two-letter code xx (where xx is cn = Simplified Chinese, de = German, da = Danish, es = Spanish, fr = French, it = Italian, nl = Dutch, pl = Polish, ru = Russian, sk = Slovak, tr = Turkish, tw = Traditional Chinese, or us = U.S. English). |
|
knoppix mem=256M |
Specifies that the PC has the stated amount of memory (in megabytes). |
|
knoppix myconf=/dev/hda1 |
Runs the shell script knoppix.sh from the /dev/hda1 partition (enter the partition name where you have the knoppix.sh file). |
|
knoppix myconf=scan |
Causes Knoppix to search for the file named knoppix.sh, scan, and execute the commands in that file, if it exists. |
|
knoppix noeject |
Does not eject the Live CD after you halt Knoppix. |
|
knoppix noprompt |
Does not prompt to remove the Live CD after you halt Knoppix. |
|
knoppix nowheel |
Forces the PS/2 protocol for a PS/2 mouse or touchpad (as opposed to the mouse being detected automatically). |
|
knoppix noxxx |
Causes Knoppix to skip specific parts of the hardware detection (where xxx identifies the hardware or server that should not be probed: apic = Advanced Programmable Interrupt Controller, agp = Accelerated Graphics Port, apm = Advanced Power Management, audio = sound card, ddc = Display Data Channel, dhcp = Dynamic Host Configuration Protocol,fstab = file system table, firewire = IEEE 1394 high-speed serial bus, pcmcia = PC Card, scsi = Small Computer System Interface, swap = hard drive space used for virtual memory, usb = Universal Serial Bus). |
|
knoppix pci=bios |
Uses BIOS directly for bad PCI controllers. |
|
knoppix pnpbios=off |
Skips the Plug and Play (PnP) BIOS initialization. |
|
knoppix screen=resolution |
Sets the screen resolution in pixels (where resolution is the resolution you want, such as 1024x768, 800x600, 640x480, and so on). |
|
knoppix testcd |
Checks the data integrity of the Live CD by using the MD5 sum. |
|
knoppix tohd=/dev/hda1 |
Copies the Live CD to the specified hard drive partition and runs from there (requires 1GB of RAM). |
|
knoppix toram |
Copies the Live CD to RAM (memory) and runs from there (requires 1GB of RAM). |
|
knoppix vga=ext |
Uses a 50-line text mode display. |
|
knoppix vsync=60 |
Uses a vertical refresh rate of 60 Hz for X (enter the vertical refresh rate you want X to use). |
|
knoppix wheelmouse |
Enables the IMPS/2 protocol for wheel mice. |
|
knoppix xmodule=modname |
Causes the X server to load the module specified by modname so that X works on your video card (where modname is ati, fbdev, i810, mga, nv, radeon, savage, svga, or s3). |
|
knoppix xserver=progname |
Starts the X server specified by progname (where progname is XFree86 or XF86_SVGA). |
When you want to issue multiple Knoppix boot commands, simply combine them in a single line. For example, to specify that you want to skip the SCSI auto detection, turn off ACPI, use the U.S. keyboard, use a wheel mouse, and require the X server to load the nv module, enter the following at the boot: prompt:
knoppix noscsi acpi=off lang=us wheelmouse xmodule=nv
The fatal signal 11 error
During installation, some people get a fatal signal 11 error message, which stops the process cold. This error usually happens past the initial boot screen as the installer is starting its GUI or text interface. The most likely cause of a signal 11 error during installation is a hardware error related to memory or the cache associated with the CPU (microprocessor).
 A signal 11, or SIGSEGV (short for Segment Violation Signal), error can occur in Linux applications. A segment violation occurs when a process tries to access a memory location that it’s not supposed to access. The operating system catches the problem before it happens and stops the offending process by sending it a signal 11. When that happens during installation, it means the installer made an error while accessing memory, and the most likely reason is a hardware problem. A commonly suggested cure for the signal 11 problem is to turn off the CPU cache in the BIOS. To do so, you have to enter Setup while the PC boots (by pressing a function key, such as F2) and turn off the CPU cache from the BIOS Setup menu.
If the problem is due to a hardware error in memory (in other words, the result of bad memory chips), you can try swapping the memory modules around in their slots. You may also consider replacing an existing memory module with another memory module if you have one handy.
You can read more about the signal 11 problem at www.bitwizard.nl/sig11.
Getting around the PC reboot problem
On some PCs, when you press Enter at the boot prompt, the initial Linux kernel loads and immediately reboots the PC. This could be due to a bad implementation of ACPI in the PC’s BIOS. To bypass the problem, type linux acpi=off at the boot prompt to turn off ACPI. If that doesn’t work, consult Table 3-3 for other boot options that you might want to try.
Table 3-3 Some Linux Boot Options
|
Boot Option |
What It Does |
|
allowcddma |
Enables DMA for CD/DVD drive. |
|
apic |
Works around a bug commonly encountered in the Intel 440GX chipset BIOS and only executes with the installation program kernel. |
|
acpi=off |
Disables ACPI in case there are problems with it. |
|
dd |
Prompts for a driver disk during the installation of Red Hat Linux. |
|
display=IP_address:0 |
Causes the installer GUI to appear on the remote system identified by the IP address. (Make sure that you run the command xhost +hostname on the remote system where hostname is the host where you run the installer.) |
|
driverdisk |
Prompts for a driver disk during the installation of Red Hat Linux. |
|
enforcing=0 |
Turns off Security Enhanced Linux (SELinux) mandatory access control. |
|
expert |
Enables you to partition removable media and prompts for a driver disk. |
|
ide=nodma |
Disables DMA on all IDE devices and can be useful when you’re having IDE-related problems. |
|
ks |
Configures the Ethernet card using DHCP and runs a kickstart installation by using a kickstart file from an NFS server identified by the boot server parameters provided by the DHCP server. |
|
ks=kickstartfile |
Runs a kickstart installation by using the kickstart file, specified by kickstartfile. (The idea behind kickstart is to create a text file with all the installation options and then kickstart the installation by booting and providing the kickstart file as input.) |
|
lowres |
Forces the installer GUI to run at a lower resolution (640 x 480). |
|
mediacheck |
Prompts you to check the integrity of the CD image (also called the ISO image). The image is checked by computing the MD5 checksum and comparing that with the official Fedora value. Checking a CD-ROM can take a few minutes. |
|
mem=xxxM |
Overrides the amount of memory that the kernel detects on the PC. (Some older machines could detect only 16MB of memory, and on some new machines, the video card may use a portion of the main memory.) Make sure you replace xxx with the number representing the megabytes of memory on your PC. |
|
nmi_watchdog=1 |
Enables the built-in kernel deadlock detector that makes use of Non-Maskable Interrupt (NMI). |
|
noapic |
Prevents the kernel from using the Advanced Programmable Interrupt Controller (APIC) chip. (You can use this command on motherboards known to have a bad APIC.) |
|
nofirewire |
Does not load support for FireWire. |
|
noht |
Disables hyper-threading, which is a feature that enables a single processor to act as multiple virtual processors at the hardware level. |
|
nomce |
Disables self-diagnosis checks performed on the CPU by using Machine Check Exception (MCE). On some machines, these checks are performed too often and need to be disabled. |
|
nomount |
Does not automatically mount any installed Linux partitions in rescue mode. |
|
nopass |
Does not pass the keyboard and mouse information to stage 2 of the installation program. |
|
nopcmcia |
Ignores any PCMCIA controllers in system. |
|
noprobe |
Disables automatic hardware detection and instead prompts the user for information about SCSI and network hardware installed on the PC. You can pass parameters to modules by using this approach. |
|
noshell |
Disables shell access on virtual console 2 (the one you get by pressing Ctrl+Alt+F2) during installation. |
|
nousb |
Disables the loading of USB support during the installation. (Booting without USB support may be useful if the installation program hangs early in the process.) |
|
nousbstorage |
Disables the loading of the usbstorage module in the installation program’s loader. This option may help with device ordering on SCSI systems. |
|
reboot=b |
Changes the way the kernel tries to reboot the PC so that it can reboot even if the kernel hangs during system shutdown. |
|
pci=noacpi |
Causes the kernel to not use ACPI to route interrupt requests. |
|
pci=biosirq |
Causes the kernel to use BIOS settings to route interrupt requests (IRQs). |
|
rescue |
Starts the kernel in rescue mode, where you get a shell prompt and can try to fix problems. |
|
resolution=HHHxVVV |
Causes the installer GUI to run in the specified video mode (where HHH and VVV are standard resolution numbers, such as 640x480, 800x600, or 1024x768). |
|
selinux=0 |
Disables the SELinux kernel extensions. |
|
serial |
Turns on serial console support during installation. |
|
skipddc |
Skips the Display Data Channel (DDC) probe of monitors. (This option is useful if probing causes problems.) |
|
vnc |
Starts a VNC (Virtual Network Computing) server so that you can control the GUI installer from another networked system that runs a VNC client. |
Using Linux kernel boot options
When you boot the PC for Linux installation, either from the DVD or the first CD-ROM, you get a text screen with the boot: prompt. Typically, you press Enter at that prompt or do nothing, and the installation begins shortly. You can, however, specify a variety of options at the boot:prompt. The options control various aspects of the Linux kernel startup, such as disabling support for troublesome hardware or starting the X server using a specific X driver module. Some of these boot options can be helpful in bypassing problems that you may encounter during installation.
To use these boot options, typically you type linux followed by the boot options. For example, to perform text mode installation and tell the kernel that your PC has 512MB of memory, you type the following at the boot: prompt:
linux text mem=512M
Consult Table 3-3 for a brief summary of some of the Linux boot options. You can use these commands to turn certain features on or off.
 Although I mention these Linux kernel boot commands in the context of troubleshooting installation problems, you can use many of these commands anytime you boot a PC with any Linux distribution and you want to turn specific features on or off.
Setting Up Printers
In most Linux distributions, you can set up printers only after you install the distribution. The following sections outline the printer configuration steps for Ubuntu and are similar for all distributions.
To set up a printer, follow these steps:
1. From the desktop, choose System Settings⇒Printers.
If you’re not logged in as root, the printer configuration tool prompts you for the root password. The printer configuration tool, shown in Figure 3-1, is called system-config-printer.
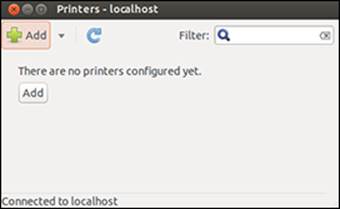
Figure 3-1: The primary printer configuration interface.
2. Click the Add button to configure a new printer.
If the device can be identified, it will appear in the list. If it can’t be identified, you can still continue with the installation and manually add the drivers and configuration data needed. Figure 3-2 shows that the Epson Stylus printer is being connected to the serial port.
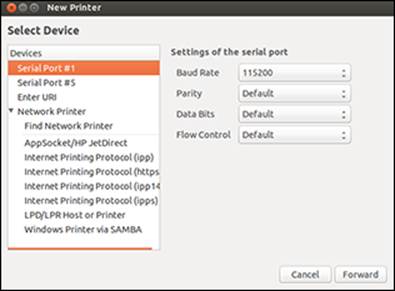
Figure 3-2: You can install a local printer or a network printer using the same interface.
3. Click Forward to continue.
The system searches for drivers and offers choices based on what it thinks you’re installing.
In the following example, the host is connecting to a local printer.
4. Select the appropriate driver (see Figure 3-3), and then click Forward.
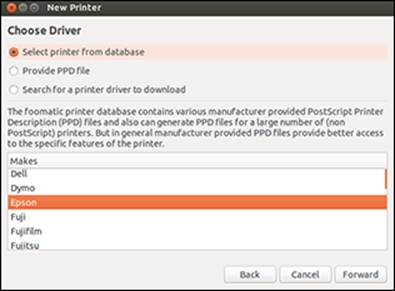
Figure 3-3: Choose the appropriate drivers to install.
5. Enter the printer name and description variables (see Figure 3-4), and then click Apply.
Both the description and location variables are optional, but are helpful if you are configuring this for access by others across the network. Identifying the location can help users know where to pick up the reports they print.

Figure 3-4: The only required configuration value is the printer name.
6. Print a test page to make sure all is working as it should.
Make any modifications to the settings as needed using the configuration options, which are shown in Figure 3-5.
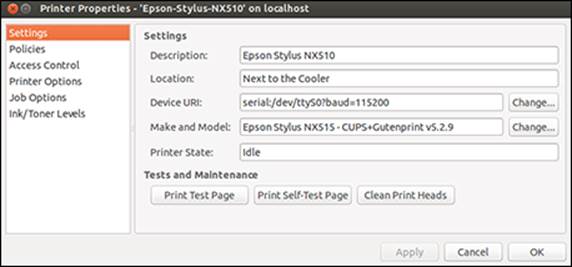
Figure 3-5: Edit the configuration with the printer configuration tool.
7. When the printer is configured as it should be, exit the printer configuration tool.
Managing DVDs, CD-ROMs, and Flash Drives
The GUI desktop makes using DVDs, CD-ROMs, and flash drives in Linux easy. Just place the external media in the drive, and an icon appears on the desktop.
You can then access the media by double-clicking the icon on the desktop. In some Linux distributions, the GUI automatically opens the contents of the media in a file-manager window soon after you insert the CD or DVD in the drive. To access the files and folders, you simply double-click the icons that appear in the GUI file manager window.
If you see an icon for the drive, right-click that icon for a context menu. From that menu, you can eject the media when you’re finished.
Installing Other Software
The exact steps for installing software depend on the type of package in which the software is distributed. Most Linux software comes in either an RPM file or a Debian package file. The RPM files have an .rpm extension, and the Debian packages have a .deb extension.
Most distributions provide GUI installers to ease the process of installing new software packages. In this section, I provide a quick overview of adding software that applies to most distributions (you don’t want to add software to Live distributions because Live distributions run from ROM and/or media that start fresh each time you boot).
 Fedora and SUSE use RPM packages. Debian, Ubuntu, and Xandros are all Debian-based distributions, and as expected, they typically use Debian packages (also called DEB files). However, both RPM and DEB packages can be installed in any Linux distribution.
Installing software in Debian and Ubuntu
The best way to manage software packages in Debian and Debian-based distributions, such as Ubuntu, is to use APT — the Advanced Packaging Tool — which you usually control through the apt-get command.
When you install Debian, one of the last steps is to configure the sources for APT. The APT sources are the Internet servers (both FTP and web) where APT looks for software packages to download and install on your system. Assuming that APT is properly configured and that your system has a high-speed Internet connection, you can begin installing any package by typing the following command in a terminal window:
apt-get install pkgname
where pkgname is the name of the package that you want to install. If you don’t know the package name, start by typing the following command in the terminal window:
apt-cache search keyword
where keyword is related to the package you want to install. For example, to search for a package that has the word screenshot in its description and also contains the word KDE, I’d type the following. (I use grep to search the output for occurrences of the text KDE.)
apt-cache search screenshot | grep KDE
This command then prints the following line as the result:
ksnapshot - Screenshot application for KDE
This shows that the ksnapshot package is what I need. If this package was not yet installed, I could then install it by typing the following command:
apt-get install ksnapshot
That, in a nutshell, is how you can use the command-line tools to look for and install packages in Debian.
 Debian and older versions of Ubuntu also come with a GUI package installer for APT called Synaptic Package Manager, whose use is intuitive:
· Debian: Depending upon your version, you will either choose Applications⇒System Tools⇒Synaptic Package Manager from the GNOME desktop or Desktop⇒Administration⇒Synaptic Package Manager.
· Ubuntu: In old versions (pre 11.10), choose Select System⇒ Administration⇒Synaptic Package Manager. When prompted for a password in Ubuntu, enter your normal user password because Ubuntu has no root user. In newer versions, you can download it with the following command:
sudo apt-get install synaptic
After Synaptic Package Manager starts, it displays a Quick Introduction dialog box that tells you, briefly, how to mark packages for installation, upgrade, or removal, and how to get to the menu to perform these actions. After reading the Introduction, click Close to get rid of that dialog box and access the Synaptic Package Manager.
In place of Synaptic you can use the Software & Updates tool, shown in Figure 3-6, to manage your software (click the Other Software tab to get started).
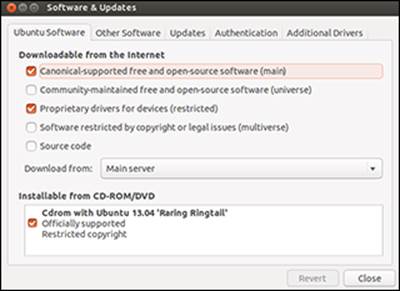
Figure 3-6: The Software & Updates Manager.
From here, you can choose to specify any software you want to download and install through APT, as shown in Figure 3-7.
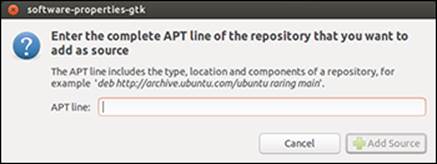
Figure 3-7: Specify what software to download and install.
Using the Ubuntu Software Center, a feature similar to what is found in many other distributions as well, you can find just about everything you’re looking for, as shown in Figure 3-8.
Installing software in Fedora
Most Fedora software comes in the form of RPM files. An RPM (Red Hat Package Manager) file is basically a single package that contains everything — all the files and configuration information — needed to install a software product.
From the GNOME desktop, you use the Add or Remove Software utility — a graphical utility for installing and uninstalling RPMs. Follow these steps:
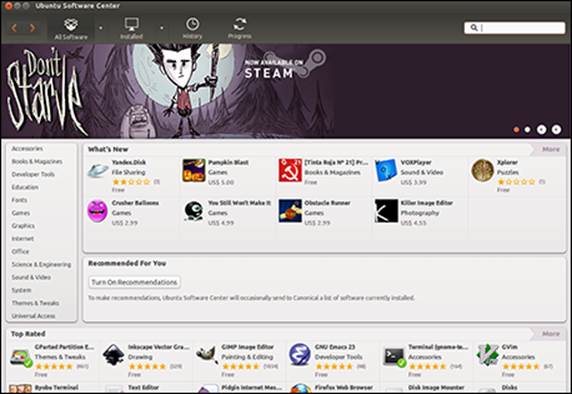
Figure 3-8: The Ubuntu Software Center has it all.
1. Choose System⇒Administration⇒Add/Remove Software.
If you’re not logged in as root, a dialog box prompts you for the root password. The Add or Remove Packages utility starts and gathers information about the status of packages installed on your system. After it sorts through the information about all the installed packages, the utility displays the Package Manager dialog box, which contains a list of all the packages, as shown in Figure 3-9.
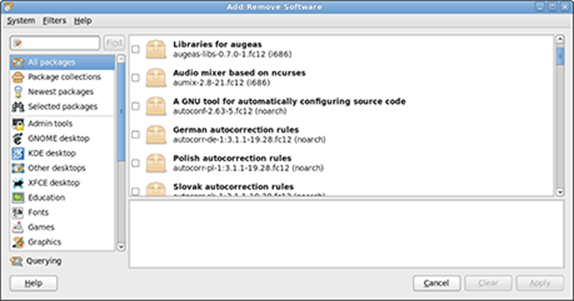
Figure 3-9: Package Manager displays the packages available.
2. To install an uninstalled package group, select the check box to the left of that package group’s name.
For partially uninstalled package groups, click the Details link (or the Optional Packages button) that appears in a column to the right of the package name.
A dialog box appears with details of the packages in the package group.
3. In the dialog box, select the packages that you want to install or remove by clicking the names, and then click Close to exit the dialog box.
You return to the Package Management dialog box, and if you added or removed any package, the Update (or Apply) button becomes active.
4. Click the Update (or Apply) button to update the packages based on any additions or removals you made in the lists of packages.
Installing software in SUSE
In SUSE, follow these steps to install or remove software:
1. From the main menu, choose YaST to start the YaST Control Center.
The YaST Control Center displays categories of tasks on the left side and specific tasks for that category on the right side.
2. Click the Software category on the left side so that the right side shows the options for software.
3. Click the Software Management icon on the right side.
YaST displays a new window where you can search for software packages.
4. Search for a package by name or select a package by browsing available packages.
To search for a package by name, type a keyword in the Search field in the upper-left corner of the window and then click Search. YaST displays the matching packages on the right side of the window. To browse for packages, click Filter in the upper-left corner, select Package Groups from the drop-down list, and click a group to see the list of individual packages in that group.
5. Click the Accept button in the bottom-right corner to begin installing selected packages.
YaST checks for dependencies — if a package requires other packages to install correctly — before installing packages. If you want to view what changes would occur when you click Accept, click Filter and select Installation Summary.
Installing software in Xandros
Xandros Desktop OS comes with Xandros Networks, which enables you to buy software online as well as install software from a CD or DVD. To start Xandros Networks, double-click the Xandros Networks icon on the Xandros Desktop. Xandros Networks starts, connects to a Xandros server, and displays information about installed, updated, and new applications.
To look at the list of new applications, click the plus sign to the left of the New Applications label on the left side of the Xandros Networks window. You get a further list of application categories. If you click a category, the right side of the window displays the names of packages within that category. You can then select a package or an entire category for installation.
To install any selected software packages, choose File⇒Enter Administrator Mode. You’re prompted for the administrator (root) password. After entering the root password, you can choose File⇒Install Selected Applications. Xandros Networks checks for dependencies, prompts you if any further information is needed, and downloads and installs the new software.
If you’ve downloaded a Debian package, you can install it by choosing File⇒Install DEB File from the Xandros Networks menu. Similarly, the menu choice File⇒Install RPM File installs an RPM package.
All materials on the site are licensed Creative Commons Attribution-Sharealike 3.0 Unported CC BY-SA 3.0 & GNU Free Documentation License (GFDL)
If you are the copyright holder of any material contained on our site and intend to remove it, please contact our site administrator for approval.
© 2016-2026 All site design rights belong to S.Y.A.