Ubuntu Linux For Dummies (2007)
Part III: Working with Ubuntu Workstation
In this part . . .
This part shows how to use Ubuntu as your everyday workstation. The primary focus is using productivity tools such as OpenOffice.org (a Microsoft Office-compatible office suite), Mozilla Firefox Web browser, plus multimedia, graphics, and other applications.
Chapters 11 and 12 introduce the GNOME graphical desktop environment and how to use it; Chapter 13 helps you set up your computer for printing. Chapter 14 covers using the ground-breaking Mozilla Firefox Web browser. In Chapter 15, I tell you about the Evolution e-mail client. Chapter 16 is close to my heart, as it describes using the Microsoft Word-compatible OpenOffice.org Writer.
Chapter 11. Introducing GNOME
In This Chapter
· Finding your way around the GNOME desktop
· Getting to know the panels and menus
· Changing the look and feel of your desktop
What do gnomes have to do with Ubuntu? Do they come by late at night and help you maintain your computer? Maybe someplace in the world, but not here. In this case, I'm not talking about little system administrators or even lawn gnomes, I'm talking about GNOME, the Linux desktop.
GNOME stands for GNU Network Object Model Environment, and GNU (some people pronounce it guh-NEW) stands for GNU's not UNIX. Ubuntu uses numerous GNU applications, libraries, and utilities. You don't need to know about all of that to be able to use Ubuntu. For now, I'll let you get on with checking out your new operating system. But if you'd like to look into how the concept of free software came to be, www.gnu.org is a great place to start. Confusing acronyms aside, it's an interesting story.
Forget the long acronym and just think of GNOME as a great desktop and desktop environment. Desktop environments pull together all the various elements that make it possible to use your computer in a convenient and productive manner.
This chapter describes GNOME and how to use it.
Getting to Know the GNOME Desktop
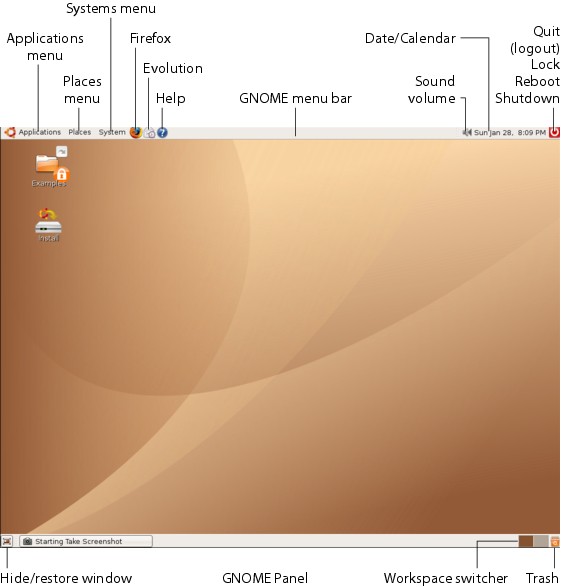
Microsoft Windows doesn't have a catchy name for its desktop, but as you might have noticed, things are a little different in the Linux world. GNOME (as well as other elements of Linux) is an open source project. Open source projects produce software that everyone can freely use, and anyone can modify — just so long as whoever does the modification doesn't restrict others from doing the same. It's supported and developed by the GNOME project — www.gnome.org. GNOME creates a desktop environment that is both easy to use and pleasant to look at. The default Ubuntu GNOME desktop uses a neutral but pleasing background, as shown in Figure 11-1 . (This figure shows an example of live Ubuntu.)
Figure 11-1: You can access many of Ubuntu's features right from the desktop.
|
The big picture Miguel de Icaza started the GNOME project in 1997. He was motivated to create a graphical desktop environment over concerns about the licensing of other desktop software. The intervening ten years has seen GNOME become one of the most popular graphical environments in the world. The GNOME environment consists of the following primary parts: · Desktop: The GNOME desktop is analogous to the top of your desk. · Panels: These are menu bars. Panels can be laid out horizontally or vertically. Ubuntu gives you two panels, one along the bottom and the other along the top of the desktop. · Icons: Graphical objects placed on the desktop that provide access to specific resources. You click (or double-click) an icon, and a window opens. You can use the resource that the window is connected to. · Nautilus file manager: Nautilus helps you use and manage files and folders. It can also browse network file shares (which I discuss in more detail later in the chapter). Chapter 12 describes how to use Nautilus. · Applications: You use your computer to get work done, surf the Internet, communicate with others, and sometimes just have fun. You can engage in these activities by using the appropriate applications. GNOME provides a lot of applications, outlined in Chapter 12, for you to use. |
The following sections describe each primary part of GNOME.
Looking at the default desktop
The desktop is the background you see before you start opening applications — plus the menu bars and icons. Everything that you do or see in GNOME, you do from the desktop. The GNOME panels, icons, and applications all work from the desktop. The desktop is the basis for everything you do on your Ubuntu computer.
You're given a default desktop when you use live Ubuntu or install Ubuntu on your computer. The desktop is shown in Figure 11-1 and provides the following objects:
· Ubuntu background: This is the image you see onscreen after you log into your user account. You can change the background using images provided as part of the Ubuntu installation. From the GNOME menu bar, choose System![]() Preferences
Preferences![]() Desktop Background. The Desktop Background Preferences dialog opens, from which you can select another image.
Desktop Background. The Desktop Background Preferences dialog opens, from which you can select another image.
· Two panels: Panels are menu bars and are equivalent to the familiar Windows menu bar.
o The top panel contains applications and system administration menus. It also includes icons for the Mozilla Firefox browser, the Evolution messaging and calendar system, available software package updates, and the clock.
o The bottom panel includes a Trash icon, a workspace switcher (more about that later in this chapter), and an icon to minimize all open windows.
· Disk icon: Displays all available disks.
All of these objects are described in more detail later in this chapter.
|
X marks the spot While GNOME provides Ubuntu with its desktop environment, the X Window System (also referred to as simply X) gives GNOME its graphics. In other words, GNOME runs on top of X. X consists of three parts: · X Server: The interface for your computer's graphics video card, keyboard, mouse, and monitor. GNOME asks X to perform basic graphical tasks, and X does the grunt work while GNOME does the higher-level work. · X Clients: Applications such as Mozilla Firefox and Evolution are X Clients. X Clients communicate with the X Server. You interface with X Client, which itself interfaces with the X Server. · X Libraries: The X Server and X Clients use X Libraries to perform their tasks. Using a suite of common libraries eliminates the need to rewrite code to perform similar tasks. X provides the graphical underpinnings for GNOME. |
Taking a closer look at the GNOME panels
The GNOME panels (menu bars) house menus, icons, and displays. The panels group commonly used features in order to make them easier to access.
By default, Ubuntu's implementation of GNOME includes two panels.
Top panel
The top panel includes the GNOME menu bar, which provides access to the following menus:
· Applications: From this menu, you can open applications such as the OpenOffice.org word processor, the Evolution e-mail and calendaring program, and the GNOME Terminal Emulator.
· Places: Travel within your Ubuntu world via this menu. The Places menu gives quick access to your home directory and desktop folders, documents, and network places.
· System: You can open system administration applications and utilities such as the Network Settings utility, the user account utility, and the printer configuration tool.
The top panel also includes the following icons:
· Firefox: Click this icon to open the Internet browser Mozilla Firefox, which I describe in more detail in Chapter 14.
· Evolution: Use this icon to open the Evolution messaging, contact list, and calendaring system. (See Chapter 15.)
· Volume control: Click this icon to adjust your computer's audio volume via a simple slider volume dialog.
· Clock/calendar: This icon displays the current time and date. Click it to open a simple calendar dialog.
· Log off: Clicking this icon opens a logout dialog. You can log out, switch users, shutdown, reboot, and suspend your Ubuntu computer using these options.
Bottom panel
The panel at the bottom of your desktop provides these options:
· Hide/Display: Sometimes your desktop gets cluttered with too many windows. Clicking this icon minimizes (hides) all windows. The minimized windows show up as icons on the bottom panel. Clicking it again reopens those windows.
· Workspace switcher: GNOME lives in a virtual reality. The desktop can span many virtual windows.
To visualize this, imagine that you have a huge monitor, let's say 4 feet by 4 feet. Put four pieces of paper over the monitor's screen so that it's completely covered. Now, pull off one section of paper and one quarter of the screen is visible. If you want to view another section of the screen, you have to put back the piece of paper that's currently not attached before pulling off anther section. Doing this divides the desktop into four sections and helps reduce clutter. GNOME's virtual windows effectively perform the same task.
Each window is represented as a small pane on the workspace switcher. Click any pane, and you're transported to the designated virtual window. This capability makes it easy to reduce clutter by using different virtual windows to group different tasks.
· Trash folder: This is where you put files you'd like to delete. You can click and drag files to the Trash or right-click a file and select the Move to Trash option.
Trashed objects aren't actually deleted until you empty the Trash folder. You can empty the trash can — permanently delete the files you sent to the trash — by choosing File![]() Empty Trash from within any Nautilus window. When the Empty All of the Items from the Trash? dialog opens, click the Empty Trash button.
Empty Trash from within any Nautilus window. When the Empty All of the Items from the Trash? dialog opens, click the Empty Trash button.
GNOME panels are highly configurable. I describe how to modify them later in this chapter.
Introducing GNOME icons
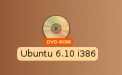
Icons are shortcuts to files, folders, and applications. They're very simple to use and create. Clicking or double-clicking an icon opens whatever resource it represents. For instance, if you have a CD inserted in your computer, Ubuntu shows an icon, as shown in Figure 11-1 . Double-clicking the CD icon opens a window showing the contents of the CD.
Figure 11-1: Icon showing a CD-ROM.
Managing files and folders with Nautilus
Nautilus is a file manager that helps you use and manipulate files, folders, and network shares. It's a powerful, yet easy-to-use, system.
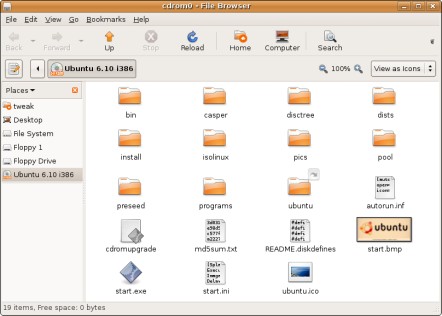
Clicking the icon of a device or folder on your desktop opens Nautilus, which displays the contents of the device or folder. For instance, if you insert your Ubuntu CD in your computer, an icon like that shown in Figure 11-1 opens. You can double-click the icon and a Nautilus window opens, displaying the CD's contents, as shown in Figure 11-1 .
Figure 11-1: The Nautilus file manager, showing the Ubuntu CD contents.
Nautilus provides the following functions:
· Display disk drives
· Display folder contents
· Open network file shares
· Create folders
· Create documents
· Search for files
· Run applications
Nautilus is easy to use. Double-click (or right-click and select Open) any desktop icon, and Nautilus opens a window displaying the contents of the resource. For instance, opening a folder icon opens a window displaying the contents of the folder.
Chapter 12 describes the Nautilus file manager in more detail.
Chapter 11. Introducing GNOME
In This Chapter
· Finding your way around the GNOME desktop
· Getting to know the panels and menus
· Changing the look and feel of your desktop
What do gnomes have to do with Ubuntu? Do they come by late at night and help you maintain your computer? Maybe someplace in the world, but not here. In this case, I'm not talking about little system administrators or even lawn gnomes, I'm talking about GNOME, the Linux desktop.
GNOME stands for GNU Network Object Model Environment, and GNU (some people pronounce it guh-NEW) stands for GNU's not UNIX. Ubuntu uses numerous GNU applications, libraries, and utilities. You don't need to know about all of that to be able to use Ubuntu. For now, I'll let you get on with checking out your new operating system. But if you'd like to look into how the concept of free software came to be, www.gnu.org is a great place to start. Confusing acronyms aside, it's an interesting story.
Forget the long acronym and just think of GNOME as a great desktop and desktop environment. Desktop environments pull together all the various elements that make it possible to use your computer in a convenient and productive manner.
This chapter describes GNOME and how to use it.
Getting to Know the GNOME Desktop
Microsoft Windows doesn't have a catchy name for its desktop, but as you might have noticed, things are a little different in the Linux world. GNOME (as well as other elements of Linux) is an open source project. Open source projects produce software that everyone can freely use, and anyone can modify — just so long as whoever does the modification doesn't restrict others from doing the same. It's supported and developed by the GNOME project — www.gnome.org. GNOME creates a desktop environment that is both easy to use and pleasant to look at. The default Ubuntu GNOME desktop uses a neutral but pleasing background, as shown in Figure 11-1 . (This figure shows an example of live Ubuntu.)
Figure 11-1: You can access many of Ubuntu's features right from the desktop.
|
The big picture Miguel de Icaza started the GNOME project in 1997. He was motivated to create a graphical desktop environment over concerns about the licensing of other desktop software. The intervening ten years has seen GNOME become one of the most popular graphical environments in the world. The GNOME environment consists of the following primary parts: · Desktop: The GNOME desktop is analogous to the top of your desk. · Panels: These are menu bars. Panels can be laid out horizontally or vertically. Ubuntu gives you two panels, one along the bottom and the other along the top of the desktop. · Icons: Graphical objects placed on the desktop that provide access to specific resources. You click (or double-click) an icon, and a window opens. You can use the resource that the window is connected to. · Nautilus file manager: Nautilus helps you use and manage files and folders. It can also browse network file shares (which I discuss in more detail later in the chapter). Chapter 12 describes how to use Nautilus. · Applications: You use your computer to get work done, surf the Internet, communicate with others, and sometimes just have fun. You can engage in these activities by using the appropriate applications. GNOME provides a lot of applications, outlined in Chapter 12, for you to use. |
The following sections describe each primary part of GNOME.
Looking at the default desktop
The desktop is the background you see before you start opening applications — plus the menu bars and icons. Everything that you do or see in GNOME, you do from the desktop. The GNOME panels, icons, and applications all work from the desktop. The desktop is the basis for everything you do on your Ubuntu computer.
You're given a default desktop when you use live Ubuntu or install Ubuntu on your computer. The desktop is shown in Figure 11-1 and provides the following objects:
· Ubuntu background: This is the image you see onscreen after you log into your user account. You can change the background using images provided as part of the Ubuntu installation. From the GNOME menu bar, choose System![]() Preferences
Preferences![]() Desktop Background. The Desktop Background Preferences dialog opens, from which you can select another image.
Desktop Background. The Desktop Background Preferences dialog opens, from which you can select another image.
· Two panels: Panels are menu bars and are equivalent to the familiar Windows menu bar.
o The top panel contains applications and system administration menus. It also includes icons for the Mozilla Firefox browser, the Evolution messaging and calendar system, available software package updates, and the clock.
o The bottom panel includes a Trash icon, a workspace switcher (more about that later in this chapter), and an icon to minimize all open windows.
· Disk icon: Displays all available disks.
All of these objects are described in more detail later in this chapter.
|
X marks the spot While GNOME provides Ubuntu with its desktop environment, the X Window System (also referred to as simply X) gives GNOME its graphics. In other words, GNOME runs on top of X. X consists of three parts: · X Server: The interface for your computer's graphics video card, keyboard, mouse, and monitor. GNOME asks X to perform basic graphical tasks, and X does the grunt work while GNOME does the higher-level work. · X Clients: Applications such as Mozilla Firefox and Evolution are X Clients. X Clients communicate with the X Server. You interface with X Client, which itself interfaces with the X Server. · X Libraries: The X Server and X Clients use X Libraries to perform their tasks. Using a suite of common libraries eliminates the need to rewrite code to perform similar tasks. X provides the graphical underpinnings for GNOME. |
Taking a closer look at the GNOME panels
The GNOME panels (menu bars) house menus, icons, and displays. The panels group commonly used features in order to make them easier to access.
By default, Ubuntu's implementation of GNOME includes two panels.
Top panel
The top panel includes the GNOME menu bar, which provides access to the following menus:
· Applications: From this menu, you can open applications such as the OpenOffice.org word processor, the Evolution e-mail and calendaring program, and the GNOME Terminal Emulator.
· Places: Travel within your Ubuntu world via this menu. The Places menu gives quick access to your home directory and desktop folders, documents, and network places.
· System: You can open system administration applications and utilities such as the Network Settings utility, the user account utility, and the printer configuration tool.
The top panel also includes the following icons:
· Firefox: Click this icon to open the Internet browser Mozilla Firefox, which I describe in more detail in Chapter 14.
· Evolution: Use this icon to open the Evolution messaging, contact list, and calendaring system. (See Chapter 15.)
· Volume control: Click this icon to adjust your computer's audio volume via a simple slider volume dialog.
· Clock/calendar: This icon displays the current time and date. Click it to open a simple calendar dialog.
· Log off: Clicking this icon opens a logout dialog. You can log out, switch users, shutdown, reboot, and suspend your Ubuntu computer using these options.
Bottom panel
The panel at the bottom of your desktop provides these options:
· Hide/Display: Sometimes your desktop gets cluttered with too many windows. Clicking this icon minimizes (hides) all windows. The minimized windows show up as icons on the bottom panel. Clicking it again reopens those windows.
· Workspace switcher: GNOME lives in a virtual reality. The desktop can span many virtual windows.
To visualize this, imagine that you have a huge monitor, let's say 4 feet by 4 feet. Put four pieces of paper over the monitor's screen so that it's completely covered. Now, pull off one section of paper and one quarter of the screen is visible. If you want to view another section of the screen, you have to put back the piece of paper that's currently not attached before pulling off anther section. Doing this divides the desktop into four sections and helps reduce clutter. GNOME's virtual windows effectively perform the same task.
Each window is represented as a small pane on the workspace switcher. Click any pane, and you're transported to the designated virtual window. This capability makes it easy to reduce clutter by using different virtual windows to group different tasks.
· Trash folder: This is where you put files you'd like to delete. You can click and drag files to the Trash or right-click a file and select the Move to Trash option.
Trashed objects aren't actually deleted until you empty the Trash folder. You can empty the trash can — permanently delete the files you sent to the trash — by choosing File![]() Empty Trash from within any Nautilus window. When the Empty All of the Items from the Trash? dialog opens, click the Empty Trash button.
Empty Trash from within any Nautilus window. When the Empty All of the Items from the Trash? dialog opens, click the Empty Trash button.
GNOME panels are highly configurable. I describe how to modify them later in this chapter.
Introducing GNOME icons
Icons are shortcuts to files, folders, and applications. They're very simple to use and create. Clicking or double-clicking an icon opens whatever resource it represents. For instance, if you have a CD inserted in your computer, Ubuntu shows an icon, as shown in Figure 11-1 . Double-clicking the CD icon opens a window showing the contents of the CD.
Figure 11-1: Icon showing a CD-ROM.
Managing files and folders with Nautilus
Nautilus is a file manager that helps you use and manipulate files, folders, and network shares. It's a powerful, yet easy-to-use, system.
Clicking the icon of a device or folder on your desktop opens Nautilus, which displays the contents of the device or folder. For instance, if you insert your Ubuntu CD in your computer, an icon like that shown in Figure 11-1 opens. You can double-click the icon and a Nautilus window opens, displaying the CD's contents, as shown in Figure 11-1 .
Figure 11-1: The Nautilus file manager, showing the Ubuntu CD contents.
Nautilus provides the following functions:
· Display disk drives
· Display folder contents
· Open network file shares
· Create folders
· Create documents
· Search for files
· Run applications
Nautilus is easy to use. Double-click (or right-click and select Open) any desktop icon, and Nautilus opens a window displaying the contents of the resource. For instance, opening a folder icon opens a window displaying the contents of the folder.
Chapter 12 describes the Nautilus file manager in more detail.
Navigating the GNOME Desktop
Using the GNOME desktop is as simple as pointing and clicking your mouse. Select and click an icon, and you can tell GNOME what to do and where to go with the icon.
Take a quick look through the various navigation methods.
Using panel menus
Menus are designed to group common applications, utilities, and locations so you can more easily use your computer.
Chapter 12 describes many of the applications you find in these menus.
The Applications menu
The Applications menu (refer to Figure 11-1 ) provides the following submenus:
· Accessories: This menu groups miscellaneous utilities and applications. For instance, you access the dictionary and calculator from here.
· Games: GNOME provides some simple games, such as Blackjack, via this menu.
· Graphics: This is where you can find programs that display and manipulate graphics. For instance, I used the GIMP (GNU Image Manipulation Program) graphical imaging and editing tool to make all the screen shots in this book. The GIMP and other graphical-oriented applications can be found in this menu.
· Internet: All these applications have the common thread of being Internet aware. From here, you can access such applications as
o Mozilla Firefox browser (Chapter 14)
o Evolution mail and calendaring program (Chapter 15)
o Gaim Internet Messenger (Chapter 18)
· Office: Access the OpenOffice.org suite of word processing, spreadsheet, slideshow, and other functions from here.
Chapter 16 describes what OpenOffice.org is and how to use it.
· Sound & Video: Ubuntu provides many multimedia applications, such as CD rippers and burners, plus music players and more. This menu provides access to them.
· Add & Remove: Ubuntu provides this utility for installing and removing software.
The Places menu
The Places menu helps you go to GNOME places. It gives access to the following locations:
· Home Folder: Selecting the Home Folder menu opens the Nautilus file manager, which shows the contents of your home directory (folder). The Home Folder is where you should save your personal files and folders — it's similar to Microsoft XP's My Documents and Microsoft Vista's Documents folders.
· Desktop: This option opens the file manager in your Desktop folder; Desktop is a subdirectory of your home directory. Files and folders that you save here are automatically displayed on your GNOME desktop. Saving files here is a convenient way to display icons that you want to be easily accessible.
· Computer: Clicking Computer opens the file manager, showing a view of your computer's drives. You see an icon for your hard drive, CD-ROM drive, and any other drives connected to your computer.
· CD/DVD Creator: Opens a window that lets you write files to your writable CD-ROM or DVD drive.
Chapter 20 describes how to use this application to burn CDs and DVDs.
· Network Servers: You can browse any file shares available on your network. (File shares are folders that appear to be and act like they're located on your Ubuntu computer but are really attached to other computers and are accessible via a network.)
· Connect to Server: Connect to any file shares on your network.
· Search for Files: Look for files on your computer. Did you type a letter to Aunt Maude but don't remember where you saved it? This feature can help you find it.
· Recent Documents: Shows any documents that you've used recently. It provides a shortcut to reopening any of those documents.
Selecting any of these options — except Connect to Server and Search for Files — opens the Nautilus file manager (see Chapter 12) in the designated context.
The System menu
The System menu helps you manage the look and feel plus the operation of your Ubuntu computer.
· Preferences: Opens a submenu providing access to GNOME and Ubuntu configuration editors that help you configure things such as your desktop background, screen saver, and the sound volume.
· Administration: Opens a submenu displaying system administration utilities and applications such as your network configuration utility and printer setup.
· Help: Opens the Ubuntu help system. (For more information about getting help with Ubuntu, see Chapter 22.)
· About GNOME: Opens a dialog giving access to GNOME information — including what version of GNOME you're using, in case you forget.
· About Ubuntu: Opens a dialog giving access to Ubuntu information — including what version of Ubuntu you're using, if anyone asks.
· Quit: Opens the logout dialog that lets you either log out, shutdown, reboot, or suspend your computer.
I explain the Quit options in Chapter 5.
Manipulating GNOME windows
Clicking icons and selecting menu options opens windows — windows with a small w, that is. You get your work done within these windows. For instance, clicking the Firefox icon on the top panel opens the Firefox window, which lets you browse the Internet.
After you open an application window, you can move it around, resize it, and so on, just as you would in that other operating system. Here's what you can do:
· Minimize Window: Click the small, horizontal bar button (looks like a minus sign) at the top-right corner of the window. The window disappears from the desktop and is represented by an icon in the bottom panel.
· Maximize Window: Click the square button in the top-right corner of the window, and the window enlarges to occupy the entire desktop. Click the same button again and the window shrinks to its original size.
· Close Window: Click the X button, and the window exits. Finished. Kaput.
Alternatively, you can close a window by clicking the File menu in the program and selecting the Quit, Close, or Exit option.
You can move a window by clicking its top border, holding the mouse button, and then dragging the window to its new location. Release the button and the window stays there.
Resizing a window is also straightforward. Move the pointer to any of the window's corner edges until the cursor changes to an arrow within a right-angle bracket. At that point, click the mouse and drag the arrow to resize the window.
Exiting from or locking GNOME
If you work with other people, you'll want to exit (log out from) GNOME when you leave your computer; alternatively, you can lock your GNOME session without ending your session. The idea is to protect your work and computer from unauthorized use.
To log out, click the red Quit icon at the top-right side of the top panel. The Quit dialog opens, from which you can
· Logout: Selecting this option logs you out of your user account and ends any applications you're currently running.
· Lock: Locks your current GNOME session. You can unlock your session by typing your password in the Unlock dialog that's displayed as soon as you lock your session.
· Switch Users: Change from one user account to another. You must, of course, know the other user account password to use this option.
· Restart: Shutdown your Ubuntu computer and immediately, and automatically, restart the computer.
· Shutdown: Shuts down your Ubuntu computer, turning off the power.
Chapter 5 describes these functions in more detail.
Altering GNOME's Appearance
GNOME is highly configurable. You can change the look and feel of the GNOME desktop, add and remove panels, manipulate icons, and change many other aspects of your graphical environment.
In this section, I describe how to perform some of the more useful configurations.
Creating and modifying folders
You can create desktop icons by right-clicking the GNOME desktop and selecting any of the following options:
· Create Folder: Select the New Folder option to create a folder.
· Create Document: Select the Empty File option. This creates an empty document.
· Application: Select the Create Launcher option. (A launcher is like a shortcut.) The Create Launcher dialog opens. Type the name and application that you want the new icon to control; you can also click the Icon button to select from generic GNOME icon images.
When you release the right mouse button, the icon appears on the desktop as an untitled folder. Type the name that you want to label the file, folder, or action with and press the Enter key.
To rename an icon, right-click it and select the Rename option in the menu that opens. Type the new name at the prompt.
If you want to copy an icon from the desktop to a panel, click the icon and drag it to the panel. Release the mouse, and you'll see the icon on both the desktop and the panel.
The opposite is also true. Open a menu on a panel and find the application or place you want to create a desktop icon for. Click the object and drag it to the desktop. Release the mouse button, and the icon is created for you.
To delete an icon, you can click it and drag it to the Trash folder, or follow these steps:
1. Right-click the icon.
A menu opens.
2. Select the Move to Trash option.
The icon, but not the object (file, folder, or application) it represents, disappears from the desktop and is moved to the Trash folder. The object isn't deleted until you right-click the Trash folder and select the Empty Trash option.
3. Double-click the Trash folder near the upper-right corner of the desktop.
The Trash - File Browser dialog opens.
4. Click the File menu and select the Empty Trash option.
The Empty all of the Items from Trash? dialog opens.
5. Click Empty Trash.
Control returns to the Trash - File Browser window.
6. Close the window by clicking the File menu and choosing the Close option.
Changing themes and backgrounds
GNOME uses themes to control its look and feel. Customizing your GNOME theme is fun and easy. Here's how:
1. From the GNOME menu bar, choose System![]() Preferences
Preferences![]() Theme.
Theme.
The Theme Preferences dialog, shown in Figure 11-1 , opens. The default theme is Ubuntu's Human theme.
Figure 11-1: Choose how you want the GNOME desktop to look.
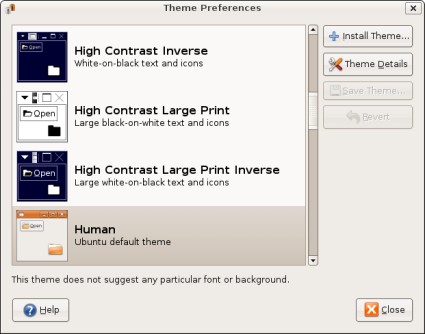
· Click the theme icon to select the theme.
Each theme icon displays a preview of what the theme looks like.
· Click Close.
Your GNOME session changes to a new theme. You can change themes as much and as often as you want.
Creating desktop shortcuts
GNOME panels are very useful. They simplify your access to GNOME and other applications and utilities. If you don't know where to find a program that you want to use, your best bet is to click the Applications or System menu and select the submenu that seems closest to your need. For instance, if you want to listen to or create an audio CD but don't know the name of the application, just click Applications and select Sound & Video. You'll find the Serpentine Audio CD Creator there.
However, rather than constantly searching for an application or place that you use often, you can create an icon on the panel for easy access.
1. Right-click any blank section of a panel.
A menu opens.
2. Select the Add to Panel option.
The Add to Panel dialog, as shown in Figure 11-1 , opens.
Figure 11-1: Create a shortcut with the Add to Panel dialog.
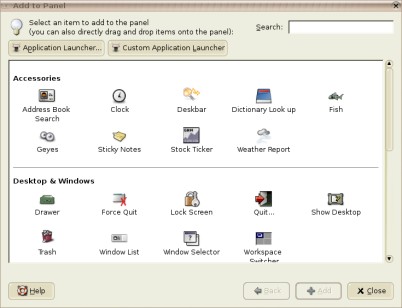
· Click to select any of the standard GNOME applications or utilities.
The applications and utilities are organized logically by type.
· (Optional) Select the Application Launcher to select non-GNOME applications such as Firefox, Evolution, and so on.
· Click the Close button.
An icon representing the application or utility you select appears on the panel. You can move the panel icon around as you want by clicking and dragging it.
You can lock an icon in place by right-clicking it and selecting the Lock option. The icon can't be moved from its current location when locked. Right-click the icon and select Unlock to unlock it.
Create new panels by right-clicking an existing panel and selecting the New Panel option. Given that Ubuntu already includes top and bottom panels, using this option creates vertical panels on the left and right sides of the desktop.
All materials on the site are licensed Creative Commons Attribution-Sharealike 3.0 Unported CC BY-SA 3.0 & GNU Free Documentation License (GFDL)
If you are the copyright holder of any material contained on our site and intend to remove it, please contact our site administrator for approval.
© 2016-2026 All site design rights belong to S.Y.A.