Ubuntu Linux For Dummies (2007)
Part IV: Multimedia
Chapter 20. Lyrical Ubuntu: Using Multimedia Applications
In This Chapter
· Playing music CDs
· Playing MP3s and Internet radio with XMM
· Using Rhythmbox
· Ripping music from CDs
· Burning music to CDs
It used to be that computers were all about work. Then came graphical interfaces, and computers very quickly became multimedia machines. There's not much that you can't do with computers when it comes to multimedia.
Ubuntu is able to do all the fun things that you expect from today's computers. This chapter shows you how to have fun with Ubuntu. I talk about using audio CDs, playing Internet audio streams (continuous music or voice transmitted over the Internet), and more.
The first three sections in this chapter describe how to play audio CDs, play audio files using various formats, and listen to Internet radio. The last sections describe how to rip and burn music CDs.
Playing CDs
Ubuntu plays CDs if you want. Here's all you have to do:
1. Pop an audio disc in your Ubuntu computer's CD player.
The Sound Juicer window opens, showing all the tracks on the CD.
By default, all the tracks are selected to play. You can deselect any tracks that you don't want to play: Click the check box next to the track.
2. Click the Play button to start playing the selected CD tracks.
That's all there is to playing a CD. Simple.
Playing MP3s with XMMS
MP3 is a popular audio-encoding protocol. Ubuntu provides an MP3 player called XMMS (X Multimedia System), which you can use to play MP3 files on your computer.
XMMS can play the following audio sources:
· MP3, Ogg, and WAV audio files
· Audio CDs
· MP3 Internet radio streams
Installing XMMS
You need to install XMMS before using it. The following instructions use the Synaptic Package Manager to find and install XMMS:
1. Click the GNOME System menu and choose Administration![]() Synaptic Package Manager.
Synaptic Package Manager.
The Enter Your Password to Perform Administrative Tasks dialog opens if you haven't performed an administrative task within the last 5 minutes.
2. If prompted, type your user account password in the Password text box.
The Synaptic Package Manager dialog opens.
3. Scroll down through the packages in the Packages menu and click the check box next to the XMMS package.
An unnamed submenu opens.
4. Click the Mark for Installation option.
The Mark Additional Required Changes? dialog opens.
5. Click the Mark button.
The Mark Additional Required Changes? dialog closes and control returns to the Synaptic Package Manager window.
6. Click the Apply button.
The Summary dialog opens.
7. Click the Apply button in the Summary dialog.
The XMMS package is installed on your Ubuntu computer.
Playing audio files with XMMS
XMMS is easy to use. To get started, click the GNOME Applications menu and choose Sound & Video![]() XMMS Music Player. XMMS, as shown in Figure 20-1 , opens.
XMMS Music Player. XMMS, as shown in Figure 20-1 , opens.
Figure 20-1: The XMMS Music Player.
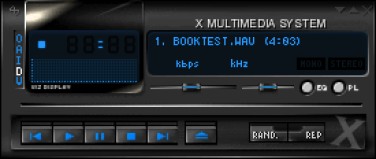
Continue reading to find out how you can use XMMS to play audio files, CDs, and Internet radio.
After you open XMMS, here's how to use it to play MP3, Ogg, and WAV audio files:
1. Click anywhere on the right side of the XMMS window.
The About XMMS drop-down menu opens.
2. From the About XMMS drop-down menu, select the file option you want.
To play a single file, follow these steps:
1. Choose Play![]() Play File.
Play File.
The Play Files dialog opens.
2. Find and select the audio file you wish to play.
If you want to play a whole directory of files, follow these steps:
3. Choose Play![]() Play Directory
Play Directory
The Play Files dialog opens.
4. Find and select the directory of files you wish to play.
3. Click the Play button.
The Play Files dialog closes and XMMS plays the selected recordings.
Playing Internet radio streams
XMMS fulfills its ace-of-trades reputation by playing Internet radio streams. The process requires you to find and select your Internet radio stream and then use XMMS to play it.
Recording a stream
Follow these steps to find a stream and save its address (but not its content):
1. Browse to your favorite Internet radio station.
For instance, go to www.virginradio.co.uk (Virgin Radio) or www.wrti.org.
2. Click the Listen Live or Windows Media link.
XMMS can also play Windows Media.
The Opening Wrti.asx dialog opens.
3. Select the Save to Disk radio button and click the OK button.
The Enter Name of File to Save To dialog opens.
4. Click the Save button.
The Downloads dialog opens.
Selecting the Open With option lets you open the audio stream directly with XMMS (or any other application you care to use). However, I like to save the audio stream's location in a file for future easy access.
5. Click the Clean Up button and close the dialog.
The saved file contains the Internet URL (uniform resource locator) of the Internet radio stream.
Playing a stream
When you know the audio you want, you can play it with XMMS. Follow these steps:
1. Click anywhere on the right side of the XMMS window.
The About XMMS drop-down menu opens.
· From the About XMMS drop-down menu, select the audio source option you want.
To play a saved file (such as the files saved with the preceding steps), follow these steps:
1. Choose Play![]() Play File.
Play File.
The Play Files dialog opens.
2. Find and select the downloaded Internet radio file (such as the file downloaded by the preceding section of this chapter).
To play a live stream, follow these steps:
1. Choose Play![]() Play Location.
Play Location.
The Enter Location to Play dialog opens.
2. Type the URL in the text box.
· Click the Play button.
The dialog closes and XMMS plays the stream. I love it!
Playing Ogg Files with Rhythmbox
Rhythmbox plays audio files and audio streams encoded with Ogg. Ogg-formatted audio files — use the suffix .ogg — are common in the Linux world because there are so many tools to record with (for instance, Audacity). Ogg-formatted audio streams are advertised as such on the provider's Web page. There are fewer Internet audio sources using Ogg versus MP3, but the list is growing.
Even though the Internet is dominated by MP3-encoded radio streams, Ogg is making progress and penetrating the market. As Linux proliferates the desktop, more listeners have access to applications compatible with the nonproprietary Ogg format. More potential listeners means more sources.
Virgin Radio is one popular Internet radio source that speaks Ogg.
Follow these steps to play Virgin Radio using Rhythmbox:
1. Open a Firefox window by clicking the GNOME Applications menu and choosing Internet![]() Firefox Web Browser, and browse to your favorite Internet radio station.
Firefox Web Browser, and browse to your favorite Internet radio station.
For example, I usually go to www.virginradio.co.uk.
2. Click the Listen Live Now button near the upper-right side of the browser window.
The names and locations of the links vary by Web site, but they usually include the word listen, or something equally intuitive.
Your browser opens a Web page, which might look something like the one in Figure 20-1 .
Figure 20-1: Virgin Radio digs Ogg Vorbis.
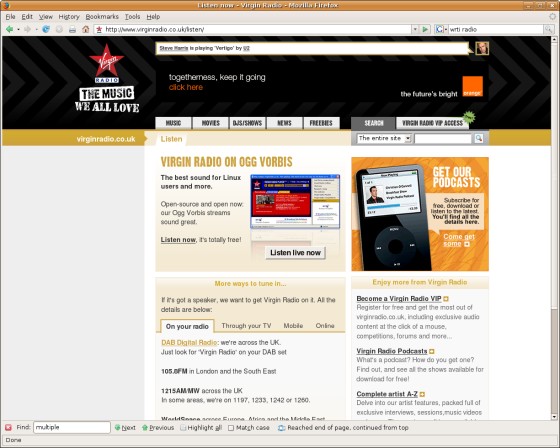
· Click the Listen Live Now button under the Virgin Radio on Ogg Vorbis heading.
The Opening Live.pls dialog opens, showing the Open with radio button selected and the Rhythmbox Music Player (default) option also selected by default.
· Click the OK button.
The first time you start Rhythmbox, the Rhythmbox dialog opens and displays the Welcome to Rhythmbox heading.
· Click the Forward button in the Welcome to Rhythmbox dialog.
The Rhythmbox dialog shows the Music Library heading.
· Click the Skip This Step radio button and click the Forward button.
The Rhythmbox dialog shows the Finish heading.
· Click the Apply button.
The Rhythmbox dialog closes and the Music Player window, as shown in Figure 20-1 , opens.
Figure 20-1: The Rhythmbox Music Player window.
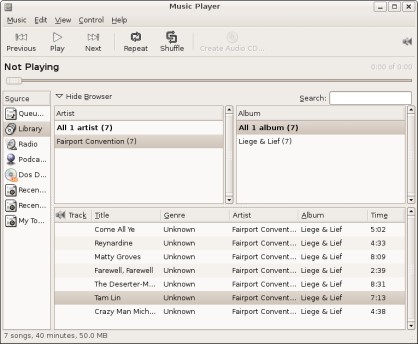
The following instructions use the Rhythmbox application to listen to an Internet radio station:
1. Click the Radio option in the Source subwindow.
The main window shows a list of Internet radio stations you can select.
2. Click to select any of the Internet radio stations displayed in the main window.
For instance, select the Virgin Radio Classic Rock option.
3. Click the Play button on the Rhythmbox toolbar.
Rhythmbox opens and plays the radio station.
You can play Ogg audio files with Rhythmbox, of course. Follow these steps:
1. From the GNOME menu bar, choose Applications![]() Sound & Video
Sound & Video![]() Rhythmbox Music Player.
Rhythmbox Music Player.
The Rhythmbox Music Player window opens.
2. Choose Music![]() Import File from the main menu bar.
Import File from the main menu bar.
The Import File into Library dialog opens.
3. Find and select the audio file you want to play by clicking the folder and file in the Import File into Library dialog.
Figure 20-1 shows an example window.
Figure 20-1: Selecting audio files to play from the Import File into Library dialog.
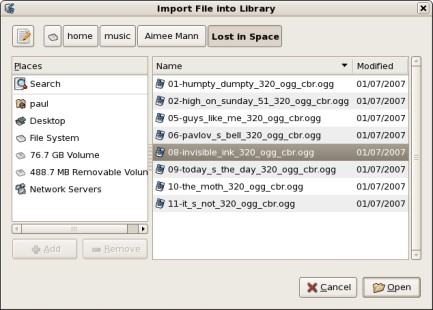
· Click the Open button in the Import File into Library dialog.
· Click the Play button.
You might be surprised that neither Ogg nor Vorbis is an acronym. The terms come from science fiction characters. For more information about Ogg Vorbis and similar open source multimedia systems, go to www.vorbis.com.
Ripping Music with Sound Juicer CD Extractor
I have a lot of old audio CDs that don't get used much. I sit at my computer most of the day and I'm too lazy to get up and choose a disc, open the jewel case, take the disc out of the jewel case. . . . Sad.
But I listen to a lot of music — albums that I've put onto my computer. I don't have to get up and find the disc and play the disc. I can still — in spite of my middle-aged lack of inertia — point and click a mouse. (Yes, there was music when I was young.) By copying and formatting the audio on a CD, I can sit here and listen to tunes. The process is called ripping.
Ubuntu makes it easy to rip CDs. Here's all you need to do:
1. Find your audio disc and put it in your Ubuntu computer's CD player.
2. From the GNOME menu bar, choose Applications![]() Sound & Video
Sound & Video![]() Sound Juicer CD Extractor.
Sound Juicer CD Extractor.
Sound Juicer opens, displaying the title and tracks of your CD. Figure 20-1 shows a sample Sound Juicer dialog.
Figure 20-1: Sound Juicer, ready to rip.
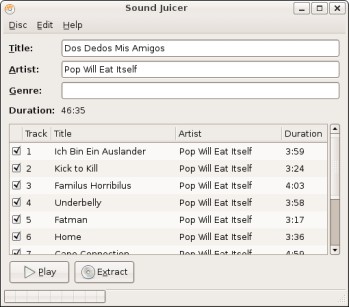
You can manually enter the title, artist, and genre (or kind of music, for those of you who aren't used to seeing that word in print) by typing into the corresponding text boxes in the Sound Juicer dialog. Older CDs often don't include such information, so you can add it yourself. When you specify the title and artist, the files are organized according to the title and artist.
All tracks are selected, by default (as shown by the check box to the left of each track number). You can deselect any that you don't wish to record.
· Click the Extract button.
The dialog starts to rip the selected tracks onto your computer. A progress bar shows the percentage finished and an estimated time to completion.
An Information dialog opens when the job finishes, telling you that, yes, the job is finished.
· When the job finishes, click the Open button.
A Nautilus window opens, showing the extracted tracks. Double-clicking an icon opens the Totem Movie Player, which plays the track while showing nifty graphics. Psychedelic, man.
· When you're finished listening to the music, click Movie and Quit to leave the Totem Movie Player.
You return to the Sound Juicer window.
· Click the Disc from the main menu and select Quit to exit from Sound Juicer.
You can use Sound Juicer to play your audio CD. From the GNOME menu bar, choose Applications![]() Sound & Video
Sound & Video![]() Sound Juicer CD Extractor and do one of the following:
Sound Juicer CD Extractor and do one of the following:
· Click the Play button to start the whole album from the first track.
· Click a track number and then click the Play button to play just one track.
By default, Sound Juicer converts your audio CD tracks into Ogg-encoded files. The files are stored in a directory (folder) named after the artist, in your home directory.
Ogg and Vorbis are the open source world's answers to MP3:
· Ogg is a protocol to format audio streams.
Ogg is quickly being adopted by people, businesses, and organizations who don't want to be beholden to proprietary formats such as MP3.
· Vorbis compresses audio streams.
· Ogg Vorbis (combined) provides better audio quality and compression than other proprietary formats.
You can play your album from the saved files you ripped. Follow these steps:
1. From the GNOME menu bar, choose Places![]() Home Folder.
Home Folder.
A Nautilus window opens, showing the contents of your home folder.
2. Double-click the artist's folder.
Nautilus opens the folder and shows the album title.
3. Double-click the album folder.
Nautilus opens the folder and displays the album tracks.
4. Click any icon.
The Totem Movie player opens and plays the track.
Burning Audio CDs
While I'm too lazy to listen to my old CDs, I'm not too lazy to purchase audio files on the Internet. I often need to burn my downloaded music to CD or DVD, so I can put a stack of discs in my car.
You can have your music and listen to it, too. See the section "Playing MP3s with XMMS" for instructions.
Unless you want to record audio files that you ripped from another CD (for instance, to back up an album), you most likely need to convert the file formats. Most CD players recognize only WAV-formatted audio, so you need to convert to that format.
Converting MP3-formatted files to WAV format
Let's say you purchase an album, or album tracks, from any of the growing number of online music vendors. You most likely download the music files encoded in MP3 format. (MP3 is shorthand for MPEG-1 Audio Layer 3; MPEG stands for the Moving Picture Experts Group.) You need to convert from MP3 to WAV to ensure your CD player can play the music.
After you convert the file from MP3 to WAV, you can use the Serpentine Audio CD Creator utility, described later in this section, to burn the CD.
Installing the Audacity sound editor
Ubuntu provides the utility necessary to convert an MP3 file to a WAV-formatted one so that you can burn it to a CD.
The Audacity sound editor utility isn't installed by default, but you can readily install it by following these instructions:
1. From the GNOME menu bar, choose System![]() Administration
Administration![]() Synaptic Package Manager.
Synaptic Package Manager.
The Package Manager window opens.
2. Scroll down and select the check box for the Audacity package.
3. From the unnamed drop-down menu that opens, choose the Mark for Installation option.
The Mark Additional Required Changes? dialog opens. The dialog informs you of the additional software that will be installed to satisfy Audacity's dependencies.
4. Click the Mark button.
The Apply button in the package manager activates.
5. Click the Apply button.
The Summary dialog opens.
6. Click the Apply button in the Summary dialog.
The Applying Changes dialog opens, showing the progress of the package download and installation. Audacity is installed and the dialog closes.
7. Click File and select Quit to close the package manager window.
An Audacity option is added to the Sound & Video menu.
Configuring Audacity
You need to configure Audacity before using it. But you don't need to change much. Just tell Audacity to record in stereo, rather than mono, by default. Follow these steps:
1. From the GNOME menu bar, choose Applications![]() Sound & Video
Sound & Video![]() Audacity.
Audacity.
The Audacity First Run dialog opens.
2. Select your language as necessary and click OK.
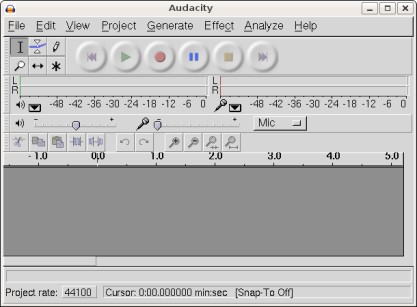
The Audacity window (Figure 20-1 ) opens.
Figure 20-1: The Audacity window.
· Click the Edit menu and select Preferences.
The Audacity Preferences dialog opens.
· Click the Channels button and select 2 (Stereo).
Nostalgia is good, but we don't want to return to the 1950s.
· Click OK.
You exit the Audacity Preferences dialog and return to the main window.
Now you can use Audacity to convert Ogg and MP3 files to WAV. The following section shows you how.
Converting from one format to another
Audacity can convert to WAV files from either MP3 or Ogg.
Repeat these steps for each file you want to convert:
1. Click File in the Audacity main menu and select the Open option.
2. Select the folder containing the audio files you want to burn to CD.
For instance, if you want to re-record tracks you ripped using Sound Juicer, double-click the artist's folder and then the album folder.
3. Click to select any individual track.
4. Click OK.
A new Audacity window opens, along with the Import dialog. The Import dialog displays the progress as the track is imported.
5. In the new Audacity window, click File and select the Export as WAV option.
The Save WAV (Microsoft) File As dialog opens, displaying the contents of your home directory (folder). This is a simple file manager that you use to select the name and location for the WAV files you export.
6. Select the folder, if any, to save the new converted files to.
7. Click OK.
The Export dialog opens, showing the progress of the export process. The Export dialog closes, when the export process completes, and control returns to the Audacity dialog.
8. Click the Audacity File menu and select Exit.
The Save Changes dialog opens.
9. Close the new Audacity dialog and select No (don't save changes) when prompted.
You don't need to save the changes because you accomplished the process of converting from MP3 to WAV format. There's no need to instruct Audacity to remember that process.
Burning an audio CD with Serpentine
It's simple to burn (write) computer WAV files to a CD disc.
If you haven't converted your MP3 files to WAV files, take a step back and go through the "Converting MP3-formatted files to WAV format" section in this chapter.
To write computer WAV files to a CD, follow these steps:
1. Put a blank, writable CD in your CD-ROM writing drive.
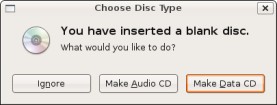
Ubuntu detects that a blank CD was inserted and opens the Choose Disc Type dialog. (See Figure 20-1 .)
Figure 20-1: Choose Disc Type dialog.
You can manually open Serpentine by clicking the Applications menu from the GNOME menu bar and choosing Sound & Video![]() Serpentine Audio CD Creator.
Serpentine Audio CD Creator.
· Click the Make Audio CD button.
The Serpentine dialog, shown in Figure 20-1 , opens.
Figure 20-1: The Serpentine Audio CD Creator window.
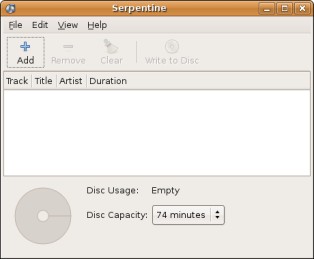
· Click the Add button.
A file manager window opens.
· Select the folder that contains the WAV music files you want to record.
· Select PCM Wave Audio from the drop-down menu near the lower-right side of the window.
Selecting this option displays only WAV-formatted files and makes it easier to make your selections.
· Hold down the Shift key while selecting one or more files.
Holding down the Shift key lets you select multiple files.
· Click Open.
Serpentine imports the files you selected.
· Click the Write to Disc button.
A warning dialog opens, asking you if you really want to make this earth-shattering decision.
· Click the Write to Disc button.
The Writing to Disc dialog opens, showing the progress.
· Click the Close button in the Writing to Disc Finished dialog when it opens.
Your disc is automatically ejected.
· Click the File menu and select Quit to exit from Serpentine.
You now have yourself a recording studio and can burn as many music discs as you want.
I remember in the mid-1980s when music CDs first hit the market. The discs were a little more expensive than they are today (much more expensive if you account for inflation). However, the factories that produced the discs were very expensive. Today, we have micro CD factories that cost less than filling your car with gas. Ain't technology amazing!
All materials on the site are licensed Creative Commons Attribution-Sharealike 3.0 Unported CC BY-SA 3.0 & GNU Free Documentation License (GFDL)
If you are the copyright holder of any material contained on our site and intend to remove it, please contact our site administrator for approval.
© 2016-2026 All site design rights belong to S.Y.A.