Ubuntu Linux For Dummies (2007)
Part IV: Multimedia
Chapter 21. Graphical Ubuntu
In This Chapter
· Uploading photographs
· Viewing thumbnails and full images
· Using The GIMP for image editing
Ubuntu provides several graphical manipulation tools. You can save photos from your digital camera and create, manipulate, and view the photos using these tools. Ubuntu covers all bases when it comes to multimedia.
This chapter describes how to work with digital cameras, graphical images, and more.
Transferring Photos from your Digital Camera to Your Ubuntu Computer
Digital photography lets you take pictures and store them on a computer for viewing and reproduction. Doing away with traditional film is a great convenience. Ubuntu Linux provides the tools to download photos from a camera.
Most digital cameras provide software to transfer photos from the camera to a computer. However, most such software is incompatible with Linux and your Ubuntu computer. Fortunately, you can still easily transfer photos to your Ubuntu computer using generic Linux utilities. This section describes how to perform such transfers.
So go out and take your shots. Later, you can download your photos to Ubuntu as follows.
1. Connect your camera to your Ubuntu computer using a USB (or FireWire) cable.
Ubuntu recognizes the device and launches the Photo Import dialog, shown in Figure 21-1 .
Figure 21-1: The Photo Import dialog.
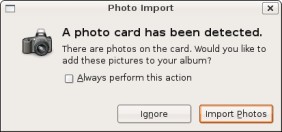
· Click the Import Photos button.
Ubuntu mounts your camera (makes the photographs it contains available to your computer) as a USB disk and shows its contents. Figure 21-1 shows an example using a Fuji camera.
Figure 21-1: My Fuji camera, mounted as a USB disk.
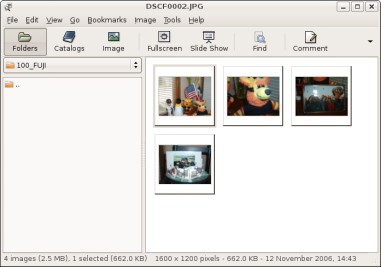
Digital cameras use the same flash memory as USB pen drives. Your camera appears as a memory device to your computer.
· Select the photos you want to import to your Ubuntu computer:
· To select a single image to import, click it.
· To select multiple images, press and hold the Shift key and click each image.
· Click the Edit menu and select the Copy option.
A Choose the Destination Folder dialog opens.
· Click the Browse button.
The Choose the Destination Folder dialog displays the camera's storage folder (typically, the camera's storage folder is in the /media/usbdisk directory).
· Designate a folder (directory) to save your photos.
There are a couple of ways to select a directory:
· Click an existing directory (folder), such as your home directory.
· Create a new directory for your photos. (Click the Create Folder button and type the name of the new folder to create.)
· Click the Open button.
The folder you select is displayed in the Choose the Destination Folder window.
· Click OK.
Your photos are copied to the selected folder.
You can edit the names using the Nautilus file manager's Rename function. Follow these steps:
1. Right-click the icon.
2. Select the Rename option in the menu that opens.
3. Type the new name at the prompt.
You can edit your photos using The GIMP image editor. (See the "Improving Your Images with The GIMP" section in this chapter.)
Chapter 21. Graphical Ubuntu
In This Chapter
· Uploading photographs
· Viewing thumbnails and full images
· Using The GIMP for image editing
Ubuntu provides several graphical manipulation tools. You can save photos from your digital camera and create, manipulate, and view the photos using these tools. Ubuntu covers all bases when it comes to multimedia.
This chapter describes how to work with digital cameras, graphical images, and more.
Transferring Photos from your Digital Camera to Your Ubuntu Computer
Digital photography lets you take pictures and store them on a computer for viewing and reproduction. Doing away with traditional film is a great convenience. Ubuntu Linux provides the tools to download photos from a camera.
Most digital cameras provide software to transfer photos from the camera to a computer. However, most such software is incompatible with Linux and your Ubuntu computer. Fortunately, you can still easily transfer photos to your Ubuntu computer using generic Linux utilities. This section describes how to perform such transfers.
So go out and take your shots. Later, you can download your photos to Ubuntu as follows.
1. Connect your camera to your Ubuntu computer using a USB (or FireWire) cable.
Ubuntu recognizes the device and launches the Photo Import dialog, shown in Figure 21-1 .
Figure 21-1: The Photo Import dialog.
· Click the Import Photos button.
Ubuntu mounts your camera (makes the photographs it contains available to your computer) as a USB disk and shows its contents. Figure 21-1 shows an example using a Fuji camera.
Figure 21-1: My Fuji camera, mounted as a USB disk.
Digital cameras use the same flash memory as USB pen drives. Your camera appears as a memory device to your computer.
· Select the photos you want to import to your Ubuntu computer:
· To select a single image to import, click it.
· To select multiple images, press and hold the Shift key and click each image.
· Click the Edit menu and select the Copy option.
A Choose the Destination Folder dialog opens.
· Click the Browse button.
The Choose the Destination Folder dialog displays the camera's storage folder (typically, the camera's storage folder is in the /media/usbdisk directory).
· Designate a folder (directory) to save your photos.
There are a couple of ways to select a directory:
· Click an existing directory (folder), such as your home directory.
· Create a new directory for your photos. (Click the Create Folder button and type the name of the new folder to create.)
· Click the Open button.
The folder you select is displayed in the Choose the Destination Folder window.
· Click OK.
Your photos are copied to the selected folder.
You can edit the names using the Nautilus file manager's Rename function. Follow these steps:
1. Right-click the icon.
2. Select the Rename option in the menu that opens.
3. Type the new name at the prompt.
You can edit your photos using The GIMP image editor. (See the "Improving Your Images with The GIMP" section in this chapter.)
Viewing Your Pictures
Ubuntu provides numerous tools for viewing images. I describe a couple of them in this section:
One application (gThumb) provides quick, thumbnail-sized images in Nautilus or the GNOME desktop. The second application (Eye of GNOME) displays the full-blown image.
Displaying thumbnails with gThumb
Ubuntu makes it easy to store graphical images on disk. You can download images from your camera or from the Internet. Those images are stored as files — typically in your home directory — on your computer.
It's easy to build up large numbers of images but difficult to keep track of them. That's where gThumb comes to the rescue. gThumb displays thumbnails of the full-size images inside Nautilus or its own file manager; you can see at a glance the image contained in a file.
Thumbnails are icons containing low-resolution versions of an image file.
Ubuntu provides standard icons you can use to add application launchers to the GNOME panel, which is a menu bar described in Chapter 11. The following instructions use Nautilus and gThumb to view thumbnails of numerous images:
1. From the GNOME menu bar, open a Nautilus window by choosing Places![]() Home Folder.
Home Folder.
2. Click the Go menu in the menu bar along the top of the Nautilus window and select Location.
3. Type /usr/share/pixmaps in the Location text box and press the Enter key.
4. Scroll down until you start seeing images (instead of generic folder icons).
What you're seeing are files that contain images. The images are simple ones used to identify icons. If you use Nautilus to view photographic images that you've downloaded to you computer, gThumb displays those images.
Displaying images
Viewing an image is as easy as clicking on it.
1. From the GNOME menu bar, open a Nautilus window by choosing Places![]() Home Folder.
Home Folder.
2. Navigate to a directory (folder) where you have images — photos or other types of pictures.
You see thumbnails of the images.
3. Click a thumbnail.
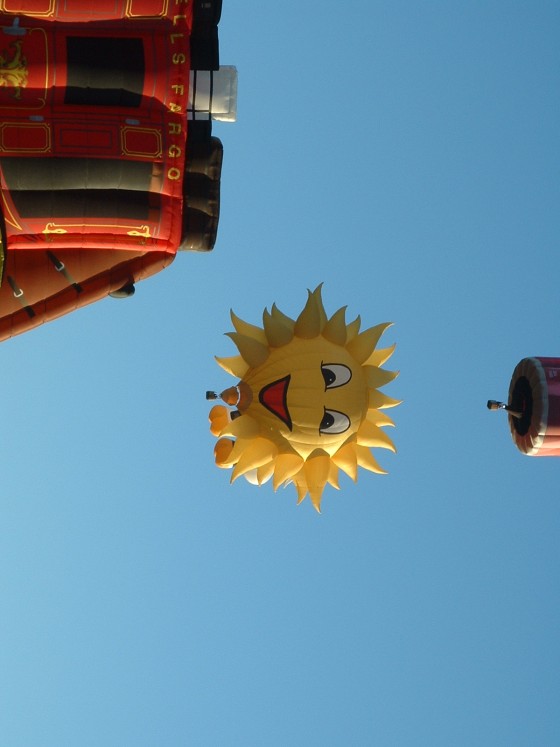
The full image is displayed. For instance, Figure 21-1 shows a picture from the 2006 Albuquerque International Balloon Fiesta.
Figure 21-1: Good morning, Albuquerque!
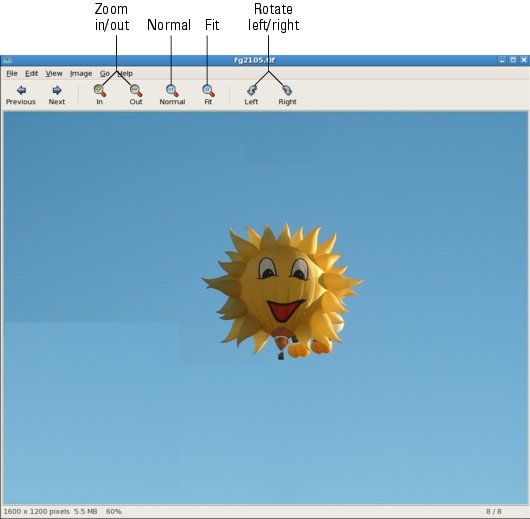
Nautilus calls on the Eye of GNOME application to display images. Eye of GNOME provides some simple manipulation capabilities, including
· Zoom In or Out: Enlarge or shrink the image.
· Rotate Left or Right: Rotate the image 90 degrees to the left or right. Figure 21-1 shows the previous figure rotated 90 degrees to the right.
Figure 21-1: Rotating the previous image 90 degrees to the right.
· Fit: Force an image to take up the entire Eye of GNOME window.
· Normal: Return an image to its original orientation and size.
Each image viewing selection is accessible via a labeled button near the top of the Eye of GNOME window.
The Eye of GNOME also lets you sequentially view a series of images. Click the Previous or Next button to go to another image.
Improving Your Images with The GIMP
The GIMP (GNU Image Manipulation Program — yet another nerdy acronym) provides power image editing capabilities similar to the commercial (and infinitely more expensive) Adobe Photoshop.
Any number divided by zero equals infinity. Since The GIMP costs nothing and similar commercial applications cost something, commercial applications are infinitely more expensive than The GIMP.
Some of The GIMP's capabilities include the following:
· Painting: You can set brush strokes, erasers, colors, and so on. Set your brush stroke size, edge, and type, or create your own brush stroke. You can mix your own colors or select them from the image you're editing.
· Editing: Select rectangles, ellipses, and circles to manipulate images.
· Resizing: Change the size of a photograph to make it fit your needs.
· Layering: You can edit one or more transparent image layers to, yes, create a layered effect.
· Creating paths: Create and edit line segments. Use mathematical tools such as Bezier curves or use simple straight lines to create diagrams and drawings.
· Creating FX: Create special effects (FX) with the filters that The GIMP provides. The GIMP helps you to create such special effects as shadows, blur lines, and noise.
· Scripting: The GIMP lets you automate image creation by providing a scripting system. You can program The GIMP with its internal scripting language.
The GIMP requires an entire book to do it justice. But I can give one simple example to demonstrate its power. I take Figure 21-1 and eliminate the two balloons at the top and bottom of the picture.
From the GNOME menu bar, choose Applications![]() Graphics
Graphics![]() GIMP Image Editor. Two GIMP windows and a handy tip-of-the-day dialog opens. Figure 21-1 shows an example of the primary — business — end of The GIMP system.
GIMP Image Editor. Two GIMP windows and a handy tip-of-the-day dialog opens. Figure 21-1 shows an example of the primary — business — end of The GIMP system.
Figure 21-1: The GIMP Image Editor.
Now I'll show an example where I edit Figure 21-1 to edit out the balloon images in the lower left and upper center of the image to leave just the single sunny balloon in the center.
You can follow the steps and perform the same type of editing on one of your own photos:
1. Click The GIMP File menu and select Open.
The Open Image dialog opens.
2. Select the image file (for example, I select the image from Figure 21-1 ) and click the Open button.
The GIMP opens another window displaying the image.
3. I repeat these steps to remove the partial images of the balloon in the lower-left corner and upper-center area of the figure:
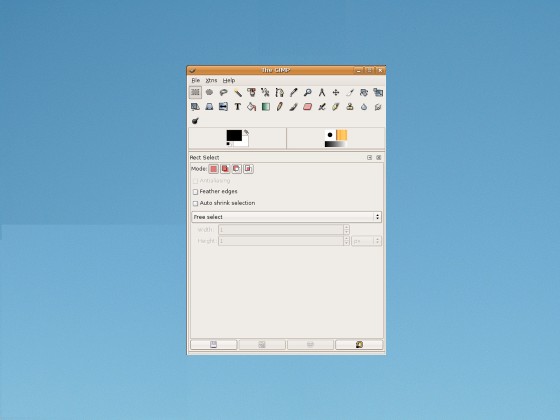
1. Click Tools and choose Selection Tools![]() Rect Select.
Rect Select.
The cursor turns into a square next to the normal arrow pointer.
2. Click the background near the balloon and drag the mouse so it traces a rectangle about the same size as the balloon.
A dotted line outlines the rectangle you selected.
3. Right click and choose Edit![]() Copy.
Copy.
4. Choose Edit![]() Paste.
Paste.
The blue rectangle is placed directly over the area you just copied.
5. Click on the newly pasted rectangle and drag it over the balloon.
The balloon is replaced by a nearly perfect sky background, as shown in Figure 21-1 .
Figure 21-1: Editing out the unwanted balloons using The Gimp.

One of The GIMP's most useful capabilities — especially for For Dummies authors — is taking screen shots (pictures of the stuff on your computer screen). I've used The GIMP to take every image in this book, and many others. Here's a trade secret:
1. Click File and select Acquire![]() Screen Shot.
Screen Shot.
2. Click the Grab button and the cursor turns into a plus (+) sign.
The GIMP can take a screen shot of any window you point and click your mouse on.
The GIMP's default action is to capture a single window. Select the Whole Screen radio button to capture your entire computer screen.
3. Point and click the mouse on the window you want to capture.
The GIMP grabs the window and displays the image in a new window.
You can edit, manipulate, and save the image as a file.
All materials on the site are licensed Creative Commons Attribution-Sharealike 3.0 Unported CC BY-SA 3.0 & GNU Free Documentation License (GFDL)
If you are the copyright holder of any material contained on our site and intend to remove it, please contact our site administrator for approval.
© 2016-2026 All site design rights belong to S.Y.A.