Ubuntu Linux For Dummies (2007)
Part V: The Part of Tens
Chapter 23. Almost Ten System-Administration Functions
In This Chapter
· Obtaining updates and new software
· Keeping an eye on system logs
· Adding, deleting, and modifying user accounts
· Setting your computer's time and date
· Viewing hardware resources
· Monitoring your system
· Starting and stopping system services
· Power management
Sure, you didn't sign up to be a system administrator when you decided to use an Ubuntu computer. Even though system administrators lead lives of excitement and get paid huge salaries — not!! — that profession is not for everyone.
But anyone who owns and uses a computer is by default a sysadmin. System administration is actually very easy. You need to perform several simple tasks and perform them regularly, and you're a sysadmin.
Being a professional system administrator is basically like being the sysadmin of your own computer. The primary difference is that you perform system-administrator tasks for others as well as for yourself. You also have to know a wider range of tasks.
This chapter describes the most common, and also most important, system-administrator tasks. Those jobs are pretty basic, if not simple. The easy part is learning what they are. The hard part is regularly doing the jobs.
Updating Debian Software Packages
Ubuntu maintains repositories that let you update your Ubuntu computer with the software. In the bad old days, you had to manually find, download, and install updated software; in the bad, really old days, you had to find, download, and recompile the bloody things. Rather than rely on and require computer users to update their computers, software repositories make the process painless and easy as pie.
The Ubuntu support system includes all the documentation and help material, described in Chapter 22, plus software package repositories designed to keep your Ubuntu workstation updated with the latest patches and bug fixes.
Computer operating systems and applications are complex beasts. Software developers are constantly improving their systems' capabilities and fixing problems that inevitably pop up. Change is part of life and software, and computer users must keep up with the change or be left with outdated software. The software package repository was invented to help you keep up with software updates, but keeping up with life is another thing.
You need to be connected to the Internet or to a network with Internet access to update your computer. See Chapters 6 – 9 for information about Ubuntu networking.
When an update to a software package is approved by Ubuntu, the software is posted to the repository and also to numerous mirrors around the world. (Mirrors are computers that hold duplicate — mirror images — Ubuntu repositories. Ubuntu uses mirrors to distribute software and eliminate bottlenecks.) Your Ubuntu computer automatically checks the mirrors for updates and informs you of them by showing the Software Updates Available icon on your screen. Figure 23-1 shows such a notification icon.
Figure 23-1: Ubuntu notifies you that software updates are available.

To install updates, follow these steps:
1. Click the update icon — the white star with an orange background on the GNOME menu bar (see Figure 23-1 ) that the Software Updates Available icon points to.
The Software Updates dialog opens, prompting you to enter your user account password.
2. Type your password in the Password text box and click the OK button.
The Software Updates dialog opens, showing a list of the available updates. Figure 23-1 shows an example.
Figure 23-1: The Software Updates dialog.

· Click the Install Updates button.
The Downloading Packages dialog shows the package download process, and the Applying Changes dialog shows the progress of the installation. When the process finishes, the Changes Applied dialog opens.
· Click the Close button.
Control returns to the Software Updates dialog.
· Click the Close button.
Your Ubuntu computer's software is now up to date.
You can also use the apt-get utility to update packages. Follow these steps:
1. Open a Terminal window by choosing Accessories![]() Terminal from the GNOME Applications menu.
Terminal from the GNOME Applications menu.
2. Type apt-get update.
This command tells apt-get to get a list of packages that need to be updated.
3. Type apt-get upgrade.
This second command selects packages to be downloaded, downloads them, and then installs them.
Chapter 23. Almost Ten System-Administration Functions
In This Chapter
· Obtaining updates and new software
· Keeping an eye on system logs
· Adding, deleting, and modifying user accounts
· Setting your computer's time and date
· Viewing hardware resources
· Monitoring your system
· Starting and stopping system services
· Power management
Sure, you didn't sign up to be a system administrator when you decided to use an Ubuntu computer. Even though system administrators lead lives of excitement and get paid huge salaries — not!! — that profession is not for everyone.
But anyone who owns and uses a computer is by default a sysadmin. System administration is actually very easy. You need to perform several simple tasks and perform them regularly, and you're a sysadmin.
Being a professional system administrator is basically like being the sysadmin of your own computer. The primary difference is that you perform system-administrator tasks for others as well as for yourself. You also have to know a wider range of tasks.
This chapter describes the most common, and also most important, system-administrator tasks. Those jobs are pretty basic, if not simple. The easy part is learning what they are. The hard part is regularly doing the jobs.
Updating Debian Software Packages
Ubuntu maintains repositories that let you update your Ubuntu computer with the software. In the bad old days, you had to manually find, download, and install updated software; in the bad, really old days, you had to find, download, and recompile the bloody things. Rather than rely on and require computer users to update their computers, software repositories make the process painless and easy as pie.
The Ubuntu support system includes all the documentation and help material, described in Chapter 22, plus software package repositories designed to keep your Ubuntu workstation updated with the latest patches and bug fixes.
Computer operating systems and applications are complex beasts. Software developers are constantly improving their systems' capabilities and fixing problems that inevitably pop up. Change is part of life and software, and computer users must keep up with the change or be left with outdated software. The software package repository was invented to help you keep up with software updates, but keeping up with life is another thing.
You need to be connected to the Internet or to a network with Internet access to update your computer. See Chapters 6 – 9 for information about Ubuntu networking.
When an update to a software package is approved by Ubuntu, the software is posted to the repository and also to numerous mirrors around the world. (Mirrors are computers that hold duplicate — mirror images — Ubuntu repositories. Ubuntu uses mirrors to distribute software and eliminate bottlenecks.) Your Ubuntu computer automatically checks the mirrors for updates and informs you of them by showing the Software Updates Available icon on your screen. Figure 23-1 shows such a notification icon.
Figure 23-1: Ubuntu notifies you that software updates are available.
To install updates, follow these steps:
1. Click the update icon — the white star with an orange background on the GNOME menu bar (see Figure 23-1 ) that the Software Updates Available icon points to.
The Software Updates dialog opens, prompting you to enter your user account password.
2. Type your password in the Password text box and click the OK button.
The Software Updates dialog opens, showing a list of the available updates. Figure 23-1 shows an example.
Figure 23-1: The Software Updates dialog.
· Click the Install Updates button.
The Downloading Packages dialog shows the package download process, and the Applying Changes dialog shows the progress of the installation. When the process finishes, the Changes Applied dialog opens.
· Click the Close button.
Control returns to the Software Updates dialog.
· Click the Close button.
Your Ubuntu computer's software is now up to date.
You can also use the apt-get utility to update packages. Follow these steps:
1. Open a Terminal window by choosing Accessories![]() Terminal from the GNOME Applications menu.
Terminal from the GNOME Applications menu.
2. Type apt-get update.
This command tells apt-get to get a list of packages that need to be updated.
3. Type apt-get upgrade.
This second command selects packages to be downloaded, downloads them, and then installs them.
Installing New Software Packages
Ubuntu provides networked software package repositories that let you install new software packages. You perform the software package installation process as follows:
1. From the GNOME menu bar, choose System![]() Administration
Administration![]() Synaptic Package Manager.
Synaptic Package Manager.
The Enter Your Password to Perform Administrative Tasks dialog opens.
2. Type your password in the Password text box and click OK.
The Synaptic Package Manager window and the Quick Introduction dialog open, with the introduction dialog on top.
3. Read the introduction and click the Close button.
Figure 23-1 shows the Synaptic Package Manager window open after closing the Quick Introduction dialog.
Figure 23-1: The Synaptic Package Manager.
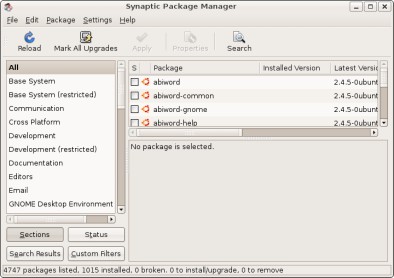
You can scroll through the list of available packages or use the search facility to find the package or packages that you want to install.
To search for packages, follow these steps:
1. Click the Search button.
The Find dialog opens.
2. Enter a text string in the Search text box.
3. Click the Search button.
You exit the Find dialog, and the Synaptic Package Manager displays any packages that meet your search criteria.
· Select the check boxes to the left of any packages you want to install.
A drop-down menu opens that lets you select the package for installation.
Installed packages have a green check box.
· Click the Mark for Installation option in the drop-down menu.
Another dialog opens, showing any additional packages that the one you just selected depends on. If you choose to install a package, its dependencies are installed, too.
· Click the Mark button in the dialog.
Control returns to the Synaptic Package Manager.
· Click the Apply button.
The Summary dialog opens, telling you what's about to happen.
· Click the Apply button in the Summary dialog.
A dialog opens, telling you about the progress of the package or packages you're downloading. When downloading is complete, another dialog opens, displaying the status of the package installation process.
The Changes Applied dialog opens when the download and installation process finishes.
· Click the Close button in the Changes Applied dialog.
Control returns to the Synaptic Package Manager. You can install additional packages if you want.
· Click the File button and select Quit.
You can use the Synaptic Package Manager to install packages from the companion Ubuntu disc or from Ubuntu Internet software package repositories.
You can also use the apt-get utility to install packages:
1. Open a Terminal window by choosing Accessories![]() Terminal from the GNOME Applications menu.
Terminal from the GNOME Applications menu.
2. Type apt-get install package-name.
apt-get downloads and installs the package.
Reading System Logs
Every time you do anything on your Ubuntu computer, Ubuntu records a log of the event. Every time Ubuntu performs a task, the event is logged. The records are called system logs.
When you start (boot) your Ubuntu computer, Ubuntu automatically runs the syslogd and klogd daemons that save system log events to files in the /var/log directory. The default — catch-all — system log file is /var/log/messages.
System logs are useful when you need to troubleshoot a problem, see what's happening on your computer, or investigate security issues. Reading your logs is one of the most under-appreciated and under-performed system-administration tasks. Unfortunately, reading logs is a boring, time-consuming process because log files contain a lot of information.
Worse, the information contained in log files is often repetitive and uninteresting. You have to wade through a lot of data before coming across something interesting.
Ubuntu provides two utilities to help you monitor your logs: System Log Viewer and Logcheck.
Using System Log Viewer
System Log Viewer graphically displays the contents of your log files. To open System Log Viewer, choose System![]() Administration
Administration![]() System Log from the GNOME menu bar. The System Log Viewer window opens; Figure 23-1 shows an example log excerpt. From here, you can look through your log files.
System Log from the GNOME menu bar. The System Log Viewer window opens; Figure 23-1 shows an example log excerpt. From here, you can look through your log files.
Figure 23-1: A sample log excerpt.
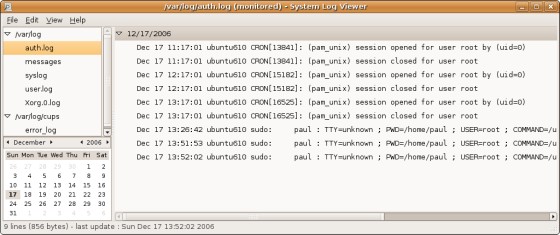
There are no tricks to using System Log Viewer. Using it regularly can, first, help you develop the habit of monitoring your computer, and second, help you develop the eye for what's normal and what's not normal. The human brain is wonderful at pattern recognition. With practice, you'll develop a feel for your computer and be able to identify problems when they occur. Practice makes perfect!
Using Logcheck
Logcheck is a utility that helps identify problems as recorded in your log files. Logcheck keeps a database of events — actually, it keeps a list of regular expressions, but that's beyond the scope of this book — that are considered normal. Any events that Logcheck finds in your log files that don't match the database are considered abnormal. Abnormal events are flagged and e-mailed to you.
Logcheck is a good tool for filtering out the noise that makes reading logs so difficult. By concentrating on unusual events, you can better monitor your logs.
Installing the Logcheck utility
Logcheck isn't installed by default on your Ubuntu computer. Here's how to install it:
1. From the GNOME menu bar, choose System![]() Administration
Administration![]() Synaptic Package Manager.
Synaptic Package Manager.
The Enter Your Password to Perform Administrative Tasks dialog opens.
2. Type your password in the Password text box and click OK.
The Synaptic Package Manager window opens. So does the Quick Introduction dialog, if this is the first time you've used the Synaptic Package Manager. Click the Close button in the Introduction dialog if it opens.
3. Scroll down to the Logcheck package.
4. Select the check box for Logcheck.
5. Select the Mark for Installation option from the drop-down menu.
6. Click the Mark button in the Mark for Installation dialog that opens.
7. Repeat Steps 4, 5, and 6 for the Logcheck-database package.
8. Click the Apply button in the Synaptic Package Manager window.
9. Click the Apply button in the Summary dialog when it opens.
The two packages are downloaded and installed.
Installing Logcheck opens the Configuring Exim dialog that configures your Ubuntu computer to deliver e-mail messages.
10. Click the Forward button in the Configuring Exim dialog.
The Synaptic Package Manager downloads and installs the package. The Changes dialog opens upon completion.
11. Click the Close button.
Logcheck will now deliver e-mail locally on your Ubuntu computer.
Using the Logcheck utility
Logcheck is configured by default to run once per hour. You can also execute Logcheck manually by typing the following command from the GNOME Terminal Emulator window (choose Accessories![]() Terminal from the GNOME Applications menu):
Terminal from the GNOME Applications menu):
sudo -u logcheck logcheck
When you run Logcheck, it searches your log files for log events it considers to be potentially interesting and e-mails you the results. For instance, I got the following listing on an Ubuntu machine I just installed:
Code View:
From logcheck@ubuntu610 Sun Dec 17 22:03:03 2006
Envelope-to: paul@ubuntu610
Delivery-date: Sun, 17 Dec 2006 22:03:03 -0700
To: paul@ubuntu610
Subject: ubuntu610 2006-12-17 22:03 System Events
From: logcheck@ubuntu610
Date: Sun, 17 Dec 2006 22:03:03 -0700
This email is sent by logcheck. If you wish to no-longer receive it,
you can either deinstall the logcheck package or modify its
configuration file (/etc/logcheck/logcheck.conf).
System Events
=-=-=-=-=-=-=
Dec 17 22:02:02 ubuntu610 CRON[19584]: (pam_unix) session closed for user logcheck
Dec 17 22:02:27 ubuntu610 su[19657]: (pam_unix) authentication failure; logname= uid=1000 euid=0 tty=pts/3 ruser=paul rhost
= user=logcheck
Dec 17 22:02:29 ubuntu610 su[19657]: pam_authenticate: Authentication failure
Dec 17 22:02:29 ubuntu610 su[19657]: FAILED su for logcheck by paul
Dec 17 22:02:29 ubuntu610 su[19657]: - pts/3 paul:logcheck
Dec 17 22:02:34 ubuntu610 su[19661]: (pam_unix) authentication failure; logname= uid=1000 euid=0 tty=pts/3 ruser=paul rhost
= user=logcheck
There's nothing sinister in here, even though the su (switch user) command failed. (Someone who breaks into a computer might try to get root privileges by using the su command.) In this case, I just fat-fingered my password and was denied root-level access. But this listing does prove that Logcheck is on the watch. Had I not been using my Ubuntu computer during this time frame, the failed su command would be very suspicious.
Use these tools to monitor your logs. Reading logs is becoming evermore important in the world of system administration. Your best defense is information, and logs provide a lot of it. Using tools like Logcheck makes it easier to sort the uninteresting information from the interesting.
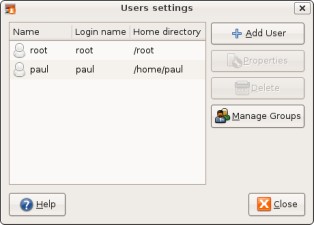
Working with User Accounts
Ubuntu configures a user account when it's installed. However, you aren't limited to using this account. You can easily create additional accounts or modify and delete existing ones by using Ubuntu utilities.
The following instructions show how to modify a user account by having Ubuntu suggest a random password:
1. From the GNOME menu bar, choose System![]() Administration
Administration ![]() Users and Groups.
Users and Groups.
The User Settings dialog opens, as shown in Figure 23-1 , showing the root (also called the superuser) account and the user account you created during the installation; in this case, the user account name (username) is paul.
Figure 23-1: The User Settings dialog.
· Click to highlight a user account.
In this case, I click the paul user account.
· Click the Properties button.
The Account Properties dialog opens. Figure 23-1 shows my account information displayed in the dialog. For instance, you can add or edit information about your home and office.
Figure 23-1: Editing a user account's properties.
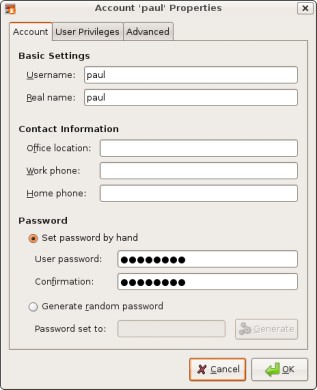
In this case, I'd like to generate a random password to frustrate any hackers who might want to compromise my Ubuntu computer.
· Select the Generate Random Password radio button.
Ubuntu generates a random, eight-character password, including numbers plus lowercase and uppercase letters. (You can generate additional random passwords by clicking the Generate button.)
· (Optional) Record the password on a piece of paper.
Recording your password is a double-edged sword. On one hand, your new password will not do you any good if you forget it. But writing the password on paper makes it possible for someone to steal it. I recommend writing your password on the back of a business card and keeping it in your wallet until you memorize it. After you memorize it, you should destroy the password. (I'm so paranoid that I rip the paper into tiny pieces and flush the pieces.)
· Double-click the password.
· Right-click the highlighted password and choose Copy.
· Click the Set Password by Hand radio button.
· Right-click the User Password text box and choose Paste.
· Repeat Steps 8 and 9 for the Confirmation text box.
· Click OK.
Control returns to the User Settings dialog.
· Click the Close button.
You can also change user account options such as its home directory, numeric user ID, and group ID. You can use the User and Groups utility to add and delete user accounts.
Changing File Permissions
One fundamental, important, yet simple-to-perform system-administration process is changing file and directory (folder) access permissions. Changing permissions lets you provide or deny access to other users and processes. Limited access is especially important when multiple users have access to your Ubuntu computer — you might or might not want your fellow users to access your files.
Linux files and folders have three sets of permissions: owner, group, and others. You can use the Nautilus file manager to prevent anyone who doesn't own your home directory from accessing anything in it.
To change file permissions, follow these steps:
1. From the GNOME menu bar, choose Places![]() Home Folder.
Home Folder.
The File Browser dialog opens.
When you build your Ubuntu computer, your home directory initially contains only one directory (folder), called the Desktop.
2. Click the Up button.
3. Right-click your user account folder icon and select Properties.
The Desktop Properties dialog opens.
4. Click the Permissions tab.
Figure 23-1 shows the Desktop Properties dialog showing the Owner, Group, and Others permissions. Each option shows the directories (folders) and file access options:
o Change the Folder Access menu options to allow or deny access to the directory itself.
o Change the File Access menu options to allow or deny access to individual files.
Figure 23-1: The Properties dialog, showing file and folder permissions.
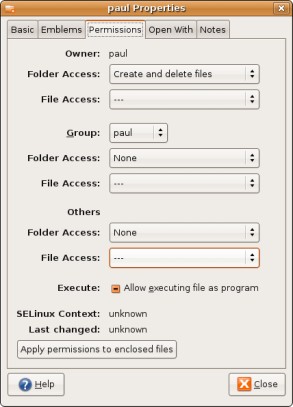
· Click the Others/Folder Access drop-down menu, near the bottom-half of the dialog and select one of these three options:
· None: You can't access or modify the folder, or the folder's contents, in any way.
· List Files Only: You can see a listing of files in the directory, but not create, read, or delete files.
· Access Files: This option lets you read but not modify or delete files.
· Create and Delete Files: This option lets you create, modify, and delete files.
For example, select the None option. Selecting the None option denies all access to anyone who does not own or belong to a group that owns the files.
You've changed your home folder (directory) access permissions to prevent anyone who is not you, and who doesn't belong to your group from accessing files in your home directory.
Alternatively, you could select options to let other users who belong to your group access your home directory.
· Click the Close button.
Control returns to the original Nautilus file browser window.
· Choose File![]() Close.
Close.
You can manually change file permissions by using a Terminal Emulator. From the GNOME menu bar, choose Applications![]() Accessories
Accessories![]() Terminal. A GNOME Terminal window opens. Type ls -l to display all files and directories in your current working directory. Use the chmod program to change file permissions. For instance, type chmod 700 /home/username to deny access to everyone except yourself. In my case, I type chmod 700 /home/paul.
Terminal. A GNOME Terminal window opens. Type ls -l to display all files and directories in your current working directory. Use the chmod program to change file permissions. For instance, type chmod 700 /home/username to deny access to everyone except yourself. In my case, I type chmod 700 /home/paul.
Changing the Time and Date
Time waits for no one, as the song goes. How true, but we're living in Ubuntu time and change it as we want. Follow these steps to modify your Ubuntu computer's time and date:
1. From the GNOME menu bar, choose System![]() Administration
Administration ![]() Time and Date.
Time and Date.
The Time and Date Settings dialog opens, as shown in Figure 23-1 .
Figure 23-1: The Time and Date Settings dialog.
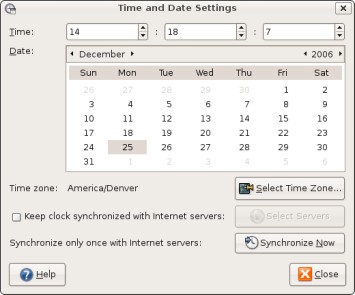
· Click the Select Time Zone button to change your time zone.
· Select the Keep Clock Synchronized check box.
The NTP Support Not Installed dialog opens.
Using the Keep Clock Synchronized option tells your Ubuntu computer to continually update its internal clock from very accurate — atomic clocks — time sources that are accessible via the Internet.
· Click the Install NTP Support button.
The Enter Your Password to Perform Administrative Tasks dialog opens.
· Type your user account password in the Password text box and click OK.
Ubuntu downloads and installs the necessary package. The Replace Configuration File /etc/ntp.conf dialog opens.
· Click the Replace button.
· Click the Close button in the Changes Applied dialog.
· Click the Select Servers button in the Time and Date dialog.
The Time Servers dialog opens.
· Select three servers closest to your area.
· Click the Close button.
· Click the Synchronize Now button.
· Click the Close button.
Your computer's clock will automatically be kept up to date.
Monitoring Your System
I like to keep tabs on what my Ubuntu computer hardware is doing. Ubuntu provides a utility for monitoring your computer. From the GNOME menu bar, choose System![]() Administration
Administration![]() System Monitor. The System Monitor dialog, shown in Figure 23-1 , opens.
System Monitor. The System Monitor dialog, shown in Figure 23-1 , opens.
Figure 23-1: The Ubuntu System Monitor dialog.
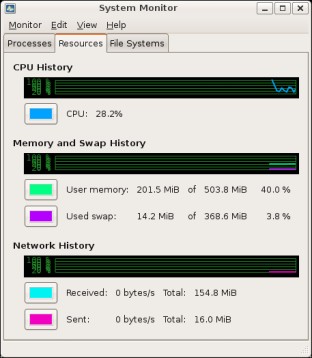
You can see at a glance how hard your CPU (central processing unit) is working. You also see how much memory and network is used.
You can put your CPU monitor information in any GNOME panel:
1. Right-click a GNOME panel and select the Add to Panel option.
The Add to Panel dialog opens.
2. Scroll down and click the System Monitor option.
3. Click the Add button.
The System Monitor icon appears on the panel.
4. Right-click the System Monitor icon and select Preferences.
The System Monitor Preferences dialog opens, as shown in Figure 23-1 .
Figure 23-1: The System Monitor Preferences dialog.
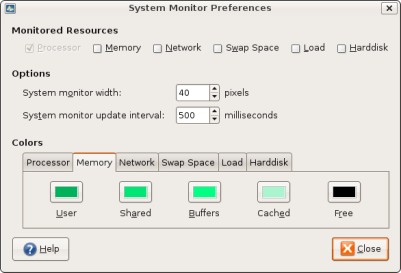
· Select any or all of the Monitored Resources check boxes.
· Click the Close button.
· Click the Close button in the Add to Panel dialog.
Your computer's real-time information is always displayed on your GNOME panel.
Placing your mouse cursor over any System Monitor icon shows the resource state in detail.
Starting and Stopping System Services
Out of the box, so to speak, Ubuntu runs a handful of system services (also known as daemons). For instance, Ubuntu runs the HAL (hardware abstraction layer) daemon that automatically detects and mounts storage devices when a device is plugged into your computer. You plug a USB flash drive into your Ubuntu computer, and HAL detects and mounts the device.
You can start and stop any service. Follow these steps:
1. From the GNOME menu bar, choose System![]() Administration
Administration ![]() Services.
Services.
The Services Settings dialog, shown in Figure 23-1 , opens.
Figure 23-1: The Services Settings dialog.
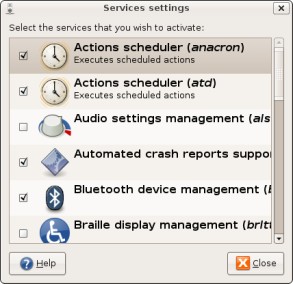
· Select any deselected check box to start the service or deselect any selected check box to stop the service.
· Click the Close button.
You can see what processes are running by using the ps command. Open a Terminal Emulator window and type either of these commands:
· ps -ef Every running process is displayed.
· top The processes using the most resources are continuously listed.
Managing Your Computer's Power Use
Ubuntu, go to sleep! You can make your Ubuntu computer hibernate, saving the time it takes to shut down and start up; this also saves money because a hibernating computer uses practically no power. Follow these steps:
1. From the GNOME menu bar, choose System![]() Preferences
Preferences![]() Power Management.
Power Management.
Figure 23-1 shows the Power Management Preferences dialog that opens.
Figure 23-1: The Power Management Preferences dialog.
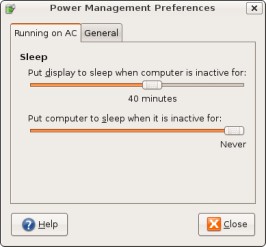
· Click the Put Computer to Sleep when It Is Inactive For slider and select a time between 1 and 60 minutes.
· Click the Close button.
Your computer will go to sleep after you haven't used it for the specified time. Your computer will wake up when you move the mouse or press any key.
All materials on the site are licensed Creative Commons Attribution-Sharealike 3.0 Unported CC BY-SA 3.0 & GNU Free Documentation License (GFDL)
If you are the copyright holder of any material contained on our site and intend to remove it, please contact our site administrator for approval.
© 2016-2026 All site design rights belong to S.Y.A.