A practical guide to Fedora and Red Hat Enterprise Linux, 7th Edition (2014)
Part III: System Administration
Chapter 16. Configuring and Monitoring a LAN
In This Chapter
Setting Up the Hardware
Routers
NIC: Network Interface Card
Configuring the Systems
NetworkManager: Configures Network Connections
Configuring a Static IP Address for a Wired NIC
Setting Up Servers
Introduction to Cacti
Objectives
After reading this chapter you should be able to:
![]() List and describe the uses of each hardware component of wired and wireless LANs
List and describe the uses of each hardware component of wired and wireless LANs
![]() Determine which network interface card is installed in the local Linux system
Determine which network interface card is installed in the local Linux system
![]() List the software settings required to communicate on a network
List the software settings required to communicate on a network
![]() Use NetworkManager to configure the system to use static network settings
Use NetworkManager to configure the system to use static network settings
![]() List several types of network services and their uses
List several types of network services and their uses
![]() Monitor devices on the network using Cacti
Monitor devices on the network using Cacti
Networks allow computers to communicate and share resources. A LAN (local area network; page 284) connects computers at one site, such as an office, a home, or library, and can allow the connected computers to share an Internet connection, files, and a printer. Smart homes make extensive use of networks. Of course, one of the most important reasons to set up a LAN is to allow systems to communicate while users enjoy multiplayer games.
This chapter covers the two aspects of configuring a LAN: setting up the hardware and configuring the software. It is not necessarily organized in the order you will perform the tasks involved in setting up a particular LAN. Instead, read the chapter through, figure out how you will set up your LAN, and then read the parts of the chapter in the order appropriate to your setup. The final section discusses how to monitor devices on a network using Cacti.
More Information
Web
Router operating systems: www.smoothwall.org, www.pfsense.com, m0n0.ch/wall
NetworkManager: projects.gnome.org/NetworkManager
Wireless NIC drivers: wireless.kernel.org/en/users/Drivers
PCI vendors, devices, and ID numbers: pciids.sourceforge.net/pci.ids and www.pcidatabase.com/reports.php?type=tab-delimeted.
NdisWrapper: sourceforge.net/projects/ndiswrapper
Cacti: cacti.net, cacti.net/additional_scripts.php
Cacti manual: cacti.net/downloads/docs/html
Cacti forums: forums.cacti.net
Cacti plugins and extensions: cacti.net/additional_scripts.php
RRDtool: oss.oetiker.ch/rrdtool
SNMP: www.net-snmp.org
Hardware compatibility list: hardware.redhat.com
Time zone list: php.net/date.timezone
HOWTOs
Linux Wireless LAN HOWTO: www.hpl.hp.com/personal/Jean_Tourrilhes/Linux
Wireless HOWTO
Linux Hardware Compatibility HOWTO
Setting Up the Hardware
Each system, or node, on a LAN must have a NIC (network interface card), and each system must connect to a central switch (or hub if it is an older setup). If the LAN is connected to another network, such as the Internet, it must also have a router.
Connecting the Computers
Computers are connected to a network using cables (wired; page 285) or radio waves (wireless or Wi-Fi, page 287). The cables can connect to a variety of devices, some of which are described in this section. See “LAN: Local Area Network” on page 284 for an explanation of cables and definitions of hub, switch, and router.
In the simple star network shown in Figure 16-1, four computers are connected to a single hub or switch. Assume computers 1 and 2 are communicating at the same time as computers 3 and 4. With a hub (page 285), each conversation is limited to a maximum of half the network bandwidth. With a switch (page 285), each conversation can theoretically use the full network bandwidth.
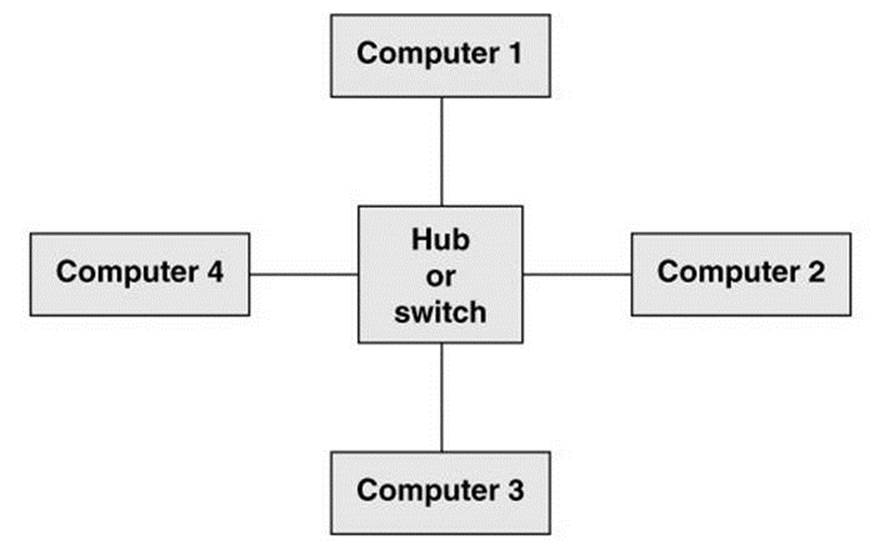
Figure 16-1 A simple star network
WAP (wireless access point)
A WAP (wireless access point) connects a wireless network to a wired one. Typically a WAP acts as a transparent bridge, forwarding packets between the two networks as if they were one. If you connect multiple WAPs in different locations to the same wired network, wireless clients can roam transparently between the WAPs.
Wireless networks do not require a hub or switch, although a WAP can optionally fill the role of a switch. In a wireless network, the bandwidth is shared among all nodes within range of one another; the maximum speed is limited by the slowest node.
Routers
A router (page 287) connects a LAN to another network, such as the Internet. A router can perform additional functions, the most common of which is allowing several systems to share a single Internet connection and IP address (NAT; page 910). With NAT, the packets from all systems on the LAN appear to come from a single IP address; the router passes return packets to the correct system. A router can also provide firewall services.
You have several choices for routers:
• A simple hardware router is relatively cheap and does most of the things required by a small network.
• You can set up a Fedora/RHEL system as a router. The Linux kernel can use firewalld (page 898) or iptables (page 908) to implement a firewall to help protect a system.
• The DSL or cable modem supplied by an ISP is a router and can also function as a firewall.
• You can use a special-purpose distribution/operating system tailored for use as a router. For example, Smoothwall (www.smoothwall.org), pfSense (www.pfsense.com), Shorewall (shorewall.net), redWall (www.redwall-firewall.com), and m0n0wall (m0n0.ch/wall) provide browser-based configurations in the style of a hardware router.
NIC: Network Interface Card
The NIC for a system can be built into the motherboard or it can be a separate Ethernet card (wired or wireless).
Supported NICs
Linux supports most wired and many wireless Ethernet NICs. For a list of drivers for wireless NICs, visit wireless.kernel.org/en/users/Drivers.
Unsupported wireless NICs
If a wireless network card is not supported under Linux directly, you might be able to get it to work with NdisWrapper (sourceforge.net/projects/ndiswrapper), which uses Win32 drivers. NdisWrapper is a kernel module that provides a subset of the Windows network driver API. No Fedora/RHEL package contains this program.
Wireless bridge
An alternative to a wireless NIC is a wireless bridge. A wireless bridge forwards packets between wired and wireless interfaces, eliminating the need for wireless drivers. This simple device has an Ethernet port that plugs into a NIC and an 802.11 (wireless) controller. Although carrying a bridge around is usually not feasible for mobile users, a wireless bridge is an easy way to migrate a desktop computer to a wireless configuration.
Ad hoc and infrastructure modes
Wireless networks operate in either ad hoc or infrastructure mode. In ad hoc mode, individual nodes in the network communicate directly with one another. In infrastructure mode, nodes communicate via a WAP (previous page). Infrastructure mode is generally more reliable if the wireless LAN must communicate with a wired LAN.
If you do not want to use a WAP, it might be possible to set up a wireless bridge so it acts as a WAP. Consult the NIC/driver documentation for more information.
Tools
This section describes four tools you can use to examine system hardware.
![]() lspci: Lists PCI Information
lspci: Lists PCI Information
PCI (Peripheral Component Interconnect) devices include network, sound, video, and TV tuner cards; modems; USB ports; and disk controllers. For information about PCI vendors, devices, and ID numbers visit pciids.sourceforge.net/pci.ids and www.pcidatabase.com/reports.php?type=tab-delimeted. The lspci utility (pciutils package) lists PCI device information:
$ lspci
00:00.0 Host bridge: Intel Corporation 440BX/ZX/DX - 82443BX/ZX/DX Host bridge (rev 01)
00:01.0 PCI bridge: Intel Corporation 440BX/ZX/DX - 82443BX/ZX/DX AGP bridge (rev 01)
00:07.0 ISA bridge: Intel Corporation 82371AB/EB/MB PIIX4 ISA (rev 08)
00:07.1 IDE interface: Intel Corporation 82371AB/EB/MB PIIX4 IDE (rev 01)
00:07.3 Bridge: Intel Corporation 82371AB/EB/MB PIIX4 ACPI (rev 08)
00:07.7 System peripheral: VMware Virtual Machine Communication Interface (rev 10)
00:0f.0 VGA compatible controller: VMware SVGA II Adapter
00:10.0 SCSI controller: LSI Logic / Symbios Logic 53c1030 PCI-X Fusion-MPT Dual Ultra320 SCSI (rev 01)
00:11.0 PCI bridge: VMware PCI bridge (rev 02)
...
02:00.0 USB controller: VMware USB1.1 UHCI Controller
02:01.0 Ethernet controller: Intel Corporation 82545EM Gigabit Ethernet Controller (Copper) (rev 01)
02:02.0 Multimedia audio controller: Ensoniq ES1371 [AudioPCI-97] (rev 02)
02:03.0 USB controller: VMware USB2 EHCI Controller
With the –v option, lspci is more verbose. You can use the –vv or –vvv option to display even more information.
$ lspci -v | head -14
00:00.0 Host bridge: Intel Corporation 440BX/ZX/DX - 82443BX/ZX/DX Host bridge (rev 01)
Subsystem: VMware Virtual Machine Chipset
Flags: bus master, medium devsel, latency 0
Kernel driver in use: agpgart-intel
00:01.0 PCI bridge: Intel Corporation 440BX/ZX/DX - 82443BX/ZX/DX AGP bridge (rev 01) (prog-if 00 [Normal decode])
Flags: bus master, 66MHz, medium devsel, latency 0
Bus: primary=00, secondary=01, subordinate=01, sec-latency=64
00:07.0 ISA bridge: Intel Corporation 82371AB/EB/MB PIIX4 ISA (rev 08)
Subsystem: VMware Virtual Machine Chipset
Flags: bus master, medium devsel, latency 0
00:07.1 IDE interface: Intel Corp 82371AB/EB/MB PIIX4 IDE (rev 01) (prog-if 8a [Master SecP PriP])
![]() lsblk: Lists Block Device Information
lsblk: Lists Block Device Information
The lsblk utility (util-linux package) lists block devices in a tree format that shows which filesystems are mounted on each device.
$ lsblk
NAME MAJ:MIN RM SIZE RO TYPE MOUNTPOINT
sda 8:0 0 200G 0 disk
+-sda1 8:1 0 500M 0 part /boot
+-sda2 8:2 0 199.5G 0 part
+-fedora-swap 253:0 0 2G 0 lvm [SWAP]
+-fedora-root 253:1 0 50G 0 lvm /
+-fedora-home 253:2 0 147.5G 0 lvm /home
sr0 11:0 1 1024M 0 rom
![]() lshw: Lists Hardware Information
lshw: Lists Hardware Information
The lshw utility (lshw package) lists information about the hardware configuration of the local system. Run this utility with root privileges to display a more detailed report. The –short option displays a brief report.
# lshw -short
H/W path Device Class Description
======================================================
system VMware Virtual Platform ()
/0 bus 440BX Desktop Reference Platform
/0/0 memory 87KiB BIOS
/0/4 processor Intel(R) Core(TM)2 Quad CPU Q9650 @ 3.00GHz
/0/4/54 memory 16KiB L1 cache
/0/4/55 memory 6MiB L2 cache
/0/5 processor CPU
...
/0/100 bridge 440BX/ZX/DX - 82443BX/ZX/DX Host bridge
/0/100/1 bridge 440BX/ZX/DX - 82443BX/ZX/DX AGP bridge
/0/100/7 bridge 82371AB/EB/MB PIIX4 ISA
/0/100/7.1 storage 82371AB/EB/MB PIIX4 IDE
/0/100/7.3 bridge 82371AB/EB/MB PIIX4 ACPI
/0/100/7.7 generic Virtual Machine Communication Interface
/0/100/f display SVGA II Adapter
/0/100/10 scsi2 storage 53c1030 PCI-X Fusion-MPT Dual Ultra320 SCSI
/0/100/10/0.0.0 /dev/sda disk 214GB SCSI Disk
/0/100/10/0.0.0/1 /dev/sda1 volume 500MiB EXT4 volume
/0/100/10/0.0.0/2 /dev/sda2 volume 199GiB Linux LVM Physical Volume partition
/0/100/11 bridge PCI bridge
/0/100/11/0 bus USB1.1 UHCI Controller
/0/100/11/1 ens33 network 82545EM Gigabit Ethernet Controller (Copper)
/0/100/11/2 multimedia ES1371 [AudioPCI-97]
/0/100/11/3 bus USB2 EHCI Controller
...
![]() lsusb: Lists USB Devices
lsusb: Lists USB Devices
The lsusb utility (usbutils package) displays information about USBs and USB devices. Use the –v (––verbose) option to display additional information.
$ lsusb
Bus 002 Device 002: ID 0e0f:0003 VMware, Inc. Virtual Mouse
Bus 002 Device 003: ID 0e0f:0002 VMware, Inc. Virtual USB Hub
Bus 001 Device 001: ID 1d6b:0002 Linux Foundation 2.0 root hub
Bus 002 Device 001: ID 1d6b:0001 Linux Foundation 1.1 root hub
Bus 002 Device 004: ID 04f9:0033 Brother Industries, Ltd
![]() Configuring the Systems
Configuring the Systems
After the hardware is in place, each system must be configured so it knows about the NIC that connects it to the network. Normally the system detects and configures new hardware automatically when you install Fedora/RHEL or the first time you boot it after you install a NIC. You can use NetworkManager (next page) to augment the information Fedora/RHEL collects or to set up things differently: For a server, you might want to assign a static IP address to the NIC and not use DHCP (page 641).
System information
In addition to information about the NIC, each system needs to be configured with:
• The system’s IP address (page 1256)
• The netmask (network mask or subnet mask) for the system’s address (page 483)
• The IP address of the router or gateway (page 633)
• The IP addresses of the nameservers (DNS addresses—specify two or three for more reliable network connections) unless you specify IP addresses in the /etc/hosts file (page 507)
• The system’s hostname (set when you install Linux or run hostnamectl [page 219])
If a DHCP server (page 491) distributes network configuration information to systems on the LAN, you do not need to specify the preceding information on each system. Instead, you just specify that the system is using DHCP to obtain this information (which Fedora/RHEL does by default). You must specify this information when you set up the DHCP server.
![]() Private address space
Private address space
When you set up a LAN, the IP addresses of the systems on the LAN are generally not made public on the Internet. Special IP addresses, which are part of the private address space defined by IANA (page 1254), are reserved for private use and are appropriate to use on a LAN (Table 16-1). Unless you have been assigned IP addresses for the systems on the LAN, choose addresses from the private address space.
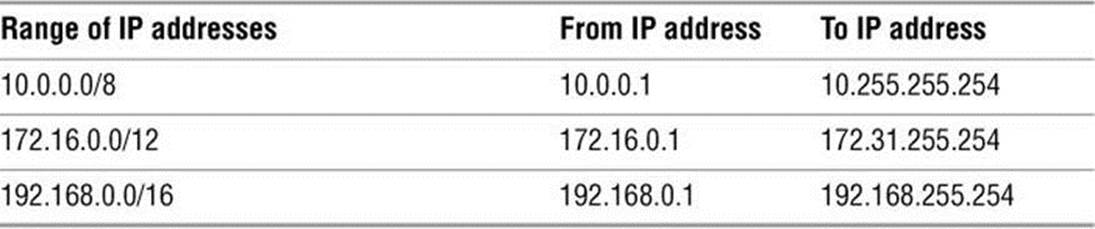
Table 16-1 Private IP ranges (defined in RFC 1918)
![]() NetworkManager: Configures Network Connections
NetworkManager: Configures Network Connections
By default, the NetworkManager daemon (projects.gnome.org/NetworkManager) configures and manages the network. When it detects a new wired or wireless connection, NetworkManager starts the appropriate interface. For a wireless connection, it prompts for and stores keys and passwords. It also detects new hardware—for example, when you plug a USB wireless adapter into the system.
NetworkManager applet
The NetworkManager applet appears toward the right end of the Top panel. It appears as an outline of a monitor when the system is using a wired connection and as a series of radiating curves when the system is using a wireless connection (Figure 16-2). Exactly what appears when you click the NetworkManager applet depends on the system hardware and the items you have previously set up.
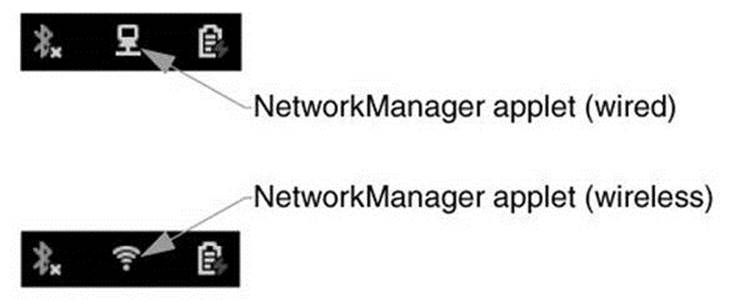
Figure 16-2 The NetworkManager applet on the Top panel
The NetworkManager Applet Menu
Right- or left-click the NetworkManager applet to display the NetworkManager applet menu that allows you to turn on/off wired networking and, if available, wireless networking (Wi-Fi). With wireless networking turned on, this menu also displays a list of available wireless networks (Figure 16-3). Click the switch adjacent to Wired or Wi-Fi to enable or disable the respective service.
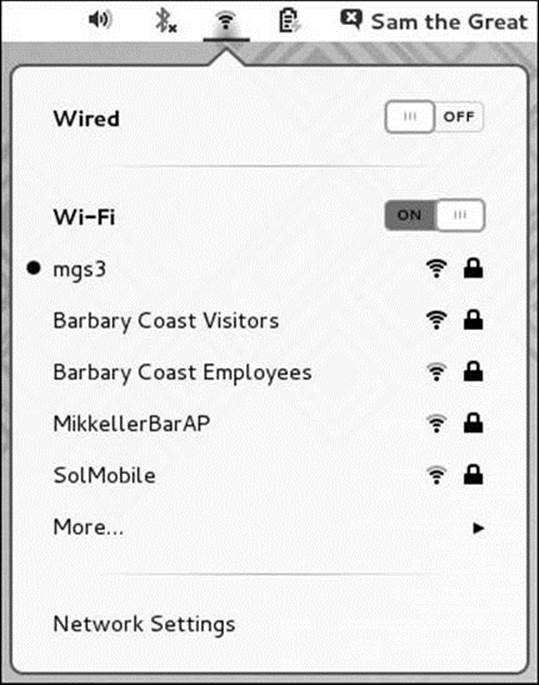
Figure 16-3 The NetworkManager applet menu
With wireless networking turned on, click the name of a wireless network (under the word Wi-Fi) to connect to that network. The NetworkManager applet shows activity while it connects to the new network. It then prompts for a password if one is required and displays the wireless applet (Figure 16-2). Normally NetworkManager uses DHCP (page 491) to set up the network automatically so you do not have to open the Network window.
The Network Window
Selecting Network Settings from the NetworkManager menu displays the Network window (Figure 16-4), which allows you to modify the configuration of wired and wireless NICs. Alternately, you can open this window from the Settings window (page 107) or by giving the commandgnome-control-center network from an Enter a Command window (ALT-F2) or a terminal emulator.
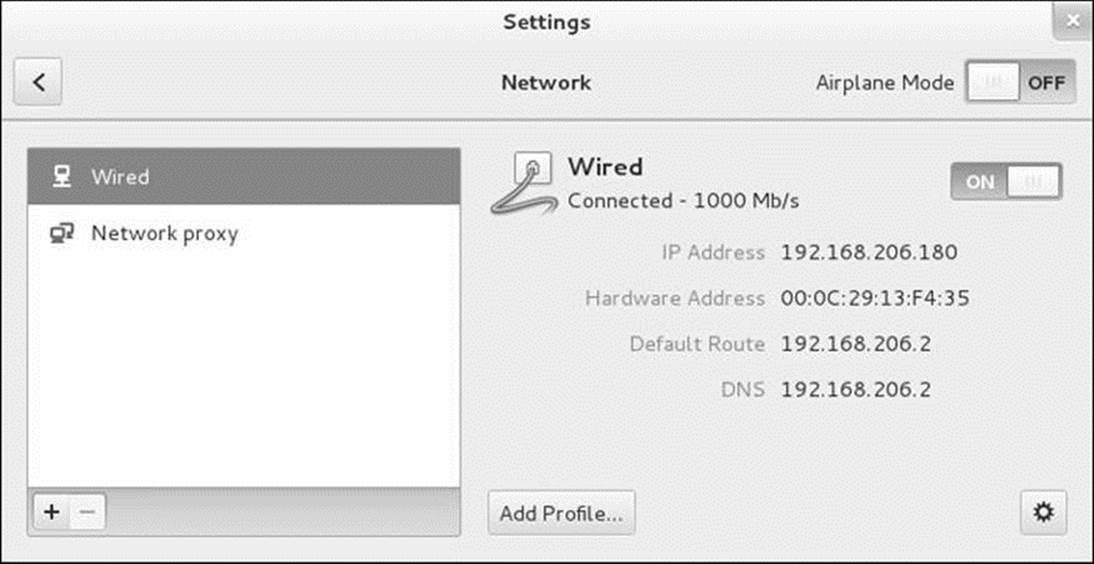
Figure 16-4 The Network window showing a Wired NIC
The frame on the left side of the Network window holds a list of the available types of networks. The list matches the list in the NetworkManager menu and can include Wired and Wi-Fi. When you click the plus sign (+) at the bottom of the this list, the Network window gives you the choice of which type of NIC you want to add (VPN, bond, bridge, or VLAN). However, this step is not normally necessary because NetworkManager configures NICs automatically. See “Identity” on the next page for a method of naming multiple NICs of the same type. Click the minus sign (–) to remove a NIC (if NetworkManager permits you to do so).
See page 643 if you want to modify the connection of a wireless NIC. To modify the configuration of a wired NIC, highlight the description of the connection you want to modify (Wired) and click the gear at the lower-right of the window; NetworkManager displays a window named for the type of connection (i.e., Wired; Figure 16-5).
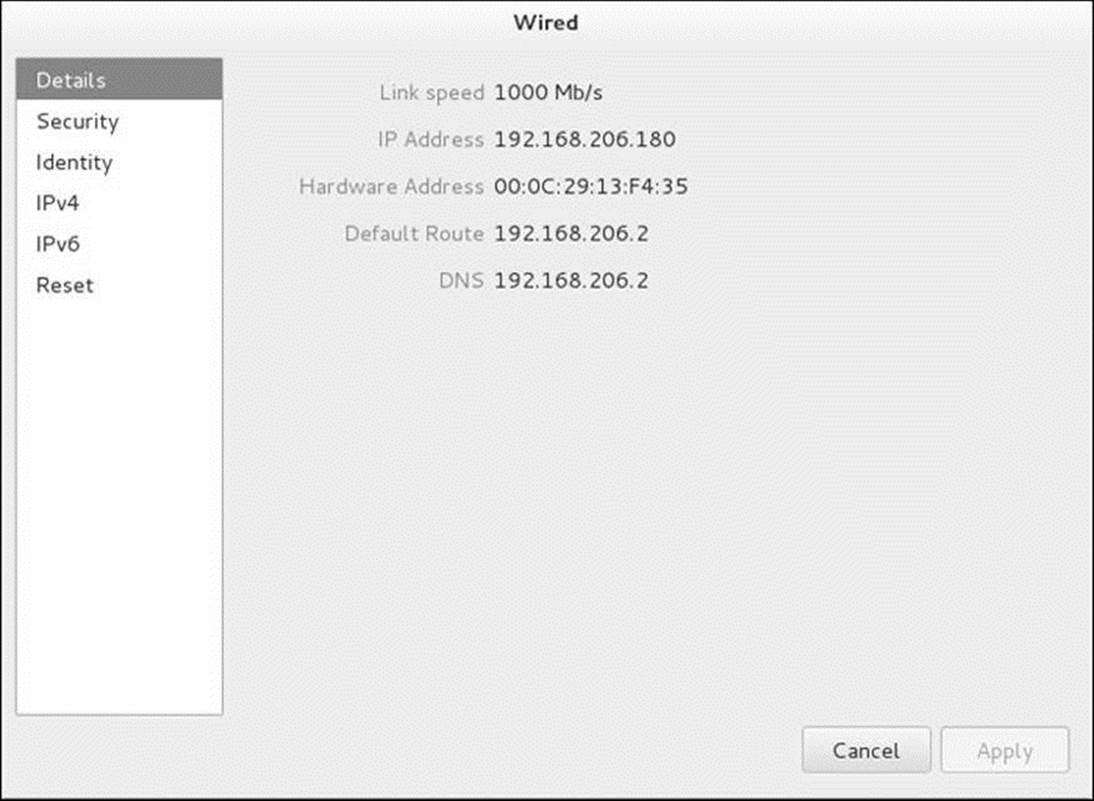
Figure 16-5 The Wired window, Details screen
The Wired/Wi-Fi Window
The Wired window (Figure 16-5) holds a list of screens in the frame on the left. Click an item in the list to display the corresponding screen. The Wi-Fi window (Figure 16-8, page 643) holds the same list. You can change most of the items in these screens. The list includes
• Details—Lists connection information including IP, MAC, and DNS addresses. You cannot make changes in this screen.
• Security—For a wired connection, displays and allows you to turn on/off and modify 802.1x PNAC (port-based Network Access Control). For a Wi-Fi connection, displays the type of security (e.g., WEP, WPA) and password.
• Identity—Displays the name, MAC address, and other information that identifies the connection. If multiple NICs of the same type exist, this screen allows you to assign a different name to each one.
• IPv4—Displays IPv4 connection information including DHCP, network addresses, DNS addresses, and routes.
• IPv6—Displays IPv6 connection information including network addresses, DNS addresses, and routes.
• Reset—Allows you to reset or forget the connection.
The next sections describe how to use this window to set up a NIC with a static IP address and how to set up a W-Fi NIC. When you are finished making changes in these screens, click Apply.
Configuring a Static IP Address for a Wired NIC
By default, DHCP (page 491) assigns a dynamic IP address to a NIC, so the IP address might not stay the same over time. To make the server easy for clients to find on the Internet, it must have the same IP address all the time (a static IP address). See page 298 for information on static IP addresses and page 494 if you want to set up a static IP address using DHCP.
This section describes how to configure a static IPv4 address that does not use DHCP. You can perform the same task by editing the appropriate configuration file in /etc/sysconfig/network-scripts (e.g., ifcfg-ens33); see the sample file on the next page.
First, select Wired in the Network window. If there is more than one connection highlight the one you want to configure and click the gear at the lower-right. NetworkManager displays the Details screen of the Wired window (Figure 16-5).
IPv4
If you are setting up an IPv4 address, select IPv4 (Figure 16-6); for an IPv6 address, select IPv6. Make sure the switch at the upper-right (across from IPv4) is set to ON. Select Manual from the drop-down list just below the switch. Enter the IP address of the NIC, the netmask, and the IP address of the gateway (router) for the connection you are setting up.
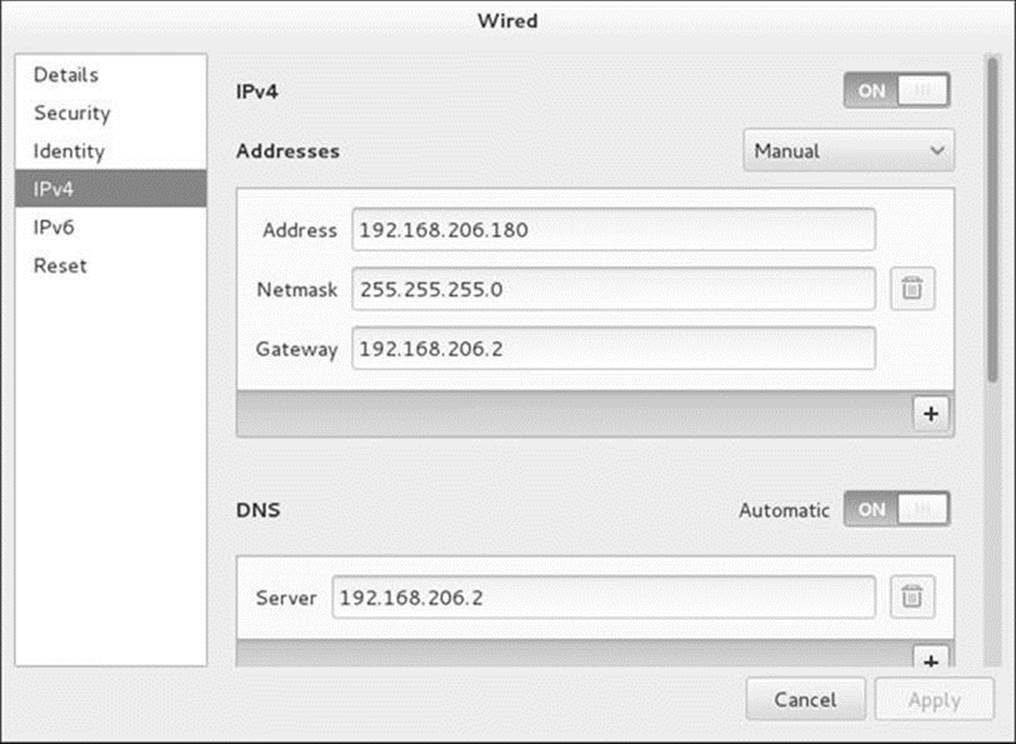
Figure 16-6 The Wired window, IPv4 screen
Set the switch across from DNS to OFF if you want to configure DNS manually. Enter the IP address of the DNS server in the text box labeled Server. Click the plus sign (+) just below the text box to add additional DNS servers. Click the trash can at the right of a text box to remove an entry. These actions set the values of IPADDR0, PREFIX0, GATEWAY0, and DNS1 in /etc/sysconfig/network-scripts/ifcfg* (below). With no entries in the Routes section, NetworkManager sets up default routes (DEFROUTE=yes). A tick in the check box labeled Use this connection only for resources on its network limits connections to the local network.
Identity
The Identity screen has two important check boxes. A tick in the check box labeled Connect automatically causes the system to bring up the connection when it boots and sets ONBOOT=yes in ifcfg*. Without a tick you must bring up the connection manually.
A tick in the check box labeled Make available to other users causes the connection to be available to all users and to be up even when the user who set up the connection is not logged in. Without a tick, the connection is up only when the user who set up the connection is logged in. Typically you want a tick in this check box.
Activating changes
When you are finished, click Apply to update the configuration files.Turn the interface off and then on again to make the changes active.
Next is the ifcfg* file that results from running NetworkManager and following the preceding instructions. For more information about this type of file, see /usr/share/doc/initscripts-*/sysconfig.txt.
$ cat /etc/sysconfig/network-scripts/ifcfg-Wired_connection_1
HWADDR=00:0C:29:13:F4:35
TYPE=Ethernet
BOOTPROTO=none
IPADDR0=192.168.206.180
PREFIX0=24
GATEWAY0=192.168.206.2
DNS1=192.168.206.2
DEFROUTE=yes
IPV4_FAILURE_FATAL=no
IPV6INIT=no
NAME="Wired connection 1"
UUID=d4511286-79bb-4e53-9cfc-6cfbf54ff475
ONBOOT=yes
nmcli
You can use the nmcli utility to control NetworkManager from the command line. See the nmcli man page for more information.
system-config-network
The system-config-network utility (system-config-network package) presents a simple, pseudographical window you can use to configure a device or DNS from the command line.
Wireless Settings
It is usually easier to configure a wireless connection using the NetworkManager applet menu (Figure 16-3, page 638) than using the Settings window. To use the Settings window, click Wi-Fi on the left side of the Network window (Figure 16-7); NetworkManager displays a list of wireless networks on the right. Click the gear in the line with name of the network you want to set up; if there is no gear, click the name of the network.
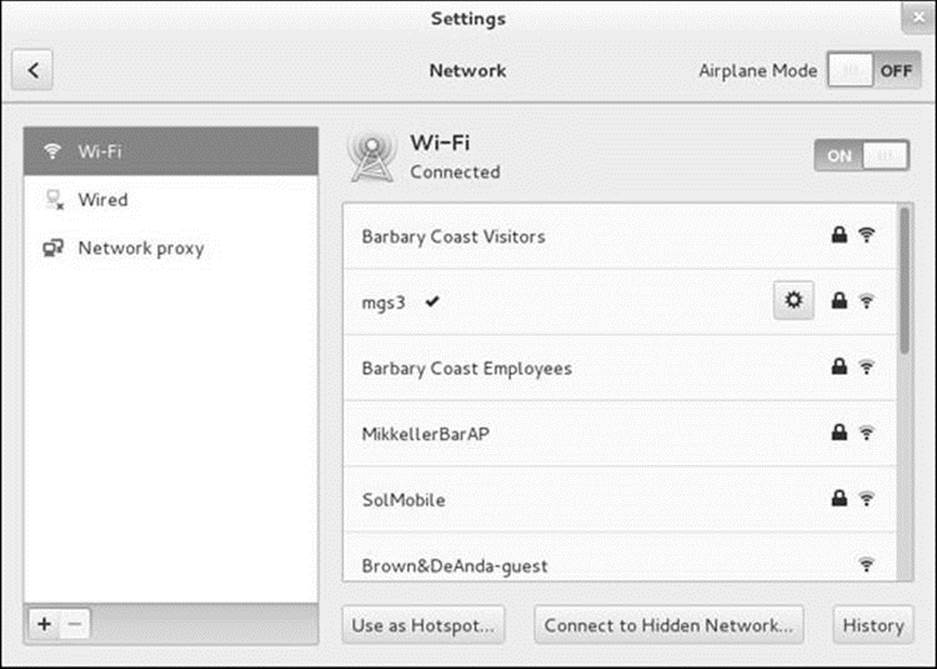
Figure 16-7 The Network window showing a Wi-Fi NIC
If you click the name of the network, NetworkManager might ask for a password. You do not need to enter a password at this time to set up the connection: Even if you click Cancel in the authentication window, NetworkManager will add a gear to the name of the network. Click the gear.
Setting up a wireless connection is similar to setting up a wired connection (page 641) except for the Security screen (Figure 16-8). In this screen select the type of security you want to use from the drop-down list labeled Security and enter the connection password in the text box labeledPassword. Click Apply. See “Activating changes” on page 642.
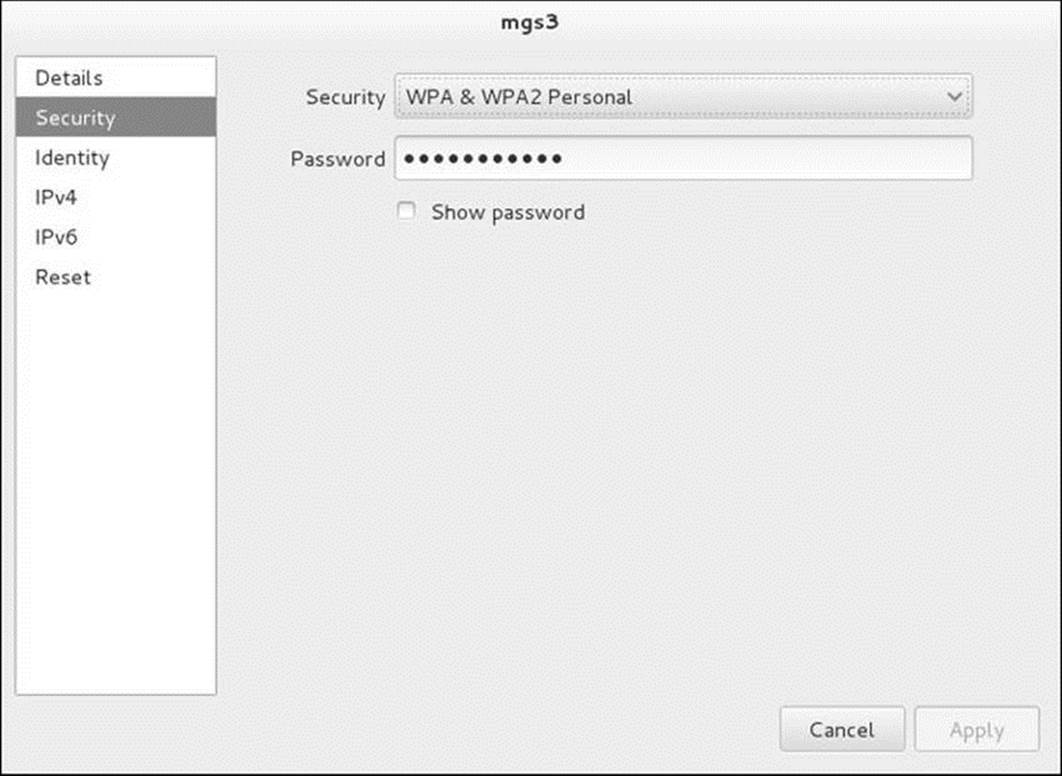
Figure 16-8 The Wi-Fi Secuity screen
Setting Up Servers
Setting up local clients and servers can make a LAN both easier to use and more useful. The following list briefly describes some clients and servers, and it references the pages that describe each in detail.
Firewall
Although not a server, a firewall is an important part of a LAN. See Chapter 25 for more information.
LDAP
LDAP is a database server that can hold names and addresses, authentication information, and other types of data. It can provide a uniform login regardless of which system you log in on. See page 786 for more information.
NIS
The NIS authentication server is covered on page 779 and the client on page 773. NIS is often combined with home directories that are mounted using NFS. Although still popular, NIS is at the end of its life: If you are setting up a new system, choose LDAP over NIS.
NFS
NFS allows you to share directory hierarchies. Sharing directories using NFS requires that the server export the directory hierarchy (page 814) and that clients mount the directory hierarchy (page 806).
Using NFS, you can store all home directories on one system and mount them from other systems as needed. This configuration works well with LDAP login authentication. With this setup, it can be convenient to create a world-writable directory—for example, /home/shared—that users can use to exchange files. If you set the sticky bit (page 1275) on this directory (chmod 1777 /home/shared), users can delete only files they created. If you do not set the sticky bit, any user can delete any file.
OpenSSH
OpenSSH tools include ssh (logs in on a remote system; page 693) and scp (copies files to and from a remote system; page 695). You can also set up automatic logins using OpenSSH: If you set up a shared home directory using NFS, each user’s ~/.ssh directory (page 688) is the same on each system; a user who sets up a personal authentication key (page 700) will be able to use OpenSSH tools between systems without entering a password. See page 700 for information on how to set up an OpenSSH server. You can use the ssh and scp clients as installed—you do not have to set them up.
DNS cache
Setting up a local DNS cache can reduce the traffic between the LAN and the Internet and can improve response times. For more information refer to “JumpStart I: Setting Up a DNS Cache” on page 866.
DHCP
DHCP enables a client system to retrieve network configuration information from a server each time it connects to a network. See page 491 for more information.
Samba
Samba allows Linux systems to participate in a Windows network, sharing directories and printers, and accessing those directories and printers shared by Windows systems. Samba includes a special share for accessing users’ home directories. For more information on the [homes] share see page 840.
You can also use Samba to set up a shared directory similar to the one described under “NFS.” To share a Linux directory with Windows computers, the value of Workgroup in /etc/samba/smb.conf must be the same as that of the Windows workgroup (frequently MSHOME or WORKGROUP by default). Place the following code in smb.conf (page 841):
[public]
comment = Public file space
path = /home/shared
read only = no
public = yes
browseable = yes
By default, SELinux will not allow you to share your home directory. Use system-config-selinux (page 475) to activate the samba_enable_home_dirs Boolean if you want to allow sharing. Any Windows or Mac user can access this share, which can be used to exchange files between users and among Linux, Mac, and Windows systems.
Introduction to Cacti
Cacti (cacti.net) is a network monitoring tool that graphs system and network information over time (time-series data) and provides a comprehensive Web interface for browsing and examining the ongoing performance of the devices on a network.
For example, Cacti can monitor the network traffic passing through the network ports on local servers and the switch and router ports on the local network. Cacti graphs provide information on traffic levels on the various parts of the network. When the network is slow, for example, you can refer to the historical graphs and see if anything out of the ordinary has occurred. In addition to network traffic levels, Cacti can collect data on CPU usage, disk space usage, page views on a Web server, and almost any other data points available on the local network.
Cacti collects baseline (typical) data over time. You can use that information to gain insight into the ongoing behavior of a system and network, and to help resolve problems. The information can even predict what might happen in the future (e.g., when a disk is likely to become full).
Cacti periodically polls devices on a network for the data it needs, and stores the data in RRD files for use with RRDtool (round-robin database tool; oss.oetiker.ch/rrdtool). The Cacti Web interface allows you to browse a list of devices and graphs and see visual representations of device activity over time.
Cacti builds on the lessons learned from tools such as MRTG (oss.oetiker.ch/mrtg; page 975) and Cricket (sourceforge.net/projects/cricket). Each of these tools has the following characteristics:
• Periodically polls tracked devices for data. The tool most commonly used to collect this data is SNMP (Simple Network Management Protocol; www.net-snmp.org).
• Stores the data in an RRD file.
• Has a Web interface that allows you to examine graphs generated from the stored data. These graphs typically display daily, weekly, monthly, and yearly information.
Cacti’s configuration is performed through its Web interface, whereas MRTG and Cricket are configured by editing text files.
RRD files and RRDtool are the key to much of Cacti’s functionality. The Cacti Web site describes Cacti as “the complete RRDtool-based graphing solution.” RRD files store time-series data efficiently and, through the use of aggregation functions, make it easy to keep a lot of detail for recent time periods but progressively less detail as the data in the files ages. RRDtool easily generates both simple and complex graphs from RRD files.
Extending Cacti
Many extensions and plugins are available for Cacti. Once you are familiar with the basic use and operation of Cacti, visit cacti.net/additional_scripts.php for a partial list of these additions. Also visit the documentation and the user forums at the same site to obtain more information about Cacti and to learn how you can add functionality and support for different devices and data sources.
Configuring SNMP
To monitor data sources on a system, you must install and run the SNMP daemon on that system as explained under “Setting Up a Data Source” on page 652. Displaying the automatically generated default graphs based on the local system is a good way to check that Cacti is working. To do so you must install and run the SNMP daemon on the local system. However, see the tip on page 647.
Setting Up LAMP
Cacti is a LAMP (Linux, Apache, MariaDB/MySQL, PHP) application; you must install and configure these applications before you can configure Cacti. This section explains how to set up the software on the system running Cacti.
Notes
See page 1114 for an explanation of why MySQL is now MariaDB.
When you set up LAMP, you use the MariaDB/MySQL databases named mysql and cacti. Fedora/RHEL sets up the mysql database when you install the MySQL/ MariaDB server. You set up and populate the cacti database as explained under “Configuring MariaDB” on the next page.
The following database users must be set up. Each of these accounts should have a password:
• A user named root for the database named mysql. This user must be named root. The MariaDB installation script sets up this user.
• A user named cactiuser for the database named mysql. You can change this username, but as installed, Cacti is set up to use cactiuser.
• A Cacti administrative user for the database named cacti. As set up when you install Cacti, this user has the name admin and the password admin. You can set up additional Cacti user accounts.
As of this writing, Fedora/RHEL has Cacti 0.8.8a-8 in its repositories. Do not be misled by the pre-1.0 version number: Cacti is stable and in use on many systems.
Prerequisites
Install the following packages:
• cacti
• mariadb (page 1118)
• mariadb-server (page 1118)
• php (installed with cacti)
• httpd (Apache; page 931; installed with cacti)
• rrdtool (installed with cacti)
• net-snmp (optional; needed only to monitor the local system)
• net-snmp-utils (optional)
Firewall
If you want to work with Cacti from a browser on a system other than the one running Cacti, and the system running Cacti is running a firewall or is behind a firewall, you need to open TCP port 80 on the system running Cacti. Give the following commands to open the port each time the system boots (permanently) and on the running system; see page 906 for information on firewall-cmd.
# firewall-cmd --add-port=80/tcp
# firewall-cmd --permanent --add-port=80/tcp
SELinux
When SELinux is set to use a targeted policy, httpd on the system running Cacti is protected by SELinux. For more information refer to “Setting the Targeted Policy with system-config-selinux” on page 475.
Configuring MariaDB
Install MariaDB and run systemctl to enable and start the mysqld daemon as explained under “Installing a MariaDB Server and Client” on page 1118. Be sure to assign a password to the MariaDB user named root by using either or mysqladmin or mysql_secure_installation. For more help, see “Setting Up MariaDB” on page 1119.
Tip: Cacti does not create the default graphs automatically
A good way to make sure Cacti is working is by the presence of the automatically generated default graphs that are based on the device named localhost (the loopback network device). As of version 0.8.8a-8, a change in one of the Cacti installation files causes Cacti not to populate these graphs nor any graphs based on localhost. For a description of the change see the Web page at svn.cacti.net/viewvc/cacti/branches/0.8.8/install/index.php?r1=6952&r2=6953.
Make the following change before the first time you start Cacti if you want Cacti to populate the automatically generated default graphs and any graphs you create based on localhost. This change is not necessary if you are interested only in graphs based on devices you set up, including devices on the local system. For more information on setting up a device that Cacti will monitor, see “Adding a Device” on page 653.
The change involves adding a line to the file named /usr/share/cacti/install/index.php. As of Cacti version 0.8.8a-8, line 358 of this file is as follows (do not change this line):
db_execute("delete from version");
Add the following line just above the preceding one (both lines are indented using one TAB character):
repopulate_poller_cache();
Save the file and exit from the editor; continue with the installation and setup.
Create the cacti database
Next, issue the following commands to create a database named cacti, create a mysql database user named cactiuser, grant that user the necessary privileges, and assign a password to that user. Replace cactipassword in the following example with your choice of a password. Although the FLUSH PRIVILEGES statement is not required, it is good practice to include it.
# mysql -p
Enter password:
Welcome to the MariaDB monitor. Commands end with ; or \g.
Your MariaDB connection id is 11
...
MariaDB [(none)]> CREATE DATABASE cacti;
Query OK, 1 row affected (0.00 sec)
MariaDB [(none)]> GRANT ALL ON cacti.*
-> TO cactiuser@localhost
-> IDENTIFIED BY 'cactipassword';
Query OK, 0 rows affected (0.00 sec)
MariaDB [(none)]> FLUSH PRIVILEGES;
Query OK, 0 rows affected (0.00 sec)
MariaDB [(none)]> EXIT
Bye
Set up and populate the cacti database
Give the following command to set up and populate the database named cacti. When MariaDB prompts for a password, provide the password for the MariaDB user named root (not the MariaDB user named cactiuser).
# mysql -p cacti < /usr/share/doc/cacti*/cacti.sql
Enter password:
Edit db.php
Most of the information in the /etc/cacti/db.php file is correct as installed. Edit this file to change the value assigned to $database_password from cactiuser to the same value you used for cactipassword when you created the cacti database (the password for the MariaDB user namedcactiuser). Do not change the value assigned to $database_username.
$database_type = "mysql";
$database_default = "cacti";
$database_hostname = "localhost";
$database_username = "cactiuser";
$database_password = "cactiuser";
$database_port = "3306";
$database_ssl = false;
Configuring Apache
Apache is installed when you install Cacti. Modify the httpd.conf file as explained on page 936; if you do not make this modification, Apache will display errors when it starts but will work anyway. Use systemctl to enable and start the httpd daemon (page 935). Cacti supplies the content.
Set the time zone
The /etc/php.ini file initializes many things including the time zone for Cacti. As installed, this file includes a commented-out example of how to set the time zone causing Cacti to use UTC by default. With this setup, Cacti might not appear to work at first because the times on the graphs will be wrong. Visit php.net/date.timezone, look up the name of the local time zone, and edit the time zone line in php.ini to include that name. If you are on the West Coast of the United States the time zone is America/Los_Angeles and the line will look like this:
date.timezone = America/Los_Angeles
Make sure to remove the semicolon from the beginning of the line. Reload the httpd daemon (page 935).
Tip: Cacti initializes the time zone to UTC
With the time zone set to UTC, the times on the Cacti graphs will be wrong in most parts of the world. This error can lead an administrator to thinking Cacti is not working because no data is displayed for the current time. To avoid this problem set the time zone as explained in the preceding section.
Apache accessibility
The /etc/httpd/conf.d/cacti.conf file controls the location and accessibility of Cacti on the Apache server. By default, Cacti is available as 127.0.0.1/cacti (based on the Alias statement), and only a user on 127.0.0.1 (and not localhost) can access Cacti.
No change is required to follow the example in this section. Modify the <Directory> container near the top of cacti.conf to allow access from other systems. The following change allows access from 127.0.0.1 and the remote system at 192.168.206.181 (assuming the host system is runninghttpd version 2.4):
<Directory /usr/share/cacti/>
<IfModule mod_authz_core.c>
# httpd 2.4
Require host localhost
Require ip 192.168.206.181
</IfModule>
...
</Directory>
Reload the httpd daemon (page 935). See “Alias” (page 953), “<Directory>” (page 945), and “Require” (page 961) for more information.
Enabling the Cacti Poller
Enable the Cacti poller by removing the hash mark from the left end of the line in the /etc/cron.d/cacti crontab file. The */5 entry in this file causes crond to execute the script every five minutes. For more information refer to “Crontab Files” on page 607.
$ cat /etc/cron.d/cacti
*/5 * * * * cacti /usr/bin/php /usr/share/cacti/poller.php > /dev/null 2>&1
Configuring Cacti
After starting or restarting Apache, point a Web browser on the system running Cacti at 127.0.0.1/cacti; Apache redirects the browser to the Cacti installation page at 127.0.0.1/cacti/install and displays the first Cacti Installation Guide screen. Click Next.
Confirm the information on the second Cacti Installation Guide screen (Figure 16-9) and click Next.
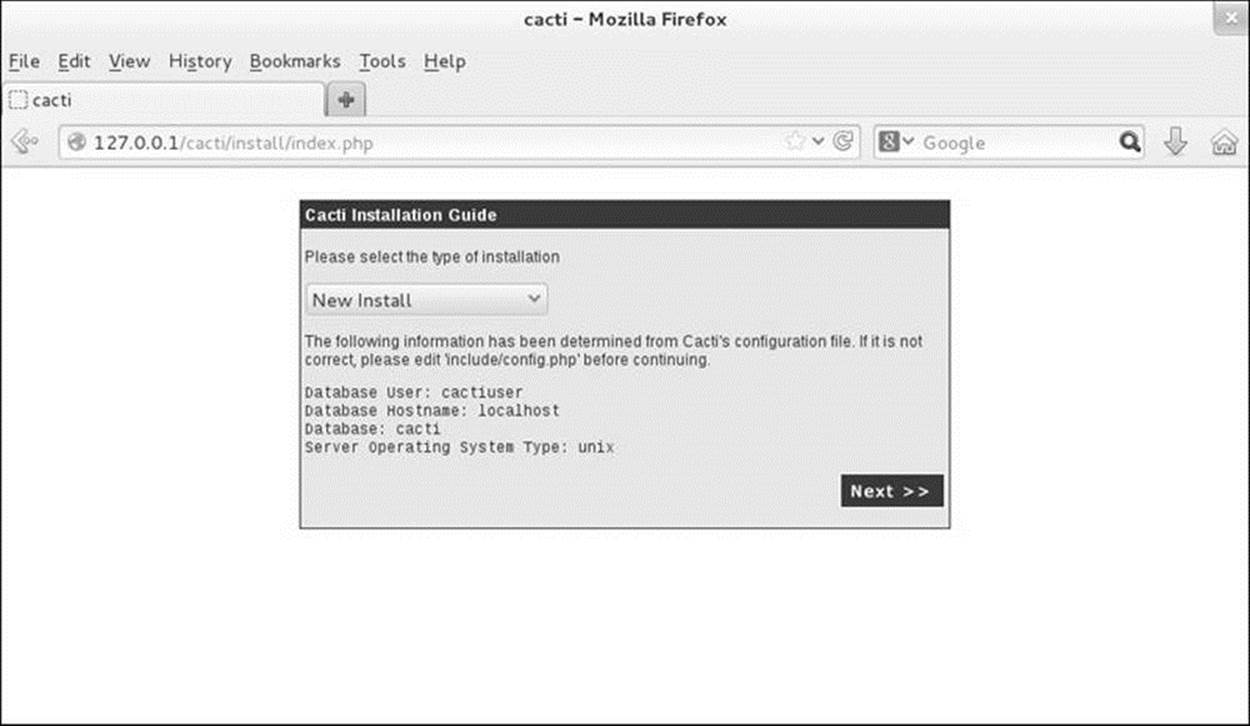
Figure 16-9 The second Cacti Installation Guide screen
The next screen displays several pathnames and information about which versions of Net-SNMP and RRDtool are installed. Review this information and click Finish.
Next Cacti displays the User Login screen. Log in with the username admin and the password admin. Cacti then forces you to change the password for the cacti database user named admin. After you change the password, Cacti displays the main Console screen (Figure 16-10). The name of the screen appears just below the Console tab at the upper-left of the screen.
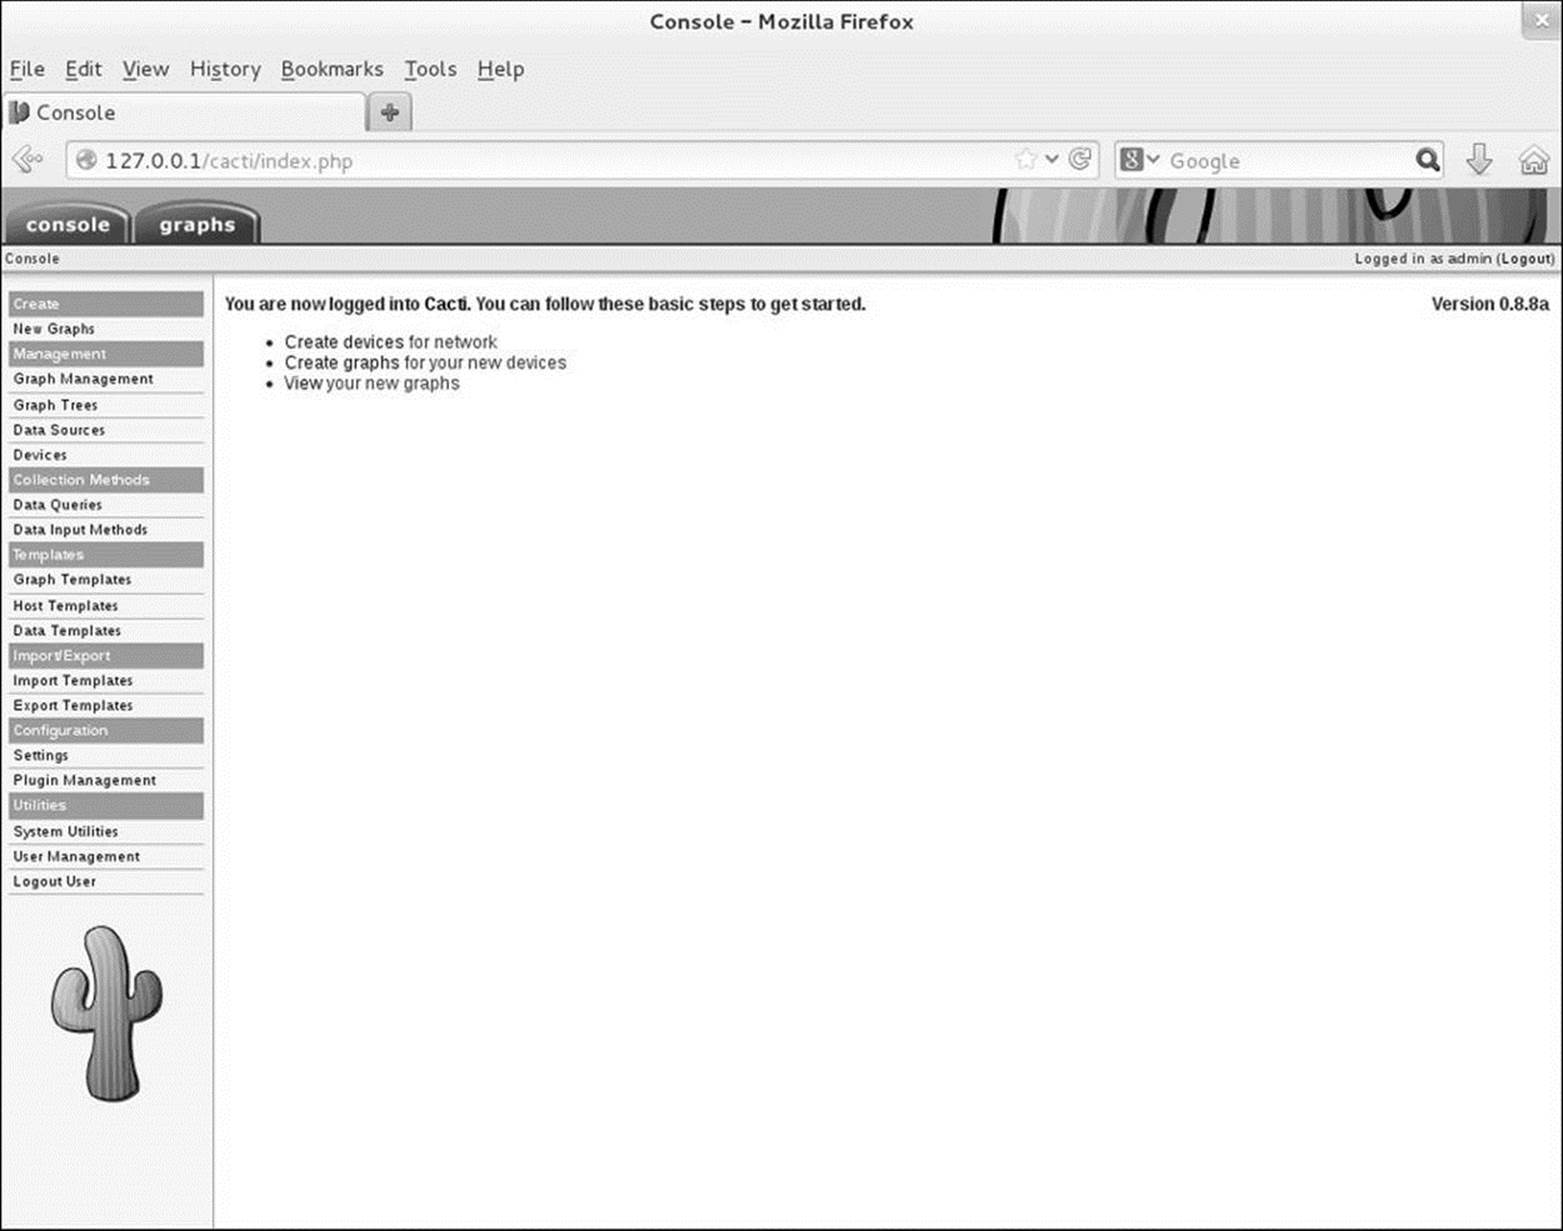
Figure 16-10 The Cacti main Console screen
Basic Cacti Administration
By default, Cacti collects data from localhost (the system it is installed on). After a few poller cycles have passed (approximately 15 minutes after you added the crond job for Cacti and started the snmpd daemon), Cacti will display this information. You must install snmpd on the local system and follow the instructions in the tip on page 647 if you want to monitor the local system.
Tip: You must install snmpd on the local system to monitor the local system
You must install, configure, enable, and start snmpd on the local system, just as you would on a remote system, if you want to monitor the local system. For more information refer to “Setting Up a Data Source” on the next page. Also see the tip on page 647.
From the main Console screen, click View your new graphs or click the Graphs tab at the top of the screen. At the left of the screen, click the triangle to the left of the words Default tree; Cacti displays Host: Localhost below these words. Click Host: Localhost; Cacti displays the default graphs in tree mode for localhost (Figure 16-11).
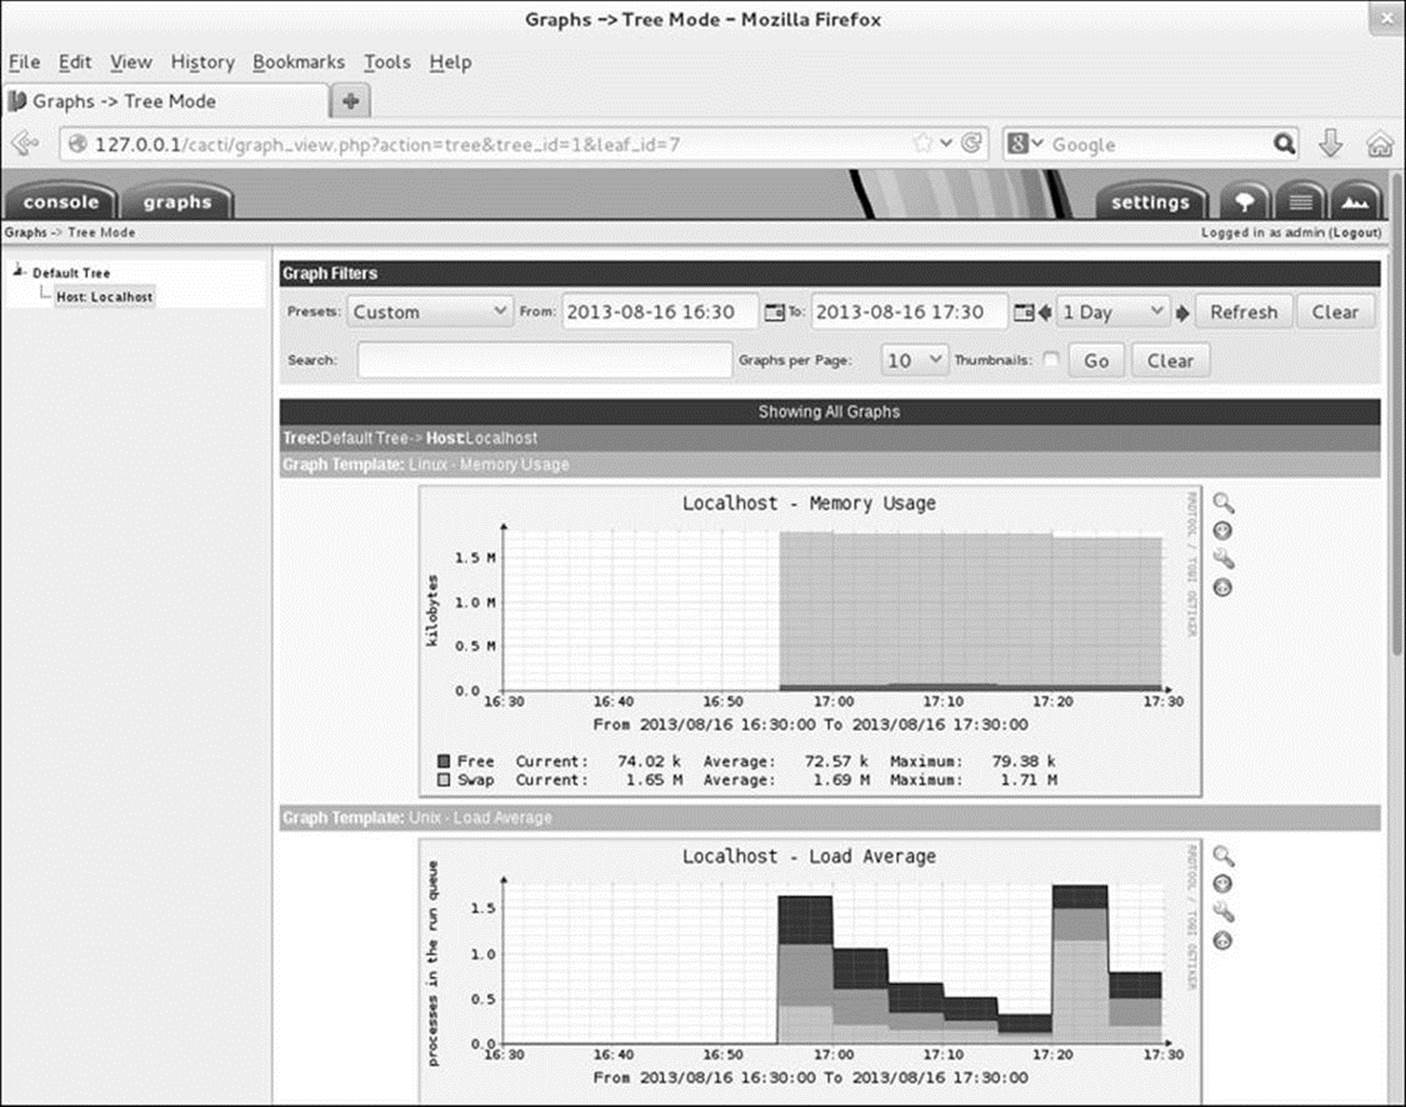
Figure 16-11 Default graphs for localhost
Cacti creates graphs for the following data sources: memory usage, load average, logged-in users, and number of processes. When you click one of the graphs, Cacti displays a page with four graphs for the data source you clicked: daily, weekly, monthly, and yearly. These graphs will mostly be blank until Cacti collects sufficient data to fill them.
To store the data it collects and to display graphs, Cacti uses RRDtool. Cacti graphs show more detail over short time spans and less detail (averaged, or otherwise aggregated) over longer time spans.
To zoom in on a graph, click the magnifying glass icon on the right side of a graph; Cacti displays a single graph, and the mouse pointer changes to a cross hairs. Drag the cross hairs horizontally over the part of the graph that represents the time period you are interested in. In response, Cacti regenerates the graph for that time period.
You can control the graphs using the tabs along the upper-right of the screen. The Settings tab allows you to set your preferences for displaying graphs; the Tree View tab displays a hierarchy of graphs, allowing you to select the devices or graphs you are interested in; the List View tab displays a list of all available graphs; and the Preview tab displays small previews of all available graphs. In addition, each of these tabs provides a filter at the top of the screen that allows you to display a subset of graphs.
The Cacti Console Tab
Clicking the Console tab displays the main Console screen (Figure 16-10, page 650) from which you can manage Cacti. The main Console screen has a menu on the left side and shows the pathname of the screen it is displaying just below the Console tab. At the upper-right of the screen is the name of the user (admin) and a button labeled Logout.
Setting Up a Data Source
You can set up any device that runs SNMP as a data source that Cacti can monitor and report on. This section explains how to set up the local system or a remote system on the local network as a data source and how to set up Cacti to monitor that source.
Prerequisites
Install the following packages on the system that Cacti will monitor. You must install and configure these packages on the local system if you want to monitor the local system; they are not installed with the cacti package.
• net-snmp
• net-snmp-utils (optional)
Firewall
The snmpd daemon, which runs on systems monitored by Cacti, uses UDP port 161. If the monitored system is running a firewall or is behind a firewall, you need to open this port. Give the following commands to open the port each time the system boots (permanently) and on the running system; see page 906 for information on firewall-cmd.
# firewall-cmd --add-port=161/udp
# firewall-cmd --permanent --add-port=161/udp
SELinux
When SELinux is set to use a targeted policy, snmpd on the systems being monitored is protected by SELinux. For more information refer to “Setting the Targeted Policy with system-config-selinux” on page 475.
snmpd.conf
The /etc/snmp/snmpd.conf file controls the snmpd daemon. Save the installed snmpd.conf file so you can refer to it later. Set up the following snmpd.conf file, which sets the SNMP community to public and allows queries from localhost and 192.168.206.180 (the system running Cacti; replace this address with that of the local Cacti server):
$ cat /etc/snmp/snmpd.conf
rocommunity public localhost
rocommunity public 192.168.206.180
/etc/default/snmpd
Under Ubuntu and other Debian-based systems, the /etc/default/snmpd file controls various aspects of the snmpd daemon. (Fedora/RHEL systems do not use this file.) For example, this file specifies which address(es) snmpd listens for queries on. You must edit the following line, which specifies the options snmpd is run with, if you want snmpd to listen for queries from a remote system:
$ cat /etc/default/snmpd
...
SNMPDOPTS='-Lsd -Lf /dev/null -u snmp -g snmp -I -smux -p /var/run/snmpd.pid 127.0.0.1'
...
Change the 127.0.0.1 to the IP address of the local system, as this is the address the system running Cacti will query the local system on. If you do not make this change, the local system will not respond to snmpd queries from a remote system.
Enable and start snmpd
Run systemctl to cause the snmpd service (snmpd daemon) to start each time the system enters multiuser mode and then start the snmpd service. Use the systemctl status command to make sure the service is running.
# systemctl enable snmpd.service
# systemctl start snmpd.service
Adding a Device
In the Web browser connected to Cacti, click the Console tab and select Configuration![]() Settings and then click the General tab and select Version 1 from the drop-down list labeled SNMP Version (not SNMP Utility Version). By default, SNMP runs with community set to public; do not change this setting unless you have reason to do so. Click Save.
Settings and then click the General tab and select Version 1 from the drop-down list labeled SNMP Version (not SNMP Utility Version). By default, SNMP runs with community set to public; do not change this setting unless you have reason to do so. Click Save.
Next select Management![]() Devices and click the word Add (it is small) at the upper-right of the screen. Alternately, you can select Create
Devices and click the word Add (it is small) at the upper-right of the screen. Alternately, you can select Create![]() New Graphs and then click Create New Host. Cacti displays a screen that allows you to specify a new device (Figure 16-12).
New Graphs and then click Create New Host. Cacti displays a screen that allows you to specify a new device (Figure 16-12).
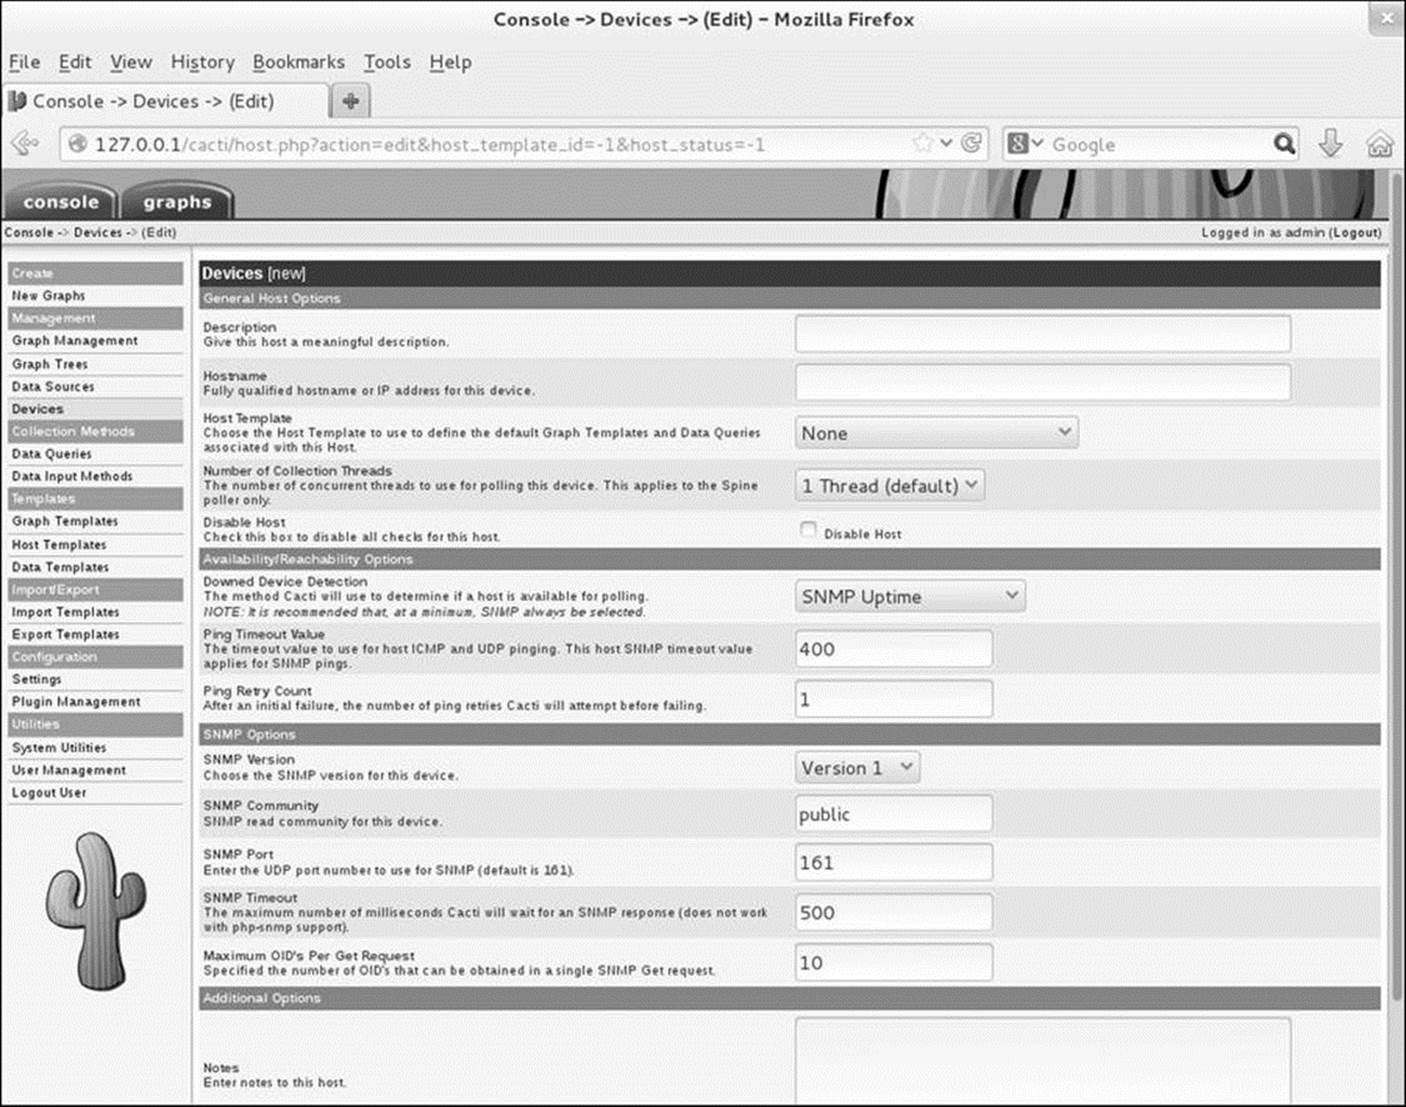
Figure 16-12 Adding a new device
If you have set the SNMP Version as just explained (i.e., Version 1), the SNMP settings will appear as shown in Figure 16-12 (previous page). Fill in the text box labeled Description with an appropriate description of the system to be monitored. Enter the IP address or fully qualified domain name in the text box labeled Hostname. Select an appropriate item from the drop-down list labeled Host Template. The example uses Generic SNMP-enabled Host. Alternately, you can use Local Linux Machine. Make sure Downed Device Detection is set to SNMP Uptime and SNMP Version is set to Version 1. Click Create.
Cacti uses SNMP to collect information from the device. If all goes well, it will report Save Successful and display the information about the new system near the top of the screen (Figure 16-13).
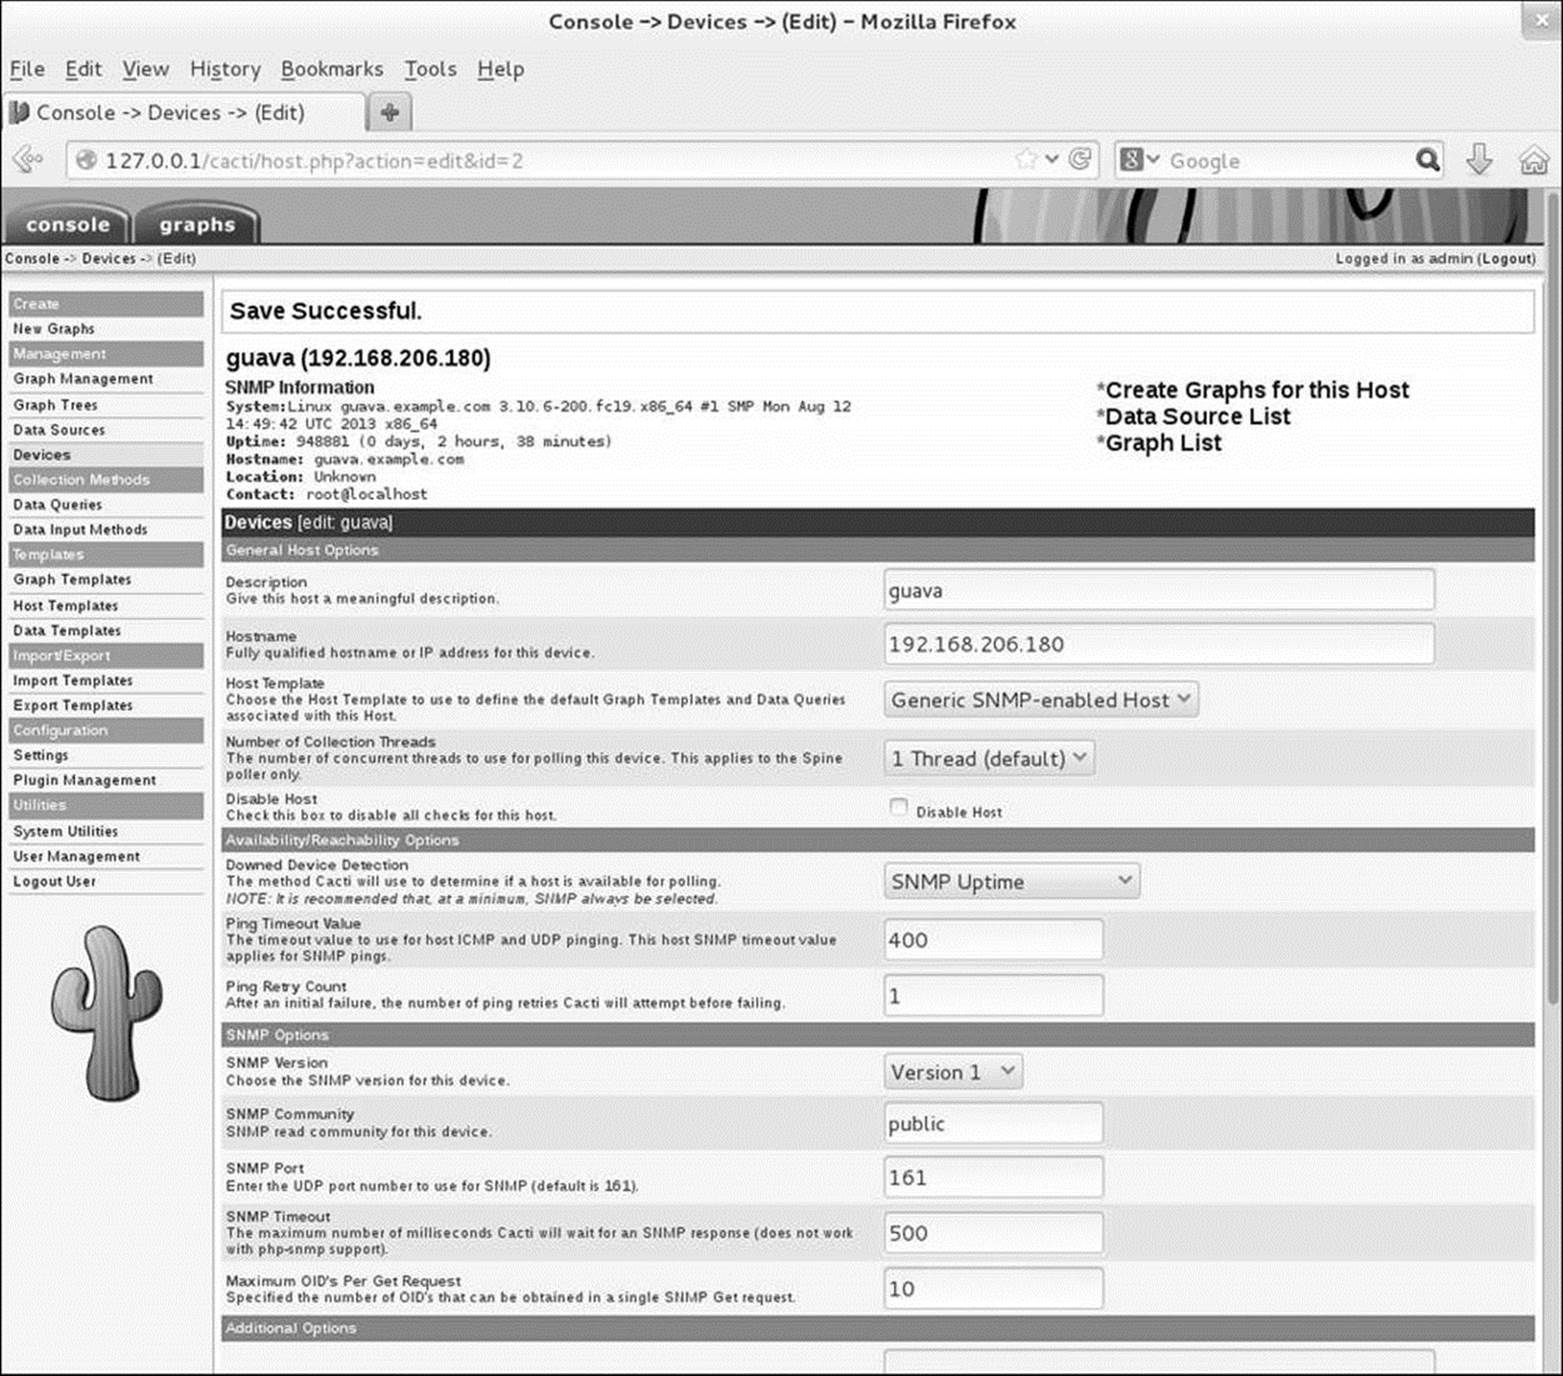
Figure 16-13 Information about the new device
Creating a graph
Click Create Graphs for this Host. Cacti displays the Create New Graph page, which holds a drop-down list labeled Create. Select a type of graph to create from the drop-down list (e.g., Unix—Load Average) and click Create. Cacti displays a message at the top of the screen that tells you which graphs it created (Figure 16-14). In some cases Cacti prompts for a Legend Color; accept the default and click Create. Repeat for each graph you want to create.
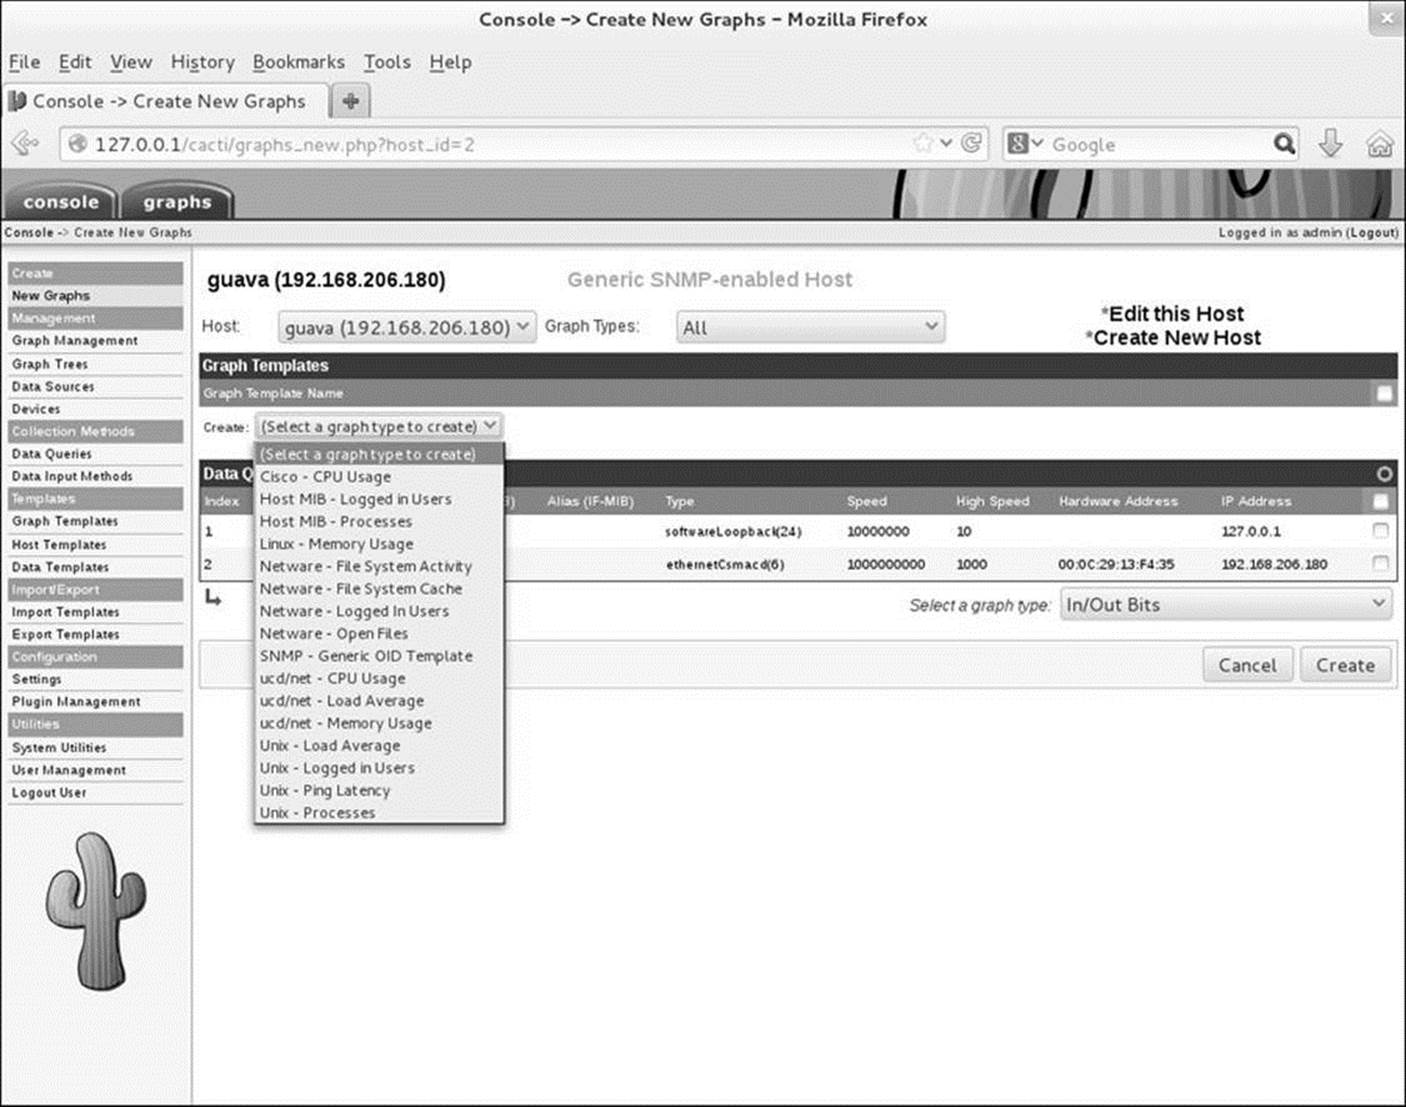
Figure 16-14 A list of queries and data sources for the new device
Adding a node to the graph tree
Select Management![]() Graph Trees and click Add to add a node to the graph tree. Enter a name for the new node (e.g., Servers) and click Create.
Graph Trees and click Add to add a node to the graph tree. Enter a name for the new node (e.g., Servers) and click Create.
Now click Add (on the right) to add a Tree Item, select Host from the drop-down list labeled Tree Item Type, select the host you just added (Cacti might add Host for you), and click Create.
Wait
Take a break for 10 or 15 minutes to allow Cacti to poll the new device a few times.
Displaying the graph
Click the Graphs tab. The name for the new node appears in the device tree on the left side of the screen. When you click the triangle that appears to the left of the node name, Cacti expands the tree and displays the node you just added. Click the node name to display the graphs for that device (Figure 16-15).
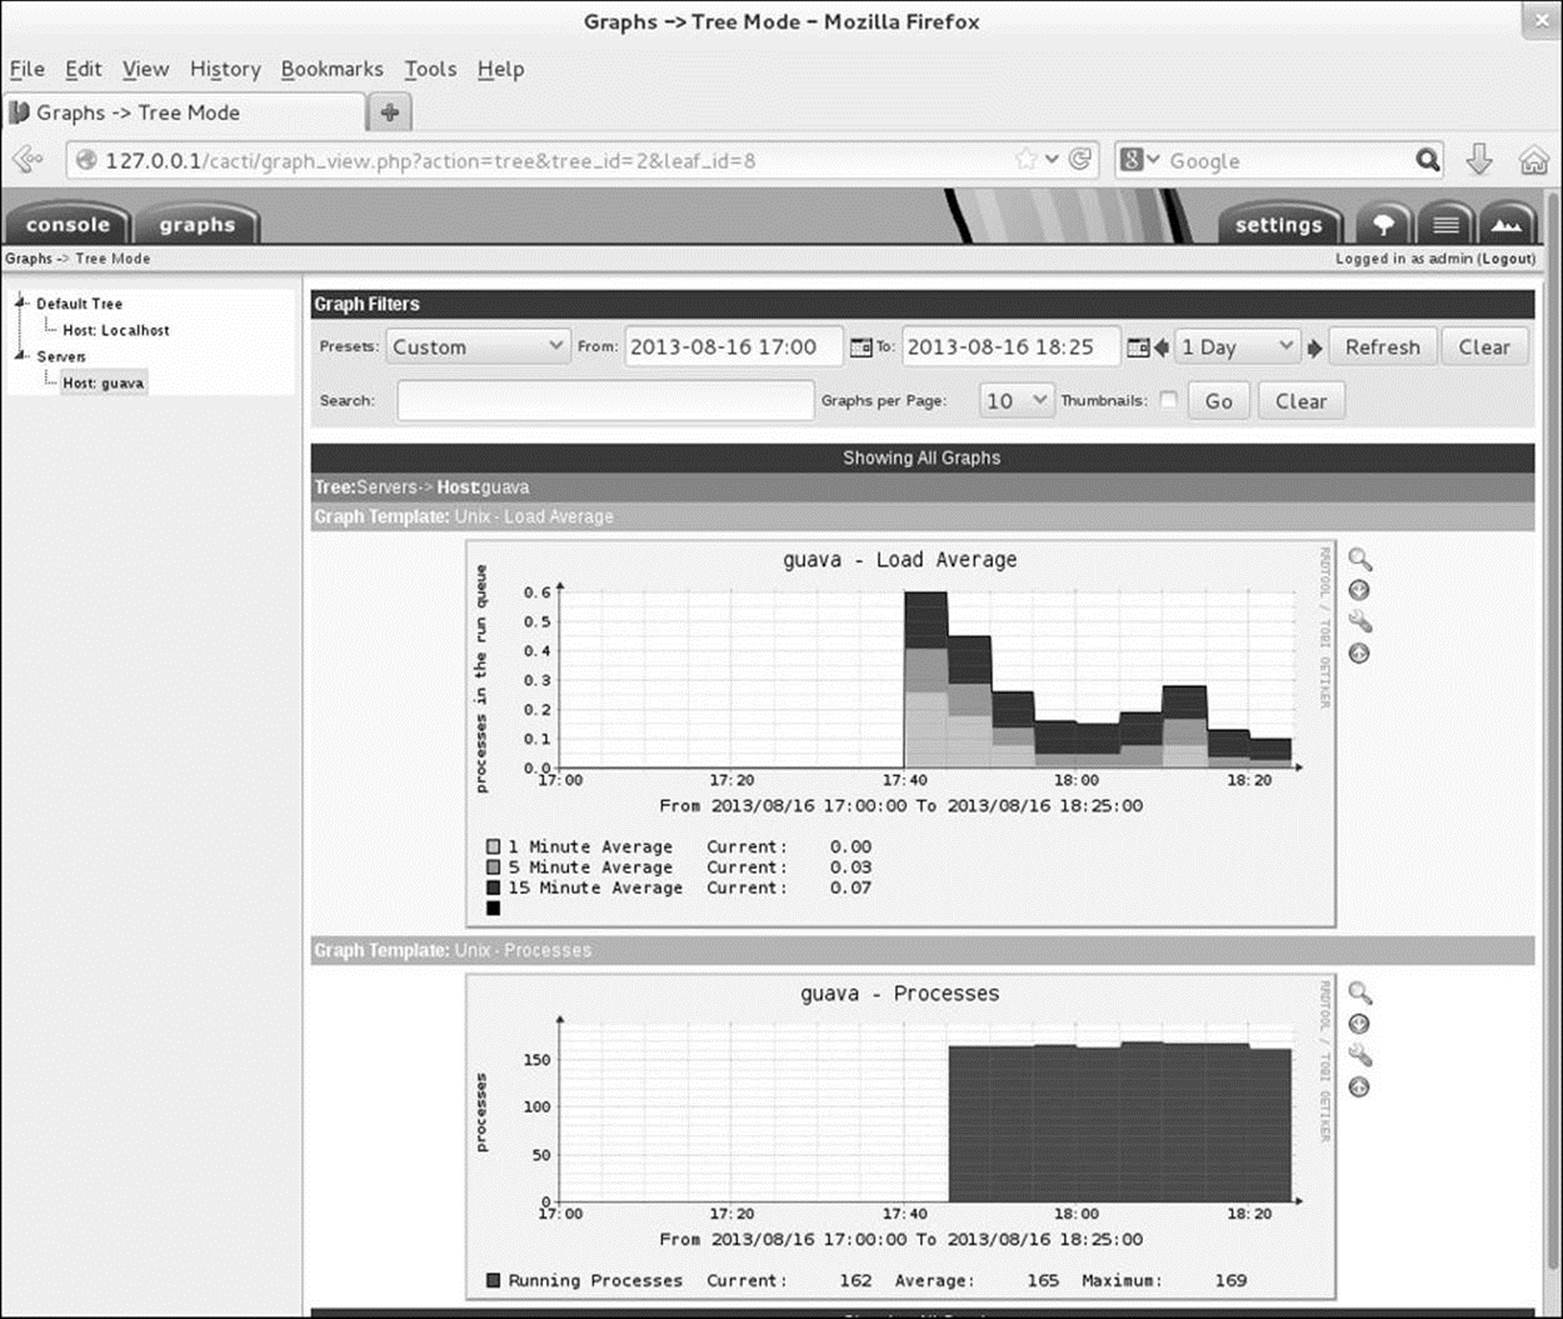
Figure 16-15 Cacti graphs for new devices
You can now browse through the graphs that are being generated, choose time periods you are interested in, and learn more about the behavior of the devices and networks.
Chapter Summary
A LAN (local area network) connects computers at one site and can allow the connected computers to share an Internet connection, files, and a printer. Each system, or node, on a LAN must have a NIC (network interface card). NICs can be connected to the network via cables (wired) or radio waves (wireless or Wi-Fi).
An Ethernet-based LAN has a connection between each computer and a central hub or switch. A WAP (wireless access point) connects a wireless network to a wired one. If the LAN you are setting up is connected to another network, such as the Internet, the LAN requires a router. Some routers can perform several additional functions, the most common of which is NAT—allowing several systems to share a single Internet connection and IP address.
Each system on a LAN must have a wired or wireless NIC that can be built into the motherboard or can be a separate Ethernet card.
Several tools are useful when you are setting up a LAN. In particular, the Network-Manager applet menu and the Network window enable you to configure NICs.
You can configure the systems on the LAN to use LDAP as a login server so you do not have to set up accounts on each system. You can use NFS, which allows you to mount remote directory hierarchies, to set up a universal home directory. Samba is an important part of many LANs: It allows Linux systems to participate in a Windows network, sharing directories and printers and accessing those directories and printers shared by Windows systems.
Cacti is a network monitoring tool that graphs system and network information over time and provides a comprehensive Web interface for browsing and examining the ongoing performance of the devices on a network.
Exercises
1. What advantage does a switch have over a hub?
2. Which server would you set up to allow users to log in with the same username and password on all computers on a LAN?
3. Name two servers that allow you to share directories between systems.
4. What is a WAP, and what does it do?
5. What is the function of a router? What else do some routers do?
6. What does a wireless bridge do?
7. Which window can you use to configure a wireless NIC (rather than having it be configured automatically)?
8. What is the private address space? When would you use a private address?
Advanced Exercises
9. If you set a system’s network mask to 255.255.255.0, how many computers can you put on the network without using a router?
10. Which file stores information about which DNS servers the system uses?
11. What is LAMP? What is a LAMP application?
12. What is Cacti? How does it communicate the information it provides?