RHCSA & RHCE Red Hat Enterprise Linux 7: Training and Exam Preparation Guide (EX200 and EX300), Third Edition (2015)
Part I. RHCSA Section
Chapter 8. Managing Users and Groups
This chapter describes the following major topics:
· Understand local user authentication files
· Maintain integrity of authentication files
· Prevent corruption in authentication files
· Activate and deactivate shadow password mechanism
· Create, modify, and delete local user accounts with default and custom values
· Set password aging on local user accounts
· Use su and sudo commands
· Create, modify, and delete local group accounts
· Overview of graphical User Manager tool
· Understand per-user and system-wide startup files
RHCSA Objectives:
05. Log in and switch users in multi-user targets
44. Create, delete, and modify local user accounts
45. Change passwords and adjust password aging for local user accounts
46. Create, delete, and modify local groups and group memberships
In order for an authorized person to gain access to the system, a unique username (a.k.a. login name) must be assigned and a user account must be created on the system. This user is apportioned membership to one or more groups. Members of the same group have the same access rights on files and directories. Other users and members of other groups may optionally be given access to those files. User and group account information is recorded in several files, which may be checked for inconsistencies, and edited manually if necessary, by one administrator at a time. Password aging may be set on user accounts for increased access control. Users may switch into other user accounts, including the root user, provided they know their passwords. Regular users on the system may be allowed access to privileged commands by defining them appropriately in the configuration file related to the sudo command. At user login, several user and system startup files are involved.
Understanding Local User Authentication Files
RHEL supports three fundamental user account types: root, normal, and service. The root user, the superuser or the administrator with full access to all services and administrative functions, possesses full powers on the system. This user is automatically created during RHEL installation. The normal users have user-level privileges. They cannot perform any administrative functions, but can run applications and programs that they are authorized to execute. The service accounts are responsible for taking care of the installed services. These accounts include apache, ftp, mail, ntp, postfix, and qemu.
User account information for local users is stored in four files in the /etc directory. These files are passwd, shadow, group, and gshadow, and they are updated when a user account is created, modified, or deleted. The same files are referenced to check and validate the credentials for a user at the time of their login attempt into the system, and hence these files are referred to as user authentication files. These files are so critical to the operation of the system that, by default, the system maintains a backup of each of these files as passwd-, shadow-, group-, and gshadow- in the /etc directory. The shadow and gshadow files, as well as the user administration commands that we will learn in this chapter, are part of the shadow-utils package that is installed on the system at the time of OS installation.
The passwd File
The /etc/passwd file contains vital user login data. Each line entry in the file contains information about one user account. There are seven fields per line entry separated by the colon : character. A sample entry from the file is displayed in Figure 8-1.
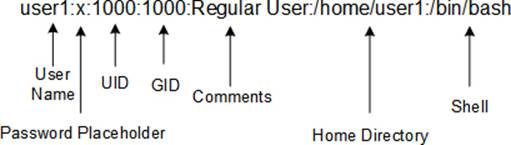
Figure 8-1 The /etc/passwd File
Here is what is stored in each field:
· The first field contains the login name that is used to log into the system. Usernames up to 255 characters, including underscore and hyphen characters, are supported; however, usernames should not use any special characters or uppercase letters.
· The second field can contain an “x” (points to the /etc/shadow file for the actual password), an asterisk * character to identify a disabled account, or an encrypted password containing a combination of random letters, numbers, and special characters in the absence of shadow file.
· The third field comprises a unique number between 0 and approximately 2 billion. This number is known as the User ID (UID). User ID 0 is reserved for the root account; UIDs between 1 and 999 are reserved for system accounts; and UIDs 1000 and beyond are used for normal user and application accounts. By default, RHEL begins assigning UIDs to new users starting at 1000.
· The fourth field holds a number referred to as the Group ID (GID). This number corresponds with a group entry in the /etc/group file. By default, RHEL creates a group for every new user matching their username and the same GID as their UID. The GID defined in this field represents a user’s primary group.
· The fifth field (called GECOS – General Electric Comprehensive Operating System and later changed to GCOS) optionally stores general comments about the user that may include the user’s name, phone number, location, or other useful information to help identify the person for whom, or the application for which, the account is set up. This data may be viewed and modified with the finger and chfn commands, respectively.
· The sixth field defines the absolute path to the user home directory. A home directory is the location where a user is placed after logging into the system, and it is typically used to store personal files for the user. The default location for user home directories is /home.
· The last field consists of the absolute path of the shell file that the user will be using as their primary shell after logging in. Common shells are bash /bin/bash and C /bin/csh. The default shell assigned to users is the bash shell.
An excerpt from the passwd file is shown below:
# cat /etc/passwd
root:x:0:0:root:/root:/bin/bash
bin:x:1:1:bin:/bin:/sbin/nologin
daemon:x:2:2:daemon:/sbin:/sbin/nologin
…… . .
user1:x:1000:1000:user1:/home/user1:/bin/bash
![]() Permissions on the /etc/passwd file should be 644, and the file must be owned by root.
Permissions on the /etc/passwd file should be 644, and the file must be owned by root.
The shadow File
The implementation of the shadow password mechanism provides a more secure password security for local users. With this mechanism in place, not only are the user passwords encrypted and stored in a more secure /etc/shadow file, but certain limits on user passwords in terms of expiration, warning period, etc., can also be applied on a per-user basis. These limits and other settings are defined in the /etc/login.defs file, which the shadow password mechanism enforces on user accounts. This is referred to as password aging. Unlike the passwd file, which is world-readable, the shadowfile is only readable by the root user. This is done to safeguard the file’s contents.
With the shadow password mechanism active, a user is initially checked in the passwd file for existence and then in the shadow file for authenticity.
The shadow file contains extended user authentication information. Each row in the file corresponds to one entry in the passwd file. There are nine colon-separated fields per line entry. A sample entry from this file is exhibited in Figure 8-2.
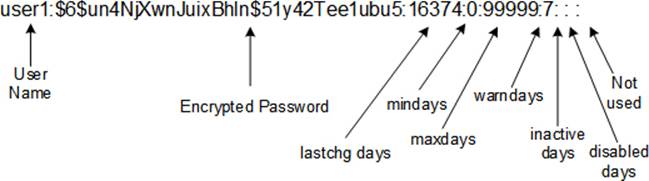
Figure 8-2 The /etc/shadow File
Here is what is stored in each field:
· The first field contains the login name as appears in the passwd file.
· The second field consists of an encrypted password. An exclamation mark ! at the beginning of this field implies that the user account is locked.
· The third field sets the number of days since the epoch time (January 01, 1970) when the password was last modified. An empty field represents the passiveness of password aging features, and a 0 in this field forces the user to change their password upon next login.
· The fourth field expresses the minimum number of days that must elapse before the user can change their password. This field can be altered using the chage command with the –m option or the passwd command with the –n option. A 0 or null in this field disables this feature.
· The fifth field defines the maximum number of days of password validity before the user starts getting warning messages to change it. This field may be altered using the chage command with the –M option or the passwd command with the –x option. A null value in this field disables this feature as well as the maximum password age, warning alerts, and the user inactivity period.
· The sixth field consists of the number of days for which the user gets warnings for changing their password. This field may be altered using the chage command with the –W option or the passwd command with the –w option. A 0 or null in this field disables this feature.
· The seventh field contains the maximum allowable number of days of user inactivity. This field may be altered using the chage command with the –I option or the passwd command with the –i option. A null value in this field disables this feature.
· The eighth field expresses the number of days since the epoch time (January 01, 1970) after which the account expires. This field may be altered using the chage command with the –E option.
· The last field is reserved for future use.
An excerpt from the shadow file is shown below:
# cat /etc/shadow
root:$6$1KaOxxu2tfC2XSzH$uoH5Ajl.OEoK/Hpuy4iihSRloEF/6YPS6RewWQYNbgrUnFHFvIX02kk7e9k0ILkjhYYuZvLCf/lIDQjzpiQoC1:16374:0:99999:7:::
bin:*:16141:0:99999:7:::
daemon:*:16141:0:99999:7:::
…… . .
user1:$6$un4NjXwnJuixBhln$51y42Tee1ubu5VkovOBMQgjoSMWX2eIlDStzpvTeGXsV1cFC3z4n8bnwCsoh.Nq5x8KZqE7XjGpQ1kfINw19w1:16374:0:99999:7:::
![]() Permissions on the shadow file should be 000, and the file must be owned by root.
Permissions on the shadow file should be 000, and the file must be owned by root.
The group File
The /etc/group file contains the group information. Each row in the file stores one group entry. Every user on the system must be a member of at least one group, which is referred to as the user’s primary group. By default, a group name matches the user name it is associated with. This group is known as the User Private Group (UPG) and it safeguards a user’s files from other users. Additional groups may be set up and users with common file access requirements can be added to them. There are four fields per line entry in the file, which are colon-separated. A sample entry from the file is exhibited in Figure 8-3.
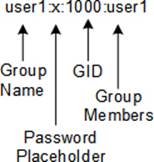
Figure 8-3 The /etc/group File
Here is what is stored in each field:
· The first field holds a unique group name, which must begin with a letter. By default, each user gets a unique group matching their name. Additional groups may be created as per need and users assigned to them. Group names up to 255 characters are supported.
· The second field is not typically used and is left blank. It may, however, contain an encrypted group-level password (copied and pasted from the shadow file or an x that points to the gshadow file for password). We may set a password on a group if we want non-members to be able to change their group identity to this group temporarily using the newgrp command. The non-members must enter the correct password in order to do so.
· The third field defines the group identifier (GID), which is also placed in the GID field of the passwd file. By default, groups are created with GIDs starting at 1000 with the same name as the user name that is assigned to them. The system allows several users to belong to a single group; it also allows a single user to be a member of several groups at the same time.
· The last field identifies the membership for the group. Note that a user’s primary group is defined in the passwd file, and not in the group file.
An excerpt from the group file is shown below:
# cat /etc/group
root:x:0:
bin:x:1:
daemon:x:2:
…… . .
user1:x:1000:user1
![]() Permissions on the group file should be 644, and the file must be owned by root.
Permissions on the group file should be 644, and the file must be owned by root.
The gshadow File
The shadow password implementation also provides an added layer of protection at the group level. With this mechanism active, the group passwords are encrypted and stored in a more secure /etc/gshadow file, which is readable only by the root user. This is done to safeguard the file’s contents.
The gshadow file stores encrypted group passwords. Each row in the file corresponds to one entry in the group file. There are four fields per line entry, which are colon-separated. A sample entry from this file is exhibited in Figure 8-4.
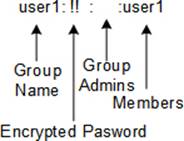
Figure 8-4 The /etc/gshadow File
Here is what is stored in each field:
· The first field consists of the group name as appears in the group file.
· The second field can contain an encrypted password, which may be set with the gpasswd command. A single exclamation point in this field disallows users from gaining access to this group with the newgrp command; a pair of exclamation marks places the same restriction as the single exclamation point, plus it also indicates that a group password has never been set; and a null value restricts the group members to change into this group with newgrp.
· The third field lists usernames of group administrators that are authorized to add or remove members to and from this group with the gpasswd command.
· The last field holds the usernames that belong to the group.
An excerpt from the gshadow file is shown below:
# cat /etc/gshadow
root:::
bin:::
daemon:::
…… . .
user1:!!::user1
![]() Permissions on gshadow file should be 000, and the file must be owned by root.
Permissions on gshadow file should be 000, and the file must be owned by root.
Maintaining Integrity of Authentication Files
Over the period of time or, especially, after making a manual modification, inconsistencies may occur in any of the four authentication files and require administrative attention. The passwd and shadow files are particularly important, as they are the primary sources for validating local user existence and authenticating them. The shadow-utils package offers a tool called pwck that we can use to check the integrity and validity of data in these files. This command checks each line entry for the correct number of fields, uniqueness and validity of the login name, and validity of the UID, GID, primary group, login directory, and the shell file. For the shadow file, it checks for the existence of corresponding entries, the correct number of fields, duplicate entries, the presence of passwords, and some password aging attributes based on the directives defined in the /etc/login.defs file. This command reports any inconsistencies as it finds.
# pwck
user 'ftp': directory '/var/ftp' does not exist
user 'avahi-autoipd': directory '/var/lib/avahi-autoipd' does not exist
user 'pulse': directory '/var/run/pulse' does not exist
user 'gnome-initial-setup': directory '/run/gnome-initial-setup/' does not exist
pwck: no changes
The shadow-utils package offers a cousin of pwck called grpck that is used to verify the information in the group and gshadow files for validity and consistency. This command performs checks on the validity of the number of fields in each line entry and whether a user belonging to a group is absent from the passwd or the shadow file. It reports inconsistencies as well.
Preventing Corruption in Authentication Files
Occasionally, it is imperative for the administrator to modify the passwd file manually using an editor such as vi. If another user attempts to change their password while the file is being edited, it results in a successful password update for the user. Unfortunately, this change is lost when the file is later saved by the administrator.
To prevent this from happening, and to prevent any corruption resulting from such a condition, the shadow-utils package offers two tools called vipw and vigr that allow a privileged user to edit the passwd and group files while disabling write access to them. The same commands are also used to edit the shadow versions of these files when they are executed with the –s option. Both commands make a copy of the respective file in the /etc directory with the .edit extension and also a corresponding lock file with the .lock extension in the same directory. The .edit file stores the changes being made while the .lock file saves the PID of the process. During this time, if a user attempts to change their password, the passwd command accepts the new password and checks for the existence of a .lock file before attempting to update the original file. The presence of a .lock file is an indication for the passwd command that an edit session is in progress and that it has to wait for it to complete. As soon as the administrator finishes with the editing and quits the file, some automatic checks are performed on the file for data and syntax validity. The original file is backed up with the hyphen sign as a suffix to its name and the edited version replaces the original file. The .edit and .lock files are then removed. At this point, the passwd command that was waiting for the editing session to finish goes ahead and updates the user password successfully.
The same rule is applied to other commands that attempt to write to these files while they are being amended. Also, while an instance of either of these tools is running on any of the four files, invoking another session of either of these tools generates an error message similar to the following:
# vigr –s
vigr: Couldn't lock file: Interrupted system call
vigr: /etc/gshadow is unchanged
At the end of an editing session for any of the four files, a message is displayed, reminding us of modifying the corresponding file also. For example, the following reminder is shown after the completion of passwd file modification with the vipw command:
You have modified /etc/passwd.
You may need to modify /etc/shadow for consistency.
Please use the command 'vipw -s' to do so.
And after the execution of the vigr command on the gshadow file:
You have modified /etc/gshadow.
You may need to modify /etc/group for consistency.
Please use the command 'vigr' to do so.
Activating and Deactivating Shadow Password Mechanism
The shadow password mechanism that enables the use of shadow and gshadow files for storing user and group passwords and password aging information may be deactivated if desired. However, this is an undesirable and unrecommended action unless there is a specific need to do so. The shadow-utils package offers four tools, two (pwconv and grpconv) to activate the mechanism and the other two (pwunconv and grpunconv) to deactivate it. These are described in Table 8-1.
|
Command |
Description |
|
pwconv |
Creates and updates the shadow file and moves user passwords over from the passwd file. |
|
pwunconv |
Moves user passwords back to the passwd file and removes the shadow file. |
|
grpconv |
Creates and updates the gshadow file and moves group passwords over from the group file. |
|
grpunconv |
Moves group passwords back to the group file and removes the gshadow file. |
Table 8-1 Password Shadowing Commands
The activation tools reference the /etc/login.defs file for some password aging attributes while being executed. Here are a few examples that show the usage of these commands.
To activate password shadowing if it is not already active:
# pwconv
This command works quietly and does not display any output unless there is a problem. It creates the shadow file with read-only permission for the root user:
![]()
To activate password shadowing at the group level if it is not already active:
# grpconv
This command works quietly and does not display any output unless there is a problem. It creates the gshadow file with read-only permission for the root user:
![]()
To deactivate password shadowing and remove the shadow files, execute the pwunconv and grpunconv commands, respectively.
Managing User Accounts and Password Aging with Commands
Managing user accounts involves creating, assigning passwords to, modifying, and deleting them. Managing password aging involves setting and modifying aging attributes on user accounts. RHEL provides a set of tools and a graphical tool called User Manager for performing these operations. The command toolset is part of the shadow-utils package and the User Manager tool becomes available when the system-config-users package is installed on the system.
Table 8-2 lists and describes the key commands used for user and password management.
|
Command |
Description |
|
useradd |
Adds a user. |
|
usermod |
Modifies user attributes. |
|
userdel |
Deletes a user. |
|
chage |
Sets or modifies password aging attributes for a user. |
|
passwd |
Sets or modifies a user password, and some password aging attributes. |
Table 8-2 User and Password Aging Commands
The useradd, usermod, and userdel Commands
This set of commands is used to add, modify, and delete a user account from the system. The useradd command adds entries to the passwd, group, shadow, and gshadow files for each user added to the system. This command creates a home directory for the user and copies the default user startup files from the skeleton directory /etc/skel into the user’s home directory. It can also be used to update the default settings that are used at the time of new user creation for unspecified settings. The useradd command has several options available with it. Table 8-3 lists most of them in both short and long versions, with an explanation.
|
Option |
Description |
|
–b (--base-dir) |
Defines the absolute path to the base directory for placing user home directories. |
|
–c (--comment) |
Describes useful information about the user. |
|
–d (--home-dir) |
Defines the absolute path to the user home directory. |
|
–D (--defaults) |
Displays or modifies the default settings. |
|
–e (--expiredate) |
Specifies a date after which a user account is automatically disabled. The format for date specification is YYYY-MM-DD. |
|
–f (--inactive) |
Denotes maximum days of inactivity before a user account is declared invalid. |
|
–g (--gid) |
Specifies the primary group identifier. The base GID is 1000. If this option is not used, a group account matching the user name is created with the GID matching the UID. If you wish to assign a different GID, specify it with this option. Make sure that the group already exists. |
|
–G (--groups) |
Specifies the membership for up to 20 comma-separated supplementary groups. If this option is not specified, no supplementary groups are added. |
|
–k (--skel) |
Specifies the location of the skeleton directory (default is /etc/skel), which contains default user startup files. These files are copied to the user’s home directory at the time of account creation. Three bash shell files – .bash_profile, .bashrc, and .bash_logout – are available in this directory by default. You may customize these files or add more files to this directory to ensure new users get them. Existing user home directories are not affected by this change. |
|
–K (--key) |
Overrides some of the default values specified in the /etc/login.defs file. |
|
–M (--no-create-home) |
Prevents the command from creating a home directory for the user. |
|
–m (--create-home) |
Creates a home directory if it does not already exist. |
|
–N (--no-user-group) |
Prevents the command from creating a private group for the user. |
|
–o (--non-unique) |
Creates a user account sharing the UID of an existing user. When two users share a common UID, both get identical rights on each other’s files. This should only be done in specific situations. |
|
–r (--system) |
Creates a system account with a UID below 1000 and a never-expiring password. |
|
–s (--shell) |
Defines the absolute path to the shell file. |
|
–u (--user-group) |
Indicates a unique user identifier. The base UID is 1000. If this option is not specified, the next available UID from the /etc/passwd file is used. |
|
login |
Specifies a login name to be assigned to the new user account. |
Table 8-3 useradd Command Options
We can modify the attributes of a user account with the usermod command. The syntax of this command is very similar to that of the useradd’s, with most options identical. Table 8-4 describes the options that are specific to usermod only, and shows them in both short and long versions.
|
Option |
Description |
|
-a (--append) |
Adds a user to the supplementary group(s). |
|
–l (--login) |
Specifies a new login name. |
|
–L (--lock) |
Locks a user account by placing an exclamation mark at the beginning of the password field and before the encrypted password. |
|
–m (--move-home) |
Creates a new home directory and moves the contents from the old location to here. |
|
–U (--unlock) |
Unlocks a user’s account by removing the exclamation sign from the beginning of the password field. |
Table 8-4 usermod Command Options
The userdel command is straightforward. It removes entries for the specified user from all the authentication files. It also deletes the user’s home directory if the –r option is specified. The –f flag may be used to force the removal even if the user is still logged in.
The chage Command
The chage command is used to set and alter password aging parameters on a user account. It supports a number of options in both short and long versions. Table 8-5 describes most of them.
|
Option |
Description |
|
–d (--lastday) |
Specifies a date in the YYYY-MM-DD format, or number of days since the epoch time when the password was last modified. With –d 0, the user is forced to change the password at next login. It corresponds to the third field in the shadow file. |
|
–E (--expiredate) |
Sets a date in the YYYY-MM-DD format, or number of days since the epoch time on which the user account is deactivated. With -1, this feature can be disabled. It corresponds to the eighth field in the shadow file. |
|
–I (--inactive) |
Defines the number of days of inactivity after the password expiry and before the account is locked. With -1, this feature can be disabled. It corresponds to the seventh field in the shadow file. |
|
–l |
Lists password aging attributes set on a user account. |
|
–m (--mindays) |
Indicates the minimum number of days that must elapse before the password can be changed. A value of 0 in this field allows the user to change their password at any time. It corresponds to the fourth field in the shadow file. |
|
–M (--maxdays) |
Denotes the maximum days of validity of the password before the user starts getting warning messages to change the password. With -1, this feature can be disabled. It corresponds to the fifth field in the shadow file. |
|
–W (--warndays) |
Designates the number of days the user gets warning messages to change password before the password expiry. It corresponds to the sixth field in the shadow file. |
Table 8-5 chage Command Options
We will use most of these options later in this chapter.
The passwd Command
The common use of the passwd command is to set or modify a user’s password; however, we can also use this command to lock and unlock a user account and modify their password aging attributes. Table 8-6 lists some key options in both short and long versions, and describes them.
|
Option |
Description |
|
–d (--delete) |
Deletes a user password without expiring the user account. |
|
–e (--expire) |
Forces a user to change their password upon next logon. |
|
–i (--inactive) |
Defines the number of days of inactivity after the password expiry and before the account is locked. It corresponds to the seventh field in the shadow file. |
|
–k (--keep) |
Re-activates an expired user account without changing the password. |
|
–l (--lock) |
Locks a user account. |
|
–n (--minimum) |
Specifies the number of days that must elapse before the password can be changed. It corresponds to the fourth field in the shadow file. |
|
–u (--unlock) |
Unlocks a user account. |
|
–w (--warning) |
Defines the number of days a user gets warning messages to change password. It corresponds to the sixth field in the shadow file. |
|
–x (maximum) |
Denotes the maximum days of validity of the password before a user starts getting warning messages to change password. It corresponds to the fifth field in the shadow file. |
Table 8-6 passwd Command Options
We will use some of these options in this chapter.
The useradd and login.defs Files
The useradd command picks up the default values from the /etc/default/useradd and /etc/login.defs files for any options that are not specified at the command line. Moreover, the login.defs file is also consulted by the usermod, userdel, chage, and passwd commands as needed. We can view theuseradd file contents with a command such as cat or more, or display the settings with the useradd command as follows:
# useradd –D
GROUP=100
HOME=/home
INACTIVE=-1
EXPIRE=
SHELL=/bin/bash
SKEL=/etc/skel
CREATE_MAIL_SPOOL=yes
We can modify these defaults and set them to our desired values. For instance, the following changes the default base directory to /usr/home as the new location for placing home directories for new users:
# useradd –D –b /usr/home
Confirm the new value by running useradd –D again.
The other file /etc/login.defs comprises of additional directives that set several defaults. User and group management commands consult this file to obtain information that is not specified at the command line. A grep on the uncommented and non-empty lines is shown below:
|
# grep –v ^# /etc/login.defs |
| grep –v ^$ |
|
MAIL_DIR |
/var/spool/mail |
|
PASS_MAX_DAYS |
99999 |
|
PASS_MIN_DAYS |
0 |
|
PASS_MIN_LEN |
5 |
|
PASS_WARN_AGE |
7 |
|
UID_MIN |
1000 |
|
UID_MAX |
60000 |
|
SYS_UID_MIN |
201 |
|
SYS_UID_MAX |
999 |
|
GID_MIN |
1000 |
|
GID_MAX |
60000 |
|
SYS_GID_MIN |
201 |
|
SYS_GID_MAX |
999 |
|
CREATE_HOME |
yes |
|
UMASK |
077 |
|
USERGROUPS_ENAB |
yes |
|
ENCRYPT_METHOD |
SHA512 |
These directives define the mail directory location for the user (MAIL_DIR), password aging attributes (PASS_MAX_DAYS, PASS_MIN_DAYS, PASS_MIN_LEN, and PASS_WARN_AGE), range of UIDs and GIDs to be allocated to new user and group accounts (UID_MIN, UID_MAX, GID_MIN and GID_MAX), range of UIDs and GIDs to be allocated to new system user and group accounts (SYS_UID_MIN, SYS_UID_MAX, SYS_GID_MIN and SYS_GID_MAX), and instructions for the useradd command to create a home directory (CREATE_HOME), set the default umask to 077 (UMASK), delete the user’s group if it contains no more members (USERGROUPS_ENAB), and use the SHA512 algorithm for encrypting user passwords (ENCRYPT_METHOD).
Exercise 8-1: Create a User Account with Default Values
This exercise should be done on server1.
In this exercise, you will create a user account user2 with all the defaults defined in the useradd and login.defs files. You will assign the user a password and show the line entries from the passwd, shadow, group, and gshadow files for this user.
1. Create user2 with all the default values:
# useradd user2
2. Create a password for this user:
# passwd user2
New password:
Retype new password:
passwd: all authentication tokens updated successfully.
3. grep for user2 on the passwd, shadow, group, and gshadow files to check what the useradd command has added:
# cd /etc; grep user2 passwd shadow group gshadow
passwd:user2:x:1001:1001::/home/user2:/bin/bash
shadow:user2:$6$GnGxfNMq$/WW79FsKs4dY2GuLPRfT31Q6/pBiavyjWiIDabw7fF6z3Ek6FainvuaZaGMc/Bk0EtWXuaUc1l3QQyyifFeSw0:16377:0:99999:7:::
group:user2:x:1001:
gshadow:user2:!::
4. Test this new account by logging in as user2 and supplying the assigned password.
As we can see, the command used the next available UID and GID, and the default settings for the home directory, shell file, and password aging.
Exercise 8-2: Create a User Account with Custom Values
This exercise should be done on server1.
In this exercise, you will create an account user3 with UID 1010, home directory /home/user3, shell /bin/bash, membership in group user3 with GID 1010, and default startup files copied into this user’s home directory. You will assign this user a password and grep the line entries from the passwd,shadow, group, and gshadow files.
1. Create user3 with UID 1010 (–u), home directory /home/user3 (–m and –d) shell /bin/bash (–s) membership in group 1001 (–g), and default startup files copied into this user’s home directory (–k):
# useradd –u 1010 –g 1001 –m –d /home/user3 –k /etc/skel –s /bin/bash user3
2. Assign user123 as password (passwords assigned this way is not recommended; however, it is okay in a lab environment):
# echo user123 | passwd --stdin user3
3. grep for user3 on the passwd, shadow, group, and gshadow files to see what was added for this user:
# cd /etc ; grep user3 passwd shadow group gshadow
passwd:user3:x:1010:1010::/home/user3:/bin/bash
shadow:user3:$6$MA1lX3Qy$xhXx7oiEYDx1ELtGMxsovRnha7MHa5lRAhb8KUWJB2vh8zYFgDwR3TNExyluK0.Pz4rP2SzINXvMxr6P3yUky1:16377:0:99999:7:::
group:user3:x:1010:
gshadow:user3:!::
4. Test this account by logging in as user3 and entering user123 as the password.
Exercise 8-3: Create a User Account with No Login Access
This exercise should be done on server1.
In this exercise, you will create an account user4 with all the default values but without login access. You will assign this user a nologin shell to prevent it from logging into the system. You will grep the line entry from the passwd file and test the account.
1. Create user4 with shell file /sbin/nologin:
# useradd –s /sbin/nologin user4
2. Assign user123 as password:
# echo user123 | passwd --stdin user4
3. grep for user4 on the passwd file and verify the shell field containing the nologin shell:
# cd /etc ; grep user4 passwd
passwd:user4:x:1011:1011::/home/user4:/sbin/nologin
4. Test this account by attempting to log in as user4:
# su – user4
This account is currently not available.
The message “This account is currently not available” is displayed when a user with a nologin shell attempts to log in. This shell is primarily used for application accounts that do not require login access to the system. It can also be assigned to a regular user to disable access temporarily using theusermod command.
Exercise 8-4: Set up Password Aging on User Accounts
This exercise should be done on server1.
In this exercise, you will configure password aging for user2 using the passwd command. You will set mindays to 7, maxdays to 28, and warndays to 5. You will run the chage command to display the aging settings on this account.
Next, you will configure aging for user3 using the chage command. You will set mindays to 10, maxdays to 30, warndays to 7, and expiry to December 31, 2015. You will run the chage command to display the updated settings.
1. Configure password aging for user2 with mindays (–n) set to 7, maxdays (–x) to 28, and warndays (–w) to 5 using the passwd command:
# passwd –n 7 –x 28 –w 5 user2
Adjusting aging data for user user2.
passwd: Success
2. Confirm the new settings with the chage command:
# chage –l user2
…… . .
Minimum number of days between password change : 7
Maximum number of days between password change : 28
Number of days of warning before password expires : 5
3. Configure password aging for user3 with mindays (–m) set to 10, maxdays (–M) to 30, warndays (–W) to 7, and account expiry set to December 31, 2015:
# chage –m 10 –M 30 –W 7 –E 2015-12-31 user3
4. Display the new settings for confirmation:
# chage –l user3
…… . .
|
Account expires |
: Dec 31, 2015 |
|
Minimum number of days between password change |
: 10 |
|
Maximum number of days between password change |
: 30 |
|
Number of days of warning before password expires |
: 7 |
Exercise 8-5: Modify and Delete a User Account
This exercise should be done on server1.
In this exercise, you will modify certain attributes for user2 and user3 using the usermod and chage commands, and then delete user4 using the userdel command. You will change the login name for user2 to user2new, UID to 2000, home directory to /home/user2new, and login shell to/sbin/nologin. You will grep the passwd file for user2new to validate the updates. You will set a new expiry on this user to February 29, 2016 and validate it with the chage command.
Next, you will modify user3 to force this user to change password at next login, be unable to change password within five days following the last password change, and disable account expiry. You will validate the change with the chage command.
Finally, you will lock user4, delete it, and confirm the deletion.
1. Modify the login name for user2 to user2new (–l), UID to 2000 (–u), home directory to /home/user2new (–m and –d) and login shell to /sbin/nologin (–s):
# usermod –u 2000 –m –d /home/user2new –s /sbin/nologin –l user2new user2
2. Obtain the information for user2new from the passwd file to confirm the changes:
# grep user2new /etc/passwd
user2new:x:2000:1001::/home/user2new:/sbin/nologin
3. Set February 29, 2016 as the new expiry date for user2new:
# usermod –e 2016-02-29 user2new
4. Confirm the new expiry for user2new:
# chage –l user2new
…… . .
Account expires : Feb 29, 2016
…… . .
5. Modify user3 to expire this user’s password and prompt to change it at next login (–d), be unable to change password within five days following the last password change (–m), and disable account expiry (–E –1):
# chage –d 0 –m 5 –E -1 user3
6. Confirm the aging updates for user3:
|
# chage –l user3 |
|
|
Last password change |
: password must be changed |
|
Password expires |
: password must be changed |
|
Password inactive |
: password must be changed |
|
Account expires |
: never |
|
Minimum number of days between password change |
: 5 |
|
Maximum number of days between password change |
: 30 |
|
Number of days of warning before password expires |
: 7 |
7. Lock user4 using either of the following:
# usermod –L user4 (or passwd –l user4)
Locking password for user user4.
passwd: Success
8. Remove user4 along with home and mail spool directories (–r):
# userdel –r user4
9. Confirm user4 deletion:
# grep user4 /etc/passwd
Switching Users
Even though we can log in to the system directly as root, it is not a recommended practice. The recommended practice is to log in with our own normal user account and then switch into the root account if necessary. This is safer and ensures system security and protection. In addition to becomingroot, we can switch into another user account as well. In either case, we need to know the password for the target user account in order for a successful switch. The su command available in RHEL provides us with the ability to switch into other user accounts. The following presents a few examples to understand the usage.
To switch from user1 to root without executing startup scripts for the target user:
$ su
Password:
To repeat the above while ensuring that startup scripts for the target user are also executed to provide an environment similar to a real login:
$ su –
Password:
To switch into a different user account, such as user3, specify the name of the target user with the command:
$ su – user1
Password:
To issue a command as a different user without switching into that user, the –c option is available with su. For example, the firewall-cmd command with the --list-services option requires superuser privileges. user1 can use su as follows and execute this privileged command to obtain desired results:
$ su –c ‘firewall-cmd --list-services’
Password:
dhcpv6-client ssh
The root user can switch into any other user account on the system without being prompted for that user’s password.
Doing as Superuser
RHEL offers a way for normal users to be able to run an assigned set of privileged commands without the knowledge of the root password. This allows the flexibility of assigning a specific command or a set of commands to an individual user or a group of users based on their needs. These users can then precede one of those commands with a utility called sudo (superuser do) at the time of executing that command. The users are prompted to enter their own password, and if correct, the command is executed successfully. The sudo utility is designed to provide protected access to administrative functions as defined in the /etc/sudoers file. It can also be used to allow a user or a group of users to run scripts and applications owned by a different user.
Any normal user who requires access to one or more administrative commands is defined in the sudoers file. This file can be edited with the visudo command, which creates a copy of the file as sudoers.tmp and applies the changes there. After the visudo session is over, the updated file overwrites the original sudoers file, and sudoers.tmp is deleted. This is done to prevent multiple users editing the file simultaneously.
The syntax for user and group entries in the file is similar to the following example entries for user user1 and group dba:
|
user1 |
ALL=(ALL) |
ALL |
|
%dba |
ALL=(ALL) |
ALL |
These entries provide ALL privileges to ALL administrative commands on the system to both user1 and members of the dba group (group is prefixed by the % sign).
Now, when user1 or any dba group member executes a privileged command, they will be required to enter their own password. For instance:
$ sudo system-config-users
Password:
If we want user1 and dba group members not to be prompted for a password, we can modify their entries in the sudoers file to look like:
![]()
To restrict user1 and dba group members to run only the system-config-printer and system-config-users commands, modify the directives as follows:
|
user1 |
ALL=/usr/bin/system-config-printer,/usr/bin/system-config-users |
|
%dba |
ALL=/usr/bin/system-config-printer,/usr/bin/system-config-users |
Configuring sudo to work the way it has just been explained may result in a cluttered sudoers file containing too many entries. To avoid this and for better management of this file, sudo allows us to use aliases to define groups of users, commands, and hosts using the User_Alias, Cmnd_Alias, and Host_Alias directives available in the file. For instance, we can define a Cmnd_Alias called PKGCMD containing yum and rpm package management commands, and a User_Alias called PKGADM containing users user1 to user5. These users may or may not belong to the same Linux group. We then give PKGADM access to PKGCMD. This way we set one rule that allows a group of users access to a group of commands. We can add or remove commands and users anytime as needed. Here is what needs to be added to the sudoers file to achieve this:
|
Cmnd_Alias |
PKGCMD = /usr/bin/yum, /usr/bin/rpm |
|
User_Alias |
PKGADM = user1, user2, user3, user4, user5 |
|
%PKGADM |
ALL = PKGCMD |
The sudo command logs successful authentication and command data to the /var/log/secure file. It uses the name of the actual user executing the command (and not root).
The sudoers file contains several examples with a brief explanation. It is a good idea to look at those examples for a better understanding.
Managing Group Accounts with Commands
Managing group accounts involves creating and modifying groups, adding and deleting group members and administrators, setting and revoking group-level password, and deleting groups. RHEL provides a set of tools and the graphical User Manager for performing these operations. The command toolset is part of the shadow-utils package and the User Manager GUI application becomes available when the system-config-users package is installed on the system.
Table 8-7 lists and describes group account management commands.
|
Command |
Description |
|
groupadd |
Adds a group. |
|
groupmod |
Modifies group attributes. |
|
groupdel |
Deletes a group. |
|
gpasswd |
Adds group administrators, adds or deletes group members, assigns or revokes a group password, and disables newgrp command access to a group. |
Table 8-7 Group Management Commands
We will use these commands for group management later in this chpater.
The groupadd, groupmod, and groupdel Commands
This set of commands is used to add, modify, and delete a group account from the system. The groupadd command adds entries to the group and gshadow files for each group added to the system. The groupadd command has a few options available with it. Table 8-8 lists them in both short and long versions, and explains them.
|
Option |
Description |
|
–g (--gid) |
Specifies the GID to be assigned to the group. |
|
–o (--non-unique) |
Creates a group account sharing the GID of an existing group. When two groups share a common GID, members of each group get identical rights on each other’s files. This should only be done in specific situations. |
|
–r |
Creates a system group account with a GID below 1000. |
|
groupname |
Specifies a group name. |
Table 8-8 groupadd Command Options
The groupadd command picks up the default values from the login.defs file.
We can modify the attributes of a group account with the groupmod command. The syntax of this command is very similar to that of the groupadd’s, with most options identical. The only option that is additional with this command is –n, which allows us to change the name of an existing group.
The groupdel command is straightforward. It removes entries for the specified group from both group and gshadow files.
The gpasswd Command
The gpasswd command can be used to add group administrators, add or delete group members, assign or revoke a group password, and disable access to a group via the newgrp command. The root user can perform all of these tasks, while the group administrator can perform only the last three. This command prompts to change the group password if invoked by root or the group administrator. The gpasswd command updates the group and gshadow files. There are several options available with this command, and these are explained in Table 8-9.
|
Option |
Description |
|
–A (--administrators) |
Adds one or more group administrators. Inserts an entry in the third field of the gshadow file. |
|
–a (--add) |
Adds a group member. Inserts an entry in the fourth field of both group and gshadow files. |
|
–d (--delete) |
Deletes a group member. |
|
–M (--members) |
Substitutes all existing group members. |
|
–R (--restrict) |
Disables access to a group for non-members. Members with a password can still join the group. |
|
–r (--remove-password) |
Revokes the password set on a group. Only group members can join the group. |
Table 8-9 gpasswd Command Options
This command picks up the default values from the /etc/login.defs file.
Exercise 8-6: Create, Modify, and Delete Group Accounts
This exercise should be done on server1.
In this exercise, you will create a group account called linuxadm with GID 5000 and another group account called sales sharing the GID 5000. You will change the group name from sales to mgmt and then change the GID for linuxadm from 5000 to 6000. You will add user1 to linuxadm and verify this action with the id and groups commands. Finally, you will remove the mgmt group.
1. Create group account linuxadm with GID 5000:
# groupadd –g 5000 linuxadm
2. Create group account sales sharing the GID of group linuxadm:
# groupadd –o –g 5000 sales
3. Alter the name of group sales to group mgmt:
# groupmod –n mgmt sales
4. Change the GID of linuxadm group to 6000:
# groupmod –g 6000 linuxadm
5. Add user user1 to group linuxadm while retaining the user’s existing memberships:
# usermod –a –G linuxadm user1
6. Verify group memberships for user1:
# id user1
uid=1000(user1) gid=1000(user1) groups=1000(user1),10(wheel),6000(linuxadm)
# groups user1
user1 : user1 wheel linuxadm
7. Delete the mgmt group:
# groupdel mgmt
Exercise 8-7: Manage Groups with gpasswd Command
This exercise should be done on server1.
In this exercise, you will add user1 and user2new as group administrators and user2new and user3 as members of the linuxadm group. You will substitute both existing group members with user4 (create this group if it does not exist) and assign a group password to the linuxadm group. You will log in as user4 and list current primary group membership for user4. You will switch the primary group to linuxadm and validate.
1. Add user1 and user2new as administrators to the linuxadm group:
# gpasswd –A user1,user2new linuxadm
2. Add user2new and user3 as members to the linuxadm group:
# gpasswd –a user2new –a user3 linuxadm
Adding user user3 to group linuxadm
3. Create user4 with default values and assign password user123:
# useradd user4 ; echo user123 | passwd --stdin user4
Changing password for user user4.
passwd: all authentication tokens updated successfully.
4. Substitute user2new and user3 with user4 as a member of the linuxadm group:
# gpasswd –M user4 linuxadm
5. Set a password on the linuxadm group:
# gpasswd linuxadm
Changing the password for group linuxadm
New Password:
Re-enter new password:
6. Log in as user4 and run the groups command to list group membership for user4. The primary group is listed first.
$ groups
user4 linuxadm
7. Temporarily change the primary group for user4 to linuxadm:
$ newgrp linuxadm
8. Verify the new primary group membership for user4. It should be listed first in the output.
$ groups
linuxadm user4
9. Return to the original primary group by issuing the exit command or pressing Ctrl+d, and verify:
$ exit
exit
$ groups
user4 linuxadm
Managing Users, Groups, and Password Aging with the User Manager Tool
The User Manager is a graphical equivalent for performing most user and group administrative functions. This application can be used to view, add, modify, and delete local user and group accounts, set and modify password aging attributes, lock and unlock user accounts, and so on. It can be invoked with the system-config-users command or by choosing Applications | Sundry | Users and Groups. The main window (similar to what is shown in Figure 8-5) will appear.
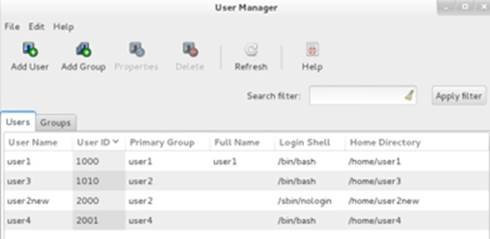
Figure 8-5 User Manager – Main Menu
There are two tabs: Users and Groups, as depicted in the main window above. The Users tab shows a list of all normal local users on the system that currently exist. Along with usernames, it also shows the corresponding UID, primary group, full name, login shell, and home directory. The Groups tab shows a list of all local groups on the system, along with their GIDs and membership.
Across the top are Add User and Add Group buttons that allow us to add new user and group accounts. Figures 8-6 and 8-7 show the interfaces that appear when we click on these buttons. The fields are self-explanatory.
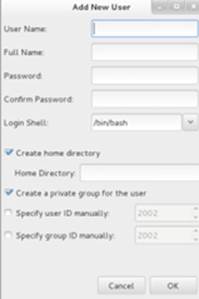
Figure 8-6 User Manager – Add New User
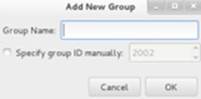
Figure 8-7 User Manager – Add New Group
The Properties button at the top of the main window is activated when we highlight a user or group account. It allows us to display and modify the highlighted user or group. For User Properties, four tabs (User Data, Account Info, Password Info, and Groups) are available, as shown in Figure 8-8. Select User Data to modify general user information; select Account Info to enable and set account expiration or lock the user; choose Password Info to enable and set password aging; and choose Groups to modify the selected user’s primary or secondary group membership.
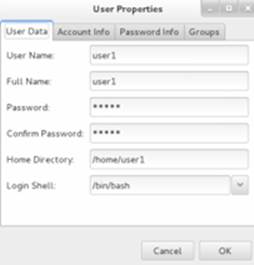
Figure 8-8 User Manager – Display / Modify User Properties
Highlight a group account in the Groups tab and click Properties at the top to display and modify the highlighted group’s name or membership. Here, two tabs (Group Data and Group Users) are available, as shown in Figure 8-9. Select Group Data to modify the group name and choose Group Users to modify group membership.
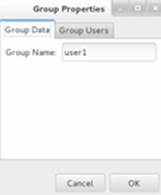
Figure 8-9 User Manager – Display / Modify Group Properties
The Delete button at the top of the main window is activated when we highlight a user or group account; this button is used to remove the highlighted user or group from the system.
Shell Startup Files
In Chapter 04 “Dealing with the Bash Shell, Processes, and Scheduling” we used local and environment variables, and modified the default command prompt to add useful information to it. In other words, we modified the default shell environment to customize it according to our needs. The changes we made were lost when we logged off. What if we wanted to make those changes permanent so that each time we logged in they were there for us?
Modifications to the default shell environment can be stored in startup (or initialization) files. These files are sourced by the shell following user authentication at the time of logging in and before the initial command prompt appears. In addition, aliases, functions, and scripts can be added to these files as well. There are two types of startup files: system-wide and per-user.
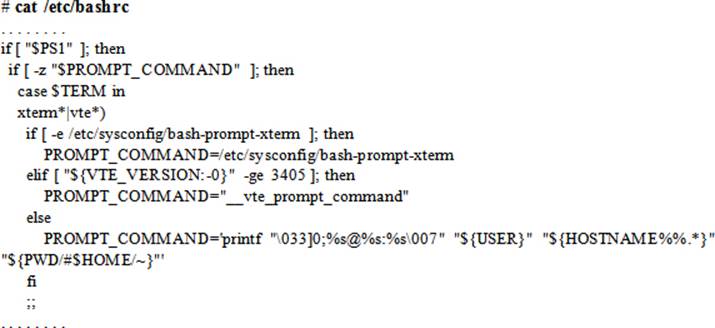
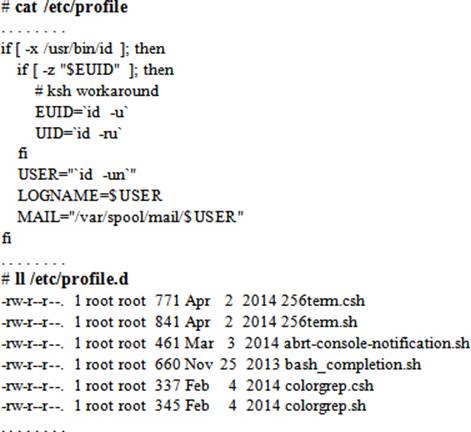
System-wide Shell Startup Files
System-wide startup files set the general environment for all users at the time of their login to the system. These files are located in the /etc directory and are maintained by the system administrator. System-wide files can be modified to include or exclude general environment settings and customizations that are needed by every user on the system.
Table 8-10 lists and describes system-wide startup files for bash shell users.
|
File |
Comments |
|
/etc/bashrc |
Defines functions and aliases, and sets the umask value, the command prompt, etc. It includes settings from the shell scripts located in the /etc/profile.d directory. |
|
/etc/profile |
Sets common environment variables such as PATH, USER, LOGNAME, MAIL, HOSTNAME, HISTSIZE, and HISTCONTROL for users and startup programs. It processes shell scripts located in the /etc/profile.d directory. |
|
/etc/profile.d |
Contains scripts for bash and C shell users that are executed by the /etc/profile file. Additional scripts may be created here for further customizing the environment. |
Table 8-10 System-wide Startup Files
Excerpts from the bashrc and profile files, and a list of files in the profile.d directory are displayed below:
Per-user Shell Startup Files
Per-user shell startup files override or modify system default definitions set by system-wide startup files. These files may be customized by individual users to suit their needs. By default, two such files (in addition to the .bash_logout file) located in the /etc/skel directory are copied into user home directories at the time of their creation.
We may create additional files in our home directories to set more environment variables or shell properties.
Table 8-11 lists and describes per-user startup files for bash shell users.
|
File |
Comments |
|
∼/.bashrc |
Defines functions and aliases. This file sources global definitions from the /etc/bashrc file. |
|
∼/.bash_profile |
Sets environment variables. This file sources the ∼/.bashrc file to set functions and aliases. |
|
∼/.gnome2/ |
Directory that holds environment settings when GNOME desktop is started. Only available if GNOME is installed. |
Table 8-11 Per-user Startup Files
Excerpts from the .bashrc and .bash_profile files for the root account are displayed below:
# cat ∼/.bashrc
# .bashrc
# User specific aliases and functions
alias rm='rm -i'
alias cp='cp -i'
alias mv='mv -i'
# Source global definitions
if [ -f /etc/bashrc ]; then
. /etc/bashrc
fi
# cat ∼/.bash_profile
# .bash_profile
# Get the aliases and functions
if [ -f ∼/.bashrc ]; then
. ∼/.bashrc
fi
# User specific environment and startup programs
PATH=$PATH:$HOME/bin
export PATH
The order in which the system-wide and per-user startup files are executed is important. The system runs the /etc/profile file first, followed by ∼/.bash_profile, ∼/.bashrc, and /etc/bashrc files.
Chapter Summary
We started this chapter by building an understanding of local user authentication files: passwd, shadow, group, and gshadow. We looked at their contents and syntax, and saw how to verify their consistency. We looked at ways to lock these files while being edited to avoid losing changes made by other users during that time.
We discussed password shadowing and password aging. We learned about user management including creating, modifying, and deleting user accounts. We looked at setting and modifying password aging attributes on user accounts. We learned the tools to switch into other user accounts and to run privileged commands as a normal user.
We studied group management including creating, modifying, and deleting group accounts. We reviewed the graphical User Manager tool and saw how to manage user and group accounts, and password aging in a graphical setting.
Finally, we learned about the system-wide and per-user startup files, and understood their contents.
Chapter Review Questions
1. What are the two utilities for manually editing shadow password files exclusively?
2. What are the two tools for checking shadow password files consistency?
3. What does the “x” in the password field in the passwd file imply?
4. What would the command useradd –D do?
5. Name the four local user authentication files.
6. The passwd file contains secondary user group information. True or False?
7. What does the gpasswd command do?
8. What is the name and location of the sudo configuration file?
9. Which command would we use to add group administrators?
10. Name the two types of shell startup files?
11. What would the command passwd –l user10 do?
12. What is the first UID assigned to a regular user?
13. Name the three fundamental user account categories in RHEL.
14. Every user in RHEL gets a private group by default. True or False?
15. What would the userdel command do if it is run with the –r option?
16. What is the first GID assigned to a group?
17. Write two command names for managing password aging.
18. What is the name of the default backup file for shadow?
19. What would the command chage –E 2015-12-31 user10 do?
20. What would the command chage –l user5 do?
21. What is the difference between running the su command with and without the dash sign?
22. What is the significance of the –o option with the groupadd and groupmod commands?
23. What would the command passwd –n 7 –x 15 –w 3 user5 do?
24. What two commands are used to create and update the shadow and gshadow files?
25. What would the command useradd user500 do?
26. Which command is used to change a user’s primary group temporarily?
27. What would the command chage –d 0 user60 do?
28. What four local files are updated when a user account is created?
29. UID 999 is reserved for normal users. True or False?
30. The /etc/bashrc file contains shell scripts that are executed at user login. True or False?
Answers to Chapter Review Questions
1. The vipw and vigr utilities.
2. The pwck and grpck tools.
3. The “x” in the password field implies that the encrypted password is stored in the shadow file.
4. This command displays the defaults used at the time of user creation or modification.
5. The passwd, shadow, group, and gshadow files.
6. False. The passwd file contains primary user group information.
7. The gpasswd command is used to add group administrators, add or delete group members, assign and revoke a group password, and disable access to a group with the newgrp command.
8. The sudo configuration file is /etc/sudoers.
9. The gpasswd command.
10. The two types of shell startup files are system-wide and per-user.
11. This command will lock user10.
12. The first UID assigned to a regular user is 1000.
13. The three fundamental user account categories are root, normal, and system.
14. True.
15. The command provided will delete the specified user and their home directory.
16. The first GID assigned to a regular user is 1000.
17. The passwd and chage commands.
18. The name of the default backup file for shadow is shadow-.
19. The command provided will set December 31, 2015 as the expiry date for user10.
20. The command provided will display password aging attributes for user5.
21. With the dash sign the su command will process the specified user’s startup files, and it won’t without this sign.
22. The –o option lets the commands set a duplicate GID on a group.
23. The command will set mindays to 7, maxdays to 15 and warndays to 3 for user5.
24. The pwconv and grpconv commands.
25. The command provided will add user500 with all pre-defined default values.
26. The newgrp command.
27. The command provided will force user60 to change their password at next login.
28. The passwd, shadow, group, and gshadow files are updated when a user account is created.
29. False.
30. False.
DIY Challenge Labs
The following labs are useful to strengthen most of the concepts and topics learned in this chapter. It is expected that you perform these labs without any additional help. A step-by-step guide is not provided, as the implementation of these labs requires the knowledge that has been presented in this chapter. Use defaults or your own thinking for missing information.
Lab 8-1: Create and Modify a User Account
Create a user account called user4000 with UID 4000, GID 5000, and home directory located in /usr. GID 5000 should be assigned to group lnxgrp. Assign this user a password and establish password aging attributes so that this user cannot change their password within 4 days after setting it, with a password validity of 30 days. This user should get warning messages for changing password for 7 days before their account is locked. This account needs to expire on the 20th of December, 2016.
Lab 8-2: Modify a Group Account
Modify the GID from 5000 to 6000 for the lnxgrp group. Add users user1 and user2new as members, and user3 as the group administrator. Assign a group password and use the newgrp command as user4 to validate that the password is working. Change this group’s name to dbagrp and verify.
All materials on the site are licensed Creative Commons Attribution-Sharealike 3.0 Unported CC BY-SA 3.0 & GNU Free Documentation License (GFDL)
If you are the copyright holder of any material contained on our site and intend to remove it, please contact our site administrator for approval.
© 2016-2026 All site design rights belong to S.Y.A.