RHCSA & RHCE Red Hat Enterprise Linux 7: Training and Exam Preparation Guide (EX200 and EX300), Third Edition (2015)
Part I. RHCSA Section
Chapter 9. Partitioning and Managing Disk Storage
This chapter describes the following major topics:
· MBR vs GPT
· Add more storage for practice
· Create and delete partitions on MBR disks
· Create and delete partitions on GPT disks
· Overview of graphical Disk Utility
· Understand LVM concepts, components, and structure
· Use LVM to initialize and uninitialize a physical volume; create, display, extend, reduce, and remove a volume group; and create, display, extend, reduce, and remove a logical volume
RHCSA Objectives:
21. List, create, and delete partitions on MBR and GPT disks
22. Create and remove physical volumes, assign physical volumes to volume groups, and create and delete logical volumes
24. Add new partitions and logical volumes, and swap to a system non-destructively
27. Extend existing unencrypted logical volumes
Data is stored on disk drives that are logically divided into partitions. A partition can exist on a portion of a disk, on an entire disk, or it may span multiple disks. Each partition may contain a file system, a raw data space, a swap space, or a dump space.
A file system is used to hold files and directories, a raw data space may be used for databases and other applications for faster access, a swap space is defined to supplement the physical memory on the system, and a dump space is created to store memory and kernel images after a system crash has occurred.
RHEL offers several toolsets for partitioning and managing disk storage. These toolsets include the parted and gdisk utilities and the Logical Volume Manager (LVM). Additional tools, such as fdisk, sfdisk, and cfdisk, are also available for this purpose. Partitions created with a combination of most of these tools can co-exist on a single disk. This chapter provides detailed coverage for storage management using parted, gdisk, and LVM.
In this chapter, exercises will be performed on server1, which was built in Chapter 06 “Configuring Server Virtualization and Network Installing RHEL7”.
MBR vs GPT
A disk in RHEL can be carved up into several partitions. This partition information is stored on the disk in a small region, which is read by the operating system at boot time. This region is referred to as the Master Boot Record (MBR) on the BIOS-based systems, and GUID Partition Table (GPT) on the UEFI-based systems. At system boot, the BIOS/UEFI scans all storage devices, detects the presence of MBR/GPT, identifies the boot disks, loads the boot loader program in memory from the default boot disk, executes the boot code to read the partition table and identify the /boot partition, and continues with the boot process by loading the kernel in the memory and passing control over to it. Though MBR and GPT are designed for different PC firmware types, their job is the same: to store partition information and the boot code.
The MBR is resident on the first sector of the boot disk. It has limitations that led to the design, development, and use of GPT type. MBR allows the creation of only up to four primary partitions on a single disk, with the flexibility of using one of the four partitions as an extended partition to hold an arbitrary number of logical partitions in it. The other limitation is its lack of addressing space beyond 2TB. This is due to its 32-bit nature and the disk sector size of 512-byte that it uses. The MBR is non-redundant; the record it contains is not replicated, resulting in an unbootable system if it gets corrupted somehow.
With the increasing use of disks larger than 2TB on x86 computers, a new 64-bit partitioning standard called Globally Unique IDentifiers (GUID) Partition Table (GPT) was developed and integrated in to the UEFI firmware. This new standard introduced several enhancements, including allowing the construction of 128 partitions, use of disks much larger than 2TB, use of 4KB sector, and redundant location for the storage of partition information. Moreover, this standard allows a BIOS-based system to boot from a GPT disk, using the boot loader program stored in a protective MBR at the first disk sector.
RHEL offers several tools for disk storage management, which includes parted, gdisk, fdisk, and LVM. In this chapter, parted, gdisk, and LVM are presented. parted understands both MBR and GPT formats. gdisk (a.k.a. GPT fdisk) is designed to support the GPT format only and can be used instead of parted. The fdisk utility does not understand GPT and cannot address space exceeding 2TB, and hence it is not discussed.
Adding and Verifying Virtual Block Storage
This chapter and the next have several exercises that require block storage devices for practice. In Chapter 01 “Installing RHEL7 on Physical Computer Using Local DVD”, we mentioned that server1 will have access to five 2GB virtual disks created on host1; of these, four will be used for partedand LVM exercises and the last one will be utilized for iSCSI exercises later in the RHCE section of this book. Therefore, we will need to create four virtual disks now and make them available to server1. The fifth disk will be created in the iSCSI chapter.
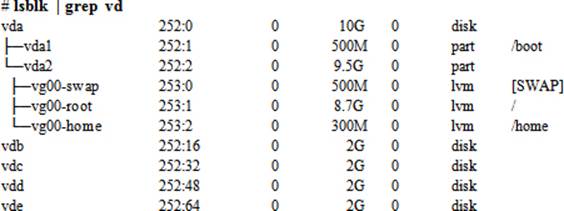
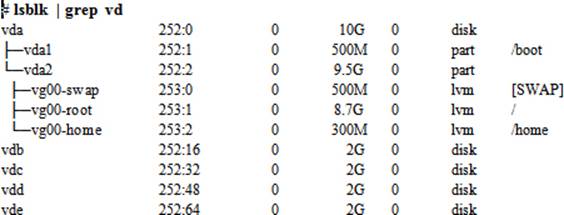
Before we create any new disks, run the lsblk command on server1 to determine what this server currently has in terms of disks and partitions:
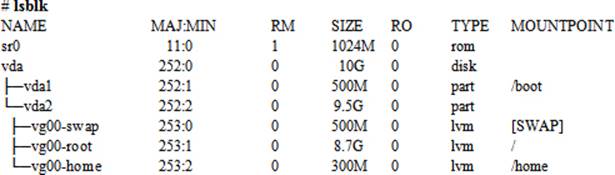
The output indicates the presence of one virtual disk vda on server1. This disk is 10GB in size and it contains two partitions: vda1 and vda2. The first partition holds /boot and the second one is an LVM physical volume with swap, root, and home logical volumes residing in it. Both vda1 and vda2partitions occupy the entire disk capacity. The sr0 represents the CDROM device.
![]() vd represents virtual disk, a represents the first disk, b represents the second disk, and so on. 1 identifies the first partition on the disk, 2 identifies the second partition on the disk, and so on. Therefore, vda1 means the first partition on the first virtual disk and vda2 is the second partition on the same disk.
vd represents virtual disk, a represents the first disk, b represents the second disk, and so on. 1 identifies the first partition on the disk, 2 identifies the second partition on the disk, and so on. Therefore, vda1 means the first partition on the first virtual disk and vda2 is the second partition on the same disk.
Adding 3x2GB Virtual Block Disks Using virt-manager
Let’s create on host1 four 2GB virtual block disks and attach them to server1 for use in parted and LVM exercises in this and the next chapter. For this purpose, we can either use the virt-manager GUI or the virsh command. The following procedure will demonstrate adding three virtual disk devices with the GUI tool.
Start virt-manager and open the console for server1 by right-clicking on it. Click the “Show virtual hardware details” button right beside the console icon below the menu bar. See Figure 9-1.
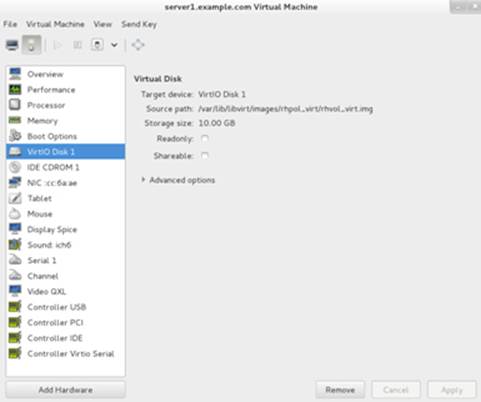
Figure 9-1 Adding Virtual Disks to Server – Step 1 of 2
Figure 9-1 shows the presence of the 10GB vda disk, which holds the operating system. Click Add Hardware in the bottom left and a window similar to the one shown in Figure 9-2 will appear. Assign 2GB size, select “Allocate entire disk now”, and choose “Virtio disk” for the device type. Click Finish when done. Repeat the procedure and add two more disks.
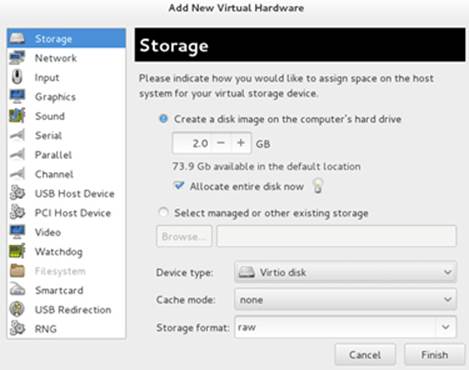
Figure 9-2 Adding Virtual Disks to Server – Step 2 of 2
Adding 1x2GB Virtual Block Disk Using Command Line
Now create one virtual block disk on host1 and attach it to server1 using a combination of qemu-img and virsh commands. To that end, execute qemu-img while in the /var/lib/libvirt/images directory and create a 2GB image file for the new disk using raw format:
# cd /var/lib/libvirt/images
# qemu-img create –f raw server1.example.com-virsh.img 2G
Formatting 'server1.example.com-virsh.img', fmt=raw size=2147483648
The next step is to attach this image file to server1 using the virsh command so that the server sees it as a block virtual disk. Specify the image file name with the --source option and a disk name with the --target option. Ensure that this assignment is stored persistently.
# virsh attach-disk server1.example.com --source \
/var/lib/libvirt/images/server1.example.com-virsh.img --target vde --persistent
Disk attached successfully
Verifying the New Storage
Both the GUI and CLI tools used above for the creation and presentation of virtual disks store the virtual disk image files in the /var/lib/libvirt/images directory on host1. Run the ll command on this directory to view the files:

The above output lists four image files, the top three are created by the GUI tool and the last one by the qemu-img command. We can also verify the new devices with the GUI, or using the virsh command on host1 as follows:
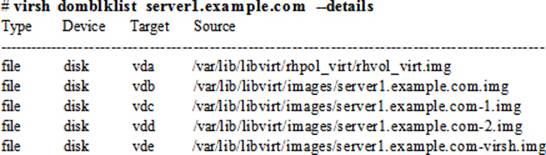
Now, log on to server1 and issue the lsblk command to confirm the presence of the new disks:
The above output confirms the presence of four new disks: vdb, vdc, vdd, and vde. It also indicates their sizes, along with other information.
Managing Storage with parted
The parted tool is used to carve up disks on RHEL systems. This text-based, menu-driven program allows us to view, add, check, modify, copy, resize, and delete partitions. parted understands and supports both MBR and GPT schemes. It can be used to create up to 128 partitions on a single GPT disk.
The main interface of the command looks similar to the following. It produces a list of subcommands when we run help at the parted prompt:
|
# parted |
|
|
GNU Parted 3.1 |
|
|
Using /dev/sda |
|
|
Welcome to GNU Parted! Type ‘help’ to view a list of commands. |
|
|
(parted) help |
|
|
align-check TYPE N |
check partition N for TYPE(min|opt) alignment |
|
help [COMMAND] |
print general help, or help on COMMAND |
|
mklabel,mktable LABEL-TYPE |
create a new disklabel (partition table) |
|
mkpart PART-TYPE [FS-TYPE] START END make a partition |
|
|
name NUMBER NAME |
name partition NUMBER as NAME |
|
print [devices|free|list,all|NUMBER] |
display the partition table, available devices, free space, all found partitions, or a particular partition |
|
quit |
exit program |
|
rescue START END |
rescue a lost partition near START and END |
|
rm NUMBER |
delete partition NUMBER |
|
select DEVICE |
choose the device to edit |
|
disk_set FLAG STATE |
change the FLAG on selected device |
|
disk_toggle [FLAG] |
toggle the state of FLAG on selected device |
|
set NUMBER FLAG STATE |
change the FLAG on partition NUMBER |
|
toggle [NUMBER [FLAG]] |
toggle the state of FLAG on partition NUMBER |
|
unit UNIT |
set the default unit to UNIT |
|
version |
display the version number and copyright information of GNU Parted |
There are several subcommands in the main menu. Table 9-1 lists and describes them.
|
Subcommand |
Description |
|
align-check |
Checks whether a partition satisfies the alignment constraints of the disk. |
|
help |
Displays available commands or help on the specified command. |
|
mklabel / mktable |
Makes a new disk label for the partition table. Supported labels are aix, amiga, bsd, dvh, gpt, mac, msdos, pc98, sun, and loop. |
|
mkpart |
Makes a new partition. |
|
name |
Assigns a name to a partition. |
|
|
Displays the partition table, a specific partition, or all devices. Information includes disk geometry and partition number, start and end, size, type, file system type, and associated flags. |
|
quit |
Quits parted. |
|
rescue |
Recovers a lost partition. |
|
rm |
Removes the specified partition. |
|
select |
Selects a device to edit. |
|
disk_set |
Sets a FLAG on the current disk. |
|
disk_toggle |
Toggles the state of FLAG on the current disk. |
|
set |
Sets a FLAG on the specified partition. |
|
toggle |
Toggles the state of FLAG on the specified partition number. |
|
unit |
Sets the default unit of measurement. |
|
version |
Displays version and copyright information for the parted utility. |
Table 9-1 parted Subcommands
At the parted prompt, we can invoke help for a specific subcommand. For example, to obtain help on mklabel, issue the following:
(parted) help mklabel
mklabel,mktable LABEL-TYPE create a new disklabel (partition table)
LABEL-TYPE is one of: aix, amiga, bsd, dvh, gpt, mac, msdos, pc98, sun, loop
Let’s create and delete a partition with parted to understand its basic usage. As noted earlier, we have access to four disk drives—/dev/vdb, /dev/vdc, /dev/vdd, and /dev/vde—on server1. After making a partition, use the print subcommand to ensure that what we have created is what we wanted. The /proc/partitions file is also updated to reflect partition creation and deletion operations.
Exercise 9-1: Create an MBR Partition Table and a Partition Using parted
This exercise should be done on server1.
In this exercise, you will assign the partition type MSDOS to /dev/vdb. You will create a 1GB primary partition on the disk for use as a file system using the parted utility, and confirm the creation.
1. Execute the parted command on /dev/vdb:
# parted /dev/vdb
GNU Parted 3.1
Using /dev/vdb
Welcome to GNU Parted! Type 'help' to view a list of commands.
2. Execute print to view the current partition information:
(parted) print
Error: /dev/vdb: unrecognised disk label
Model: Virtio Block Device (virtblk)
Disk /dev/vdb: 2147MB
Sector size (logical/physical): 512B/512B
Partition Table: unknown
Disk Flags:
3. Assign disk label “msdos” to the disk with mklabel. This must be done on a new disk.
(parted) mklabel msdos
![]() To use the GPT partition table type, run “mklabel gpt” instead.
To use the GPT partition table type, run “mklabel gpt” instead.
4. Create a 1GB primary partition starting at 1MB using mkpart:
(parted) mkpart primary 1 1g
5. Verify the new partition with print and quit parted.

![]() You may need to run the partprobe command after exiting the parted utility to inform the kernel of changes in the partition table if the disk previously had partitions. This is not required for new unpartitioned disks.
You may need to run the partprobe command after exiting the parted utility to inform the kernel of changes in the partition table if the disk previously had partitions. This is not required for new unpartitioned disks.
6. Confirm the partition information by running either of the following at the command prompt:
Exercise 9-2: Delete an MBR Partition Using parted
This exercise should be done on server1.
In this exercise, you will delete the vdb1 partition that you created in the previous exercise, and confirm the deletion.
1. Execute the parted command on the /dev/vdb disk:
# parted /dev/vdb
2. View the current partition table using the print subcommand:
(parted) print
3. Execute rm and specify the partition number to delete:
(parted) rm 1
4. Verify the new partition information with print and quit parted:
(parted) print
(parted) quit
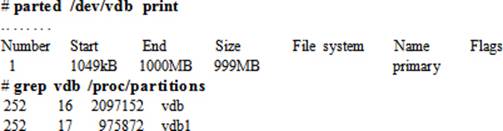
5. Confirm the partition information using either of the following:
# parted /dev/vdb print
# grep vdb /proc/partitions
Managing Storage with gdisk
The gdisk utility is used to carve up disks using GPT format. This text-based, menu-driven program allows us to view, add, verify, modify, and delete partitions among other tasks. gdisk can be used to create up to 128 partitions on a single GPT disk on systems with UEFI firmware.
The main interface of the gdisk command looks similar to the following when we run it on an available disk device, such as /dev/vdc. It produces a list of subcommands when we type ? at the prompt and press the Enter key:
# gdisk /dev/vdc
GPT fdisk (gdisk) version 0.8.6
Partition table scan:
MBR: not present
BSD: not present
APM: not present
GPT: not present
Creating new GPT entries.
Command (? for help): ?
b back up GPT data to a file
c change a partition's name
d delete a partition
i show detailed information on a partition
l list known partition types
n add a new partition
o create a new empty GUID partition table (GPT)
p print the partition table
q quit without saving changes
r recovery and transformation options (experts only)
s sort partitions
t change a partition's type code
v verify disk
w write table to disk and exit
x extra functionality (experts only)
? print this menu
Command (? for help):
The output indicates that there is no partition table assigned to the disk. There are several subcommands in the main menu followed by a short description. Table 9-2 summarizes some key subcommands.
|
Subcommand |
Description |
|
c |
Changes a partition’s name. |
|
d |
Deletes a partition. |
|
i |
Displays a partition information. |
|
l |
Lists available partition types. |
|
n |
Creates a partition. |
|
o |
Labels the disk to use GPT scheme. |
|
p |
Prints the partition table. |
|
q |
Quits gdisk without saving modifications. |
|
r |
Provides subcommands for recovery and transformation purposes. |
|
S |
Displays a sorted partition list. |
|
t |
Changes the type code of a partition. |
|
v |
Verifies a disk. |
|
w |
Writes the changes and exits gdisk. |
|
x |
Provides subcommands for various expert-level disk operations. |
Table 9-2 gdisk Subcommands
Let’s label /dev/vdc disk on server1 to use GPT using gdisk, and then create and delete a partition to understand its basic usage. After making a partition, use appropriate subcommands for verification. The /proc/partitions file is also updated to reflect partition creation and deletion operations.
Exercise 9-3: Create a GPT Partition Table and a Partition Using gdisk
This exercise should be done on server1.
In this exercise, you will assign tye partition type GPT to /dev/vdc. You will create a 200MB partition on the disk for use as a file system using the gdisk utility, and confirm the creation.
1. Execute the gdisk command on /dev/vdc:
# gdisk /dev/vdc
GPT fdisk (gdisk) version 0.8.6
Partition table scan:
MBR: not present
BSD: not present
APM: not present
GPT: not present
Creating new GPT entries.
Command (? for help):
2. Assign GPT as the partition table to the disk using the o subcommand. Enter y for confirmation to proceed.
Command (? for help): o
This option deletes all partitions and creates a new protective MBR.
Proceed? (Y/N): y
3. Run the p subcommand to view the disk label:
Command (? for help): p
Disk /dev/vdc: 4194304 sectors, 2.0 GiB
Logical sector size: 512 bytes
Disk identifier (GUID): AA668D3F-FEB4-4959-B949-7D15684F5254
Partition table holds up to 128 entries
First usable sector is 34, last usable sector is 4194270
Partitions will be aligned on 2048-sector boundaries
Total free space is 4194237 sectors (2.0 GiB)
Number Start (sector) End (sector) Size Code Name
The output shows the assigned GUID states that the partition table can hold up to 128 partition entries.
4. Create a 200MB partition using the n subcommand. Use all the defaults except for the size specification.
Command (? For help): n
Partition number (1-128, default 1):
First sector (34-4194270, default = 2048) or {+-}size{KMGTP}:
Last sector (2048-4194270, default = 4194270) or {+-}size{KMGTP}: +200M
Current type is 'Linux filesystem'
Hex code or GUID (L to show codes, Enter = 8300):
Changed type of partition to 'Linux filesystem'
5. Verify the new partition with p:
Command (? for help): p
![]()
6. Run the w subcommand to write the partition information to the partition table. Enter y to confirm.
Command (? for help): w
Final checks complete. About to write GPT data. THIS WILL OVERWRITE EXISTING PARTITIONS!!
Do you want to proceed? (Y/N): y
OK; writing new GUID partition table (GPT) to /dev/vdc.
The operation has completed successfully.
![]() You may need to run the partprobe command after exiting the gdisk utility to inform the kernel of changes in the partition table if the disk previously had partitions. This is not required for new unpartitioned disks.
You may need to run the partprobe command after exiting the gdisk utility to inform the kernel of changes in the partition table if the disk previously had partitions. This is not required for new unpartitioned disks.
7. Confirm the partition information by running either of the following at the command prompt:
# gdisk –l /dev/vdc
GPT fdisk (gdisk) version 0.8.6
Partition table scan:
MBR: protective
BSD: not present
APM: not present
GPT: present
Found valid GPT with protective MBR; using GPT.
Disk /dev/vdc: 4194304 sectors, 2.0 GiB
Logical sector size: 512 bytes
Disk identifier (GUID): AA668D3F-FEB4-4959-B949-7D15684F5254
Partition table holds up to 128 entries
First usable sector is 34, last usable sector is 4194270
Partitions will be aligned on 2048-sector boundaries
Total free space is 3784637 sectors (1.8 GiB)
Number Start (sector) End (sector) Size Code Name
1 2048 411647 200.0 MiB 8300 Linux filesystem
Exercise 9-4: Delete a GPT Partition Using gdisk
This exercise should be done on server1.
In this exercise, you will delete the vdc1 partition that you created in the previous exercise, and confirm the deletion.
1. Execute the gdisk command on the /dev/vdc disk:
# gdisk /dev/vdc
2. View the current partition table using the p subcommand:
Command (? for help): p
3. Execute the d subcommand and specify the partition number to delete:
Command (? for help): d1
4. Verify the new partition information with p and quit gdisk:
Command (? for help): p
Command (? for help): q
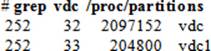
5. Confirm the partition information using either of the following:
# gdisk –l /dev/vdc
# grep vdc /proc/partitions
Partitioning with the Graphical Disk Utility
Disk Utility is a graphical partition management tool that is available in the GNOME desktop, and it is used to accomplish basic functions on disks, partitions, and file systems. To check whether it is present on the system, use the yum command:
# yum list installed | grep gnome-disk-utility
gnome-disk-utility.x86_64 3.8.2-5.el7 @anaconda/7.0
Install the gnome-disk-utility package if this program is not present.
Disk Utility may be launched by running the gnome-disks utility at the shell prompt or choosing Applications | Utilities | Disks. Some of the key functions that this tool allows us to perform include creating, modifying, and deleting a partition; formatting, modifying, mounting, unmounting, measuring read/write performance of, and encrypting a file system; and creating and restoring a disk image. Figure 9-3 shows the main menu with vdc disk selected.
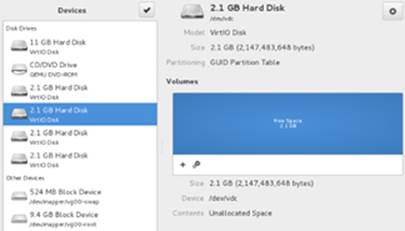
Figure 9-3 Graphical Disk Utility
The main window lists all block devices on the left-hand side along with their size and type. In Figure 9-3, it shows the main 11GB OS disk, 4x2.1GB disks, a CD/DVD device, and two LVM partitions that exist on the OS disk at the bottom. Upon clicking a device on the left, details associated with that device appear on the right side. For instance, the selected device in Figure 9-3 is an empty 2.1GB vdc virtual disk. This device can be partitioned by clicking the + sign and choosing a size, or manipulated by clicking the icon next to the + sign. See Figure 9-4 for options.
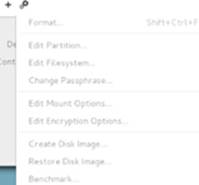
Figure 9-4 Graphical Disk Utility / Disk Manipulation Options
Once a partition is created and we highlight it, the grayed out options become visible as necessary, enabling us to perform additional tasks on the partition and file system.
Understanding Logical Volume Manager
The LVM solution is widely used for managing disk storage. It provides an abstraction layer between the physical storage and the file system, enabling the file system to be resized, to span across multiple physical disks, use random disk space, etc. LVM allows us to accumulate spaces taken from one or several partitions or disks (called physical volumes) to form a logical container (called volume group), which is then divided into logical partitions (called logical volumes). Primary benefits that LVM offers include, in addition to the three advantages mentioned above, the resizing of volume groups and logical volumes, online data migration between logical volumes and physical volumes, user-defined naming for volume groups and logical volumes, mirroring and striping across multiple physical disks, and snapshotting of logical volumes. RHEL7 includes version 2 of LVM calledLVM2, which is the default when we use the LVM technique to carve up storage devices. Figure 9-5 depicts the LVM components.
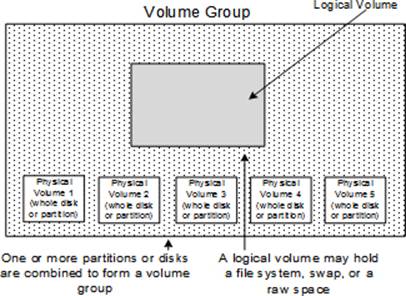
Figure 9-5 LVM Structure
As noted above, the LVM structure is made up of three key objects called physical volume, volume group, and logical volume. These objects are further carved up in physical extents (PEs) and logical extents (LEs). The LVM components are explained in the following sub-sections.
Physical Volume
A physical volume (PV) is created when a block storage device such as a partition or an entire disk is brought under LVM control after going through the initialization process. This process constructs LVM data structures on the device, including a label on the second sector and metadata information shortly thereafter. The label includes a UUID, device size, and pointers to the locations of data and metadata areas. Given the criticality of metadata, LVM stores a copy of it at the end of the physical volume as well. The rest of the device space is available for use.
Currently, there is one physical volume on server1, which was created during the installation. Run the pvs command to view it:

The output confirms the presence of one physical volume /dev/vda2 of size 9.5GB in vg00 volume group. Additional information displays the metadata format (Fmt) used, status of the physical volume under the Attr column (a for allocatable), and the amount of free space available on the physical volume.
Run this command again with the –v option and it will show you more details.
Volume Group
A volume group (VG) is created when at least one physical volume is added to it. The space from all physical volumes in a volume group is aggregated to form one large pool of storage, which is then used to build one or more logical volumes. The physical volumes added to a volume group may be of varying sizes. LVM writes metadata information for the volume group on each physical volume that is added to it. The volume group metadata contains its name, a unique ID, date and time of creation, how it was created, the extent size used, a list of included physical volumes and their attributes, a list of logical volumes, a mapping of physical and logical extents, etc. A volume group can have any name assigned to it at the time of its creation. For example, it may be called vg01, vgora, or vgweb so as to identify the type of information it is constructed to store. The metadata includes volume group information, and a copy of it is maintained at two locations on each physical volume within the volume group.
Currently, there is one volume group on server1, which was created during the installation. Run the vgs command to view it:

The output confirms the existence of one volume group called vg00 on the system containing one physical volume. Additional information displays the number of logical volumes (LV) and snapshots (SN) in the volume group, status of the volume group under the Attr column (w for writeable, z for resizable, and n for normal), size of the volume group, and the amount of free space available in the volume group.
Run this command again with the –v option and it will show you more details.
Physical Extent
A physical volume is divided into several smaller logical pieces when it is added to a volume group. These logical pieces are known as physical extents (PEs). An extent is the smallest allocatable unit of space in LVM. At the time we create a volume group, we can either define the size of the PE or leave it to the default size of 4MB. This means a 20GB disk would contain approximately 5,000 PEs. Any physical volumes added to this volume group thereafter will use the same PE size.
The following command displays the physical extent size used in the vg00 volume group:
# vgdisplay vg00 | grep ‘PE Size’
PE Size 4.00 MiB
Logical Volume
A volume group consists of a pool of storage taken from one or more physical volumes. This volume group space is divided into one or more logical partitions called logical volumes (LVs).
A logical volume can be expanded or shrunk, and can use space taken from one or several physical volumes inside the volume group.
The default naming convention for logical volumes is lvol0, lvol1, lvol2, and so on; however, we may assign any name that we wish. For example, a logical volume may be called system, undo, or oraarch so as to identify the type of information that it is constructed to store.
Currently, there are two logical volumes on server1 that were created during the installation. Run the lvs command to view them:

The output indicates the presence of three logical volumes home, root, and swap in vg00 volume group. Additional information displays the status of the logical volumes under the Attr column (w for writeable, i for inherited allocation policy, a for active, and o for open) and their sizes.
Run this command again with the –v option and it will show you more details.
Logical Extent
A logical volume is made up of extents called logical extents (LEs). Logical extents point to physical extents, and they may be random or contiguous. The larger a logical volume is, the more LEs it will have. Logical extents are a set of physical extents allocated to the logical volume.
The PE and LE sizes are usually kept the same within a volume group; however, a logical extent can be smaller or larger than a physical extent. The default LE size is 4MB, which corresponds to the default PE size. The following command displays the information about the root logical volume in the vg00 volume group. The output does not indicate the LE size; however, we can convert the LV size in MBs and then divide the result by the Current LE count to get the LE size (which comes to 4MB in the following example).
# lvdisplay /dev/vg00/root
|
--- Logical volume --- |
|
|
LV Path |
/dev/vg00/root |
|
LV Name |
root |
|
VG Name |
vg00 |
|
LV UUID |
3qq1S7-lXYk-s390-ZdQP-1la6-y7Ka-fcKZ9e |
|
LV Write Access |
read/write |
|
LV Creation host, time |
localhost.localdomain, 2014-10-21 06:49:04 -0400 |
|
LV Status |
available |
|
# open |
1 |
|
LV Size |
8.72 GiB |
|
Current LE |
2232 |
|
Segments |
1 |
|
Allocation |
inherit |
|
Read ahead sectors |
auto |
|
- currently set to |
256 |
|
Block device |
253:1 |
Thin Provisioning
Thin provisioning technology allows for the economical allocation and utilization of storage space. With thin provisioning support in LVM, we can create a thin pool of storage space and assign logical volumes larger space than what the pool actually has available. Applications begin consuming the actual space when data writing occurs. We set a threshold (80%, for instance) on the actual consumption of the physical storage in the thin pool, and monitor it. As soon as the actual usage reaches the preset threshold, we expand the thin pool dynamically by adding more physical storage to it. The logical volumes will automatically begin taking advantage of the new space right away. Thin provisioning technique saves us from spending more money upfront.
Managing Storage with Logical Volume Manager
Managing storage with LVM involves several administrative tasks, such as creating a physical volume, creating and displaying a volume group, creating and displaying a logical volume, extending a volume group, extending a logical volume, reducing a logical volume, renaming a logical volume, removing a logical volume, reducing a volume group, removing a volume group, and uninitializing a physical volume. All of these tasks are covered in this chapter.
LVM Commands
There are several commands available to accomplish various LVM operations listed above. Table 9-3 describes the common tools.
|
Command |
Description |
|
Physical Volume Commands |
|
|
pvck |
Checks the integrity of a physical volume. |
|
pvcreate |
Initializes a disk or partition for LVM use. |
|
pvdisplay |
Displays details of a physical volume. |
|
pvresize |
Resizes a physical volume. |
|
pvmove |
Moves data from one physical volume to another. |
|
pvremove |
Uninitializes a physical volume. |
|
pvs |
Lists physical volumes. |
|
pvscan |
Scans the entire system and lists all physical volumes found. |
|
Volume Group Commands |
|
|
vgck |
Checks the integrity of a volume group. |
|
vgcreate |
Creates a volume group. |
|
vgdisplay |
Displays the details of a volume group. |
|
vgextend |
Adds a physical volume to a volume group. |
|
vgreduce |
Removes a physical volume from a volume group. |
|
vgrename |
Renames a volume group. |
|
vgremove |
Removes a volume group. |
|
vgs |
Lists volume groups. |
|
vgscan |
Scans the entire system and lists all volume groups found, and rebuilds the cache. |
|
Logical Volume Commands |
|
|
lvcreate |
Creates a logical volume. |
|
lvdisplay |
Displays the details of a logical volume. |
|
lvextend |
Extends the size of a logical volume. |
|
lvreduce |
Reduces the size of a logical volume. |
|
lvremove |
Removes a logical volume. |
|
lvrename |
Renames a logical volume. |
|
lvresize |
Resizes a logical volume. With the –r option, this command calls the resize2fs command and resizes the underlying file system as well. |
|
lvs |
Lists logical volumes. |
|
lvscan |
Scans the entire system and lists all logical volumes found. |
|
Miscellaneous LVM Commands |
|
|
lvm |
Interactive LVM management tool. |
|
lvmdiskscan |
Scans for existing LVM disks and partitions, and those that can be initialized for use in LVM. |
Table 9-3 LVM Commands
All the commands listed in Table 9-3 support the –v option for verbosity. See the man pages of each command for additional options and usage.
As noted earlier in this chapter, you have vdb, vdc, vdd, and vde available on server1 for practice. Issue the lsblk command to confirm this information:
Execute the lvmdiskscan command to identify the disks and partitions that you can use for LVM exercises:
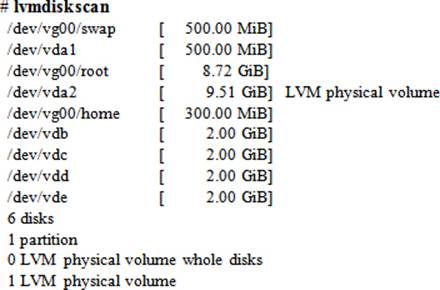
The above output shows six disks/partitions of which vda’s are used for the operating system, and the rest are empty. We can use the four empty disks in the following exercises.
Exercise 9-5: Create a Physical Volume and a Volume Group
This exercise should be done on server1.
In this exercise, you will initialize one disk vdb (2GB) and one partition vdc1 (200MB) for use as physical volumes. You will then create a volume group called vg01 and add both physical volumes to it. You will use the PE size 16MB for the volume group and display the details of the volume group and the physical volumes.
1. Create vdc1 of size 200MB using parted and confirm:

2. Initialize vdb and vdc1 using the pvcreate command:
# pvcreate –v /dev/vdb /dev/vdc1
Set up physical volume for "/dev/vdb" with 4194304 available sectors
Zeroing start of device /dev/vdb
Writing physical volume data to disk "/dev/vdb"
Physical volume "/dev/vdb" successfully created
Set up physical volume for "/dev/vdc1" with 391168 available sectors
Zeroing start of device /dev/vdc1
Writing physical volume data to disk "/dev/vdc1"
Physical volume "/dev/vdc1" successfully created
EXAM TIP: Use lsblk to determine available disk space.
3. Create vg01 volume group using the vgcreate command and add vdb and vdc1 physical volumes to it. Use the –s option to specify the PE size in MBs.
# vgcreate –s 16 vg01 /dev/vdb /dev/vdc1 –v
Adding physical volume '/dev/vdb' to volume group 'vg01'
Adding physical volume '/dev/vdc1' to volume group 'vg01'
Archiving volume group "vg01" metadata (seqno 0).
Creating volume group backup "/etc/lvm/backup/vg01" (seqno 1).
Volume group “vg01” successfully created
4. Display basic information for vg01 using the vgs and vgscan commands:
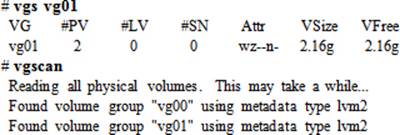
We can also display the details for the volume group with the vgdisplay command. With the –v switch, this command also shows the physical volumes in it:
# vgdisplay –v vg01
--- Volume group ---
|
VG Name |
vg01 |
|
System ID |
|
|
Format |
lvm2 |
|
Metadata Areas |
2 |
|
Metadata Sequence No |
1 |
|
VG Access |
read/write |
|
VG Status |
resizable |
|
MAX LV |
0 |
|
Cur LV |
0 |
|
Open LV |
0 |
|
Max PV |
0 |
|
Cur PV |
2 |
|
Act PV |
2 |
|
VG Size |
2.16 GiB |
|
PE Size |
16.00 MiB |
|
Total |
PE 138 |
|
Alloc PE / Size |
0 / 0 |
|
Free PE / Size |
138 / 2.16 GiB |
|
VG UUID |
SXTjT1-xtrH-MtGg-U9Kl-aWgq-HEFc-55Hxdo |
|
--- Physical volumes --- |
|
|
PV Name |
/dev/vdb |
|
PV UUID |
8cVKkL-VGQm-MW7Z-hnTZ-WS2m-M7LG-mKmw0F |
|
PV Status |
allocatable |
|
Total PE / Free PE |
127 / 127 |
|
PV Name |
/dev/vdc1 |
|
PV UUID |
qBtEPJ-Pb7p-AJf0-zDZX-RGeS-SmrH-IlHE6a |
|
PV Status |
allocatable |
|
Total PE / Free PE |
11 / 11 |
The vgdisplay command shows that there are two physical volumes in vg01 volume group, with 127 PEs in the first physical volume and 11 in the second, totaling 138. The PE size is 16MB and total usable space is about 2.16GB.
5. Display basic information for vdb using the pvs and pvscan commands:
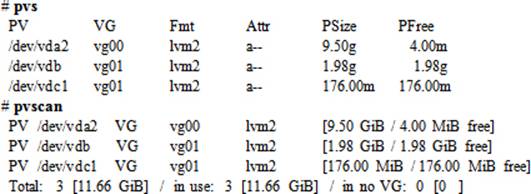
We can also display the details for the physical volumes with the pvdisplay command:
# pvdisplay /dev/vdb
--- Physical volume ---
|
PV Name |
/dev/vdb |
|
VG Name |
vg01 |
|
PV Size |
2.00 GiB / not usable 16.00 MiB |
|
Allocatable |
yes |
|
PE Size |
16.00 MiB |
|
Total PE |
127 |
|
Free PE |
127 |
|
Allocated PE |
0 |
|
PV UUID |
8cVKkL-VGQm-MW7Z-hnTZ-WS2m-M7LG-mKmw0F |
# pvdisplay /dev/vdc1
|
PV Name |
/dev/vdc1 |
|
VG Name |
vg01 |
|
PV Size |
191.00 MiB / not usable 15.00 MiB |
|
Allocatable |
yes |
|
PE Size |
16.00 MiB |
|
Total PE |
11 |
|
Free PE |
11 |
|
Allocated PE |
0 |
|
PV UUID |
qBtEPJ-Pb7p-AJf0-zDZX-RGeS-SmrH-IlHE6a |
Once a disk or a partition is initialized and added to a volume group, both are treated identically. LVM does not differentiate between the two.
Exercise 9-6: Create a Logical Volume
This exercise should be done on server1.
In this exercise, you will create two logical volumes called lvol0 and oravol in vg01 volume group. You will use 600MB for lvol0 and 1.3GB for oravol from the available pool of space. You will display the details of the volume group and the logical volumes.
1. Create lvol0 of size 600MB using the lvcreate command. Use the –L option to specify the logical volume size. You may want to use the –v, –vv, or –vvv option with the command for verbosity.
# lvcreate –L 600 vg01 –v
Setting logging type to disk
Finding volume group "vg01"
Rounding up size to full physical extent 608.00 MiB
Archiving volume group "vg01" metadata (seqno 7).
Creating logical volume lvol0
Creating volume group backup "/etc/lvm/backup/vg01" (seqno 8).
Activating logical volume "lvol0".
activation/volume_list configuration setting not defined: Checking only host tags for vg01/lvol0
Creating vg01-lvol0
Loading vg01-lvol0 table (253:4)
Resuming vg01-lvol0 (253:4)
Wiping known signatures on logical volume "vg01/lvol0"
Initializing 4.00 KiB of logical volume "vg01/lvol0" with value 0.
Creating volume group backup "/etc/lvm/backup/vg01" (seqno 8).
Logical volume “lvol0” created
The size may be specified in KBs (kilobytes), MBs (megabytes), GBs (gigabytes), TBs (terabytes), PBs (petabytes), EBs (exabytes), bytes, sectors, or a count of LEs; however, MB is the default if no unit is specified. The minimum size of a logical volume is the size of a PE set at the time of volume group creation, and it is always in multiples of the PE size. For instance, logical volumes that we can create in vg01 with the PE size set at 16MB will be 16MB, 32MB, 48MB, 64MB, and so on; it cannot be any other size. Therefore, care must be taken when setting the PE size and creating logical volumes to avoid wasting space.
2. Create oravol of size 1.3GB using the lvcreate command. Use the –L option to specify the size and –n for the custom name. You may use –v for verbose information.
# lvcreate –L 1.3g –n oravol vg01
Rounding up size to full physical extent 1.31 GiB
Logical volume “oravol” created
3. Display basic information for the two logical volumes using the lvs and lvscan commands:
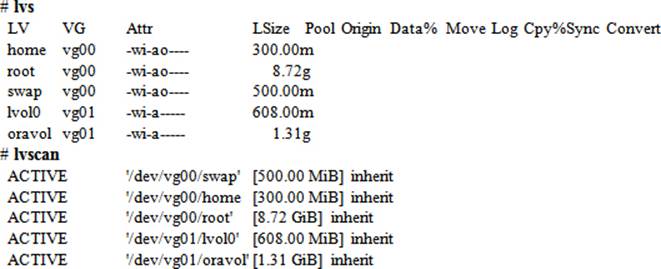
Execute the vgdisplay command on vg01 with the –v option to get details for the entire volume group including the logical volumes and the physical volumes it holds. You can also run the lvdisplay command on /dev/vg01/lvol0 and /dev/vg01/oravol to obtain the details for the two logical volumes.
# lvdisplay /dev/vg01/lvol0
--- Logical volume ---
|
LV Path |
/dev/vg01/lvol0 |
|
LV Name |
lvol0 |
|
VG Name |
vg01 |
|
LV UUID |
e2c5W3-TLkU-0V6q-l8pg-dfFl-R0X8-Rd8UVT |
|
LV Write Access |
read/write |
|
LV Creation host, time |
server1.example.com, 2014-10-23 21:45:18 -0400 |
|
LV Status |
available |
|
# open |
0 |
|
LV Size |
608.00 MiB |
|
Current LE |
38 |
|
Segments |
1 |
|
Allocation |
inherit |
|
Read ahead sectors |
auto |
|
- currently set to |
8192 |
|
Block device |
253:2 |
![]() If you want to understand where the vgdisplay command gets volume group information from, go to the /etc/lvm/backup directory and view the contents of the desired volume group file.
If you want to understand where the vgdisplay command gets volume group information from, go to the /etc/lvm/backup directory and view the contents of the desired volume group file.
Exercise 9-7: Extend a Volume Group and a Logical Volume
This exercise should be done on server1.
In this exercise, you will add another disk vdd to vg01 to increase the pool of allocatable space. You will run the pvcreate command to initialize the target disk prior to adding it to the volume group. You will increase the size of lvol0 from 600MB to 1GB and that of oravol from 1.3GB to 2GB using the lvextend command. You will display basic and detailed information for the volume group and the logical volumes.
1. Prepare /dev/vdd for use in LVM using the pvcreate command:
# pvcreate /dev/vdd –v
Set up physical volume for "/dev/vdd" with 4194304 available sectors
Zeroing start of device /dev/vdd
Writing physical volume data to disk "/dev/vdd"
Physical volume "/dev/vdd" successfully created
2. Add /dev/vdd to vg01 using the vgextend command:
# vgextend vg01 /dev/vdd –v
Checking for volume group "vg01"
Archiving volume group "vg01" metadata (seqno 1).
Adding physical volume '/dev/vdd' to volume group 'vg01'
Volume group "vg01" will be extended by 1 new physical volumes
Creating volume group backup "/etc/lvm/backup/vg01" (seqno 2).
Volume group "vg01" successfully extended
3. View basic information of vg01:

The output reflects the addition of a third physical volume to vg01. The total capacity for the volume group has now increased to 4.14GB, with 2.23GB free.
4. Execute the lvextend command on lvol0 and specify either the absolute desired size for the logical volume or the additional amount you wish to add to it:
# lvextend –L 1g /dev/vg01/lvol0 (or lvextend –L +400m /dev/vg01/lvol0)
Extending logical volume lvol0 to 1.00 GiB
Logical volume lvol0 successfully resized
5. Execute the lvresize command on oravol and specify either the absolute desired size for the logical volume or the additional amount you wish to add to it:
# lvresize –L 2g /dev/vg01/oravol (or lvresize –L +700m /dev/vg01/oravol)
Rounding size to boundary between physical extents: 704.00 MiB
Extending logical volume oravol to 2.00 GiB
Logical volume oravol successfully resized
EXAM TIP: Make sure the expansion of a logical volume does not affect the file system and the data it contains.
6. Issue vgdisplay on vg01 with the –v switch for the updated details:
# vgdisplay –v vg01
--- Volume group ---
|
VG Name |
vg01 |
|
System ID |
|
|
Format |
lvm2 |
|
Metadata Areas |
3 |
|
Metadata Sequence No |
55 |
|
VG Access |
read/write |
|
VG Status |
resizable |
|
MAX LV |
0 |
|
Cur LV |
2 |
|
Open LV |
0 |
|
Max PV |
0 |
|
Cur PV |
3 |
|
Act PV |
3 |
|
VG Size |
4.14 GiB |
|
PE Size |
16.00 MiB |
|
Total PE |
265 |
|
Alloc PE / Size |
192 / 3.00 GiB |
|
Free PE / Size |
73 / 1.14 GiB |
|
VG UUID |
SXTjT1-xtrH-MtGg-U9Kl-aWgq-HEFc-55Hxdo |
|
--- Logical volume --- |
|
|
LV Path |
/dev/vg01/lvol0 |
|
LV Name |
lvol0 |
|
VG Name |
vg01 |
|
LV UUID |
e2c5W3-TLkU-0V6q-l8pg-dfFl-R0X8-Rd8UVT |
|
LV Write Access |
read/write |
|
LV Creation host, time |
server1.example.com, 2014-10-23 21:45:18 -0400 |
|
LV Status |
available |
|
# open |
0 |
|
LV Size |
1.00 GiB |
|
Current LE |
64 |
|
Segments |
3 |
|
Allocation |
inherit |
|
Read ahead sectors |
auto |
|
- currently set to |
8192 |
|
Block device |
253:2 |
|
--- Logical volume --- |
|
|
LV Path |
/dev/vg01/oravol |
|
LV Name |
oravol |
|
VG Name |
vg01 |
|
LV UUID |
JeQF6O-ReLp-eg4z-wjZh-ufdf-aqAL-1efXgL |
|
LV Write Access |
read/write |
|
LV Creation host, time |
server1.example.com, 2014-10-24 07:45:35 -0400 |
|
LV Status |
available |
|
# open |
0 |
|
LV Size |
2.00 GiB |
|
Current LE |
128 |
|
Segments |
2 |
|
Allocation |
inherit |
|
Read ahead sectors |
auto |
|
- currently set to |
8192 |
|
Block device |
253:3 |
|
--- Physical volumes --- |
|
|
PV Name |
/dev/vdb |
|
PV UUID |
8cVKkL-VGQm-MW7Z-hnTZ-WS2m-M7LG-mKmw0F |
|
PV Status |
allocatable |
|
Total PE / Free PE |
127 / 0 |
|
PV Name |
/dev/vdc1 |
|
PV UUID |
qBtEPJ-Pb7p-AJf0-zDZX-RGeS-SmrH-IlHE6a |
|
PV Status |
allocatable |
|
Total PE / Free PE |
11 / 11 |
|
PV Name |
/dev/vdd |
|
PV UUID |
2MWF1s-QGyj-Msb8-pi41-J226-Cfel-hC3cQ4 |
|
PV Status |
allocatable |
|
Total PE / Free PE |
127 / 62 |
The above output shows a lot of information about the volume group and the logical and physical volumes it contains. It reflects the updates made in this exercise. In fact, each time a volume group or a logical volume in it is resized, the vgdisplay command output reflects those updates. The above output shows three physical volumes with the combined allocatable space grown to 4.14GB. The number of PEs have increased to 265, with 192 allocated to logical volumes and 73 unused. The unused PEs amounts to 1.14GB of free space in the pool. The two Logical Volume sections display the updated information for the logical volumes. And at the very bottom, all three physical volumes are listed with their device names and total and available PEs in each.
Exercise 9-8: Rename, Reduce, and Remove a Logical Volume
This exercise should be done on server1.
In this exercise, you will rename lvol0 to lvolnew. You will decrease the size of lvolnew to 800MB using the lvreduce command and then further reduce its size to 700MB with the lvresize command. You will then remove oravol and lvolnew logical volumes with the lvremove command. You will display the updated details for the volume group.
1. Rename lvol0 to lvolnew using the lvrename command and confirm with lvs:
# lvrename vg01 lvol0 lvolnew
Renamed "lvol0" to "lvolnew" in volume group "vg01"
# lvs | grep lvolnew
lvolnew vg01 -wi-a----- 1.00g
2. Reduce the size of lvol0 logical volume to 800MB with the lvreduce command. Specify either the absolute desired size for the logical volume or the amount that you wish to subtract from it. Answer “Do you really want to reduce lvolnew?” in the affirmative.
# lvreduce –L 800m /dev/vg01/lvolnew (or lvreduce –L –200m /dev/vg01/lvolnew)
WARNING: Reducing active logical volume to 800.00 MiB
THIS MAY DESTROY YOUR DATA (filesystem etc.)
Do you really want to reduce lvolnew? [y/n]: y
Reducing logical volume lvolnew to 800.00 MiB
Logical volume lvolnew successfully resized
3. Reduce the size of lvolnew logical volume to 700MB with the lvresize command. Specify either the absolute desired size for the logical volume or the amount that you wish to subtract from it. Answer “Do you really want to reduce lvolnew?” in the affirmative.
# lvresize –L 700m /dev/vg01/lvolnew (or lvresize –L –100m /dev/vg01/lvolnew)
Rounding size to boundary between physical extents: 96.00 MiB
WARNING: Reducing active logical volume to 704.00 MiB
THIS MAY DESTROY YOUR DATA (filesystem etc.)
Do you really want to reduce lvolnew? [y/n]: y
Reducing logical volume lvolnew to 704.00 MiB
Logical volume lvolnew successfully resized
![]() There is risk involved when you reduce the size of a logical volume. You may end up losing data that is located on the logical extents being removed. To be on the safe side, perform a backup of the data in the logical volume before proceeding with size reduction.
There is risk involved when you reduce the size of a logical volume. You may end up losing data that is located on the logical extents being removed. To be on the safe side, perform a backup of the data in the logical volume before proceeding with size reduction.
4. Remove lvolnew and oravol logical volumes with the lvremove command. Use the –f option to suppress the “Do you really want to remove active logical volume <lvol_name>” message.
# lvremove –f /dev/vg01/lvolnew
Logical volume "lvolnew" successfully removed
# lvremove –f /dev/vg01/oravol
Logical volume "oravol" successfully removed
![]() Removing a logical volume is a destructive task. You need to ensure that you perform a backup of any data in the target logical volume prior to deleting it. You will need to unmount the file system or disable swap in the logical volume. See Chapter 10 “Constructing and Using File Systems and Swap” on how to unmount a file system and disable swap.
Removing a logical volume is a destructive task. You need to ensure that you perform a backup of any data in the target logical volume prior to deleting it. You will need to unmount the file system or disable swap in the logical volume. See Chapter 10 “Constructing and Using File Systems and Swap” on how to unmount a file system and disable swap.
5. Execute the vgdisplay command and grep for “Cur LV” to see the number of logical volumes currently available in vg01. It should show 0, as you have removed both logical volumes.
# vgdisplay vg01 | grep ‘Cur LV’
Cur LV 0
Exercise 9-9: Reduce and Remove a Volume Group
This exercise should be done on server1.
In this exercise, you will reduce vg01 by removing vdb and vdc1 physical volumes from it using the vgreduce command, and then remove the volume group.
1. Remove vdb and vdc1 physical volumes from vg01 by issuing the vgreduce command:
# vgreduce vg01 /dev/vdb /dev/vdc1
Removed "/dev/vdb" from volume group "vg01"
Removed "/dev/vdc1" from volume group "vg01"
2. Remove the volume group using the vgremove command. This will also remove the last physical volume from it.
# vgremove vg01
Volume group "vg01" successfully removed
![]() You can also use the –f option with the vgremove command to force the volume group removal even if it contains any number of logical and physical volumes.
You can also use the –f option with the vgremove command to force the volume group removal even if it contains any number of logical and physical volumes.
![]() Remember to proceed with caution whenever you perform reduce and remove operations.
Remember to proceed with caution whenever you perform reduce and remove operations.
Exercise 9-10: Uninitialize a Physical Volume
This exercise should be done on server1.
In this exercise, you will uninitialize all three physical volumes vdb, vdc1, and vdd by deleting the LVM structural information from them using the pvremove command.
1. Issue the pvremove command on vdb, vdc1, and vdd physical volumes to uninitialize them:
# pvremove /dev/vdb /dev/vdc1 /dev/vdd
Labels on physical volume "/dev/vdb" successfully wiped
Labels on physical volume "/dev/vdc1" successfully wiped
Labels on physical volume "/dev/vdd" successfully wiped
The disks and the partition are now back to their raw state and can be repurposed or removed from server1.
Chapter Summary
This chapter started with an overview of disk management tools available in RHEL7 and features and benefits associated with them. Later, it presented several exercises for slicing and managing disks using these tools.
We performed functions such as creating, displaying, and deleting partitions using the parted and gdisk utilities. We looked at the graphical Disk Utility that may be used to perform several disk management tasks.
We learned the concepts, components, and structure of LVM at length. We learned how to perform LVM management tasks using commands, and strengthen our understanding by performing several exercises including converting disks and partitions into physical volumes; creating, displaying, extending, reducing, and removing volume groups; creating, displaying, extending, reducing, and removing logical volumes; and uninitializing physical volumes.
Chapter Review Questions
1. What are the two commands that we can use to reduce the number of logical extents from a logical volume?
2. Write the command to add physical volumes /dev/vdd1 and /dev/vdc to vg20 volume group.
3. Where is the partition table information stored by default on BIOS-based systems?
4. What would vdd3 represent in a virtualized environment?
5. What are the two commands that we can use to add logical extents to a logical volume?
6. What is the maximum number of partitions that can be created on a GPT disk?
7. Write the command to create a volume group called vg20 with physical extent size set to 64MB and include a physical volume /dev/vdd to the volume group.
8. Write the command to remove vg20 volume group along with any logical and physical volumes that it contains.
9. What is the default size of a physical extent in LVM?
10. The gdisk utility can be used to store partition information in MBR format. True or False?
11. Which file in the /proc file system stores the in-memory partitioning information?
12. What is the default name of the first logical volume in a volume group?
13. What is one difference between the pvs and pvdisplay commands?
14. When can a disk or partition be referred to as a physical volume?
15. Write the command to remove webvol logical volume from vg20 volume group.
16. It is necessary to create file system structures in a logical volume before it can be used to store files in it. True or False?
17. Physical and logical extents are typically of the same size. True or False?
18. What is the purpose of the pvremove command?
19. What would the command pvcreate /dev/vdd do?
20. A disk or partition can be added to a volume group without being initialized. True or False?
21. Write the command to create a logical volume called webvol of size equal to 100 logical extents in vg20 volume group.
22. A volume group can be created without any physical volume in it. True or False?
23. Where does the LVM store volume group details?
24. A single disk can be used by both parted and LVM at the same time. True or False?
25. When should we run the partprobe command?
26. Write the command to remove /dev/vdd1 physical volume from vg20 volume group.
27. A partition can be used as an LVM object. True or False?
28. Which command would we use to view the details of a volume group and logical and physical volumes within it?
Answers to Chapter Review Questions
1. The lvreduce and the lvresize commands.
2. vgextend vg20 /dev/vdd1 /dev/vdc
3. The partition table information is stored on the Master Boot Record.
4. vdd3 points to the third partition on the fourth virtual disk.
5. The lvextend and the lvresize commands.
6. 128.
7. vgcreate –s 64 vg20 /dev/vdd
8. vgremove –f vg20
9. The default size of a PE in LVM is 4MB.
10. False. The gdisk tool is only for GPT type tables.
11. The partitions file.
12. lvol0 is the default name for the first logical volume created in a volume group.
13. The pvs command lists the physical volumes, whereas the pvdisplay command displays the details.
14. After the pvcreate command has been executed on it successfully.
15. lvremove /dev/vg20/webvol
16. True, it is mandatory.
17. True.
18. The pvremove command is used to uninitialize a physical volume.
19. This command will initialize the /dev/vdd disk for use in a volume group.
20. False, a disk or partition must be initialized before it can be added to a volume group.
21. lvcreate –l 100 –n webvol vg20
22. False.
23. In the /etc/lvm/backup directory.
24. True, a single disk can be used by all three disk management solutions at a time.
25. The partprobe command should be run whenever partitioning is modified on a disk.
26. vgreduce vg20 /dev/vdd1
27. True.
28. The vgdisplay command with the –v option.
DIY Challenge Labs
The following labs are useful to strengthen most of the concepts and topics learned in this chapter. It is expected that you perform these labs without any additional help. A step-by-step guide is not provided, as the implementation of these labs requires the knowledge that has been presented in this chapter. Use defaults or your own thinking for missing information.
Lab 9-1: Manage Partitioning with parted
Create three 100MB primary partitions on /dev/vdd using the parted utility and set appropriate flags to use them as a file system, a swap space, and an LVM partition, respectively.
Lab 9-2: Manage Partitioning with gdisk
Create three 50MB partitions on /dev/vdc using the gdisk utility and set appropriate flags to use them as a file system, a swap space, and an LVM partition, respectively.
Lab 9-3: Manage Storage with LVM
Initialize vdb and vdc disks for use in LVM. Create a volume group called vg10 and add both physical volumes to it. Ensure that vg10 uses 32MB as the physical extent size. Add three logical volumes called lvol0, swapvol, and oravol to the volume group with sizes 1GB, 2.2GB, and 500MB, respectively. Create vdd4 and vdd5 partitions of size 1GB each and initialize them for use in LVM. Add both new physical volumes to vg10. Create an additional logical volume called lvol1 using 30 LEs. Add 200MB to oravol logical volume and remove 150MB from lvol0.
All materials on the site are licensed Creative Commons Attribution-Sharealike 3.0 Unported CC BY-SA 3.0 & GNU Free Documentation License (GFDL)
If you are the copyright holder of any material contained on our site and intend to remove it, please contact our site administrator for approval.
© 2016-2026 All site design rights belong to S.Y.A.