RHCSA & RHCE Red Hat Enterprise Linux 7: Training and Exam Preparation Guide (EX200 and EX300), Third Edition (2015)
Part I. RHCSA Section
Chapter 10. Constructing and Using File Systems and Swap
This chapter describes the following major topics:
· Overview of file systems
· Types of file systems
· Manage extended and xfs file systems including creating, mounting, determining UUID, labeling, reporting usage, resizing, unmounting, and removing
· Create and mount vfat file system
· Check and repair extended and xfs file system structures
· Mount and unmount CIFS and NFS file systems
· Mount and unmount NFS file systems automatically
· Understand and manage swap spaces including creating, activating, deactivating, and removing them
· Set, view, and unset enhanced file permissions with Access Control Lists
RHCSA Objectives:
23. Configure systems to mount file systems at boot by UUID or label
24. Add new partitions and logical volumes, and swap to a system non-destructively
25. Create, mount, unmount, and use vfat, ext4, and xfs file systems
26. Mount and unmount CIFS and NFS network file systems
29. Create and manage Access Control Lists (ACLs)
Afile system is a logical container that is used to store files and directories. Each file system must be connected to the root of the directory hierarchy in order to be accessible. This is typically done automatically when the system boots up; however, it can be done manually as well. Each file system can be mounted or unmounted by using the unique UUID associated with it or by using a label that can be assigned to it. The file system space may fill up quickly, depending on the usage; there are tools that help keep an eye on their utilization. A file system may become corrupted if it is not properly unmounted due to a system crash or other similar reasons. It is necessary to check and repair any issues arising out of such situations.
Remote file systems may be mounted (and unmounted) on a RHEL system and accessed in a similar fashion as a local file system. This can be done manually using the same tools that are used for mounting and unmounting local file systems. Alternatively, RHEL provides the AutoFS service that may be configured to mount entire remote file systems or individual directories located in remote file systems automatically without having to execute any commands explicitly.
Swapping and paging are used on every Linux system. In fact, a RHEL installation cannot proceed unless a swap space is defined. Swapping and paging provide a mechanism to move pages of data from the physical memory to the swap region and back as and when required.
ACLs allow the administrator to enforce extended security attributes on a file or directory. These attributes are in addition to the existing Linux access rights. A directory can have default ACL settings applied to it to allow multiple users to share its contents without having to change permissions on new files and sub-directories created within it.
Understanding File Systems
A file system is a logical container that is used to store files and directories. Each file system is created in a separate partition or logical volume. A typical RHEL system usually has numerous file systems. During OS installation, only two file systems are created by default: / and /boot, though we can choose custom partitioning and construct separate containers to store dissimilar information. Typical additional file systems created during the installation are /home, /opt, /tmp, /usr, and /var. / and /boot are two mandatory file systems without which a system cannot be installed or booted.
Storing disparate data in separate file systems versus storing all data in a single file system offers the following advantages. We can:
· Make a specific file system accessible or inaccessible to users independent of other file systems on the system. This hides or reveals information contained in that file system.
· Perform file system repair activities on individual file systems.
· Keep dissimilar data in separate file systems.
· Optimize or tune each file system independently.
· Grow or shrink a file system independent of other file systems.
Moreover, some native backup tools such as xfsdump work only at the file system level.
Types of File System
There are several different types of file systems supported in RHEL that may be categorized in three basic groups: disk-based, network-based, and memory-based. Disk-based file systems are typically created on hard drives using SCSI, iSCSI, SAS, SATA, USB, Fibre Channel, and other technologies. Network-based file systems are basically disk-based file systems shared over the network for remote access. Memory-based file systems are virtual; they are created automatically at system startup and destroyed when the system goes down. The first two types of file systems store information persistently, while any data saved in virtual file systems is lost at system reboots. Table 10-1 lists and explains various common disk- and network-based file system types supported in RHEL7.
|
File System |
Type |
Description |
|
ext2 |
Disk |
The second generation of the extended file system. The first generation is no longer supported. ext2 is deprecated in RHEL7 and will be removed in a future RHEL release. |
|
ext3 |
Disk |
The third generation of the extended file system. It supports metadata journaling for faster recovery, offers superior reliability, supports file systems of sizes up to 16TiB, files of sizes up to 2TiB, and up to 32,000 sub-directories. ext3 writes each metadata update in its entirety to the journal after it has been completed. The system looks in the file system journal following a reboot after a system crash has occurred, and recovers the file system rapidly using the updated structural information stored in its journal. |
|
ext4 |
Disk |
The fourth generation of the extended file system developed as the successor to ext3. It supports all features of ext3 in addition to a larger file system size of up to 1EiB, a bigger file size of up to 16TiB, an unlimited number of sub-directories, metadata and quota journaling, and extended user attributes. ext4 uses a series of contiguous physical blocks on the hard disk called extents, resulting in improved read and write performance with reduced fragmentation. |
|
xfs |
Disk |
XFS is a highly scalable and high-performance 64-bit file system. It supports metadata journaling for faster crash recovery, and online defragmentation, expansion, quota journaling, and extended user attributes. xfs is the default file system type in RHEL7. It supports file systems and files of sizes up to 8EiB. |
|
btrfs |
Disk |
B-tree file system is introduced in RHEL7 as a technology preview. It supports a file system size of up to 50TiB. It is capable of addressing and managing more files, larger files, and larger volumes than ext4. It supports snapshotting and compression capabilities. |
|
vfat |
Disk |
This is used for post-Windows 95 file system formats on hard disks, USB drives, and floppy disks. |
|
iso9660 |
Disk |
This is used for CD/DVD-based optical file systems. |
|
BIOS Boot |
Disk |
A very small partition required for booting a device with a GUID partition table (GPT) on a BIOS system. |
|
EFI System Partition |
Disk |
A small partition required for booting a device with a GUID partition table (GPT) on a UEFI system. |
|
NFS |
Network |
Network File System. A directory or file system shared over the network for access by other Linux systems. |
|
AutoFS |
Network |
Auto File System. An NFS file system set to mount and unmount automatically on a remote system. |
|
CIFS |
Network |
Common Internet File System (a.k.a. Samba). A directory or file system shared over the network for access by Windows and other Linux systems. |
Table 10-1 File System Types
This chapter covers ext3, ext4, xfs, and vfat file systems at length. It also covers mounting and unmounting iso9660, CIFS, and NFS file systems. For a brief discussion on memory-based virtual file systems, see Chapter 03 “Working with Files and File Permissions”. The rest of the file system types mentioned in Table 10-1 are beyond the scope of this book.
Extended File Systems
Extended file systems have been supported in RHEL for years. The first generation is obsolete and is no longer supported. The second generation is deprecated in RHEL7 and will be removed in a future release. The third generation has been part of RHEL for a long period of time. It was the first in the series that supported the journaling mechanism. The fourth generation is the latest in the series and is superior with respect to features and enhancements to the previous generations.
The structure of an extended file system is built on a partition or logical volume at the time of file system creation. This structure is divided into two sets. The first set holds the file system’s metadata information and it is very tiny. The second set stores the actual data and it occupies almost the entire partition or the logical volume space.
The metadata includes the superblock, which keeps vital file system structural information, such as the type, size, and status of the file system, and the number of data blocks it contains. Since the superblock holds such critical information, it is automatically replicated and maintained at various locations throughout the file system. The superblock at the beginning of the file system is referred to as the primary superblock, and all its copies as backup superblocks. If, for any reason, the primary superblock is corrupted or lost, it renders the file system inaccessible. One of the backup superblocks is then used to replace the corrupted or lost primary superblock to bring the file system back to its normal state. The metadata also contains the inode table, which maintains a list of index node (inode) numbers. Each inode number is assigned to a file when the file is created, and holds the file attributes such as its type, permissions, ownership, group membership, size, and last access/modification time. The inode also holds and keeps track of the pointers to the actual data blocks where the file contents are located.
The ext3 and ext4 file systems support a journaling mechanism that provides them the ability to recover swiftly after a system crash. Both ext3 and ext4 file systems keep track of their structural (metadata) changes in a journal (or log). Each structural update is written in its entirety to the journal after completion. The system checks the journal of each extended file system following the reboot after a crash, and recovers the file system rapidly using the latest structural information stored in its journal.
In contrast with ext3, the ext4 file system supports very large file systems of sizes up to 1EiB (ExbiByte) and files of sizes up to 16TiB (TebiByte). Additionally, ext4 uses a series of contiguous physical blocks on the hard disk called extents. This technique improves the performance of very large files and reduces fragmentation. ext4 supports both extended user attributes and acl mount options, but neither of them is active by default.
XFS File System
The X File System (XFS) is a high-performance 64-bit extent-based journaling file system type that was originally developed by Silicon Graphics a little over two decades ago, and was used as the default file system in their version of UNIX. Later, it was ported to Linux. Today, it is supported on most Linux distributions, including RHEL7 that has it as the default file system type. XFS allows the creation of file systems and files of sizes up to 8EiB. It does not run file system checks at system boot; rather it relies on us to use the xfs_repair utility manually to fix any issues if found. XFS sets the extended user attributes and acl mount options by default on new file systems. It enables defragmentation on mounted and active file systems to keep as much data in contiguous blocks as possible for faster access. The only major caveat with using XFS is its inability to shrink.
Like ext3 and ext4, XFS also uses journaling for metadata operations, guaranteeing the consistency of the file system against abnormal or forced unmounting. The journal information is read and any pending metadata transactions are replayed when the XFS file system is remounted.
XFS uses some techniques in its architecture for speedy IO performance. These techniques include the use of allocation groups, direct IO, guaranteed rate IO, and delayed allocation. Allocation groups are fixed-sized virtual storage regions that allow concurrent read and write access to the file system especially for file systems that span multiple physical disks; direct IO sends file system data directly to the application memory space circumventing both processor and cache memory; guaranteed rate IO ensures dedicated bandwidth to and from the file system; and delayed allocation reserves file system blocks for data that is still in cache and allocates them when the operating system writes that data to disk.
The XFS file system can be snapshot while it is mounted and active. The snapshot thus produced can then be mounted for backup or other purposes.
VFAT File System
VFAT stands for Virtual File Allocation Table. It is an extension to the legacy FAT file system type that was introduced in 1981 with very early versions of MS-DOS. The support for FAT was later added to Microsoft Windows, Mac OS, and some UNIX versions, enabling them to read and write files written in that format. The FAT file system had limitations, however, it was designed to use not more than 11 characters, excluding the period, in filenames. Moreover, the names of files stored in FAT file systems must begin with a letter or number and were not allowed to contain spaces. The FAT file system treated lowercase and uppercase letters alike.
VFAT was introduced with Microsoft Windows 95 in 1995. It supported 255 characters in filenames including spaces and periods; however, it still did not differentiate between lowercase and uppercase letters. VFAT support was added to Linux and it is still supported. RHEL7 is able to read and write files written in this format. VFAT is used on systems running Windows operating systems, and on floppy and USB flash media.
Managing File Systems
Managing file systems involves such operations as creating (or formatting), manually mounting, labeling, viewing, growing, shrinking, unmounting, automatically mounting, modifying attributes of, and removing a file system. These management tasks are common to all three file system types discussed in the previous section. Some of these administrative functions are also applicable to network and optical file systems, and will be covered later in this chapter.
File System Administration Commands
There are several commands available to administer specific file systems such as Extended, XFS, and VFAT. Table 10-2 describes them. This table also lists commands that are common to these three file systems and are equally good for NFS and ISO9660.
|
Command |
Description |
|
Extended File System |
|
|
dumpe2fs |
Displays metadata information. |
|
e2fsck |
Checks a file system for metadata consistency, and repairs it. Can also be invoked as fsck.ext3, fsck.ext4, fsck –t ext3, and fsck –t ext4. |
|
e2label |
Modifies the label of an extended file system. |
|
mke2fs |
Creates a file system. Can also be invoked as mkfs.ext3, mkfs.ext4, mkfs –t ext3, and mkfs –t ext4. |
|
resize2fs |
Resizes a file system. This command may also be invoked when the lvresize command is executed with the –r option. |
|
tune2fs |
Tunes file system attributes. |
|
XFS |
|
|
mkfs.xfs |
Creates an XFS file system. |
|
xfs_admin |
Tunes file system attributes. |
|
xfs_growfs |
Extends the size of a file system. |
|
xfs_info |
Displays information about a file system. |
|
xfs_repair |
Checks consistency of a file system and repairs it if necessary. |
|
VFAT |
|
|
mkfs.vfat |
Creates a vfat file system. It is equivalent to mkfs –t vfat. |
|
Commands Common to All File Systems |
|
|
blkid |
Displays block device attributes including their UUIDs. |
|
df |
Displays file system utilization in detail. |
|
du |
Calculates disk usage of directories and file systems. |
|
findmnt |
Lists all mounted file systems in tree form. Use –t to view specific file system type only. |
|
fuser |
Lists and terminates processes using a file system. |
|
mount |
Mounts a file system for user access, and also displays currently mounted file systems. Use –t to view specific file system type only. |
|
umount |
Unmounts a file system. |
Table 10-2 File System Management Commands
Most of these commands will be used in this and subsequent chapters.
Mounting and Unmounting a File System
The mount command is used to attach a file system to a desired point in the directory hierarchy to make it accessible to users and applications. This desired point is referred to as the mount point, which is in essence an empty directory created solely for this purpose. The mount command requires the absolute pathname (or its UUID or label) to the block device containing the file system, and a mount point name in order to attach it to the directory tree. Options are available with this command to mount all or a specific type of file systems as listed in the /etc/fstab file. The mount command is also used to mount other types of file systems such as optical and network file systems. This command adds an entry to the /etc/mtab file and instructs the kernel to add the entry to the /proc/mounts file as well after a file system has been successfully mounted.
![]() A mount point should be empty when an attempt is made to mount a file system on it, otherwise the contents of the mount point will hide. As well, the mount point must not be in use or the mount attempt will fail.
A mount point should be empty when an attempt is made to mount a file system on it, otherwise the contents of the mount point will hide. As well, the mount point must not be in use or the mount attempt will fail.
The mount command supports numerous options. Some of them are described in Table 10-3.
|
Option |
Description |
|
async (sync) |
Allows file system I/O to occur asynchronously (synchronously). This option does not have an effect on XFS file systems. |
|
acl (noacl) |
Enables (disables) the support for ACLs. |
|
atime (noatime) |
Updates (does not update) the inode access time for each access. |
|
auto (noauto) |
Mounts (does not mount) the file system when the –a option is specified. |
|
defaults |
Accepts all default values (async, auto, dev, exec, nouser, rw, and suid). |
|
dev (nodev) |
Interprets (does not interpret) the device files on the file system. |
|
exec (noexec) |
Permits (does not permit) the execution of a binary file. |
|
loop |
Mounts an ISO image as a loop device. |
|
owner |
Allows the file system owner to mount the file system. |
|
_netdev |
Used for a file system that requires network connectivity in place before it can be mounted. Examples are iSCSI, NFS, and CIFS. |
|
remount |
Remounts an already mounted file system to enable or disable an option. |
|
ro (rw) |
Mounts a file system read-only (read/write). |
|
suid (nosuid) |
Enables (disables) running setuid and setgid programs. |
|
user (nouser) |
Allows (disallows) a normal user to mount a file system. |
|
users |
Allows all users to mount and unmount a file system. |
Table 10-3 mount Command Options
The opposite of the mount command is umount, which is used to detach a file system from the directory hierarchy and make it inaccessible to users and applications. This command expects the absolute pathname to the block device containing the file system or its mount point name in order to detach it. Options are available with the umount command to unmount all or a specific type of file systems. This command removes the corresponding entry from the /etc/mtab file and instructs the kernel to remove it from the /proc/mounts file as well.
Examples on the usage of the mount and umount commands are provided in exercises later in this chapter.
Determining the UUID of a File System
A file system created in a standard partition or a logical volume has a UUID (Universally Unique IDentifier) assigned to it at the time of creation. Assigning a UUID makes the file system unique amongst many file systems that potentially exist on the system. The primary benefit of using a UUID is the fact that it always stays persistent across system reboots. A UUID is used by default in RHEL7 in the /etc/fstab file for any file system that is created by the system in a standard partition.
![]() The system attempts to mount all file systems listed in the /etc/fstab file at reboots. Each file system has an associated device file and UUID, but may or may not have a corresponding label. The system checks for the presence of each file system’s device file, UUID, or label, and then attempts to mount it.
The system attempts to mount all file systems listed in the /etc/fstab file at reboots. Each file system has an associated device file and UUID, but may or may not have a corresponding label. The system checks for the presence of each file system’s device file, UUID, or label, and then attempts to mount it.
The /boot file system, for instance, is located in a partition and the device file associated with it on server1 is /dev/vda1. The xfs_admin command with the –u option can be used to determine the UUID of /boot as it is created by default as an XFS file system at install time. Alternatively, we can use the blkid command or grep for boot in the /etc/fstab file.
# xfs_admin -u /dev/vda1
UUID = 362e0c12-a644-4611-b4ce-656c72750483
# blkid /dev/vda1
/dev/vda1: UUID="362e0c12-a644-4611-b4ce-656c72750483" TYPE="xfs"
# grep boot /etc/fstab
UUID=362e0c12-a644-4611-b4ce-656c72750483 /boot xfs defaults 1 2
This indicates the use of a UUID for mounting the /boot file system rather than its partition name (/dev/vda1), and this was automatically set at install time. A discussion on the /etc/fstab file is provided in a later sub-section.
![]() For an extended file system, we can use the tune2fs command with the –l option to find its UUID.
For an extended file system, we can use the tune2fs command with the –l option to find its UUID.
EXAM TIP: Knowing how to determine the UUID of a file system created in a standard partition is important.
A UUID is also assigned to a file system that is created in a logical volume; however, it need not be used in the fstab file as the device files associated with physical and logical volumes always stay unique amongst any number of logical volumes that exist on the system. They remain persistent across system reboots as well.
Labeling a File System
A label may be used instead of a UUID to keep the file system association with its device file unique and persistent across system reboots. The /boot file system, for instance, is located in a partition and the device file associated with it on server1 is /dev/vda1. The xfs_admin command with the –l option can be issued to determine the label set on /dev/vda1:
# xfs_admin –l /dev/vda1
label = ""
The output indicates that there is currently no label assigned to the /boot file system. A label is not needed for a file system if we are using its UUID or logical volume name; however, we can still apply one using the xfs_admin command with the –L option. We must unmount an XFS file system before we are able to change its label. The following example unmounts /boot, sets the label “bootfs” on the corresponding device file, and then remounts it:
# umount /boot
# xfs_admin –L bootfs /dev/vda1
writing all SBs
new label = "bootfs"
# mount /boot
Confirm the label by reissuing the xfs_admin command. We can also use the blkid command for verification.
![]() For an extended file system, we can use the e2label command to apply a label and tune2fs with –l to verify.
For an extended file system, we can use the e2label command to apply a label and tune2fs with –l to verify.
Now we can replace the UUID for /boot in the fstab file with LABEL=bootfs, and unmount and remount /boot as demonstrated above for confirmation. A discussion on the /etc/fstab file is provided in the next sub-section.
A label may also be applied to a file system created in a logical volume; however, it is not recommended for use in the fstab file as the device files for physical volumes and logical volumes are always unique and remain persistent across reboots.
Automatically Mounting a File System at Reboots
File systems defined in the fstab file are mounted automatically at reboots. This file must contain proper and complete information for each listed file system. An incomplete or inaccurate entry might leave the system in an undesirable state. Another benefit to adding entries to this file is that we need to specify only one of the attributes—block device name, UUID, label, or mount point—of the file system that we wish to mount manually with the mount command. The mount command will obtain the rest of the information from this file by itself. Similarly, we only need to specify one of these attributes with the umount command to detach it from the directory hierarchy.
The default fstab file contains entries for file systems that are created at the time of installation. On server1, for instance, this file currently has the following three entries:

EXAM TIP: Any missing or invalid information in this file may render the system unbootable. You will have to boot to single-user mode to fix this file. Ensure that you understand each field in this file properly for both file system and swap entries.
The format of this file is such that each row is broken out into six columns to identify the required attributes for each file system to successfully mount it. Here is what each column contains:
· The first column defines the physical or virtual device where the file system is resident, or its associated UUID or label. We may see entries for network file systems here as well.
· The second column identifies the mount point for the file system. For swap partitions, use either “none” or “swap”.
· The third column specifies the type of file system such as ext3, ext4, xfs, vfat, or iso9660. For swap, type “swap” is used.
· The fourth column identifies one or more comma-separated options to be used when mounting the file system. Some options that we may want to use were described in Table 10-3 earlier.
· The fifth column is used by the dump utility to ascertain the file systems that need to be dumped. A value of 0 (or the absence of this column) disables this check.
· The last column indicates the sequence number in which to run the e2fsck (file system check) utility on the file system at system reboots. By default, 0 is used for memory-based, remote, and removable file systems, 1 for /, and 2 for /boot and other physical file systems. 0 can also be used for/, /boot, and other physical file systems if we do not want to use this feature.
Reporting File System Usage
On a live system, we often need to check file system usage to determine if a file system needs to be expanded for growth or cleaned up to generate free space. This involves checking the used and available space for a file system. The df (disk free) command is used for this purpose. It reports details of file system blocks and lists each file system along with its device file; total, used, and available blocks; percentage of used blocks; and its mount point. By default, the df command reports the usage in KBs if no options are specified. However, we can specify the –m option to view the output in MBs or the –h option to view the information in human readable format.
Run the df command with the –h option:
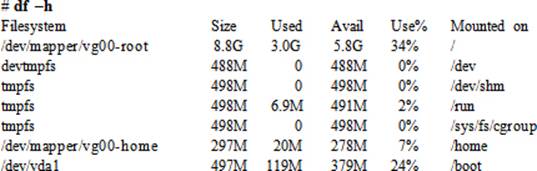
With the –h option, the command shows the usage in KBs, MBs, GBs, or TBs as appropriate. Try running df with –T, “–t xfs”, and “–t ext4” options, and observe the outputs.
Exercise 10-1: Create and Mount Extended File Systems
This exercise should be done on server1.
In this exercise, you will label vdb disk as msdos. You will create a 200MB vdb1 partition and format it as an ext3 file system. You will initialize vdd disk for use in LVM, create vg10 volume group, create lvolext4 logical volume of size 1.5GB in it, and format it as an ext4 file system. You will create /mntext3 and /mntext4 mount points and manually mount both file systems. You will run appropriate commands to confirm their mount status and sizes. You will append entries to the fstab file for vdb1 using its UUID and the lvolext file system. You will unmount both file systems manually using their mount points. You will then reboot the system and run appropriate commands to confirm that they have been automatically mounted.
1. Label the vdb disk as msdos using the parted command:
# parted /dev/vdb mklabel msdos
# parted /dev/vdb print | grep msdos
Partition Table: msdos
2. Create a 200MB primary partition on vdb disk with the parted command, and confirm:
# parted /dev/vdb mkpart primary ext3 1 201m
# parted /dev/vdb print
1 1049kB 201MB 200MB ext3 primary
3. Format the partition with ext3 file system type using the mke2fs command:
# mke2fs –t ext3 /dev/vdb1
mke2fs 1.42.9 (28-Dec-2013)
Filesystem label=
OS type: Linux
Block size=1024 (log=0)
Fragment size=1024 (log=0)
Stride=0 blocks, Stripe width=0 blocks
48960 inodes, 195584 blocks
9779 blocks (5.00%) reserved for the super user
First data block=1
Maximum filesystem blocks=67371008
24 block groups
8192 blocks per group, 8192 fragments per group
2040 inodes per group
Superblock backups stored on blocks:
8193, 24577, 40961, 57345, 73729
Allocating group tables: done
Writing inode tables: done
Creating journal (4096 blocks): done
Writing superblocks and filesystem accounting information: done
4. Initialize vdd disk for use in LVM using the pvcreate command:
# pvcreate /dev/vdd –v
Set up physical volume for "/dev/vdd" with 4194304 available sectors
Zeroing start of device /dev/vdd
Writing physical volume data to disk "/dev/vdd"
Physical volume "/dev/vdd" successfully created
5. Create vg10 volume group using the vgcreate command and add physical volume vdd to it:
# vgcreate –v vg10 /dev/vdd
Adding physical volume '/dev/vdd' to volume group 'vg10'
Archiving volume group "vg10" metadata (seqno 0).
Creating volume group backup "/etc/lvm/backup/vg10" (seqno 1).
Volume group "vg10" successfully created
6. Create lvolext4 logical volume of size 1.5GB in vg10 volume group using the lvcreate command:
# lvcreate –L 1.5g –n lvolext4 vg10 –v
Setting logging type to disk
Finding volume group "vg10"
Archiving volume group "vg10" metadata (seqno 3).
Creating logical volume lvolext4
Creating volume group backup "/etc/lvm/backup/vg10" (seqno 4).
Activating logical volume "lvolext4".
activation/volume_list configuration setting not defined: Checking only host tags for vg10/lvolext4
Creating vg10-lvolext4
Loading vg10-lvolext4 table (253:3)
Resuming vg10-lvolext4 (253:3)
Wiping known signatures on logical volume "vg10/lvolext4"
Initializing 4.00 KiB of logical volume "vg10/lvolext4" with value 0.
Creating volume group backup "/etc/lvm/backup/vg10" (seqno 4).
Logical volume "lvolext4" created
7. Format lvolext4 logical volume with ext4 file system type using the mke2fs command:
# mke2fs –t ext4 /dev/vg10/lvolext4
mke2fs 1.42.9 (28-Dec-2013)
Filesystem label=
OS type: Linux
Block size=4096 (log=2)
Fragment size=4096 (log=2)
Stride=0 blocks, Stripe width=0 blocks
98304 inodes, 393216 blocks
19660 blocks (5.00%) reserved for the super user
First data block=0
Maximum filesystem blocks=402653184
12 block groups
32768 blocks per group, 32768 fragments per group
8192 inodes per group
Superblock backups stored on blocks:
32768, 98304, 163840, 229376, 294912
Allocating group tables: done
Writing inode tables: done
Creating journal (8192 blocks): done
Writing superblocks and filesystem accounting information: done
8. Create /mntext3 and /mntext4 mount points:
# mkdir –v /mntext3 /mntext4
mkdir: created directory ‘/mntext3’
mkdir: created directory ‘/mntext4’
9. Mount /dev/vdb1 on /mntext3 and /dev/vg10/lvolext4 on /mntext4 using the mount command:
# mount /dev/vdb1 /mntext3
# mount /dev/vg10/lvolext4 /mntext4
10. Confirm the mount status and sizes with the df command:

11. Determine the UUID for /dev/vdb1 using the tune2fs command:
# tune2fs –l /dev/vdb1 | grep UUID
Filesystem UUID: c8dd716e-b9ba-465d-859b-d7115a1ea289
12. Open the /etc/fstab file and append entries for both file systems:

13. Unmount both file systems using their mount points:
# umount /mntext3 /mntext4
14. Reboot the system using the reboot command:
# reboot
15. Check the mount status of both file systems using the mount and df commands after the system has returned to its normal operating state:

Exercise 10-2: Resize an Extended File System
This exercise should be done on server1.
In this exercise, you will create a 500MB vdb2 partition, initialize it for use in LVM, extend vg10 volume group to include this physical volume, and grow the size of lvolext4 online by 500MB ensuring that the underlying file system is also grown to take advantage of the new space. You will then shrink the file system size by 900MB, ensuring that lvolext4 is also reduced. You will confirm the new size of the logical volume and the file system.
1. Create a 500MB primary partition on vdb disk with the parted command, and confirm:

EXAM TIP: Extend the size of the logical volume before attempting to increase the file system in it.
2. Initialize vdb2 partition for use in LVM using the pvcreate command. Use the –v option if you want to view details.
# pvcreate /dev/vdb2
Physical volume "/dev/vdb2" successfully created
3. Extend vg10 volume group using the vgextend command and add the new physical volume to it. Use the –v option if you want to view details.
# vgextend vg10 /dev/vdb2
Volume group "vg10" successfully extended
4. Extend lvolext4 logical volume from 1.5GB in vg10 volume group to 2GB using the lvresize command, ensuring that the underlying file system is also extended (–r option):
# lvresize –r –L 2g /dev/vg10/lvolext4
Extending logical volume lvolext4 to 2.00 GiB
Logical volume lvolext4 successfully resized
resize2fs 1.42.9 (28-Dec-2013)
Filesystem at /dev/mapper/vg10-lvolext4 is mounted on /mntext4; on-line resizing required
old_desc_blocks = 1, new_desc_blocks = 1
The filesystem on /dev/mapper/vg10-lvolext4 is now 524288 blocks long.
5. Confirm the mount status, and the sizes of both the logical volume and the file system:

6. Shrink the file system size by 900MB using the lvresize command. This operation will prompt us to unmount the file system for shrinking it. Respond with y to proceeed.
# lvresize –r –L 1.1g /dev/vg10/lvolext4
Rounding size to boundary between physical extents: 1.10 GiB
Do you want to unmount "/mntext4"? [Y|n] y
fsck from util-linux 2.23.2
/dev/mapper/vg10-lvolext4: 11/131072 files (9.1% non-contiguous), 17580/524288 blocks
resize2fs 1.42.9 (28-Dec-2013)
Resizing the filesystem on /dev/mapper/vg10-lvolext4 to 288768 (4k) blocks.
The filesystem on /dev/mapper/vg10-lvolext4 is now 288768 blocks long.
Reducing logical volume lvolext4 to 1.10 GiB
Logical volume lvolext4 successfully resized
7. Confirm the new size of the logical volume and the file system:

Exercise 10-3: Create, Mount, and Extend an XFS File System
This exercise should be done on server1.
In this exercise, you will use an existing 188MB vdc1 partition created in the previous chapter. You will initialize it for use in LVM, add it to vg10 volume group, create lvolxfs logical volume to occupy the entire vdc1 physical volume only, and format it as an xfs file system. You will create /mntxfsmount point and manually mount this file system using its device name. You will run appropriate commands to confirm its mount status and size. You will append an entry for it to the fstab file. You will grow it online by 112MB on the space that is available in the volume group, ensuring that the underlying file system is also expanded. You will then reboot the system and run appropriate commands to confirm the automatic mount of the new file system, along with all other file systems defined in the file.
1. Initialize the partition for use in LVM and add it to the vg10 volume group. Use the –v option if you want to view details.
# pvcreate /dev/vdc1
Physical volume "/dev/vdc1" successfully created
# vgextend vg10 /dev/vdc1
Volume group "vg10" successfully extended
2. Create lvolxfs logical volume of size 188MB in vg10 volume group using the lvcreate command. Make sure that the command uses only vdc1 partition and no other physical volume space. Use the –v option if you want to view details.
# lvcreate –L 188m –n lvolxfs vg10 /dev/vdc1
Logical volume "lvolxfs" created
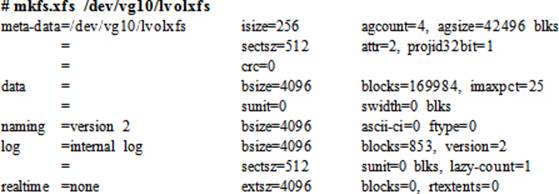
3. Format lvolxfs logical volume with xfs file system type using the mkfs.xfs command:
4. Create /mntxfs mount point:
# mkdir /mntxfs
5. Mount /dev/vg10/lvolxfs on /mntxfs using the mount command:
# mount /dev/vg10/lvolxfs /mntxfs
6. Confirm the mount status and sizes with the df command:
![]()
7. Open the /etc/fstab file and append an entry for this file system:

8. Grow the new file system online by 112MB, using the available space in vg10 volume group. Make sure that the underlying xfs file system also grows with the logical volume.
# lvresize –r –L 300m /dev/vg10/lvolxfs
Extending logical volume lvolxfs to 300.00 MiB
Logical volume lvolxfs successfully resized
…… . .
9. Check the logical volume size with the lvs command. You can also issue the lvdisplay /dev/vg10/lvolxfs command to view details about the logical volume.
![]()
10. Reboot the system using the reboot command:
# reboot
11. Check the mount status of the XFS file system using the mount command after the system has returned to its normal operating system. Ensure with the df command that all file systems previously created are also mounted.

12. Display information about the XFS file system using the xfs_info command:

Exercise 10-4: Create and Mount a VFAT File System
This exercise should be done on server1.
In this exercise, you will label vde disk as msdos. You will create a 400MGB vde1 partition and format it as a VFAT file system. You will create /mntvfat mount point and manually mount this file system using its device name. You will run appropriate commands to confirm its mount status and size. You will append an entry to the fstab file for this file system. You will reboot the system and run appropriate commands to confirm that the new file system has been automatically mounted without affecting the previously configured file systems.
1. Label vde disk as msdos with the parted command, and confirm:
# parted /dev/vde mklabel msdos
# parted /dev/vde print | grep –i partition
Partition Table: msdos
2. Create a 400MB primary partition on vde disk with the parted command, and confirm:
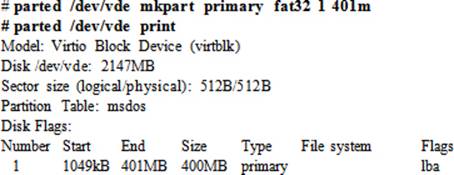
3. Format the partition with vfat file system type using the mkfs.vfat command:
# mkfs.vfat /dev/vde1
mkfs.fat 3.0.20 (12 Jun 2013)
4. Create /mntvfat mount point:
# mkdir /mntvfat
5. Mount /dev/vde1 on /mntvfat using the mount command:
# mount /dev/vde1 /mntvfat
6. Confirm the mount status and sizes with the df command:
![]()
7. Determine the UUID for /dev/vde1 using the blkid command:
# blkid /dev/vde1
/dev/vde1: SEC_TYPE="msdos" UUID="4741-2068" TYPE="vfat"
8. Open the /etc/fstab file and append an entry for this file system:

9. Reboot the system using the reboot command:
# reboot
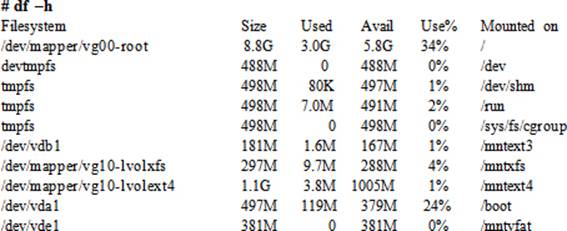
10. Check the mount status of all the file systems after the system has come up using the df command:
Exercise 10-5: Create, Mount, Unmount, and Remove File Systems
This exercise should be done on server1.
In this exercise, you will create a 100MB vdc2 partition and format it as xfs. You will create another partition vde2 of size 100MB and initialize it for use in LVM. You will create vg20 volume group, create lvolext4rem logical volume using the vde2 partition, and format it as ext4. You will create/mntxfsrem and /mntext4rem mount points. You will apply label mntxfsrem to the xfs file system. You will append entries to the fstab file for vdc2 using its label and for lvolext4rem. You will reboot the system and run appropriate commands to confirm that these two and all other file systems added to the fstab file in previous exercises have been mounted successfully and automatically.
Next, you will cd into the /mntxfsrem mount point and try to unmount the xfs file system. You will take appropriate measures to unmount it if you get a “device busy” or a similar message. You will destroy both file systems and delete their mount points. You will remove their entries from the fstabfile. You will then reboot the system and confirm that the system has been booted up without any issues. You will run appropriate commands after the system is up to verify the deletion of both file systems. Use the –v option with the LVM commands if you want to view details.
1. Create one 100MB second primary partition on vdc disk and one 100MB second primary partition on vde disk. Make sure these partitions begin right after the previous existing partition.
# parted /dev/vdc mkpart primary 202 303m
# parted /dev/vde mkpart primary 402 503m
2. Format the vdc2 partition with xfs file system type using the mkfs.xfs command:
# mkfs.xfs /dev/vdc2
3. Initialize the vde2 partition for use in LVM using the pvcreate command:
# pvcreate /dev/vde2
4. Create vg20 volume group and add physical volume vde2 to it using the vgcreate command:
# vgcreate vg20 /dev/vde2
5. Create lvolext4rem logical volume in vg20 volume group using the lvcreate command:
# lvcreate –L 96m –n lvolext4rem vg20
6. Format lvolext4rem logical volume with ext4 file system type using the mkfs.ext4 command:
# mkfs.ext4 /dev/vg20/lvolext4rem
7. Create /mntxfsrem and /mntext4rem mount points:
# mkdir /mntxfsrem /mntext4rem
8. Apply label mntxfsrem to the xfs file system using the xfs_admin command:
# xfs_admin –L mntxfsrem /dev/vdc2
9. Mount /dev/vdc2 on /mntxfsrem using its label and /dev/vg20/lvolext4rem on /mntext4rem:
# mount LABEL=mntxfsrem /mntxfsrem
# mount /dev/vg20/lvolext4rem /mntext4rem
10. Confirm the mount status with the df command:
# df –h | grep rem
11. Open the /etc/fstab file and append entries for both file systems:

12. Reboot the system:
# reboot
13. Check the mount status of all file systems that you have added previously after the system reboot:
# df –h
14. Change the directory into the /mntxfsrem mount point and try to unmount it:
# cd /mntxfsrem
# umount /mntxfsrem
umount: /mntxfsrem: target is busy.
15. Determine which user(s) and process(es) are using this mount point by issuing the fuser command with the –cu options (c for the PID and u for the user owning the PID):
# fuser –cu /mntxfsrem
/mntxfsrem: 2599c(root)
16. cd out of the mount point and run the previous command again:
# cd
# fuser –cu /mntxfsrem
17. Now you should be able to umount this file system. Also, unmount /mntext4rem file system.
# umount /mntxfsrem /mntext4rem
18. Remove the vdc2 partition using the parted command:
# parted /dev/vdc rm 2
19. Remove the lvolext4rem logical volume and the vg20 volume group using the lvremove and vgremove commands:
# lvremove –f /dev/vg20/lvolext4rem
# vgremove vg20
20. Remove both mount points:
# rmdir /mntxfsrem /mntext4rem
21. Remove their corresponding entries from the /etc/fstab file.
22. Reboot the system with the reboot command:
# reboot
23. Verify that the two file systems are not there anymore using the findmnt command:
# findmnt | egrep ‘xfsrem|ext4rem’
At this point or during this exercise, you can use several other commands listed in Table 8-2 and Table 9-2 to view LVM and file system information.
Checking and Repairing Extended File Systems
The structure of an extended file system could be damaged when an abnormal system shutdown or crash occurs, potentially leaving the mounted and active file systems in an inconsistent state. To maintain integrity, a utility called e2fsck is used. This utility is hardlinked to fsck.ext3 and fsck.ext4commands that may be used instead on the specific file system type. The behavior of this command is based on whether the file system has a journal or not. e2fsck is invoked automatically during the reboot following a system crash. It runs a full check and repair on the entire file system that is without a journal, reports any inconsistencies as it finds them, and attempts to fix them automatically. It prompts for user intervention if it is unable to resolve an inconsistency. Conversely, if it determines that the file system has a journal, it simply replays the journal and brings the file system back to its previous consistent state.
The e2fsck utility can also be executed manually on an unmounted extended file system from the command line. During the check, it expects a yes or no response while attempting to correct discovered discrepancies, unless the –p (preen) option is specified, which gives the command a go ahead to fix problems automatically.
During the check, if e2fsck encounters a corruption in the primary superblock, it exits out to the command prompt, as it requires us to take a corrective measure. The system does not allow a file system to be mounted if its primary superblock is lost or corrupt. In this situation, we need to determine the backup superblock locations with the dumpe2fs command for that file system, and then re-invoke e2fsck by specifying with it one of these locations to overwrite the primary superblock. We should be able to mount the file system back after the primary superblock has been fixed.
While checking a file system, e2fsck may come across a file with a missing name. It moves the file to the lost+found directory located in that file system. This file is known as an orphan file and it is renamed to match its inode number. You need to figure out the actual name of the file and its original location. You can use the file command to identify the file type. If it is a text file, use cat or more to view its contents; otherwise, use the strings command to extract its legible contents for review. You may likely get enough information on the name and location of the file to rename it and move it back to its place.
Exercise 10-6: Repair a Damaged Extended File System
This exercise should be done on server1.
In this exercise, you will unmount the /mntext4 file system and run the file system check and repair utility on it. You will replace its primary superblock assuming that it is corrupt, and then mount the file system back.
1. Unmount the /mntext4 file system using the umount command:
# umount /mntext4
2. Execute the e2fsck command on its logical volume device file /dev/vg10/lvolext4:
# e2fsck /dev/vg10/lvolext4
/dev/vg10/lvolext4: clean, 11/73728 files, 13789/288768 blocks
3. Obtain the list of backup superblock locations for this file system using the dumpe2fs command:
# dumpe2fs /dev/vg10/lvolext4 | grep superblock
Primary superblock at 0, Group descriptors at 1-1
Backup superblock at 32768, Group descriptors at 32769-32769
Backup superblock at 98304, Group descriptors at 98305-98305
Backup superblock at 163840, Group descriptors at 163841-163841
Backup superblock at 229376, Group descriptors at 229377-229377
4. Run the e2fsck command and specify the location of the first backup superblock (32768) to repair the primary superblock:
# fsck –b 32768 /dev/vg10/lvolext4
e2fsck 1.42.9 (28-Dec-2013)
/dev/vg10/lvolext4 was not cleanly unmounted, check forced.
Pass 1: Checking inodes, blocks, and sizes
Pass 2: Checking directory structure
Pass 3: Checking directory connectivity
Pass 4: Checking reference counts
Pass 5: Checking group summary information
/dev/vg10/lvolext4: ***** FILE SYSTEM WAS MODIFIED *****
/dev/vg10/lvolext4: 11/73728 files (9.1% non-contiguous), 13789/288768 blocks
5. Mount the file system back:
# mount /mntext4
Checking and Repairing an XFS File System
An XFS file system may be checked and repaired if a corruption in its metadata is suspected. The xfs_repair utility is available for this purpose. This tool requires that the file system be unmounted and in a clean state. When invoked, it replays the journal while performing all operations automatically without prompting for user input. The xfs_repair program goes through seven phases during its execution lifecycle on a file system. It runs checks elements such as inodes, directories, pathnames, link counts, and superblocks. The following is an example of running this tool on the/mntxfs file system that resides in lvolxfs logical volume in vg10 volume group. Remember, we have to unmount the file system before running this command on it.
# umount /mntxfs
# xfs_repair /dev/vg10/lvolxfs
|
Phase 1 |
- find and verify superblock… |
|
Phase 2 |
- using internal log |
|
- zero log… |
|
|
- scan filesystem freespace and inode maps… |
|
|
- found root inode chunk |
|
|
Phase 3 |
- for each AG… |
|
- scan and clear agi unlinked lists… |
|
|
- process known inodes and perform inode discovery… |
|
|
- agno = 0 |
|
|
- agno = 1 |
|
|
- process newly discovered inodes… |
|
|
Phase 4 |
- check for duplicate blocks… |
|
- setting up duplicate extent list… |
|
|
- check for inodes claiming duplicate blocks… |
|
|
- agno = 0 |
|
|
- agno = 1 |
|
|
Phase 5 |
- rebuild AG headers and trees… |
|
- reset superblock… |
|
|
Phase 6 |
- check inode connectivity… |
|
- resetting contents of realtime bitmap and summary inodes |
|
|
- traversing filesystem … |
|
|
- traversal finished … |
|
|
- moving disconnected inodes to lost+found … |
|
|
Phase 7 |
- verify and correct link counts… |
|
done |
|
|
# mount /mntxfs |
|
The xfs_repair command does not run at boot even if an xfs file system is not cleanly unmounted. In the event of an unclean unmount, this command simply replays the log at mount time, ensuring a consistent file system.
Mounting and Unmounting Remote File Systems
Remote file systems, such as NFS and CIFS, are treated as any other local file systems after they are mounted and attached to the directory tree on a client system. They can also be added to the file system table, just like local file systems, so that they are automatically mounted during a reboot. In the same manner, they can be detached from the directory tree and made inaccessible to users and applications. This section presents exercises to demonstrate how to mount and unmount NFS and CIFS file systems.
Exercise 10-7: Mount and Unmount an NFS File System
This exercise should be done on server2.
For this exercise, an NFS server is set up in Chapter 20 “Sharing File Storage with NFS” on server1, sharing /nfsrhcsa directory in read-only mode with appropriate firewall rules and SELinux settings in place.
In this exercise, you will mount this NFS file system on /nfsrhcsamnt, check its status, and unmount it. You will add an entry for it to the fstab file and reboot the system to confirm the file system’s automatic remount.
1. Install the NFS client package nfs-utils:
# yum –y install nfs-utils
Package 1:nfs-utils-1.3.0-0.el7.x86_64 already installed and latest version
Nothing to do
2. Create a mount point called /nfsrhcsamnt:
# mkdir /nfsrhcsamnt
3. Add the following entry to the /etc/fstab file to ensure an automatic file system remount after system reboots:
![]()
![]() The _netdev option will instruct the system to wait for networking to establish before attempting to mount this file system.
The _netdev option will instruct the system to wait for networking to establish before attempting to mount this file system.
EXAM TIP: If you miss adding an entry to the fstab file for a remote file system, you will lose the marks.
4. Execute either of the following to mount the file system:
# mount –t nfs 192.168.0.110:/nfsrhcsa /nfsrhcsamnt
# mount /nfsrhcsamnt
5. Check the status of the remote file system using the mount command:
# mount | grep nfsrhcsa
192.168.0.110:/nfsrhcsa on /nfsrhcsamnt type nfs4
(ro,relatime,vers=4.0,rsize=131072,wsize=131072,namlen=255,hard,proto=tcp,port=0,timeo=600,retrans=2,sec=sys,clientaddr=192.168.0.120,local_lock=none,addr=192.168.0.110)
6. Unmount the file system using the umount command:
# umount /nfsrhcsamnt
7. Reboot the system:
# shutdown –ry now
8. Issue the mount command again and check if the file system has been automatically remounted after the reboot:
# mount | grep nfsrhcsa
192.168.0.110:/nfsrhcsa on /nfsrhcsamnt type nfs4
(ro,relatime,vers=4.0,rsize=131072,wsize=131072,namlen=255,hard,proto=tcp,port=0,timeo=600,retrans=2,sec=sys,clientaddr=192.168.0.120,local_lock=none,addr=192.168.0.110)
This completes the setup and testing of mounting, unmounting, and remounting of an NFS file system on the client.
Exercise 10-8: Mount and Unmount a CIFS File System
This exercise should be done on server2.
For this exercise, a Samba server is set up in Chapter 21 “Sharing File Storage with Samba” on server1, sharing /smbrhcsa directory in browsable mode with login and write access allocated to user1 and read-only to user3. The server has appropriate firewall rules and SELinux settings in place. For more details on CIFS client configuration, review Chapter 21.
In this exercise, you will access and mount this share on /smbrhcsamnt, and add an entry to the /etc/fstab file so that it is automatically mounted at system reboots. You will confirm the share access and mount, and test access by creating a file in the mount point. You will store the username and password for user1 in a file owned by root with 0400 permissions to allow this user to be able to mount this share. Lastly, you will reboot the system and validate the automatic remount after the system is back up.
1. Install the Samba client packages samba-client and cifs-utils:
# yum –y install samba-client cifs-utils
…… . .
Installed:
cifs-utils.x86_64 0:6.2-6.el7
samba-client.x86_64 0:4.1.1-31.el7
Complete!
2. Log on to the /smbrhcsa share as user1 using the smbclient command:
# smbclient //192.168.0.110/smbrhcsa –U user1
Enter user1's password:
Domain=[EXAMPLE] OS=[Unix] Server=[Samba 4.1.1]
smb: \>
The connection is successfully made to the /smbrhcsa share. You can run the help subcommand to list available subcommands, use ls to list files in the share, use get/mget and put/mput to transfer one or more files, and so on. Issue exit when done to disconnect.
3. Create /smbrhcsamnt mount point:
# mkdir /smbrhcsamnt
4. Mount /smbrhcsa on to the /smbrhcsamnt mount point as user1:
# mount //192.168.0.110/smbrhcsa /smbrhcsamnt –o username=user1
Password for user1@//192.168.0.110/smbrhcsa: *******
5. Check the mount status of the share using the df and mount commands:
# df –h | grep smbrhcsa
//192.168.0.110/smbrhcsa 8.8G 3.4G 5.4G 39% /smbrhcsamnt
# mount | grep smbrhcsa
//192.168.0.110/smbrhcsa on /smbrhcsamnt type cifs
(rw,relatime,vers=1.0,cache=strict,username=user1,domain=SERVER1,uid=0,noforceuid,gid=0,noforcegid,addr=192.168.0.110,unix,posixpaths,serverino,acl,rsize=1048576,wsize=65536,actimeo=1)
6. Create /etc/samba/smbrhcsacred file and add the credentials for user1 to it:
# vi /etc/samba/smbrhcsacred
username=user1
password=user123
7. Set ownership on the file to root and permissions to 0400:
# chown root /etc/samba/smbrhcsacred && chmod 0400 /etc/samba/smbrhcsacred
8. Open the /etc/fstab file and add the following entry to automatically mount the share at system reboots:
//192.168.0.110/smbrhcsa /smbrhcsamnt cifs rw,credentials=/etc/samba/smbrhcsacred 0 0
![]() You can add the _netdev option to instruct the system to wait for networking to establish before attempting to mount this file system.
You can add the _netdev option to instruct the system to wait for networking to establish before attempting to mount this file system.
9. Create a file called smbrhcsatest as user1 under /smbrhcsamnt and confirm its creation by running ll on /smbrchsa on the Samba server:
[server2] $ touch /smbrhcsamnt/smbrhcsatest
[server1] # ll /smbrhcsa
-rw-r--r--. 1 root root 0 Jan 27 14:22 nfsrhcsatest
-rw-r--r--. 1 user1 user1 0 Jan 29 21:21 smbrhcsatest
10. Unmount the file system using the umount command:
# umount /smbrhcsamnt
11. Reboot the system:
# shutdown –ry now
12. Issue the mount command again and check if the file system has been automatically remounted after the reboot:
# mount | grep smbrhcsa
//192.168.0.110/smbrhcsa on /smbrhcsamnt type cifs
(rw,relatime,vers=1.0,cache=strict,username=user1,domain=SERVER1,uid=0,noforceuid,gid=0,noforcegid,addr=192.168.0.110,unix,posixpaths,serverino,acl,rsize=1048576,wsize=65536,actimeo=1)
The remote share is successfully mounted and remounted on server2, and it can be accessed as any other local file system. Access to it is also tested by creating a file on the Samba client and validating its presence on the Samba server. user3, and all other users on the system, should be able to access this share in read-only mode. This ability is enabled by adding the “public = yes” directive on the Samba server.
AutoFS
In the previous section, we learned how to attach (mount) an NFS file system to the Linux directory tree manually for access by users and applications. Once attached, the NFS file system was treated just like any other local file system. We also learned how to detach (unmount) an NFS file system manually from the directory tree and make it inaccessible to users and applications. We placed an entry for the NFS file system in the /etc/fstab file to guarantee its mount during system reboots.
RHEL offers an alternative way of mounting and unmounting an NFS file system during runtime and system reboots, and it is referred to as the AutoFS (Auto File System) service. AutoFS is a client-side service, which is used to mount an NFS file system on-demand. With a proper entry placed in AutoFS configuration files, the AutoFS service automatically mounts an NFS file system upon detecting an activity in its mount point with a command such as ls or cd. In the same manner, the AutoFS service unmounts the NFS file system automatically if the file system has not been accessed for a pre-defined period of time.
![]() The AutoFS service also supports the automounting and autounmounting of CIFS and removable file systems via the /etc/auto.smb and /etc/auto.misc configuration files, respectively.
The AutoFS service also supports the automounting and autounmounting of CIFS and removable file systems via the /etc/auto.smb and /etc/auto.misc configuration files, respectively.
The use of the AutoFS service saves the Linux kernel from dedicating system resources to maintain unused NFS file systems, ultimately contributing to the overall system performance. Imagine a system with many NFS mounts!
![]() In order to avoid inconsistencies, mounts managed with AutoFS should not be mounted or unmounted manually or via the /etc/fstab file.
In order to avoid inconsistencies, mounts managed with AutoFS should not be mounted or unmounted manually or via the /etc/fstab file.
Benefits of Using AutoFS
There are several benefits associated with using the AutoFS service over placing entries in the /etc/fstab file. Some of the key benefits are described below:
· AutoFS requires that NFS file systems be defined in text configuration files called maps, which are located in the /etc directory. AutoFS does not use the /etc/fstab file.
· AutoFS does not require root privileges to mount an NFS file system; manual mounting and mounting via fstab do require that privilege.
· AutoFS prevents an NFS client from hanging if an NFS server is down or inaccessible. With the other method, the unavailability of the NFS server may cause the NFS client to hang.
· With AutoFS, an NFS file system is unmounted automatically if it is not accessed for five minutes by default. With the fstab method, the NFS file system stays mounted until it is either manually unmounted or the client shuts down.
· AutoFS supports wildcard characters and environment variables, which the other method does not support.
· A special map is available with AutoFS that mounts all available NFS file systems from a reachable NFS server automatically without explicitly defining them in the AutoFS configuration. The fstab method does not offer any such feature.
How AutoFS Works
The AutoFS service consists of a daemon called automount in the userland that mounts configured NFS file systems automatically upon access. This daemon is invoked at system boot. It reads the AutoFS master map and creates initial mount point entries in the /etc/mtab file; however, it does not mount any corresponding file systems yet. During runtime when the daemon detects a user activity under a mount point, it goes ahead and actually mounts the requested file system at that time. If an NFS file system remains idle for a certain time period, automount unmounts it by itself.
AutoFS Configuration File
The configuration file for AutoFS is /etc/sysconfig/autofs, which AutoFS consults at service startup. Some key directives from this file are shown below along with preset values:
MASTER_MAP_NAME="auto.master"
TIMEOUT=300
NEGATIVE_TIMEOUT=60
BROWSE_MODE="no"
MOUNT_NFS_DEFAULT_PROTOCOL=4
APPEND_OPTIONS="yes"
LOGGING="none"
OPTIONS=""
There are additional directives available in this file and more can be added to modify the default behavior of the AutoFS service. Table 10-4 describes the above directives.
|
Directive |
Description |
|
MASTER_MAP_NAME |
Defines the name of the master map. The default is auto.master, which is located in the /etc directory. |
|
TIMEOUT |
Specifies, in seconds, the maximum idle time after which a file system is automatically unmounted. The default is five minutes. |
|
NEGATIVE_TIMEOUT |
Specifies, in seconds, a timeout value for failed mount attempts. The default is one minute. |
|
BROWSE_MODE |
Defines whether maps are to be made browsable. |
|
MOUNT_NFS_DEFAULT_PROTOCOL |
Sets the default NFS version to be used to mount NFS file systems. |
|
APPEND_OPTIONS |
Identifies additional options to the OPTIONS directive. |
|
LOGGING |
Specifies a logging level. Other options are verbose and debug. |
|
OPTIONS |
Defines global options. |
Table 10-4 AutoFS Directives
These directives are usually kept to their default values; however, you can alter them if required.
AutoFS Maps
The AutoFS service needs to know the NFS file systems to be mounted and their locations. It also needs to know any specific options to use for mounting. This information is defined in AutoFS maps. There are four types of AutoFS maps: master, special, direct, and indirect.
The Master Map
The /etc/auto.master file is the default master map, as defined in the /etc/sysconfig/autofs configuration file with the MASTER_MAP_NAME directive. This map maintains entries for indirect, special, and direct maps. Three sample entries are provided below and explained subsequently:
|
/net |
–hosts |
|
/– |
/etc/auto.direct |
|
/misc |
/etc/auto.misc |
The first entry is for a special map, which directs AutoFS to mount all shares available from the NFS server listed as /net/<NFS_server> when an activity occurs under this mount point.
The second entry defines a direct map and points to the /etc/auto.direct file for mount details.
The third entry is for an indirect map, notifying AutoFS to refer to the /etc/auto.misc file for mount details. The umbrella mount point /misc will precede all mount point entries listed in the /etc/auto.misc file. This indirect map entry is used to automount removable file systems, such as CD, DVD, floppy, JAZ, external USB disks, and so on.
You may append an option to any of the entries in the auto.master file; however, that option will apply globally to all sub-entries in the specified map file.
The Special Map
The –hosts special map allows all NFS shares from all accessible NFS servers to be mounted under the /net<NFS_server> mount point without explicitly mounting each one of them. The /etc/auto.net file is executed to obtain a list of NFS servers and shares available from them. Accessing/net/<NFS_server> will instruct AutoFS to mount all available resources from that NFS server. By default, the entry “/net –hosts” exists in the /etc/auto.master file, and is enabled. This map is not recommended in an environment with many NFS servers and many shares, as AutoFS will attempt to mount all of them whether or not they are needed.
The Direct Map
The direct map is used to mount NFS shares automatically on any number of unrelated mount points. Each direct map entry places a separate share entry to the /etc/mtab file, which maintains a list of all mounted file systems whether they are local or remote. Some key points to note when working with direct maps are:
· Direct mounted shares are always visible to users.
· Local and direct mounted shares can co-exist under one parent directory.
· Accessing a directory containing many direct mount points mounts all shares.
Exercise 10-9: Access an NFS Share with a Direct Map
This exercise should be done on server2.
For this exercise, an NFS server is set up in Chapter 20 “Sharing File Storage with NFS” on server1, sharing /nfsrhcsa directory in read-only mode with appropriate firewall rules and SELinux settings in place.
In this exercise, you will configure a direct map for this NFS share to mount it automatically on /autodir with AutoFS.
1. Install the autofs package called autofs:
# yum –y install autofs
…… . .
Package 1:autofs-5.0.7-40.el7.x86_64 already installed and latest version
Nothing to do
2. Create a mount point called /autodir if it does not already exist. This mount point will be used to mount the NFS share.
# mkdir /autoind
3. Edit the /etc/auto.master file and add the following entry if it does not already exist. This entry will instruct the AutoFS service to consult the auto.direct file for direct map entries.
/– /etc/auto.direct
4. Create /etc/auto.direct file and add the mount point and the NFS server and share information:
/autodir server1.example.com:/nfsrhcsa
5. Set the AutoFS service to autostart at system reboots:
# systemctl enable autofs
ln -s '/usr/lib/systemd/system/autofs.service' '/etc/systemd/system/multi-user.target.wants/autofs.service'
6. Start the AutoFS service and verify its operational state:
# systemctl start autofs
# systemctl status autofs
autofs.service - Automounts filesystems on demand
Loaded: loaded (/usr/lib/systemd/system/autofs.service; enabled)
Active: active (running) since Mon 2015-03-16 23:35:47 MIST; 1h 1min ago
Main PID: 8219 (automount)
CGroup: /system.slice/autofs.service
└─8219 /usr/sbin/automount --pid-file /run/aut…
7. Run the ll command on the mount point /autodir and then execute the mount command to verify that the share is automounted and accessible for use:
# ll /autodir
# mount | grep autodir
/etc/auto.direct on /autodir type autofs (ro,relatime,fd=18,pgrp=9129,timeout=300,minproto=5,maxproto=5,direct)
server1.example.com:/nfsrhcsa on /autodir type nfs4 (ro,relatime,vers=4.0,rsize=131072,wsize=131072,namlen=255,hard,proto=tcp,port=0,timeo=600,retrans=2,sec=sys,clientaddr=192.168.0.120,local_lock=none,addr=192.168.0.110)
This completes the AutoFS setup for an NFS file system on the client using a direct map. You can wait for five minutes and then run the mount command again to observe the disappearance of the file system. A cd or ll on the mount point will bring the file system back.
The Indirect Map
The indirect map is used to automatically mount shares under one common parent directory. Some key points to note when working with indirect maps are:
· Indirect mounted shares become visible only after they have been accessed.
· Local and indirect mounted shares cannot co-exist under the same parent directory.
· Each indirect map puts only one entry in the /etc/mtab file.
· Accessing a directory containing many indirect mount points shows only the shares that are already mounted.
All three maps have their own advantages and disadvantages. However, by comparing their features, it seems more prudent to use indirect maps for automounting NFS shares. This statement may not be true for every environment, as there are specifics that dictate which option or combination to go with.
Exercise 10-10: Access an NFS Share with an Indirect Map
This exercise should be done on server2.
For this exercise, an NFS server is set up in Chapter 20 “Sharing File Storage with NFS” on server1, sharing /nfsrhcsa directory in read-only mode with appropriate firewall rules and SELinux settings in place.
In this exercise, you will configure an indirect map for this NFS share to mount it automatically under /misc with AutoFS. You will observe that the specified mount point “autoind” will be automatically created by AutoFS under /misc.
1. Install the autofs package called autofs:
# yum –y install autofs
2. Edit /etc/auto.master and ensure that the following indirect map entry is defined. This entry will instruct the AutoFS service to consult the auto.misc file for indirect map entries.
/misc /etc/auto.misc
3. Edit /etc/auto.misc file and add the mount point and the NFS server and share information to the bottom of the file:
autoind server1.example.com:/nfsrhcsa
4. Set the AutoFS service to autostart at system reboots:
# systemctl enable autofs
5. Start the AutoFS service and verify its operational state:
# systemctl start autofs
# systemctl status autofs
6. Run the ll command on the mount point /misc/autoind and then execute the mount command to verify that the share is automounted and accessible for use. Observe the creation of autoind under /misc by AutoFS.
# ll /misc/autoind
# mount | grep autoind
server1.example.com:/nfsrhcsa on /misc/autoind type nfs4 (ro,relatime,vers=4.0,rsize=131072,wsize=131072,namlen=255,hard,proto=tcp,port=0,timeo=600,retrans=2,sec=sys,clientaddr=192.168.0.120,local_lock=none,addr=192.168.0.110)
This completes the AutoFS setup for an NFS file system on the client using an indirect map. You can wait for five minutes and then run the mount command again to observe the disappearance of the file system. A cd or ll on the mount point will bring the file system back.
Automounting User Home Directories Using Wildcard Substitution
AutoFS allows us to use two special characters in indirect maps. These special characters are asterisk (*) and ampersand (&), and are used to replace the references to specific mount points, and NFS servers and share subdirectories, respectively. With user home directories located under /home, for instance, and shared by one or more NFS servers, the automount daemon will contact all of them simultaneously when a user attempts to log on to the client. The daemon will only mount that specific user’s home directory rather than the entire /home. The indirect map entry for this type of substitution is defined in an indirect map, such as /etc/auto.home, and will look like:
* –nfs4,rw &:/home/&
With this entry in place, there is no need to update any AutoFS configuration files if NFS servers with /home shared are added or removed. Similarly, if user home directories are added or deleted, there will be no impact on the functionality of AutoFS either. If there is only one NFS server sharing the home directories, you can simply specify its name in place of the first & sign in the above entry.
You will also need to update the /etc/auto.master map to reflect the addition of this indirect map:
/home /etc/auto.home
Reload the AutoFS maps or restart the AutoFS service after the above changes have been made, and then try to log in with a valid user account. You should be able to log in with your home directory automounted.
![]() To test the above configuration, set up a system to share /home using NFS. Create a few user accounts on both the server and client. Do not create user home directories on the client, just have /home available. Refer to Chapter 20 “Sharing File Storage with NFS” to get assistance on the NFS server setup.
To test the above configuration, set up a system to share /home using NFS. Create a few user accounts on both the server and client. Do not create user home directories on the client, just have /home available. Refer to Chapter 20 “Sharing File Storage with NFS” to get assistance on the NFS server setup.
EXAM TIP: You may need to configure AutoFS for mounting user home directories for one or more users. A successful implementation of this setup will also allow OpenLDAP users to be able to log in and be placed in their automounted home directories.
Understanding and Managing Swap
Physical memory in the system is a finite temporary storage resource used for loading kernel and data structures, and running user programs and applications. Swap space is a region on the physical disk used for holding idle data temporarily until it is needed. The system divides the physical memory into smaller chunks called pages and maps their physical locations to virtual locations on the swap to facilitate access by system processors. This physical-to-virtual mapping of pages is stored in a page table and is maintained by the kernel.
When a program or process is spawned, it requires space in the physical memory to run and be processed. Although many programs can run concurrently, the physical memory cannot hold all of them at the same time. The kernel monitors the memory usage. As long as the free memory remains below a high threshold, nothing happens. However, when the free memory falls below that threshold, the system starts moving selected idle pages of data from physical memory to the swap space in an effort to make room to accommodate other programs. This piece in the process is referred to aspage out. Since the system CPU performs the process execution in a round-robin fashion, when the system needs this paged-out data for execution, the CPU looks for that data in the physical memory and a page fault occurs, resulting in moving the pages back to the physical memory from the swap. The return of this data to the physical memory is referred to as page in, and the entire process of paging data out and in is known as demand paging.
RHEL systems with less physical memory but high memory requirements can become so busy with paging out and in that they do not have enough cycles to carry out other useful tasks, resulting in degraded system performance. In this situation the system appears to be frozen. The excessive amount of paging that affects the system performance is called thrashing.
When thrashing begins, or when the free physical memory falls below a low threshold, the system deactivates idle processes and prevents new processes from being initiated. The idle processes only get reactivated and new processes are only allowed to be started when the system discovers that the available physical memory has climbed above the threshold level and thrashing has ceased.
Determining Swap Usage
The size of a swap should not be less than the amount of physical memory; however, depending on application requirements, it may be twice the size, or even larger. It is also not uncommon to see systems with less swap than the actual amount of physical memory. This is especially witnessed on systems with a very large physical memory size.
We can issue the free command to view how much physical memory is installed, used, and free on the system. The –h flag may be used to list the values in human readable format.

Alternatively, we can also view the contents of the /proc/meminfo file to determine memory information:
# cat /proc/meminfo
|
MemTotal: |
1017992 kB |
|
MemFree: |
566216 kB |
|
MemAvailable: |
710144 kB |
|
…… . . |
|
|
SwapTotal: |
511996 kB |
|
SwapFree: |
511996 kB |
|
…… . . |
There is about 1GB (MemTotal) of total memory on this system. For better performance, the kernel uses as much memory as it can for caching data. As reads and writes occur constantly, the kernel struggles to keep the data in cache as pertinent as possible. The caching information is reported as the sum of the number of buffers and cached pages. The portion of the cache memory used by a certain process is released when the process is terminated, and is allocated to a new process as needed. The above output indicates that about 184MB (Inactive) of the total memory is available for use by new processes. The output also displays the total configured swap (SwapTotal) and how much of it is currently available (SwapFree).
Exercise 10-11: Create and Activate Swap Spaces
This exercise should be done on server1.
In this exercise, you will create swap structures in vdb2 using the mkswap command. You will create swapvol logical volume in vg10 of size 300MB. You will enable swap in both using the swapon command. You will add entries to the /etc/fstab file so that both swap regions are activated at reboots. Finally, you will reboot the system and confirm by using appropriate commands that the new swap regions have been successfully activated.
EXAM TIP: Use lsblk to determine available disk space.
1. Create swap structures in the vdb2 partition using the mkswap command:
# mkswap /dev/vdb2
mkswap: /dev/vdb2: warning: wiping old LVM2_member signature.
Setting up swapspace version 1, size = 488444 KiB
no label, UUID=40809164-d5a3-40f7-9862-cce2a6e532ce
2. Create logical volume swapvol in vg10 of size 300MB using the lvcreate command:
# lvcreate –L 300m –n swapvol vg10
Logical volume "swapvol" created
3. Create swap structures in swapvol using the mkswap command:
# mkswap /dev/vg10/swapvol
Setting up swapspace version 1, size = 307196 KiB
no label, UUID=5ccdcb52-fd4b-4409-a5e9-38fa390c20f6
4. Enable swapping in the partition and the logical volume using the swapon command:
# swapon /dev/vdb2
# swapon –v /dev/vg10/swapvol
swapon /dev/vg10/swapvol
swapon: /dev/mapper/vg10-swapvol: found swap signature: version 1, page-size 4, same byte order
swapon: /dev/mapper/vg10-swapvol: pagesize=4096, swapsize=314572800, devsize=314572800
5. Confirm the activation of swap in the new areas by running either the swapon command with the –s switch or viewing the contents of the /proc/swaps file:
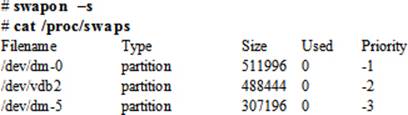
6. Display virtual memory statistics using the vmstat command:

The command produced the output in six categories: procs, memory, swap, io, system, and cpu. The r and b under procs show the number of processes waiting to run and in uninterruptible sleep; the swpd, free, buff, and cache under memory indicate the amount of used virtual memory, idle memory, memory used as buffers, and cache memory; the si and so under swap determine the amount of memory swapped in and out; the bi and bo under io display the number of input and output blocks; the in and cs under system indicate the number of interrupts and context switches per second; and us, sy, id, wa, and st identify the percentage of total CPU time spent in running the non-kernel code, kernel code, idle state, waiting for I/O, and stolen from a virtual machine.
We can run the vmstat command with the –s switch to display the output in a different format:
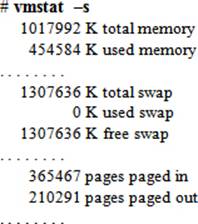
7. Finally, edit the fstab file and add entries for both swap areas for auto-activation during reboots:
![]()
EXAM TIP: You will not be given any credit for this work if you forget to add an entry to the /etc/fstab file.
8. Reboot the system now and issue commands used earlier in this exercise after the system comes back up to validate the activation of the new swap regions.
Exercise 10-12: Deactivate and Remove Swap Spaces
This exercise should be done on server1.
In this exercise, you will deactivate both swap regions that you added in the previous exercise with the swapoff command. You will remove their entries from the fstab file and reboot the system to confirm.
1. Deactivate swap in vdb2 and swapvol using the swapoff command:
# swapoff –v /dev/vdb2
swapoff /dev/vdb2
# swapoff /dev/vg10/swapvol
swapoff /dev/vg10/swapvol
2. Remove the partition and the logical volume using appropriate tools:
# parted /dev/vdb rm 2
# lvremove –f /dev/vg10/swapvol
Logical volume "swapvol" successfully removed
3. Edit the fstab file and remove their entries.
4. Reboot the system to confirm a smooth startup following the removals. Use appropriate commands to validate the removal.
Access Control Lists (ACLs)
The Access Control Lists (ACLs) provide an extended group of permissions that may be set on files and directories. These permissions are in addition to the standard Linux file and directory permissions, and the special setuid, setgid, and sticky bit permissions that we discussed earlier in Chapter 03 “Working with Files and File Permissions”. The ACLs allow us to define permissions for specific users and groups using either the octal or symbolic notation of permission allocation. The specific users may or may not be part of the same group. ACLs are configured and treated the same way on both files and directories. Before any ACLs are applied to a file or directory, the file system it is located in has to be mounted or remounted with ACL support enabled. This support is turned on for XFS file systems by default; however, it needs to be activated for extended file systems. ACLs can also be used on both NFS and CIFS file systems.
ACLs are categorized into two groups based on their types, and are referred to as access ACLs and default ACLs. Access ACLs are set on individual files and directories whereas default ACLs can only be applied at the directory level. Files and sub-directories under a parent directory with default ACLs set inherit the default ACL settings.
ACL Management Commands
ACL support is loaded on the system at the time of OS installation via the acl software package. This package includes three management commands—chacl, getfacl, and setfacl—and are described in Table 10-5.
|
Command |
Description |
|
chacl |
Changes ACL settings on a file or directory. Available for users who are familiar with its use from IRIX UNIX. |
|
getfacl |
Displays ACL settings for a file or directory. |
|
setfacl |
Sets, modifies, substitutes, and deletes ACL settings on a file or directory. |
Table 10-5 ACL Management Commands
Here we are going to use the getfacl and setfacl commands only as they are more common than chacl. The getfacl command has several options that we may specify to see the output as desired; however, it displays all necessary information without furnishing any options with it. The example below creates an empty file file1 in /root and then displays the ACLs on it:
# pwd
/root
# touch file1
# getfacl file1
# file: file1
# owner: root
# group: root
user::rw-
group::r--
other::r--
The output shows the names of the file, the owner, and the owning group as comments and then it displays the present permissions placed on the file: read and write for the owner and read-only for everyone else. Notice the two colon characters in the permission rows. They currently contain nothing between them but this is where a specific user, a specific group, or their corresponding UID or GID is inserted when extended permissions are set on the file with the setfacl command. For instance, ACLs user:1000:r-- on a file would imply that a user with UID 1000, who is not the owner of the file or a member of the owning group, is allowed only read access to this file. Similarly, the ACL setting group:dba:rw- would give a non-owning group (dba in this case) read and write access to the file.
In addition to using the getfacl command for viewing ACL settings, the ll command also indicates the presence of ACLs by showing the + sign right beside the permissions column in the output. An example permissions column from the ll command would be -rw-rw-r--+.
The setfacl command is used to apply or modify ACL settings on a file or directory. The way it accepts specific permissions at the command line is explained in Table 10-6.
|
ACL Rule |
Description |
|
u[ser]:UID:perms |
Permissions assigned to a specific user (user name or UID). The user must exist in the /etc/passwd file. |
|
g[roup]:GID:perms |
Permissions assigned to a specific group (group name or GID). The group must exist in the /etc/group file. |
|
m[ask]:perms |
Maximum permissions a specific user or a specific group can have on a file or directory. If this is set to rw-, for example, then no specific user or group will have more permissions than read and write. |
|
o[ther]:perms |
Permissions assigned to users not in the owning group. |
Table 10-6 ACL Rules
The setfacl command provides several switches to use depending on what we want to achieve. Table 10-7 describes some of them.
|
Switch |
Description |
|
-b |
Removes all ACL settings. |
|
-d |
Applies to the default ACLs. |
|
-k |
Removes all default ACL settings. |
|
-m |
Sets or modifies ACL settings. |
|
-R |
Applies recursively to all files and sub-directories. |
|
-x |
Removes an ACL setting. |
Table 10-7 setfacl Command Switches
We will use some of these switches shortly.
The Role of the mask Value
The value of mask determines the maximum allowable permissions placed for a specific user or group on a file or directory. If it is set to rw, for instance, no specific user or group will exceed those permissions. The mask value is displayed on a separate line in the getfacl command output. Each time ACLs are modified for a file or directory, the mask is recalculated automatically and applied unless we supply our own desired mask value with the command. On file1, there are no ACLs currently set as shown below. The –c option instructs the command not to display the header information.
# getfacl –c file1
user::rw-
group::r--
other::r--
If we give read and write permissions to user1 and change the mask to read-only at the same time, the command will allocate the permissions as mentioned; however, the effective permissions for the user will only be read-only.
# setfacl –m u:user1:rw,m:r file1
# getfacl –c file1
user::rw-
user:user1:rw- #effective:r--
group::r--
mask::r--
other::r--
This means that user1 will not be able to modify this file even though they appear to have the write permission. The actual permissions for user1 include both read and write, but only the read bit is in effect. Now, let’s promote the mask value to include the write bit as well, and observe the result:
# setfacl –m m:rw file1
# getfacl –c file1
user::rw-
user:user1:rw-
group::r--
mask::rw-
other::r--
The actual permissions for user1 are now promoted to include the write bit to reflect the new higher mask value.
Exercise 10-13: Determine, Set, and Delete Access ACLs
This exercise should be done on server1.
In this exercise, you will create file1 as user1 in /home/user1 and will check to see if there are any ACL settings on the file. You will check to ensure that the /home file system is mounted with acl support turned on. You will apply ACL settings on the file for user3 and allow them full access. You will observe the change in the mask value. You will add user4 to the ACL settings on the file. You will delete the settings for user3 and then delete all other ACL settings from the file.
1. Log in as user1 and create file1. Run the ll and getfacl commands on the file and see if there are any ACL entries placed on it.
$ pwd
/home/user1
$ touch file1
$ ll file1
-rw-rw-r--. 1 user1 user1 0 Nov 4 21:12 file1
$ getfacl file1
# file: file1
# owner: user1
# group: user1
user::rw-
group::rw-
other::r--
The output indicates an absence of ACL settings on the file. It also shows the owner and owning group names. The owner and group members have read and write permissions and everyone else has the read-only permission.
2. Now, log in as root on a different terminal (or switch into root with the su command) and check the file system type for /home. If it is an extended file system, run mount | grep home to determine if acl support is turned on. If not, issue the following to remount the file system with that support:
# mount –o remount,acl /home
EXAM TIP: Modify the /etc/fstab file and replace ‘defaults’ with ‘acl’ (or add ‘acl’ if other options are listed) in the mount options field for the extended file system where you want ACLs set up.
There is no need to check this for an XFS file system as the acl support is an integral part of it.
3. Allocate read/write/execute permissions to user3 with the setfacl command using the octal notation for permission representation. Run this command as user1.
$ setfacl –m u:user3:7 file1
4. Run the ll command to check if the + sign has appeared by the permission settings and the getfacl command to check the new ACL settings:
$ ll
-rw-rwxr--+ 1 user1 user1 0 Nov 4 21:12 file1
$ getfacl –c file1
user::rw-
user:user3:rwx
group::rw-
mask::rwx
other::r--
A row is added for user3 showing rwx (7) permissions. Another row showing the mask is also added and is set to rwx (7) as well. The mask value determines the maximum permissions assigned to a specific user or group. In this case, the maximum permissions allocated to user3 are rwx and the mask reflects it.
5. Add user4 with read/write permissions to file1 using the symbolic notation for permission representation:
$ setfacl –m u:user4:rw file1
$ getfacl file1
user::rw-
user:user3:rwx
user:user4:rw-
group::rw-
mask::rwx
other::r--
6. Delete the ACL entries set for user3 and confirm:
$ setfacl –x u:user3 file1
$ getfacl file1
user::rw-
user:user4:rw-
group::rw-
mask::rw-
other::r--
Notice that the mask value has reduced to read/write, which reflects the current maximum permissions placed on the specific user user4.
7. Delete all the ACL entries set on file1:
$ setfacl –b file1
Confirm after the deletion using the getfacl command.
Default ACLs
Sometimes it is imperative for several users that belong to different groups to be able to share the contents of a common directory. They want permissions set up on this directory in such a way that the files and sub-directories created underneath inherit its permissions. This way the users do not have to adjust permissions on each file and sub-directory they create under the parent directory. Setting default ACLs on a directory fulfills this requirement.
The default ACLs can be described as the maximum discretionary permissions that can be allocated on a directory. Table 10-8 describes the syntax for applying default entries with the setfacl command.
|
ACL Entry |
Description |
|
d[efault]:u:perms |
Default standard Linux permissions for the owner. |
|
d[efault]:u:UID:perms |
Default permissions for a specific user (user name or UID). |
|
d[efault]:g:perms |
Default standard Linux permissions for the owning group. |
|
d[efault]:g:GID:perms |
Default permissions for a specific group (group name or GID). |
|
d[efault]:o:perms |
Default permissions for public. |
|
d[efault]:m:perms |
Default maximum permissions a user or group can have when they create a file in a directory with default ACLs in place. |
Table 10-8 Format for Using Default ACLs
Let’s apply the concept in the following exercise for a better understanding.
Exercise 10-14: Set, Confirm, and Delete Default ACLs
This exercise should be done on server1.
In this exercise, you will create a directory /home/user4/projects as user4 and set default ACL entries for user1 and user3 to allow them read and write permissions on this directory. You will create a sub-directory prj1 and a file file1 under projects and observe the effect of default ACLs on them. You will delete all the default entries at the end of the exercise.
1. Log in as user4 and create projects. Run the getfacl command and see what the default permissions are on the directory.
$ pwd
/home/user4
$ mkdir projects
$ getfacl projects
# file: project
# owner: user4
# group: user4
user::rwx
group::rwx
other::r-x
2. Allocate default read and write permissions to user1 and user3 with the setfacl command. Run this command as user4 and use octal notation.
$ setfacl –m d:u:user1:6,d:u:user3:6 projects
$ getfacl –c projects
user::rwx
group::rwx
other::r-x
default:user::rwx
default:user:user1:rw-
default:user:user3:rw-
default:group::rwx
default:mask::rwx
default:other::r-x
3. Create a sub-directory prj1 under projects and observe that it has inherited the ACL settings from its parent directory:
$ cd projects ; mkdir prj1
$ getfacl –c prj1
user::rwx
user:user1:rw-
user:user3:rw-
group::rwx
mask::rwx
other::r-x
default:user::rwx
default:user:user1:rw-
default:user:user3:rw-
default:group::rwx
default:mask::rwx
default:other::r-x
4. Create a file file1 under projects and observe the inheritance of ACLs from the parent directory:
$ touch file1
$ getfacl –c file1
user::rw-
user:user1:rw-
user:user3:rw-
group::rwx ;#160;#effective:rw-
mask::rw-
other::r--
The output indicates that the maximum permissions the group members have on the file are read and write, and the execute permission for them is ineffective due to the mask setting.
5. Delete all the default ACL settings from the directory and confirm:
$ setfacl –k project
$ getfacl –c project
user::rwx
group::rwx
other::r-x
Confirm the deletion with the getfacl command.
Chapter Summary
This chapter discussed local and remote file systems, AutoFS, swap, and ACLs. We reviewed file system concepts and types, and learned about extended and xfs file systems. We looked at various file system administration utilities. We studied the concepts around mounting and unmounting file systems. We examined the UUID associated with file systems and applied labels to file systems. We analyzed the file system table and added entries to it to automatically activate file systems at system reboots. We looked at a tool for reporting file system usage. We learned about file system check utilities for determining and fixing issues related to unhealthy file systems. We performed a number of exercises on file system administration and repair to reinforce the concepts learned.
We looked at mounting and unmounting remote file systems on the client manually, via the fstab file, and using the AutoFS service. We discussed the concepts, benefits, and components associated with AutoFS. We performed exercises to fortify our understanding of mounting remote file systems using the three mount methods.
We studied the concepts around swapping and paging, and looked at how they worked. We performed exercises on creating, activating, viewing, deactivating, and removing swap spaces, as well as configuring them for auto-activation at system reboots.
Finally, we covered ACLs at length. We learned concepts and the purpose of applying extended security attributes on files and directories. We performed exercises to strengthen our understanding.
Chapter Review Questions
1. xfs is the default file system type in RHEL7. True or False?
2. What would the entry “ * server10:/home/& “ in an AutoFS indirect map imply?
3. What type of information does the blkid command display?
4. What is the process of paging out and paging in known as?
5. What would the command mkswap /dev/vdc2 do?
6. Where does AutoFS automount a DVD?
7. Which two files contain entries for mounted file systems?
8. What would happen if we mount a file system on a directory that already contains files in it?
9. What type of AutoFS map would have the “/- /etc/auto.media” entry in the auto.master file?
10. A UUID is always assigned to a file system at its creation time. True or False?
11. What would the command mount –t cifs –o ro //192.168.0.120/cifs1 /cifs1 do?
12. The difference between the primary and backup superblocks is that the primary superblock includes pointers to the data blocks where the actual file contents are stored whereas the backup superblocks don’t. True or False?
13. What would the command setfacl –m d:u:user1:7,d:u:user4:6,d:o:4 dir do?
14. AutoFS requires root privileges to automatically mount a network file system. True or False?
15. What would the command mkfs.ext4 /dev/vgtest/lvoltest do?
16. Arrange the tasks in correct sequence: umount file system, mount file system, create file system, remove file system.
17. The parted utility may be used to create LVM logical volumes. True or False?
18. Which command can we use to create a label for an xfs file system?
19. What is the default timeout value for a file system before AutoFS unmounts it automatically?
20. What would the mount command do with the –a switch?
21. Name the four types of maps that AutoFS support.
22. What would the command df –t xfs do?
23. What would happen if we try to apply ACL settings to a file that resides in an ACL-deactivated file system?
24. What would the command setfacl –m u::7,g::4,o:4,u:user3:7 file do?
25. What is the difference between the mkfs.ext4 and mke2fs commands?
26. What two commands can be used to determine the total and used physical memory and swap in the system?
27. Which virtual file contains information about the current swap?
28. The /etc/fstab file can be used to activate swap spaces automatically at system reboots. True or False?
29. The xfs_repair command must be run on a mounted file system. True or False?
30. What is the name of the AutoFS configuration file and where is it located?
31. Name of the AutoFS daemon is automountd. True or False?
32. What are the commands to activate and deactivate swap spaces manually? Write two commands.
Answers to Chapter Review Questions
1. True.
2. This indirect map entry would mount individual user home directories from server10.
3. The blkid command displays block device file attributes.
4. The process of paging out and in is known as demand paging.
5. The command provided will create swap structures in the /dev/vdc2 partition.
6. AutoFS mounts a DVD under /misc.
7. The /etc/mtab and the /proc/mounts files.
8. The files in the directory will hide.
9. A direct map.
10. True.
11. The command provided will mount the CIFS file system cifs1 in read-only mode on the /cifs1 mount point from Samba server with IP address 192.168.0.120.
12. False.
13. The command provided will set default ACLs of rwx for user1, rw for user4, and r-only for everyone else on the dir directory.
14. False.
15. The command provided will format /dev/vgtest/lvoltest logical volume with ext4 file system type.
16. Create, mount, unmount, and remove.
17. False.
18. The xfs_admin command can be used to create a label for an xfs file system.
19. Five minutes.
20. The command provided will mount all file systems listed in the /etc/fstab file but are currently not mounted.
21. The AutoFS service supports master, special, direct, and indirect maps.
22. The command provided will display all mounted file systems of type xfs.
23. The attempt to apply ACLs to a file located in an ACL-deactivated file system is not allowed.
24. The command provided will assign rwx permissions to file owner and user3, and read-only permission to everyone else.
25. No difference.
26. The free and vmstat commands.
27. The /proc/swaps file contains information about the current swap.
28. True.
29. False.
30. The name of the AutoFS configuration file is autofs and it is located in the /etc/sysconfig directory.
31. False.
32. The swapon and swapoff commands.
DIY Challenge Labs
The following labs are useful to strengthen most of the concepts and topics learned in this chapter. It is expected that you perform these labs without any additional help. A step-by-step guide is not provided, as the implementation of these labs requires the knowledge that has been presented in this chapter. Use defaults or your own thinking for missing information.
Lab 10-1: Create and Mount an Extended File System
Destroy all partitions and volume groups created on vdb, vdc, vdd, and vde drives in previous labs and exercises.
Create a partition in vdb of size 1GB and initialize it with ext4 file system structures. Initialize the vdc disk for use in LVM, create a volume group called vgtest and include the vdc disk in it. Create oravol logical volume of size 1GB in the volume group and initialize it with ext4 file system structures. Create mount points of your choice, and mount both file systems manually. Apply any label to the file system created in vdb1 and add both file systems to the fstab file using the label of vdb1 and the LV name of oravol. Reboot the system and test if it boots up successfully and mounts both new file systems.
Lab 10-2: Automount a Network File System
In Exercise 20-1, a directory called /common is shared in read/write mode via the NFS protocol. In order to perform this lab, complete that exercise, and then set AutoFS maps appropriately on the client to automount /common on /mntauto using a direct map. Set the idle time period to 60 seconds. Reboot the system and test to ensure the automount works as expected. Remove the direct map configuration and replace it with an indirect map to automount /common on /mnt/automnt. Test the configuration.
Lab 10-3: Create and Enable Swap
Create vdb2 of size 1.2GB and lvswap2 in vgtest of size 1.8GB. Initialize both for use as swap. Create swap structures in them and add entries to the file system table so that they are automatically activated at each system reboot. Use defaults or your own ideas for missing information.
Lab 10-4: Apply ACL Settings
Create a file called testfile in user1’s home directory. Create a directory in user2’s home directory and call it dir1. Ensure that the /home file system is mounted with acl option activated. Apply settings on testfile so that user2 gets 7, user3 gets 6, and user4 gets 4 permissions. Apply default settings on dir1 so that user4 gets 7 and user2 gets 5 permissions on it.
All materials on the site are licensed Creative Commons Attribution-Sharealike 3.0 Unported CC BY-SA 3.0 & GNU Free Documentation License (GFDL)
If you are the copyright holder of any material contained on our site and intend to remove it, please contact our site administrator for approval.
© 2016-2026 All site design rights belong to S.Y.A.