RHCSA & RHCE Red Hat Enterprise Linux 7: Training and Exam Preparation Guide (EX200 and EX300), Third Edition (2015)
Part II. RHCE Section
Chapter 16. Synchronizing Time with NTP
This chapter describes the following major topics:
· Introduction to the Network Time Protocol service
· Overview of time sources, NTP roles, and stratum levels
· Understand NTP packages and tools
· Analysis of the configuration file
· Use and configure NTP client, server, and peer
· Overview of the graphical configuration tool
· Update system clock and query NTP servers
RHCE Objectives:
40. Configure a system to use time services
82. Synchronize time using other NTP peers
The Network Time Protocol service maintains the clock on the system and keeps it synchronized with a more accurate and reliable source of time. Providing accurate and uniform time for systems on the network allows time-sensitive applications, such as monitoring software, backup tools, scheduling utilities, billing systems, file sharing protocols, and authentication programs, to perform correctly and precisely. It also aids logging and auditing services to capture messages and alerts in log files with accurate timestamps.
Understanding Network Time Protocol
Network Time Protocol (NTP) is a networking protocol for synchronizing the system clock with timeservers that are physically closer and redundant for high accuracy and reliability. This protocol was developed over three decades ago and it is still widely in use, with tens of millions of computing devices employing it to obtain time from tens of thousands of configured NTP servers spread across the globe. NTP supports both client-server as well as peer-to-peer configurations with an option to use either public-key or symmetric-key cryptography for authentication. When using this protocol, time accuracies are typically within a millisecond. Having precise time on networked systems allows time-sensitive applications, such as logging and monitoring software, backup and scheduling tools, financial and billing systems, authentication and email applications, and file and storage sharing protocols, to function with precision.
The NTP daemon, called ntpd, uses the UDP protocol over well-known port 123, and it runs on all participating servers, peers, and clients. This daemon typically starts at system boot and continuously operates to keep the operating system clock in sync with a more accurate source of time. In order to understand NTP, a discussion of its components and roles is imperative.
Time Source
A time source is any device that acts as a provider of time to other devices. The most accurate source of time is provided by atomic clocks that are deployed around the globe. Atomic clocks use Universal Time, Coordinated (UTC) for time accuracy. They produce radio signals that radio clocks use for time propagation to computer servers and other devices that require accuracy in time. When choosing a time source for a network, preference should be given to the one that is physically close and takes the least amount of time to send and receive NTP packets.
The most common sources of time employed on computer networks are the local system clock, an Internet-based public timeserver, a radio clock, and a satellite receiver.
Local System Clock
You can arrange for one of the RHEL systems to function as a provider of time using its own clock. This requires the maintenance of correct time on this server either manually or automatically via the cron daemon. Keep in mind, however, that this server has no way of synchronizing itself with a more reliable and precise external time source. Therefore, using a local system clock as a timeserver with reliance on its own clock is the least recommended option.
Internet-Based Public Timeserver
Several public timeservers (visit www.ntp.org for a list) are available via the Internet for the provision of time on the network. One of the systems on the local network is identified and configured to obtain time from one or more of the public timeservers. To use a time source, you may need to open a port in the firewall to allow NTP traffic to pass through. Internet-based timeservers are spread around the world and are typically operated by government agencies, research organizations, and universities. This option is preferred over the use of the local system clock.
Radio/Atomic Clock
A radio clock is regarded as the most accurate provider of time. A radio clock receives time updates from one or more atomic clocks. Global Positioning System (GPS), National Institute of Science and Technology (NIST) radio station WWVB broadcasts in the Americas, and DCF77 radio broadcasts in Europe are some popular radio clock methods. Of these, GPS-based sources are perfect. A direct use of signals from any of these devices requires connectivity of some hardware to a computer system that is intended to be used as an organizational or site-wide timeserver.
NTP Roles
A role is a function that a system performs from an NTP standpoint. A system can be configured to assume one or more of the following roles:
Primary NTP Server
A primary NTP server gets time from one of the time sources mentioned above, and provides time to one or more secondary servers or clients, or both. It can also be configured to broadcast time to secondary servers and clients.
Secondary NTP Server
A secondary NTP server receives time from a primary server or directly from one of the time sources mentioned above. It can be used to provide time to a set of clients to offload the primary, or for redundancy. The presence of a secondary server on the network is optional, although highly recommended. A secondary NTP server can also be configured to broadcast time to clients and peers.
NTP Peer
An NTP peer provides time to an NTP server and receives time from it. All peers work at the same stratum level, and all of them are considered equally reliable. Both primary and secondary servers can be peers of each other.
NTP Client
An NTP client receives time from either a primary or a secondary server. A client can be configured in one of the following ways:
· As a polling client that contacts a defined NTP server directly for time synchronization.
· As a broadcast client that listens to time broadcasts by an NTP server. A broadcast client binds itself with the NTP server that responds to its requests and synchronizes its clock with it. The NTP server must be configured in the broadcast mode in order for a broadcast client to be able to bind to it. A broadcast NTP configuration cannot span the local subnet.
· A multicast client operates in a similar fashion as a broadcast client; however, it is able to span the local subnet. The NTP server must be configured in the multicast mode in order for a multicast client to work with it.
· A manycast client automatically discovers manycast NTP servers and uses the ones with the best performance. The NTP server must be configured in the manycast mode in order for a manycast client to work with it.
Stratum Levels
As you are aware, there are different types of time sources available to synchronize the system time. These time sources are categorized hierarchically into multiple levels, which are referred to as stratum levels based on their distance from the reference clocks (atomic, radio, and GPS). The reference clocks operate at stratum level 0 and are assumed to be the most accurate provider of time with little to no delay.
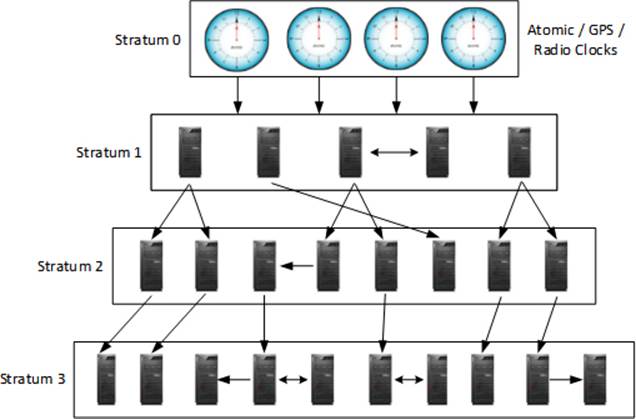
Figure 16-1 NTP Stratum Levels
Besides stratum 0, there are fifteen additional stratum levels that range between 1 and 15. Of these, servers operating at stratum 1 are considered the most accurate, as they get time directly from a stratum 0 device. See Figure 16-1. A stratum 0 device cannot be used on the network directly. It is attached to one of the computers on the network via an RS-232 connection, for example, and then that computer is configured to operate at stratum 1. Servers functioning at stratum 1 are called timeservers (or primary timeservers) and they can be set up to provide time to stratum 2 servers over a network path via NTP packets. Similarly, a stratum 3 server can be configured to synchronize its time with a stratum 2 server, and so on. Servers sharing the same stratum can be configured as peers to exchange time updates with each other.
![]() If a secondary server is also configured to get time from a stratum 1 server directly, it will act as a peer to the primary server.
If a secondary server is also configured to get time from a stratum 1 server directly, it will act as a peer to the primary server.
There are a number of public NTP servers available for free to synchronize with the system time. You do not have to connect your system directly to a stratum 0 device.
Managing Network Time Protocol
This section discusses the management tasks including installing the NTP software, configuring an NTP server, peer, and client, configuring a broadcast NTP server and client using a combination of manual file editing and commands, and testing the configurations. This section also introduces the graphical tool for NTP administration.
Before we get into the setup tasks, let’s look at the software packages, utilities, and the main NTP configuration file.
NTP Packages and Utilities
There is only one required software package that needs to be installed on the system for NTP. This package is called “ntp” and it includes all the necessary support to configure the system as an NTP server, peer, or client. RHEL7 includes version 4.2.6 of this package. Additionally, a package called “ntpdate” may also be installed to get access to a command that is used to update the system with an NTP server without the involvement of the ntpd daemon. You can use the yum command on server1 to list whether these two packages are installed:
|
# yum list installed | grep ^ntp |
||
|
ntp.x86_64 |
4.2.6p5-18.el7 |
@ftprepo |
|
ntpdate.x86_64 |
4.2.6p5-18.el7 |
@anaconda/7.0 |
The above output confirms the presence of both packages on the system.
These packages bring several administration commands, some of which are described in Table 16-1.
|
Command |
Description |
|
ntpdate |
Updates the system date and time immediately. This command is deprecated and will be removed from a future RHEL release. Use ntpd –q instead. |
|
ntpq |
Queries the NTP daemon. |
|
ntpd |
NTP daemon program that must run on a system to use it as a server, peer, or client. |
|
ntpstat |
Shows time synchronization status. |
Table 16-1 NTP Administration Commands
We will use these tools later in this chapter.
NTP Configuration File
The key configuration file for NTP is called ntp.conf, and it is located in the /etc directory. This file can be modified by hand, and the directives in it can be set based on the role the system is intended to play. Some key directives from this file are:
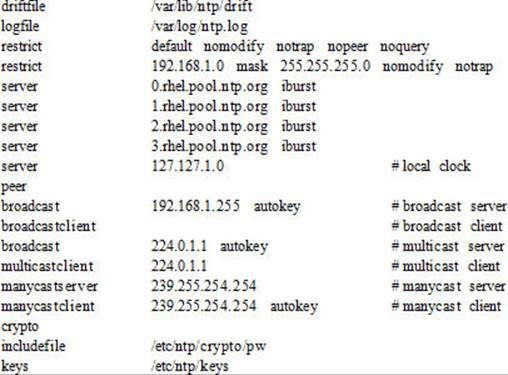
EXAM TIP: The /etc/ntp.conf is the only configuration file that is modified for NTP server, peer, and client. Understanding of how entries are defined for these roles is important.
Table 16-2 describes these directives.
|
Directive |
Description |
|
driftfile |
Specifies the location of the driftfile (default is /var/lib/ntp/drift). This file is used by the ntpd daemon to keep track of local system clock accuracy. |
|
logfile |
Specifies the location of the log file. |
|
restrict |
Sets access control restrictions on inbound NTP queries. Several defaults are defined with this directive including nomodify, notrap, nopeer, and noquery. The nomodify option disallows any modification attempts by other NTP servers; the notrap option disables control messages from being captured; the nopeer option prevents remote servers from establishing peer relationship; and the noquery option disallows remote ntpq queries but answers time queries. |
|
server |
Specifies the hostname or IP address of the timeserver. By default, the file contains four public timeserver entries. The iburst option helps improve the time taken for initial synchronization. |
|
peer |
Specifies the hostname or IP address of the peer. |
|
broadcast |
Specifies the hostname or IP address of the broadcasting timeserver. The autokey option describes the type of authentication to use. This option is preferred in an environment with a large number of NTP clients. |
|
broadcastclient |
The presence of this directive sets the system as a broadcastclient. |
|
multicastclient |
Enables reception of multicast server messages to the specified multicast group address. |
|
manycastserver |
Specifies the hostname or IP address of the manycast timeserver. |
|
manycastclient |
Sets the system as a manycast client. The autokey option describes the type of authentication to use. |
|
crypto |
Enables public-key or symmetric-key authentication. |
|
includefile |
This file stores the password to be used to decrypt encrypted files that contain private keys. |
|
keys |
This file stores authentication keys. |
Table 16-2 Description of /etc/ntp.conf Directives
There are several additional directives and options that may be defined in this file.
Exercise 16-1: Use Pre-Defined NTP Polling Client
This exercise should be done on server2.
By default, the NTP software comes pre-configured for use as an NTP client. The configuration file, /etc/ntp.conf, already has four public NTP server entries.
In this exercise, you will activate the NTP service and check to ensure that it is functional.
1. Install the NTP software (if it is not already installed):
# yum –y install ntp
2. Ensure that the following public NTP server entries are defined in the /etc/ntp.conf file:
# grep ^server /etc/ntp.conf
server 0.rhel.pool.ntp.org iburst
server 1.rhel.pool.ntp.org iburst
server 2.rhel.pool.ntp.org iburst
server 3.rhel.pool.ntp.org iburst
3. Enable the ntpd daemon to autostart at reboots:
# systemctl enable ntpd
ln -s '/usr/lib/systemd/system/ntpd.service' '/etc/systemd/system/multi-user.target.wants/ntpd.service'
4. Start the NTP service and check its status:
# systemctl start ntpd
# systemctl status ntpd
ntpd.service - Network Time Service
Loaded: loaded (/usr/lib/systemd/system/ntpd.service; enabled)
Active: active (running) since Thu 2015-01-08 09:08:17 EST; 19min ago
Main PID: 21475 (ntpd)
CGroup: /system.slice/ntpd.service
└─21475 /usr/sbin/ntpd -u ntp:ntp -g
Jan 08 09:08:17 server2.example.com ntpd[21475]: Listen normally on 12 team0…3
Jan 08 09:08:17 server2.example.com ntpd[21475]: Listening on routing socket…s
Jan 08 09:08:17 server2.example.com systemd[1]: Started Network Time Service.
Jan 08 09:08:17 server2.example.com ntpd[21475]: 0.0.0.0 c016 06 restart
Jan 08 09:08:17 server2.example.com ntpd[21475]: 0.0.0.0 c012 02 freq_set ke…M
Jan 08 09:08:17 server2.example.com ntpd[21475]: 0.0.0.0 c011 01 freq_not_set
Jan 08 09:08:18 server2.example.com ntpd[21475]: 0.0.0.0 c614 04 freq_mode
Jan 08 09:25:09 server2.example.com ntpd[21475]: 0.0.0.0 0612 02 freq_set ke…M
Jan 08 09:25:09 server2.example.com ntpd[21475]: 0.0.0.0 0615 05 clock_sync
5. Check whether the system is bound to the NTP servers:
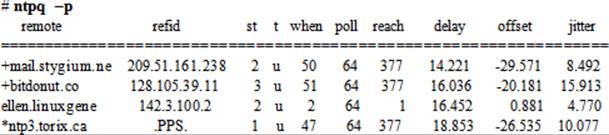
The above output indicates that the ntpd daemon on server2 is currently bound to an NTP server ntp3.torix.ca. Details for each column in this output are provided later in this chapter.
6. Check the status of NTP client:
# ntpstat
synchronised to NTP server (67.215.197.149) at stratum 3
time correct to within 61 ms
polling server every 128 s
Exercise 16-2: Configure NTP Server and Polling Client
This exercise should be done on server1 (NTP server) and server2 (NTP client).
In this exercise, you will set up server1 as an NTP server and sync time to its local clock and provide time to clients on the network. You will use the IP 127.127.1.0 which is reserved for this purpose. You will disable existing public timeserver entries from the configuration file. You will open UDP port 123 in the firewall to allow NTP traffic to pass through. You will configure server2 as a polling client to obtain time from server1 and disable other default server entries from its configuration file as well.
1. Install the NTP software on server1 (if it is not already installed):
# yum –y install ntp
2. Comment out all server directives from the /etc/ntp.conf file and add a new one with IP 127.127.1.0:
#server 0.rhel.pool.ntp.org iburst
#server 1.rhel.pool.ntp.org iburst
#server 2.rhel.pool.ntp.org iburst
#server 3.rhel.pool.ntp.org iburst
server 127.127.1.0
3. Enable the NTP service to autostart at reboots:
# systemctl enable ntpd
ln -s '/usr/lib/systemd/system/ntpd.service' '/etc/systemd/system/multi-user.target.wants/ntpd.service'
4. Open UDP port 123 in the firewall persistently and load the new rule:
# firewall-cmd --permanent --add-service ntp
# firewall-cmd --reload
5. Start the ntpd service and check its status:

The above output indicates that the ntpd daemon on server1 is using its own clock as the timeserver.
6. Disable the server directives in the /etc/ntp.conf file on server2 and add the following to use server1 as the timeserver:
#server 0.rhel.pool.ntp.org iburst
#server 1.rhel.pool.ntp.org iburst
#server 2.rhel.pool.ntp.org iburst
#server 3.rhel.pool.ntp.org iburst
server server1.example.com
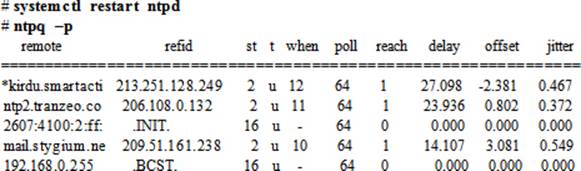
7. Restart ntpd on server2 and check the status of binding with the ntpq command:

The above output confirms the NTP association of server2 with server1.
Exercise 16-3: Configure an NTP Peer
This exercise should be done on host1.
In this exercise, you will configure host1 as a peer of NTP server server1 and test the configuration.
1. Install the NTP software on host1 (if it is not already installed):
# yum –y install ntp
2. Comment out all server directives from the /etc/ntp.conf file and add the following with either the hostname or IP address of server1:
#server 0.rhel.pool.ntp.org iburst
#server 1.rhel.pool.ntp.org iburst
#server 2.rhel.pool.ntp.org iburst
#server 3.rhel.pool.ntp.org iburst
peer server1.example.com
3. Enable the NTP service to autostart at reboots:
# systemctl enable ntpd
ln -s '/usr/lib/systemd/system/ntpd.service' '/etc/systemd/system/multi-user.target.wants/ntpd.service'
4. Open UDP port 123 in the firewall persistently and load the new rule:
# firewall-cmd --permanent --add-service ntp
# firewall-cmd --reload
5. Restart the ntpd service and check its status:

The above output indicates that the ntpd daemon on host1 has an association with server1.
Exercise 16-4: Configure a Broadcast Server and Client
This exercise should be done on server2 (NTP server) and host1 (NTP client).
In this exercise, you will set up server2 as an NTP client to obtain time from the original four NTP servers and broadcast time to devices on the local network (192.168.0.0/24). You will open UDP port 123 in the firewall to allow NTP traffic to pass through. You will configure host1 as a broadcast client to get time from the broadcast. This exercise assumes that the NTP software is already loaded on both server2 and host1.
1. Ensure that the following entries are defined in the /etc/ntp.conf file on server2 as shown below:
server 0.rhel.pool.ntp.org iburst
server 1.rhel.pool.ntp.org iburst
server 2.rhel.pool.ntp.org iburst
server 3.rhel.pool.ntp.org iburst
broadcast 192.168.0.255
2. Enable the NTP service to autostart at reboots:
# systemctl enable ntpd
3. Open UDP port 123 in the firewall persistently and load the new rule:
# firewall-cmd --permanent --add-service ntp
# firewall-cmd --reload
4. Restart the ntpd service and check its status:
The above output indicates that the ntpd daemon on server2 is using the public NTP servers as the provider of time. It also shows that this server is broadcasting time to devices on the 192.168.0.0 network.
5. Disable the server directives in the /etc/ntp.conf file on host1 and add broadcastclient and disable directives as shown. Disable secret-key authentication as well.
#server 0.rhel.pool.ntp.org iburst
#server 1.rhel.pool.ntp.org iburst
#server 2.rhel.pool.ntp.org iburst
#server 3.rhel.pool.ntp.org iburst
broadcastlient
disable auth
6. Restart ntpd on host1 and check the status of binding with the ntpq command:

The above output confirms the NTP association of host1 with broadcast server server2.
Overview of System-Config-Date Tool
The NTP client service can be set up using the graphical System-Config-Date tool. This tool is not installed by default. Run the following to install it:
# yum –y install system-config-date
In order to run this tool, execute system-config-date in an X terminal window or choose Applications | Sundry | System-Config-Date in the GNOME desktop. The System-Config-Date tool will open up as shown in Figure 16-2.
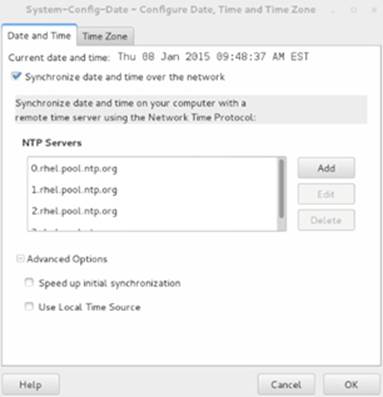
Figure 16-2 System-Config-Date Tool for NTP Client Configuration
Select “Synchronize date and time over the network” and add the IP address(es) of time servers under NTP Servers. Select “Speed up initial synchronization” to instruct the tool to run the ntpdate command and immediately bring the local system clock close to the first NTP server listed. Choose “Use Local Time Source” if you wish to use the local system clock as the provider of time. Click OK when done.
EXAM TIP: The GUI tool is simple to use. It updates the /etc/ntp.conf file for you.
Updating System Clock Manually
You can run the ntpdate command anytime to instantly bring the system clock close to the time on an NTP server. The NTP service must not be running in order for this command to work. Run ntpdate manually and specify either the hostname or the IP address of the remote timeserver to immediately sync your system time. For example, to bring the clock on server1 at par with the clock on server2, run the following set of commands on server1:
# systemctl stop ntpd
# ntpdate server2
8 Jan 21:31:59 ntpdate[32502]: step time server 192.168.0.120 offset 1.125541 sec
# systemctl start ntpd
Restart the ntpd service after executing the ntpdate command so that the local clock continues to poll configured timeservers for updates.
Querying NTP Servers
We used the NTP query tool called ntpq earlier in this chapter to query the status of server association and time synchronization. This command sends out requests to and receives responses from NTP servers, as well as reports the outcome on the screen. The ntpq command may also be run in an interactive mode.
Run this tool with the –p option to print a list of NTP servers known to the system along with a summary of their status:
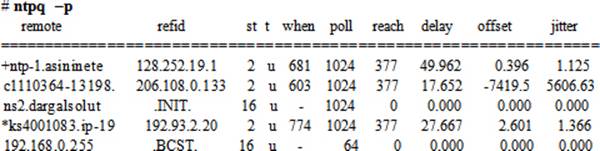
The ntpq command produces the output in ten columns, which are explained in Table 16-3.
|
Column |
Description |
|
remote |
Shows IP addresses or hostnames of NTP servers and peers. Each IP/hostname may be preceded by one of the following characters: * Indicates the current source of synchronization. # Indicates the server selected for synchronization, but distance exceeds the maximum. o Displays the server selected for synchronization. + Indicates the system considered for synchronization. x Designated false ticker by the intersection algorithm. . Indicates the systems picked up from the end of the candidate list. - Indicates the system not considered for synchronization. Blank Indicates the server rejected because of high stratum level or failed sanity checks. |
|
refid |
Shows a reference ID for each timeserver. |
|
st |
Displays a stratum level. Stratum level 16 indicates an invalid level. |
|
t |
Shows available types: l = local (such as a GPS clock), u = unicast, m = multicast, b = broadcast, and - = netaddr (usually 0). |
|
when |
Displays time, in seconds, when a response was last received from the server. |
|
poll |
Shows a polling interval. Default is 64 seconds. |
|
reach |
Expresses the number of successful attempts to reach the server. The value 001 indicates that the most recent probe was answered, 357 indicates that one probe was unanswered, and the value 377 indicates that all recent probes were answered. |
|
delay |
Indicates a length of time, in milliseconds, it took for the reply packet to return in response to a query sent to the server. |
|
offset |
Shows a time difference, in milliseconds, between server and client clocks. |
|
jitter |
Displays a variation of offset measurement between samples. This is an error-bound estimate. |
Table 16-3 ntpq Command Output Description
Chapter Summary
This chapter discussed the Network Time Protocol service. It described various sources of obtaining time, different roles that systems could play from an NTP standpoint, and elaborated on the strata paradigm. We looked at NTP packages and utilities available for performing various NTP management tasks, and continued with a discussion of a primary NTP configuration file and several directives that could be set in that file.
We performed a variety of exercises to strengthen the concepts learned. Finally, we reviewed the graphical NTP client configuration tool, and saw how to update system clock instantly and query NTP servers.
Chapter Review Questions
1. Which graphical tool may be used to configure an NTP client?
2. What is the default polling interval set on an NTP client?
3. Write the command that would list the current source of time synchronization.
4. What protocol and port does NTP use?
5. Can an NTP server be configured to broadcast time on the network? True or False?
6. Name two common sources for obtaining time.
7. What is the purpose of the drift file?
8. Define stratum levels.
9. What would happen if you run the ntpdate command for instant time update while the ntpd daemon is running on the system?
10. Write a difference between an NTP peer and an NTP client.
11. What would the command ntpdate server.ntp.org do?
Answers to Chapter Review Questions
1. The System-Config-Date tool.
2. The default polling interval is sixty-four seconds.
3. The ntpq command with the –p switch.
4. NTP uses the UDP protocol and port 123.
5. True.
6. The two common sources for getting time are public timeservers and radio clocks.
7. The ntpd daemon uses the drift file to keep track of local system clock accuracy.
8. Stratum levels determine the proximity of a time source.
9. The ntpdate command will display a message that the NTP socket is busy.
10. An NTP peer provides time while an NTP client may obtain time from it.
11. This command will instantly synchronize the system’s time with the specified server’s time.
DIY Challenge Labs
The following labs are useful to strengthen the concepts and topics learned in this chapter. It is expected that you perform these labs without any additional help. A step-by-step guide is not provided, as the implementation of these labs requires the knowledge that has been presented in this chapter. Use defaults or your own thinking for missing information.
Lab 16-1: Configure the Network Time Protocol Service
Obtain a list of public timeservers from www.ntp.org and configure server2 as a peer of one of them. Configure polling client on server1 using the GUI program to sync its clock with server2. Run appropriate commands on server2 to validate its peer association and on server1 to verify its binding with server2.
All materials on the site are licensed Creative Commons Attribution-Sharealike 3.0 Unported CC BY-SA 3.0 & GNU Free Documentation License (GFDL)
If you are the copyright holder of any material contained on our site and intend to remove it, please contact our site administrator for approval.
© 2016-2026 All site design rights belong to S.Y.A.