RHCSA & RHCE Red Hat Enterprise Linux 7: Training and Exam Preparation Guide (EX200 and EX300), Third Edition (2015)
Part II. RHCE Section
Chapter 19. Sharing Block Storage with iSCSI
This chapter describes the following major topics:
· Introduction to the iSCSI protocol
· Description of various iSCSI terms
· iSCSI target and initiator software packages
· Tools to administer iSCSI target and initiator
· Initiator configuration and database files
· Configure a system as an iSCSI target and share disk-based storage
· Configure a system as an iSCSI initiator and mount the discovered storage persistently
· Configure an iSCSI target to share file-based storage and mount it on an iSCSI initiator persistently
RHCE Objectives:
61. Configure a system as either an iSCSI target or initiator that persistently mounts an iSCSI target
iSCSI is a storage networking protocol used to share a computer’s local storage with remote clients using the SCSI commandset over an existing IP network infrastructure. The clients see the shared storage as a locally attached hard disk and can use any available disk and file system management tools to partition, format, and mount it. This way, unused storage on one system can be utilized by other systems without the need of physically relocating it or re-organizing cables.
Understanding the iSCSI Protocol
The Internet Small Computer System Interface (iSCSI) is a storage networking transport protocol that carries SCSI commands over IP networks, including the Internet. This protocol enables data transfer between iSCSI clients and iSCSI storage servers instituting a Storage Area Network (SAN) of disparate storage. As this protocol is designed to work on IP networks, the distance between clients and storage servers is irrelevant as long as the link between them is fast and stable. Once a proper configuration is in place and a connection is established, any storage shared by a storage server appears as a locally attached hard disk to the client.
An iSCSI SAN is a low-cost alternative to the expensive Fibre Channel-based SAN (FC SAN). It does not require special or dedicated cabling, switches, and host controller adapters as does the FC SAN; rather, it uses the existing network infrastructure for storage sharing. In environments, however, where superior performance is sought, deployment of dedicated network infrastructure is recommended to evade potential bandwidth issues. Furthermore, an iSCSI SAN can be scaled without an outage or additional investment. This protocol communicates over port 3260 and uses TCP by default.
Unlike the NFS and CIFS protocols (discussed in subsequent chapters) that are used for network file sharing, iSCSI presents the network storage to clients as a local raw block disk drive. The clients can carve the disk up using any disk partitioning software, such as parted or LVM. The shared network storage does not have to be an entire physical or virtual disk; rather, it could be a simple file, an LVM logical volume, a disk partition, a RAID partition, or a ramdisk. In all cases, it appears to clients as just another regular local disk.

Figure 19-1 Basic iSCSI Target and Initiator Arrangement
Figure 19-1 shows a basic iSCSI SAN with server2 acting as a storage server and server1 as its client. In iSCSI nomenclature, a storage server is referred to as a target and a client is referred to as an initiator. We will use this basic arrangement to build our small iSCSI SAN in the following exercises.
Terminology
The iSCSI technology has several terms that need to be grasped in order to fully understand how it works and is configured. This knowledge will also benefit you in performing the exercises offered later in this chapter. The key iSCSI terms are described below.
ACL: An ACL (access control list) controls an iSCSI client access to target LUNs.
Addressing: iSCSI assigns a unique address to each target server. It supports multiple addressing formats; however, the IQN (iSCSI qualified name) is most common. A sample IQN is shown below:
iqn.2015-01.com.example:testiscsilun0
In the above sample, iqn identifies the iSCSI address format, 2015-01 represents the year and month when your organization (example.com in this example) registered this domain, com.example represents the reversed domain name of your organization, and :testiscsilun0 represents a string of your choice to uniquely identify this address among hundreds of other targets that may exist on the system.
Alias: An alias is an optional string of up to 255 characters that may be defined to give a description to an iSCSI LUN. For instance, “Oracle ABC DB Archive Log Files, LUN 001” might be an alias assigned to a LUN that is used explicitly to store archive log files for an Oracle DB instance named ABC. An alias helps identify a LUN quickly.
Authentication: Authentication allows initiators and targets to prove their identity at the time of discovery and normal access. The iSCSI protocol supports CHAP-based authentication (challenge-handshake authentication protocol) methods that use usernames and passwords, but hide the network transmission of passwords. These methods are referred to as CHAP initiator authentication and mutual CHAP authentication. The former requires the initiators to prove their identity to the target by entering valid credentials (one-way authentication), and the latter requires both the initiator and the target to supply their credentials to each other to confirm their identities (two-way authentication). The third option, the demo mode, is the default option, and it is used to disable the authentication feature and open full access for all initiators to all exported target LUNs.
Backstore: A backstore is a local storage resource that serves as the backend for the LUN presented to the initiator. A backstore may be an entire physical or virtual disk (block), a standard partition (block), a RAID partition (block), an LVM logical volume (block), a plain file (fileio), or a ramdisk image (ramdisk). The first four represents disk-based block devices, the fileio identifies the backstore as a plain file that is treated as a disk image, and the ramdisk image represents the kernel memory that is treated as a block device. There is another backstore type called pscsi, however, it is recommended to use the block backstore type instead of pscsi.
Initiator: An initiator is a client system that accesses LUNs presented by a target server. Initiators are either software- or hardware-driven. A software initiator is a kernel module that uses the iSCSI protocol to emulate a discovered LUN as a block SCSI disk. A hardware initiator, on the other hand, uses a dedicated piece of hardware called an HBA (host bus adapter) to perform the same function. An HBA offloads system processors by processing SCSI commands on onboard processors, resulting in improved system performance.
iSNS: An iSNS (internet Storage Name Service) is a protocol that is used by an initiator to discover shared LUNs.
LUN: A LUN (logical unit number) represents a single addressable logical SCSI disk that is exported on the target server. From an initiator perspective, a LUN is just like any other hard disk attached to it. Disk management software, such as parted and LVM, treat both LUN and hard disk identically.
Node: A node is a single discoverable object on the iSCSI SAN. It may represent a target server or an initiator. A node is identified by its IP address or a unique iSCSI address (see Addressing).
Portal: A portal is a combination of an IP address and TCP port that a target server listens on and initiators connect to. iSCSI uses TCP port 3260 by default.
Target: A target is a server that emulates a backstore as a LUN for use by an initiator over an iSCSI SAN. A target may be a dedicated hardware RAID array or a RHEL server with appropriate software support loaded in the kernel. The term “target” also represents an object with one or more LUNs enclosed within it. To avoid confusion, where applicable, we will use the term “target server” to represent a storage server, and the term “target LUN” for a LUN exported by the target server.
TPG: A TPG (target portal group) represents one or more network portals assigned to a target LUN for running iSCSI sessions for that LUN.
iSCSI Software Packages
A single software package, targetcli, needs to be installed on the target server in order to provide the iSCSI target functionality. This package has a number of dependencies that are also installed with it. targetcli implements the open source Linux IO (LIO) iSCSI target subsystem in the kernel to support the configuration and sharing of storage resources and their presentation as block storage to clients over IP networks. This utility is used to manage the LIO subsystem and it runs as a shell interface.
On the client side, the iSCSI initiator functionality becomes available when the iscsi-initiator-utils package is installed. This package brings the iscsiadm management command, the /etc/iscsi/iscsid.conf configuration file, and other relevant commands and files.
Managing iSCSI Target Server and Initiator
Managing iSCSI on the target server involves setting up a backstore, building an iSCSI target on the backstore, assigning a network portal, creating a LUN, exporting the LUN, establishing an ACL, and saving the configuration. Managing iSCSI on the initiator involves discovering a target server for LUNs, logging on to discovered target LUNs, and using disk management tools to partition, format, and mount the LUNs. These tasks are covered in exercises presented in this section.
Understanding the targetcli Command for Target Administration
The targetcli command is an administration shell that allows you to display, create, modify, and delete target LUNs. It is a complete iSCSI target configuration tool in RHEL7 that acts as an interface between you and the LIO subsystem in the kernel. It gives you the ability to present local storage resources backed by a file, whole disk, logical volume, RAID partition, standard partition, or ramdisk to iSCSI clients as block storage. This tool provides a hierarchical view (similar to the Linux directory tree) of all target LUNs configured on the target server.
Several kernel modules load in the memory to support the setup and operation of iSCSI LUNs on the target server. You can view the modules that are currently loaded by running the lsmod command:
# lsmod | grep target
iscsi_target_mod 278732 1
target_core_mod 299412 2 iscsi_target_mod
There are additional modules that are loaded when specific target types are configured. These modules include target_core_iblock for a disk type target, target_core_file for a plain file type target, and so on.
Here is the shell interface that is invoked when you run targetcli at the Linux command prompt:
# targetcli
targetcli shell version 2.1.fb34
Copyright 2011-2013 by Datera, Inc and others.
For help on commands, type 'help'.
/>
Run help at the tool’s prompt to view available subcommands:
/> help
…… . .
AVAILABLE COMMANDS
=====================
The following commands are available in the current path:
- bookmarks action [bookmark]
- cd [path]
- clearconfig [confirm]
- exit
- get [group] [parameter…]
- help [topic]
- ls [path] [depth]
- pwd
- refresh
- restoreconfig [savefile] [clear_existing]
- saveconfig [savefile]
- sessions [action] [sid]
- set [group] [parameter=value…]
- status
- version
The output lists numerous subcommands of which some are described in Table 19-1.
|
Subcommand |
Description |
|
ls |
Shows the downward view of the tree from the current location. |
|
pwd |
Displays the current location in the tree. |
|
cd |
Navigates in the tree. |
|
exit |
Quits the targetcli shell interface. |
|
saveconfig |
Saves the modifications. |
|
get / set |
Gets (or sets) configuration attributes. |
|
sessions |
Displays details for open sessions. |
Table 19-1 targetcli Subcommands
While in the targetcli shell, there are different paths that point to a single target, and each one of them includes a different set of subcommands. The shell prompt changes to reflect the current path as you navigate in the tree. You can use the pwd subcommand to view your current location in the tree. The cd subcommand helps you navigate in the tree, and without any options, it displays the full object tree view from where you can highlight and select a desired path and get there directly.
Run the ls subcommand to list the entire object hierarchy from the root of the tree:
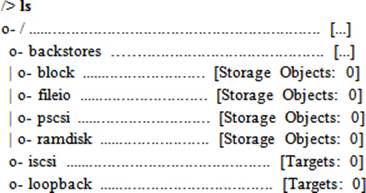
The tree currently shows an empty view.
If you want to move to the block target path under backstores, run the following:
/> cd /backstores/block
And run the following to go to the iscsi directory:
/> cd /iscsi
While in any of the object directories, running the ls command shows information specific to that object only. For instance, run ls while in the /iscsi directory:
/iscsi> ls
o- iscsi ………………………………………. [Targets: 0]
The targetcli command may alternatively be run directly from the command prompt. Exercise 19-3 demonstrates this use.
Adding 1x2GB Virtual Disk to Target Server
As indicated in Chapter 01 “Installing RHEL7 on Physical Computer Using Local DVD”, server2 will have 1x2GB virtual disk for iSCSI exercises. We will create it on host1 and attach it to server2 using a combination of qemu-img and virsh commands. To that end, execute qemu-img while in the /var/lib/libvirt/images directory on host1 and create a 2GB image file for the new disk using raw format:
# cd /var/lib/libvirt/images
# qemu-img create –f raw server2.example.com-virsh.img 2G
Formatting 'server2.example.com-virsh.img', fmt=raw size=2147483648
The next step is to attach this image file to server2 using the virsh command so that the server sees it. Specify the image file name with the --source option and a disk name (vdb) with the --target option to appear on server2 as. Ensure that this assignment is stored persistently.
# virsh attach-disk server2.example.com --source \ /var/lib/libvirt/images/server2.example.com-virsh.img --target vdb --persistent
Disk attached successfully
Verify the attachment of the new storage device vdb on host1:
![]()
Now, log on to server2 and issue the lsblk command. You should be able to see the new device there.
![]()
The above output confirms the appearance of a new disk on the system. For more details on creating and presenting virtual storage, refer to Chapter 06 “Configuring Server Virtualization and Network Installing RHEL7”.
We will configure this new disk on server2 as an iSCSI target LUN and access it as a block disk on server1 (iSCSI initiator).
Exercise 19-1: Configure a Disk-Based iSCSI Target LUN
This exercise should be done on server2.
In this exercise, you will install the targetcli software on server2 (target server), set the target service to autostart at system reboots, define the entire vdb disk as a backstore, build a target using this backstore, assign a network portal to the target, create a LUN in the target, disable authentication, and create and activate a firewalld service for iSCSI port 3260.
1. Run the yum command to install the targetcli package:
# yum –y install targetcli
…… . .
Installed:
targetcli.noarch 0:2.1.fb34-1.el7
Dependency Installed:
pyparsing.noarch 0:1.5.6-9.el7
python-configshell.noarch 1:1.1.fb11-3.el7
python-kmod.x86_64 0:0.9-4.el7
python-rtslib.noarch 0:2.1.fb46-1.el7
python-urwid.x86_64 0:1.1.1-3.el7
Complete!
2. Set the target service to autostart at system reboots:
# systemctl enable target
ln -s '/usr/lib/systemd/system/target.service' '/etc/systemd/system/multi-user.target.wants/target.service'
3. Launch the targetcli shell and change into /backstores/block to build a backstore called iscsidisk1 using the vdb disk:
/> cd /backstores/block
/backstores/block> create iscsidisk1 dev=/dev/vdb
Created block storage object iscsidisk1 using /dev/vdb.
4. Display the backstore construction:

5. Build an iSCSI target with address iqn.2015-01.com.example.server2:iscsidisk1 on the iscsidisk1 backstore in the default TPG after changing into the /iscsi directory:
/backstores/block> cd /iscsi
/iscsi> create iqn.2015-01.com.example.server2:iscsidisk1
Created target iqn.2015-01.com.example.server2:iscsidisk1.
Created TPG 1.
6. Display the target construction:
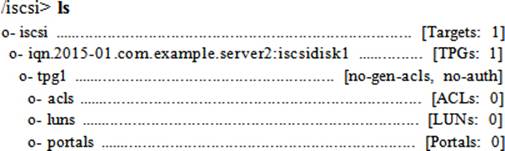
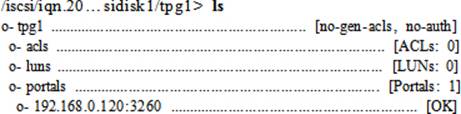
7. Create a network portal for the target using the IP (192.168.0.120) to be used for iSCSI traffic and the default port by changing into the iqn.2015-01.com.example.server2:iscsidisk1/tpg1 directory. This will make the target discoverable and accessible on the network.
/iscsi> cd iqn.2015-01.com.example.server2:iscsidisk1/tpg1
/iscsi/iqn.20…sidisk1/tpg1> portals/ create 192.168.0.120
Using default IP port 3260
Created network portal 192.168.0.120:3260.
8. Display the network portal construction:
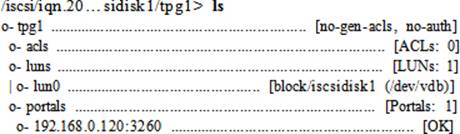
9. Create a LUN called lun0 in the target and export it to the network:
/iscsi/iqn.20…sidisk1/tpg1> luns/ create /backstores/block/iscsidisk1
iscsidisk1
Created LUN 0
10. Display the LUN construction:
11. Disable authentication so that any initiator can access this LUN. The demo_mode_write_protect=0 attribute makes the LUN write-enabled and the generate_node_acls=1 attribute enables the use of TPG-wide authentication settings (this disables any user-defined ACLs):
/iscsi/iqn.20…sidisk1/tpg1> set attribute authentication=0 \ demo_mode_write_protect=0 generate_node_acls=1
Parameter demo_mode_write_protect is now '0'.
Parameter authentication is now '0'.
Parameter generate_node_acls is now '1'.
12. Return to the root of the tree and display the entire configuration for this target LUN:
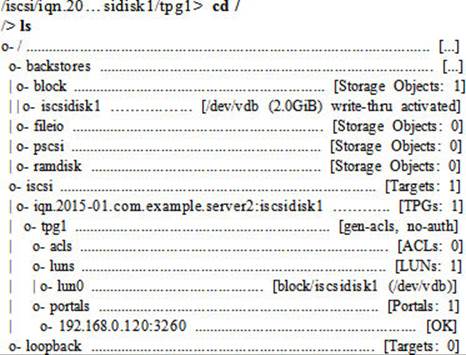
13. Exit out of the shell interface. By default, the auto_save_on_exit directive is set to true, which instructs the exit subcommand to save the configuration before exiting.
/> exit
Global pref auto_save_on_exit=true
Last 10 configs saved in /etc/target/backup.
Configuration saved to /etc/target/saveconfig.json
The configuration is stored in the /etc/target/saveconfig.json file as indicated in the exit subcommand output above. You can use the cat or more command to view the file contents if you wish to. It also backs up and stores the previous ten configuration files in the /etc/target/backup directory just in case you want to revert to one of them.
14. Add a service called iscsitarget by creating a file called iscsitarget.xml in the /etc/firewalld/services directory to permit iSCSI traffic on port 3260. Add the following contents to the file:
# vi /etc/firewalld/services/iscsitarget.xml
<?xml version="1.0" encoding="utf-8"?>
<service>
<short>iSCSI</short>
<description>This is to permit the iSCSI traffic to pass through the firewall</description>
<port protocol="tcp" port="3260"/>
</service>
15. Add the new iscsitarget service to firewalld and activate it:
# firewall-cmd --permanent --add-service iscsitarget ; firewall-cmd --reload
success
success
This completes the configuration of an iSCSI target LUN on server2 and it is now ready to be discovered and used on the iSCSI initiator server1.
Understanding the iscsiadm Command for Initiator Administration
The primary tool to discover iSCSI targets, to log in to them, and to manage the iSCSI discovery database is the iscsiadm command. This command interacts with the iscsid daemon and reads the /etc/iscsi/iscsid.conf file for configuration directives at the time of discovering and logging in to new targets.
The iscsiadm command has four modes of operation that are described in Table 19-2.
|
Mode |
Description |
|
Discovery |
Queries the specified portal for available targets based on the configuration defined in the /etc/iscsi/iscsi.conf file. The records found are stored in discovery database files located in the /var/lib/iscsi directory. |
|
Node |
Establishes a session with the target and creates a corresponding device file for each discovered LUN in the target. |
|
Session |
Displays current session information. |
|
Iface |
Defines network portals. |
Table 19-2 iscsiadm Command Operating Modes
There are several options available with the iscsiadm command, some of which are described in Table 19-3.
|
Option |
Description |
|
–D (--discover) |
Discovers targets using discovery records. If no matching record is found, a new record is created based on settings defined in the /etc/iscsi/iscsi.conf file. |
|
–l (--login) |
Logs in to the specified target. |
|
–L (--loginall) |
Logs in to all discovered targets. |
|
–m (--mode) |
Specifies one of the supported modes of operation: discovery, node, fw, iface, and session. |
|
–p (--portal) |
Specifies a target server portal. |
|
–o (--op) |
Specifies one of the supported database operators: new, delete, update, show, or non-persistent. |
|
–T (--targetname) |
Specifies a target name. |
|
–t (--type) |
Specifies a type of discovery. Sendtargets (st) is usually used. iSNS is another available type. |
|
–u (--logout) |
Logs out from a target. |
|
–U (--logoutall) |
Logs out from all targets. |
Table 19-3 iscsiadm Command Options
We will use most of these options shortly.
The /etc/iscsi/iscsid.conf File
The /etc/iscsi/iscsid.conf file is the iSCSI initiator configuration file that defines several options for the iscsid daemon that dictate how to handle an iSCSI initiator via the iscsiadm command. During an iSCSI target discovery, the iscsiadm command references this file and creates discovery and node records, and stores them in send_targets (or other supported discovery type) and nodes sub-directories under the /var/lib/iscsi directory. The records saved in send_targets are used when you attempt to perform discovery on the same target server again, and the records saved in nodes are used when you attempt to log in to the discovered targets.
The following shows the default uncommented entries from the iscsid.conf file. The grep command is used to remove commented and empty lines from the output.
# grep –v ‘^#|^$’ /etc/iscsi/iscsid.conf
iscsid.startup = /bin/systemctl start iscsid.socket iscsiuio.socket
node.startup = automatic
node.leading_login = No
node.session.timeo.replacement_timeout = 120
node.conn[0].timeo.login_timeout = 15
node.conn[0].timeo.logout_timeout = 15
node.conn[0].timeo.noop_out_interval = 5
node.conn[0].timeo.noop_out_timeout = 5
node.session.err_timeo.abort_timeout = 15
node.session.err_timeo.lu_reset_timeout = 30
node.session.err_timeo.tgt_reset_timeout = 30
node.session.initial_login_retry_max = 8
node.session.cmds_max = 128
node.session.queue_depth = 32
node.session.xmit_thread_priority = -20
node.session.iscsi.InitialR2T = No
node.session.iscsi.ImmediateData = Yes
node.session.iscsi.FirstBurstLength = 262144
node.session.iscsi.MaxBurstLength = 16776192
node.conn[0].iscsi.MaxRecvDataSegmentLength = 262144
node.conn[0].iscsi.MaxXmitDataSegmentLength = 0
discovery.sendtargets.iscsi.MaxRecvDataSegmentLength = 32768
node.conn[0].iscsi.HeaderDigest = None
node.session.nr_sessions = 1
node.session.iscsi.FastAbort = Yes
The /etc/iscsi/initiatorname.iscsi File
The /etc/iscsi/initiatorname.iscsi file stores the discovered node names along with optional aliases using the InitiatorName and InitiatorAlias directives, respectively. This file is read by the iscsid daemon on startup, and it is used by the iscsiadm command to determine node names and aliases. A sample entry from this file is shown below:
InitiatorName=iqn.2014-09.net.example.server5:mdblun01
InitiatorAlias=”LUN01 for MariaDB Database Files”
This file is updated manually with discovered node names that exist in the /var/lib/iscsi/nodes directory.
Exercise 19-2: Mount the iSCSI Target on Initiator
This exercise should be done on server1.
In this exercise, you will install the iscsi-initiator-utils software package on server1, set the iscsid service to autostart at system reboots, discover available targets, log in to a discovered target, and create a file system using LVM. You will add an entry for the file system to the /etc/fstab file and mount it manually. You will reboot the system to ensure the file system is automatically remounted.
1. Run the yum command to install the iscsi-initiator-utils package:
# yum –y install iscsi-initiator-utils
…… . .
Installed:
iscsi-initiator-utils.x86_64 0:6.2.0.873-21.el7
Dependency Installed:
iscsi-initiator-utils-iscsiuio.x86_64 0:6.2.0.873-21.el7
Complete!
2. Set the iscsid service to autostart at system reboots:
# systemctl enable iscsid
ln -s '/usr/lib/systemd/system/iscsid.service' '/etc/systemd/system/multi-user.target.wants/iscsid.service'
3. Execute the iscsiadm command in sendtargets type (–t) discovery mode (–m) to locate available iSCSI targets from the specified portal (–p):
# iscsiadm –m discovery –t st –p 192.168.0.120
192.168.0.120:3260,1 iqn.2015-01.com.example.server2:iscsidisk1
The above command also adds the new record to appropriate discovery database files located in the /var/lib/iscsi directory, and starts the iscsid daemon. This information remains persistent unless you delete it.
4. Log in (–l) to the target (–T) in node mode (–m) at the specified portal (–p) to establish a target/initiator session:
# iscsiadm –m node –T iqn.2015-01.com.example.server2:iscsidisk1 \
–p 192.168.0.120 –l
Logging in to [iface: default, target: iqn.2015-01.com.example.server2:iscsidisk1, portal: 192.168.0.120,3260] (multiple)
Login to [iface: default, target: iqn.2015-01.com.example.server2:iscsidisk1, portal: 192.168.0.120,3260] successful.
5. View information for the established iSCSI session (–m) and specify printlevel (–P) 3 for verbosity:
# iscsiadm –m session –P3
iSCSI Transport Class version 2.0-870
version 6.2.0.873-21
Target: iqn.2015-01.com.example.server2:iscsidisk1 (non-flash)
Current Portal: 192.168.0.120:3260,1
Persistent Portal: 192.168.0.120:3260,1
**********
Interface:
**********
Iface Name: default
Iface Transport: tcp
Iface Initiatorname: iqn.1994-05.com.redhat:df707aba1117
Iface IPaddress: 192.168.0.110
Iface HWaddress: <empty>
Iface Netdev: <empty>
SID: 1
iSCSI Connection State: LOGGED IN
iSCSI Session State: LOGGED_IN
Internal iscsid Session State: NO CHANGE
*********
Timeouts:
*********
Recovery Timeout: 120
Target Reset Timeout: 30
LUN Reset Timeout: 30
Abort Timeout: 15
*****
CHAP:
*****
username: <empty>
password: ********
username_in: <empty>
password_in: ********
************************
Negotiated iSCSI params:
************************
…… . .
Attached SCSI devices:
************************
Host Number: 2 State: running
scsi2 Channel 00 Id 0 Lun: 0
Attached scsi disk sda State: running
The output shows details for the target and the established session. It also shows the name of the LUN (sda) as identified on the initiator at the very bottom of the output.
6. Edit the /etc/iscsi/initiatorname.iscsi file and add the target information:
InitiatorName=iqn.2015-01.com.example.server2:iscsidisk1
7. Execute the lsblk and fdisk commands and grep for sda to see the new LUN:

8. The /var/log/messages file has captured several messages for the new LUN. grep for sda to view them.
# grep sda /var/log/messages
Jan 16 11:53:25 server1 kernel: sd 2:0:0:0: [sda] 4194304 512-byte logical blocks: (2.14 GB/2.00 GiB)
Jan 16 11:53:25 server1 kernel: sd 2:0:0:0: [sda] Write Protect is off
Jan 16 11:53:25 server1 kernel: sd 2:0:0:0: [sda] Write cache: enabled, read cache: enabled, supports DPO and FUA
Jan 16 11:53:25 server1 kernel: sda: unknown partition table
Jan 16 11:53:25 server1 kernel: sd 2:0:0:0: [sda] Attached SCSI disk
9. Use LVM to initialize (pvcreate) this LUN (/dev/sda), create (vgcreate) a volume group (vgiscsi) and add the physical volume to it, create (lvcreate) a logical volume (lviscsi1) of size 1GB, format (mkfs.xfs) the logical volume (/dev/vgiscsi/lviscsi1) with xfs structures, create (mkdir) a mount point (/iscsidisk1), add (vi) an entry to the /etc/fstab file making sure to use the _netdev option, mount (mount) the new file system, and execute the df command for mount confirmation:
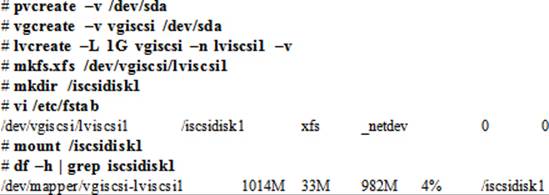
10. Reboot server1 to ensure that the client configuration survives. Run the df command after the system is back up. You should be able to see the iSCSI file system mounted.
Exercise 19-3: Configure a File-Based iSCSI Target and Mount it on Initiator
This exercise should be done on server2 (target server) and server1 (initiator).
For this exercise, presume that targetcli and iscsi-initiator-utils software packages are already installed on server2 and server1, respectively.
In this exercise, you will configure a 50MB plain file as a backstore, build a target using this backstore, assign a network portal to the target, create a LUN in the target, export the LUN, disable authentication, and create and activate a firewalld service for iSCSI port 3260. You will discover this target on the initiator, log in to it, and create a file system using parted. You will add an entry for the file system to the /etc/fstab file using the file system’s UUID and mount the file system manually. You will reboot server1 to ensure the file system is automatically remounted.
On server2 (iSCSI target server):
1. Create a file called iscsifile1.img of 50MB in the /usr directory as a fileio type backstore called iscsifile1:
# targetcli /backstores/fileio create iscsifile1 /usr/iscsifile1.img 50M
Created fileio iscsifile1 with size 52428800
2. Display the backstore construction:

3. Build an iSCSI target with address iqn.2015-01.com.example.server2:iscsifile1 on the iscsifile1 backstore in the default TPG:
# targetcli /iscsi create iqn.2015-01.com.example.server2:iscsifile1
Created target iqn.2015-01.com.example.server2:iscsifile1.
Created TPG 1.
4. Display the target construction:

5. Create a network portal for the target using the IP (192.168.0.120) to be used for iSCSI traffic and the default port. This will make the target discoverable and accessible on the network.
# targetcli /iscsi/iqn.2015-01.com.example.server2:iscsifile1/tpg1/portals/ create \ 192.168.0.120
Using default IP port 3260
Created network portal 192.168.0.120:3260.
6. Display the network portal construction:
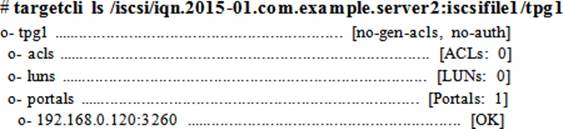
7. Create a LUN called lun0 in the target and export it to the network:
# targetcli /iscsi/iqn.2015-01.com.example.server2:iscsifile1/tpg1/luns/ create \ /backstores/fileio/iscsifile1
Created LUN 0.
8. Display the LUN construction:
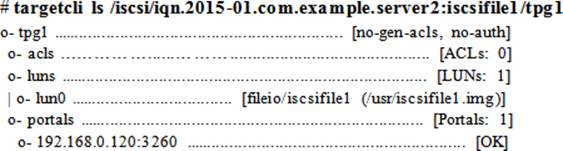
9. Disable authentication so that any initiator can access this LUN. The demo_mode_write_protect=0 attribute makes the LUN write-enabled and the generate_node_acls=1 attribute enables the use of TPG-wide authentication settings (this disables any user-defined ACLs):
# targetcli /iscsi/iqn.2015-01.com.example.server2:iscsifile1/tpg1 set attribute \ authentication=0 demo_mode_write_protect=0 generate_node_acls=1
Parameter demo_mode_write_protect is now '0'.
Parameter authentication is now '0'.
Parameter generate_node_acls is now '1'.
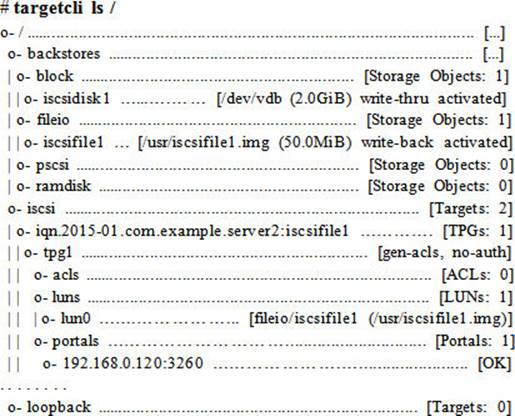
10. Display the entire tree view for this target from the root of the hierarchy:
11. Save the configuration to the /etc/target/saveconfig.json:
# targetcli saveconfig
Last 10 configs saved in /etc/target/backup.
Configuration saved to /etc/target/saveconfig.json
The configuration is stored in the /etc/target/saveconfig.json file as indicated in the exit subcommand output above. You can use the cat or more command to view the file contents if you want to. It also backs up and stores the previous ten configuration files in the /etc/target/backup directory just in case you want to revert to one of them.
12. (Do this step and step 13 only if they were not done previously). Add a service called iscsitarget by creating a file called iscsitarget.xml in the /etc/firewalld/services directory to permit iSCSI traffic on port 3260. Add the following contents to the file:
# vi /etc/firewalld/services/iscsitarget.xml
<?xml version="1.0" encoding="utf-8"?>
<service>
<short>iSCSI</short>
<description>This is for allowing the iSCSI traffic to pass through the firewall</description>
<port protocol="tcp" port="3260"/>
</service>
13. Add the new iscsitarget service to firewalld and activate it:
# firewall-cmd --permanent --add-service iscsitarget ; firewall-cmd --reload
success
success
On server1 (iSCSI initiator):
14. (Do this step if it was not previously done). Set the iscsid service to autostart at system reboots:
# systemctl enable iscsid
ln -s '/usr/lib/systemd/system/iscsid.service' '/etc/systemd/system/multi-user.target.wants/iscsid.service'
15. Execute the iscsiadm command in the sendtargets (–t) discovery mode (–m) to locate available iSCSI targets from the specified portal (–p):
# iscsiadm –m discovery –t st –p 192.168.0.120
192.168.0.120:3260,1 iqn.2015-01.com.example.server2:iscsidisk1
192.168.0.120:3260,1 iqn.2015-01.com.example.server2:iscsifile1
The above command also adds the new record to appropriate discovery database files located in the /var/lib/iscsi directory, and starts the iscsid daemon. This information remains persistent unless you delete it.
16. Log in (–l) to the target (–T) in node mode (–m) at the specified portal (–p) to establish a target/initiator session:
# iscsiadm –m node –T iqn.2015-01.com.example.server2:iscsifile1 –p 192.168.0.120 –l
Logging in to [iface: default, target: iqn.2015-01.com.example.server2:iscsifile1, portal: 192.168.0.120,3260] (multiple)
Login to [iface: default, target: iqn.2015-01.com.example.server2:iscsifile1, portal: 192.168.0.120,3260] successful.
17. View information for the established iSCSI session (–m) and specify printlevel (–P) 3 for verbosity:
# iscsiadm –m session –P3
…… . .
Target: iqn.2015-01.com.example.server2:iscsifile1 (non-flash)
Current Portal: 192.168.0.120:3260,1
Persistent Portal: 192.168.0.120:3260,1
**********
Interface:
**********
Iface Name: default
Iface Transport: tcp
Iface Initiatorname: iqn.1994-05.com.redhat:df707aba1117
Iface IPaddress: 192.168.0.110
Iface HWaddress: <empty>
Iface Netdev: <empty>
SID: 2
iSCSI Connection State: LOGGED IN
iSCSI Session State: LOGGED_IN
Internal iscsid Session State: NO CHANGE
*********
Timeouts:
*********
Recovery Timeout: 120
Target Reset Timeout: 30
LUN Reset Timeout: 30
Abort Timeout: 15
*****
CHAP:
*****
username: <empty>
password: ********
username_in: <empty>
password_in: ********
************************
Negotiated iSCSI params:
************************
…… . .
Attached SCSI devices:
************************
Host Number: 3 State: running
scsi3 Channel 00 Id 0 Lun: 0
Attached scsi disk sdb State: running
The output shows details for the target and the established session. It also shows the name of the LUN (sdb) as identified on the initiator at the very bottom of the output.
18. Edit the /etc/iscsi/initiatorname.iscsi file and add the target information:
InitiatorName=iqn.2015-01.com.example.server2:iscsifile1
19. Execute the lsblk and fdisk commands and grep for sdb to see the new LUN:

20. The /var/log/messages file has captured several messages for the new LUN. grep for sdb to view them.
# grep sdb /var/log/messages
Jan 16 16:33:38 server1 kernel: sd 3:0:0:0: [sdb] 102400 512-byte logical blocks: (52.4 MB/50.0 MiB)
Jan 16 16:33:38 server1 kernel: sd 3:0:0:0: [sdb] Write Protect is off
Jan 16 16:33:38 server1 kernel: sd 3:0:0:0: [sdb] Write cache: enabled, read cache: enabled, supports DPO and FUA
Jan 16 16:33:38 server1 kernel: sdb: unknown partition table
Jan 16 16:33:38 server1 kernel: sd 3:0:0:0: [sdb] Attached SCSI disk
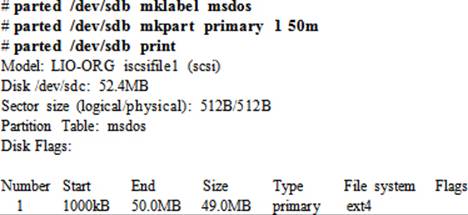
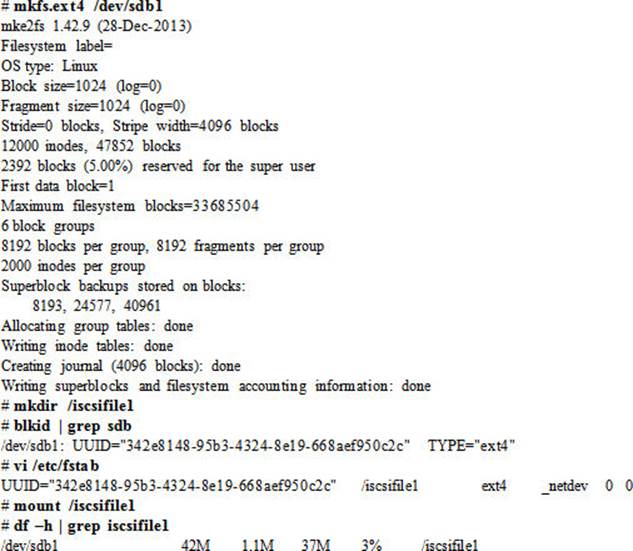
21. Use parted to label this disk (/dev/sdb), create a 50MB primary partition, display the disk’s partition table, format (mkfs.ext4) the partition (/dev/sdb1) with ext4 structures, create (mkdir) a mount point (/iscsifile1), determine the file system’s UUID (blkid), add (vi) an entry to the /etc/fstab file using the UUID and making sure to use the _netdev option, mount (mount) the new file system, and execute the df command for mount confirmation:
22. Reboot server1 to ensure that the client configuration survives for both exercises. Run the df command after the system is back up for confirmation.
Chapter Summary
This chapter presented the basics of iSCSI and demonstrated its implementation in a client/server setting. We started with an overview of the iSCSI protocol and described various terms. The iSCSI implementation on the server offers a single utility to set up and view storage targets and another tool on the client side to discover and manage the discovered storage targets. There are several administration tasks involved in setting up a LUN on the target server and presenting it to an initiator. Likewise, there are several administration tasks involved on the initiator side to discover, format, and mount the discovered LUN just like any other local disk drive. We looked at these tools and used them in the implementation of the exercises.
Chapter Review Questions
1. Once an iSCSI LUN is discovered and logged on, it is used just like any other locally attached hard disk. True or False?
2. What is the use of the targetcli command?
3. Name the file on the initiator where you store node names.
4. What is the directory location for iSCSI database files?
5. Which protocol may be used to authenticate iSCSI discovery and logging?
6. Can a plain file be used as an iSCSI backing store?
7. Discovered LUNs on the initiator cannot be partitioned using LVM. True or False?
8. Which file stores the settings that are used during a discovery?
9. What is the default port used by the iSCSI protocol?
10. Which two files are updated in the /var/lib/iscsi directory if sendtargets discovery type is used for discovering targets?
11. What is the use of the iscsiadm command?
12. Name the target and initiator packages.
Answers to Chapter Review Questions
1. True.
2. The targetcli command is used to configure a storage resource into an exported LUN.
3. The name of the file on the initiator that stores node names is /etc/iscsi/initiatorname.iscsi.
4. The iSCSI database files are located in the /var/lib/iscsi directory.
5. The CHAP protocol may be used for iSCSI discovery and logging authentication.
6. Yes, a plain file can be configured as a backing store.
7. False.
8. The /etc/iscsi/iscsid.conf file stores the settings that are used during target discovery.
9. The default port used by iSCSI is 3260.
10. The two files updated in the /var/lib/iscsi directory are send_targets and nodes.
11. The iscsiadm command is used for discovering, logging in, and administering iSCSI targets and LUNs.
12. The name of the target package is targetcli and that of the initiator package is iscsi-initiator-utils.
DIY Challenge Labs
The following labs are useful to strengthen the concepts and topics learned in this chapter. It is expected that you perform these labs without any additional help. A step-by-step guide is not provided, as the implementation of these labs requires the knowledge that has been presented in this chapter. Use defaults or your own thinking for missing information.
Lab 19-1: Build an iSCSI LUN on an LVM Logical Volume and Mount it on Initiator
Build an iSCSI target using a 300MB logical volume as a backstore and export the LUN to an initiator. Use a non-default port 2020 and ensure both firewalld and SELinux are aware of this setting. Initialize a portion (200MB) of the LUN on initiator and format it with xfs file system structures. Make appropriate modifications on the initiator so that the new file system is automatically mounted after system reboots.
All materials on the site are licensed Creative Commons Attribution-Sharealike 3.0 Unported CC BY-SA 3.0 & GNU Free Documentation License (GFDL)
If you are the copyright holder of any material contained on our site and intend to remove it, please contact our site administrator for approval.
© 2016-2026 All site design rights belong to S.Y.A.