RHCSA & RHCE Red Hat Enterprise Linux 7: Training and Exam Preparation Guide (EX200 and EX300), Third Edition (2015)
Part II. RHCE Section
Chapter 20. Sharing File Storage with NFS
This chapter describes the following major topics:
· Understand NFS concepts and benefits
· Overview of NFS versions, security, daemons, commands, and files
· Understand the exports file and various NFS server options
· Understand SELinux requirements for NFS
· Export a share on NFS server and mount it on NFS client
· Export a share to NFS client for group collaboration on NFS client
· Understand various NFS mount options
· Export and mount a share with Kerberos security enabled
· View NFS I/O statistics
RHCE Objectives:
26. Mount and unmount NFS network file systems
73. Provide network shares to specific clients
74. Provide network shares suitable for group collaboration
75. Use Kerberos to control access to NFS network shares
The Network File System protocol allows the sharing of files between systems over the network. It lets a directory or file system on one system to be mounted and used remotely on another system as if it exists locally on that system. Users will not see a difference between the Network File System and another local file system.
Shares may be used for collaboration among group members on a remote system, and can be secured using the Kerberos authentication system to prevent unauthorized access and ensure data integrity.
There are read and write activities that occur between the server and client while shares are accessed and files modified. These I/O activities can be monitored and used to troubleshoot performance issues.
Understanding Network File System
Network File System (NFS) is a networking protocol that allows file sharing over the network. The Network File System service is based upon the client/server architecture whereby users on one system access files, directories, and file systems (we’re going to call them “shares”) residing on a remote system as if they are mounted locally on their system. The remote system that makes its shares available for network access is referred to as an NFS server, and the process of making the shares accessible is referred to as exporting. The shares the NFS server exports may be accessed by one or more systems. These systems are called NFS clients, and the process of making the shares accessible on clients is referred to as mounting. See Figure 20-1 for a simple NFS client/server arrangement that shows two shares /export1 and /export2 exported on the network to a remote system, which has them mounted there.
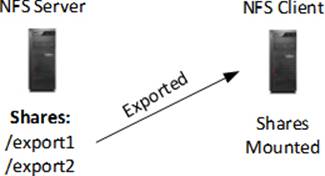
Figure 20-1 NFS Server/Client
A system can provide both server and client functionality concurrently. When a directory or file system share is exported, the entire directory structure beneath it becomes available for mounting on the client. A sub-directory or the parent directory of a share cannot be re-exported if it exists in the same file system. Similarly, a mounted share cannot be exported further. A single exported file share is mounted on a directory mount point.
NFS uses the Remote Procedure Call (RPC) and eXternal Data Representation (XDR) mechanisms that allow a server and client to communicate with each other using a common language that they both understand. This allows the NFS server and client to run on two different operating systems with different hardware platforms.
Benefits of Using NFS
The use of NFS provides several benefits, some of which are highlighted below:
· Supports a variety of operating system platforms including Linux, UNIX, and Microsoft Windows.
· Multiple NFS clients can access a single share simultaneously.
· Enables the sharing of common application binaries and other read-only information, resulting in reduced administration overhead and storage cost.
· Gives users access to uniform data.
· Allows the consolidation of scattered user home directories on the NFS server and then exporting them to the clients. This way users will have only one home directory to maintain.
NFS Versions
RHEL7 provides the support for NFS versions 3, 4.0, and 4.1, with NFSv4 being the default. NFSv3 supports both TCP and UDP transport protocols, asynchronous writes, and 64-bit file sizes that gives clients the ability to access files of sizes larger than 2GB.
NFSv4 and NFSv4.1 are Internet Engineering Task Force (IETF) standard protocols that provide all the features of NFSv3 protocol, plus the ability to transit firewalls and work on the Internet, enhanced security, encrypted transfers, support for ACLs, greater scalability, better cross-platform interoperability, and better handling of system crashes. They use the TCP protocol by default, but can work with UDP for backward compatibility. They use usernames and groupnames rather than UIDs and GIDs for files located on network shares.
![]() NFSv4.1 is the latest NFS protocol version, and one of its attractive features is the support of pNFS (parallel NFS). This new feature greatly improves the I/O performance by allowing NFS clients parallel and direct access to the share that sits on a remote physical storage system, and limiting the NFS server role to regulate metadata and manage access.
NFSv4.1 is the latest NFS protocol version, and one of its attractive features is the support of pNFS (parallel NFS). This new feature greatly improves the I/O performance by allowing NFS clients parallel and direct access to the share that sits on a remote physical storage system, and limiting the NFS server role to regulate metadata and manage access.
In this chapter, we will focus on the NFSv4 protocol, as it is the default protocol version used in RHEL7. A mix of both v4.0 and v4.1 clients and servers work as well. Then we will focus on NFSv4.0 protocol, which applies to v4.1 as well unless mentioned otherwise.
NFS Security
NFS security is paramount in NFSv4, which guarantees secure operation on WANs. When an NFS client attempts to access a remote share, an exchange of information takes place with the server to identify the client and the user on the server, authenticate them to the server, and authorize their access to the share. In-transit data between the two entities is encrypted to prevent eavesdropping and unauthorized access. NFS may be configured to use an existing Kerberos server for authentication, integrity, and data encryption. The NFS protocol uses TCP port 2049 for all communications between the server and client; hence, this port must be opened in the firewall for the NFS traffic to pass through.
NFS Daemons
NFS is a client/server protocol that employs several daemon programs to work collaboratively in order to export and mount shares, and manage I/O between them. One of these daemons need to run on the NFS server, and the rest run on both the server and the client. These daemon processes are described in Table 20-1.
|
Daemon |
Description |
|
nfsd |
NFS server process that responds to client requests on TCP port 2049 for file access and operations. It also provides the file locking and recovery mechanism. If the client sees an issue with the state of a file on the share, it notifies this server process for an action. |
|
rpcbind |
Runs on both the server and client. It converts RPC program numbers into universal addresses to facilitate communication for other RPC-based services. Access to this service can be controlled via TCP Wrappers. |
|
rpc.rquotad |
Runs on both the server and client. It displays user quota information for a remotely mounted share on the server, and it allows the setup of user quotas on a mounted share on the client. |
|
rpc.idmapd |
Runs on both the server and client to control the mappings of UIDs and GIDs with their corresponding usernames and groupnames based on the configuration defined in the /etc/idmapd.conf file. |
Table 20-1 NFS Daemons
NFS Commands
There are numerous commands available to establish and manage NFS shares and to monitor their I/O. A proper understanding of the usage of these commands is necessary for smooth administration of NFS. Refer to Table 20-2 for an explanation.
|
Command |
Description |
|
exportfs |
Server command that exports shares listed in the /etc/exports file and the files in the /etc/exports.d directory with .exports extension. It is also used to display the exported shares as listed in the /var/lib/nfs/etab and /proc/fs/nfs/exports files. Some of the key switches available with this command are: –r to re-export entries listed in the /etc/exports file, –a to perform an action on all configured shares listed in the /etc/exports file or exported shares listed in the /var/lib/nfs/etab file, –u to unexport the specified share, and –v to enable verbosity. This command displays the list of shares when executed without any options. |
|
mount |
Client command that mounts a share specified at the command line or listed in the /etc/fstab file, and adds an entry to the /etc/mtab file. Without any options, this command can also be used to display mounted shares as listed in the /etc/mtab file. |
|
nfsiostat |
Client command that provides NFS I/O statistics on mounted shares by consulting the /proc/self/mountstats file. |
|
nfsstat |
Displays NFS and RPC statistics by consulting the /proc/net/rpc/nfsd (server) and /proc/net/rpc/nfs (client) files, respectively. |
|
mountstats |
Client command that displays per-mount statistics by consulting the /proc/self/mountstats file. |
Table 20-2 NFS Commands
Commands such as rpcinfo and showmount are also available; however, they are not needed in an NFSv4 environment. If you still want to use them, you might have to disable the firewall in order for them to work as desired. For details, view the man pages for these commands if needed.
NFS Configuration and Functional Files
NFS reads configuration data from various files at startup and during its operation. Table 20-3 describes key configuration and functional files.
|
File |
Description |
|
/etc/exports |
Server file that contains share definitions for export. |
|
/var/lib/nfs/etab |
Server file that records entries for exported shares whether or not they are remotely mounted. This file is updated each time a share is exported or unexported. |
|
/etc/nfsmount.conf |
Client file that defines settings used at mounting shares. |
|
/etc/fstab |
Client file system table that contains a list of shares to be mounted at system reboots or manually with the mount command. This file also maintains a list of local file systems. |
|
/etc/mtab |
Client file that keeps track of mounted shares, as well as the local file systems. The mount and umount commands update this file. |
|
/etc/sysconfig/nfs |
A server- and client-side NFS startup configuration file. |
Table 20-3 NFS Configuration and Functional Files
Of these, the exports and fstab files are manually updated, the nfsmount.conf and /etc/sysconfig/nfs files do not need any modifications if NFSv4 is used with default settings, and the etab and mtab files are automatically updated when the exportfs and mount/umount commands are executed.
The /etc/exports File and NFS Server Options
The /etc/exports file defines the configuration for NFS shares. It contains one-line entry per share to be exported. For each share, a pathname, client information, and options are included. These options govern the share access on the clients. Options must be enclosed within parentheses and there must not be any space following the hostname. If an option is specified, it will override its default setting; the other defaults will remain effective. Some of the common options are described in Table 20-4, with their default values shown in square brackets.
|
Option |
Description |
|
* |
Represents all possible matches for hostnames, IP addresses, domain names, or network addresses. |
|
all_squash (no_all_squash) [no_all_squash] |
Treats all users, including the root user, on the client as anonymous users. |
|
anongid=GID [65534] |
Assigns this GID explicitly to anonymous groups on the client. |
|
anonuid=UID [65534] |
Assigns this UID explicitly to anonymous users on the client. |
|
async (sync) [sync] |
Replies to client requests before changes made by previous requests are written to disk. |
|
fsid |
Identifies the type of share being exported. Options are device number, root, or UUID. This option applies to file system shares only. |
|
mp |
Exports only if the specified share is a file system. |
|
root_squash (no_root_squash) [root_squash] |
Prevents the root user on the client from gaining superuser access on mounted shares by mapping root to an unprivileged user account called nfsnobody with UID 65534. |
|
rw (ro) [ro] |
Allows file modifications on the client. |
|
sec [sec=sys] |
Limits the share export to clients using one of these security methods: sys, krb5, krb5i, or krb5p. The sys option uses local UIDs and GIDs, and the rest use Kerberos for user authentication, krb5 plus integrity check, and krb5i plus data encryption, respectively. |
|
secure / (insecure) [secure] |
Allows access only on clients using ports lower than 1024. |
|
subtree_check (no_subtree_check) [no_subtree_check] |
Enables permission checks on higher-level directories of a share. |
|
wdelay (no_wdelay) [wdelay] |
Delays data writes to a share if it expects the arrival of another write request to the same share soon, thereby reducing the number of times the actual writes to the share must be made. |
Table 20-4 exportfs Command Options
The following shows a few sample entries to understand the syntax of the exports file:
/export1 client1 client2 client3.example.com(rw,insecure)
/export2 client4.example.com(rw) 192.168.1.20(no_root_squash) 192.168.0.0/24
The first example above will export /export1 to client1 and client2 using all the defaults and to client3.example.com with read/write and insecure options. The second example will export /export2 to client4.example.com with read/write option to a client with IP 192.168.1.20 with no_root_squash option, and to the 192.168.0.0/24 network with all the default options. Check the manual pages of the exports file for additional examples.
Configuring NFS Server and Client
This section presents several exercises on how to set up the NFS service and export a share; mount the share on the client by making updates to appropriate files and start the NFS client processes; export and mount another share for group collaboration; and export and mount a different share and use Kerberos authentication for controlling access to it on the client. These exercises will solidify the knowledge you have gained in this chapter.
SELinux Requirements for NFS Operation
SELinux protects systems by setting appropriate controls using contexts and booleans. Before you proceed to the exercises, let’s look at the NFS-specific SELinux contexts on processes and files, and also see the booleans that may need to be modified for NFS to function properly. By default, the SELinux policy allows NFS to export shares on the network without making any changes to either file contexts or booleans. All NFS daemons are confined by default, and are labeled with appropriate domain types. For instance, the nfsd process is labeled with the kernel_t type, rpcbind is labeled with the rpcbind_t type, rpc.mountd is labeled with the nfsd_t type, and so on. This information can be verified with the following:
# ps -eZ | egrep 'nfs|rpc'

Similarly, NFS configuration and functional files already have proper SELinux contexts in place and, therefore, they need no modifications. For instance, the context on the /etc/exports file is:
# ll –Z /etc/exports
-rw-r--r--. root root system_u:object_r:exports_t:s0 /etc/exports
However, any directory or file system that you want to export on the network for sharing purposes will need to have either public_content_ro_t or public_content_rw_t SELinux type applied. This is only required if more than one file-sharing service, such as any combination of NFS and CIFS, NFS and FTP, or CIFS and FTP, are used. For the use of NFS alone, there is no need to make this change on the directory or file system being shared.
The SELinux policy includes numerous booleans that may be of interest from an NFS operation standpoint. These booleans need a careful review to see which ones might require a toggle for NFS to operate well. Most of these booleans relate to services, such as HTTP, KVM, and FTP, that want to use mounted NFS shares to store their files. There is one boolean called samba_share_nfs, which is enabled in case the same directory or file system is shared via both NFS and CIFS. We will look at this boolean in Chapter 21 “Sharing File Storage with Samba”.
To list the booleans other than the ones mentioned above, run the getsebool command as follows:
# getsebool –a | egrep ‘^nfs|^use_nfs’
nfs_export_all_ro --> on
nfs_export_all_rw --> on
nfsd_anon_write --> off
use_nfs_home_dirs --> off
The output lists four booleans, and they are described in Table 20-5.
|
Boolean |
Purpose |
|
nfs_export_all_ro |
Allows/disallows share exports in read-only mode. |
|
nfs_export_all_rw |
Allows/disallows share exports in read/write mode. |
|
nfsd_anon_write |
Allows/disallows the nfsd daemon to write anonymously to public directories on clients. |
|
use_nfs_home_dirs |
Allows/disallows NFS clients to mount user home directories. |
Table 20-5 NFS SELinux Booleans
Some of these booleans will be used in our exercises.
Exercise 20-1: Export Shares to NFS Client
This exercise should be done on server1.
In this exercise, you will create a directory called /common and export it with the NFSv4 protocol to server2 in read/write mode with root squash disabled. You will create another directory called /nfsrhcsa and export it with the NFSv4 protocol to server2 in read-only mode. You will ensure that appropriate SELinux controls are enabled for the NFS service and it is allowed through the firewall. You will confirm the exports using a command and file.
1. Install the NFS package called nfs-utils:
# yum –y install nfs-utils
Package 1:nfs-utils-1.3.0-0.el7.x86_64 already installed and latest version
Nothing to do
2. Create /common and /nfsrhcsa directories for use as mount points:
# mkdir /common /nfsrhcsa
3. Activate the SELinux booleans persistently to allow NFS exports in both read-only and read/write modes, and verify the activation:
# setsebool –P nfs_export_all_ro=1 nfs_export_all_rw=1
# getsebool –a | grep nfs_export
nfs_export_all_ro --> on
nfs_export_all_rw --> on
4. Add the NFS service persistently to the firewalld configuration to allow the NFS traffic on TCP port 2049 to pass through, and load the rule:
# firewall-cmd --permanent --add-service nfs ; firewall-cmd --reload
success
success
5. Set the rpcbind and NFS services to autostart at system reboots:
# systemctl enable rpcbind nfs-server
ln -s '/usr/lib/systemd/system/rpcbind.service' '/etc/systemd/system/multi-user.target.wants/rpcbind.service'
ln -s '/usr/lib/systemd/system/nfs-server.service' '/etc/systemd/system/nfs.target.wants/nfs-server.service'
ln -s '/usr/lib/systemd/system/rpcbind.socket' '/etc/systemd/system/sockets.target.wants/rpcbind.socket'
ln -s '/usr/lib/systemd/system/nfs.target' '/etc/systemd/system/multi-user.target.wants/nfs.target'
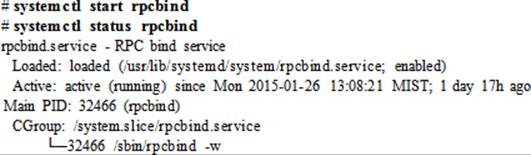
6. Start the rpcbind and NFS services, and confirm their status:

7. Open the /etc/exports file in a text editor and add an entry for /common to export it to server2 with read/write and no_root_squash options, and another entry for /nfsrhcsa to export it to server2 using the sync option:
/common server2.example.com(rw,no_root_squash)
/nfsrhcsa server2.example.com(sync)
EXAM TIP: Use at least one option when adding an entry to the /etc/exports file.
8. Export the entries defined in the /etc/exports file:
# exportfs –avr
exporting server2.example.com:/common
exporting server2.example.com:/nfsrhcsa
9. Show the contents of the /var/lib/nfs/etab file:
# cat /var/lib/nfs/etab
/common server2.example.com(rw,sync,wdelay,hide,nocrossmnt,secure,no_root_squash,no_all_squash,no_subtree_check,secure_locks,acl,anonuid=65534,anongid=65534,sec=sys)
/nfsrhcsa server2.example.com(ro,sync,wdelay,hide,nocrossmnt,secure,no_root_squash,no_all_squash,no_subtree_check,secure_locks,acl,anonuid=65534,anongid=65534,sec=sys)
The NFS service is now set up on server1 with both /common and /nfsrhcsa shares available for mounting on the client. The /nfsrhcsa share is created for use in two exercises in Chapter 10 “Constructing and Using File Systems and Swap”.
For practice, if you want to unexport one of these shares, you can do so with the exportfs command by specifying the –u option with it. The following unexports /common:
# exportfs –u server2.example.com:/common
Confirm the unexport:
# exportfs –v | grep common
Before proceeding, re-export the share using the following:
# exportfs –avr
NFS Client Options
You have just shared a directory as an NFS share on the network with several default, read/write, and no_root_squash options. On the client, the mount command is used to connect the NFS share to the file system hierarchy. This command supports several options as well, and some common options are described in Table 20-6 with their default values shown in square brackets.
|
Option |
Description |
|
ac (noac) [ac] |
Specifies whether to cache file attributes for better performance. |
|
async (sync) [async] |
Causes the I/O to happen asynchronously. |
|
defaults |
Selects the following default options automatically: rw, suid, dev, exec, auto, nouser, and async. |
|
exec / noexec [exec] |
Allows the execution of binaries. |
|
fg / bg [fg] |
Use fg (foreground) for shares that must be available to the client to boot successfully or operate properly. If a foreground mount fails, it is retried for retry minutes in the foreground until it either succeeds or times out. With bg (background), mount attempts are tried repeatedly for retry minutes in the background without hampering the system boot process or hanging the client. |
|
hard / soft [hard] |
With the hard option, the client tries repeatedly to mount a share until either it succeeds or times out. With the soft option, if a client attempts to mount a share for retrans times unsuccessfully, an error message is displayed. |
|
_netdev |
Mounts a share only after the networking has been started. |
|
nfsvers |
Specifies the NFS version to be used. |
|
remount |
Attempts to remount an already mounted share with, perhaps, different options. |
|
retrans=n [3] |
The client retransmits a read or write request for n times after the first transmission times out. If the request does not succeed after the n retransmissions have completed, a soft mount displays an error message and a hard mount continues to retry. |
|
retry=n [2 minutes for fg and 10,000 minutes for bg] |
Tries to mount a share for the specified amount of time before giving up. |
|
rsize=n [negotiated] |
Specifies the size of each read request. |
|
rw / ro [rw] |
rw allows file modifications, and ro prevents file modifications. |
|
sec=mode [sys] |
Specifies the type of security to be used. The default uses local UIDs and GIDs. Additional choices are krb5, krb5i, and krb5p, and they use Kerberos for user authentication, krb5 plus integrity check, and krb5i plus data encryption, respectively. |
|
suid / nosuid [suid] |
Allows users to run setuid and setgid programs. |
|
timeo=n [600] |
Sets a wait timeout, in tenths of a second, for NFS read and write requests to be responded before it retries again for retrans times. When the number of retrans attempts have been made, a soft mount displays an error message while a hard mount continues to retry. |
|
wsize=n [negotiated] |
Specifies the size of each write request. |
Table 20-6 mount Command Options
You will see the usage of some of these options in the following exercises.
Exercise 20-2: Mount a Share on NFS Client
This exercise should be done on server2.
In this exercise, you will access and mount the /common share exported in the previous exercise. You will create a mount point for it called /nfsrhcemnt, and add an entry to the file system table so that this share is automatically mounted at system reboots. You will confirm the share mount using commands, and test access by creating a file in the mount point and viewing it on the NFS server.
1. Install the NFS package called nfs-utils:
# yum –y install nfs-utils
Package 1:nfs-utils-1.3.0-0.el7.x86_64 already installed and latest version
Nothing to do
2. Create /nfsrhcemnt mount point:
# mkdir /nfsrhcemnt
3. Set the rpcbind service to autostart at system reboots:
# systemctl enable rpcbind
ln -s '/usr/lib/systemd/system/rpcbind.service' '/etc/systemd/system/multi-user.target.wants/rpcbind.service'
ln -s '/usr/lib/systemd/system/rpcbind.socket' '/etc/systemd/system/sockets.target.wants/rpcbind.socket'
4. Start the rpcbind service, and confirm its status:
5. Open the /etc/fstab file and add the following entry to automatically mount the share at system reboots:
server1.example.com:/common /nfsrhcemnt nfs _netdev,rw 0 0
6. Mount the new share using either of the following:
# mount /nfsrhcemnt
# mount –t nfs –o rw server1:/common /nfsrhcemnt
7. Confirm the mount using either of the following:

![]() A mount point should be empty when an attempt is made to mount a share on it, otherwise, the contents of the mount point will hide. As well, the mount point must not be in use or the mount attempt will fail.
A mount point should be empty when an attempt is made to mount a share on it, otherwise, the contents of the mount point will hide. As well, the mount point must not be in use or the mount attempt will fail.
8. Create a file called nfsrhcetest under /nfsrhcemnt on the client and confirm its creation by running ll on /common on the NFS server:

The remote share is successfully mounted on server2, and it can be accessed as any other local file system. Access to it is also tested by creating a file on the NFS client and validating its presence on the NFS server.
EXAM TIP: Do not forget to update the /etc/fstab file on the client.
Exercise 20-3: Export a Share for Group Collaboration on NFS Client
This exercise should be done on server1 (NFS server) and server2 (NFS client).
On server1, you will create a group called nfssdatagrp, add members user3 and user4 to it, create a directory called /nfssdata with ownership and owning group belonging to user nfsnobody and group nfssdatagrp, enable the setgid bit on the directory, and export it to server2 for group collaboration on that system. On server2, you will create user3 and user4, and group nfssdatagrp. Add both users to this group, create /nfssdatamnt mount point, add an entry to the fstab file, and mount the share on /nfssdatamnt. You will confirm the mount, and the permissions and owning group. You will log in as user3 and user4, and create files for group collaboration.
On server1 (NFS server):
1. Add group nfssdatagrp with GID 7777:
# groupadd –g 7777 nfssdatagrp
2. Add user3 and user4 to this group:
# usermod –G nfssdatagrp user3
# usermod –G nfssdatagrp user4
3. Create /nfssdata directory:
# mkdir /nfssdata
4. Set ownership and owning group on this directory to user nfsnobody and group sdatagrp, respectively:
# chown nfsnobody:nfssdatagrp /nfssdata
5. Enable the setgid bit on /nfssdata:
# chmod 2770 /nfssdata
6. Verify the new permissions on /nfssdata:
# ll –d /nfssdata
drwxrws---. 2 nfsnobody nfssdatagrp 6 Jan 27 14:54 /nfssdata
7. Complete steps 1, 3, 4, 5, and 6 from Exercise 20-1 if they were not previously run.
8. Open the /etc/exports file in a text editor and add the following entry to export /nfssdata to server2 with read/write and no_root_squash options:
/nfssdata server2.example.com(rw,no_root_squash)
9. Export the entry defined in the /etc/exports file:
# exportfs –avr
exporting server2.example.com:/nfssdata
exporting server2.example.com:/common
10. Show the contents of the /var/lib/nfs/etab file:
# cat /var/lib/nfs/etab | grep nfssdata
/nfssdata server2.example.com(rw,sync,wdelay,hide,nocrossmnt,secure,no_root_squash,no_all_squash,no_subtree_check,secure_locks,acl,anonuid=65534,anongid=65534,sec=sys,rw,secure,no_root_squash,no_all_squash)
On server2 (NFS client):
11. Add group nfssdatagrp with GID 7777:
# groupadd –g 7777 nfssdatagrp
12. Create user accounts user3 and user4 (use the matching UIDs/GIDs as on server1):
# useradd user3 ; useradd user4
13. Assign password user123 to user3 and user4 (passwords assigned this way is not recommended; however, it is okay in a lab environment):
# echo user123 | passwd --stdin user3
Changing password for user user3.
passwd: all authentication tokens updated successfully.
# echo user123 | passwd --stdin user4
Changing password for user user4.
passwd: all authentication tokens updated successfully.
14. Add user3 and user4 to the nfssdatagrp group:
# usermod –G nfssdatagrp user3
# usermod –G nfssdatagrp user4
15. Open the /etc/fstab file and add the following entry to automatically mount the share at system reboots:
![]()
16. Create /nfssdatamnt mount point:
# mkdir /nfssdatamnt
17. Mount the new share using either of the following:
# mount /nfssdatamnt
# mount –t nfs –o rw server1:/nfssdata /nfssdatamnt
18. Confirm the mount using either of the following:
# mount | grep nfssdata
server1.example.com:/nfssdata on /nfssdatamnt type nfs4 (rw,relatime,vers=4.0,rsize=131072,wsize=131072,namlen=255,hard,proto=tcp,port=0,timeo=600,retrans=2,sec=sys,clientaddr=192.168.0.120,local_lock=none,addr=192.168.0.110)
# df –h | grep nfssdata
server1.example.com:/nfssdata 8.8G 3.4G 5.4G 39% /nfssdatamnt
19. Confirm that /nfssdatamnt has proper permissions and owning group:
# ll –d /nfssdatamnt
drwxrws---. 2 nfsnobody nfssdatagrp 6 Jan 28 06:54 /nfssdatamnt
20. Log on as user3 and create nfssdatatest3 file, then log in as user4 and create nfssdatatest4 file:
# su – user3
$ touch /nfssdatamnt/nfssdatatest3 ; exit
# su – user4
$ touch /nfssdatamnt/nfssdatatest4 ; exit
21. Confirm the creation of the two files with ownership belonging to user3 and user4, respectively, and owning group to nfssdatagrp:
# ll /nfssdatamnt
-rw-rw-r--. 1 user3 nfssdatagrp 0 Jan 28 08:38 nfssdatatest3
-rw-rw-r--. 1 user4 nfssdatagrp 0 Jan 28 08:38 nfssdatatest4
The remote share is successfully mounted on server2 for group collaboration. Both group members can share files created under this mount point.
Exercise 20-4: Provide Secure Access to NFS Share with Kerberos
This exercise should be done on server1 (NFS server) and server2 (Kerberos server and NFS client).
This exercise assumes that server2 is running Kerberos services (both KDC and admin services) for realm EXAMPLE.COM, the root user is added as an admin principal, DNS is disabled, the hosts file is updated with appropriate mappings for both server1 and server2, and these servers are already added as host principals (host/server1 and host/server2) to the KDC database with their keytab files stored in the /etc directory by the name krb5.keytab. It is also assumed that the NFS service is running on server1, which will also be used as the service host.
EXAM TIP: You may have to copy an existing keytab file from a specified location to the /etc directory.
EXAM TIP: You do not have to worry about updating the /etc/hosts file. DNS will be in place with all hostnames resolvable.
In this exercise, you will create and store the key file locally on the client, obtain a TGT for user1, and log in as this user to test the configuration.
On server1 (NFS server):
1. Follow the steps provided in Exercise 20-1 to create and export /nfskrb5 directory with the following entry in the /etc/exports file:
/nfskrb5 server2.example.com(sec=krb5p,rw,no_root_squash)
2. Activate the nfs-secure-server service at system reboots:
# systemctl enable nfs-secure-server
ln -s '/usr/lib/systemd/system/nfs-secure-server.service' '/etc/systemd/system/nfs.target.wants/nfs-secure-server.service'
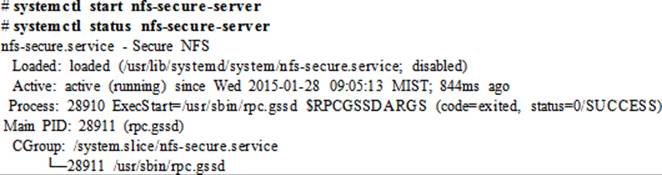
3. Start the nfs-secure-server service and confirm its status:
On server2 (NFS client):
4. Activate the nfs-secure service at system reboots:
# systemctl enable nfs-secure
ln -s '/usr/lib/systemd/system/nfs-secure.service' '/etc/systemd/system/nfs.target.wants/nfs-secure.service'
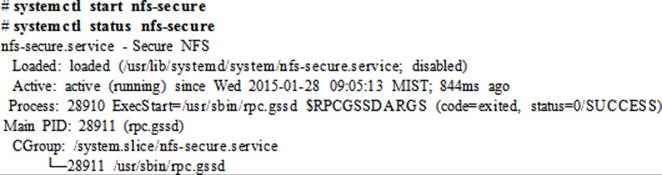
5. Start the nfs-secure service and confirm its status:
6. Open the /etc/fstab file and add the following entry for the share so that it is mounted automatically at system reboots:
![]()
7. Create the required mount point with the mkdir command:
# mkdir /nfskrb5mnt
8. Mount the new share using either of the following:
# mount /nfskrb5mnt
# mount –t nfs –o rw,sec=krb5p server1:/nfskrb5 /nfskrb5mnt
The secure remote share is successfully mounted on server2. Now, a user with TGT should be able to access the NFS mount.
![]() You might have to install the ipa-client application on the NFS client and execute the ipa-client-setup utility to prepare the groundwork for this secure mount.
You might have to install the ipa-client application on the NFS client and execute the ipa-client-setup utility to prepare the groundwork for this secure mount.
Monitoring NFS Activities
Monitoring NFS activities typically involves capturing and displaying read and write statistics on the NFS server and client. Tools such as nfsstat, nfsiostat, and mountstats are available and may be used for this purpose. The details that these tools provide require an in-depth understanding of various fields and parameters that are depicted in the output. The following presents only a high-level introduction of these tools. See the man pages for details.
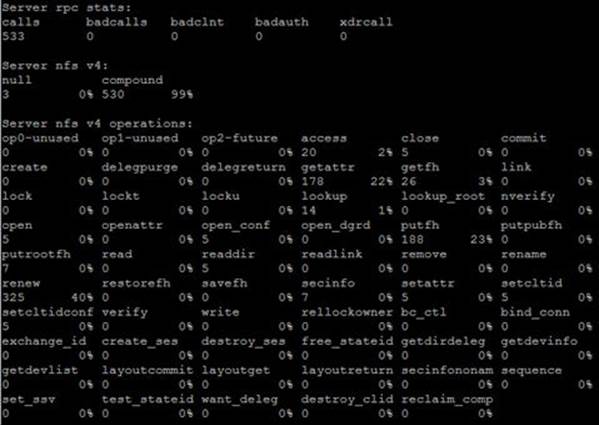
The nfsstat command can be run on both the NFS server and client to produce NFS and RPC I/O statistics. It can be used to display server (–s), client (–c), NFS (–n), and RPC (–r) statistics. With the –m option, it shows all activities on mounted shares, and without any options, it exhibits both NFS and RPC statistics.
Here is a sample output of this command when it is executed without any options on the NFS server (server1):
# nfsstat
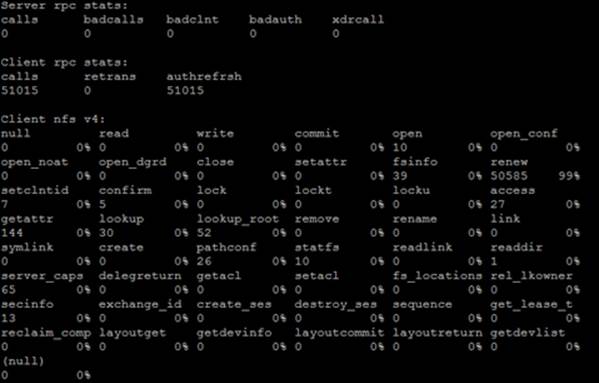
This command also includes the client-side activities if run on the NFS client. Here is a sample from server2:
# nfsstat
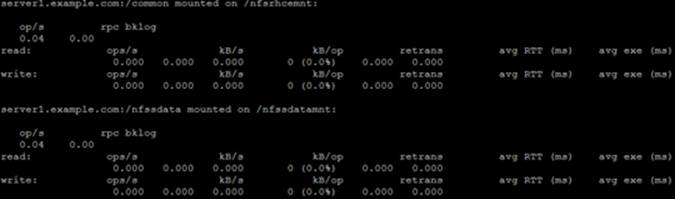
The nfsiostat command is an NFS client-side utility that produces read and write statistics for each mounted share by consulting the /proc/self/mountstats file. You can specify a time interval and a count of iterations for the execution of this command.
Here is a sample output of this command when it is executed without any options on server2:
# nfsiostat
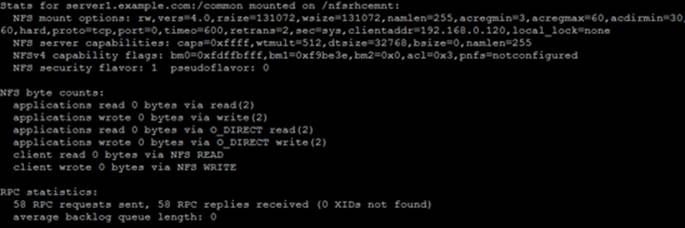
The mountstats command also consults the /proc/self/mountstats file and displays the NFS read and write statistics for the specified mounted share. You can specify the --nfs or --rpc option with the command to restrict it to display NFS or RPC statistics only.
Here is a sample output of the mountstats command when it is executed on the /nfsrhcemnt mount point on server2:
# mountstats /nfsrhcemnt
Chapter Summary
This chapter introduced one of the most common Linux system administration tasks, the administration of shares using the NFS protocol. It explained the concepts, benefits, versions, and security associated with NFS, and described various daemons, commands, and files involved in NFS management on the server and the client. The chapter demonstrated several exercises to strengthen the concepts learned by setting up NFS services to export and mount shares to be used for various purposes, and they included the configuration of a Kerberized NFS service. Finally, the chapter presented tools to display and monitor NFS usage statistics.
Chapter Review Questions
1. Which port must be enabled in the firewall to allow NFS traffic to pass through?
2. Which command can be used to export a share?
3. What is the role of the nfsnobody user account?
4. Is this command syntax correct? mount –t nfs –o rw <hostname>:<share> /mnt_point
5. Which option would you use with the exportfs command to unexport a share?
6. Write the names of at least three SELinux booleans that are related to NFS.
7. What kind of information does the /var/lib/nfs/etab file store?
8. Name the three commands to get NFS read and write statistics.
9. Which file is updated when the exportfs command is executed successfully?
10. What is the default NFS version used in RHEL7?
11. Which daemon is no longer needed if NFSv4 is used on both server and client?
12. What is the purpose of the all_squash option used with a share?
13. What is the difference between the Kerberos krb5i and krb5p security levels?
14. Which daemon is responsible for mapping UIDs and GIDs with their corresponding usernames and groupnames?
15. Which file is referenced by the nfsiostat and mountstats commands to produce reports?
16. What is the name of the NFS configuration file?
17. What does this line entry in the /etc/exports file mean? /dir1 *(rw)
18. Which file needs to be modified to completely disable the support for older NFS versions?
Answers to Chapter Review Questions
1. The port 2049.
2. The exportfs command.
3. The nfsnobody user account provides unprivileged access to files.
4. Yes, it is correct.
5. The –u option.
6. The nfs_export_all_ro, nfs_export_all_rw, and nfsd_anon_write booleans.
7. It stores information about all exported shares.
8. The nfsstat, nfsiostat, and mountstats commands.
9. The /var/lib/nfs/etab file.
10. The default NFS version used in RHEL7 is version NFSv4.
11. The rpcbind daemon.
12. The all_squash option treats all users on the NFS client as anonymous users.
13. krb5i provides data integrity while krb5p provides data integrity as well as encryption.
14. The rpc.idmapd daemon.
15. The /proc/self/mountstats file.
16. The /etc/sysconfig/nfs file.
17. This would export /dir1 in read/write mode to all systems.
18. The /etc/sysconfig/nfs configuration file.
DIY Challenge Labs
The following labs are useful to strengthen the concepts and topics learned in this chapter. It is expected that you perform these labs without any additional help. A step-by-step guide is not provided, as the implementation of these labs requires the knowledge that has been presented in this chapter. Use defaults or your own thinking for missing information.
Lab 20-1: Share a Directory with NFS
Configure the NFS services and export /var/log to systems on the local network in read-only mode. Ensure that the NFS server supports all NFS versions. Mount the share on another RHEL7 system persistently using all the default mount options.
Lab 20-2: Share a Directory for Group Collaboration
Create a group and add users to it as members. Create a directory and assign it to the group. Set appropriate bits on the directory to prepare it for group collaboration. Use NFS and share the directory in read/write mode to a specific client. Create a mount point on the client and a group with the same name as that created on the server. Ensure that the same group members exist on the client as well. Mount the share persistently and test to ensure the group members are able to share files.
Lab 20-3: Access NFS Shares via Kerberos
Create a directory and share it with NFS using Kerberos krb5i security level. Create a mount point on the client and mount it persistently. Set up Kerberos services if needed.
All materials on the site are licensed Creative Commons Attribution-Sharealike 3.0 Unported CC BY-SA 3.0 & GNU Free Documentation License (GFDL)
If you are the copyright holder of any material contained on our site and intend to remove it, please contact our site administrator for approval.
© 2016-2026 All site design rights belong to S.Y.A.