RHCSA & RHCE Red Hat Enterprise Linux 7: Training and Exam Preparation Guide (EX200 and EX300), Third Edition (2015)
Part II. RHCE Section
Chapter 21. Sharing File Storage with Samba
This chapter describes the following major topics:
· Describe Samba and its features and benefits
· Samba daemons, commands, and configuration files
· Analyze the Samba configuration file and understand software packages
· Describe SELinux requirements for Samba
· Configure Samba to provide network shares to clients
· Configure Samba client to access and mount the share
· Configure Samba to provide network share for group collaboration on Samba clients
· Configure Samba client to access a share using Kerberos authentication
RHCE Objectives:
26. Mount and unmount CIFS network file systems
76. Provide network shares to specific clients
77. Provide network shares suitable for group collaboration
78. Use Kerberos to authenticate access to shared directories
Samba is a networking protocol that allows Linux and UNIX systems to share file and print resources with Windows and other Linux and UNIX systems. It is the standard Windows interoperability suite of programs for Linux and UNIX. Samba offers numerous benefits, including a seamless interaction with Microsoft Windows systems. RHEL7 includes the support for Samba software v4.1, which uses the SMB3 protocol that allows encrypted transport connections to Windows and other Linux-based Samba servers. The Samba service is configured with the help of a single configuration file and a few commands.
Understanding Samba
Server Message Block (SMB), now widely known as the Common Internet File System (CIFS), is a networking protocol developed by Microsoft, IBM, and Intel in the late 1980s to enable Windows-based PCs to share file and print resources with one another. This protocol has been used in Windows operating systems as the primary native protocol for file and printer sharing. Samba was developed in the Linux world to share file and print resources with Microsoft Windows systems using the SMB format. This allowed Linux systems to participate in Windows workgroups and domains, as well as share Windows resources with other Linux systems and UNIX.
In Samba terminology, the system that shares its file and print resources is referred to as a Samba server, and the system that accesses those shared resources is referred to as a Samba client. The network file shares may be used for collaboration among group members with accounts on different systems running a mix of Linux and Windows operating systems. Moreover, user home directories that exist on Windows may be shared with Linux systems, and vice versa. This would eliminate the need of having a separate home directory on each system for each user to log on. A single system can be configured to provide both Samba server and client functionality concurrently.
Benefits of Using Samba
The use of Samba provides several benefits, some of which are listed below:
· Samba shares can be accessed on Windows, as well as UNIX and other Linux systems.
· Windows shares can be accessed and mounted on Linux.
· Linux and Windows domain user credentials can be used interchangeably on either platform for authentication and authorization.
· A Samba server can:
· Act as a print server for Windows systems.
· Be configured as a Primary Domain Controller (PDC) and as a Backup Domain Controller (BDC) for a Samba-based PDC.
· Be set up as an Active Directory member server on a Windows network.
· Provide Windows Internet Name Service (WINS) name resolution.
Samba Daemon
Samba and CIFS are client/server protocols that employ the smbd daemon on the server to share and manage directories and file systems. This daemon process uses TCP port 445 for operation, and it is also responsible for share locking and user authentication.
Samba Commands
There are numerous commands available to establish and manage Samba functionality on the server and client. A proper understanding of the usage of these commands is essential for smooth administration. Refer to Table 21-1 for an explanation.
|
Command |
Description |
|
mount |
Mounts a Samba share specified at the command line or listed in the /etc/fstab file. It adds an entry for the mounted share to the client’s /etc/mtab file and can be used to display mounted shares listed in this file. |
|
mount.cifs |
Mounts a Samba share on the client. |
|
pdbedit |
Maintains a local user database in the /var/lib/samba/private/smbpasswd file on the server. |
|
smbclient |
Connects to a Samba share to perform FTP-like operations. |
|
smbpasswd |
Changes Samba user passwords. |
|
testparm |
Tests the syntax of the smb.conf file. |
|
umount |
Functions opposite to that of the mount command. |
Table 21-1 Samba Commands
There are additional commands available; however, their discussion is beyond the scope of this book.
Samba Configuration and Functional Files
Samba references several files at startup and during its operation. These files include those that store configuration data and logs. Table 21-2 describes key configuration and functional files.
|
File |
Description |
|
/etc/samba/smb.conf |
Samba server configuration file. |
|
/etc/samba/smbusers |
Maintains Samba and Linux user mappings. |
|
/etc/sysconfig/samba |
Contains directives used at Samba startup. Stores Samba startup configuration. |
|
/var/lib/samba/private/smbpasswd |
Maintains Samba user passwords. This file is used for authentication purposes. Samba user passwords may be different from their Linux user passwords. |
|
/var/log/samba |
Directory location for Samba logs. |
Table 21-2 Samba Configuration and Functional Files
Some of these files are present on the system, while others are created during a server setup.
Understanding Samba Configuration File
The smb.conf file is the primary configuration file for setting up a Samba server. You specify share definitions and set parameter values to modify their behavior. This file has two major sections: Global Settings and Share Definitions. Global Settings defines the directives that affect the overall Samba server behavior and includes options for networking, logging, standalone server, domain members, domain controller, browser control, name resolution, printing, and file systems. Share Definitions sets share-specific directives for home and custom shares. Most settings in the global section are applied to all other sections in the file provided the other sections do not have them defined explicitly.
The following shows an excerpt from the smb.conf file with directives of our interest:
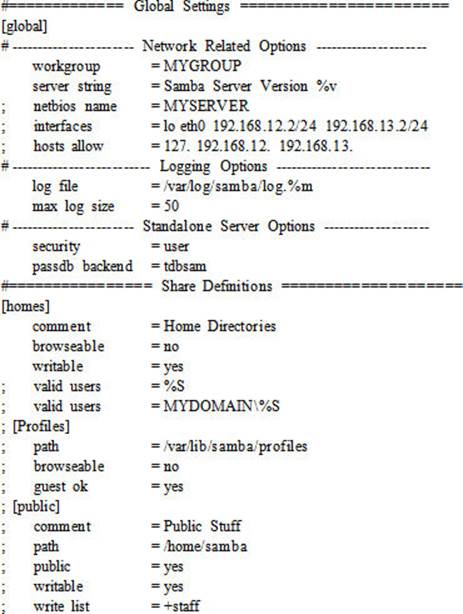
![]() The directive names used in this file are case insensitive, the white space before and after an equal sign is ignored, and any text that follows the # or ; sign is treated as a comment.
The directive names used in this file are case insensitive, the white space before and after an equal sign is ignored, and any text that follows the # or ; sign is treated as a comment.
Description of directives located in the Network Related Options, Logging Options, Standalone Server Options, and Share Definitions from the preceding output is provided in Table 21-3. The rest of the options are beyond the scope.
|
Directive |
Global Settings |
|
Network-Related Options |
|
|
workgroup |
The name of the workgroup that the server is (or appears to be) a part of. |
|
server string |
Any description that identifies this system as a Samba server. |
|
netbios name |
The name of the Samba server by which it is known. |
|
interfaces |
Specifies the network interface name, or host or network IP to be served. This directive is useful when there are multiple configured network interfaces on the system. |
|
hosts allow / hosts deny |
Allows/disallows the specified networks or domain names to access the shares. May also be set at the individual share level. |
|
Logging Options |
|
|
log file |
Defines separate log file names in the /var/log/samba directory for every client that connects to this Samba server. |
|
max log size |
Specifies the size in KBs for the log file to grow to before it is rotated. A 0 sets it to grow to an unlimited size. The default size is 50KB. |
|
Standalone Server Options |
|
|
security |
Defines one of the following authentication options: · ads = performs authentication on an Active Directory server. · domain = performs authentication on a domain controller. · server = performs authentication on a server. · user = matches usernames/passwords with those on clients. This is the default. |
|
passdb backend |
Specifies the backend to be used for storing user and group information. This directive supports three options: · smbpasswd = uses the /var/lib/samba/private/smbpasswd file. · tdbsam (Trivial Database Security Accounts Manager) = sets up a trivial local account database in the /var/lib/samba directory. This is the default. · ldapsam (LDAP Security Accounts Manager) = uses a remote LDAP account database. |
|
Directive |
Share Definitions |
|
comment |
A short description of the share displayed with a client query response. |
|
browsable |
Allows/disallows clients to see the share. |
|
writable |
Allows/disallows read/write access to the share. This directive is opposite to the “read only” directive. |
|
valid users |
Specifies a comma-separated list of users or groups, or a combination, that are allowed to log in to the share (group names are prefixed with the @ sign). If this directive is empty or not defined, all users will be able to log in. |
|
path |
Sets the absolute path to the share. |
|
guest ok |
Allows/disallows users to access the share as a guest without having to enter a password. This is same as the public directive. |
|
public |
Allows/disallows everyone read-only access to the share. This directive is same as “guest ok”. |
|
write list |
Specifies a comma-separated list of users or groups, or a combination, that can write to the share (group names are prefixed with the @ sign). The value of this directive applies even if the “read only” directive is set to yes. |
|
guest only |
Allows/disallows only the guest users to access the share. |
|
force group |
Specifies a Linux group that is assigned as the default group to files created for group collaboration. |
|
create mask |
Specifies a umask value assigned to files at the time of their creation. |
Table 21-3 Directives in the smb.conf File
There are numerous other directives available to be set in this file. Check the man pages for smb.conf for details.
EXAM TIP: Make sure that you understand various directives and how to define their values in the smb.conf file.
The smb.conf configuration file is automatically reloaded if smbd detects a change in it, or you can reload the updated configuration using the systemctl command with the --reload option. Reloading the configuration does not affect established connections.
Samba Software Packages
There are several software packages that need to be installed on the system to configure it as a Samba server or client. The rpm command below produces a list of the Samba packages that are currently installed on server1:
# yum list installed | grep ^samba
|
samba.x86_64 |
4.1.1-31.el7 |
@ftprepo |
|
samba-common.x86_64 |
4.1.1-31.el7 |
@ftprepo |
|
samba-libs.x86_64 |
4.1.1-31.el7 |
@anaconda/7.0 |
Table 21-4 describes these packages, as well as the packages that will be installed later for our exercises.
|
Package |
Description |
|
samba |
Provides the Samba server support. |
|
samba-client |
Includes utilities for performing various operations on server and client. |
|
samba-common |
Provides Samba man pages, commands, and configuration files. |
|
samba-libs |
Contains library routines used by Samba server and client. |
|
cifs-utils |
Client-side utilities for mounting and managing CIFS shares. |
Table 21-4 Samba Software Packages
A Samba server needs all packages except for the cifs-utils package to be able to provide network shares. On the client side, however, only cifs-utils and samba-client packages are needed, along with any dependent packages.
Configuring Samba Server and Client
This section presents several exercises to set up the Samba service and share a directory or file system; mount the share on the client; share and mount another share for group collaboration; and share and mount a different share and use Kerberos authentication for controlling access to it on the client. These exercises will solidify the knowledge you have gained in this chapter.
SELinux Requirements for Samba Operation
SELinux protects systems by setting appropriate controls using contexts and booleans. Before you proceed to the exercises, let’s look at the Samba-specific SELinux contexts on processes and files, and also see the booleans that may need to be modified for Samba to function properly. The Samba daemon is confined by default and is labeled appropriately with smbd_t domain type. This information can be verified with the following:
# ps –eZ | grep smbd
system_u:system_r:smbd_t:s0 28046 ? 00:00:00 smbd
Similarly, Samba configuration and functional files already have proper SELinux contexts in place; therefore, they need no modifications. For instance, the context on the /etc/samba/smb.conf file is:
# ll –Z /etc/samba/smb.conf
-rw-r--r--. root root system_u:object_r:samba_etc_t:s0 /etc/samba/smb.conf
However, any directory or file system that you want to share on the network with Samba alone needs to have samba_share_t type applied to it. In case of multiple file-sharing services, such as any combination of CIFS and NFS, CIFS and FTP, or NFS and FTP, sharing the same directory or file system, you will need to use either the public_content_ro_t or public_content_rw_t type instead.
The SELinux policy includes numerous booleans that may be of interest from a Samba operation standpoint. These booleans need a careful review to see which ones might require a toggle for Samba to operate well. Most of these booleans relate to services, such as HTTP, KVM, and FTP, that want to use mounted Samba shares to store their files. There is one boolean called samba_share_nfs, which is enabled in case the same directory or file system is shared via both NFS and CIFS.
To list Samba-related booleans, run the getsebool command as follows:
# getsebool –a | egrep ‘samba|smb|cifs’
cobbler_use_cifs --> off
ftpd_use_cifs --> off
git_cgi_use_cifs --> off
git_system_use_cifs --> off
httpd_use_cifs --> off
ksmtuned_use_cifs --> off
mpd_use_cifs --> off
polipo_use_cifs --> off
samba_create_home_dirs --> off
samba_domain_controller --> off
samba_enable_home_dirs --> off
samba_export_all_ro --> off
samba_export_all_rw --> off
samba_portmapper --> off
samba_run_unconfined --> off
samba_share_fusefs --> off
samba_share_nfs --> off
sanlock_use_samba --> off
smbd_anon_write --> off
use_samba_home_dirs --> off
virt_sandbox_use_samba --> off
virt_use_samba --> off
The above output shows twenty-two booleans that should be reviewed and modified as required. Table 21-5 describes the purpose of some key booleans.
|
Boolean |
Purpose |
|
ftpd_use_cifs |
Allows/disallows a mounted Samba share to be used as a public file transfer location by the FTP service. |
|
httpd_use_cifs |
Allows/disallows a mounted Samba share to be used by the Apache service. |
|
samba_create_home_dirs |
Allows/disallows Samba to create home directories. |
|
samba_enable_home_dirs |
Allows/disallows Samba to share user home directories. |
|
samba_export_all_ro |
Allows/disallows Samba to share in read-only mode. |
|
samba_export_all_rw |
Allows/disallows Samba to share in read/write mode. |
|
smbd_anon_write |
Allows/disallows Samba to write to public directories with public_content_rw_t type. |
|
use_samba_home_dirs |
Allows/disallows Samba clients to mount user home directories. |
Table 21-5 Samba-Related SELinux Booleans
We will use some of these booleans in our exercises.
Exercise 21-1: Provide Network Shares to Samba Client
This exercise should be done on server1.
Part 1: In this exercise, you will share the /common directory (path), which you also shared via NFS in the previous chapter. You will make this share browsable (browsable) with login (valid users) and write (writable) access given to only (write list) user10 from systems in the example.comdomain (hosts allow). This share should have read-only (public) access given to user3, and it should not be accessible (hosts deny) from 192.168.2.0/24 network.
Part 2: In this exercise, you will create a directory called /smbrhcsa (path) in browsable mode (browsable) with login (valid users) and write (writable) access allocated to only (write list) user1, and read-only (public) access to user3. This share is being created for an exercise in Chapter 10 “Constructing and Using File Systems and Swap”.
For both parts of this exercise, you will ensure that appropriate SELinux controls are enabled for the Samba service and it is allowed through the firewall.
1. Install Samba server packages samba and samba-client:
# yum –y install samba samba-client
Package samba-4.1.1-31.el7.x86_64 already installed and latest version
Package samba-client-4.1.1-31.el7.x86_64 already installed and latest version
Nothing to do
2. Create /smbrhcsa directory:
# mkdir /smbrhcsa
3. Activate the SELinux booleans persistently to allow Samba shares in both read-only and read/write modes, and allow Samba and NFS to share /common. Verify the activation.
# setsebool –P samba_export_all_ro=1 samba_export_all_rw=1 samba_share_nfs=1
# getsebool –a | egrep ‘samba_export|samba_share_nfs’
samba_export_all_ro --> on
samba_export_all_rw --> on
samba_share_nfs --> on
4. Add SELinux file types public_content_rw_t on /common and samba_share_t on /smbrhcsa directories to the SELinux policy rules:
# semanage fcontext –at public_content_rw_t “/common(/.*)?”
# semanage fcontext –at samba_share_t “/smbrhcsa(/.*)?”
5. Apply the new contexts on both directories and confirm:
# restorecon /common /smbrhcsa
# ll –Zd /common /smbrhcsa
drwxr-xr-x. root root unconfined_u:object_r:public_content_rw_t:s0 /common
drwxr-xr-x. root root unconfined_u:object_r:samba_share_t:s0 /smbrhcsa
6. Add the Samba service persistently to the firewalld configuration to allow Samba traffic on TCP port 445 to pass through, and load the rule:
# firewall-cmd --permanent --add-service=samba; firewall-cmd --reload
success
success
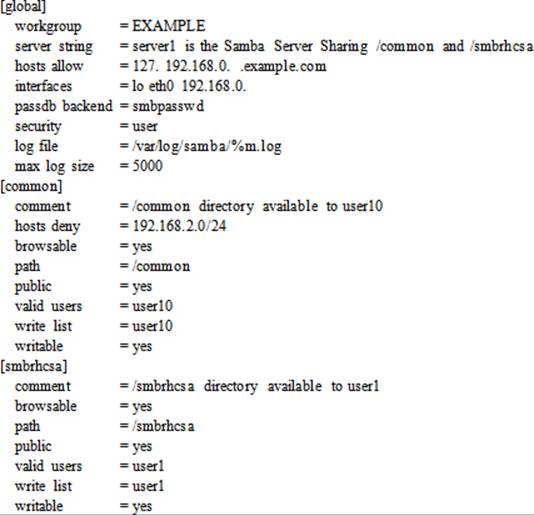
7. Rename the smb.conf file to smb.conf.old, and create a new file called smb.conf with the following entries only:
8. Execute the testparm command to check for any syntax errors in the file. Use the –v switch to display other defaults that are not defined in the file.
# testparm
Load smb config files from /etc/samba/smb.conf
rlimit_max: increasing rlimit_max (1024) to minimum Windows limit (16384)
Processing section "[common]"
Processing section "[smbrhcsa]"
Loaded services file OK.
Server role: ROLE_STANDALONE
Press enter to see a dump of your service definitions
[global]
workgroup = EXAMPLE
server string = server1 is the Samba Server Sharing /common and /smbrhcsa
interfaces = lo, eth0, 192.168.0.
passdb backend = smbpasswd
log file = /var/log/samba/%m.log
idmap config * : backend = tdb
hosts allow = 127., 192.168.0., .example.com
[common]
comment = /common directory available to user10
path = /common
valid users = user10
write list = user10
read only = No
guest ok = Yes
hosts deny = 192.168.2.0/24
[smbrhcsa]
comment = /smbrhcsa directory available to user1
path = /smbrhcsa
valid users = user1
write list = user1
read only = Yes
guest ok = Yes
9. Create Linux user user10 with password user123:
# useradd user10
# echo user123 | passwd --stdin user10
10. Add (–a) user10 to Samba user database /var/lib/samba/private/smbpasswd, and assign them password user123. Show the contents of the smbpasswd file.
# smbpasswd –a user10
New SMB password:
Retype new SMB password:
startsmbfilepwent_internal: file /var/lib/samba/private/smbpasswd did not exist. File successfully created.
Added user user10.
# cat /var/lib/samba/private/smbpasswd
user10:2003:XXXXXXXXXXXXXXXXXXXXXXXXXXXXXXXX:EACB2C6A3AAA4ED476ED2741BE8C7A4E:[U ]:LCT-54CAD791:
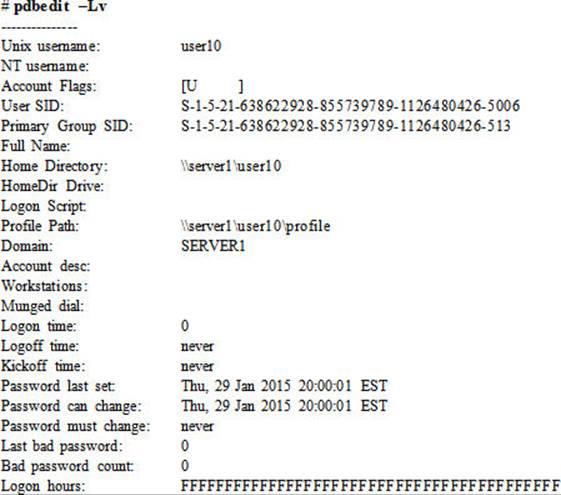
11. Display (–L) the user information verbosely using the pdbedit command:
12. Set the Samba service to autostart at system reboots:
# systemctl enable smb
ln -s '/usr/lib/systemd/system/smb.service' '/etc/systemd/system/multi-user.target.wants/smb.service'
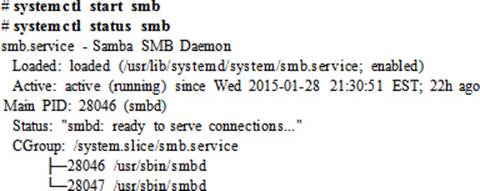
13. Start the Samba service, and confirm its status:
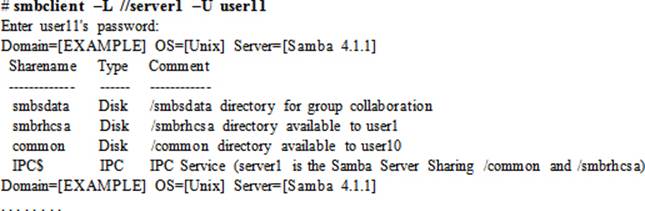
14. List (–L) the shares available on the server as user10 (–U) using the smbclient command:
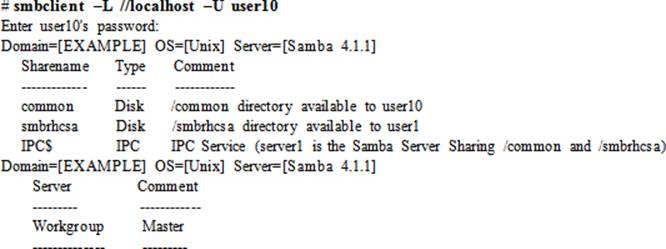
The Samba service is now set up on server1 with /common and /smbrhcsa shared over the network, and are available for accessing and mounting on the client.
Exercise 21-2: Access and Mount a Share on Samba Client
This exercise should be done on server2.
In this exercise, you will access and mount the /common share exported in the previous exercise. You will create user10 using the same UID that is used on server1. You will create a mount point called /smbrhcemnt, and add an entry to the file system table so that this share is automatically mounted at system reboots. You will confirm the share access and mount using commands, and test access by creating a file in the mount point and viewing it on the Samba server. You will store the username and password for user10 in a file owned by root with 0400 permissions.
1. Install the Samba client packages samba-client and cifs-utils:
# yum –y install samba-client cifs-utils
Package samba-client-4.1.1-31.el7.x86_64 already installed and latest version
Package cifs-utils-6.2-6.el7.x86_64 already installed and latest version
Nothing to do
2. Create Linux users user10 with password user123 (use matching UID/GID as on server1):
# useradd user10
# echo user123 | passwd --stdin user10
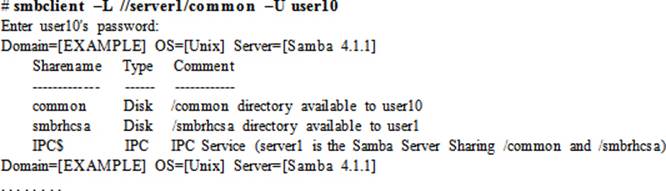
3. List (–L) what shares are available from server1 using the smbclient command:
4. Log on to the /common share as user10 using the smbclient command:
# smbclient //server1/common –U user10
Enter user10's password:
Domain=[EXAMPLE] OS=[Unix] Server=[Samba 4.1.1]
smb: \>
The connection is successfully established with the /common share. You can run the help subcommand to list available commands, use ls to list files in the share, use get/mget and put/mput to transfer one or more files, and so on. Issue exit when done to disconnect.
5. Create /smbrhcemnt mount point:
# mkdir /smbrhcemnt
6. Mount /common on the /smbrhcemnt mount point as user10:
# mount //server1/common /smbrhcemnt –o username=user10
Password for user10@//server1/common: *******
7. Execute the df and mount commands to check the mount status of the share:
# df –h | grep smbrhcemnt
//server1/common 8.8G 3.4G 5.4G 39% /smbrhcemnt
# mount | grep smbrhcemnt
//server1/common on /smbrhcemnt type cifs (rw,relatime,vers=1.0,cache=strict,username=user10,domain=SERVER1,uid=0,noforceuid,gid=0,noforcegid,addr=192.168.0.110,unix,posixpaths,serverino,acl,rsize=1048576,wsize=65536,actimeo=1)
8. Create a file called /etc/samba/smbrhcecred and add the credentials for user10 to it:
# vi /etc/samba/smbrhcecred
username=user10
password=user123
9. Set ownership on the file to root and permissions to 0400:
# chown root /etc/samba/smbrhcecred && chmod 0400 /etc/samba/smbrhcecred
10. Open the /etc/fstab file and add the following entry to automatically mount the share at system reboots:
//server1/common /smbrhcemnt cifs rw,credentials=/etc/samba/smbrhcecred 0 0
![]() You can add the _netdev option to instruct the system to wait for networking to establish before attempting to mount this file system.
You can add the _netdev option to instruct the system to wait for networking to establish before attempting to mount this file system.
EXAM TIP: Do not forget to update the /etc/fstab file on the client.
11. Create a file called smbrhcetest as user10 under /smbrhcemnt and confirm its creation by running ll on /common on the Samba server:

The remote share is successfully mounted on server2, and it can be accessed as any other local file system. Access to it is also tested by creating a file on the Samba client and validating its presence on the Samba server.
Exercise 21-3: Provide a Share for Group Collaboration on Samba Client
This exercise should be done on server1 (Samba server) and server2 (Samba client).
In this exercise, (on server1) you will create users user11 and user12 and a group called smbgrp. You will add the two users to group smbgrp, create a directory called /smbsdata, set owning group on the directory to group smbgrp, permissions to 0770, and share /smbsdata for group collaboration. (on server2) You will create user11 and user12 and group smbgrp, and add both users to this group as members. You will create /smbsdatamnt mount point for this share and add an entry to the fstab file. You will mount the share on /smbsdatamnt and confirm the mount. You will log in as user3and then as user4 and create files for group collaboration.
On server1 (Samba server):
1. Install samba and samba-client software packages (if they are not already there).
2. Create Linux users user11 and user12 with password user123 (this way of setting a user password is done for ease; it is not recommended):

3. Add group smbgrp with GID 8888:
# groupadd –g 8888 smbgrp
4. Add user11 and user12 as members to smbgrp:
# usermod –G smbgrp user11
# usermod –G smbgrp user12
5. Create /smbsdata directory:
# mkdir /smbsdata
6. Set owning group on /smbsdata to smbgrp:
# chgrp smbgrp /smbsdata
7. Set permissions to 0770 on the directory:
# chmod 0770 /smbsdata
8. Activate the SELinux booleans persistently to allow the share in both read-only and read/write modes, and verify the activation:

9. Add SELinux file context with type samba_share_t on /smbsdata directory to the SELinux policy rules:
# semanage fcontext –at samba_share_t “/smbsdata(/.*)?”
10. Apply the new context on the directory, and confirm:
# restorecon /smbsdata
# ll –Zd /smbsdata
drw-rw----. root smbgrp unconfined_u:object_r:samba_share_t:s0 /smbsdata
11. Add the Samba service persistently to the firewalld configuration to allow Samba traffic on TCP port 445 to pass through, and load the rule:
# firewall-cmd --permanent --add-service=samba; firewall-cmd --reload
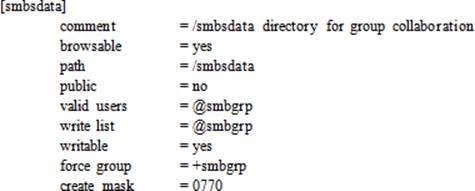
12. Append the following to the /etc/samba/smb.conf file. Leave /common and /smbrhcsa entries intact if they were previously added.
13. Check for any syntax errors in the file using the testparm command:
# testparm
14. Add user11 and user12 to the Samba user database /var/lib/samba/private/smbpasswd (this file will be created) and assign them password user123:
# smbpasswd –a user11
# smbpasswd –a user12
15. Display the user information using the pdbedit command:
# pdbedit –Lv
16. Set the Samba service to autostart at system reboots:
# systemctl enable smb
17. Start the Samba service and confirm its status:
# systemctl start smb
# systemctl status smb
18. List (–L) the shares available on the server as user11 (–U) using the smbclient command:
On server2 (Samba client):
19. Install samba, samba-client, and cifs-utils software packages (if they are not already there).
20. Create Linux users user11 and user12 with password user123 (use matching UIDs/GIDs as on server1):
21. Add group smbgrp with GID 8888:
# groupadd –g 8888 smbgrp
22. Add user11 and user12 as members to smbgrp:
# usermod –G smbgrp user11
# usermod –G smbgrp user12
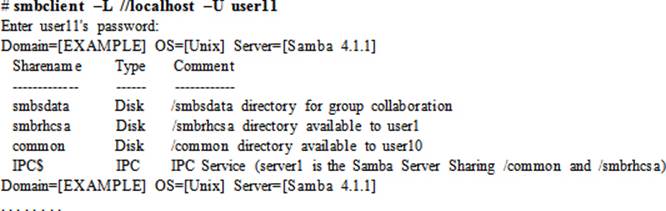
23. List (–L) what shares are available from server1 using the smbclient command:
24. Log on to the /smbsdata share as user11 using the smbclient command:
# smbclient //server1/smbsdata –U user11
Enter user11's password:
Domain=[EXAMPLE] OS=[Unix] Server=[Samba 4.1.1]
smb: \>
25. Create /smbsdatamnt mount point:
# mkdir /smbsdatamnt
26. Mount /smbsdata on to the /smbsdatamnt mount point as user11:
# mount //server1/smbsdata /smbsdatamnt –o username=user11
Password for user11@//server1/smbsdata: *******
27. Execute the df and mount commands to check the mount status of the share:
# df –h | grep smbsdata
//server1/smbsdata 8.8G 3.4G 5.4G 39% /smbsdatamnt
# mount | grep smbsdata
//server1/smbsdata on /smbsdatamnt type cifs (rw,relatime,vers=1.0,cache=strict,username=user11,domain=SERVER1,uid=0,noforceuid,gid=0,noforcegid,addr=192.168.0.110,unix,posixpaths,serverino,acl,rsize=1048576,wsize=65536,actimeo=1)
28. Create /etc/samba/smbsdatacred file and add the credentials for user11 to it so that this user is able to mount this share:
# vi /etc/samba/smbsdatacred
username=user11
password=user123
29. Set ownership on the file to root and permissions to 0400:
# chown root /etc/samba/smbsdatacred && chmod 0400 /etc/samba/smbsdatacred
30. Open the /etc/fstab file and add the following entry to automatically mount the share at system reboots:
//server1/smbsdata /smbsdatamnt cifs rw,credentials=/etc/samba/smbsdatacred 0 0
![]() You can add the _netdev option to instruct the system to wait for networking to establish before attempting to mount this file system.
You can add the _netdev option to instruct the system to wait for networking to establish before attempting to mount this file system.
31. Unmount and remount this file system to test the entry placed in the fstab file works:
# umount /smbsdatamnt
# mount /smbsdatamnt
# mount | grep smbsdatamnt
//server1/smbsdata on /smbsdatamnt type cifs (rw,relatime,vers=1.0,cache=strict,username=user11,domain=SERVER1,uid=0,noforceuid,gid=0,noforcegid,addr=192.168.0.110,unix,posixpaths,serverino,acl,rsize=1048576,wsize=65536,actimeo=1)
32. Create a file called smbsdatatest11 as user11 and another file called smbsdatatest12 as user12 under /smbsdatamnt. List the directory contents to ensure both files have the owning group smbgrp.
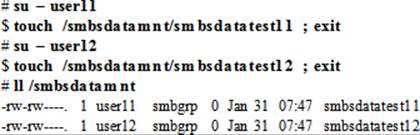
The remote share is successfully mounted on server2 for group collaboration. Both group members can share files created under this mount point.
Exercise 21-4: Provide Secure Access to Samba Share with Kerberos
This exercise should be done on server1 (Samba server) and server2 (Kerberos server and Samba client).
This exercise assumes that server2 is running Kerberos services (both KDC and admin services) for realm EXAMPLE.COM, the root user is added as an admin principal, DNS is disabled, and the hosts file is updated with appropriate mappings for both server1 and server2. It is also assumed that the Samba service is running on server1, which will also be used as the service host.
EXAM TIP: You do not have to worry about updating the /etc/hosts file. DNS will be in place with all hostnames resolvable.
In this exercise, you will add the Samba server as a cifs principal and produce a keytab for it and store it locally. You will add appropriate entries to the Samba server for a share and test access on the client.
On server2 (Kerberos server):
1. Log in as the root principal and add server1 as a cifs principal to the KDC database:
# kadmin –p root/admin
Authenticating as principal root/admin with password.
Password for root/admin@EXAMPLE.COM:
kadmin: addprinc –randkey cifs/server1.example.com
WARNING: no policy specified for cifs/server1.example.com@EXAMPLE.COM; defaulting to no policy
Principal "cifs/server1.example.com@EXAMPLE.COM" created.
2. Generate a keytab for the new principal and store it in the /etc/krb5.keytab file:
kadmin: ktadd –k /etc/krb5.keytab cifs/server1.example.com
3. Ensure that the file has the ownership and owning group set to root, and permissions to 0600.
EXAM TIP: You may have to copy an existing keytab file from a specified location to the /etc directory.
4. Copy the keytab file to the Samba server server1:
# scp /etc/krb5.keytab server1:/etc
On server1 (Samba server):
5. Follow the steps provided in Exercise 21-1 to create and share /smbkrb5 directory for user7 access with security set to ADS and Kerberos realm set to EXAMPLE.COM. Create the user if they do not exist.
On server2 (Samba client):
6. Confirm access to the share by logging in to it using Kerberos (–k) credentials:
# smbclient –k //server1/smbkrb5 –U user7
7. Create /smbkrb5mnt mount point:
# mkdir /smbkrb5mnt
8. Mount /smbkrb5 on to the /smbkrb5mnt mount point as user7:
# mount //server1/smbkrb5 /smbkrb5mnt –o username=user7,sec=krb5,rw
9. Verify the mount with the df and mount commands.
10. Open the /etc/fstab file and add the following entry to automatically mount the share at system reboots:
//server1/smbkrb5 /smbkrb5mnt cifs username=user7,rw,sec=krb5 0 0
11. Create a file called smbkrb5test7 as user7 under /smbkrb5mnt, and check its existence on the Samba server.
You can reboot the Samba client at this point to test if the share is automatically remounted after the system is back up. A user with TGT should now be able to access the mount.
Chapter Summary
This chapter discussed the Samba service, another file-sharing service. The chapter began with an introduction of Samba, the SMB and CIFS protocols, and Samba features. The chapter described Samba daemons and commands, and analyzed the main Samba configuration file with an explanation of some of the key directives that are commonly used. It then presented basic information on Samba software packages. The SELinux requirements were discussed, and then the chapter presented four exercises on configuring Samba server and client for network sharing directories for simple and group uses, and with Kerberos authentication.
Chapter Review Questions
1. What is the use of the pdbedit command?
2. Samba is used for file and printer sharing on the network. True or False?
3. What is the use of the “valid users” directive?
4. What is the name of the main Samba server configuration file and where is it located?
5. What is the new name for the SMB protocol?
6. The smbclient command is used to mount Samba shares on a Linux system. True or False?
7. Can “force group” directive be used for group collaboration?
8. What does the directive browsable mean in Samba?
9. What is the purpose of the mount.cifs command?
10. What would the Samba directive write list = @dba do?
11. What is the purpose of the testparm command?
12. What would the directive hosts allow = 192.168.23 in the global section of the Samba configuration file imply?
13. What is the difference between the “public” and “guest ok = yes” directives?
14. What SELinux file context would you set on a directory to be shared only by Samba?
15. What SELinux file context would you set on a directory to be shared in read/write mode by Samba and NFS?
16. What is the name of the Samba daemon?
17. What is the default location where Samba stores user passwords?
18. Where does the Samba server log its activities?
19. Provide two benefits of using Samba on Linux.
20. User home directories on a Samba server can be used by Windows clients and vice versa. True or False?
21. When would you activate the Samba boolean samba_export_all_rw?
22. Samba can be configured as a DNS server. True or False?
Answers to Chapter Review Questions
1. The pdbedit command is used to administer the Samba user database.
2. True.
3. The “valid users” directive limits the login access to a Samba share to the specified users or groups.
4. The main Samba server configuration file is called smb.conf and it is located in the /etc/samba directory.
5. Common Internet File System (CIFS).
6. False. The smbclient command is used to list available shares and it provides an FTP-like interface to a share.
7. Yes, this directive can be used to set up a share for group collaboration.
8. The browsable directive gives users the ability to browse the contents of a Samba share.
9. The mount.cifs command is used to mount a CIFS share.
10. This directive would give write access to the members of the dba group.
11. The testparm command is used to validate the settings in the smb.conf file.
12. This directive would allow systems on the 192.168.23 network to access the Samba service.
13. There is no difference between the two directives.
14. The samba_share_t file context.
15. The public_content_rw_t file context.
16. The Samba daemon is called smbd.
17. Samba stores user passwords in the /var/lib/samba/private directory.
18. The Samba server logs its activities in the /var/log/samba directory.
19. Samba shares can be accessed on Windows and vice versa, and a Samba server can be configured to function as a PDC in a Windows environment.
20. True.
21. This boolean needs to be activated when you want to export a share in read/write mode.
22. False.
DIY Challenge Labs
The following labs are useful to strengthen the concepts and topics learned in this chapter. It is expected that you perform these labs without any additional help. A step-by-step guide is not provided, as the implementation of these labs requires the knowledge that has been presented in this chapter. Use defaults or your own thinking for missing information.
Lab 21-1: Share a Directory with Samba
Share a directory for read-only access by guest accounts and give them the ability to browse this share. Restrict access to the share to systems in the example.com domain only. Configure the share on the client for automatic remount after system reboots. Implement necessary firewalld and SELinux rules.
Lab 21-2: Share a Directory with Samba for Group Collaboration
Share a directory for group collaboration. Create a group account, create three users, and add the three users to the group. Configure access for this share on the client in read/write mode and ensure that it is automatically remounted after system reboots. Implement necessary firewalld and SELinux rules.
All materials on the site are licensed Creative Commons Attribution-Sharealike 3.0 Unported CC BY-SA 3.0 & GNU Free Documentation License (GFDL)
If you are the copyright holder of any material contained on our site and intend to remove it, please contact our site administrator for approval.
© 2016-2026 All site design rights belong to S.Y.A.