RHCSA & RHCE Red Hat Enterprise Linux 7: Training and Exam Preparation Guide (EX200 and EX300), Third Edition (2015)
Part I. RHCSA Section
Chapter 1. Installing RHEL7 on Physical Computer Using Local DVD
This chapter describes the following major topics:
· A brief history of Linux and Open Source
· Linux distributions from Red Hat
· Obtain Red Hat Enterprise Linux 7
· Plan for an installation
· Overview of virtual consoles and installation logs
· Recommended lab setup for exam preparation
· Install RHEL7 on a physical computer using local DVD medium
· Perform post-installation configuration
RHCSA Objectives:
None, but sets up the foundation for learning and practicing the exam objectives for both RHCSA and RHCE
Linux has been around for years. It is a free operating system with source code available to developers and amateurs for customization and other purposes. Red Hat Inc. tailored the source code and added many features, enhancements, and bug fixes to make their Linux distribution as stable, robust, and feature-rich as possible for enterprise use.
The Red Hat Enterprise Linux operating system is available to subscribers in ISO format for download and use. It has hardware requirements that should be met for a smooth and worry-free operation. In order to practice and pass the RHCSA and RHCE exams, a proper lab setup is mandatory. The install process requires prior planning to identify system configuration pieces related to locale, networking, disk partitioning, file system types and sizes, software components, and so on. Identification of these items before starting the installation makes for a smooth installation process.
Overview of Linux
Linux is a free computer operating system similar to the UNIX operating system in terms of concepts, features, and functionality. It is therefore referred to as a UNIX-like operating system.
In 1984, an initiative was undertaken by Richard Stallman with the goal to create a completely free, UNIX-compatible, open source operating system with global collaboration from software developers. The initiative was called the GNU (GNU’s Not Unix) Project and by 1991, significant software had been developed. The only critical piece missing was a kernel to drive it. Around the same time, Linus Torvalds, who was working independently on the development of a kernel during his computer science studies, announced the availability of his kernel. The new kernel was given the nameLinux and it was gradually integrated with the GNU software to form what is now referred to as GNU/Linux, Linux operating system, or simply Linux. Linux was released under the GNU General Public License (GPL). Initially written to run on Intel x86-based computers, the first version (0.01) of Linux was released in September 1991 with little more than 10,000 lines of code. In 1994, the first major release (1.0.0) debuted, followed by a number of versions until version 3.0 in 2011. Development and enhancements continued and version 3.0 was followed by stable versions 3.2 and 3.4 in 2012, and 3.10 in 2013. At the time of this writing, version 3.17, with many millions of lines of code, is the latest stable kernel. The Linux kernel, and the operating system in general, has been enhanced with contributions from tens of thousands of software programmers and amateurs around the world into a large and complex system under GNU GPL, which provides public access to its source code free of charge, and with full consent to amend and redistribute.
Today, Linux runs on an extensive range of computer hardware platforms, from laptop and desktop computers to massive mainframe and supercomputers. Linux also runs as the base operating system on a variety of other electronic devices such as routers, switches, storage arrays, tape libraries, video games, and mobile devices. Numerous vendors including Red Hat, HP, IBM, Oracle, Novell, and Dell offer commercial support to Linux users worldwide.
The functionality, adaptability, portability, and cost-effectiveness that Linux offers has made it the main alternative to proprietary UNIX and Windows operating systems. At present, over a hundred different flavors of Linux are circulating from various vendors, organizations, and individuals; though only a few of them are popular and are widely accepted.
Linux is largely used in government agencies, corporate businesses, academic institutions, and scientific organizations, as well as in home computers. Linux deployment and usage is constantly on the rise.
Linux Distributions from Red Hat
Red Hat, Inc., founded in 1993, assembled an operating system called Red Hat Linux (RHL) under the GNU GPL and released their first version as Red Hat Linux 1.0 in November 1994. Several versions followed until the last version in the series, called Red Hat Linux 9 (later also referred to as RHEL3), based on kernel 2.4.20 was released in March 2003. Red Hat renamed the Red Hat Linux operating system series Red Hat Enterprise Linux (RHEL) in 2003.
RHL was originally assembled and enhanced within the Red Hat company. In 2003, Red Hat began sponsoring a project called Fedora and invited the user community to participate in enhancing the source code. This project served as the test-bed for developing and testing new features for Red Hat and enabled the company to include the improved code in successive versions of RHEL. The Fedora distribution is completely free; RHEL is commercial. RHEL4 (based on kernel 2.6.9 and released in February 2005), RHEL5 (based on kernel 2.6.18 and released in March 2007), RHEL6 (based on kernel 2.6.32 and released in November 2010), and RHEL7 (based on kernel 3.10 and released in June 2014) have been built using Fedora distributions 3, 6, 12, 13, and 19, respectively. The following are RHEL7 variants available for commercial use:
· Red Hat Enterprise Linux for Desktop (targeting desktop and laptop computers)
· Red Hat Enterprise Linux for Workstation (targeting workstation-class computers)
· Red Hat Enterprise Linux for Server (targeting small to large deployments)
· Red Hat Enterprise Linux for High-Performance Computing (targeting scientific use)
· Red Hat Enterprise Linux for IBM Power (targeting IBM Power series computers)
· Red Hat Enterprise Linux for IBM System z (targeting IBM mainframe computers)
· Red Hat Enterprise Linux for SAP Business Applications (targeting SAP application deployments)
· Red Hat Enterprise Linux for SAP HANA (targeting SAP in-memory database management system)
There are two 100% rebuilds of Red Hat Enterprise Linux. These are referred to as CentOS (Community Enterprise Operating System) and Scientific Linux, and are available for Linux users and learners at no cost. These rebuilds are not sponsored or supported by Red Hat. CentOS may be downloaded from www.centos.org and Scientific Linux from www.scientificlinux.org. For practice and training purposes, you may like to download and use one of these instead of RHEL7.
Obtaining, Planning, and Installing RHEL7
Red Hat Enterprise Linux 7 may be downloaded from Red Hat’s website as directed in the following sub-section. The downloaded image can then be burned to a DVD, used to create a bootable USB flash drive, placed on a hard drive to use the drive as an installation source, or located on a server to support network-based installations. Network-based installations are faster and can be done on numerous systems concurrently. Enough planning needs to be done to ensure installation meets desired needs. There are several options available for installing the operating system. We cover one of them in this chapter, another later in the book, and the rest are beyond the scope.
Downloading RHEL7 and Preparing Boot Media
You need to download the RHEL7 installation ISO image and burn it to a DVD (or use it to create a bootable USB flash drive). Follow the instructions below to download the full Server OS image for the x86_64 architecture, and burn it to a DVD:
1. Go to www.redhat.com and click “Customer Portal”.
2. Click “Log In” in the upper right corner with account credentials, or click “Register” and fill out the form to open a new account.
3. Click “Downloads” to get to the “Product Downloads” page.
4. Click “Red Hat Enterprise Linux” from the list if you already have an active subscription, or click “Start Evaluation” to obtain a free 30-day trial. Follow the instructions and links to download the “RHEL 7.0 Binary DVD” Server variant for x86_64 architecture.
![]() You can get technical support from Red Hat for your subscribed RHEL7 copy; the evaluation copy comes with 30-day limited support with no updates available after the expiry of that time period.
You can get technical support from Red Hat for your subscribed RHEL7 copy; the evaluation copy comes with 30-day limited support with no updates available after the expiry of that time period.
5. Use a DVD burner on Windows to burn the image to an empty physical DVD. To create a bootable USB stick, download “Fedora LiveUSB Creator” software from fedorahosted.org/liveusb-creator and use it. This procedure will destroy any data previously stored on the USB device.
Installation Media Options
There are multiple options available with respect to accessing the installation software. You can have the software located on a DVD, on a USB flash drive, on a hard drive, or on a network server accessible via the FTP, NFS, HTTP, or HTTPS protocol for network-based installations. In this chapter, we will perform an installation using the DVD that we have just created.
The RHEL7 installation program is called Anaconda. It provides three main interfaces for interaction: graphical, text-based, and kickstart. The graphical interface delivers an intuitive GUI to prepare a system for installation. It provides a central hub that lists groups of configuration options; you click the options that require modifications before beginning the installation process. One other major benefit of using the graphical installer is its ability to run some processor-intensive tasks such as storage layout detection in the background while allowing you to continue with the configuration.
The text-based interface is used on systems with no graphics card or to meet certain needs.
Kickstart is a fully-automated method for RHEL7 installation. It does not require user intervention during the installation. It may be used to load RHEL7 on a number of systems at the same time with identical configuration.
Hardware Requirements
The first thing that you need to do is understand the requirements for the installation. Critical items such as system and CPU types, amount of physical memory, and types and sizes of hard disks need to be determined. Installation may fail or the system may not function as expected if any of these requirements are not met. The following presents a discussion of these requirements.
System Requirements
There is a wide array of hardware platforms on which RHEL7 can be installed and run. The best place to check whether the hardware is certified to run RHEL7 without glitches is to refer to the Red Hat Hardware Compatibility List (HCL) available online at https://hardware.redhat.com. The HCL lists a number of computer system brands that Red Hat engineers have tested and certified to work with RHEL7; however, a large number of computers and laptops (both branded and unbranded) that are not on HCL may still work without issues. For laptop computers, visit www.linux-laptop.net where a wealth of information on thousands of different laptop models on which people have installed and run Linux is shared. If you have issues installing or running RHEL7 on your laptops, browse this website and search for the laptop model. It is likely that you will find a solution or a hint that helps fix the issue.
CPU Requirements
RHEL7 is supported on computer architectures with 64-bit Intel, AMD, IBM Power7, and IBM System zEnterprise processors. This hardware, along with integrated support for hardware virtualization, should be used for the purpose of RHCSA and RHCE exam preparation, general learning, or for hosting virtual machines.
RHEL7 has the capacity to support 5000+ logical CPUs on a single computer. It has integrated support for virtualization using Kernel-based Virtual Machine (KVM) hypervisor software, which allows the creation and execution of virtual machines to host RHEL or Microsoft Windows operating systems.
Memory Requirements
RHEL7 supports up to 3TiB of physical memory on a single computer. However, there are very few servers out there that require that much memory. For a typical RHEL7 server, enough physical memory should be available to support not only full RHEL but also the applications that the system is purposed to host. For a typical installation, reserve a minimum of 1GiB memory for RHEL; add more for better performance.
Planning the Installation
The installation program asks us for several configuration items during the installation. Some of the questions are compulsory and must be answered appropriately while others are optional, and may be skipped for post-installation setup if desired. The configuration can be done in any sequence that you prefer.
You should have the minimum mandatory configuration data handy and be ready to enter it when prompted. Some of the key configuration items are language, keyboard type, timezone, disk partitioning, hostname/IP, software selection, root password, user information, and kdump.
Virtual Console Screens
During the installation, there are six text-based virtual console screens available to you to monitor the installation process, view diagnostic messages, and discover and fix any issues encountered. You can switch between screens by pressing a combination of keys. The information displayed on the consoles is captured in installation log files.
Console 1 (Ctrl+Alt+F1): This is the main installer program console screen where you select a language to use during installation and which appears before Anaconda begins and switches the default console to the sixth screen.
Console 2 (Ctrl+Alt+F2): The bash shell interface for running commands as the root user.
Console 3 (Ctrl+Alt+F3): This screen displays installation messages and stores them in /tmp/anaconda.log file. This file also captures information on detected hardware, in addition to other data.
Console 4 (Ctrl+Alt+F4): This screen shows storage messages and records them in /tmp/storage.log file.
Console 5 (Ctrl+Alt+F5): This screen displays program messages and logs them to /tmp/program.log file.
Console 6 (Ctrl+Alt+F6): This is the default graphical configuration and installation console screen.
Installation Logs
There are several log files created and updated as the installation progresses. These files record configuration and status information. We can view their contents after the installation has been completed to check how the installation proceeded. These files are described in Table 1-1.
|
File |
Description |
|
/root/anaconda-ks.cfg |
Records the configuration entered. |
|
/root/install.log |
Lists the packages being installed. |
|
/root/install.log.syslog |
Stores general messages. |
|
/var/log/anaconda.ifcfg.log |
Captures messages related to network interfaces. |
|
/var/log/anaconda.log |
Contains informational, debug, and other general messages. |
|
/var/log/anaconda.syslog |
Records messages related to the kernel. |
|
/var/log/anaconda.xlog |
Stores X window information. |
|
/var/log/anaconda.packaging.log |
Records messages generated by the yum and rpm commands during software installation. |
|
/var/log/anaconda.program.log |
Captures messages generated by external programs. |
|
/var/log/anaconda.storage.log |
Records messages generated by storage modules. |
|
/var/log/anaconda.yum.log |
Contains messages related to yum packages. |
Table 1-1 Installation Logs
Files in the /var/log directory are actually created and updated in the /tmp directory during the installation; however, they are moved to /var/log once the installation is complete.
LAB Setup for Practicing RHCSA & RHCE Exam Objectives
Beginning in this chapter and throughout this book, several administration topics on system, network, and security will be presented, along with procedures on how to implement and administer them. A number of exercises will be performed and commands executed. The following minimum hardware and virtual machine configuration will be used to elucidate the procedures and perform the exercises and labs:
|
OS software: |
Download either RHEL7.0 or CentOS7.0 and burn it to a DVD. |
|
PC/laptop architecture: |
64-bit Intel dual-core (or equivalent AMD processor) with integrated hardware virtualization support. |
|
Physical memory: |
4GB |
|
Physical disk space: |
40GB |
|
Physical network interfaces: |
1 |
|
Physical host configuration: |
host1 in example.com domain with IP 192.168.0.100 and 1x40GB disk (10GB for OS, 10GB each for two virtual machines, and 10GB for storage exercises). This server will be installed locally using the RHEL7 installation DVD in this chapter. This server will provide the foundation to host two virtual machines server1 and server2, and may be used to test configuration made on them. This system will also provide RHEL7 installation files via FTP to server1 andserver2. |
|
Number of VMs: |
2 |
|
Memory in each VM: |
1024MB |
|
vCPUs in each VM: |
1 |
|
OS in each VM: |
RHEL7 or CentOS7 |
|
VM1: |
server1 in example.com domain with IP 192.168.0.110, 1x10GB virtual disk for OS, 4x2GB virtual disks for various disk management exercises, and six virtual network interfaces. The first network interface will have the primary IPv4 address, the second interface will be used for an interface management exercise (192.168.0.111) in Chapter 12 and for IPv6 exercise in Chapter 15, and the last four (2 pairs) will be used for bonding (192.168.1.110) and teaming (192.168.2.110) exercises in the RHCE section. Most services will be configured on this VM and it will also be used as an iSCSI initiator. This VM will be created using the virt-manager GUI and the OS will be installed using the installation files located on the FTP server host1. |
|
VM2: |
server2 in example.com domain with IP 192.168.0.120, 1x10GB virtual disk for OS, 1x2GB virtual disk for iSCSI exercises, and six virtual network interfaces. The first network interface will have the primary IPv4 address, the second interface will be used for an interface management exercise (192.168.0.121) in Chapter 12 and for IPv6 exercise in Chapter 15, and the last four (2 pairs) will be used for bonding (192.168.1.120) and teaming (192.168.2.120) exercises in the RHCE section. This VM will be built using the virt-install command and the OS will be installed using a kickstart configuration file with installation files located on the FTP server host1. This server will be used as a client and test system for most services configured on server1, as an iSCSI target, and as a server for some services. |
Though I highly recommend using a dedicated physical computer for the above, those who cannot afford or want convenience may build and use two virtual machines in VirtualBox, VMware, or some other virtualization software running on a Windows system. Do not forget that some of the exam objectives do require virtualizing a physical host. Another option would be to get a physical computer for a short period of time just to practice the exercises and the labs presented in the virtualization chapter, and use Windows-based virtual machines for the rest.
EXAM TIP: The exam systems may not have the graphical support pre-installed. If you want to use the GUI environment during the exams, you will need to install X Window System and GNOME software groups using the yum group install “X Window System” “GNOME” –ycommand. After the installation is complete, run the systemctl set-default graphical.target and then reboot the system. Accept the license agreement and log on to the system. This entire process may take up to 15 minutes of your exam time. See Chapter 05 “Managing Software Packages” for details, and other chapters to gain access to additional graphical tools.
Exercise 1-1: Install RHEL7 Server Using DVD
This exercise should be done on the physical computer.
In this exercise, you will perform a RHEL7 Server installation using the graphical interface on a physical computer using the DVD. This procedure presumes that the physical computer meets the requirements presented in the previous sub-section. Name this system host1.example.com and use the IP and disk information provided in the previous sub-section. Additional configuration will be supplied as the installation advances. The interface configuration, partitioning, base environments, user creation, network authentication services, NTP, and other topics will not be explained as part of this exercise; however, we will study them in detail in their respective chapters later in this book.
![]() Screenshots presented in the Configuring Installation Destination sub-section in this exercise are taken from an installation performed in a VirtualBox virtual machine. You may see different disk sizes while studying Chapter 09 “Partitioning and Managing Disk Storage”. Ignore the discrepancies.
Screenshots presented in the Configuring Installation Destination sub-section in this exercise are taken from an installation performed in a VirtualBox virtual machine. You may see different disk sizes while studying Chapter 09 “Partitioning and Managing Disk Storage”. Ignore the discrepancies.
EXAM TIP: RHEL7 installation is not an exam objective.
Initiating Installation
1. Power on the computer.
2. Insert the RHEL7 installation DVD in the drive.
3. Boot the computer from the DVD.
4. A graphical boot menu displaying three options on the main menu appears, as shown in Figure 1-1:
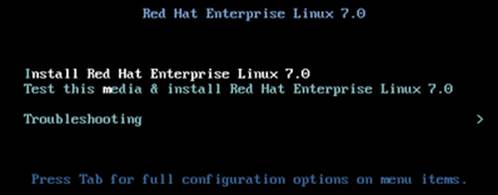
Figure 1-1 Boot Menu
The first option “Install Red Hat Enterprise Linux 7.0” is used for installing RHEL7 unless you want to use the second option, which is also the default option, to test the integrity of the installation media before continuing. The Anaconda installer program waits for 60 seconds for you to alter the selection, or it goes ahead and boots using the default option. You can also press the Enter key after highlighting the first or the second option to start the installation process right away. The installation begins in the graphical mode. The third option “Troubleshooting”, as shown in Figure 1-2, encapsulates several choices to address boot-related issues.
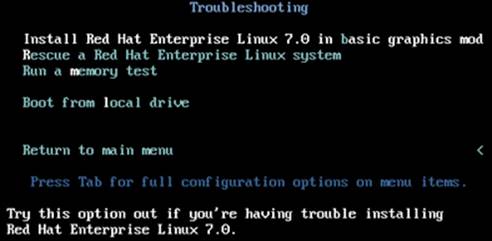
Figure 1-2 Boot Menu / Troubleshooting Sub Menu
These additional tasks allow you to perform an installation using a basic video driver (in case the installer cannot load a proper driver for the installed video card), interact with the system to recover an installed RHEL7 copy facing boot issues, run a memory test, or boot using a local disk drive.
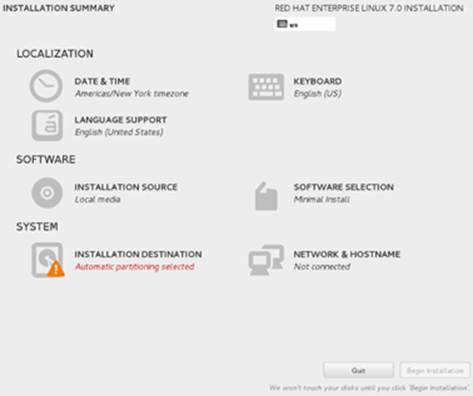
Figure 1-3 Installation Summary
5. The next screen allows you to choose a language for use during the installation. The default is English. Click Continue.
6. The “Installation Summary” screen appears next, as shown in Figure 1-3 (previous page). Here, you can make all necessary configuration changes prior to starting the installation. This screen presents a single interface to configure localization (date, time, timezone, keyboard, and language), software (installation source and selection), and system settings (disk selection & partitioning and network & hostname assignments). You can configure these items in any sequence you like.
Configuring Date & Time
7. Click Date & Time to set time zone (region and city), date, and time for the system. See Figure 1-4. Click Done in the upper left corner to save the changes and go back to the Installation Summary screen. If you do not wish to modify the default values shown, you can skip this step.
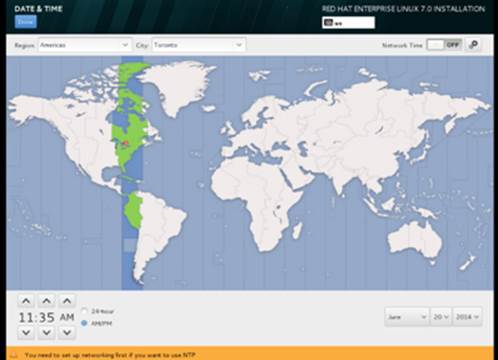
Figure 1-4 Installation Summary / Date & Time
Adding Support for Keyboards and Languages
8. Anaconda presents additional choices for keyboard layouts and languages for use during and after the installation. This should be done on systems where support for multiple keyboard layouts and languages is required. Click Done in the upper left corner to return to the Installation Summary. You can skip this step if you do not wish to include this additional support.
Choosing Installation Source
9. This is where you can change the default RHEL7 installation source. By default, Anaconda chooses the auto-detected source (DVD, USB flash drive, or ISO image) that is used to boot it. If you have access to a configured network location hosting the installation files, choose “On the network” and specify the HTTP, HTTPS, FTP, or NFS protocol, hostname or IP address of the network server, and the path to the files. You can also specify the locations of additional software repositories; however, they are not required for a complete RHEL7 installation. Click Done to return to the Installation Summary page after making the changes on this screen.
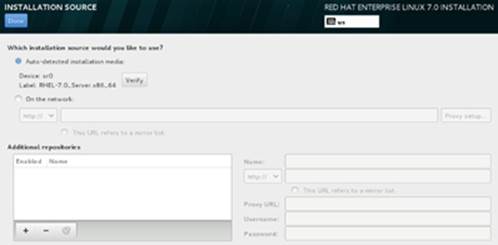
Figure 1-5 Installation Summary / Installation Source
Selecting Software to be Installed
10. Here, you can choose the base operating environment that you want installed. Base environments are pre-defined groups of software packages designed for specific purposes. They are listed with a short description in Table 1-2.
|
Server Role |
Description |
|
Minimal Install |
Installs basic RHEL OS. |
|
Infrastructure Server |
Minimal plus basic network services. |
|
File and Print Server |
Minimal plus file, print, and storage services. |
|
Basic Web Server |
Infrastructure plus Apache web service. |
|
Virtualization Host |
Infrastructure plus virtualization support to host virtual machines. |
|
Server with GUI |
Infrastructure with graphics support. |
Table 1-2 Software Selection
Choosing a base environment in the left pane reveals additional components on the right that become available for selection to be installed as part of the selected base environment installation. See Figure 1-6.

Figure 1-6 Installation Summary / Software Selection
The installer program automatically selects and installs pre-requisite software components in order to fulfill dependency requirements for a successful installation of the selected environment. The default is the Minimal Install. For this installation, choose Server with GUI without selecting any additional components. Click Done to return to the Installation Summary page.
Configuring Installation Destination
11. The Installation Destination allows you to choose an available local disk for installation and partition it. See Figure 1-7. It also gives you the ability to add a remote disk and partition it. By default, Anaconda selects “Automatic partitioning selected” on the Installation Summary page. However, on the Installation Destination page, the installer lets you either retain the automatic partitioning or configure your own. The availability of a local disk represented as sda is also shown on this page. The “Encrypt my data” checkbox under the Encryption section permits the encryption of all partitions except for the /boot partition. If you choose this option, you will be prompted to enter a passphrase to be used to access the partitions later. The “Full disk summary and bootloader” link at the bottom left corner on the Installation Destination page allows you to choose a disk to place the bootloader program on. On a single disk system, you do not need to modify it. The default, and the only, bootloader program available in RHEL7 is called GRUB2, and it is explained at length in Chapter 07 “Booting RHEL7, Updating Kernel, and Logging Messages”.
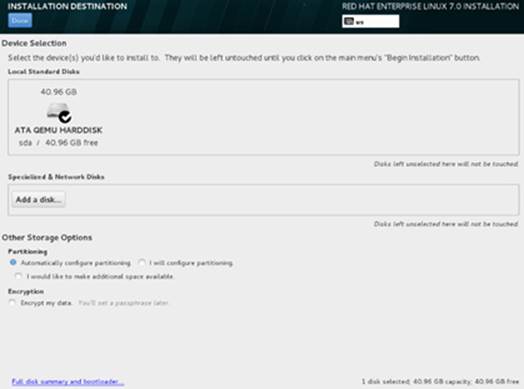
Figure 1-7 Installation Summary / Installation Destination
If you wish to choose automatic partitioning at this point, simply click the Done button to permit the installer to use automatic disk partitioning. This will create three partitions: /boot, /, and swap, and together they take up the full available capacity on the selected disk.
For this demonstration, choose “I will configure partitioning” under “Other Storage Options”, and click Done to proceed to the Manual Partitioning sub-screen shown in Figure 1-8.

Figure 1-8 Installation Summary / Installation Destination / Manual Partitioning
12. The Manual Partitioning sub-screen lets you partition the selected disk. It shows the total and available disk space in the bottom left corner. The link “Click here to create them automatically” shows the three partitions the installer will create if you select the automatic partitioning discussed in the previous step. The installer supports four types of partitioning schemes: standard, BTRFS, LVM, and LVM Thin Provisioning, and these schemes are visible when you click the LVM option. These partitioning techniques are explained at length in Chapter 09 “Partitioning and Managing Disk Storage”.
13. For this demonstration, partition the chosen disk based on the information provided in Table 1-3.
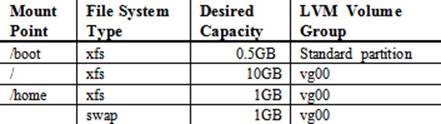
Table 1-3 Custom Partition Information
![]() The installer program requires that three partitions: /boot, /, and swap must be created at a minimum.
The installer program requires that three partitions: /boot, /, and swap must be created at a minimum.
Click the + sign in the bottom left to add custom partitions. The following window pops up.
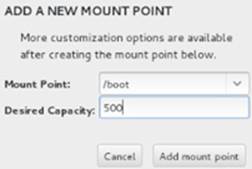
Figure 1-9 Installation Summary / Installation Destination / Manual Partitioning / Add Mount Point
14. Select /boot as the mount point and enter 500 as the desired capacity for the first partition. Click “Add mount point”. A new window shows up as shown in Figure 1-10.
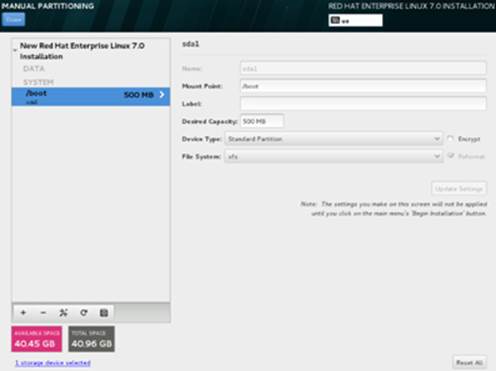
Figure 1-10 Installation Summary / Installation Destination / Manual Partitioning
The default device and file system types are automatically filled in for the /boot file system.
![]() The /boot partition must be created as a standard partition outside LVM boundaries.
The /boot partition must be created as a standard partition outside LVM boundaries.
Click the + sign again and enter the mount point and size for the / file system. Click “Add mount point” and the root file system properties become visible. Notice a new property called Volume Group appears with the default value “rhel”. By default, LVM suggests “rhel” as the volume group name and placing the root file system in this volume group. See Figure 1-11.

Figure 1-11 Installation Summary / Installation Destination / Manual Partitioning
Click Modify beside Volume Group and enter vg00 as the new volume group name. See Figure 1-12. Click Save to proceed.
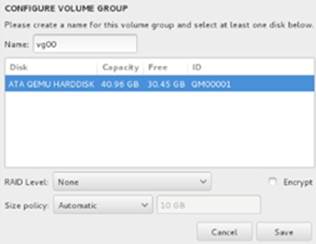
Figure 1-12 Installation Summary / Installation Destination / Manual Partitioning / Volume Group
The updated information is reflected on the main Manual Partitioning screen.
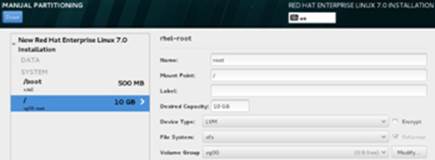
Figure 1-13 Installation Summary / Installation Destination / Manual Partitioning
Repeat the above procedure for the /home and swap partitions to ensure they are part of the vg00 volume group as well. The final partitioning will look like Figure 1-14.
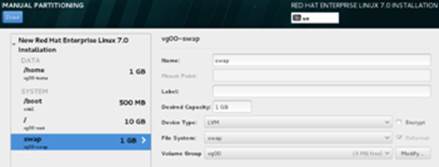
Figure 1-14 Installation Summary / Installation Destination / Manual Partitioning
You can highlight a partition on the left, and view or modify any of its properties. Several file system types are supported and these can be viewed by clicking on the down arrow beside File System. These include ext2, ext3, ext4, swap, BIOS Boot, xfs, and vfat, and are explained in Chapter 10 “Constructing and Using File Systems and Swap”.
15. Click Done. The installer program asks for confirmation as indicated in Figure 1-15. Click Accept Changes to confirm the partitioning and return to the Installation Summary page.
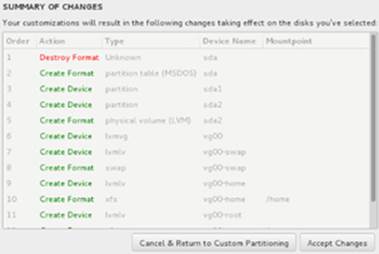
Figure 1-15 Installation Summary / Installation Destination / Manual Partitioning / Summary
Configuring Network & Hostname
16. Assigning appropriate IP information and a hostname is essential for system functionality in a network environment. Click Network & Hostname on the Installation Summary page and a window similar to the one shown in Figure 1-16 pops up. Anaconda detects all network interfaces available on the system; however, it does not automatically assign them IPs. Also the default hostname is set to localhost.localdomain. You need to modify these assignments so that your system is able to communicate with other systems on the network. Your system has one network interface, represented as eth0, and this is detected by the installer. You can obtain IP assignments automatically from an available DHCP server by simply moving the switch located in the top right-hand corner on this window. However, for this demonstration, click Configure in the bottom right corner and enter IP information manually for this interface.
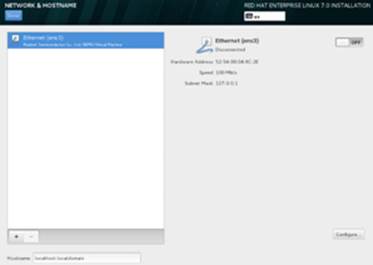
Figure 1-16 Installation Summary / Network & Hostname
There are multiple tabs available on the interface configuration screen, as depicted in Figure 1-17. Go to IPv4 Settings and choose Manual from the drop-down list against Method. Click Add and enter IP information. Click Save to save the configuration and return to the previous window. Now enter host1.example.com in the Hostname field and click Done to return to the Installation Summary page. Chapter 12 “Administering Network Interfaces and Network Clients” talks about configuring network interfaces manually in detail.
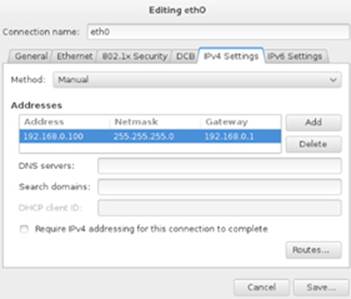
Figure 1-17 Installation Summary / Network & Hostname / Configure
Beginning Installation
17. The Installation Summary page now looks like Figure 1-18. Click Begin Installation in the bottom right to begin the installation based on the configuration entered in previous steps. Anaconda will now partition the disk and install the software in the partitions. Any data previously stored in the partitions will be overwritten and will not be recoverable. Before you click the Begin Installation button, you still have the opportunity to go back and configure or reconfigure any items you desire or have missed.
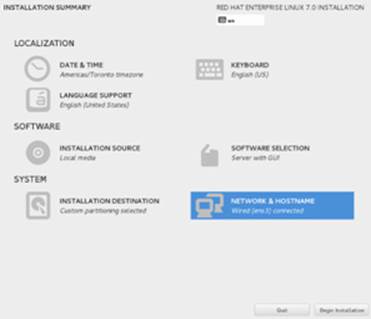
Figure 1-18 Installation Summary
![]() The Begin Installation button is not visible unless all required configuration is entered.
The Begin Installation button is not visible unless all required configuration is entered.
Setting root Password and Creating a User Account
18. Once the installation has begun, a new screen appears that shows the installation progress. This screen also allows you to assign a password to the root user and create a user account.

Figure 1-19 Configuration
19. While the installer program continues with background configuration and software copy, click Root Password and set a password for the root user. Click Done to return to the installation progress screen.
20. Next, click User Creation and create a user account called user1 and assign it a password of your choice. Click Done to return.
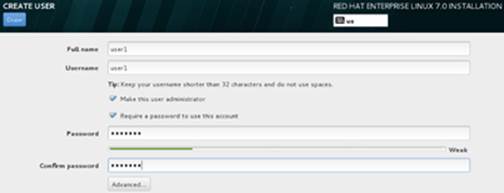
Figure 1-20 Configuration / Create User
Finishing Installation
21. When all software packages are installed, the Reboot button becomes active in the bottom right corner of the screen. Click this button to reboot the new system.
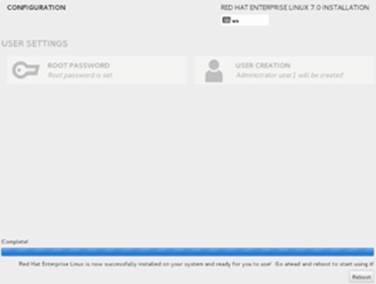
Figure 1-21 Configuration / Finishing Installation
Performing Post-Installation Tasks
22. Following the reboot, the system initiates the Initial Setup application so you can complete certain post-installation configuration tasks. Figure 1-22 shows the Initial Setup screen.
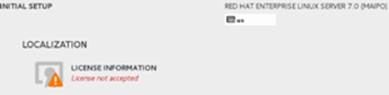
Figure 1-22 Initial Setup
23. On this screen you must accept the license agreement by clicking the License Information icon and then ticking the box beside “I accept the license agreement”. Click Done and then Finish Configuration to continue.
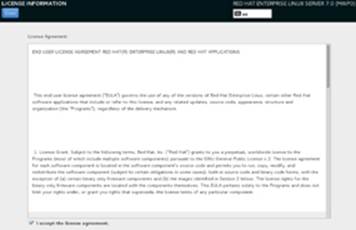
Figure 1-23 Initial Setup / License Agreement
24. The next screen allows you to configure a kernel crash dump. The default shown here is 128MB, which should be sufficient for this system. The dump may prove helpful in determining the root cause of a system crash. Accept the default value and click Forward to continue.
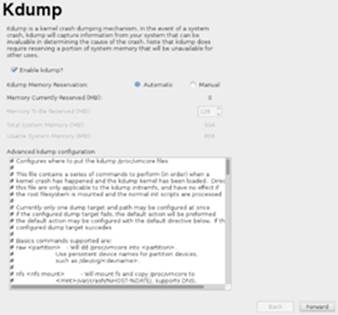
Figure 1-24 Initial Setup / Kernel Dump Configuration
25. If you have an active subscription, you should register this system with Red Hat to get benefits such as automatic software updates, etc. For this demonstration, tick “No, I prefer to register at a later time” and click Finish to continue.
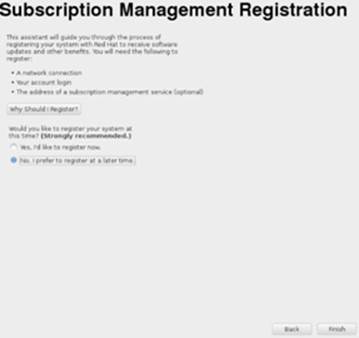
Figure 1-25 Initial Setup / Subscription Registration
26. Next is the login screen where the user account you created earlier is displayed. Click the user name and enter the password to sign in.
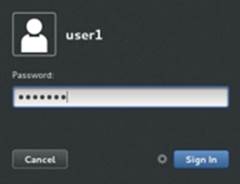
Figure 1-26 Sign In Screen
27. The login process continues and a Welcome screen pops up that shows the language that you selected at the beginning of the installation. You can change it to a different language if you wish to. Click Next to continue.
28. On the next screen, add an Input Source to be used. The default is the US English keyboard type that you selected earlier. Click Next to continue.
29. Click “Start using Red Hat Enterprise Linux Server” on the “Thank You” screen. This marks the end of the post-configuration tasks.
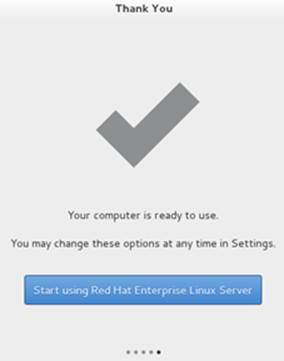
Figure 1-27 Sign In Process
30. The default graphical desktop called GNOME appears (Figure 1-28) and you should now be able to start using the system as user1.
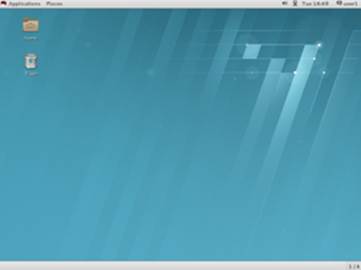
Figure 1-28 GNOME Desktop
31. After you are done navigating, click user1 at the top right corner and choose Log Out to log off the system.
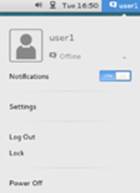
Figure 1-29 Log Out
This completes the step-by-step procedure for installing RHEL7 using a local DVD medium.
Chapter Summary
In this chapter, we started by looking at Linux history and exploring available distributions from Red Hat. We looked at various pre-installation items to prepare for a smooth installation. We reviewed what was required to build the lab for practicing the exercises and labs presented in this book. We demonstrated downloading the OS ISO image, and performed a DVD-based installation on a physical computer. We completed several post-installation tasks to complete the installation. Finally, we logged in to the new system to verify the installation.
Chapter Review Questions
1. Can we install RHEL7 in text mode?
2. How many console screens do we have access to during the installation process?
3. We can use the /boot partition within LVM to boot RHEL. True or False?
4. Which kernel version is the initial release of RHEL7 based on?
5. What are the two 100% rebuilds of Red Hat Enterprise Linux?
6. Several log files are created and updated in the /tmp directory during the installation process. Where are these files moved to after the completion of installation?
7. Identify the two key hardware requirements for a computer to support KVM.
8. Name the RHEL installer program.
9. What server role would we choose during installation if we want KVM support added?
10. RHEL7 cannot be installed over the network. True or False?
11. RHEL7 supports both automatic and custom disk partitioning during installation. Would it use standard partitioning or LVM if we select automatic partitioning?
12. Minimal server installation provides X window as well. True or False?
Answers to Chapter Review Questions
1. Yes, RHEL7 can be installed in text mode.
2. There are six console screens available during the installation process.
3. False. /boot must not be enclosed within LVM.
4. The initial release of RHEL7 is based on kernel version 3.10.
5. The two 100% rebuilds of Red Hat Enterprise Linux are CentOS and Scientific Linux.
6. These files are moved to the /var/log directory.
7. A computer must be 64-bit and support hardware virtualization.
8. The name of the RHEL installer program is Anaconda.
9. We will choose Server with Virtualization during installation to ensure KVM support is added.
10. False. RHEL7 can be installed with installation files located on network servers.
11. It will select LVM if automatic partitioning is opted.
12. False. Minimal server installation does not include graphics support.
DIY Challenge Labs
The following labs are provided for those who wish to master the installation. I recommend that you practice these labs in a VMware, Oracle VirtualBox, or MS HyperV virtual machine and not overwrite the installation that we have done, unless you want to re-do it with the exact same configuration. Also, a step-by-step procedure is not included for these labs, as sufficient detail is already available in this chapter for your assistance. Use defaults or your own thinking for missing information.
Lab 1-1: Perform a Default Local Installation
Perform a local installation of RHEL7 on your physical computer or on a virtual machine. Use default partitioning. Add support for X Window and GNOME desktop. Create a local user account called tricia with all the defaults. Force the system to use the local clock for time updates. Use information at will for additional configuration.
Lab 1-2: Perform a Custom Local Installation
Perform a local installation of RHEL7 on your physical computer or on a virtual machine. Use a standard partition for /boot and LVM for the rest. Create /boot 400MB, / 4GB, swap 1GB, /usr 4GB, /var 2GB, /tmp 1GB, and /home 1GB. Select necessary packages to support X Window, GNOME desktop, graphical administration tools, and CIFS, NFS, and Apache web services. Create a local user account called joseph with all default values and sync the system time with the default NTP servers. Use information at will for additional configuration.
All materials on the site are licensed Creative Commons Attribution-Sharealike 3.0 Unported CC BY-SA 3.0 & GNU Free Documentation License (GFDL)
If you are the copyright holder of any material contained on our site and intend to remove it, please contact our site administrator for approval.
© 2016-2026 All site design rights belong to S.Y.A.