RHCSA & RHCE Red Hat Enterprise Linux 7: Training and Exam Preparation Guide (EX200 and EX300), Third Edition (2015)
Part I. RHCSA Section
Chapter 3. Working with Files and File Permissions
This chapter describes the following major topics:
· The Red Hat Enterprise Linux directory structure
· Access files using absolute and relative pathnames
· Types of files
· Manage and manipulate files and directories including creating, listing, displaying, copying, moving, renaming, and removing them
· View and set control attributes on files and directories
· Search for files in the directory system
· Create file and directory links
· Permissions assigned to owners, owning group, and others
· Permission types – read, write, and execute
· Permission assignment modes – adding, revoking, and assigning
· Modify permissions using symbolic and octal notations
· Set default permissions on new files and directories
· Modify ownership and group membership
· Configure special permissions with setuid, setgid, and sticky bits
· Use setgid bit for group collaboration
RHCSA Objectives:
08. Create, delete, copy, and move files and directories
09. Create hard and soft links
10. List, set, and change standard ugo/rwx permissions
28. Create and configure set-GID directories for collaboration
30. Diagnose and correct file permission problems
Linux files are organized logically for ease of administration. This file organization is maintained in hundreds of directories located in larger containers called file systems. Red Hat Enterprise Linux follows the File system Hierarchy Standard (FHS) for file organization, which describes names, locations, and permissions for many file types and directories. File systems are primarily of two types: disk-based and memory-based, and they are used to store permanent and runtime data, respectively.
Files are static and dynamic, and are referenced using absolute and relative pathnames. Linux supports several different types of files and their type is based on the type of data they store. There are a number of management operations that can be performed on files and directories. Linux includes thousands of files and each file has certain default attributes that can be viewed or modified. There are tools available that prove to be very helpful in searching for files within a specified boundary and in linking them as desired.
Permissions are set on files and directories to restrict their access to authorized users only. Users are grouped into three distinct categories. Each user category is then assigned required permissions. Permissions can be modified using one of two available methods. The user mask may be defined for individual users so that the new files and directories they create always get preset permissions. Every file in Linux has an owner and a group associated with it. The OS offers three additional permission bits to control user access to certain executable files and shared directories. A directory with one of these permission bits set can be used for group collaboration.
File System Tree
Linux uses the conventional hierarchical directory structure where directories may contain both files and sub-directories. Sub-directories may further hold more files and sub-directories. A sub-directory, also referred to as a child directory, is a directory located under a parent directory. That parent directory is a sub-directory of some other higher-level directory. In other words, the Linux directory structure is similar to an inverted tree where the top of the tree is the root of the directory, and branches and leaves are sub-directories and files, respectively. The root of the directory is represented by the forward slash (/) character, and this is the point where the entire file system structure is ultimately connected. The forward slash character is also used as a directory separator in a path, such as /etc/rc.d/init.d/network.
In this example, the etc sub-directory is located under /, making root the parent of etc (which is a child). rc.d (child) is located under etc (parent), init.d (child) is located under rc.d (parent), and at the very bottom, network (leave) is located under init.d (parent).
Each directory has a parent directory and a child directory, with the exception of the root and the lowest level directories. The root directory has no parent and the lowest level sub-directory has no child.
![]() The term sub-directory is used for a directory that has a parent directory.
The term sub-directory is used for a directory that has a parent directory.
The hierarchical directory structure keeps related information together in a logical fashion. Compare this concept with a file cabinet containing several drawers, with each drawer storing multiple file folders.
Two file systems, / and /boot, are created during a default RHEL7 installation. However, the custom installation procedure covered in Chapter 01 “Installing RHEL7 on Physical Computer Using Local DVD” allows us to create /var, /usr, /tmp, /opt, and /home file systems besides / and /boot. The main directories under the / and other file systems are shown in Figure 3-1. Some of these directories hold static data while others contain dynamic (or variable) information. Static data refers to file contents that are usually not modified, and dynamic or variable data refers to file contents that are modified and updated as required. Static directories normally contain commands, library routines, kernel files, device files, etc., and dynamic directories hold log files, status files, configuration files, temporary files, and so on.
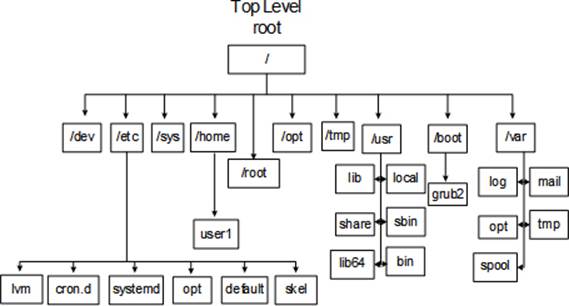
Figure 3-1 File System Tree
A brief description of disk-based and virtual file systems is provided in the following sub-sections.
The Root File System (/) – Disk-Based
The root file system is the top-level file system in the FHS and contains many higher-level directories holding specific information. Some of the key directories are:
/etc: The etcetera directory holds system configuration files. Some common sub-directories are—systemd, default, lvm, and skel—which contain configuration files for systemd, defaults for user accounts and some other services, the Logical Volume Manager, and per-user shell startup template files, respectively.
/root: This is the default home directory location for the root user.
/media: This directory is used by the system to automatically mount removable media, such as floppy, CD, DVD, USB, and Zip drives.
/mnt: This directory is used to mount a file system temporarily.
The Boot File System (/boot) – Disk-Based
The /boot file system contains the Linux kernel, boot support files, and boot configuration files. The default size of this file system is 500MB, and it may be expanded as part of the preparation to update the kernel.
The Variable File System (/var) – Disk-Based
/var contains data that frequently changes while the system is operational. Files holding log, status, spool, lock, and other dynamic data are located in this file system.
Some common sub-directories under /var are:
/var/log: This is the storage for most system log files, such as system logs, boot logs, failed user logs, user logs, installation logs, cron logs, mail logs, etc.
/var/opt: For additional software installed in /opt, this directory stores log, status, and other variable data files for that software.
/var/spool: Directories that hold print jobs, cron jobs, mail messages, and other queued items before being sent out are located here.
/var/tmp: Large temporary files or temporary files that need to exist for longer periods of time than what is allowed in /tmp are stored here. These files survive system reboots and are not automatically deleted.
The UNIX System Resources File System (/usr) – Disk-Based
This file system contains general files related to the system, with some portions perhaps shared with other remote systems. This file system is mounted read-only. Some of the important sub-directories under /usr are:
/usr/lib: The library directory contains shared library routines required by many commands and programs located in the /usr/bin and /usr/sbin directories, as well as by the kernel and other programs.
/usr/bin: The binary directory contains crucial user executable commands.
/usr/sbin: Most commands required at system boot are located in this system binary directory as well as most commands requiring root privileges to run. In other words, this directory contains crucial system administration commands that are not intended for execution by regular users (although they can still run a few of them). This directory is not included in the default search path for normal users because of the nature of data it contains.
/usr/local: This directory serves as a system administrator repository for storing commands and tools downloaded from the web, developed in-house, or obtained elsewhere. These commands and tools are not generally included with the original Linux distribution. In particular, /usr/local/bin holds executables and /usr/local/etc contains their configuration files.
/usr/include: This directory contains header files for C language.
/usr/src: This directory is used to store source code.
/usr/share: This is the directory location for man pages, documentation, sample templates, configuration files, etc. that may be shared on multi-vendor Linux platforms with heterogeneous hardware architectures.
The Optional File System (/opt) – Disk-Based
This file system holds additional software installed on the system. A sub-directory is created for each installed software.
The Home File System (/home) – Disk-Based
The /home file system is designed to hold user home directories. Each user account is assigned a home directory in which to save personal files. Each home directory is owned by the user the directory is assigned to, with no access to other users.
The Devices File System (/dev) – Virtual
The /dev file system contains device nodes for physical hardware and virtual devices. The Linux kernel communicates with these devices through corresponding device nodes located here. These device nodes are created and deleted by the udevd service as necessary.
There are two types of device files: character (or raw) device files and block device files. The kernel accesses devices using either or both types of device files.
Character devices are accessed serially, with streams of bits transferred during kernel and device communication. Examples of such devices are serial printers, mice, keyboards, terminals, tape drives, etc.
Block devices are accessed in a parallel fashion, with data exchanged in blocks (parallel) during kernel and device communication. Data on block devices is accessed randomly. Examples of block devices are hard disk drives, optical drives, parallel printers, etc.
The Process File System (/proc) – Virtual
The /proc file system maintains information about the current state of the running kernel, including details on CPU, memory, disks, partitioning, file systems, networking, and running processes. This virtual file system contains a hierarchy of sub-directories containing thousands of zero-length files pointing to relevant data that is maintained by the kernel in the memory. This virtual directory structure simply provides an easy interface to interact with kernel-maintained information. The /proc file system is automatically managed by the system.
The contents in /proc are created in memory at boot time, updated during runtime, and destroyed at reboot time. Underneath this file system are stored current hardware configuration and status information. A directory listing of /proc is provided below:
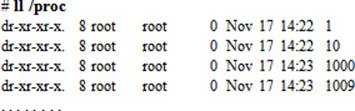
As mentioned, this file system contains thousands of files and sub-directories. Some sub-directory names are numerical and they point to information about specific processes, with process IDs matching the sub-directory names. Within each sub-directory, there are files and further sub-directories, which include information such as memory segment specific to that particular process. Other files and sub-directories point to configuration data for system components. If you wish to view configuration information for a specific item, such as the CPU or memory, you can cat the contents ofcpuinfo and meminfo files as shown below:
# cat /proc/cpuinfo
processor : 0
vendor_id : GenuineIntel
cpu family : 6
model : 42
model name : Intel(R) Core(TM) i7-2760QM CPU @ 2.40GHz
stepping : 7
cpu MHz : 2423.437
…… . .
# cat /proc/meminfo (also shows available memory)
MemTotal: 7889040 kB
MemFree: 757800 kB
MemAvailable: 1451248 kB
…… . .
The data located under /proc is referenced by a number of system utilities, including top, ps, uname, and vmstat, for display purposes.
The System File System (/sys) – Virtual
Information about configured hotplug hardware devices is stored and maintained in the /sys file system. This information is referenced for loading kernel modules, creating device nodes in the /dev directory, and configuring each device. This file system is auto-maintained as well.
The Temporary File System (/tmp) – Virtual
This file system is a repository for temporary storage. Many programs create temporary files as they run or while they are being installed. The contents of this file system are automatically deleted at system reboots.
Absolute and Relative Pathnames
A path is like a road map showing how to get from one place in the directory tree to another. It uniquely identifies a particular file or directory by its absolute or relative location in the directory structure.
At any given time, the directory you are located in within the tree is referred to as your present (or current) working directory. When you log in to the system, you are placed in your home directory by default. Use the pwd command to determine your current location in the tree.
Absolute Path
An absolute path (a.k.a. a full path or a fully qualified pathname) points to a file or directory in relation to /. It always starts with the forward slash (/) character. The pwd command displays the current location in the tree.
# pwd
/root
The output indicates /root as the current location in the directory hierarchy. This path begins with /, which identifies it as a full path.
Relative Path
A relative path points to a file or directory in relation to your current location in the directory tree. A relative path never begins with a forward slash; rather it always begins in one of the following two ways:
With two periods: This represents a parent directory in relation to your current working directory. A parent directory is one level higher than the current working directory. For example, to go one level up to the parent directory, type:
# cd ..
With a sub-directory name: Suppose you are in the / directory and want to go to the sysconfig sub-directory under /etc, you would run the following:
# cd etc/sysconfig
File Types
RHEL supports several different types of files. Some of the common file types are—regular files, directory files, executable files, symbolic link files, and device files—and are described in the following sub-sections.
Regular Files
Regular files may contain text or binary data. These files may be shell scripts or commands in the binary form. When you list a directory, all line entries for files in the output that begin with the – sign represent regular files:
You can use a command called file to determine the type of a file. For example, the following shows that .bash_profile in the root user’s home directory contains ascii text:
# file .bash_profile
.bash_profile: ASCII text
Directory Files
Directories are logical containers that are used to hold files and sub-directories. Run ll on the /root directory and you should see an output similar to:
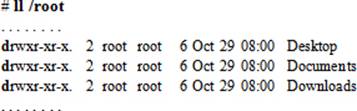
The letter d at the beginning of each line entry identifies the file as a directory. You can use the file command to see what it reports it as. For example, the following shows that /root is a directory file:
# file /root
/root: directory
Executable Files
Executable files could be commands in the binary format or shell scripts. In other words, any file that can be run is an executable file. A file that has an x in the fourth, seventh, or the tenth field in the output of the ll command is executable.
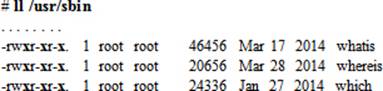
The file command reports the type of an executable file as follows:
# file /usr/bin/whoami
/usr/bin/whoami: ELF 64-bit LSB executable, x86-64, version 1 (SYSV), dynamically linked (uses shared libs), for GNU/Linux 2.6.32, BuildID[sha1]=0x130a11a3f5598dddb581134373700d6554fa6527, stripped
Symbolic Link Files
A symbolic link (a.k.a. a soft link or a symlink) may be considered a shortcut to another file or directory. When you issue ll on a symbolically linked file or directory, you will notice two things. One, the line entry begins with the letter l; and two, there is an arrow pointing to the linked file or directory. For example:
![]()
The file command can be used to confirm that the vigr file is a symlink:
# file /usr/sbin/vigr
/usr/sbin/vigr: symbolic link to `vipw'
Device Files
Each piece of hardware in the system has an associated file used by the kernel to communicate with it. This type of file is called a device file. There are two types of device files: a character (or raw) device file and a block device file. The following example uses the ll command to display device files:
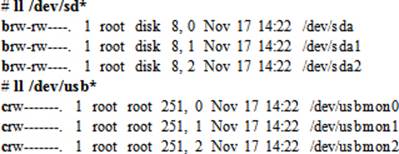
The first character in each line entry tells if the file type is block or character. A b denotes a block device file and a c represents a character device file. You can use the file command to determine their types:
# file /dev/sda
/dev/sda: block special
# file /dev/tty0
/dev/usbmon0: character special
File and Directory Operations
This section elaborates on various management operations that can be performed on files and directories. These operations include creating, listing, displaying contents of, copying, moving, renaming, and deleting files and directories. These are common operations that root and all normal users usually perform.
Creating Files and Directories
Files can be created in multiple ways; however, there is only one command to create directories.
Creating Files Using the touch Command
The touch command creates an empty file. If the file already exists, it updates the time stamp on it to the current system date and time. Execute the following as user1 in their home directory to create file1, and then run the ll command to verify:
$ cd
$ touch file1
$ ll file1
-rw-rw-r--. 1 user1 user1 0 Nov 26 10:07 file1
As expected, the fifth field in the output is 0, meaning that file1 is created with zero bytes. Now, if you re-run the command on file1, you will notice that it gets an updated time:
$ touch file1
$ ll file1
-rw-rw-r--. 1 user1 user1 0 Nov 26 10:14 file1
Creating Files Using the cat Command
The cat command allows you to create short text files:
$ cat > newfile
Nothing is displayed when you execute this command because the system is waiting on you to input something; it expects you to enter text that it will capture into newfile. Press Ctrl+d when done to save and return to the shell prompt.
Creating Files Using the vi (vim) Editor
You can use the vi editor to create and modify text files. Refer to Chapter 02 “Using Basic Linux Tools” on how to use this tool.
Creating Directories Using the mkdir Command
The mkdir command is used to create directories. This command shows an output if you run it with the –v option. The following example demonstrates the creation of a directory called scripts.dir1 in user1 user’s home directory (/home/user1):
$ cd
$ pwd
/home/user1
$ mkdir scripts.dir1
mkdir: created directory ‘scripts.dir1’
![]() You must have appropriate permissions to create a directory; otherwise, an error message complaining of a lack of permissions is generated.
You must have appropriate permissions to create a directory; otherwise, an error message complaining of a lack of permissions is generated.
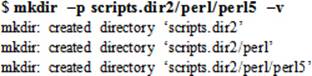
You can create a hierarchy of sub-directories by specifying the –p option with mkdir. In the following example, mkdir creates the hierarchy scripts.dir2/perl/per5 in user1’s home:
Listing Files and Directories
Use the ll command to list files and directories. This command shows the details for each listed file and directory in nine columns. For instance:
![]()
Each column in the above output furnishes a unique piece of information about the file or directory:
Column 1: The first character tells the file type and the next nine characters indicate permissions.
Column 2: Displays the number of links.
Column 3: Shows the owner name.
Column 4: Displays the owning group name.
Column 5: Identifies the file size in bytes. For directories, this number reflects the number of blocks being used by the directory to hold information about its contents.
Columns 6, 7, and 8: Display the month, day of the month, and time of creation or last modification.
Column 9: Indicates the name of the file or directory.
Displaying File Contents
Linux offers several tools for showing file contents. Directory contents are simply the files and sub-directories that it contains. Use the ll or the ls command as explained earlier to view directory contents.
For file viewing, you can use the cat, more, less, head, and tail commands. These tools are explained below.
Using the cat Command
cat displays the contents of a text file. In the example below, the .bash_profile file in user1’s home directory is displayed with the cat command:
$ cat /home/user1/.bash_profile
# Get the aliases and functions
if [ -f ∼/.bashrc ]; then
. ∼/.bashrc
fi
# User specific environment and startup programs
PATH=$PATH:$HOME/.local/bin:$HOME/bin
export PATH
Using the more and less Commands
more can be used to view long text files one page at a time, starting at the beginning. In the example below, /etc/profile is displayed with more. This command shows the percentage of the file being viewed in the last line.
$ more /etc/profile
…… . .
USER="`id -un`"
--More--(43%)
Navigation keys listed in Table 3-1 are helpful while you are in a more session.
|
Key |
Purpose |
|
Spacebar / f |
Scrolls forward one screen. |
|
Enter |
Scrolls forward one line. |
|
b |
Scrolls backward one screen. |
|
d |
Scrolls forward half a screen. |
|
h |
Displays help. |
|
q |
Quits and returns to the command prompt. |
|
/string |
Searches forward for a string. |
|
?string |
Searches backward for a string. |
|
n / N |
Finds the next / previous occurrence of a string. |
Table 3-1 Navigating with more or less
less is similar to the more command but it offers some extended capabilities. It does not need to read the entire file before it starts to show it, thus making it faster than more. In the example below, /etc/profile is shown with less:
$ less /etc/profile
…… . .
USER="`id -un`"
/etc/profile
The same navigation keys listed in Table 3-1 are also helpful when viewing a large file with less.
Using the head and tail Commands
head displays the first few lines of a text file. By default, it shows the first ten lines. See the example below:
$ head /etc/profile
# /etc/profile
# System wide environment and startup programs, for login setup
# Functions and aliases go in /etc/bashrc
# It's NOT a good idea to change this file unless you know what you
# are doing. It's much better to create a custom.sh shell script in
# /etc/profile.d/ to make custom changes to your environment, as this
# will prevent the need for merging in future updates.
There are three empty lines in the above output as well. You can specify a number with the command as an argument and it will show you that many lines only. For example, to view the first three lines from /etc/profile:
$ head –3 /etc/profile
# /etc/profile
# System wide environment and startup programs, for login setup
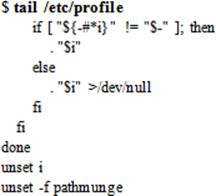
tail, on the other hand, displays the last ten lines of a file by default unless a number is supplied to alter its behavior. The following example shows the last ten lines from /etc/profile:
And the following example shows only the last three lines from the same file:
$ tail –3 /etc/profile
done
unset i
unset -f pathmunge
The tail command proves to be very useful when you wish to view a log file while it is being updated. The –f option enables this function. The following example shows how to view the system log file /var/log/messages in real time:
# tail –f /var/log/messages
Copying Files and Directories
The copy operation duplicates a file or directory. There is a single command called cp that is used for this purpose.
Copying Files
The cp command copies one or more files to either the current directory or another. If you want to duplicate a file in the same directory, you must give a different name to the target file. If you want to copy a file to a different directory, you can use the same file name or different. Consider the following examples.
To copy file1 as newfile1 in the same directory:
$ cp file1 newfile1
To copy file1 by the same name to another existing directory called scripts.dir1:
$ cp file1 scripts.dir1
By default, the copy operation overwrites the destination (if it exists) without giving a warning. Use the –i option to instruct the cp command to prompt for confirmation before overwriting:
$ cp –i file1 scripts.dir1
cp: overwrite `scripts.dir1/file1'?
![]() By default, you do not need to specify the –i option for yes/no confirmation if you are attempting to copy a file to overwrite the destination file as root. There is a pre-defined alias “alias cp=’cp –i’” in the root user’s ∼/.bashrc file that takes care of that.
By default, you do not need to specify the –i option for yes/no confirmation if you are attempting to copy a file to overwrite the destination file as root. There is a pre-defined alias “alias cp=’cp –i’” in the root user’s ∼/.bashrc file that takes care of that.
Copying Directories
The cp command with the –r (recursive) option copies an entire directory tree to another location. In the following example, scripts.dir1 is copied to scripts.dir2 and then the directory contents of scripts.dir2 is displayed for validation:
$ cp –r scripts.dir1 scripts.dir2
$ ll scripts.dir2
drwxrwxr-x. 2 user1 user1 18 Nov 26 11:27 scripts.dir1
You may want to use the –i option for overwrite confirmation.
Moving and Renaming Files and Directories
A file or directory can be moved within the same file system or to another. Within the file system move, a corresponding entry is added to the target directory and the source entry is removed. In this case, the actual data remains intact. On the other hand, a move to a different file system physically moves the file or directory contents to the new location.
A rename simply changes the name of a file or directory; data is not touched.
Moving and Renaming Files
The mv command is used to move or rename files. The –i option can be specified for user confirmation if a file by that name already exists. The following example moves file1 to scripts.dir1 and prompts for confirmation:
$ mv –i file1 scripts.dir1
mv overwrite: scripts.dir1/file1? (y/n)
![]() By default, you do not need to specify the –i option for yes/no confirmation if you are attempting to move a file to overwrite the destination file as root. There is a pre-defined alias “alias mv=’mv –i’” in the root user’s ∼/.bashrc file that takes care of that.
By default, you do not need to specify the –i option for yes/no confirmation if you are attempting to move a file to overwrite the destination file as root. There is a pre-defined alias “alias mv=’mv –i’” in the root user’s ∼/.bashrc file that takes care of that.
To rename newfile as newfile1:
$ mv newfile newfile1
You can use the –i option with mv, if needed.
Moving and Renaming Directories
To move a directory along with its contents to somewhere else or simply change the name of the directory, use the mv command. For example, to move scripts.dir1 into scripts.dir2 (scripts.dir2 must exist, otherwise it will simply rename it), issue the following:
$ mv scripts.dir1 scripts.dir2
To rename scripts.dir2 as scripts.dir20:
$ mv scripts.dir2 scripts.dir20
Removing Files and Directories
The remove operation deletes a file entry from the directory structure and marks its data space as free. For a directory, it deletes corresponding entries from the file system structure.
Removing Files
You can remove a file using the rm command, which deletes one or more specified files at once. The following example deletes newfile:
$ rm newfile
The –i option can be used to prevent accidental removals. The option instructs the command to prompt for confirmation before proceeding with the removal. See the following example:
$ rm –i newfile
rm: remove regular empty file ‘newfile’?
![]() By default, you do not need to specify the –i option for yes/no confirmation if you are attempting to remove a file as root. There is a pre-defined alias “alias rm=’rm –i’” in the root user’s ∼/.bashrc file that takes care of that.
By default, you do not need to specify the –i option for yes/no confirmation if you are attempting to remove a file as root. There is a pre-defined alias “alias rm=’rm –i’” in the root user’s ∼/.bashrc file that takes care of that.
Removing Directories
There are two commands available to remove directories, which are demonstrated in the following examples.
Use the rmdir command to remove an empty directory:
$ rmdir scripts.dir20
Use the rm command with the –r switch to remove a non-empty directory:
$ rm –r scripts.dir10
You can provide the –i option with rm to instruct the command to prompt for confirmation for each file being deleted.
File and Directory Control Attributes
There are certain attributes that may be set on a file or directory in order to control what can or cannot be done to it. For example, you can enable attributes on a file or directory so that no users, including root, can delete, modify, rename, or compress it. These attributes can be set on files and directories located in an ext3, ext4, or xfs file system.
Table 3-2 lists common control attributes.
|
Attribute |
Effect on File or Directory |
|
a (append) |
File can only be appended. |
|
A |
Prevents updating the access time. |
|
c (compressed) |
File is automatically compressed on the disk. |
|
D |
Changes on a directory are written synchronously to the disk. |
|
e (extent format) |
File uses extents for mapping the blocks on disk. |
|
i (immutable) |
File cannot be changed, renamed, or deleted. |
|
S (synchronous) |
Changes in a file are written synchronously to the disk. |
Table 3-2 File and Directory Control Attributes
There are two commands—lsattr and chattr—that are used for attribute management. The first command displays the attributes and the second sets the specified attributes. The following examples demonstrate the usage of these commands with the assumption that you are in the /root directory andfile1 exists.
To list current attributes for file1:
# lsattr file1
---------------- file1
The output indicates the absence of control attributes on the file. To allow only append operation on this file, use the chattr command:
# chattr +a file1
# lsattr file1
-----a---------- file1
Now, try copying the contents of /etc/fstab file to it:
# cat /etc/fstab > file1
-bash: file1: Operation not permitted
However, if you attempt an append operation, it will work:
# cat /etc/fstab >> file1
Now, add the immutable flag to this file to prevent it from being deleted or modified:
# chattr +i file1
# lsattr file1
----ia---------- file1
If you try to delete it now, this is what you will get:
# rm file1
rm: remove regular file `file1'? y
rm: cannot remove ‘file1’: Operation not permitted
To unset both attributes:
# chattr –ia file1
Finding Files
A typical running RHEL system has a few hundred thousand files distributed across various file systems. Sometimes it is imperative to look for one or more files based on certain criteria. One example would be to find all files owned by employees who left the company over a year ago. Another example would be to search for all the files that have been modified in the past 20 days by a specific user. For such situations RHEL offers a command called find. You supply your search criteria and this command gets you the result on the screen or redirect to a file. You can also instruct this utility to execute a command on the files as they are found. This command is expounded in the following sub-section.
Using the find Command
The find command recursively searches the directory tree, finds files that match the specified criteria, and optionally performs an action on the files as they are found. This powerful tool can be tailored to look for files in a number of ways. The search criteria may include tracking for files by name, ownership, owning group, permissions, inode number, last access or modification time, size, and file type. Figure 3-2 shows the command syntax.
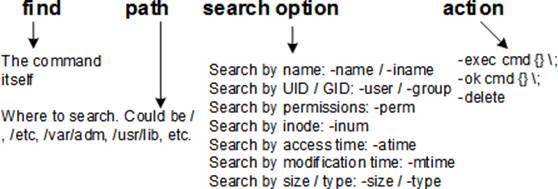
Figure 3-2 Find Command Syntax
With the find command, files that match the specified criteria are located and the full path to each file is displayed on the screen by default. Let’s look at a few examples.
To search for a file called newfile by its name in user1’s home directory (assuming newfile exists):
$ cd
$ find . –name newfile –print
![]() –print is optional. The find command, by default, displays the results on the screen. You do not have to specify this option.
–print is optional. The find command, by default, displays the results on the screen. You do not have to specify this option.
To search for files and directories in /dev that begin with vg00 followed by any characters. The–iname option directs the command to perform a case-insensitive search.
# find /dev –iname vg00*
/dev/vg00
/dev/mapper/vg00-home
/dev/mapper/vg00-root
/dev/mapper/vg00-swap
To find files smaller than 1MB in size in root’s home directory:
# find ∼ –size –1M
/root/.cache/abrt/applet_dirlist
/root/.local/share/gnome-settings-daemon/input-sources-converted
/root/.local/share/folks/relationships.ini
/root/.local/share/tracker/data/.meta.isrunning
…… . .
![]() The tilde ∼ character represents a user’s home directory.
The tilde ∼ character represents a user’s home directory.
To find files larger than 40MB in size in /usr directory:
# find /usr –size +40M
/usr/lib/locale/locale-archive
/usr/lib/jvm/java-1.7.0-openjdk-1.7.0.51-2.4.5.5.el7.x86_64/jre/lib/rt.jar
/usr/lib64/firefox/libxul.so
/usr/share/icons/gnome/icon-theme.cache
To find files in the entire root file system with ownership set to user1 and group membership set to any group other than user1:
# find / –user user1 –not –group user1
/var/spool/mail/user1
To find files in the /etc directory that were modified more than 2000 days ago:
# find /etc –mtime +2000
/etc/xdg/menus/documentation.menu
/etc/xdg/menus/server-settings.menu
/etc/xdg/menus/settings.menu
/etc/xdg/menus/start-here.menu
To find files in the /var directory that were modified exactly 12 days ago:
# find /var –mtime 12
/var/log/sa/sa14
/var/log/sa/sar14
To search for character device files in the /dev directory with permissions set to 666:
# find /dev –type c –perm 666
/dev/kvm
/dev/net/tun
/dev/fuse
/dev/ptmx
/dev/tty
/dev/urandom
/dev/random
/dev/full
/dev/zero
/dev/null
To search for character device files in the /dev directory that are world writeable:
# find /dev –type c –perm –222
/dev/kvm
/dev/net/tun
/dev/fuse
/dev/ptmx
/dev/tty
/dev/urandom
/dev/random
/dev/full
/dev/zero
/dev/null
To search for core files in the entire directory tree and delete them as they are found without prompting for confirmation:
# find / –name core –exec rm {} \;
![]() The pattern {} \; is part of the syntax and must be defined that way.
The pattern {} \; is part of the syntax and must be defined that way.
There are numerous other options available with the find command. Refer to the command’s man pages and try some of them out.
Linking Files and Directories
Each file within a file system has several attributes assigned to it at the time of its creation. These attributes are collectively referred to as the file’s metadata, and they change when the file is accessed or modified. A file’s metadata includes several pieces of information, such as the file’s type, size, permissions, owner’s name, owner’s group name, last access/modification time, ACL settings, link count, number of allocated blocks, and pointers to the location in the file system where the file data is actually stored. This metadata information takes 128-byte space in the file system for each file, and this tiny storage space is referred to- as the file’s inode (index node). The inode is assigned a unique numeric identifier that is used by the kernel for accessing, tracking, and managing the file. The inode does not store the file’s name in its metadata; the file name and corresponding inode number mapping is maintained in the directory’s metadata.
Linking files or directories creates additional instances for them, but all point to the same physical data location in the directory tree. Linked files may or may not have identical inode numbers and metadata depending on how they are linked.
Linux has two ways of creating file and directory links, and they are referred to as soft and hard links.
Soft Link
A soft link (a.k.a. a symbolic link or a symlink) makes it possible to associate one file with another. It is similar to a shortcut in MS Windows where the actual file is resident somewhere in the directory structure but we may have multiple shortcuts (or pointers) with different names pointing to it. This allows accessing the file via the actual file name as well as any of the shortcuts. Each soft link has a unique inode number that stores the path to the file it is linked with.
A soft link can cross file system boundaries and can be used to link directories.
To create a soft link for newfile as newfile10 in the same directory, use the ln command with the –s option:
$ cd
$ ln –s newfile newfile10
where:
newfile is an existing file (create it if it does not exist)
newfile10 is soft-linked to newfile
After you have created the link, issue ll with –i and notice the letter l as the first character in the second column of the output. Also notice the arrow pointing from the linked file to the original file. Both of these signs indicate that newfile10 is merely a pointer to newfile. The –i option displays associated inode numbers in the first column.

If you remove the original file (newfile in this case), the link newfile10 will stay but points to something that does not exist.
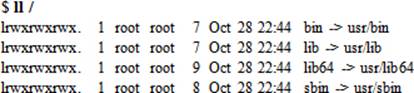
RHEL7 has four soft-linked directories in the / file system. You can list them with the ll command:
The syntax for creating soft-linked directories is exactly the same as that for files.
Hard Link
A hard link associates one or more files with a single inode number, making all files indistinguishable from one another. This implies that the files will have identical permissions, ownership, time stamp, and file contents. Changes made to any of the files will be reflected in the other linked files as well. All hard-linked files share an identical data location.
A hard link cannot cross file system boundaries, and cannot be used to link directories because of restrictions within the operating system designed to avoid potential issues with some commands.
The following example uses the ln command and creates a hard link for newfile2 located under /home/user1 to newfile20 in the same directory (create newfile20 as it currently does not exist):
$ cd
$ ln newfile2 newfile20
After creating the link, run ll with the –i option:

Look at the first and third columns. The first column indicates the common inode number and the third column tells you the number of hard links that each file has. newfile2 points to newfile20, and vice versa. If you remove the original file (newfile2 in this example), you will still have access to the data through the linked file newfile20.
File and Directory Permissions
As you know, Linux is a multi-user operating system that allows hundreds of users the ability to log in and work concurrently. Also, the operating system has hundreds of thousands of files and directories that it must maintain securely in order to warrant a successful system and application operation from a security standpoint. Given these features, it is imperative for us as system administrators to regulate user access to files and directories, and grant them appropriate rights to carry out their designated functions without jeopardizing system security. This control of permissions on files and directories for users may also be referred to as user access rights.
Determining Access Permissions
Access permissions on files and directories allow administrative control over which users (permission classes) can access them and to what level (permission types). File and directory permissions discussed in this section are referred to as standard ugo/rwx permissions.
Permission Classes
Users are categorized into three unique classes for maintaining file security through access rights. These classes are described in Table 3-3.
|
Permission Class |
Description |
|
User (u) |
The owner of file or directory. Usually, the file creator is its owner. |
|
Group (g) |
A set of users that need identical access on files and directories that they share. Group information is maintained in the /etc/group file and users are assigned to groups according to shared file access needs. |
|
Others (o) |
All other users on the system except for the owner and group members. Also called public. |
Table 3-3 Permission Classes
Permission Types
Permissions control what actions can be performed on a file or directory and by whom. There are three types of permissions, as defined in Table 3-4.
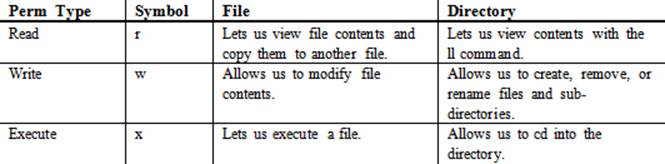
Table 3-4 Permission Types
If a read, write, or execute permission is not desired, the – sign is used to represent its absence.
Permission Modes
A permission mode is used to add, revoke, or assign a permission type to a permission class. Table 3-5 shows various permission modes.
|
Permission Mode |
Description |
|
Add (+) |
Allocates permissions. |
|
Revoke (-) |
Removes permissions. |
|
Assign (=) |
Allocates permissions to owner, group members, and public at once. |
Table 3-5 Permission Modes
We can view permission settings on files and directories using the ll command. This information is enclosed in the first column of the command output. The first character indicates the type of file: d for directory, – for regular file, l for symbolic link, c for character device file, b for block device file, p for named pipe, s for socket, and so on. The next nine characters—three groups of three characters—show the read (r), write (w), and execute (x) permissions for the three user classes: user (owner), group, and others (public), respectively. The hyphen character represents a permission denial for that level.
Figure 3-3 illustrates the ll command output and its various components.
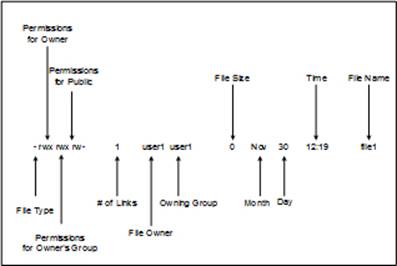
Figure 3-3 Permission Settings
The above figure depicts the file owner (user1) in the third column and the owning group (user1) in the fourth column.
Modifying Access Permissions
Linux provides the chmod command to modify access rights on files and directories. It works identically for both files and directories. chmod can be used by root or the file owner, and can modify permissions specified in one of two ways: symbolic or octal. Symbolic notation uses a combination of letters and symbols to add, revoke, or assign permissions to each class of users. The octal notation (a.k.a. the absolute notation), on the other hand, uses a three-digit numbering system ranging from 0 to 7 to express permissions for the three user classes. Octal values are given in Table 3-6.
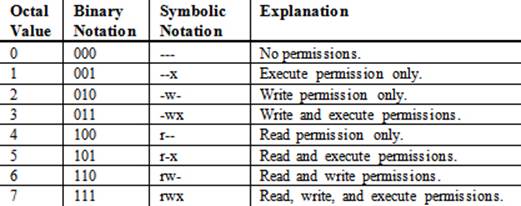
Table 3-6 Octal Permission Notation
From Table 3-6, it is obvious that each 1 corresponds to an r, w, or x, and each 0 corresponds to the – character for no permission at that level. Figure 3-4 shows weights associated with each digit position in the 3-digit octal numbering model.

Figure 3-4 Permission Weights
The right-most position has weight 1, the middle position carries weight 2, and the left-most position has 4. If we assign a permission of 6, for example, it would correspond to the two left-most digit positions. Similarly, a permission of 2 would point to the middle digit position only.
Exercise 3-1: Modify File Permissions Using Symbolic Notation
This exercise should be done on host1.
For this exercise, presume that file1 with read permission for the owner (user1), owning group (user1), and others, exists, and that you are logged in as user1.
-r--r--r--. 1 user1 user1 0 Nov 30 12:30 file1
In this exercise, you will add the execute permission for the owner and the write permission for the group and public. You will then revoke the write permission from public and assign read, write, and execute permissions to the three user categories at the same time. The chmod command accepts the –v option to display what it has changed.
1. Add the execute permission for the owner and show the output of ll to verify:
$ chmod u+x file1 –v
mode of ‘file1’ changed from 0444 (r--r--r--) to 0544 (r-xr--r--)
$ ll file1
-r-xr--r--. 1 user1 user1 0 Nov 30 12:30 file1
2. Add the write permission for group members and public and verify:
$ chmod go+w file1
$ ll file1
-r-xrw-rw-. 1 user1 user1 0 Nov 30 12:30 file1
3. Remove the write permission for the public and confirm:
$ chmod o-w file1
$ ll file1
-r-xrw-r--. 1 user1 user1 0 Nov 30 12:30 file1
4. Assign read, write, and execute permissions to all three user categories and validate:
$ chmod a=rwx file1
$ ll file1
-rwxrwxrwx. 1 user1 user1 0 Nov 30 12:30 file1
Exercise 3-2: Modify File Permissions Using Octal Notation
This exercise should be done on host1.
For this exercise, assume that file2 with permissions 444 and ownership belongs to user1 exists, and that you are logged in as user1.
-r--r--r--. 1 user1 user1 0 Dec 1 08:27 file2
In this exercise, you will add the execute permission for the owner and the write permission for the group and public. You will then revoke the write permission from the public and assign read, write, and execute permissions to the three user categories at the same time.
1. Add the execute permission for the file owner and verify with the ll command:
$ chmod 544 file2
$ ll file2
-r-xr--r--. 1 user1 user1 0 Dec 1 08:27 file2
2. Add the write permission for the owning group and others, and verify:
$ chmod 766 file2
$ ll file2
-rwxrw-rw-. 1 user1 user1 0 Dec 1 08:27 file2
3. Remove the write permission for the public and verify:
$ chmod 764 file2
$ ll file2
-rwxrw-r--. 1 user1 user1 0 Dec 1 08:27 file2
4. Assign read, write, and execute permissions to all three user categories and confirm:
$ chmod 777 file2
$ ll file2
-rwxrwxrwx. 1 user1 user1 0 Dec 1 08:27 file2
Default Permissions
Linux assigns default permissions to a file or directory at the time of its creation. Default permissions are calculated based on the umask (user mask) permission value subtracted from a preset value called initial permissions.
The umask is a three-digit value that refers to read/write/execute permissions for owner, group, and public. Its purpose is to set default permissions on new files and directories created without touching the existing files and directories. In RHEL, the default umask value is set to 0022 for the root and other system users and 0002 for all regular users with bash shell assigned. Note that the left-most 0 has no significance. Run the umask command without any options and it will display the current umask value:
$ umask
0002
Run the command again but with the –S option to display the umask in symbolic notation:
$ umask –S
u=rwx,g=rwx,o=rx
The pre-defined initial permission values are 666 (rw-rw-rw-) for files and 777 (rwxrwxrwx) for directories. Even if the umask is set to 000, the new files will always get a maximum of 666 permissions, and we use the chmod command to add executable bits explicitly if desired.
Calculating Default Permissions
Consider the following example to calculate the default permission values on files for regular users:
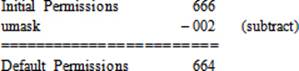
This indicates that every new file will have read and write permissions assigned to the owner and the owning group, and a read-only permission to others.
To calculate default permission values on directories for regular users:
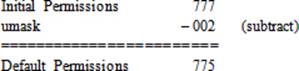
This indicates that every new directory will have read, write, and execute permissions assigned to the owner and the owning group, and read and execute permissions to everyone else.
Now, if you wish to have different default permissions set for new files and directories, you need to modify the umask. You first need to determine the desired default values. For instance, if you want all your new files and directories to get 640 and 750 permissions, respectively, you can set the value to 027 as follows:
$ umask 027
The new value becomes effective right away, and it will only be applied to files and directories created thereafter. The existing files and directories will remain intact. Now create file10 and dir10 as user1 under /home/user1 to test the effect of the new umask.
$ touch file10
$ ll file10
-rw-r-----. 1 user1 user1 0 Dec 1 08:48 file10
$ mkdir dir10
$ ll –d dir10
drwxr-x---. 2 user1 user1 6 Dec 1 08:48 dir10
The above examples show that the new file and directory were created with different permissions. The file got (666 – 027 = 640) and the directory (777 – 027 = 750) permissions.
The umask value set at the command line will be lost as soon as you log off. In order to retain the new setting, place it in an appropriate shell startup files discussed in Chapter 08 “Managing Users and Groups”.
File Ownership and Group Membership
In Linux, every file and directory has an owner. By default, the creator assumes ownership but this may be altered and allocated to a different user if required.
Similarly, every user is a member of one or more groups. A group is a collection of users with common requirements. By default, the owner’s group is assigned to a file or directory.
The following ll command output shows the owner and the owning group for file file10:
$ ll file10
-rw-r-----. 1 user1 user1 0 Dec 1 08:48 file10
The output indicates that the owner of file10 is user1 who belongs to group user1. If you wish to view the corresponding UID and GID instead, you can specify the –n option with ll:
$ ll –n file10
-rw-r-----. 1 1000 1000 0 Dec 1 08:48 file10
Linux provides the chown and chgrp commands that you can use to alter ownership and owning group for files and directories; however, you must be root to make these modifications.
Exercise 3-3: Modify File Ownership and Group Membership
This exercise should be done on host1.
For this exercise, presume that file10 and dir10 with ownership and owning group set to user1 exist, and that you are logged in as root.
![]()
In this exercise, you will first create user accounts user100 and user200, and then change the ownership for file10 to user100 and the owning group to user100. You will apply both ownership and owning group on the file to user200 at the same time. Finally, you will change both ownership and owning group on the directory to user200 recursively.
1. Create user accounts user100 and user200:
# useradd user100
# useradd user200
2. Change into the home directory of user100 and modify the ownership on file10:
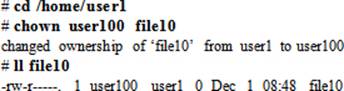
3. Change the owning group to user100:

4. Assign both ownership and owning group to user200 at the same time:

5. Change both ownership and group membership to user200 recursively on dir10:

Use the –R option with ll to view file and directory information under dir10; however, it will not show anything as the directory is currently empty.
Special Permissions
Linux offers three types of special permission bits that may be set on executable files or directories to allow them to respond differently for certain operations. These permission bits are:
· setuid (set user identifier) bit
· setgid (set group identifier) bit
· sticky bit
The first two bits may be defined on executable files to provide non-owners and non-group members the ability to run executables with the privileges of the owner or the owning group, respectively. The setgid bit may also be set on shared directories for group collaboration. The last bit may be set on public directories for inhibiting file deletion by non-owners.
The use of the special bits should be regulated and monitored appropriately to avoid potential security issues to the system and applications.
The setuid Bit on Executable Files
The setuid flag is set on executable files at the file owner level. With this bit set, the file is executed by other regular users with the same privileges as that of the file owner. A common example is that of su command that is owned by the root user. This command has the setuid bit enabled on it by default. See the highlighted s in the owner’s permission class below:
![]()
When a normal user executes this command, it will run as if root (the owner) is running it and, therefore, the user is able to run it successfully and gets the desired result.
![]() The su (switch user) command allows a user to switch to some other user account provided the switching user knows the password of the user they are trying to switch to.
The su (switch user) command allows a user to switch to some other user account provided the switching user knows the password of the user they are trying to switch to.
Now, remove the setuid bit from su and replace it with the underlying execute attribute. You must be root in order to make this change. List the file after this modification for verification.
![]()
The file is still executable by non-owners as indicated by the execute flag; however, it will prevent regular non-owning users from switching accounts as they have lost that special privilege. Here is what will happen when user1 tries to su into the root account with a valid password:
$ su –
Password:
su: Authentication failure
user1 gets an “authentication failure” message even though they entered the correct login credentials.
To reset the setuid bit on su (or on any other file), use the chmod command:
# chmod 4755 /usrbin/su
# ll /usr/bin/su
-rwsr-xr-x. 1 root root 32032 Mar 28 2014 /usr/bin/su
When digit 4 is used with the chmod command in this manner, it enables setuid on the specified file. Alternatively, you can use the symbolic notation as follows:
# chmod u+s /usr/bin/su
You can search for all files in the system with this special bit defined using the find command:
# find / –perm –4000
/usr/bin/fusermount
/usr/bin/umount
/usr/bin/mount
/usr/bin/chage
/usr/bin/gpasswd
/usr/bin/newgrp
/usr/bin/chfn
/usr/bin/chsh
/usr/bin/su
/usr/bin/pkexec
/usr/bin/crontab
…… . .
The setgid Bit on Executable Files
The setgid attribute is set on executable files at the group level. With this bit set, the file is executed by non-owners with the exact same privileges that the group members have. For instance, the wall command is owned by root with group membership set to tty and setgid enabled. See the highlighted s in the group’s permission class below:
# ll /usr/bin/wall
-r-xr-sr-x. 1 root tty 15344 Jan 27 2014 /usr/bin/wall
The wall command allows users to broadcast a message to all logged-in users and print it on their terminal screens. By default, normal users are allowed this privilege because of the presence of the setgid flag on the file. To test, run the command and supply a message as an argument:
$ wall Hello, this is to test the setgid flag on the wall command
Broadcast message from user1@host1.example.com (pts/0) (Mon Dec 1 11:26:24 2014):
Hello, this is to test the setgid flag on the wall command
Now, remove the bit from /usr/bin/wall and replace it with the underlying execute flag. You must be root in order to make this change. List the file after this modification for confirmation.
# chmod g-s /usr/bin/wall
-r-xr-xr-x. 1 root tty 15344 Jan 27 2014 /usr/bin/wall
The file is still executable by non-owners; however, it will prevent regular non-owning users from sending out messages as they have lost that special privilege.
Now, put this bit back on /usr/bin/wall and confirm:
# chmod 2555 /usr/bin/wall
# ll /usr/bin/wall
-r-xr-sr-x. 1 root tty 15344 Jan 27 2014 /usr/bin/wall
When digit 2 is used with the chmod command in this manner, it sets the setgid attribute on the specified file. Alternatively, you can use the symbolic notation as follows:
# chmod g+s /usr/bin/wall
You can search for all files in the system with this special bit defined using the find command:
# find / –perm –2000
/run/log/journal
/run/log/journal/03858cff4a7b482e8b70a7cea28585b5
/usr/bin/wall
/usr/bin/write
/usr/bin/ssh-agent
/usr/bin/locate
/usr/sbin/netreport
…… . .
The setgid Bit on Shared Directories
The setgid bit can also be set on group-shared directories to allow files and sub-directories created in that directory to automatically inherit the directory’s owning group. This saves group members sharing the directory contents from changing the group on every new file and sub-directory that they add to that directory. The standard behavior for new files and sub-directories is to always receive the creator’s group.
Exercise 3-4: Use setgid for Group Collaboration
This exercise should be done on host1.
In this exercise, you will create a group called sdatagrp with GID 9999, and add user100 and user200 to this group as members with shared data needs. You will create a directory called /sdata with ownership and owning group belonging to root and sdatagrp, respectively, then set the setgid bit on/sdata and test. For details on managing users and groups, consult Chapter 08 “Managing Users and Groups”.
1. Add group sdatagrp with GID 9999 with the groupadd command:
# groupadd –g 9999 sdatagrp
2. Add existing users user100 and user200 as members to sdatagrp using the usermod command:
# usermod –G sdatagrp user100
# usermod –G sdatagrp user200
3. Create the /sdata directory:
# mkdir /sdata
4. Set ownership and owning group on /sdata to root and sdatagrp, respectively, using the chown command:
# chown root:sdatagrp /sdata –v
changed ownership of ‘/sdata’ from root:root to root:sdatagrp
5. Set the setgid bit on /sdata using the chmod command:
# chmod g+s /sdata –v
mode of ‘/sdata’ changed from 0755 (rwxr-xr-x) to 2755 (rwxr-sr-x
6. Verify the attributes set in the above steps using the ll command on /sdata:
# ll –d /sdata
drwxrws---. 2 root sdatagrp 18 Dec 1 14:06 /sdata
7. Switch or log in as user100 and change to the /sdata directory:
# su – user100 ; cd /sdata
8. Create a file and list it to check the owning group on it:
# touch file1
# ls –l file1
-rw-rw-r--. 1 user100 sdatagrp 0 Dec 1 14:06 file1
Both members of the group can now create files in /sdata and modify them. They will own the files, but the owning group will be sdatagrp to which they both belong.
The Sticky Bit on Public Directories
The sticky bit is set on public writable directories (or other directories with rw permissions for everyone) to protect files and sub-directories owned by regular users from being deleted or moved by other regular users. This attribute is set on /tmp and /var/tmp directories by default as depicted below:

Notice the bolded t in other’s permissions, indicating the presence of this attribute on the two directories.
You can use the chmod command to set and unset the sticky bit. Add this flag to the /var directory and then revoke it. Use the –v option for verbosity. The following lists the /var directory, sets the bit on it, and then lists the directory again to confirm:
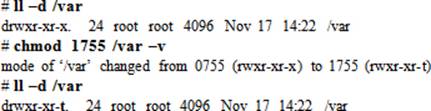
When digit 1 is used with the chmod command in this manner, it sets the sticky bit on the specified directory. Alternatively, you can use the symbolic notation to do exactly the same:
# chmod o+t /var
To unset, use either of the following:
# chmod 755 /var
mode of ‘/var’ changed from 1755 (rwxr-xr-t) to 0755 (rwxr-xr-x)
# chmod o-t /var
You can search for all files in the system with this special bit defined using the find command:
# find / –type d –perm –1000
/dev/mqueue
/dev/shm
/tmp
/tmp/.X11-unix
/tmp/.ICE-unix
/tmp/.XIM-unix
/tmp/.font-unix
/tmp/.Test-unix
/tmp/systemd-private-vPX96e/tmp
…… . .
Chapter Summary
This chapter presented an overview of RHEL file system structure and significant higher-level sub-directories that consisted of static and variable files, and were grouped logically into lower level sub-directories. We looked at how files and sub-directories were accessed using a path relative to either the top-most directory of the file system structure or our current location in the tree.
We learned about different types of files, and looked at several file and directory manipulation tools for creating, listing, displaying, copying, moving, renaming, and removing them. We reviewed attributes set on files and directories, and used appropriate tools to set and unset them.
Searching for files within the directory structure using specified criteria provided us with an understanding and explanation of the tool required to perform such tasks. We discussed soft and hard links and their use.
We studied topics related to file and directory permissions. We covered permission classes, types, and modes, and saw how to modify permissions using symbolic and octal notations. We looked at default permissions, how to set them up for new files and directories, and the role of the umask value in determining the new default permissions.
The next topic explained how to modify ownership and owning group for files and directories.
Finally, we talked about special permission bits for executable files and directories to gain privileged access and prevent files and directories from being deleted by non-owners. We also looked at how to set up a shared directory for group collaboration.
Chapter Review Questions
1. Which command can be used to determine a file type?
2. The output generated by the umask command shows the current user mask in four digits. What is the significance of the left-most digit?
3. Default permissions are calculated by subtracting the initial permissions from the umask value. True or False?
4. The chgrp command may be used to modify both ownership and group membership on a file. True or False?
5. Name the permission classes, types, and modes.
6. The default umask for a regular user in bash shell is 0027. True or False?
7. What digit represents the setuid bit in the chmod command?
8. What would the command find /var -perm -1000 –type d do?
9. What would the command chmod g-s file1 do?
10. Sticky bit is recommended for every system directory. True or False?
11. The setgid bit enables group members to run a command at a higher priority. True or False?
12. The chown command may be used to modify both ownership and group membership on a file. True or False?
13. What is the equivalent symbolic value for permissions 751?
14. A file must have the .exe extension to be able to run. True or False?
15. /boot is a memory-based file system. True or False?
16. Name the two types of paths.
17. What are the two indications in the ll command output that tells us if the file is a symlink?
18. The rmdir command can be used to remove an entire directory structure. True or False?
19. The –A option with the chattr command makes a file immutable. True or False?
20. The ll command produces 9 columns in the output by default. True or False?
21. Soft linked directories cannot cross file system boundaries but hard linked directories can. True or False?
22. What permissions would the owner of the file get if the chmod command is executed with 555?
23. What would the find / -name core –ok rm {} \; command do?
24. Which special permission bit is set on a directory for team sharing?
Answers to Chapter Review Questions
1. The file command can be used to determine a file type.
2. The left-most digit has no significance in the umask value.
3. False. Default permissions are calculated by subtracting the umask value from the initial permission values.
4. False.
5. Permission classes are user, group, and public; permission types are read, write, and execute; and permission modes are add, revoke, and assign.
6. False. The default umask for bash shell users is 0002.
7. The digit 4 represents the setuid bit.
8. It would search the /var directory for directories with sticky bit set.
9. It would remove the setgid bit from file1.
10. False.
11. False.
12. True.
13. The equivalent for octal 751 is rwxr-x--x.
14. False.
15. False. /boot is a disk-based file system.
16. The two types of pathnames are absolute and relative.
17. A symlink file line entry in the ll command output begins with the letter l and has an arrow pointing to the source file.
18. False. The rmdir is used to remove empty directories.
19. False. The –i option is used with the chattr command to make a file immutable.
20. True.
21. False. Soft linked directories can and hard linked directories cannot cross file system boundaries.
22. The owner will get read and execute permissions.
23. The find command provided will display all files by the name core in the entire directory hierarchy and ask for removal confirmation as it finds them.
24. The setgid bit is set for team sharing.
DIY Challenge Labs
The following labs are useful to strengthen most of the concepts and topics learned in this chapter. It is expected that you perform these labs without any additional help. A step-by-step guide is not provided, as the implementation of these labs requires the knowledge that has been presented in this chapter. Use defaults or your own thinking for missing information.
Lab 3-1: Find Files and Determine File Types
Log on to host1 as root and execute the find command to search for all files in the entire directory structure that have been modified in the past 10 days and display their type. Use the find command again and search for named pipe and socket files. Check the type of some of those files and directories with the file command.
Lab 3-2: File and Directory Operations
Log on to host1 as user1 and create one file and one directory in the home directory. List the file and directory and observe the permissions, ownership, and owning group. Try to move the file and directory to the /var/log directory and observe the output. Try again to move them to the /tmpdirectory. Duplicate the file with the cp command and then rename the duplicated file using any name. Finally, remove the file and directory created for this lab.
Lab 3-3: Find Files Using Different Criteria
Log on to host1 as root and execute the find command to search for regular files in the entire directory structure that were accessed more than 10 days ago, are not bigger than 5MB in size, and are owned by the user root.
Lab 3-4: Manipulate File Permissions
Log on to host1 as user1 and create file file11 and directory dir11 in the user’s home directory. Make a note of the permissions on them. Run the umask command to determine the current umask. Change the umask value to 0035 using the symbolic notation and then create file22 and directory dir22in the user’s home directory. Observe the permissions on file22 and dir22 and compare them with the permissions on file11 and dir11. Using the chmod command, modify the permissions on file11 to match that on file22. Using the chmod command, modify the permissions on dir22 to match that ondir11. Do not remove file11, file22, dir11, and dir22 yet.
Lab 3-5: Configure Group Collaboration
Log on to host1 as root and create directory /shared_dir1. Create a group called shared_grp and assign user1000 and user2000 to it (create these users if they do not already exist). Set up appropriate ownership, group membership, and permissions on the directory to support group collaboration.
All materials on the site are licensed Creative Commons Attribution-Sharealike 3.0 Unported CC BY-SA 3.0 & GNU Free Documentation License (GFDL)
If you are the copyright holder of any material contained on our site and intend to remove it, please contact our site administrator for approval.
© 2016-2026 All site design rights belong to S.Y.A.