Running Linux, 5th Edition (2009)
Part II. System Administration
Chapter 14. Printing
The paperless society has not yet come to pass, and it now seems more likely that we'll just move from conventional paper to electronic paper. Until that time comes, you'll need to communicate with many people by putting your computer documents on bleached dead trees.
Because many distributions set up printing for you, we start this chapter with an introduction to command-line utilities you can use for printing and printer control. Then we'll explain how to configure printing on both local and network printers, focusing on the simple and powerful Common Unix Printing System (CUPS ).
Printing
Linux provides various user-level printing options. Traditionally, tools such as the text-mode lpr have been used to print files from the command line. Understanding how to use these and other printing and document formatting commands will enable you to print documents quickly and efficiently. A quick rundown of the enscript and nenscript utilities will help you create good-looking printouts even from basic text documents. GUI programs present their own user interfaces that you can use to control printing options from such programs. Finally, we describe some of the mechanics behind the printing system. This will help you to manage your printing sessions by giving you an understanding of how it all works, enabling you to use the system to its best effect.
Basic Linux Printing Commands
The lpr command prints a document in Linux. You might not always invoke this command directly—you may just press a Print button on some glitzy drag-and-drop graphical interface—but ultimately, printing is handled by lpr and the other print management utilities we describe here.
If you want to print a program listing, you might enter the following:
$ lpr myprogram.c
Input is also often piped to lpr from another command, as described later. The lpr program starts the printing process by storing the data temporarily to a directory called a print spool . Other parts of the print management system, which we show you how to set up in "Managing Print Services" later in this chapter remove files from the print queue in the correct order, process the files for printing, and control the flow of data to the printer.
There is at least one print queue for each printer on the system, but each system has one print queue that's marked as the default. (In the old LPD printing systems, this queue was traditionally called lp, but this naming convention is less common with computers that run CUPS.) If you need to specify a queue of a different name, just include a -P option, as in lpr -Pepson myprogram.c. If you forget the name of a queue, you can look at queue names in the /etc/printcap file, access the CUPS web configuration tool (as described in "Managing Print Services"), or type lpstat -a to see the status of all the queues.
Tip
A printer that can be used in different modes of operation, such as for printing faxes as well as letters, may have a separate print queue for each purpose. You can also create multiple queues for a single printer in order to use different resolutions, paper sizes, or other features.
As a user, you do not see whether a printer is connected directly to your computer or somewhere else on the network; all you see and need to know is the name of the printer queue. If you use a printer queue that points to a printer on another machine, the file to print will first be spooled on your machine, then transmitted to the appropriate queue of the machine connected to the printer, and finally be printed. "Managing Print Services" tells you more about setting up printer queues.
Some programs look to the PRINTER environment variable to determine what queue to use. Thus, if you want to use a particular printer for most of your printing needs, you can set this environment variable. For instance, if you are using the bash shell, you could make epson_360 your personal default queue by putting this command in your .bashrc file:
$ export PRINTER=epson_360
This procedure doesn't work for all programs, though; many ignore the PRINTER environment variable. Some complex programs enable you to set a default queue in some other way, such as in a GUI dialog box. Consult your program's documentation for details. In any event, if you use lprfor printing, directly or indirectly, and can change how lpr is called, you can use the -P option to lpr to set the destination queue. This option overrides the PRINTER environment variable.
Once you know how to print a file, the next problem you might face is finding out what is happening if your file doesn't instantly print as you expect. You can find out the status of files in the print queue by using the lpq command. To find out the status of files sent to your default printer, enter:
$ lpq
epson_360 is ready and printing
Rank Owner Job File(s) Total Size
1st rodsmit 440 (stdin) 2242560 bytes
2nd rodsmit 441 (stdin) 5199872 bytes
3rd lark 442 (stdin) 1226752 bytes
You see that the printer is running, but large jobs are queued ahead of yours (if you are lark). If you just can't wait, you might decide to remove the job from the print queue. You can use the job number of the printing task that lpq reported to remove the printing job:
$ lprm 442
The spooled print file identified as job 442 is discarded. You can narrow the lpq report by asking about a specific print job by task ID (rarely used), by printer, or by user ID. For example, to get a report that identifies spooled files sent to a printer named hp4500, you would enter
$ lpq hp4500
ada is ready and printing
Rank Owner Job File(s) Total Size
active lovelac 788 (stdin) 16713 bytes
1st lark 796 (stdin) 70750 bytes
If you are the root user, you can kill all pending printing tasks by entering the command:
# lprm -
If you are not the root user, issuing that command kills only the printing tasks you own. This restriction also holds true if you specify a printer:
# lprm ada
If you are root, the print queue is emptied. If you are a normal user, only the print files you own are removed from the specified print spool. The lprm utility reports on the tasks it kills.
The root user can kill all the print tasks issued by any user by specifying:
# lprmusername
If you issue lprm with no argument, it deletes the currently active print jobs that you own. This is equivalent to entering:
$ lprmyourusername
If you want to see whether a queue is down, you can use the lpc command:
$ /usr/sbin/lpc status epson_360
See "Managing Print Services" for details. The lpc utility is usually installed in the /sbin or /usr/sbin directory. Alternatively, the CUPS lpstat command performs a task similar to lpc status.
Some Common Command-Line Printing Tasks
Sometimes you want to do more than just send a file that's already been prepared for printing to the printer. For instance, you might want to print a manpage or some other document that's not quite ready for printing. To do so, you can use various Linux utilities, often in pipelines, to do the job. For instance, to get a quick hardcopy printout of the cupsd manual page, enter:
$ man cupsd | col -b | lpr
The man command finds, formats, and outputs the cupsd manual page in an enriched ASCII output that uses backspaces to overstrike and underline characters (in place of italics) for highlighting. The output is piped through col, a Unix text filter, whose -b option strips the backspace instructions embedded in the manpage, which results in simple text strings while maintaining the layout of the formatted manpage. The output of col is piped to lpr, which spools the text in a spool directory.
Suppose you want to print the fully enriched manpage with highlighting and all. You might use a command like this:
$ gunzip -c /usr/share/man/man8/cupsd.8.gz | groff -man -Tps | lpr
The gunzip -c command uncompresses the compressed manpage and passes the results to standard output (and hence to the next command in the pipeline). The groff command applies the man macros to the file specified, creating PostScript output (specified by -Tps). This output is then passed to lpr, which spools it, and CUPS applies the default print-processing instructions for the default print queue.
Another useful tool for printing pure-text files is the pr command, which formats files in a number of ways. For instance, you can create multicolumn output, documents with headers, numbered lines, and more. Consult the pr manpage for details.
Most Linux distributions today use CUPS as the default printing system, but older distributions used the LPRng system or the even older BSD LPD system. (Some distributions ship with two or all three of these systems, but CUPS is usually the default choice.) The BSD LPD and LPRng systems use commands similar to those described here, so even if your distribution uses these older systems, you should be able to use these commands. Some Unix printing systems, such as the SysV printing system, use different commands, such as lp for printing. If you've installed such an unusual (for Linux) printing system, you may need to look at its documentation to learn how it works.
Tip
CUPS was designed as a drop-in replacement for LPD systems such as BSD LPD and LPRng, as well as for SysV-style printing systems. Thus, CUPS implements the basic printing commands, such as lpr and lp, used by both of these systems.
nenscript and enscript
The nenscript utility, now often called enscript, is a flexible filter that provides good formatted output for PostScript printers, even from ASCII text files. It isn't a basic Linux utility, but it is included in most Linux distributions and can be retrieved from the usual Linux FTP sites.
Tip
Although nenscript and enscript create PostScript output, they can still be used if you have a non-PostScript printer. As described later in this chapter, a properly configured Linux print queue automatically converts PostScript to the formats required by non-PostScript printers.
Suppose you are printing out a C program and want line numbering and a printout on green-striped fanfold paper (not the same format you'd want when printing those graphics you downloaded from the Internet on your nifty PostScript printer). You need to have the program processed, and then insert the line numbers in front of the lines. The solution is to process the file through a filter such as the enscript utility. After doing its own processing, enscript passes the file to lpr for spooling and printing to your trusty tractor-feed printer (named here):
$ enscript -C -B -L54 -Pdino -M Letter myprogram.c
The enscript filter numbers each line of the file passed through it when you specify the -C option. (Earlier versions of enscript used -N rather than -C for line numbering.) The -B option suppresses the usual header information from being printed on each page, and the -L54 option specifies formatting at 54 lines per page. The enscript filter just passes the -Pdino option through to lpr, which interprets it and directs the output to dino's print spool for printing. The -M Letter option specifies you want a printout on letter-size paper. (Depending on compile-time options, enscriptmay default to European A4 paper.)
When called on the command line, enscript automatically passes output to lpr unless you specify standard output by supplying the -p option. You don't need to pipe or redirect enscript output to lpr explicitly.
Suppose you are going to print a lot of program listings today. For convenience, you can set an environment variable for enscript to specially process and print your listings each time:
$ export ENSCRIPT=" -C -B -L54 -Pdino -M Letter"
Now, to print your listing correctly, all you need enter is:
$ enscript myprogram.c
enscript optionally sends output to a file, which is often useful for preparing PostScript files on Linux hosts that don't actually have a PostScript printer available. For example, to convert a text file to a PostScript file, formatted for two-column printing on the standard European A4 paper format in 6-point Courier font, you would type:
$ enscript -2 -f Courier6 -M A4 -p document.ps document.txt
The -2 option overrides the one-column default, and the -f Courier6 option overrides the 7-point Courier default for two-column output. (The one-column default is Courier 10; enscript always uses Courier font when converting plain text into PostScript, unless told to do otherwise via -f.) The -M A4 option specifies A4 paper size. (To learn what options are available, type enscript - -list-media.) The -p option specifies that the output should be stored to document.ps, and the filename specified with no option is the input to enscript. If no filename had been specified, enscriptwould have taken standard input as the filename.
As another example, to print the enscript manual page as basic text on a PostScript printer, enter:
$ man
enscript | col -b | enscript
The man command retrieves the manual page and formats it for text display. The col -b command strips the backspace instructions for highlighting and underlining, leaving plain text that is piped to the enscript filter. This turns the plain text into simple PostScript with some "pretty printing" that applies headers, footers, page numbering, and the like. Finally, the file is passed to lpr, which spools the file. CUPS then processes the file in the same way it handles all files, which may involve sending the file directly to a PostScript printer, passing it through Ghostscript, or performing other filtering tasks.
If you specify the -Z option with enscript, it attempts to detect PostScript files passed to it and passes them through unaltered.
Warning
If a PostScript file is passed to enscript and is interpreted as a text file (probably because enscript was not called with the -Z option), enscript will encapsulate it and pass it through to print. This can result in the PostScript code being printed out literally. Even a small PostScript file can use up a lot of paper in this way.
Note that you could specify the default print queue to use either in PRINTER or as a -P argument stored to the ENSCRIPT environment variable. If you set ENSCRIPT to specify a queue to use, that queue will be used every time enscript filters one of your files. We recommend that you setPRINTER rather than -P in ENSCRIPT so that you can change the queue specification and have it filtered appropriately.
Printing Using GUI Tools
Most GUI programs use the standard printing tools, such as lpr, behind the scenes. These programs display friendly print dialog boxes, such as the one shown in Figure 14-1 (for OpenOffice). Typically, you select your printer from the list near the top (called Name in Figure 14-1). You can also set various program-specific options, such as the number of pages to print and the number of copies. When you've set your options, click a button to begin printing, such as the OK button in Figure 14-1.
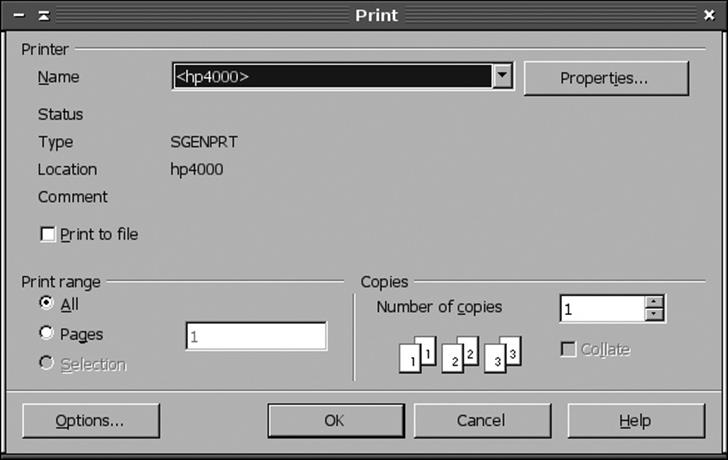
Figure 14-1. GUI programs present dialog boxes that serve as interfaces to more traditional tools
Frequently, there's little you can do to adjust the way a GUI program prints; there are no options that enable you to tell it to use a variant printing command, so you're stuck with whatever options the program provides. Other times, though, the program does present such options. One way to do this that's quite obvious is to present a print dialog box that enables you to enter the print command. For instance, Figure 14-2 shows the xv print dialog box. Rather than select a printer from a drop-down list, you enter the print command, including any printer specification, just as you would at a command prompt.
A few programs combine these two approaches, providing both a drop-down list of printers and a way to specify the print command. Some programs also provide configuration options that enable you to set the printing command you want to use. Such options, if present, are usually accessible from the program's preferences or configuration dialog box. Consult your program's documentation if you want to change the way it prints.
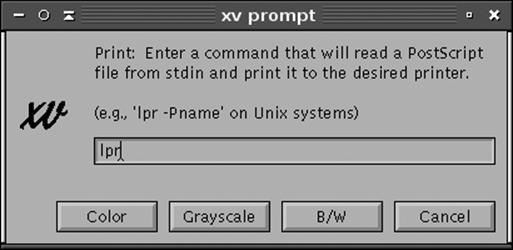
Figure 14-2. Some GUI programs enable you to specify a print command to suit your needs
How the Printing System Processes a File
Generally, after you have handed your document or file that you want printed over to the printing system, you can forget about it until the printed sheet comes out of the printer. But when things go wrong and the sheet does not appear, or if you are simply curious (like us!), you might want to know what goes on behind the scenes between the lpr command and the output tray of your printer. If you want, you can skip this section and come back here later.
Only the root user has the ability to access printers directly, without using the printing system. (That's not a wise thing to do, by the way.) Linux doesn't grant system users the ability to address various physical devices directly because crippling conflicts could result, and also because it's just too much work for them. Instead, utilities call background system processes to schedule your printing. Among other tasks, these processes convert source file data to print to a specific printer using its printer language and protocols, set the print resolution, format the pages, and add (or know not to add) header and footer data and page numbering. Linux configures itself to handle its physical devices when it is booted, including setting up ports and protocols to handle printing.
The print management system is controlled by cupsd, the daemon that has necessary privileges to access printers on behalf of the user. (Older Linux systems used BSD LPD or LPRng. These daemons were called lpd rather than cupsd, but they filled the same basic role.) Once the print management system is installed, cupsd is started every time the Linux system is booted. Files in /etc/cups provide the control information cupsd needs to manage the files the user wants to print.
Two paths exist for printing on a Linux system that runs CUPS. The first path involves lpr or lp. These programs are named after the utilities in BSD printing systems (BSD LPD and LPRng) or SysV printing systems, respectively. They accept a file that's to be printed and behave much like their namesakes in the older printing systems, at least as far as the calling application or user is concerned. Behind the scenes, though, these programs are really just gateways into the second printing path.
This second printing path involves CUPS-specific system calls. Applications that use this path can communicate bidirectionally with CUPS. In addition to passing plain-text, PostScript, or other files to the print daemon (as in old-style printing systems), applications can query CUPS about a printer's capabilities. CUPS can then deliver a PostScript Printer Definition (PPD) file to applications. These files describe a PostScript printer's features: its page sizes, printable area, color capabilities, and so on. As described in "Managing Print Services," PPD files are key components of Linux printer driver packages, even for non-PostScript printers. (For such printers, Linux printer driver packages include PPD files that describe the printer's capabilities as driven via Ghostscript.) Because of this bidirectional communication, CUPS-aware programs can set more printer features, such as printer resolution, than can older programs that are not CUPS-aware.
Tip
You can turn some old-style (CUPS-unaware) applications into CUPS-aware applications by changing their printing paths. Specifically, if you call kprinter rather than lpr, the result is that print jobs will be processed by KDE's printing system, which is CUPS-aware. You can then set CUPS-specific options, such as changing the printer resolution. This option works best for GUI programs because kprinter is an X-based application. You could also use this approach for printing from text-mode programs run from within an xterm terminal program.
Whether the program is CUPS-aware or not, once cupsd has received a print job, it's stored in the print spool directory (usually /var/spool/cups), along with a file that describes the print job. CUPS then orders the list of print jobs and sends them to the printer in an organized fashion, preventing conflicts in accessing the printer. Each print queue has associated with it a set of filters, which are programs that process files of particular types. The details of print filter configuration are hidden from view, even from system administrators, unless you dig pretty deeply into the CUPS workings. Typically, applications deliver plain text or PostScript to CUPS. Plain text may be sent on to the printer without processing, but PostScript is usually processed through Ghostscript, which converts the PostScript into a format that the printer can understand.
Managing Print Services
Linux has a fairly complicated printing system, compared with the printing services most PCs use. Configuring the printing system is usually either very easy (because the semiautomated tools get it right) or very hard (because the semiautomated tools fail or because your printer is poorly supported under Linux). The next few pages describe the Linux printing system, beginning with an overview of the software and moving on to hardware configuration and testing, configuring the Common Unix Printing System (CUPS) to enable its web-based configuration tools and network helpers, defining printers in CUPS, fine-tuning printer definitions, managing printer queues, maintaining LPD compatibility, and troubleshooting printers.
Linux Printing Software
Printing in Linux involves the interactions of several different software packages. The most important of these is the Linux printing daemon, which accepts jobs to be printed, keeps them in one or more queues, and sends the jobs to printers in an orderly manner. Additional software includes Ghostscript, which converts between PostScript and a form the printer can understand; Ghostscript printer definitions; and assorted extra tools that can help you create nicely formatted output. Before you can configure Linux printing, you must install all of these components.
Linux printing daemons
A printing daemon's job is to run in the background, accept print jobs from applications, temporarily store those print jobs, and send them to the appropriate printers without interfering with each other. All mainstream Linux distributions ship with at least one printing daemon, and most set them up in at least a minimal way when you install the OS. You may still need to configure your printing daemon so that it knows about your printer, though. This task is described later in this chapter, in "Defining Printers in CUPS."
Traditionally, Linux has used the Berkeley Standard Distribution Line Printer Daemon (BSD LPD) or the updated LPRng package for printing. (For simplicity, both systems are referred to as LPD systems from here on.) Basic LPD systems are fairly simple tools; they accept print jobs, store those jobs in queues, and then send them directly to the printer. These systems can be modified to pipe the print jobs through other programs for additional processing, if desired. Unlike printing systems for Windows, Mac OS, and other OSs, LPD printing systems don't provide a two-way communication path. For instance, an application can't query the LPD system about the page width or color capabilities of a printer. Thus, you must tell each application about a printer's special features. LPD systems are, though, network-enabled, which makes it possible for one computer to share its printers with others, or for a computer to print to a network-capable printer.
In 1999, an experimental new printing system was developed: CUPS. This package uses a new network printing protocol and enables applications to query a printer's capabilities and set printer features in ways that aren't possible with LPD systems. By 2004, all major Linux distributions had either switched to CUPS as the default printing system or offered it as an option on equal footing with BSD LPD or LPRng. For this reason, we describe CUPS in this chapter. Although some of the principles and support software are the same for BSD LPD and LPRng as for CUPS, the details are completely different. If you're using an older printing system, you may want to consider upgrading to CUPS.
In most cases, you can install CUPS (if it's not already installed) by using your distribution's package management tools. Look for a package called cups and install it. If your system is already configured to use BSD LPD or LPRng, you should first remove that package. If you prefer, you can download the original CUPS source code from its web page, http://www.cups.org.
Ghostscript
The traditional LPD printing system passes a file from an application to a printer. In its most basic form, this means that the application must know how to create a file that the printer can understand. This contrasts with printing under most other OSs, such as Windows, in which the application can use OS calls to help prepare a document for printing. As a practical matter, Unix and Linux applications almost always generate one of two types of output:
Plain text
Programs can send plain text to the printer, under the assumption that the printer is either a dumb line printer (that is, a fast printer with few fancy formatting capabilities) or can at least accept the plain text.
PostScript
Adobe's PostScript language is one of many printer languages. It became popular on laser printers in the 1980s, and most Linux programs that need to print documents with multiple fonts, graphics, or other special formatting almost always do so by generating PostScript output.
Unfortunately, most printers, and particularly the inexpensive consumer and small business printers that are often paired with Linux, don't understand PostScript. The answer is to pipe output through Ghostscript (http://www.cs.wisc.edu/~ghost/), which is a PostScript interpreter that can reside on the computer rather than in the printer. Ghostscript converts PostScript into formats that most printers can understand. In effect, the combination of PostScript and Ghostscript becomes the Linux equivalent of the Windows printer driver system.
Although CUPS changes many things about the Linux printing system, it still relies on Ghostscript to convert PostScript into printers' native languages. Thus, you must have Ghostscript installed on your system if you expect to print to a non-PostScript printer. Fortunately, all major Linux distributions ship with Ghostscript. You may want to check to be sure it's installed, though; look for a package called ghostscript.
Ghostscript is actually available in two versions. The most recent version of Ghostscript is AFPL Ghostscript, which is available under a license that permits free use for many purposes, but not free redistribution. After a few months, AFPL Ghostscript is released under the GPL as GNU Ghostscript, and it's this version that comes with most Linux distributions. In most cases, being a few months behind the leading edge of Ghostscript development is unimportant. If you absolutely must have the latest version, though, check the Ghostscript home page.
Ghostscript comes with drivers for many common printers , and it can also output many common graphics file formats. You can even generate Adobe Portable Document Format (PDF) files with Ghostscript. (The ps2pdf shell script helps automate this process.) For more flexibility, you can add Ghostscript drivers for assorted printers.
As a point of interest, you should know that Ghostscript treats all printers as graphics devices. That is, if you print a purely textual document, Ghostscript converts that text into a graphics bitmap and sends the bitmap to the printer. This means that Ghostscript cannot take advantage of fonts that are built into the printer. It also means that Ghostscript sometimes prints more slowly than other software, such as Windows drivers, can print to the same printer. (This effect is usually negligible, but it's sometimes dramatic.) On some very old laser printers, another consequence is that Ghostscript (and hence Linux) requires a printer memory upgrade for the printer to print at full resolution. In practice, though, even Windows treats many printers as graphics-only devices, so Ghostscript's doing so may not make any difference.
Printer definitions
A standard CUPS installation supports a fairly narrow range of printers, typically PostScript models and some Hewlett-Packard and Epson printers. To support more printers, you must install a printer driver package. (In truth, many of these "drivers" are really just printer descriptions coupled to standard Ghostscript drivers, but in practice they're necessary either way.) Several such driver packages exist:
Foomatic
These drivers, headquartered at http://www.linuxprinting.org/foomatic.html, handle many popular printers. They're a good place to start for many printers.
GIMP Print
The GNU Image Manipulation Program (GIMP) is a popular graphics package that's developed its own set of printer drivers. These have been spun off into a separate printer driver package that can be used with CUPS (or with BSD printing systems). The GIMP Print drivers are often particularly good choices if you want to print graphics. Check http://gimp-print.sourceforge.net for more information.
ESP Print Pro
The original CUPS developers have made a set of printer definitions available on a commercial basis. You can learn more at http://www.easysw.com/printpro.
Most distributions ship with Foomatic or GIMP Print, so check for those packages. Sometimes they're called something else, and occasionally they're bundled with still more printer definitions. If you fail to install any printer definitions, you'll see a very limited set of printers when you configure printing.
Sometimes multiple printer definitions are available for a single printer—for instance, separate definitions in the Foomatic and GIMP Print packages, or even multiple definitions in a single package. In such cases, you may want to try all the available definitions to see which one works best with your printer and the types of documents you print. Sometimes the developers give you a hint by specifying in the configuration menus that one definition is recommended over the others.
Additional printing software
CUPS (or an LPD printing system) is a practical necessity for printing from Linux. For most printers, Ghostscript and Ghostscript driver definitions are also practical necessities. Several additional tools are often highly desirable, but may not be necessary in all cases:
enscript or nenscript
These commands were described earlier in this chapter. They help format plain text as PostScript or in other ways, which can be very helpful.
groff
This program is the open source implementation of the roff typesetting system, which enables creation of prettily formatted documents from text-mode files using troff/nroff markup codes. Although many users today prefer GUI word processors for this task, groff is still required by some tools, and can be used more directly, as well.
TEX and LATEX
The TEX package is a high-end document processing system, and LATEX is an extension to this package. These tools are favored by many mathematicians, scientists, computer scientists, and engineers for creating files. Some Linux documentation comes in the form of TEX or LATEX files, although such documents are also usually available in other formats.
Lout
This package is also worthy of consideration as an efficient and compact package to format text documents for PostScript output. It supports Level 2 PostScript and the Adobe Structuring Conventions, takes comparatively little memory, and comes with good enough documentation to learn quickly. Lout doesn't create an intermediate output form; it goes directly from markup input to PostScript output.
netpbm and pbmplus
These programs support a wide variety of graphics file format conversions. (Such formats have to be converted to PostScript before you try to print them.)
Ghostview
This package provides display tools to view PostScript files in an X Window System environment, and also provides PostScript and PDF support for other packages, such as your web browser.
ImageMagick
This program lets you display a large number of graphics formats in an X window and convert many file formats to other file formats. (It uses Ghostview and Ghostscript when it needs to display a PostScript image.) Most of the graphics files that you can print can also be displayed using ImageMagick.
Fax packages
If you want to support fax devices, you can use the tiffg3 utility with Ghostscript to output Group III fax format files. To control a Class 1 or Class 2 fax modem on your Linux host, you can use the efax package, which is provided in many distributions, or you can install and configure the more capable, but more complex, FlexFax or HylaFax packages.
Some of these tools are covered elsewhere in this book. Most require little configuration, and all are primarily user-level tools. Be aware that this list is not comprehensive; Linux printing tools are extremely plentiful, and range from simple text formatting tools to sophisticated word processors and graphics applications.
Configuring Printer Hardware
The first order of business when configuring a printer is configuring the hardware . You must verify that your printer is compatible with Linux, check its physical interface to the computer, and verify that the interface is working. Failure to check these details can lead to problems when you try to actually configure the printer in Linux, leading to a wild goose chase as you try to debug problems in the wrong subsystems.
Verifying printer compatibility
The main issue with respect to printer compatibility is the language the printer uses. Several languages are common, but many printers use their own unique languages. The more common printer languages include PostScript, HP's Printer Control Language (PCL) , and Epson's ESC/P2 language. (ESC/P2 is most common on old dot matrix printers.) Many manufacturers make printers that use each of these languages, but sometimes they bury this detail in their descriptions or refer to it in another way. One common example is a laser printer that uses PCL; the manufacturer may refer to the printer as being "HP-compatible" (usually with a reference to a specific HP printer model).
The best hope for Linux compatibility is to get a printer that supports PostScript. Such printers are typically mid-range to high-end laser printers. Few inkjet or low-end laser printers support PostScript. With a PostScript printer, you needn't be concerned about whether a Ghostscript driver exists for your printer; just configure CUPS to pass the raw PostScript straight through to the printer.
Warning
Some printers are advertised as supporting PostScript when in fact they don't. Manufacturers may do this when their printers ship with software that's similar to Ghostscript, but such manufacturer-supplied software usually only runs under Windows. Thus, if you have or are looking for a PostScript-capable printer, try to verify that the PostScript support is in the printer itself, not in a Windows driver package.
If you don't have a PostScript printer, your best bet for assessing Linux compatibility is to check the Linux Printing web site, and particularly its printer database, located at http://www.linuxprinting.org/printer_list.cgi. Locate your printer make and model in the drop-down fields on this site and then click the Show button. You'll then see a description of your printer and its Linux compatibility. The description may also tell you where to find drivers or printer descriptions to use with CUPS, so you can check that you have the appropriate support software.
If your printer is listed on the Linux Printing web site as a "paperweight" (meaning it doesn't work at all under Linux), you may want to try doing a web search on the printer's name and Linux. If you're lucky, you'll turn up a new or experimental driver you can try. If not, you may want to look into replacing the printer with one that's more Linux-friendly.
If you have, or are considering buying, a multifunction device (such as one that handles both printing and scanning functions), you should investigate Linux support for all of the device's functions. Sometimes the printer side will work fine but the scanner will be useless, for instance. Typically, support for each function is provided by its own project under Linux, such as Ghostscript for the printer and the Scanner Access Now Easy (SANE ) project for scanner support. Occasionally, a project exists to provide all the necessary drivers in one place, such as the HP Office Jet project (http://hpoj.sourceforge.net) or Epson's drivers (http://www.avasys.jp/english/linux_e). These projects may be independent or sponsored by the device's manufacturer.
Printer interfaces
Printers can be connected to computers in several different ways. Four interface methods are common:
Parallel port
A very popular interface method. Most x86 computers have a single parallel port that's intended for handling a printer (although some other devices have been designed to use this port, too). The parallel port has the advantage of speed, particularly compared with the RS-232 serial port. Under Linux, the parallel port is usually /dev/lp0, although it can be /dev/lp1 or higher, particularly if you've added parallel port cards to your computer to support multiple printers.
RS-232 serial port
Some very old printers use the RS-232 serial port standard. These ports are substantially slower than the parallel port, which is why this interface method hasn't been a favored one in decades. If you have such a printer, it will probably be accessible as /dev/ttyS0 or /dev/ttyS1, although higher numbers are possible. Other devices, such as mice and modems, often use RS-232 serial ports, so you may need to study your cabling to determine which one is your printer. You may also need to use the setserial program to configure your RS-232 serial port.
USB port
In recent years the Universal Serial Bus (USB) port has eclipsed the parallel port as the favored port for printers. The USB 1.x standard nearly matches the speed of the parallel port, and USB 2.0 exceeds it, so USB provides plenty of speed for printing. Under recent kernels, USB printers are accessed from the /proc/bus/usb directory tree, and CUPS should be able to automatically detect USB printers; however, the printer must be turned on when the CUPS daemon is started for this to happen. Because CUPS normally starts automatically when the system boots, this means you should ensure that your printer is plugged in and powered on when you boot your system.
Ethernet
Some printers support Ethernet connections, either directly or indirectly. Workgroup printers often have Ethernet ports and show up as if they were computers on the network. Dedicated print server appliances are also available. These devices enable you to connect a USB or parallel printer, effectively turning them into Ethernet printers. These printers support one or more network printing protocols. The best case from a Linux and CUPS perspective is for the printer to understand the Internet Printing Protocol (IPP ) that CUPS uses. Failing that, the LPD or Server Message Block/Common Internet File System (SMB/CIFS) protocols will do.
You should be aware of which interface method your printer uses. Some testing and configuration features won't work with some interfaces; for instance, you can't easily bypass the printing system to send a file directly to a USB or Ethernet printer. You must also have appropriate ports on your computer to support your printer, and the necessary cabling. If you lack this hardware, you should buy it. You can purchase add-in cards with any of the necessary port types; or if you have USB ports but no open slots in your computer, you can purchase an adapter so that you can connect a parallel, RS-232 serial, or even an Ethernet printer via a USB port. Be sure Linux drivers exist for the adapter, though!
If your printer supports multiple interface types, USB is generally the best to use, followed by a parallel interface and then RS-232 serial. USB provides more information to the computer about the printer, uses less bulky cables, and (in its 2.0 incarnation) can be faster than the parallel port. A network-enabled printer can be a big advantage if you want it to be accessible to several computers, but if it uses an odd protocol it could be more trouble than it's worth, particularly if you use it on only one system. Of course, you should also consider your available ports and cables; it might be more trouble than it's worth to install a USB card in an older system that you're using as a print server, for instance.
Verifying basic printer connectivity
Before you set up printer services, be sure the printing devices are online. If you also use another operating system, such as Microsoft Windows, you can exercise the hardware to ensure that it is connected properly and working before loading Linux. Successfully printing a document from another operating system immediately eliminates one major source of woe and head scratching. Similarly, if you are going to use printer services on a network, your system should be on the network and all protocols functioning before proceeding.
If you have a parallel or RS-232 serial printer, you can test basic printer functionality by sending a document directly to the printer device file. For instance, you might test a parallel printer by typing this command:
# cat /etc/fstab > | /dev/lp0
This command copies the /etc/fstab file to /dev/lp0, the most common identifier for a parallel printer. If your printer can print a text file, the result should be a printout of your /etc/fstab file. On some printers, status lights will blink but nothing will emerge. Frequently, pressing a button (marked Form Feed, Continue, or something similar) on the printer will cause the file to print. This happens because the printer didn't receive a full page of data, and so was waiting until it received more data to continue. This shouldn't happen in normal operation, though—just when testing the printer. Another problem is "stair-stepping," which is a printout that doesn't reset the line starts, like this:
/dev/hda1 / ext3 defaults 1 1
/dev/hda5 /home ext3 defaults 1 2
You might be able to figure out what went wrong here. Text files in Unix use just a newline (also known as a linefeed, ASCII code 10) to terminate each line. MS-DOS uses both a newline and a carriage return. Your printer was therefore set up to use MS-DOS-style line endings with both newline and carriage-return characters at the end of each line. In practice, CUPS normally filters newlines so that printers configured for DOS can understand them. If you still see this problem once you've fully configured printing, though, you can reconfigure your printer to properly return to the start of the line on receipt of a newline character. Often this is simply a matter of setting a dip switch. Check your printer manual. (Be careful about changing your printer characteristics if you use multiple operating systems.)
If you're using a USB printer, you can look for it with the lsusb command:
$ lsusb
Bus 005 Device 004: ID 04b8:0807 Seiko Epson Corp.
In practice, you're likely to see more output than this; however, this output shows a USB printer—an Epson RX500, to be precise. It's on USB bus 5, device 4. You can learn more about it by viewing the contents of /proc/bus/usb/devices, but most of the information in that file is likely to look like gibberish to the uninitiated. One feature to look for in this file, though, is Driver=usblp. If a line containing this string is present, it means that Linux has recognized the printer as a printer, which means that CUPS should be able to communicate with it. (Whether you can get output from the printer depends on the status of Ghostscript drivers, though.)
Finally, Ethernet printers can be treated just like other network devices. Specifically, you can use ping to verify that they're connected to the network. More substantial tests of their connectivity depend on the protocols the printer understands. Although low-level diagnostics of these protocols are possible, the simplest approach is usually to try configuring them, as described later in this chapter, in "Defining Printers in CUPS."
Configuring CUPS Security
Before proceeding with configuring CUPS to print, you should review your CUPS security and web-based configuration tool options. Unlike LPD systems, CUPS is best managed through its web-based configuration tool; however, this tool is sometimes disabled or set up in an inconvenient way. (Some distributions provide their own GUI tools for CUPS configuration. When using these distributions, you can either use their GUI tools or use the standard CUPS tools.) Depending on your network configuration, you might want to enable or disable the CUPS browsing feature, which enables CUPS servers to communicate their lists of available printers to one another. Browsing greatly simplifies network printer configuration and maintenance, but some distributions disable it by default. On the other hand, in a high-security environment or if your system is connected directly to the Internet, you might want to disable browsing, but some distributions enable it by default. In any event, you should review these settings and be sure they're set appropriately for your environment and needs.
Enabling web-based configuration
The main CUPS configuration file is /etc/cups/cupsd.conf. This file is modeled after the Apache configuration file, so if you're familiar with Apache, you should feel at home with this file. If you're not familiar with the Apache configuration file, the basics are as follows. The file begins with a series of global directives, which take the form of a directive name followed by the directive's value. For instance, to override the default server name (advertised to other systems), you would enter a directive like this one:
ServerName gutenberg.example.com
This line sets the server name to gutenberg.example.com. CUPS accepts a large number of configuration directives; you should consult its manpage for complete details. Some sets of configuration directives are enclosed in sections delimited by lines that are enclosed in angle brackets:
<Location /admin>
AuthType
Basic
AuthClass
System
Order
Deny,Allow
Deny From All
Allow From 127.0.0.1
Allow from 192.168.1.0/24
</Location>
This set of lines sets directives that apply only to certain functions of the server—in this case, those handled by the /admin (administrative) subsystem. You can use this feature to selectively modify the CUPS security functions (or other functions). The /admin area is particularly important for controlling access to the CUPS web-based administration tool. The options shown in the preceding example control features you may want to adjust:
AuthType
The AuthType directive tells CUPS what type of authentication to require for access to the location. In the case of /admin, this is usually set to Basic, which corresponds to password exchanges in cleartext. If you intend to administer the server from remote systems, you may want to change this to Digest, which adds encryption for the password exchange. (This feature requires that you set a password digest using the lppasswd program.) Some subsystems don't normally enable authentication; they use None for the AuthType. This configuration is a common default setting, and enables users to print without providing a password.
AuthClass
This directive tells CUPS what groups of users to accept. Possible values are Anonymous, User, System, and Group. The Anonymous option specifies that no authentication should be performed. User means that any valid username and password will grant access. System means that the user who authenticates must be a member of the CUPS system group. (This option varies from system to system, but it's normally sys, system, or root. You can set it with the SystemGroup option.) The Group option enables you to specify a Linux group name with theAuthGroupName directive, which must appear on another line.
Order
This directive tells CUPS whether to grant or deny access by default. If it's set to Deny,Allow, CUPS denies access unless it's explicitly granted. Setting the value to Allow,Deny grants access unless it's specifically denied.
Deny and Allow
These directives specify machines or networks from which access should be denied or allowed, respectively. You can specify machines by IP address, by network address, by hostname, by domain name (preceding the name with a dot), by the keywords All or None, or by the variables@IF (followed by a specific interface name in parentheses) or @LOCAL (for all local networks).
To enable web-based configuration, you should be sure that your CUPS configuration has an /admin location defined and that it grants access to the 127.0.0.1 address, as shown in the preceding example. That example also gives administrative access to users on the 192.168.1.0/24 network. Generally speaking, you should activate such access only for print servers that you want to administer remotely; opening this option up increases the security risks associated with running CUPS.
If you want to completely disable the CUPS web-based administrative tools (say, because you intend to use your distribution's own CUPS administrative programs instead), you should remove all the Allow directives and ensure that the configuration includes a Deny from All directive.
Enabling or disabling browsing
While you're digging in the /etc/cups/cupsd.conf file, you may want to examine the server's browsing options. In the context of CUPS, browsing refers to automatic network printer discovery. This feature, supported by IPP, enables IPP servers to exchange lists of printers with one another. Each server periodically sends out broadcasts to which other IPP servers respond. The result is that you need configure each printer only once, on the computer to which it's connected. That server then propagates the configuration for the printer to other CUPS/IPP servers. Applications on those remote systems will see the new printer appear once they're restarted. This feature can be a great time-saver, particularly on networks on which printers are frequently added or removed.
A couple of caveats are in order concerning browsing, though. First, like many network features, browsing comes with some security baggage. Systems configured to browse could be tricked into displaying bogus printer information, and it's conceivable that a bug in the CUPS browsing code could lead to more serious system compromises. For this reason, some distributions ship with browsing disabled. This fact is the second caveat: if you do want to use browsing, you may need to enable it. If you fail to do so, your system won't automatically detect other printers on your network. Likewise, if you want to tell your system to enable others to print to its printers you must be sure certain options are enabled. You should check several options on your client and server systems:
BrowseAllow and BrowseDeny
These directives tell a CUPS client the addresses from which it should accept or reject browse packets, respectively. They take options with the same form as the Allow and Deny directives. On a LAN, setting BrowseAllow @LOCAL generally works well to enable a system to automatically detect remote printers. This option tells the system to accept browse packets from all the local interfaces. You can set specific IP addresses or hostnames instead of this option to tighten this security, or specify entire network addresses to loosen or change the security. You can also explicitly exclude computers or networks with BrowseDeny. You can include multiple BrowseAllow and BrowseDeny directives.
Browsing
This directive takes On and Off options. You should be sure that any CUPS server that is to share its printers has this directive set to On, which is the default setting for stock CUPS configurations. (Some distributions change the default to Off, though.)
BrowseAddress
You can tell a CUPS server to which addresses it should send browse packets with this directive, which takes IP addresses, network addresses, and hostnames in the same forms as the Allow and Deny directives. The default is to not send any browse packets, so chances are you'll need to set this line. Using BrowseAddress @LOCAL works well on small networks, but you may need to use multiple lines or configure your system in another way, depending on your network.
These browsing directives are typically set in the global section of the cupsd.conf file. They're sometimes set separately or redundantly in the /printers section, though, so check there if you have problems.
Tip
Actually printing to a server requires general access to the /printers section, independent of the browsing access. Thus, CUPS servers typically have one or more Allow directives in their /printers sections. Without these directives (either in this section or set globally), a CUPS server will reject incoming print jobs.
Restarting CUPS
If you make changes to your CUPS configuration, you should restart the CUPS daemon. On most distributions, this is done via the SysV startup script file:
# /etc/init.d/cupsd restart
This command (or one like it; you may need to change the path to cupsd) shuts down the CUPS daemon and restarts it. The result should be that the system implements any changes you make to the server's configuration.
Defining Printers in CUPS
Now that you've ensured the CUPS administrative tools are available, you can begin using them. To do so, you'll need a web browser. Any modern browser will work: Mozilla Firefox, Konqueror, Opera, or even the text-mode Lynx, to name just four possibilities. With the help of your web browser, you can add your printer definitions and test your printer configuration.
Tip
We describe administering CUPS via its own web-based interface because this approach works with all Linux distributions. Many distributions provide their own tools for CUPS administration, though. For instance, Fedora and Red Hat have the Printer Configuration tool (akasystem-config-printer), and SUSE uses its YaST and YaST2 utilities. If you like, you can use such tools. They provide the same basic options as the CUPS printer configuration utility, but the details of their operation differ.
Accessing the printer definition tool
CUPS runs its web-based configuration tool on port 631, so you should be able to access the system by entering http://localhost:631 in your web browser's address field. If you've configured CUPS to accept administrative input from other systems, you should be able to access the printer configuration tool from another computer by entering the server's hostname, as in http://gutenberg.example.com:631.
Tip
You cannot use your computer's regular hostname to access the CUPS configuration tools, even from your computer itself, if you restrict administrative access to the localhost interface (127.0.0.1). When you so restrict access, you must use the localhost name or 127.0.0.1 IP address.
If CUPS is properly configured and running, the result of accessing a computer's port 631 with a web browser should be a display with a series of links called Do Administration Tasks, Manage Printer Classes, On-Line Help, and so on. If you get an error message from your browser, chances are that something is wrong with your CUPS configuration; review the earlier section "Configuring CUPS Security," and check that the cupsd server is running. If you do see the main CUPS page, you can begin using it to add or reconfigure your printers.
Creating a printer definition
To add a printer to a system, you should select the Manage Printers link on the main CUPS configuration page. The result should resemble Figure 14-3, which shows a CUPS configuration with some remote printers already autodetected.
To create a new printer definition, follow these steps:
1. Ensure that your printer is connected and powered on. In the case of USB printers, if it's not already connected and turned on, you may need to restart CUPS, as described earlier in "Restarting CUPS," after connecting and turning on the printer.
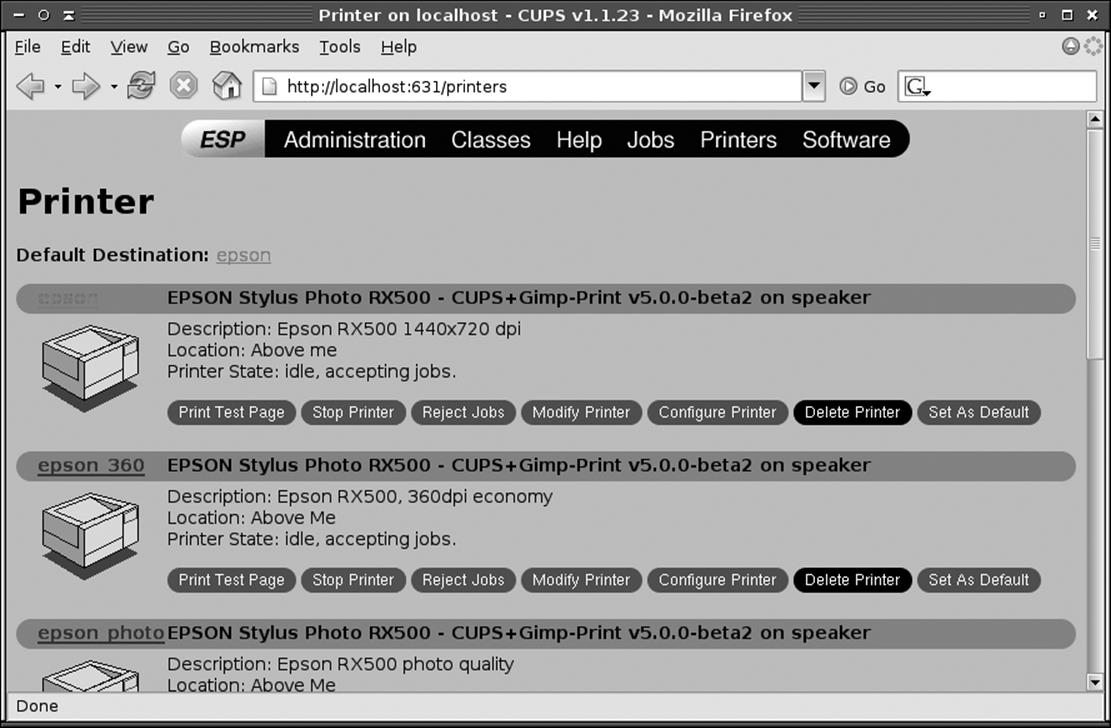
Figure 14-3. The CUPS web-based administrative tool lists all printers, including those detected on other systems
2. Click Add Printer. This link is near the bottom of the page and is not visible in Figure 14-3. Unless you've already done something that requires authentication, the result will probably be a window asking for your username and password. Enter root and the root password. You should now see a new page entitled Add New Printer, in which you enter basic printer identifying information: a name, a location, and a description.
3. Enter the printer's name, location, and description. The printer name is used to identify the printer in applications, and is usually fairly short, such as lexmark or hp4500. One-word names (or multiple words separated by an underscore) work best; multiple words and hyphens tend to confuse CUPS, so don't use them. The location and description fields are purely descriptive, so enter information that will help you distinguish the printer from any others on your network. These fields can and often do contain multiple words. When you're done, click the Continue button.
4. CUPS now displays a Device page, in which you identify the hardware used to connect to the printer. Select the hardware device, which typically appears as follows:
a. Parallel ports are identified as Parallel Port #1, Parallel Port #2, and so on.
b. RS-232 serial ports are identified as Serial Port #1, Serial Port #2, and so on.
c. USB printers are identified as USB Printer #1, USB Printer #2, and so on. In addition, the make and model of the printer should appear in parentheses. If it doesn't, you should check that your printer is connected and powered on and then restart CUPS and begin the process again.
d. Network printers are identified by protocol, such as LPD/LPR Host or Printer, Windows Printer via SAMBA, or Internet Printing Protocol. You must know what protocol to use, and depending on the protocol you select, you may need to pick extra options, as described in the sidebar "Printing to Network Printers."
e. Various additional and more obscure options also exist.
Once you've picked your printer device, click Continue.
5. You should now see a Model/Driver page, as shown in Figure 14-4. You should pick the make of your printer from the list and then click Continue. Note that, depending on the printer definition packages you've installed, some makes may appear twice, possibly under different spellings or names, such as HP and Hewlett-Packard. If this is the case for your printer, pick one and if you can't find your specific model, move back and try the other entry. If you don't see your make and it's a common one, such as Epson, Canon, or Lexmark, you should try installing a printer definition package, as described earlier in "Printer definitions." If you don't see your printer make because it's a very obscure one, consult your manual to learn what models your printer emulates and select one of them. Some common printer languages, including PostScript, PCL, and ESC/P2, appear under the Generic brand, so you might try that if your printer is an obscure model that uses such a common printer language.
6. After the first Model/Driver page, CUPS presents a second Model/Driver page in which you select your printer's model, such as the Lexmark Optra Color 45 or the Lexmark Z51. Locate your printer, select it, and click Continue. If you don't see your model, click your browser's Back button and look for another name for your printer manufacturer or select a compatible model and try it. If you still can't find your model, perhaps you need to install more or newer printer definitions; consult the Linux Printing web page for pointers on your model.
7. After clicking Continue on the second Model/Driver page, CUPS should respond with a message to the effect that your printer has been added. If you click Printers at the top of the page, you should see the printer list (Figure 14-3) again, but it should now include the printer you've just defined. You can now exit and fine-tune the printer definition.
If you decide to change any of the features of your printer configuration, you can do so by clicking Modify Printer in the printer's area on the main printer configuration page (Figure 14-3). The result is a run through the original configuration options, except that the defaults have changed to whatever you've entered before. (You will be unable to change the printer's name, but you can change other options.)
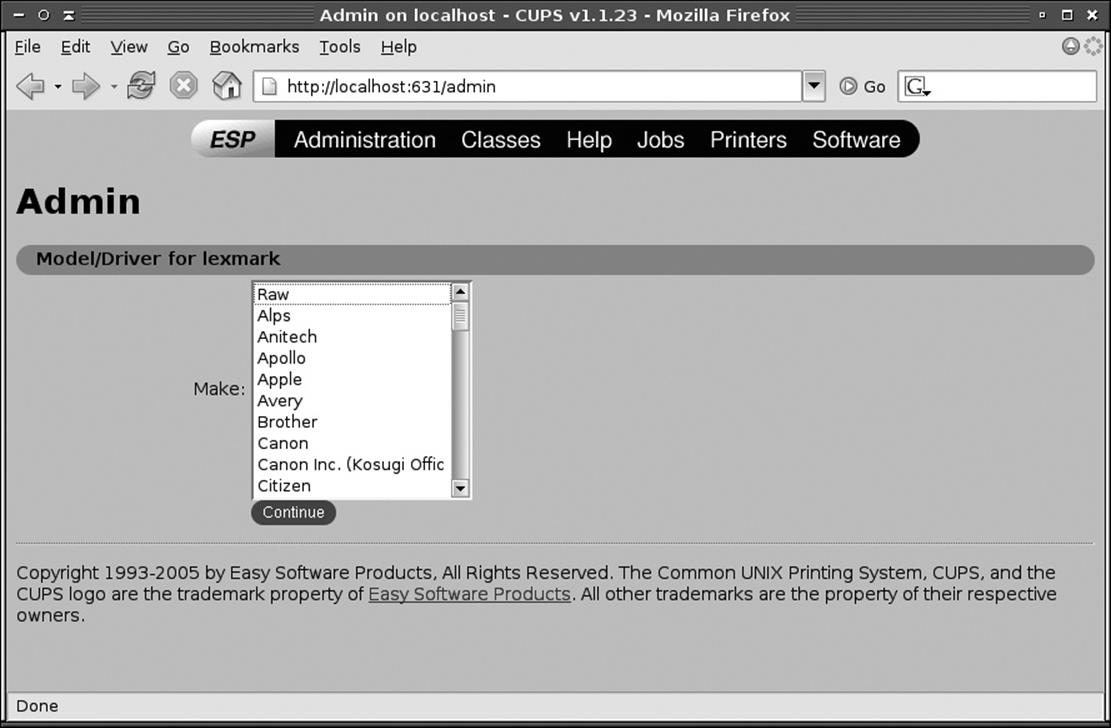
Figure 14-4. CUPS configured with printer definitions
This procedure (or the GUI tools provided by your distribution) is the simplest way to configure a print queue in CUPS. If you happen to know all the values, though, you can use the lpadmin command-line utility instead. When used to define a queue, this utility takes the following syntax:
lpadmin [-E] [-h server] -pprinter option...
The -E option enables the print queue (a desirable option, typically), while -h enables you to modify the configuration of a server other than the local one, and -p sets the name of the queue.
The final, trailing options are the tricky part. Typically, the most important of these options are -i interface, which sets the interface device, and -m model, which points to a PostScript Printer Definition (PPD ) file that defines the printer's model and capabilities. You must know the filename of the PPD file for your printer, which may not be obvious unless you've obtained a PPD file specifically for the printer (say, from the printer's manufacturer). As the name implies, a PPD file describes the capabilities of a PostScript printer, so printer manufacturers normally only make these files available for PostScript models. CUPS printer definitions rely on PPD files for all printers, though, and in fact these are the main part of the Foomatic, GIMP Print, and other Linux printer definition packages.
Printing to Network Printers
Network printers require more in the way of identification (described in step 4 of "Creating a printer definition") than local printers do. In all cases, you enter the information in a Device URI screen, which provides a single text-entry field in which you enter a string to identify the remote printer. Precisely what sort of information is required depends on the network protocol in use:
§ For LPD printers, you must provide the identifying prefix lpd://, the hostname, and the printer queue name. For instance, lpd://gutenberg/lexmark allows printing to the lexmark printer on gutenberg.
§ For printers served by Windows systems or Samba using SMB/CIFS, you must provide a hostname and printer queue name, as with LPD printers, but you may also need to provide a username and password. The full URI might resemble
smb://printacct:ppass@GUTENBERG/LEXMARK
to print to the LEXMARK printer on GUTENBERG using the printacct account and ppass password. Depending on the server's configuration, you may be able to omit the account and possibly the password.
§ The best way to manage IPP printers is generally to take advantage of browsing. If that's not possible, though, you can use an ipp:// prefix, a hostname, and a printer name, much as with LPD printers. Some network-enabled devices that support IPP require variants on this, so consult their documentation.
One type of print queue definition requires special mention: a raw queue. You can create a raw queue by selecting a printer make of Raw and model of Raw Queue. Unlike most CUPS printer queues, a raw queue uses no filtering—that is, CUPS won't try to determine the file's type and pass it through programs such as Ghostscript to produce output that's acceptable for your printer. For most Linux purposes, raw queues aren't very useful; however, there are a few cases where you might want to use one. One such instance is if you want to use Linux as a print server for non-Linux systems, such as Windows computers. You might then install Windows drivers on the Windows clients to have them print to the Linux raw queue. Using a raw queue in this instance guarantees that CUPS won't corrupt the Windows print jobs. (Another option for this scenario is to use PostScript drivers on Windows. Each approach has its plusses and minuses.) A second situation where raw queues can be handy is when you use an application that provides its own printer drivers. The GIMP is one such program, and you might get better results using the GIMP's printer drivers than using the standard Ghostscript drivers for your printer.
If in doubt, you should probably create a regular printer queue, which will try to parse the file type and convert it (via Ghostscript or other filtering programs) to your printer's native format. If this doesn't work or if you know you'll need it, though, a raw queue can be the way to go.
Testing your printer definition
Once you've configured your printer queue, you can test it. From the main printer description page (Figure 14-3), click Print Test Page for your queue. CUPS should respond with a message to the effect that a test page has been printed. After a brief delay, the result should be a printer test page being printed. (Precisely how long a delay you'll experience depends on the printer, its configuration, how it's connected to your computer, your computer's CPU speed, and your computer's CPU load.)
The standard CUPS test page includes a color wheel; a circle of fine radial lines (used to assess resolution); information on page size, borders, and nominal resolution; and PostScript interpreter data. Check that the resolution (expressed in dots per inch, or dpi, in the Imageable Area box) is reasonable. If it's not, consult "Fine-Tuning Printer Definitions" for help. Likewise, if a color printer produces merely black-and-white printouts, you will have to adjust your configuration. (This is assuming you know the printer is working correctly; it's entirely possible that the printer's color ink is depleted or clogged!)
If your printer doesn't generate any output at all, consult the section "Printer Troubleshooting," later in this chapter.
Fine-Tuning Printer Definitions
Most modern printers provide options that affect print quality and style. These features include variable resolution, ink- or toner-saving modes, printing modes optimized to particular types of paper, and so on. CUPS provides a way to set defaults for these features for a given queue. From the main print queue list page in the web-based CUPS configuration (Figure 14-3), click Configure Printer in the area for the printer you want to modify. The result is a list of options you can set, as shown in Figure 14-5.
The list of options available for any given printer varies greatly from one printer to another. Some common options you might want to investigate include the following:
Output Mode
This option sets the color options for the printer: whether it prints in color or black and white, and if in color, how it encodes color information. For most color printers, RGB Color is the best choice.
Print Quality
This option describes print resolution in imprecise verbal terms (Economy, Standard, High, and so on).
Resolution
You can set the print resolution in precise numeric terms using this option. Many printers support different horizontal and vertical resolutions. As a general rule of thumb, the higher the resolution, the slower the printing, particularly for inkjet printers.
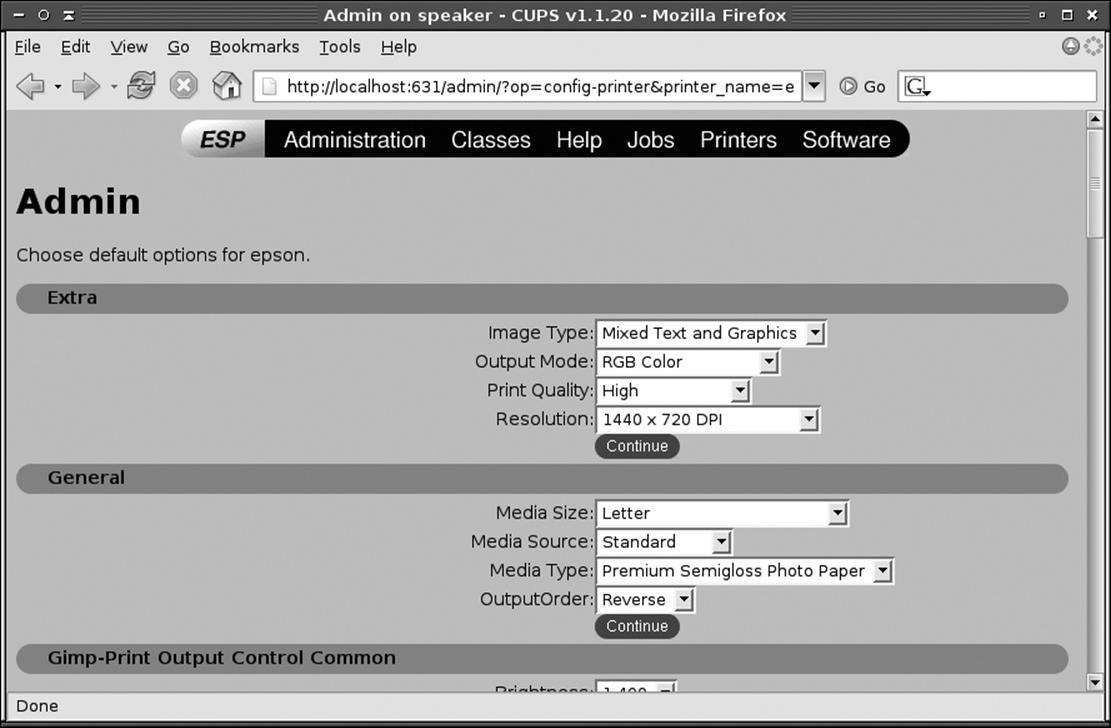
Figure 14-5. CUPS enables you to fine-tune the configuration for each of your print queues
Media Size
You can tell CUPS what size paper you use with this option. Be sure to check it, because it has a habit of setting itself to the wrong size when you first install a printer.
Media Source
Many printers support multiple paper feeds, and this option lets you tell CUPS which one to use by default.
Media Type
This option lets you tell CUPS about the type of paper you're using. This feature can be particularly important for inkjet printers, because different papers absorb ink in different ways. When CUPS knows what type of paper you're using, it can have Ghostscript adjust its output to suit the paper.
Output Order
Depending on the printer's design, multipage documents may print in such a way that the complete stack is backwards. You can set this option to correct for this problem by having the document print backwards, if you like.
Duplexing and paper handling
Some drivers enable you to turn on duplexing (printing on both sides of the paper) and other advanced paper-handling options.
Color and brightness options
Many options relate to the brightness, saturation, and color balance of the output of color printers. These options vary from one printer to another. You may need to experiment with these options to find what works best for you.
Dithering options
Ghostscript dithers its output—that is, when it's told to print a particular color, it's likely to print a pattern of several different ink colors. The reason is simple: color printers have just a few colors at their disposal, so to match a given color, two or more must be combined in a pattern. Certain dithering algorithms work better for particular applications than others, and personal preference can also play a role. Thus, CUPS lets you tell Ghostscript what dithering algorithm to use. As with color and brightness options, you may need to experiment to determine what works best for you.
Specialty print options
Some printers support borderless (edge-to-edge) printing, printing on CD-R and DVD-R media, and other special options. You can set these options if your Ghostscript driver supports them.
Print direction and interleaving options
Most modern inkjet printers support bidirectional printing—that is, they print in one direction and then in the other to save time. This is handy, but alignment is sometimes improved by printing in one direction alone. Similarly, interleaving options that relate to which ink nozzles fire can improve or degrade print quality while affecting print speed.
Ink options
Some drivers enable you to specify which ink tanks to use, or to tell Ghostscript that you've installed an optional ink set.
Banners
You can have CUPS print a banner page before or after each print job. This page can identify the job and optionally include a brief note, such as Confidential.
PostScript level filtering
For some PostScript printers, CUPS can convert the PostScript level to a specified version, such as converting everything to PostScript Level 1. This can be handy if your printer chokes on more recent versions of PostScript.
Because printer capabilities vary so much, we can't describe all the options here. You may need to examine the options and experiment with them. Change an option and see how it affects output. Some options will affect text more than graphics or graphics more than text. Different types of graphics, such as digital photos versus charts and graphs, may also be affected differently by certain options. As a general rule, if you don't understand an option you should probably leave it alone.
In the past, Linux provided applications with limited or no access to printer options such as those described here. In fact, applications built for the old LPD system may not be able to set these options directly; these programs can only use the printer's defaults. To set such options in such applications, you can create multiple print queues for each printer. For instance, suppose you want to be able to print at 360 dpi for quick printouts or at 1440 dpi for slower but higher-quality printouts. You would create two print queues (say, canon_360 and canon_1440). Both queues would connect to a single printer device, but you'd set different default options for the two queues. You'd then choose your desired print resolution by printing to one queue or the other.
Alternatively, if you're running in X and if the application enables you to enter the printing command, you can use kprinter as the printing command. The result is the standard KDE printing dialog box. When you set it to use CUPS (via the listbox near the bottom of the dialog box) and select a print queue, you can click the Properties button in the upper-right corner of the dialog box. The result is the Configuration dialog box shown in Figure 14-6. This dialog box has multiple tabs that correspond to various CUPS configuration options, so you can adjust the resolution (as shown in Figure 14-6) or other printing options.
Another fine-tuning detail is setting the default print queue. In theory, you should be able to do this from the CUPS interface by clicking the Set as Default option; however, in practice this often produces an error message about an unknown operation. To work around this bug, use the lpadmincommand with its -d option, which takes the name of the default queue:
# lpadmin -d hp4500
This command sets the default queue to hp4500. All subsequent print jobs submitted via lp or lpr that don't specify a queue will go to the hp4500 queue. This queue will also be the one to appear in print dialog boxes when they first open. In the case of both text-mode and GUI programs, though, you can still print to non-default queues by specifying the one you want to use.
Managing Printer Queues
An important part of printer administration is managing active print queues. Once a system has print queues defined, users start using them, and the result can sometimes be problems. You may need to delete jobs that are too big, temporarily shut down a queue while you reconfigure it, or otherwise manipulate the queue. To handle this task, CUPS provides two basic classes of tools: text-mode and web-based.
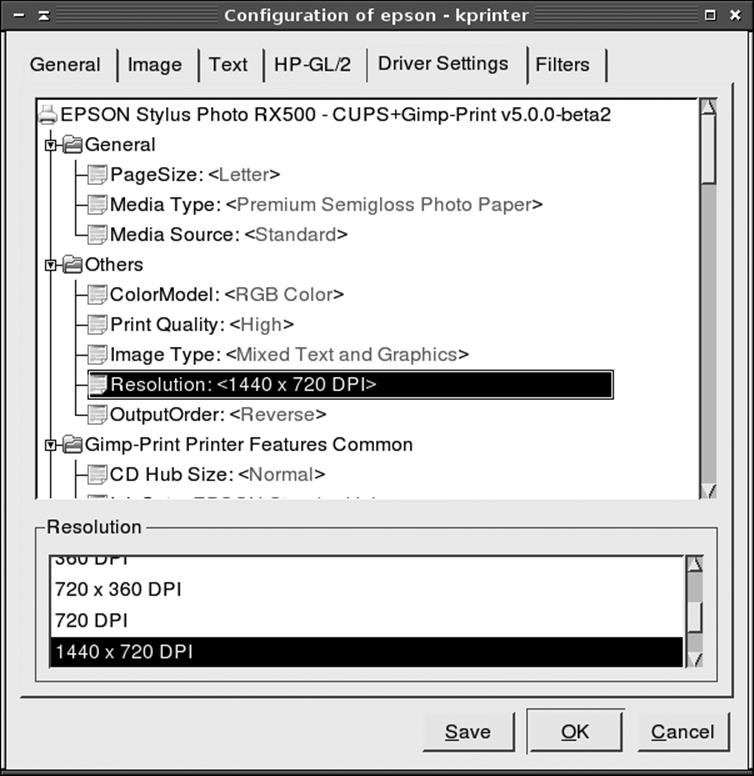
Figure 14-6. kprinter lets you adjust printer features from many CUPS-unaware applications
Using command-line tools
Text-mode CUPS commands enable you to control print queues from a text-mode login, an xterm window, or any other text-mode interface. Most of these commands require root privilege to function correctly, but a few can be used by ordinary users:
lpc
This command is named after the main text-mode queue manager in LPD, but the CUPS version is very limited; its only useful option is status. Type lpc status to see a list of available queues and the status of each (queueing enabled, printing enabled, number of queued jobs, and the availability of a CUPS daemon to manage the queue). You can add a queue name to obtain status on that queue alone.
lpstat
This command lists status information on print jobs, and like lpc, it can be used by ordinary users. Type this command by itself to see a list of jobs that are queued for printing on all the system's printers. You can also use various options to modify its output in various ways. For instance, -p queue restricts output to the specified queue, -u users restricts output to jobs submitted by the specified user or users, and -d displays the current default destination.
lpq
Like lpc, this command is borrowed from the LPD printing system. It displays information on the status of the current queue, similar in some ways to lpstat. It's often used with the -P queue option to display information on the specified queue rather than the default one. (Alternatively, -acan be used to display information on all queues.)
lppasswd
This program changes the CUPS digest password—that is, the password used by the system if you set AuthType to Digest in the cupsd.conf configuration file.
enable and disable
These commands start or stop a queue, respectively. Both commands take a queue name as an option, and disable also takes a few options, the most important of which may be -c. This option causes disable to cancel all the jobs currently in the queue. The disable command also accepts an-r reason option, which enters the text string reason as an explanation for the printer 's unavailability.
Tip
If you receive the error message not a shell builtin when you use the enable command, you must provide the complete path to the command, usually /usr/bin/enable.
accept and reject
These commands cause the specified print queue to begin accepting or rejecting new jobs for printing. This differs from enable and disable in that accept and reject affect only the queue's ability to accept new jobs for printing, whereas enable and disable affect the queue's ability to print jobs in the queue. Like disable, reject supports a -r reason option so that you can register a reason for the queue's unavailability.
lprm
You can remove a job from the queue using this command. It takes an optional queue definition (-P queue) and a job identifier (which you can obtain with lpstat) as arguments.
lpmove
This command moves a print job from one queue to another. It accepts two arguments: a job identifier and a queue name, as in lpmove oldqueue-456 newqueue. This command moves job oldqueue-456 to the newqueue queue.
As an example of these commands in action, suppose you have a problem with the hp4000 queue—perhaps the printer is malfunctioning and needs to be serviced. Thus, you want to disable it and move some of its jobs to another queue (say, the laserwriter queue), and perhaps delete other jobs. You might type commands like these to do all this:
# disable hp4000
# lpc status hp4000
hp4000:
printer is on device '/dev/null' speed -1
queuing is enabled
printing is disabled
no entries
daemon present
# lpstat
hp4000-433 sholmes 15360 Sun Apr 10 22:20:44 2005
hp4000-434 moriarty 2977 Sun Apr 10 22:21:32
# lpmove hp4000-433 laserwriter
# lprm hp4000-434
# lpstat
laserwriter-433 sholmes 15360 Sun Apr 10 22:20:44 2005
In this example, the hp4000 queue is first disabled, and lpc status hp4000 confirms its disabled status—note the printing is disabled message. The lpstat command reveals that two jobs are now stuck in the disabled queue. The first of these, belonging to sholmes, is moved to thelaserwriter queue with the lpmove command, whereas the second job, belonging to moriarty, is deleted with lprm. A subsequent check with lpstat shows the moved job under its new name. (This job might not show up if it had been completely accepted by the printer before the command was typed.)
Using the CUPS web-based interface
The CUPS web-based interface provides an alternative means of controlling print queues whose features largely parallel those of the text-based commands. From the main printer list (Figure 14-3), you can stop a queue (equivalent to disable) or tell it to reject new jobs (equivalent to reject) by clicking the Stop Printer or Reject Jobs links, respectively. Once clicked, these links change to Start Printer and Accept Jobs, respectively, and have the effect of the enable and accept commands.
You can view the contents of print queues by clicking the Jobs link at the top of the page. The result is a process list similar to the one created by lpstat. This list includes a Control column with a Hold Job and a Cancel Job link for each job. Click these links to temporarily stop a job from printing or to delete the job entirely, respectively.
Maintaining LPD Compatibility
CUPS is designed as a drop-in replacement for LPD , and in fact it uses many of the same commands for printing as LPD. (These are described in "Printing," earlier in the chapter.) A couple of key LPD compatibility issues are providing an environment that programs designed for LPD will find helpful and accepting print jobs from networked LPD clients.
Maintaining a legacy /etc/printcap file
Many programs that expect to print using LPD examine the /etc/printcap file to determine what queues are available. Under LPD, this file defines all the available print queues, so it's a critical LPD file. Thus, CUPS tries to maintain a minimal /etc/printcap file for the benefit of user programs. (CUPS-enabled programs communicate with CUPS in other ways to obtain print queue lists.)
A full LPD /etc/printcap file contains many types of fields, and any given printer definition is likely to use about half a dozen field types. The simplified needs of CUPS, though, mean that a stripped-down file is sufficient. A typical file looks like this:
hp4000|Hewlett-Packard HP LaserJet 4000 Series:rm=nessus:rp=hp4000:
epson|Epson RX500 1440x720 dpi:rm=nessus:rp=epson:
epson_360|Epson RX500, 360dpi economy:rm=nessus:rp=epson_360:
These three lines describe three queues: hp4000, epson, and epson_360. Under LPD, print queues may have multiple names, which are separated from one another by vertical bars (|). Typically, a short name begins the entry, and longer names follow. CUPS uses this feature to provide a short name based on the print queue name and a longer name based on the printer description. Subsequent fields in each line are separated by colons (:). In this example, CUPS has generated entries using the rm= and rp= options, which in LPD define the remote server name and remote print queue name for network printers. In this sample, these fields identify the computer on which the file resides and the queue name. CUPS doesn't require this information, nor do most LPD-using programs, but it can help keep a few programs happy to see this minimal information.
Normally, you needn't be concerned with maintaining an /etc/printcap file, because CUPS does so automatically. If something interferes with this process, though, you might want to create a dummy /etc/printcap file yourself. At a minimum, the file should hold each queue's correct name and a colon. Adding rm= and rp= fields, as in the preceding example, might help some programs.
Accepting print jobs from LPD systems
As noted earlier, CUPS uses IPP for communicating with other CUPS systems. LPD systems use the older LPD protocol. Thus, if your network contains a mix of CUPS and LPD systems, or a mix of CUPS systems with systems that use some other printing system that nonetheless understands the LPD protocol, you may want to enable LPD support in CUPS. This support will enable a CUPS system to accept print jobs submitted via the LPD protocol. It is not necessary on an all-CUPS network, and is disabled by default on all major Linux distributions.
Enabling LPD support is necessary only to accept print jobs from LPD clients. If you want your CUPS daemon to print to a remote system that runs LPD, you can do so without activating this support. In this case, you need to specify the LPD server as a network print server, as described earlier in "Creating a printer definition."
The CUPS LPD support is provided by a small daemon called, appropriately enough, cups-lpd. This server is designed to be run via a super server, such as inetd or xinetd. On distributions that use xinetd, such as Fedora, Red Hat, and SUSE, look for a xinetd configuration file called cups-lpdin the /etc/xinetd.d directory. Look for a line in this file that reads disable = yes and edit it so that it reads disable = no. You can then restart xinetd or tell it to reload its configuration, and the cups-lpd server should be started. This server will accept print jobs using the LPD protocol just like BSD LPD or LPRng would, but it will redirect the job into the local CUPS queue of the same name.
If your system uses inetd, you must add an entry for cups-lpd to the /etc/inetd.conf file:
printer stream tcp nowait lp /usr/lib/cups/daemon/cups-lpd cups-lpd
Some systems will require changes to this configuration. For instance, you might want to call cups-lpd via TCP Wrappers (tcpd) rather than calling cups-lpd directly. As with xinetd, you must restart inetd or tell it to reload its configuration to start cups-lpd.
Printer Troubleshooting
With any luck, if you follow the instructions in this chapter, your printer will work with little or no fuss. Unfortunately, CUPS configuration doesn't always work as planned, and printer troubleshooting can be tricky and frustrating. Although we can't provide a sure-fire way to get your printer working, we can provide some suggestions that can help you track down the source of problems and find solutions to them.
§ If possible, verify that the printer works in another OS on the same computer. Even a FreeDOS (http://www.freedos.org) boot floppy can be handy for such verification, at least for parallel and RS-232 serial printers . If the printer works in another OS, that rules out a lot of pure hardware problems. If not, that suggests (but does not prove) that the problem is hardware-related.
§ Try checking all hardware connections, from the power cables to the cables to the computer. Loose or defective cables can cause endless hours of trouble. If your printer has a power switch, check that the printer is turned on. (We know that sounds incredibly basic, but failure to turn on a printer really is a leading cause of problems!) While you're at it, check that you've got paper in the printer's paper trays—all of them, if it has multiple trays.
§ Examine the printer's front or top panel for any error signals. Some printers have LCDs that can display short messages such as out of paper or paper jam. Others rely on blinking LEDs. Consult your printer's manual for help interpreting these displays.
§ If you have a parallel or RS-232 serial printer, try sending a print job to the printer using its raw device file, as described earlier in "Verifying printer compatibility." If this doesn't work but the printer checks out physically, it could mean you're missing a kernel driver for your device. Loading it with modprobe will perhaps do the trick. Another possible cause of such problems is that you're using the wrong device file, so you might want to try others. If the printer's LEDs blink when you try to print, chances are the file is getting through but is in a format that the printer can't understand, so basic hardware functions are probably (but not certainly) working.
§ If you have a USB printer, check that the kernel has identified the printer by using the lsusb command and by examining the contents of /proc/bus/usb/devices, as described earlier in "Verifying printer compatibility." If the printer's not showing up, you may be missing kernel drivers or your printer might be an exotic model that's not yet supported by Linux.
§ If the printer has a network interface, try using ping to verify basic connectivity with the printer. If it doesn't respond, consult the printer's manual to learn how to activate its network interface. You might also need to review your DHCP server's configuration and logfiles to see why the printer's not obtaining an IP address, if it's supposed to do so via DHCP.
§ If the printer sports multiple interfaces (such as parallel and USB ports), try using the interface you didn't originally use. If the printer begins working (after appropriate reconfiguration in Linux), it could be that the Linux drivers for the interface you originally tried didn't work, or there could be a hardware defect in the printer, your computer, or a cable. You can either try to track down this problem or continue using the interface that's working.
§ If you can get basic printing via a device file working or if you have a USB or network printer that responds in basic ways, you should move on to CUPS configuration.
§ From the main CUPS interface (Figure 14-3), check the printer's description. (Alternatively, type lpc status at a command prompt.) If the printer is described as stopped or rejecting jobs, you should click the appropriate button or use enable or accept to get the queue working again.
§ If the printer's description includes the phrase waiting for job to complete, it means that something's preventing CUPS from clearing a job from the queue. This could be a physical connection problem or a software foul-up. Sometimes restarting CUPS will clear this problem.
§ If the printer prints, but produces reams of gibberish, it probably means that you've selected the wrong printer when configuring the queue. (Sometimes you'll get gibberish if a job is interrupted and you turn the printer on without clearing the existing jobs from the queue, but this doesn't mean your driver is fouled up.) If the gibberish looks like a PostScript program, you might have selected a PostScript variant of your non-PostScript printer, so selecting the non-PostScript variant might work better. If the gibberish seems utterly random, it's probably a matter of selecting a completely incompatible non-PostScript printer.
§ Slow printouts can be a serious problem. You can often improve print speed, particularly for inkjet printers, by reducing the print resolution. This will degrade the print quality, though, and you'll have to decide where a good trade-off point lies. If a USB 2.0 printer is slow, check that you're using a USB 2.0 port and that you've loaded the Linux USB 2.0 (EHCI) drivers. If not, load the appropriate drivers and, if necessary, buy a supplementary USB 2.0 card.
§ If printouts don't meet your expectations for quality, review the printer options described in "Fine-Tuning Printer Definitions." You may be able to increase resolution, change dithering options, alter brightness settings, or otherwise change the way Ghostscript and the printer process your printouts to improve the quality. Some of these changes will slow down the printouts, though.
On the whole, printer troubleshooting can be as much of an art as a science. A lot of things can go wrong, and it's hard to predict what's most likely to go wrong. The preceding summary should at least help you narrow the list of potential causes and get you on the right track to fixing the problem, though.
Behind the Scenes: CUPS Files and Directories
Most of the preceding description of CUPS has steered clear of describing specific files and directories. This is because, with the exception of the /etc/cups/cupsd.conf file, manually editing CUPS configuration files or changing its directories is seldom helpful. CUPS often responds unpredictably to manual changes in its configuration files; you should really use its web-based interface and text-mode commands to configure and control CUPS.
That said, you may need to know about these files and directories. The CUPS configuration files reside in /etc/cups. The cupsd.conf file, as already noted, controls the server on a broad level, and you may need to edit this file. Other important files in this directory include printers.conf (which defines local printers) and lpoptions (which identifies the default printer). The ppd subdirectory holds PPD files for local printers (they're copied from elsewhere, as described shortly).
CUPS stores a great deal of support data in the /usr/share/cups directory tree. Of particular interest is the /usr/share/cups/model subdirectory, which holds PPD files (most in subdirectories named after the printers' manufacturers). The Foomatic and GIMP Print packages may install PPD files there. If they don't, and if you can't get these printer definitions recognized, try creating symbolic links in this subdirectory to the actual location of the printer definition package's PPD files. This should enable CUPS to locate the PPD files and install the printers.
In actual operation, CUPS uses the /var/spool/cups subdirectory to hold print job descriptions and the actual print job files. This directory is owned by root and the lp group and has 0710 (rwx--x---) permissions. CUPS also uses the /var/spool/cups/tmp directory, which is owned by root and the lp group and has 1710 (rwx--x--T) permissions. (These owners and permissions are typical, but may differ between distributions.) Unlike LPD, CUPS doesn't use separate subdirectories for each printer; print jobs for all printers are dumped into the same directory tree.
All materials on the site are licensed Creative Commons Attribution-Sharealike 3.0 Unported CC BY-SA 3.0 & GNU Free Documentation License (GFDL)
If you are the copyright holder of any material contained on our site and intend to remove it, please contact our site administrator for approval.
© 2016-2026 All site design rights belong to S.Y.A.