Ubuntu 15.04 Server with systemd: Administration and Reference (2015)
Part III. Shared Resources
Chapter 10. Print Services
Print services have become an integrated part of every Linux system. They allow you to use any printer on your system or network. Once treated as devices attached to a system directly, printers are now treated as network resources managed by print servers. In the case of a single printer attached directly to a system, the networking features become transparent and the printer appears as just one more device. On the other hand, you could easily use a print server's networking capability to let several systems access the same printer. Although printer installation is almost automatic on most Linux distributions, it helps to understand the underlying process. Printing sites and resources are listed in Table 10-1 .
CUPS
The Common Unix Printing System (CUPS) provides printing services, developed by Apple as an open source project, and is freely available under the GNU Public License. CUPS is the primary print server for most Linux distributions, including Ubuntu. The CUPS site athttp://cups.org provides detailed documentation on installing and managing printers. CUPS is based on the Internet Printing Protocol (IPP), which was designed to establish a printing standard for the Internet (for more information, see http://pwg.org/ipp). Whereas the older line printer (LPD) based printing systems focused primarily on line printers, an IPP-based system provides networking, PostScript, and web support. CUPS works like an Internet server and employs a configuration setup much like that of the Apache web server. Its network support lets clients directly access printers on remote servers, without having to configure the printers themselves. Configuration needs to be maintained only on the print servers. With libgnomecups, GNOME provides integrated support for CUPS, allowing GNOME-based applications to directly access CUPS printers.
|
Resource |
Description |
|
http://cups.org |
Common Unix Printing System |
|
http://pwg.org/ipp |
Internet Printing Protocol |
|
http://lprng.sourceforge.net/ |
LPRng print server (Universe repository) |
Table 10-1: Print Resources
Once you have installed your printers and configured your print server, you can print and manage your print queue using print clients. A variety of print configuration tools are available for the CUPS server such as system-config-printer, the CUPS configuration tool, and various line printing tools such as lpq and lpc, described in detail later in this chapter. Check the Ubuntu Server Guide | File Servers | CUPS - Print Server for basic configuration.
https://help.ubuntu.com/stable/serverguide/cups.html
CUPS is managed by systemd using an on demand socket implementation with cups.service, cups.socket, and cups.path files. In addition, a special printer.target unit detects when a printer is connected to your system. The cups.service file runs the CUPS server, /usr/sbin/cupsd(ExecStart). It is run when the printer.target is activated, which happens when a user connects a printer (WantedBy). The cups.socket unit file has CUPS listen for request at the CUPS socket, /var/run/cups/cups.sock (ListenStream). In effect, CUPS runs like the old inetd daemons, activated only when requested. The cups.path unit sets up CUPS print directories at /var/spool/cups (PathExistsGlob) when the system starts up (WantedBy=multi-user.target).
cups.service
[Unit]
Description=CUPS Scheduler
Documentation=man:cupsd(8)
[Service]
ExecStart=/usr/sbin/cupsd -l
Type=simple
[Install]
Also=cups.socket cups.path
WantedBy=printer.target
cups.socket
[Unit]
Description=CUPS Scheduler
[Socket]
ListenStream=/var/run/cups/cups.sock
[Install]
WantedBy=sockets.target
cups.path
[Unit]
Description=CUPS Scheduler
[Path]
PathExists=/var/cache/cups/org.cups.cupsd
[Install]
WantedBy=multi-user.target
cups-browsed.service
[Unit]
Description=Make remote CUPS printers available locally
After=cups.service avahi-daemon.service
Wants=cups.service avahi-daemon.service
[Service]
ExecStart=/usr/sbin/cups-browsed
[Install]
WantedBy=multi-user.target
Note: Line Printer, Next Generation (LPRng) was the traditional print server for Linux and UNIX systems, but it has since been dropped from many Linux distributions. You can find out more about LPRng at http://lprng.sourceforge.net/.
Printer Devices and Configuration
Before you can use any printer, you first have to install it on a Linux system on your network. A local printer is installed directly on your own system. This involves creating an entry for the printer in a printer configuration file that defines the kind of printer it is, along with other features such as the device file and spool directory it uses. On CUPS, the printer configuration file is /etc/cups/printers.conf. Installing a printer is fairly simple. You determine which device file to use for the printer and the configuration entries for it.
Tip: If you cannot find the drivers for your printer, you may be able to download them from OpenPrinting database at http://www.openprinting.org/drivers. The site maintains an extensive listing of drivers.
Printer Device Files
Linux dynamically creates the device names for printers that are installed. USB-connected printers will be treated as a removable device that can easily be attached to other connections and still be recognized. For older printers connected to a particular port, dedicated device files will be generated. As an example, for parallel printers, the device names will be lp0, lp1, lp2, and so on. The number used in these names corresponds to a parallel port on your PC; lp0 references the LPT1 parallel port and lp1 references the LPT2 parallel port. Serial printers will use serial ports, referenced by the device files like ttyS0, ttyS1, ttyS2, and so on.
Printer URI (Universal Resource Identifier)
Printers can be local or remote. Both are referenced using Universal Resource Identifiers (URI). URIs support both network protocols used to communicate with remote printers, and device connections used to reference local printers.
Remote printers are referenced by the protocol used to communicate with it, like ipp for the Internet Printing Protocol used for UNIX network printers, smb for the Samba protocol used for Windows network printers, and lpd for the older LPRng Unix servers. Their URIs are similar to a Web URL, indicating the network address of the system the printer is connected to.
ipp://mytsuff.com/printers/queue1
smb://guest@lizard/myhp
For attached local printers, especially older ones, the URI will use the device connection and the device name. The usb: prefix is used for USB printers, parallel: for older printers connected to a parallel port, serial: for printers connected to a serial port, and scsi: for SCSI connected printers.
In the CUPS /etc/cups/printers.conf file the DeviceURI entry will reference the URI for a printer. For USB printers, the URI uses usb:.
DeviceURI usb://Canon/S330
Spool Directories
When your system prints a file, it makes use of special directories called spool directories. A print job is a file to be printed. When you send a file to a printer, a copy of it is made and placed in a spool directory set up for that printer. The location of the spool directory is obtained from the printer’s entry in its configuration file. On Linux, the spool directory is located at /var/spool/cups under a directory with the name of the printer. For example, the spool directory for the myepson printer would be located at /var/spool/cups/myepson. The spool directory contains several files for managing print jobs. Some files use the name of the printer as their extension. For example, the myepson printer has the files control.myepson, which provides printer queue control, and active.myepson for the active print job, as well as log.myepson, which is the log file.
CUPS start and restart: cups init script
You can start, stop, and restart CUPS using the service command and the cups script. When you make changes or install printers, be sure to restart CUPS to have your changes take effect. You can use the following command:
sudo service cups restart
The CUPS server is configured to start up when your system boots. The /etc/default/cups script holds start up options for the cups server, such as the LOAD_LP_MODULE option to load the parallel printer driver module.
Installing Printers
Several tools are available for installing CUPS printers. The easiest method is to use the Ubuntu system-config-printer tool on a desktop system. You can also use the CUPS Web browser-based configuration tools, included with the CUPS software (will work with lynx command line browser). Or you can just edit the CUPS printer configuration files directly.
Configuring Printers on the Desktop with system-config-printer
Printers are detected and configured automatically. For removable printers, like a USB printer, a printer icon will appear on the panel as soon as you connect your USB printer, as your printer is detected and configured. If a driver is available for your printer, it will be selected automatically for you and a setup message will appear. If the driver is not available, a Missing printer driver notification is displayed, and a New Printer dialog opens where you can choose your driver.

![]()
system-config-printer
To change your configuration or to add a remote printer, you can use the printer configuration tool, system-config-printer. This utility enables you to select the appropriate driver for your printer, as well as set print options, such as paper size and print resolutions. You can configure a printer connected directly to your local computer or a printer on a remote system on your network. You can start system-config-printer by choosing Printers in the Applications lens System filter.
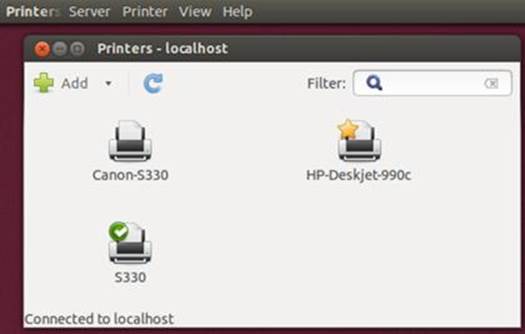

Figure 10-1: system-config-printer tool
The Printing configuration window displays icons for installed printers (see Figure 10-1 ). The menu bar has menus for Server configuration and selection, Printer features like its properties and the print queue, printer classes, and viewing discovered printers. A toolbar has buttons for adding new printers manually and refreshing print configuration. A Filter search box lets you display only printers matching a search pattern. Click on the x icon in the search box to clear the pattern. Clicking on the Looking glass icon in the File search box will display a pop-up menu that will let you search on Name, Description, Location, and Manufacturer/Model. You can save searches as a search group.
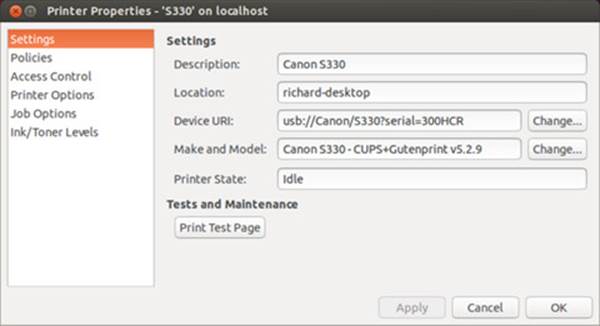
Figure 10-2: Printer properties window
To see the printer settings such as printer and job options, access controls, and policies, double-click on the printer icon or right-click and select Properties. The Printer Properties window opens up with six tabs: Settings, Policies, Access Control, Printer Options, Job Options, and Ink/Toner Levels (see Figure 10-2 ).
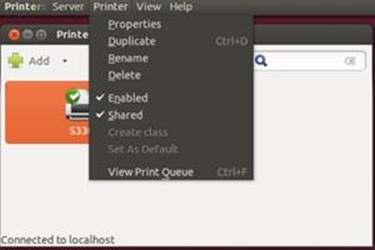
Figure 10-3: Printer configuration window Printer menu
The Printing configuration window's Printer menu lets you rename the printer, enable or disable it, and make it a shared printer. Select the printer icon and then click the Printer menu (see Figure 10-3 ). You can also display the Printer menu by right-clicking on a printer icon. The Delete entry will remove a printer configuration. Use the Set As Default entry to make the printer a system-wide or your personal default printer. The properties entry opens the printer properties window for that printer. You can also access the print queue for the selected printer. If the printer is already a default, the Set As Default entry is shaded out.
When print jobs are waiting in the print queue, a printer icon will appear on the top panel. Clicking on this icon opens the Document Print Status window listing the pending print jobs. You can also open this window from the system-config-printer's Printer menu, View Print Queue item (Printer | View Print Queue). On the Document Print Status window, you can change a job's queue position as well as stop or delete a job (see Figure 10-4 ). From the job menu you can cancel, hold (stop), release (restart), or reprint a print job. Reprint is only available if you have set the preserve jobs option in the printer settings Advanced dialog. You can also authenticate a job. From the View menu, you can choose to display just-printed jobs and refresh the queue.
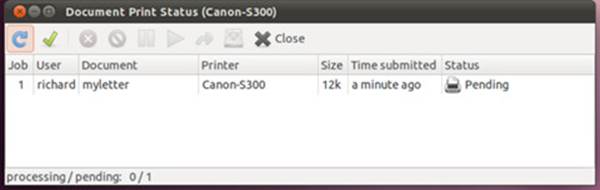
Figure 10-4: Printer queue
To check the server settings, select Settings from the Server menu. This opens a new window showing the CUPS printer server settings (see Figure 10-5 ). The Advanced expand button displays job history and browser server options. If you want to allow reprinting, then select the "Preserve job files (allow reprinting)" option.
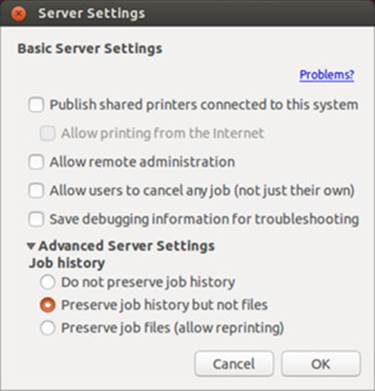
Figure 10-5: Server Settings
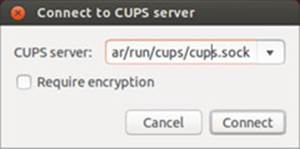
Figure 10-6: Selecting a CUPS server
To select a particular CUPS server, select the Connect entry in the Server menu. This opens a "Connect to CUPS Server" window with a drop down menu listing all current CUPS servers from which to choose (see Figure 10-6 ).
Editing Printer Configuration
To edit an installed printer, double click its icon in the Printer configuration window, or right-click and select the Properties entry. This opens a Printer Properties window for that printer. A sidebar lists configuration tabs. Click on one to display that tab. There are configuration tabs for Settings, Policies, Access Control, Printer Options, Job Options, and Ink/Toner Levels (see Figure 10-8 ).
Once you have made changes, you can click Apply to save your changes and restart the printer daemon. You can test your printer using the Tests and Maintenance tasks on the Settings tab. The Print Test Page prints a page, whereas the Print Self-Test Page also checks the printer hardware such as ink-jet heads.
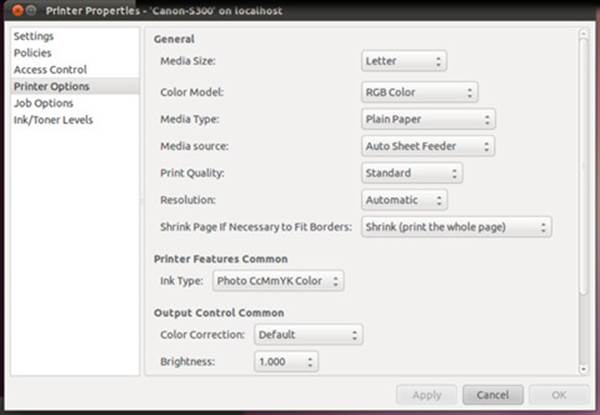
Figure 10-7: Printer Options
On the Settings tab you can change configuration settings like the driver and the printer name, and run test pages (see Figure 10-2 ). Should you need to change the selected driver, click on the Change button next to the Make and Model entry to open printer model and driver windows like those described in the "Add new printer manually" section. There you can specify the model and driver you want to use, even loading your own driver. Should you have to change the device URI (location and protocol), you can click the Change button to the right of the Device URI entry to open a "Change Device URI" dialog.
The Policies tab lets you enable and disable the printer, determine if it is to be shared, and whether to let it accept jobs or not (you also can enable or share the printer from the Printer menu). You can also specify an error policy, which specifies whether to retry or abort the print job, or stop the printer should an error occur. You can choose to print banners at the start or end indicating the level of security for a document, like confidential and secret.
The Access Control tab lets you to deny access to certain users.
The Printer Options tab is where you set particular printing features like paper size and type, print quality, and the input tray to use (see Figure 10-7 ).
On the Job Options tab you can select default printing features (see Figure 10-8 ) such as the number of copies, orientation, and single or double sided printing. Options are arranged into three categories: Common Options, Image Options, and Text Options. Only the more common options are displayed. Each category has an expand button that will display all the options for that category. Double sided, output order, and media are all expanded options in the Common Options category.
The Ink/Toner Levels tab will display Ink or Toner levels for supported printers, along with status messages.
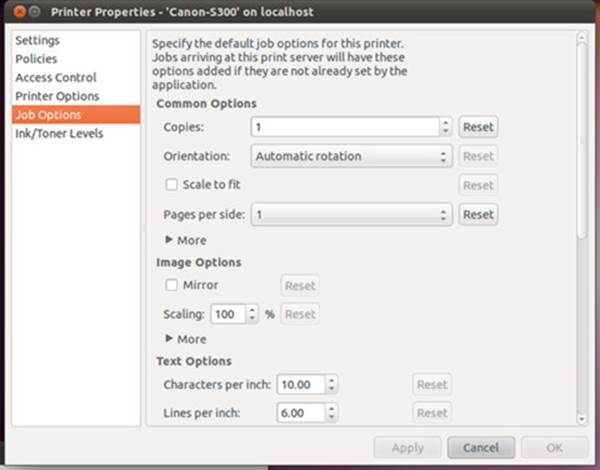
Figure 10-8: Jobs Options
Default System-wide and Personal Printers
To make a printer the default printer, either right-click on the printer icon and select "Set As Default", or single click on the printer icon and then from the Printer configuration window's Printer menu select the "Set As Default" entry (see Figure 10-3 ). A Set Default Printer dialog open with options for setting the system-wide default or setting the personal default (see Figure 10-9 ). The system-wide default printer is the default for the system served by your CUPS server.
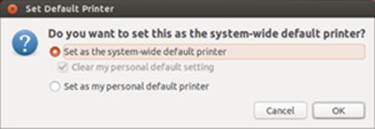
Figure 10-9: Set Default Printer
The system-wide default printer will have a green check mark emblem on its printer icon in the Printing configuration window.
Should you wish to use a different printer yourself (user-specific) as your default printer, you can designate it as your personal default. To make a printer your personal default, select the entry "Set as my personal default printer" in the Set Default Printer dialog. A personal emblem, a yellow star, will appear on the printer's icon in the Printer configuration window. In Figure 10-10 , the Canon-S300 printer is the system-wide default, whereas the HP-DeskJet printer is the personal default.
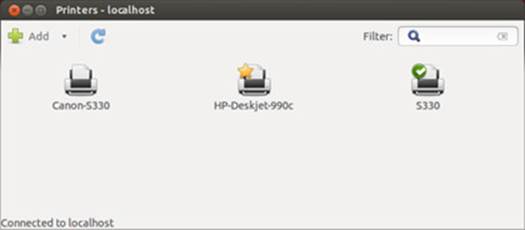
Figure 10-10: System-wide and personal default printers
Printer Classes
The Class entry in the Server | New menu lets you create a printer class. You can access the New menu from the Server menu or from the Add button. This feature lets you select a group of printers to print a job, instead of selecting just one. That way, if one printer is busy or down, another printer can be selected automatically to perform the job. Installed printers can be assigned to different classes. When you click the Class entry in the New menu, a New Class window opens. Here you can enter the name for the class, any comments, and the location (your host name is entered by default). The next screen lists available printers on right side (Other printers) and the printers you assigned to the class on the left side (Printers in this class). Use the arrow button to add or remove printers to the class. Click Apply when finished. Tabs for a selected class are much the same as for a printer, with a Members tab instead of a Printer Options tab. In the Members tab you can change which printers belong to the class
Adding New Printers Manually
Printers are detected automatically, though in the case of older printers and network printers, you may need to add the printer manually. In this case click the Add button and select Printer. A New Printer window opens, displaying a series of dialog boxes where you select the connection, model, drivers, and printer name with location.
On the Select Device dialog, select the appropriate printer connection information. Connected local printer brands will already be listed by name, such as Canon. For remote printers you will specify the type of network connection, like "Windows printers via Samba" for printers connected to a Windows system, "AppSocket/HP Direct" for HP printers connected directly to your network, and the "Internet Printing Protocol (ipp)" for printers on Linux and Unix systems on your network. These connections are displayed under the Network Printer heading. Click the expansion arrow to display them.
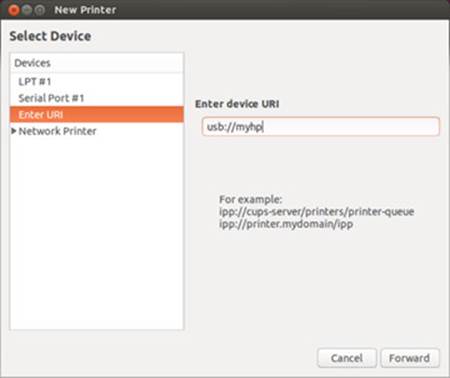
Figure 10-11: Selecting a new printer connection
For most connected printers, your connection is usually determined by udev, which now manages all devices. A USB printer will simply be described as a USB printer, using the usb URI designation (see Figure 10-11 ). For an older local printer, you may have to choose the port the printer is connected to, such as LPT1 for the first parallel port used for older parallel printers, or Serial Port #1 for a printer connected to the first serial port. To add a USB printer manually, you would select the "Enter URI" Entry and enter the URI consisting of the prefix usb:// and the name you want to give to the printer, like usb://myepson.
A search is conducted for the appropriate driver, including downloadable drivers. If the driver is found, the Choose Driver screen is displayed with the appropriate driver manufacturer already selected for you. You need only click the forward button. On the next screen, also labeled Choose Driver, the printer models and drivers files are listed and the appropriate one is already selected for you. Just click the Forward button. The Describe Printer screen is then displayed where you can enter the Printer Name, Description, and Location. These are ways you can personally identify a printer. Then click Apply.
If the printer driver is not detected or is detected incorrectly, on the Choose Driver screen you have the options to choose the driver from the printer database, from a PPD driver file, or from a search of the OpenPrinting online repository. The selection display will change according to which option you choose.
The database option lists possible manufacturers. Use your mouse to select the one you want (see Figure 3-12 ).
The search option displays a search box for make and model. Enter both the make (printer manufacturer) and part of the model name (See figure 3-13). The search results will be available in the Printer model drop down menu. Select the one you want. Then click Forward.

Figure 10-12: Printer manufacturer for new printers
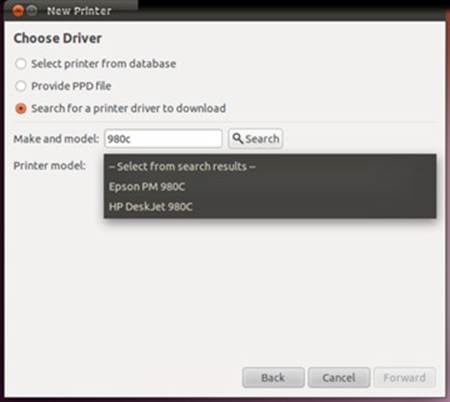
Figure 10-13: Searching for a printer driver from the OpenPrinting repository
The PPD file option displays a file location button that opens a Select file dialog you can use to locate the PPD file on your system.
If you are selecting a printer from the database, on the next screen you select that manufacturer’s model along with its driver (see Figure 10-14 ). For some older printer, though the driver can be located on the online repository, you will still choose it from the local database (the drivers are the same). The selected drivers for your printer will be listed. If there are added options for your printer, the Installable Options screen lists them allowing you to check the ones you want.
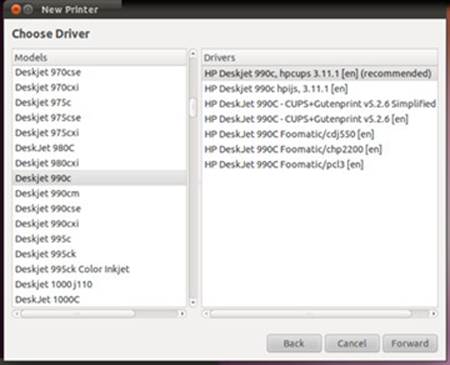
Figure 10-14: Printer Model and driver for new printers using local database
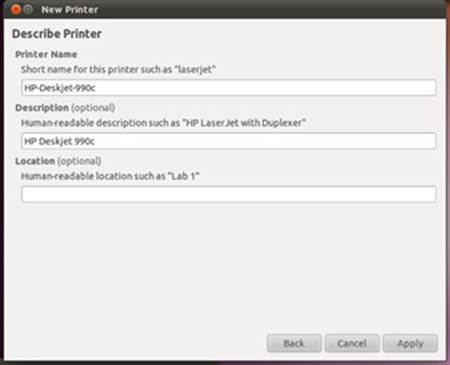
Figure 10-15: Printer Name and Location for new printers
You can then enter your printer name and location (see Figure 10-15 ). These will be entered for you using the printer model and your system's host name. You can change the printer name to anything you want. When ready, click Apply. You will be prompted to print a test page. An icon for your printer will be displayed in the Printing configuration window. You are now ready to print.
Note: KDE 4 provides a printer configuration interface for CUPS. Access it on the System Settings Advanced tab, or from Applications | System | Printer Configuration). Configuration is similar to system-config-printer.
CUPS Web Browser-based configuration tool
One of the easiest ways to configure and install printers with CUPS is to use the CUPS configuration Web interface, a web browser–based tool. The CUPS configuration interface is a web-based tool that can also manage printers and print jobs. A web page is displayed with tabs for managing jobs and printers, and performing administrative tasks. You can access the CUPS configuration tool using the localhost address and specifying port 631. Enter the following URL into your web browser:
http://localhost:631
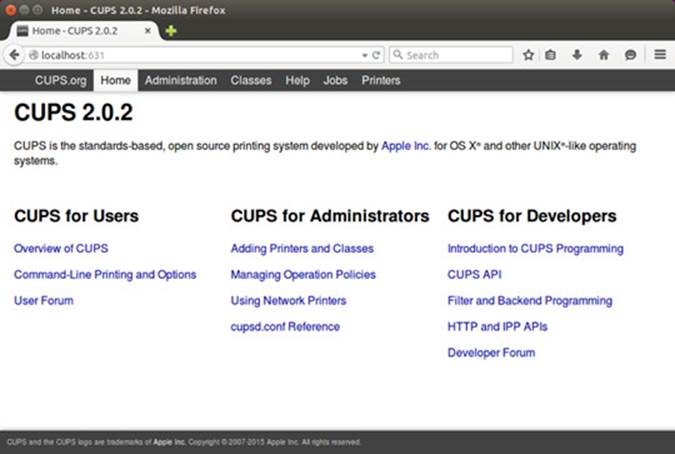
Figure 10-16: CUPS Web-based Configuration Tool: Home tab
You can also can use this CUPS configuration interface with a command line Web browser like elinks (install elinks first). This allows you to configure a printer from the command line interface. Use the ENTER key to display menus and make selections, and arrow keys to navigate.
elinks localhost:631
Entering the localhost:631 URL in your Web browser opens the Home screen for the CUPS Web interface. There are tabs for various sections, as well as links for specialized tasks like adding printers or obtaining help (see Figure 10-16 ). Tabs include Administration, Classes, Online Help, Jobs, and Printers. You can manage and add printers on the Administration tab. The Printers tab will list installed printers with buttons for accessing their print queues, printer options, and job options, among others. The Jobs tab lists your print jobs and lets you manage them.
When you try to make any changes for the first time during the session, you will first be asked to enter the administrator’s username (your user name) and password (your user password), just as you would for the sudo command.
The Administration tab displays segments for Printers, Classes, Jobs, and the Server (see Figure 10-17 ). The server section is where you allow printer sharing. Buttons allow you to view logs and change settings.
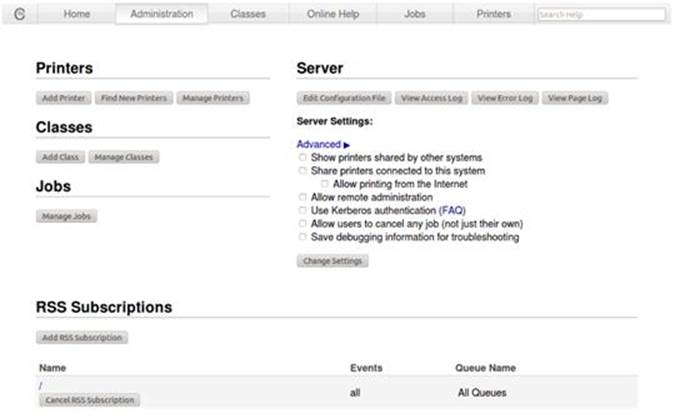
Figure 10-17: CUPS Web-based Configuration Tool: Administration tab
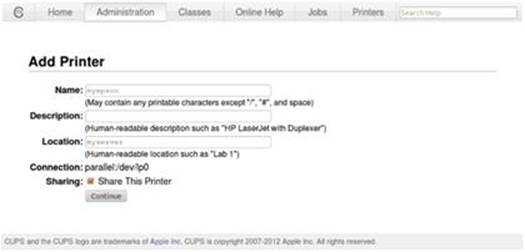
Figure 10-18: Adding a new printer: CUP Web Interface
With the CUPS configuration tool, you install a printer on CUPS through a series of Web pages, each of which requests different information. To install a printer, click the Add Printer button either on the Home page or the Administration page. You must first specify the protocol. On the next screen you enter a URI to use for the printer. For a local printer this is the protocol and the host name. A page is displayed where you enter the printer name and location (see Figure 10-18 ). A Sharing entry lets you choose to share the printer. The location is the host to which the printer is connected. The procedure is similar to system-config-printer. Subsequent pages will prompt you to enter the make and model of the printer, which you select from available listings. You can also load a PPD driver file instead, if you have one. Click the Add Printer button when read. On the following page you then set default options for your printer, like paper size and type, color, print quality, and resolution.
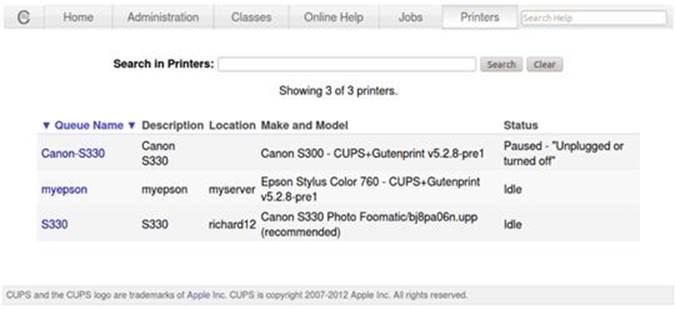
Figure 10-19: CUPS Web-based Configuration Tool: Printers tab
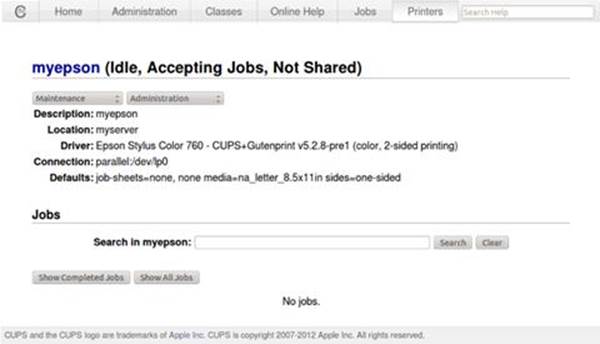
Figure 10-20: CUPS Web-based Configuration Tool: Managing Printers
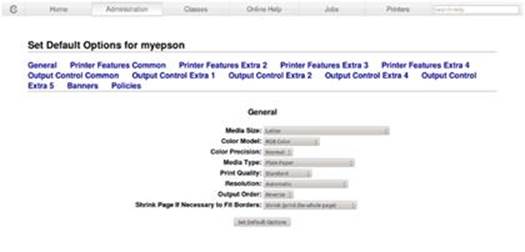
Figure 10-21: CUPS Web-based Configuration Tool: Printer Options
To manage a printer, click the Printers tab or the Manage Printers button in the Administration page. The Printers page will list your installed printers (see Figure 10-19 ). Clicking a printer link opens a page for managing your jobs and performing administrative tasks (see Figure 10-20 ). From the Maintenance drop down menu lets you perform printer and job tasks like pausing the printer, printing a test page, and canceling all jobs. The Administration menu lets you modify the printer, delete it, and set default options. Choosing the Administration menu's Set Default Options entry displays a page can configure how your printer prints (see Figure 10-21 ). Links at the top of the page display pages for setting certain options like general options, output control, banners, and extra features such as printer direction, ink type, color density, and drop size. The general options are listed first, where you can set basic features like the resolution and paper size.
Note: You can perform all administrative tasks from the command line using the lpadmin command. See the CUPS documentation for more details.
Configuring Remote Printers on CUPS
To install a remote printer that is attached to a Windows system or another Linux system running CUPS, you specify its location by using special URL protocols. For another CUPS printer on a remote host, the protocol used is ipp, for Internet Printing Protocol, whereas for a Windows printer, it would be smb. Older UNIX or Linux systems using LPRng would use the lpd protocol.
To use the CUPS configuration tool to install a remote printer, specify the remote printer network protocol on the initial Add Printer page. You can choose from Windows, Internet Printing Protocol (other UNIX or Linux systems), Apple and HP JetDirect connected printers, and the older LPD line printers (see Figure 10-22 ). If a network printer is connected currently, it may be listed in the Discovered Network Printers list.
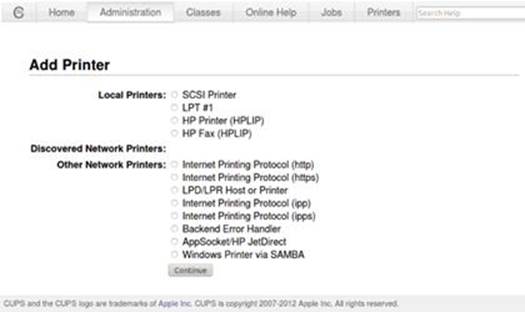
Figure 10-22: CUPS Web-based Configuration Tool: Network Printers
Configuring Remote Printers on the Desktop with system-config-printer
You specify a printer location using special URI protocols. For a locally attached USB printer, the USB URI is usb. For another CUPS printer on a remote host, the protocol used is ipp, for Internet Printing Protocol, whereas for a Windows printer, it would be smb. Older UNIX or Linux systems using LPRng would use the lpd protocol.
You can use system-config-printer to set up a remote printer on Linux, UNIX, or Windows networks. When you add a new printer or edit one, the New Printer dialog will list possible remote connection types under the Network entry. When you select a remote connection entry, a pane will be displayed to the right where you can enter configuration information.
To find any connected printers on your network automatically, click the Find Network Printer entry. Enter the host name of the system the remote printer is connected to, then click the Find button. The host is searched and the detected printers are displayed as entries under the Network Printer heading (see Figure 10-23 ).
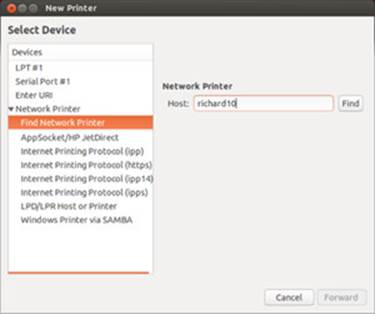
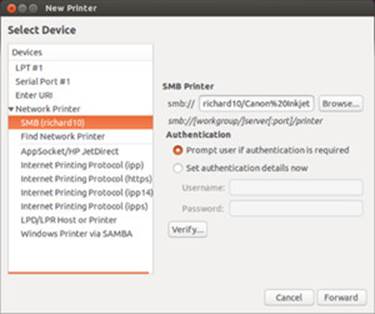
Figure 10-23: Finding a network printer
To configure a specific type of printer, choose from the available entries. For a remote Linux or UNIX printer, select either Internet Printing Protocol (ipp), which is used for newer systems, or LPD/LPR Host or Printer, which is used for older systems. Both panes display entries for the Host name and the queue. For the Host name, enter the hostname for the system that controls the printer. For an Apple or HP jet direct printer on your network, select the AppSocket/HP jetDirect entry.
A "Windows printer via Samba" printer is one located on a Windows network (see Figure 10-24 ). You need to specify the Windows server (host name or IP address), the name of the share, the name of the printer’s workgroup, and the username and password. The format of the printer SMB URL is shown on the SMP Printer pane. The share is the hostname and printer name in the smb URI format //workgroup/hostname/printername. The workgroup is the windows network workgroup that the printer belongs to. On small networks there is usually only one. The hostname is the computer where the printer is located. The username and password can be for the printer resource itself, or for access by a particular user. The pane will display a box at the top where you can enter the share host and printer name as a smb URI.
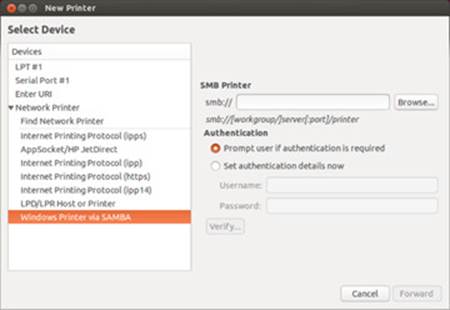
Figure 10-24: Selecting a Windows printer
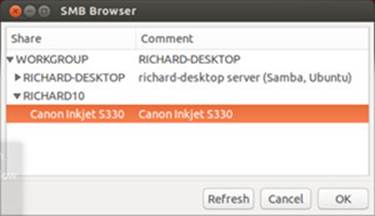
Figure 10-25: SMB Browser, selecting a remote windows printer
Instead of manually entering the URI for a printer, you can use the Browse button to choose from a list of detected Windows printers on your network. Click the Browse button to open a SMB Browser window, where you can select the printer from a listing of Windows hosts (see Figure 10-25 ). For example, if your Windows network is WORKGROUP, then the entry WORKGROUP will be shown, which you can then expand to list all the Windows hosts on that network (if your network is MSHOME, then that is what will be listed). If you are using a firewall, be sure to turn it off before browsing a Windows workgroup for a printer, unless the firewall is already configured to allow Samba access.
When you make your selection, the corresponding URI will show up in the smb:// box (See Figure 10-26 ). You also can enter in any needed Samba authentication, if required, like user name or password. Check "Authentication required" to allow you to enter the Samba Username and Password.
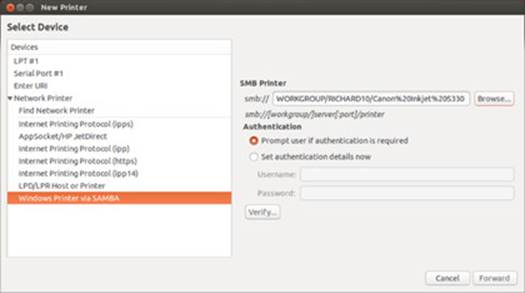
Figure 10-26: Remote Windows printer connection configuration
You then continue with install screens for the printer model, driver, and name. Once installed, you can then access the printer properties just as you would any printer (see Figure 10-27 ).
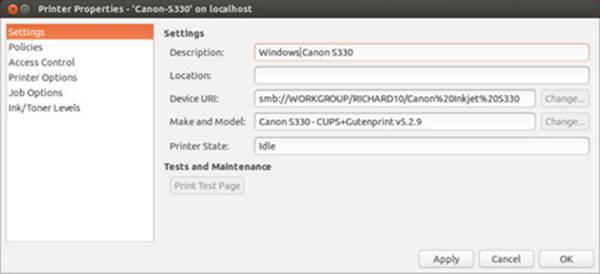
Figure 10-27: Remote Windows printer Settings
To access an SMB shared remote printer, you need to install Samba and have the Server Message Block services enabled using the smbd and nmbd daemons. The Samba service will be enabled by default. You can use the service command to restart, stop, and start the services. Printer sharing must be enabled on the Windows network.
sudo service smbd restart
sudo service nmbd restart
Configuring remote printers manually
In the printers.conf file, for a remote printer, instead of listing the device, the DeviceURI entry, will have an Internet address, along with its protocol. For example, a remote printer on a CUPS server (ipp) would be indicated as shown here (a Windows printer would use the smbprotocol):
DeviceURI ipp://mytsuff.com/printers/queue1
For a Windows printer, you first need to install, configure, and run Samba (CUPS uses Samba to access Windows printers). When you install the Windows printer on CUPS, you specify its location using the URL protocol smb. The username of the user allowed to log in to the printer is entered before the hostname and separated from the hostname by an @ sign. On most configurations, this is the guest user. The location entry for a Windows printer called myhp attached to a Windows host named lizard is shown next. Its Samba share reference would be //lizard/myhp:
DeviceURI smb://guest@lizard/myhp
To enable CUPS on Samba, you also have to set the printing option in the /etc/samba/smb.conf file to cups, as shown here:
printing = cups
printcap name = cups
Note: To configure a shared Linux printer for access by Windows hosts, you need to configure it as a SMB shared printer. You do this with Samba.
CUPS Printer Classes
CUPS lets you select a group of printers to print a job, instead of selecting just one. If one printer is busy or down, another printer can be selected automatically to print the job. Such groupings of printers are called classes. Once you have installed your printers, you can group them into different classes. For example, you may want to group all inkjet printers into one class and laser printers to another, or you may want to group printers connected to one specific printer server in their own class.
You can create classes on the CUPS Configuration tool Administration tab by clicking the Add Class button. On the Add Class page you enter the name of the class, its location and then select the printers to add to the class from the Members list. The class will then show up on the Classes tab, showing its members and status.
As previously noted, on system-config-printer, you can set up classes for printers. The Class entry in the Server | New menu lets you create a printer class. You can access the New menu from the Server menu or from the Add button. You can also select a printer or set of printers and choose "Create class" from the Printer menu, automatically adding them to the new class.
CUPS Configuration files
CUPS configuration files are placed in the /etc/cups directory. These files are listed in Table 10-2 . The classes.conf and printers.conf files can be managed by the web interface. The printers.conf file contains the configuration information for the different printers you have installed. Any of these files can be edited manually, if you want. Some applications will have their own configuration files like acroread.conf for the Adobe Reader.
|
Filename |
Description |
|
classes.conf |
Contains configurations for different local printer classes |
|
client.conf |
Lists specific options for specified clients |
|
cupsd.conf |
Configures the CUPS server, cupsd |
|
printers.conf |
Contains printer configurations for available local printers |
|
cups-files.conf |
File and directories used by CUPS |
|
cups-browsed.conf |
Access to remote and local printers |
|
subscriptions.conf |
Subscription controls for printer and print job information |
Table 10-2: CUPS Configuration Files
cupsd.conf
The CUPS server is configured with the cupsd.conf file located in /etc/cups. You must edit configuration options manually; the server is not configured with the web interface. Your installation of CUPS installs a commented version of the cupsd.conf file with each option listed, though most options will be commented out. Commented lines are preceded with a # symbol. Each option is documented in detail. The server configuration uses an Apache web server syntax consisting of a set of directives. As with Apache, several of these directives can group other directives into blocks.
For a detailed explanation of cupsd.conf directives check the CUPS documentation for cupsd.conf. You can also reference this documentation from the Online Help page | References link on the CUPS browser-based administration tool, http://localhost:631.
http://www.cups.org/documentation.php/doc-1.7/ref-cupsd-conf.html
The cupsd.conf file begins with setting.
LogLevel warn
On Ubuntu CUPS logging in disables.
MaxLogSize 0
The Listen directives set the machine and socket on which to receive connections. These are set by default to the local machine, localhost port 631. If you are using a dedicated network interface for connecting to a local network, you would add the network card's IP address, allowing access from machines on your network.
# Only listen for connections from the local machine.
Listen localhost:631
Listen /var/run/cups/cups.sock
Browsing directives allows your local printers to be detected on your network, enabling them to be shared. For shared printing, the Browsing directive is set to on (it is set to Off by default). A BrowseOrder of allow, deny will deny all browse transmissions, then first check the BrowseAllow directives for exceptions. A reverse order (deny, allow) does the opposite, accepting all browse transmissions, and first checks for those denied by BrowseDeny directives. The default cupsd.conf file has a BrowseOrder allow, deny directive followed by a BrowseAllow directive, which is set to all. To limit this to a particular network, use the IP address of the network instead of all. The BrowseLocalProtocols lists the network protocols to use for advertising the printers on a local network. The BrowseAddress directive will make your local printers available as shared printers on the specified network. It is set to @LOCAL to allow access on your local network. You can add other BrowseAddress directives to allow access by other networks.
# Show shared printers on the local network.
Browsing On
BrowseOrder allow,deny
BrowseAllow all
BrowseLocalProtocols CUPS dnssd
BrowseAddress @LOCAL
CUPS supports both Basic and Digest forms of authentication, specified in the AuthType directive. Basic authentication requires a user and password. For example, to use the web interface, you are prompted to enter the root user and the root user password. Digest authentication makes use of user and password information kept in the CUPS /etc/cups/passwd.md5 file, using MD5 versions of a user and password for authentication. In addition, CUPS also supports a BasicDigest and Negotiate authentication. BasicDigest will use the CUPS md5 password file for basic authentication. Negotiate will use Kerberos authentication. The default authentication type is set, using the DefaultAuthType directive, set to Basic.
# Default authentication type, when authentication is required...
DefaultAuthType Basic
The Web interface setting is set to yes.
WebInterface Yes
Location Directives
Certain directives allow you to place access controls on specific locations. These can be printers or resources, such as the administrative tool or the spool directories. Location controls are implemented with the Location directive. There are several Location directives that control access. The first controls access to the server root directory, /. The Order allow, deny entry activates restrictions on access by remote systems. If there are no following Allow or Deny entries then the default is to deny all. There is an implied Allow localhost with the "Order allow, deny" directive, always giving access to the local machine. In effect, access here is denied to all systems, allowing access only by the local system.
# Restrict access to the server...
<Location />
Order allow,deny
</Location>
Another Location directive is used to restrict administrative access, the /admin resource. The Order allow,deny directive denies access to all systems, except for the local machine.
# Restrict access to the admin pages...
<Location /admin>
Order allow,deny
</Location>
Allowfrom and Denyfrom directives can permit or deny access from specific hosts and networks. If you wanted to just allow access to a particular machine, you would use an Allow from directive with the machine's IP address. CUPS also uses @LOCAL to indicate you local network, andIF(name) for a particular network interface (name is the device name of the interface) used to access a network. Should you want to allow administrative access by all other systems on your local network, you can add the Allow from @LOCAL. If you add an Allow directive, you also have to explicitly add the Allow localhost to insure access by your local machine.
# Restrict access to the admin pages...
<Location /admin>
Allow from localhost
Allow from @LOCAL
Order allow,deny
</Location>
The following entry would allow access from a particular machine.
Allow From 192.168.0.5
The next location directive restricts access to the CUPS configuration files, /admin/conf. The AuthType default directive refers to the default set by DefaultAuthType. The Require user directive references the SystemGroup directive, @SYSTEM (defined in the cups-files.conf file). Only users from that group are allowed access.
# Restrict access to configuration files...
<Location /admin/conf>
AuthType Default
Require user @SYSTEM
Order allow,deny
</Location>
Default Operation Policy: Limit Directives
A default operation policy is then defined for access to basic administration, printer, print job, and owner operations. The default operation policy section begins with the <Policy default> directive. Limit directives are used to implement the directives for each kind of operation. Job operations covers tasks like sending a document, restarting a job, suspending a job, and restarting a job. Administrative tasks include modifying a printer configuration, deleting a printer, managing printer classes, and setting the default printer. Printer operations govern tasks like pausing a printer, enabling or disabling a printer, and shutting down a printer. The owner operations consist of just canceling a job and authenticating access to a job.
See the CUPS documentation on managing operations policies for more details.
http://www.cups.org/documentation.php/doc-1.6/policies.html
On all the default Limit directives, access is allowed only by the local machine (localhost), Order allow,deny.
The policy section begins with access controls for user and job information. The default for JobPrivateAccess limits access to owner, system, and access control lists. JobPrivateValues specifies values made private, such as the job name, originating host, and originating user. SubscriptionPrivateAccess and SubscriptionPrivateValues specify access for subscription attributes such notifications of printer events like job completed or job stopped.
Limit directive are set up to create and print jobs.
<Limit Create-Job Print-Job Print-URI Validate-Job>
Order deny,allow
</Limit>
Both the administrative and printer Limit directives are set to the AuthTypedefault and limited to access by an administrative users, Require user @SYSTEM. The administrative directive is shown here.
# All administration operations require an administrator to authenticate...
<Limit CUPS-Add-Modify-Printer CUPS-Delete-Printer CUPS-Add-Modify-Class CUPS-Delete-Class CUPS-Set-Default CUPS-Get-Devices>
AuthType Default
Require user @SYSTEM
Order deny,allow
</Limit>
Both the job related and owner Limit directives require either owner or administrative authentication, Require user @OWNER @SYSTEM. The Owner Limit directive is shown here.
# Only the owner or an administrator can cancel or authenticate a job...
<Limit Cancel-Job CUPS-Authenticate-Job>
Require user @OWNER @SYSTEM
Order deny,allow
</Limit>
For all other tasks, <Limit All>, access is restricted to the local machine (localhost).
<Limit All>
Order deny,allow
</Limit>
The AuthClass directive can be used within a Limit directive to specify the printer class allowed access. The System class includes the root, sys, and system users.
An authenticated set of policy directives follows the default policy, with similar entries and an added AuthType entry in the Limit directive to create and print jobs.
<Limit Create-Job Print-Job Print-URI Validate-Job>
AuthType Default
Order deny,allow
</Limit>
cupsctl
You can use the cupsctl command to modify your cupsd.conf file, rather than editing the file directly. Check the cupsctl Man page for details. The cupsctl command with no options will display current settings.
cupsctl
The changes you can make with this command are limited turning off remote administration or disabling shared printing. The major options you can set are:
remote-admin Enable or disable remote administration
remote-any Enable or disable remote printing
remote-printers Enable or disable the display of remote printers
share-printers Enable or disable sharing of local printers with other systems
printers.conf
Configured information for a printer will be stored in the /etc/cups/printers.conf file. You can examine this file directly, even making changes. Here is an example of a printer configuration entry. The DeviceURI entry specifies the device used, in this case a USB printer. It is currently idle, with no jobs:
# Printer configuration file for CUPS
# Written by cupsd
<Printer mycannon>
Info Cannon s330
Location richard-server
MakeModel Canon S330
DeviceURI usb://Canon/S330
State Idle
StateTime 1166554036
Accepting Yes
Shared Yes
ColorManaged Yes
JobSheets none none
QuotaPeriod 0
PageLimit 0
KLimit 0
OpPolicy default
ErrorPolicy retry-job
</Printer>
subscriptions.conf
Configured information for printer and job information is located in the /etc/cups/subscriptions.conf file. Those receiving the information are specified by the SubscriptionPrivateAccess and SubscriptionPrivateValues directives in the policy section of the cupd.conf file. TheEvents directive specifies notifications of events to be sent, events such as job-completed, printer-stopped, and server-started. The Owner directive lists the users for this subscription. LeaseDuration is the time the subscription remains valid (0 value is the life of the print job or forever).Interval is the time between notifications. Recipient is the recipient URI for the notification. In the following example it is dbus:// (your desktop). You can find a complete list of directives and events at:
http://www.cups.org/documentation.php/ref-subscriptions-conf.html
A sample subscriptions.conf file is shown here:
# Subscription configuration file for CUPS v1.5.4
# Written by cupsd on 2013-03-13 14:13
NextSubscriptionId 119
<Subscription 118>
Events printer-state-changed printer-restarted printer-shutdown printer-stopped printer-added printer-deleted job-state-changed job-created job-completed job-stopped
Owner richard
Recipient dbus://
LeaseDuration 3600
Interval 0
ExpirationTime 1363212783
NextEventId 1
</Subscription>
cups-files.conf
The files and directories that CUPS uses to manage print jobs can be configured in the /etc/cups/cups-files.conf file. The ErrorLog directive specified the CUPS error log file.
ErrorLog /var/log/cups/error_log
The SystemGroup directive defines the users referenced by @SYSTEM in cupsd.conf.
SystemGroup lpadmin
cups-browsed.conf
The cups-browsed.conf file configures the cups-browsed daemon, used for browsing remote and local printers. The BrowseRemoteProtocoals defines the protocols to use.
BrowseRemoteProtocols dnssd cups
The BrowseAllow directive can be used to restrict browsing to specified servers or networks.
BrowseAllow 192.168.1.0/24
The CreateIPPPrinterQueues directive allows the detection of non-CUPS IPP printers.
CUPS Command Line Print Clients
Once a print job is placed in a print queue, you can use any of several print clients to manage the jobs on your printer or printers, such as system-config-printer and the CUPS Printer Configuration tool. You can also use several command line print CUPS clients, which include the lpr, lpc,lpq, and lprm commands. With these clients, you can print documents, list a print queue, reorder it, and remove print jobs, effectively canceling them. For network connections, CUPS features an encryption option for its commands, -E, to encrypt print jobs and print information sent from a network. Table 10-3 shows various printer commands.
Note: The command line clients have the same name, and much the same syntax, as the older LPR and LPRng command line clients used in Unix and older Linux systems.
lpr
The lpr client submits a job, and lpd then takes it in turn, and places it on the appropriate print queue; lpr takes as its argument the name of a file. If no printer is specified, the default printer is used. The -P option lets you specify a particular printer. In the next example, the user first prints the file preface and then prints the file report to the printer with the name myepson:
$ lpr preface
$ lpr -P myepson report
|
Printer Management |
Description |
|
GNOME Print Manager |
GNOME print queue management tool (CUPS) |
|
CUPS Configuration Tool |
Prints, manages, and configures CUPS |
|
lpr options file-list |
Prints a file, copies the file to the printer’s spool directory, and places it on the print queue to be printed in turn. |
|
lpq options |
Displays the print jobs in the print queue. |
|
lpstat options |
Displays printer status |
|
lprm options printjob-id or printer |
Removes a print job from the print queue. You identify a particular print job by its number as listed by lpq. |
|
lpc |
Manages your printers. At the lpc> prompt, you can enter commands to check the status of your printers and take other actions |
Table 10-3: CUPS Print Clients
lpc
You can use lpc to enable or disable printers, reorder their print queues, and re-execute configuration files. To use lpc, enter the command lpc at the shell prompt. You will see an lpc> prompt, where you can enter lpc commands to manage your printers and reorder their jobs. The statuscommand with the name of the printer displays whether the printer is ready, how many print jobs it has, and so on. The stop and start commands can stop a printer and start it back up. The printers shown depend on the printers configured for a particular print server. A printer configured on CUPS will appear only if you have switched to CUPS.
$ lpc
lpc> status myepson
myepson:
printer is on device 'usb' speed -1
queuing is enabled
printing is enabled
1 entry in spool area
lpq and lpstat
You can manage the print queue using the lpq and lprm commands. The lpq command lists the print jobs currently on the print queue. With the -P option and the printer name, you can list the jobs for a particular printer. If you specify a username, you can list the print jobs for that user. With the -l option, lpq displays detailed information about each job. If you want information on a specific job, simply use that job’s ID number with lpq. To check the status of a printer, use lpstat.
$ lpq
myepson is ready and printing
Rank Owner Jobs File(s) Total Size
active chris 1 report 1024
lprm
The lprm command lets you remove a print job from the queue, erasing the job before it can be printed. The lprm command takes many of the same options as lpq. To remove a specific job, use lprm with the job number. To remove all printing jobs for a particular printer, use the -P option with the printer name. lprm with no options removes the job printing currently. The following command removes the first print job in the queue (use lpq to obtain the job number):
lprm 1
CUPS Command Line Administrative Tools
CUPS provides command line administrative tools such as lpadmin, lpoptions, lpinfo, cupsenable, cupsdisable, accept, and reject (cups-client package). The cupsenable and cupsdisable commands start and stop print queues directly, whereas the accept and reject commands start and stop particular jobs. The lpinfo command provides information about printers, and lpoptions lets you set printing options. The lpadmin command lets you perform administrative tasks such as adding printers and changing configurations. CUPS administrative tools are listed in Table 10-4 .
You can use the lpadmin command either to set the default printer or configure various options for a printer. You can use the -d option to specify a particular printer as the default destination. Here myepson is made the default printer:
lpadmin -d myepson
The -p option lets you designate a printer for which to set various options. The following example sets printer description information:
lpadmin -p myepson -D Epson550
Certain options let you control per-user quotas for print jobs. The job-k-limit option sets the size of a job allowed per user, job-page-limit sets the page limit for a job, and job-quota-period limits the number of jobs with a specified time frame. The following command set a page limit of 100 for each user:
lpadmin -p myepson -o job-page-limit=100
|
Administration Tool |
Description |
|
lpadmin |
CUPS printer configuration |
|
lpoptions |
Sets printing options |
|
cupsenable |
Activates a printer |
|
cupsdisable |
Stops a printer |
|
accept |
Allows a printer to accept new jobs |
|
reject |
Prevents a printer from accepting print jobs |
|
lpinfo |
Lists CUPS devices available |
Table 10-4: CUPS Administrative Tools
lpadmin
User access control is determined with the -u option with an allow or deny list. Users allowed access are listed following the allow: entry, and those denied access are listed with a deny: entry. Here access is granted to chris but denied to aleina and larisa.
lpadmin -p myepson -u allow:chris deny:aleina,larisa
Use all or none to permit or deny access to all or no users. You can create exceptions by using all or none in combination with user-specific access. The following example allows access to all users except justin:
lpadmin -p myepson -u allow:all deny:justin
lpoptions
The lpoptions command lets you set printing options and defaults that mostly govern how your print jobs will be printed. For example, you can set the color or page format to be used with a particular printer. The -l option lists current options for a printer, and the -p option designates a printer (you can also set the default printer to use with the -d option). The following command lists the current options for the myepson printer.
lpoptions -p myepson -l
Printer options are set using the -o option along with the option name and value, -o option=value. You can remove a printer option with the -r option. For example, to print on both sides of your sheets, you can set the sides option to two-sided:
lpoptions -p myepson -o sides=two-sided
To remove the option, use -r.
lpoptions -p myepson -r sides
To display a listing of available options, check the standard printing options in the CUPS Software Manual at http://cups.org.
cupsenable and cupsdisable
The cupsenable command starts a printer, and the cupsdisable command stops it. With the -c option, you can cancel all jobs on the printer's queue, and the -r option broadcasts a message explaining the shutdown. This command disables the printer named myepson.
cupsdisable myepson
These are CUPS versions of the System V enable and disable commands, renamed to avoid conflicts.
accept and reject
The accept and reject commands let you control access to the printer queues for specific printers. The reject command prevents a printer from accepting jobs, whereas accept allows new print jobs. The following command prevents the myepson printer from accepting print jobs:
reject myepson
The Man pages for accept and reject are cupsaccept and cupsreject. These names are also links to the accept and reject commands, allowing you to use them instead.
lpinfo
The lpinfo command is a handy tool for letting you know what CUPS devices and drivers are available on your system. Use the -v option for devices and the -m option for drivers.
lpinfo -m
All materials on the site are licensed Creative Commons Attribution-Sharealike 3.0 Unported CC BY-SA 3.0 & GNU Free Documentation License (GFDL)
If you are the copyright holder of any material contained on our site and intend to remove it, please contact our site administrator for approval.
© 2016-2026 All site design rights belong to S.Y.A.