Ubuntu 15.04 Server with systemd: Administration and Reference (2015)
Part III. Shared Resources
Chapter 11. Network File Systems, Network Information System, and Distributed Network File Systems: NFS, NIS, and GFS
Linux provides several tools for accessing files on remote systems connected to a network. The Network File System (NFS) enables you to connect to and directly access resources such as files or devices like CD-ROMs that reside on another machine. The new version, NFS4, provides greater security, with access allowed by your firewall. The Network Information Service (NIS) maintains configuration files for all systems on a network.
Distributed Network File Systems build on the basic concept of NFS as well as RAID techniques to create a file system implemented on multiple hosts across a large network, in effect, distributing the same file system among different hosts. The primary implementation used on most Linux systems, including Ubuntu, is Red Hat's Global File System (GFS).
Network File Systems: NFS and /etc/exports
NFS enables you to mount a file system on a remote computer as if it were local to your own system. You can then directly access any of the files on that remote file system. This has the advantage of allowing different systems on a network to access the same files directly, without each having to keep its own copy. Only one copy will be on a remote file system, which each computer can then access. You can find out more about NFS at its website at http://nfs.sourceforge.net.
To set up the NFS service for your system, install the nfs-kernel-server, nfs-common, and portmap packages (selecting just the nfs-kernel-server will select the others automatically).
sudo apt-get install nfs-kernel-server
NFS Daemons
NFS operates over a TCP/IP network using Remote Procedure Calls (RPC) to manage file systems. The remote computer that holds the file system makes it available to other computers on the network. It does so by exporting the file system, which entails making entries in an NFS configuration file called /etc/exports, as well as by running several daemons to support access by other systems. These include rpc.mountd, rpc.nfsd, and rpc.gssd. Access to your NFS server can be controlled by the /etc/hosts.allow and /etc/hosts.deny files. The NFS server daemons provided in the nfs-kernel-server package are listed here. You can configure options in the /etc/default/nfs-kernel-server file.
rpc.nfsd Receives NFS requests from remote systems and translates them into requests for the local system.
rpc.mountd Performs requested mount and unmount operations.
rpc.svcgssd Performs security for rpc operations (rpcsec_gss protocol).
Additional NFS support daemons are provided by the nfs-common package. You can configure options in the /etc/default/nfs-common file.
rpc.gssd Client support for the rpcsec_gss protocol for gss-api security in NFSv4.
rpc.idmapd Maps user and group IDs to names.
rpc.statd Provides locking services when a remote host reboots.
The portmap server converts remote procedure calls program number to appropriate port numbers.
The NFS daemons are managed by systemd using several service unit files located in /lib/systemd/system. The NFS daemons and their systemd unit files are listed in Table 11-1 .
The nfs-server.service file is shown here. Runtime configuration information is read from /etc/default/nfs-kernel-server (EnvironmentFile).
nfs-server.service
[Unit]
Description=NFS server and services
DefaultDependencies=no
Requires= network.target proc-fs-nfsd.mount rpcbind.target
Requires= nfs-mountd.service
Wants=nfs-idmapd.service
After= local-fs.target
After= network.target proc-fs-nfsd.mount rpcbind.target nfs-mountd.service
After= nfs-idmapd.service rpc-statd.service
Before= rpc-statd-notify.service
# GSS services dependencies and ordering
Wants=auth-rpcgss-module.service
After=rpc-gssd.service gssproxy.service rpc-svcgssd.service
# start/stop server before/after client
Before=remote-fs-pre.target
Wants=nfs-config.service
After=nfs-config.service
[Service]
EnvironmentFile=-/run/sysconfig/nfs-utils
Type=oneshot
RemainAfterExit=yes
ExecStartPre=/usr/sbin/exportfs -r
ExecStart=/usr/sbin/rpc.nfsd $RPCNFSDARGS
ExecStop=/usr/sbin/rpc.nfsd 0
ExecStopPost=/usr/sbin/exportfs -au
ExecStopPost=/usr/sbin/exportfs -f
ExecReload=/usr/sbin/exportfs -r
[Install]
WantedBy=multi-user.target
Use the service command to start, stop, and restart the NFS server manually.
sudo service nfs-kernel-server start
The corresponding systemd unit files for the, mountd and idmapd daemons, will run these daemons.
To see if NFS is actually running, you can use the rpcinfo command with the -p option. You should see entries for mountd and nfs. If not, NFS is not running.
Option for the nfsd, mountd, nfsd, and svcgssd daemons are set in the /etc/default/nfs-kernel-server file, where you can set options, such as the number of servers, server priority, ports, and whether to use svcgsssd.
/etc/default/nfs-kernel-server
# Number of servers to start up
# To disable nfsv4 on the server, specify '--no-nfs-version 4' here
RPCNFSDCOUNT=8
# Runtime priority of server (see nice(1))
RPCNFSDPRIORITY=0
# Options for rpc.mountd.
# If you have a port-based firewall, you might want to set up
# a fixed port here using the --port option. For more information,
# see rpc.mountd(8) or http://wiki.debian.org/?SecuringNFS
RPCMOUNTDOPTS=--manage-gids
# Do you want to start the svcgssd daemon? It is only required for Kerberos
# exports. Valid alternatives are "yes" and "no"; the default is "no".
NEED_SVCGSSD=
# Options for rpc.svcgssd.
RPCSVCGSSDOPTS=
# Options for rpc.nfsd.
RPCNFSDOPTS=
The rpc.statd, rpc.idmapd, and rpc.gssd daemons can be accessed using the service command.
sudo service statd restart
sudo service idmapd restart
sudo service gssd restarr
To configure whether to start up the statd, idmapd, and gssd daemons, you set options in the /etc/default/nfs-common file. By default, the statd and idmapd daemons are started up.
/etc/default/nfs-common
# If you do not set values for the NEED_ options, they will be attempted
# autodetected; this should be sufficient for most people. Valid alternatives
# for the NEED_ options are "yes" and "no".
# Do you want to start the statd daemon? It is not needed for NFSv4.
NEED_STATD=
# Options for rpc.statd.
# Should rpc.statd listen on a specific port? This is especially useful
# when you have a port-based firewall. To use a fixed port, set this
# this variable to a statd argument like: "--port 4000 --outgoing-port 4001".
# For more information, see rpc.statd(8) or http://wiki.debian.org/?SecuringNFS
STATDOPTS=
# Do you want to start the idmapd daemon? It is only needed for NFSv4.
NEED_IDMAPD=
# Do you want to start the gssd daemon? It is required for Kerberos mounts.
NEED_GSSD=
Setting up NFS Directories on the Desktop with shares-admin
You can set up an NFS shared folder easily using the shares-admin tool, which is part of the gnome-system-tools package. This package is no longer supported by Ubuntu and is part of the Universe repository. You can install it from the Ubuntu Software Center's System list. The menu entry for shares-admin is Shared Folders, and is hidden by default. Use Main Menu to activate it, checking it under the Other menu. To have the item appear on the Unity System Dash, you may have to log out and log in again. Then choose Shared Folders on the System dash. You can also enter the shares-admin command in a terminal window, without the sudo or gksu commands.


Figure 11-1: Shared Folders tool
The Shared Folders window has three tabs: Shared Folders, General Properties, and Users (see Figure 11-1 ). On the General tab you specify the Windows workgroup name, and a WINS server is there is one (see ). On Shared Folders, user access can be configured, but only for all the shares. Use the Users tab to specify which user can have access to the shared folders (see Figure 11-2 ).
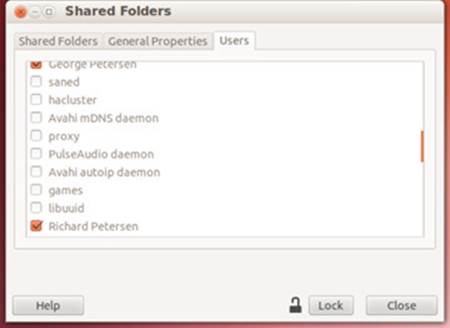
Figure 11-2: Shared Folders User tab
To use shares-admin to manage NFS directories, you first have to unlock it, providing you with administrative access. Click the bottom-left lock button labeled "Lock". A PolicyKit authorization dialog will appear, prompting you to enter your password. Upon entering your password, the button label will change to "Click to prevent changes", and you can now add or modify NFS directories.
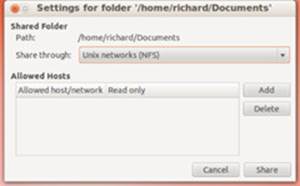
Figure 11-3: Adding a new shared folder
To add a new shared folder, click the Add button to open a Share Folder window (see Figure 11-3 ). On the Path pop-up menu, select the folder you want to share. If the one you want is not listed, select Other to open a file browser for the entire system. You then select the server to share through. For NFS select Unix networks (NFS).
You then select the host or network to allow access to this folder (see Figure 11-4 ). Click Add to open the Add Allowed hosts window. Here you can select a host name, IP address, or network address, and then enter the name or address. You can also specify read only, otherwise access is writeable.
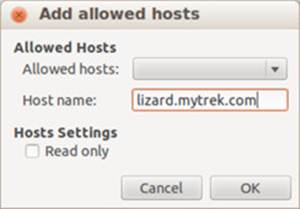
Figure 11-4: Specifying allowed hosts or networks
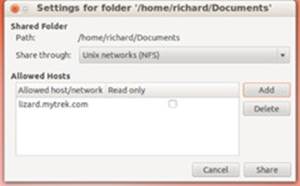
Figure 11-5: Share Folder with host access
The allowed host will then appear in the Share Folder dialog (see Figure 11-5 ). You can add more hosts, or delete others to deny access. When finished, click the Share button. The shared folder will then appear in the Shared Folders window.
NFS Configuration: /etc/exports
An entry in the /etc/exports file specifies the file system to be exported as well as the hosts on the network that can access it. For the file system, enter its mountpoint (the directory to which it was mounted on the host system). This is followed by a list of hosts that can access this file system along with options to control that access. A comma-separated list of export options placed within a set of parentheses may follow each host. For example, you might want to give one host read-only access and another read and write access. If the options are preceded by an * symbol, they are applied to any host. A list of options is provided in Table 11-1 . The format of an entry in the /etc/exports file is shown here:
directory-pathname host-designation(options)
NFS Host Entries
You can have several host entries for the same directory, each with access to that directory:
directory-pathname host(options) host(options) host(options)
You have a great deal of flexibility when specifying hosts. For hosts within your domain, you can just use the hostname, whereas for those outside, you need to use a fully qualified domain name. You can also use just the host’s IP address. Instead of a single host, you can reference all the hosts within a specific domain, allowing access by an entire network. A simple way to do this is to use the * for the host segment, followed by the domain name for the network, such as *.mytrek.com for all the hosts in the mytrek.com network. Instead of domain names, you can use IP network addresses with a CNDR format where you specify the netmask to indicate a range of IP addresses. You can also use an NIS netgroup name to reference a collection of hosts. The NIS netgroup name is preceded by an @ sign.
directory host(options)
directory *(options)
directory *.domain(options)
directory 192.168.1.0/255.255.255.0(options)
directory @netgroup(options)
NFS Options
Options in /etc/exports operate as permissions to control access to exported directories. Read-only access is set with the ro option, and read/write with the rw option. The sync and async options specify whether a write operation is performed immediately (sync) or when the server is ready to handle it (async). By default, write requests are checked to see if they are related, and if so, they are written together (wdelay). This can degrade performance. You can override this default with no_wdelay and have writes executed as they are requested. If two directories are exported, where one is the subdirectory of another, the subdirectory is not accessible unless it is explicitly mounted (hide). In other words, mounting the parent directory does not make the subdirectory accessible. The subdirectory remains hidden until it is also mounted. You can overcome this restriction with theno_hide option (though this can cause problems with some file systems).
If an exported directory is actually a subdirectory in a larger file system, its parent directories are checked to make sure that the subdirectory is the valid directory (subtree_check). This option works well with read-only file systems, but can cause problems for write-enabled file systems, where filenames and directories can be changed. You can cancel this check with the no_subtree_check option.
NFS User-Level Access
Along with general options, are options that apply to user-level access. As a security measure, the client’s root user is treated as an anonymous user by the NFS server. This is known as squashing the user. In the case of the client root user, squashing prevents the client from attempting to appear as the NFS server’s root user. Should you want a particular client’s root user to have root-level control over the NFS server, you can specify the no_root_squash option. To prevent any client user from attempting to appear as a user on the NFS server, you can classify them as anonymous users (the all_squash option). Such anonymous users can access only directories and files that are part of the anonymous group.
Normally, if a user on a client system has a user account on the NFS server, that user can mount and access files on the NFS server. However, NFS requires the User ID for the user be the same on both systems. If this is not the case, the user is considered to be two different users. To overcome this problem, you can use an NIS service, maintaining User ID information in just one place, the NIS password file (see the following section for information on NIS).
|
General Option |
Description |
|
secure |
Requires that requests originate on secure ports, those less than 1024 This is on by default |
|
insecure |
Turns off the secure option |
|
ro |
Allows only read-only access. This is the default |
|
rw |
Allows read/write access |
|
sync |
Performs all writes when requested. This is the default |
|
async |
Performs all writes when the server is ready |
|
no_wdelay |
Performs writes immediately, not checking to see if they are related |
|
wdelay |
Checks to see if writes are related, and if so, waits to perform them together. Can degrade performance. This is the default. |
|
hide |
Automatically hides an exported directory that is the subdirectory of another exported directory |
|
subtree_check |
Checks parent directories in a file system to validate an exported subdirectory. This is the default. |
|
no_subtree_check |
Does not check parent directories in a file system to validate an exported subdirectory |
|
insecure_locks |
Does not require authentication of locking requests. Used for older NFS versions |
|
User ID Mapping |
Description |
|
all_squash |
Maps all UIDs and GIDs to the anonymous user. Useful for NFS-exported public FTP directories, news spool directories, and so forth |
|
no_all_squash |
The opposite option to all_squash. This is the default setting. |
|
root_squash |
Maps requests from remote root user to the anonymous UID/GID. This is the default. |
|
no_root_squash |
Turns off root squashing. Allows the root user to access as the remote root |
|
anonuid |
Sets explicitly the UID and GID of the anonymous account used for all_squash and root_squash options. The defaults are nobody and nogroup |
Table 11-1: The /etc/exports Options
NFSv4
NFS version 4 is the latest version of the NFS protocol with enhanced features, such as greater security, reliability, and speed. Most of the commands are the same as the earlier version, with a few changes. For example, when you mount an NFSv4 file system, you need to specify thenfs4 file type. Also, for NFSv4, in the /etc/exports file, you can use the fsid=0 option to specify the root export location.
/home/richlp *(fsid=0,ro,sync)
The preceding entry lets you mount the file system to the /home/richlp directory without having to specify it in the mount operation.
mount -t nfs4 rabbit.mytrek.com:/ /home/dylan/projects
NFSv4 also supports the RPCSEC_GSS (Remote Procedure Call Security, Generic Security Services) security mechanism which provides for private/public keys, encryption, and authentication with support for Kerberos. Kerberos comes in two flavors: krb5i with validates the integrity of the data, and krb5p which encrypts all requests, but involves a performance hit. Samples for using the GSS and Kerberos security are listed as comments in the /etc/exports file. Instead of specifying a remote location, the rpcsec_gss protocol (gss) is used with krb5i security, gss/krb5i. The directory mounted in the sample is the /srv/nfs4/homes directory, which you could set up if you want.
# /srv/nfs4/homes gss/krb5i(rw,sync,no_subtree_check)
NFS /etc/exports Example
Examples of entries in an /etc/exports file are shown here. Read-only access is given to all hosts to the file system mounted on the /srv/pub directory. Users, however, are treated as anonymous users (all_squash). The /srv directory is used usually for server managed directories and file systems. In the next entry, read and write access is given to the lizard.mytrek.com computer for the file system mounted on the /home/mypics directory. The next entry allows access by rabbit.mytrek.com to the NFS server’s CD-ROM, using only read access. The last entry allows anyone secure access to /home/richlp.
/etc/exports
/srv/pub *(ro,insecure,all_squash,sync)
/home/mypics lizard.mytrek.com(rw,sync)
/media/cdrom rabbit.mytrek.com(ro,sync)
/home/richlp *(secure,sync)
The default /etc/options file shows examples for using NFSv2, NFSv3, and NFSv4 formats.
/etc/exports
# /etc/exports: the access control list for filesystems which may be exported
# to NFS clients. See exports(5).
#
# Example for NFSv2 and NFSv3:
# /srv/homes hostname1(rw,sync,no_subtree_check) hostname2(ro,sync,no_subtree_check)
#
# Example for NFSv4:
# /srv/nfs4 gss/krb5i(rw,sync,fsid=0,crossmnt,no_subtree_check)
# /srv/nfs4/homes gss/krb5i(rw,sync,no_subtree_check)
#
Applying Changes
Each time your system starts up the NFS server (usually when the system starts up), the /etc/exports file will be read and any directories specified will be exported. When a directory is exported, an entry for it is made in the /var/lib/nfs/xtab file. It is this file that NFS reads and uses to perform the actual exports. Entries are read from /etc/exports and corresponding entries made in /var/lib/nfs/xtab. The xtab file maintains the list of actual exports.
If you want to export added entries in the /etc/exports file immediately, without rebooting, you can use the exportfs command with the -a option. It is helpful to add the -v option to display the actions that NFS is taking. Use the same options to effect any changes you make to the/etc/exports file.
exportfs -a -v
If you make changes to the /etc/exports file, you can use the -r option to re-export its entries. The -r option will re-sync the /var/lib/nfs/xtab file with the /etc/exports entries, removing any other exports or any with different options.
exportfs -r -v
To export added entries and re-export changed ones, you can combine the -r and -a options.
exportfs -r -a -v
Manually Exporting File Systems
You can also use the exportfs command to export file systems manually instead of using entries for them in the /etc/exports file. Export entries will be added to the /var/lib/nfs/xtab file directly. With the -o option, you can list various permissions and then follow them with the host and file system to export. The host and file system are separated by a colon. For example, to export the /home/myprojects directory manually to golf.mytrek.com with the permissions ro and insecure, you use the following:
exportfs -o rw,insecure golf.mytrek.com:/home/myprojects
You can also use exportfs to un-export a directory that has already been exported, either manually or by the /etc/exports file. Just use the -u option with the host and the directory exported. The entry for the export will be removed from the /var/lib/nfs/xtab file. The following example will un-export the /home/foodstuff directory that was exported to lizard.mytrek.com:
exportfs -u lizard.mytrek.com:/home/foodstuff
Controlling Accessing to NFS Servers
You can use several methods to control access to your NFS server, such as using hosts.allow and hosts.deny to permit or deny access, as well as using your firewall to intercept access.
/etc/hosts.allow and /etc/hosts.deny
The /etc/hosts.allow and /etc/hosts.deny files are used to restrict access to services provided by your server to hosts on your network or on the Internet (if accessible). For example, you can use the hosts.allow file to permit access by certain hosts to your FTP server. Entries in thehosts.deny file explicitly deny access to certain hosts. For NFS, you can provide the same kind of security by controlling access to specific NFS daemons. The entries in the hosts.allow file are the same you specified in the shares-admin tool's Add Allow hosts window (Share Folder).
Portmap Service
The first line of defense is to control access to the portmapper service. The portmapper tells hosts where the NFS services can be found on the system. Restricting access does not allow a remote host to even locate NFS. For a strong level of security, you should deny access to all hosts except those that are explicitly allowed. In the hosts.deny file, you should place the following entry, denying access to all hosts by default. ALL is a special keyword denoting all hosts.
portmap:ALL
The portmapper service is referenced with the portmap name. You can set options manually in the /etc/default/portmap file.
In the hosts.allow file, you can then enter the hosts on your network, or any others that you want to permit access to your NFS server. Again, specify the portmapper service and then list the IP addresses of the hosts you are permitting access. You can list specific IP addresses or a network range using a netmask. The following example allows access only by hosts in the local network, 192.168.0.0, and to the host 10.0.0.43. You can separate addresses with commas:
portmap: 192.168.0.0/255.255.255.0, 10.0.0.43
The portmapper is also used by other services such as NIS. If you close all access to the portmapper in hosts.deny, you will also need to allow access to NIS services in hosts.allow, if you are running them. These include ypbind and ypserver. In addition, you may have to add entries for remote commands like ruptime and rusers, if you are supporting them.
It is also advisable to add the same level of control for specific NFS services. In the hosts.deny file, you add entries for each service, as shown here:
mountd:ALL
statd:ALL
Then, in the hosts.allow file, you can add entries for each service:
mountd: 192.168.0.0/255.255.255.0, 10.0.0.43
statd: 192.168.0.0/255.255.255.0, 10.0.0.43
Netfilter Rules
You can further control access using Netfilter to check transmissions from certain hosts on the ports used by NFS services. The portmapper uses port 111, and nfsd uses 2049. Netfilter is helpful if you have a private network that has an Internet connection and you want to protect it from the Internet. Usually a specific network device, such as an Ethernet card, is dedicated to the Internet connection. The following examples assume that device eth1 is connected to the Internet. Any packets attempting access on port 111 or 2049 are refused.
iptables -A INPUT -i eth1 -p 111 -j DENY
iptables -A INPUT -i eth1 -p 2049 -j DENY
To enable NFS for your local network, you will have to allow packet fragments. Assuming that eth0 is the device used for the local network, you could use the following example:
iptables -A INPUT -i eth0 -f -j ACCEPT
Mounting NFS File Systems: NFS Clients
Once NFS makes directories available to different hosts, those hosts can then mount those directories on their own systems and access them. The host needs to be able to operate as an NFS client. Current Linux kernels all have NFS client capability built in. This means that any NFS client can mount a remote NFS directory that it has access to by performing a simple mount operation.
|
Option |
Description |
|
rsize=n |
The number of bytes NFS uses when reading files from an NFS server. The default is 1,024 bytes. A size of 8,192 can greatly improve performance. |
|
wsize=n |
The number of bytes NFS uses when writing files to an NFS server. The default is 1,024 bytes. A size of 8,192 can greatly improve performance. |
|
timeo=n |
The value in tenths of a second before sending the first retransmission after a timeout. The default value is seven-tenths of a second. |
|
retry=n |
The number of minutes to retry an NFS mount operation before giving up. The default is 10,000 minutes (one week). |
|
retrans=n |
The number of retransmissions or minor timeouts for an NFS mount operation before a major timeout (default is 3). At that time, the connection is canceled or a “server not responding” message is displayed. |
|
soft |
Mount system using soft mount. |
|
hard |
Mount system using hard mount. This is the default. |
|
intr |
Allows NFS to interrupt the file operation and return to the calling program. The default is not to allow file operations to be interrupted. |
|
bg |
If the first mount attempt times out, continues trying the mount in the background. The default is to fail without backgrounding. |
|
tcp |
Mounts the NFS file system using the TCP protocol, instead of the default UDP protocol. |
Table 11-2: NFS Mount Options
Mounting NFS Automatically: /etc/fstab
You can mount an NFS directory either by an entry in the /etc/fstab file or by an explicit mount command. You have your NFS file systems mounted automatically by placing entries for them in the /etc/fstab file. An NFS entry in the /etc/fstab file has a mount type of NFS. An NFS file system name consists of the hostname of the computer on which it is located, followed by the pathname of the directory where it is mounted. The two are separated by a colon. For example, rabbit.trek.com:/home/project specifies a file system mounted at /home/project on therabbit.trek.com computer. The format for an NFS entry in the /etc/fstab file follows. The file type for NFS versions 1 through 3 is nfs, whereas for NFS version 4 it is nfs4.
host:remote-directory local-directory nfs options 0 0
You can also include several NFS-specific mount options with your NFS entry. You can specify the size of datagrams sent back and forth, and the amount of time your computer waits for a response from the host system. You can also specify whether a file system is to be hard-mounted or soft-mounted. For a hard-mounted file system, your computer continually tries to make contact if for some reason the remote system fails to respond. A soft-mounted file system, after a specified interval, gives up trying to make contact and issues an error message. A hard mount is the default. A system making a hard-mount attempt that continues to fail will stop responding to user input as it tries continually to achieve the mount. For this reason, soft mounts may be preferable, as they will simply stop attempting a mount that continually fails. Table 11-2 and the Man pages for mount contain a listing of these NFS client options. They differ from the NFS server options indicated previously.
An example of an NFS entry follows. The remote system is rabbit.mytrek.com, and the file system is mounted on /home/projects. This file system is to be mounted on the local system as the /home/dylan/projects directory. The /home/dylan/projects directory must already be created on the local system. The type of system is NFS, and the timeo option specifies the local system waits up to 20 tenths of a second (two seconds) for a response. The mount is a soft mount and can be interrupted by NFS.
rabbit.mytrek.com:/home/projects /home/dylan/projects nfs soft,intr,timeo=20
Mounting NFS Manually: mount
You can also use the mount command with the -tnfs option to mount an NFS file system explicitly. For a NFSv4 file system you use -tnfs4. To mount the previous entry explicitly, use the following command:
mount -t nfs -o soft,intr,timeo=20 rabbit.mytrek.com:/home/projects /home/dylan/projects
You can, of course, unmount an NFS directory with the umount command. You can specify either the local mountpoint or the remote host and directory, as shown here:
umount /home/dylan/projects
umount rabbit.mytrek.com:/home/projects
Mounting NFS on Demand: autofs
You can also mount NFS file systems using the automount service, autofs (autofs package). This requires added configuration on the client’s part. The autofs service will mount a file system only when you try to access it. A directory change operation (cd) to a specified directory will trigger the mount operation, mounting the remote file system at that time.
The autofs service is configured using a master file to list map files, which in turn lists the file systems to be mounted. The /etc/auto.master file is the autofs master file. The master file will list the root pathnames where file systems can be mounted, along with a map file for each of those pathnames. The map file will then list a key (subdirectory), mount options, and the file systems that can be mounted in that root pathname directory. On some distributions, the /auto directory is already implemented as the root pathname for file systems automatically mounted. You can add your own file systems in the /etc/auto.master file along with your own map files, if you wish. You will find that the /etc/auto.master file contains the following entry for the /auto directory, listing auto.misc as its map file:
/auto auto.misc --timeout 60
Following the map file, you can add options, as shown in the preceding example. The timeout option specifies the number of seconds of inactivity to wait before trying to automatically unmount.
In the map file, you list the key, the mount options, and the file system to be mounted. The key will be the subdirectory on the local system where the file system is mounted. For example, to mount the /home/projects directory on the rabbit.mytrek.com host to the /auto/projectsdirectory, use the following entry:
projects soft,intr,timeo=20 rabbit.mytrek.com:/home/projects
You can also create a new entry in the master file for an NFS file system, as shown here:
/myprojects auto.myprojects --timeout 60
You then create an /etc/auto.myprojects file and place entries in it for NFS files system mounts, like the following:
dylan soft,intr,rw rabbit.mytrek.com:/home/projects
newgame soft,intr,ro lizard.mytrek.com:/home/supergame
Network Information Service: NIS
On networks supporting NFS, many resources and devices are shared by the same systems. Normally, each system needs its own configuration files for each device or resource. Changes entail updating each system individually. However, NFS provides a special service called the Network Information System (NIS) that maintains such configuration files for the entire network. For changes, you need only to update the NIS files. NIS works for information required for most administrative tasks, such as those relating to users, network access, or devices. For example, you can maintain user and password information with an NIS service, having only to update those NIS password files.
The NIS service is configured for use by the /etc/nsswitch configuration file. Here are some standard entries:
passwd: compat
shadow: compat
networks: files
protocols: db files
Note: NIS+ is a more advanced form of NIS that provides support for encryption and authentication. However, it is more difficult to administer.
NIS was developed by Sun Microsystems and was originally known as Sun’s Yellow Pages (YP). NIS files are kept on an NIS server (NIS servers are still sometimes referred to as YP servers). Individual systems on a network use NIS clients to make requests from the NIS server. The NIS server maintains its information on special database files called maps. Linux versions exist for both NIS clients and servers. Linux NIS clients easily connect to any network using NIS.
Note: Instead of NIS, many networks now use LDAP to manage user information and authentication.
The NIS client is installed as part of the initial installation on most Linux distributions. NIS client programs are ypbind (the NIS client daemon), ypwhich, ypcat, yppoll, ypmatch, yppasswd, and ypset. Each has its own Man page with details of its use. The NIS server programs are ypserv (the NIS server), ypinit, yppasswdd, yppush, ypxfr, and netgroup—each also with its own Man page. When you install the NIS server (nis package) you will be prompted to enter an NIS domain, listing your host name as the default.
The NIS server is managed by systemd using the nis.service unit files in the /run/systemd/generator.late directory. It is generated by systemd-sysv-generator using the /etc/init.d/nis script. The ypbind.service and ypserv.service files are links to the nis.service file.
nis.service
# Automatically generated by systemd-sysv-generator
[Unit]
Documentation=man:systemd-sysv-generator(8)
SourcePath=/etc/init.d/nis
Description=LSB: Start NIS client and server daemons.
Before=runlevel2.target runlevel3.target runlevel4.target runlevel5.target
After=network-online.target rpcbind.target
Wants=network-online.target
[Service]
Type=forking
Restart=no
TimeoutSec=5min
IgnoreSIGPIPE=no
KillMode=process
GuessMainPID=no
RemainAfterExit=yes
ExecStart=/etc/init.d/nis start
ExecStop=/etc/init.d/nis stop
ExecReload=/etc/init.d/nis reload
/etc/nsswitch.conf: Name Service Switch
Different functions in the standard C Library must be configured to operate on your Linux system. Previously, database-like services, such as password support and name services like NIS or DNS, directly accessed these functions, using a fixed search order. For GNU C Library 2.x,used on current versions of Linux, this configuration is carried out by a scheme called the Name Service Switch (NSS), which is based on the method of the same name used by Sun Microsystems Solaris 2 OS. The database sources and their lookup order are listed in the /etc/nsswitch.conffile.
The /etc/nsswitch.conf file holds entries for the different configuration files that can be controlled by NSS. The system configuration files that NSS supports are listed in Table 11-3 . An entry consists of two fields: the service and the configuration specification. The service consists of the configuration file followed by a colon. The second field is the configuration specification for that file, which holds instructions on how the lookup procedure will work. The configuration specification can contain service specifications and action items. Service specifications are the services to search. Currently, valid service specifications are nis, nis-plus, files, db, dns, and compat (see Table 11-4 ). Not all are valid for each configuration file. For example, the dns service is valid only for the hosts file, whereas nis is valid for all files. The following example will first check the local /etc/password file and then NIS.
passwd: files nisplus
|
File |
Description |
|
ethers |
Ethernet numbers |
|
group |
Groups of users |
|
hosts |
Hostnames and numbers |
|
netgroup |
Network-wide list of hosts and users, used for access rules; C libraries before glibc 2.1 only support netgroups over NIS |
|
network |
Network names and numbers |
|
passwd |
User passwords |
|
protocols |
Network protocols |
|
publickey |
Public and secret keys for SecureRPC used by NFS and NIS+ |
|
rpc |
Remote procedure call names and numbers |
|
services |
Network services |
|
shadow |
Shadow user passwords |
Table 11-3: NSS-Supported databases
For more refined access to passwd, group, and shadow sources, you can use the + and - symbols in file entries to determine if the entry can be accessed by the nsswitch service. The compat service provides a compatible mode that will check for such entries. With no such entries, the nis service will be used for all entries. The compat service can only be applied to the passwd, group, and shadow databases. This provides the equivalent of the files and nis services.
If your passwd, group, and shadow files already have + and - entries, and you need to have the file entries take precedence over the nis service, you can specify the files database before the compat entry.
passwd: files compat
An action item specifies the action to take for a specific service. An action item is placed within brackets after a service. A configuration specification can list several services, each with its own action item. In the following example, the entry for the hosts file has a configuration specification that says to check the /etc/hosts files and mdns4_minimal service and, if not found, to check the DNS server and the mdns4 service (multicast DNS name resolution).
hosts: files mdns4_minimal [NOTFOUND=return] dns mdns4
|
Service |
Description |
|
files |
Checks corresponding /etc file for the configuration (for example, /etc/hosts for hosts); this service is valid for all files |
|
db |
Checks corresponding /var/db databases for the configuration; valid for all files except netgroup |
|
compat |
Provides nis and files services, with compatibility support for + and - entries. Valid only for passwd, group, and shadow files |
|
dns |
Checks the DNS service; valid only for hosts file |
|
nis |
Checks the NIS service; valid for all files |
|
nisplus |
NIS version 3 |
|
hesiod |
Uses Hesiod for lookup |
Table 11-4: NSS Configuration Services
An action item consists of a status and an action. The status holds a possible result of a service lookup, and the action is the action to take if the status is true. Currently, the possible status values are SUCCESS, NOTFOUND, UNAVAIL, and TRYAGAIN (service temporarily unavailable). The possible actions are return and continue: return stops the lookup process for the configuration file, whereas continue continues on to the next listed service. In the preceding example, if the record is not found in NIS, the lookup process ends.
Shown here is a copy of the /etc/nsswitch.conf file, which lists commonly used entries. Comments and commented-out entries begin with a # sign:
/etc/nsswitch.conf
# /etc/nsswitch.conf
#
# Example configuration of GNU Name Service Switch functionality.
# If you have the `glibc-doc-reference' and `info' packages installed, try:
# `info libc "Name Service Switch"' for information about this file.
passwd: compat
group: compat
shadow: compat
hosts: files mdns4_minimal [NOTFOUND=return] dns
networks: files
protocols: db files
services: db files
ethers: db files
rpc: db files
netgroup: nis
Distributed Network File Systems
For very large distributed systems like Linux clusters, Linux also supports distributed network file systems, such as Oracle Cluster File System for Linux (OCFS2), Lustre, the Gluster Storage Platform (GlusterFS), and Red Hat Global File System (GFS and GFS 2). These systems build on the basic concept of NFS as well as RAID techniques to create a file system implemented on multiple hosts across a large network, in effect, distributing the same file system among different hosts at a very low level (see Table 11-5 ). You can think of it as a kind of RAID array implemented across network hosts instead of just a single system. Instead of each host relying on its own file systems on its own hard drive, they all share the same distributed file system that uses hard drives collected on different distributed servers. This provides far more efficient use of storage available to the hosts, as well as providing for more centralized management of file system use.
A distributed network file system builds on the basic concept of NFS as well as RAID techniques to create a file system implemented on multiple hosts across a large network, in effect, distributing the same file system among different hosts at a very low level. You can think of it as a kind of RAID array implemented across network hosts instead of just a single system. That is, instead of each host relying on its own file systems on its own hard drive, they all share the same distributed file system that uses hard drives collected on different distributed servers. This provides far greater efficient use of storage available to the hosts and provides for more centralized management of file system use. GFS can be run either directly connected to a SAN (storage area network) or using GNBD (Global Network Block Device) storage connected over a LAN. The best performance is obtained from a SAN connection, whereas a GNBD format can be implemented easily using the storage on LAN (Ethernet)–connected systems. As with RAID devices, mirroring, failover, and redundancy can help protect and recover data.
|
Website |
Name |
|
http://fedoraproject.org/wiki/Features/Cluster |
Fedora Cluster status and links |
|
http://www.corosync.org |
Corosync Cluster Engine |
|
http://clusterlabs.org/ |
Pacemaker cluster services and PCS documentation |
|
http://oss.oracle.com/projects/ocfs2/ |
OCFS2, Oracle Cluster File System for Linux |
|
https://access.redhat.com/knowledge/docs/en-US/Red_Hat_Enterprise_Linux/6/html/High_Availability_Add-On_Overview/index.html |
Red Hat High Availability Addon |
|
http://www.gluster.org |
Gluster Storage Platform |
|
http://wiki.lustre.org |
Lustre cluster file system |
Table 11-5: Distributed File Systems
The Red Hat Global File System (GFS2) is the preferred distributed file system for Ubuntu. GFS separates the physical implementation from the logical format. A GFS appears as a set of logical volumes on one seamless logical device that can be mounted easily to any directory on your Linux file system. The logical volumes are created and managed by the Cluster Logical Volume Manager (CLVM), which is a cluster-enabled LVM. Physically, the file system is constructed from different storage resources, known as cluster nodes, distributed across your network. The administrator manages these nodes, providing needed mirroring or storage expansion. Should a node fail, GFS can fence a system off until it has recovered the node. Setting up a GFS requires planning. You have to determine ahead of time different settings like the number and names of your Global File Systems, the nodes that will be able to mount the file systems, fencing methods, and the partitions and disks to use.
The Red Hat Global File System (GFS2), the Gluster Storage Platform (GlusterFS), and the Oracle Cluster File System for Linux (OCFS2) are available from the Ubuntu repository. GlusterFS is open source and freely available, though support can be purchased commercially. On Ubuntu it is installed with the glusterfs-server, glusterfs-common, and glusterfs-client packages. See the GlusterFS site for more details, http://www.gluster.org, and commercial support is available at http://www.gluster.com. Configuration is located at /etc/glusterfs and is started using the glusterfsd init script in /etc/init.d. Detailed examples are located in the /usr/share/doc/glusterfs-server directory.
The OCFS2 cluster file system is provided by Oracle as open source software. You can install it with the ocfs2-tools and ocfs2-tools-dev packages. The ocfs2console package installs a graphical management interface which you can run with the ocfs2console command in a terminal window. You can use it to configure, mount, format, and check your OCFS2 file systems. You can find out more about OCFS2 at http://oss.oracle.com/projects/ocfs2/.
Note: The Parallel Virtual File System (PVFS) implements a distributed network file system using a management server that manages the files system on different I/O servers. Management servers maintain the file system information, including access permissions, directory structure, and metadata information, http://www.pvfs.org.
Corosync Cluster Engine
The Corosync Cluster Engine is a "user space kernel" for clustering services. It provides the basis of communication, membership, and other services used in clustering environments., www.corosync.org. This is an open source Linux project. Ubuntu provides Ubuntu compliant binaries in the corosync and corosynclib packages. Corosync packages include corosync, corosync-cfgtool (a configuration tool), and corosync-keygen. Corosync is managed by systemd using the corosync.service unit file, which starts the Corosync service for the multi-user.target using thecorosync script located at /usr/share/corosync. You can use the service command to start and stop corosync.
It separates the core infrastructure from the clustering services. Derived from the OpenAIS project, Corosync provides the underlying cluster infrastructure rather than API.
You can find out more about Corosync at:
http://www.corosync.org/
Corosync is a plug-in cluster engine with a modular design. Modules, known as service engines, are plugged in to the Corosync engine to make use of Corosync cluster services. Corosync components include Totem communications protocol which is based on the OpenAIS virtual synchrony communications model, a live component replacement (LCR) plugin system, an object database for the service engines and their configuration, a logging system, and inter-process communications (IPC) manager. Service engine modules include configuration for LDAP and corosync/openeais file format, the cluster manager (pacemaker) operates as part of corosync, both fence and fence agents.
Corosync is configured by the /etc/corosync.conf configuration file. Currently there are four directives, forming blocks, within which options can be specified. They are the same as those used for OpenAIS. The four directives are totem for the Totem protocol, logging, amf for the AMF service, and event for the event service. See the corosync.conf man page for a complete description of directives and options.
Corosync uses its own protocol called Totem to perform multicast communications. Totem configuration is specified in the totem directive of the corosync.conf file as shown here.
totem {
version: 2
secauth: off
threads: 0
interface {
ringnumber: 0
bindnetaddr: 192.168.1.1
mcastaddr: 226.94.1.1
mcastport: 5405
}
}
Pacemaker
To manage your clusters you use a cluster manager. The recommended one for Ubuntu is the Pacemaker Cluster Resource Manager (pacemaker and pcs packages). The older cman cluster manager has been deprecated. The pacemaker package installs the pacemaker service. The pcspackage installs the pacemaker configuration service. Pacemaker can work with Redhat's GFS2, Oracle's OCFS2, and with Cluster LVM (CLVM2). On Ubuntu you would normally use GFS2.
Pacemaker is managed by systemd using the pacemaker.service unit file, which is generated from a pacemaker System V script in /etc/init.d.
Once installed, you can use the Pacemaker Configuration Service (pcs) to manage your clusters. The pcs daemon is managed by systemd using the pcsd.service unit file. You can use pcs commands to setup and manage your clusters.
Check the Pacemaker Web site for detailed documentation on Pacemaker and Corosync for PCS.
http://clusterlabs.org
Red Hat Global File System (GFS)
Red Hat provides the Global File System (GFS) as an open source freely available distributed network file system. The original GFS version has been replaced with the new version of GFS, GFS 2, which uses a similar set of configuration and management tools, as well as native kernel support. Instead of a variety of seemingly unrelated packages. Native kernel support for GFS 2 provides much of the kernel-level operations. GFS 2 now works through the Corosync Cluster Engine. You would use Corosync cluster commands for your cluster. GFS2 tools have been placed in the gfs2-utils, package, and the Distributed Lock Manager (DLM) commands in the dlm package.
Many former cluster packages and applications have been deprecated with Ubuntu, including cman, rgmanager, openais, heartbeat, luci, and system-config-cluster. Though lower level GFS commands are available in the gfs2-utils package, you are expected to use Corosync and Pacemaker commands to manage your clusters.
To run a cluster, you need both a cluster manager and locking mechanism. Pacemaker with the Distributed Lock Manager (dlm) implements cluster management and locking. Pacemaker manages connections between cluster devices and services, using dlm to provide locking. The dlmlocking mechanism operates as a daemon with supporting libraries.
To set up a GFS 2 file system, you first need to create cluster devices using the physical volumes and organizing them into logical volumes. You use the CLVM (Clustering Logical Volume Manager) to set up logical volumes from physical partitions (in the past you used a volume manager called pool to do this). You can then install GFS file systems on these logical volumes directly. CLVM operates like LVM, using the same commands. It works over a distributed network and requires that the clvmd server be running (clvm package).
Several GFS commands manage the file system, such as gfs2_mount for mounting file systems, gfs2_mkfs to make a GFS file system, gfs2_fsck to check and repair, and gfs2_grow to expand a file system. Check their respective Man pages for detailed descriptions. The GFS commands for managing GFS file systems are listed in Table 11-6 .
To mount a GFS file system, you use the mount command specifying gfs2 as the mount type, as in
mount -t gfs2 /dev/vg0/mgfs /mygfs
This will invoke the gfs2_mount tool to perform the mount operation. Several GFS-specific mount options are also available, specified with the -o option, such as lockproto to specify a different lock protocol and acl to enable ACL support.
To check the status of a file system, you can use gfs2_fsck. This tool operates much like fsck, checking for corrupt systems and attempting repairs. You must first unmount the file system before you can use gfs2_fsck on it.
Should you add available space to the device on which a GFS file system resides, you can use gfs2_grow to expand the file system to that available space. It can be run on just one node to expand the entire cluster. If you want journaling, you first have to add journal files with the gfs2_jadd tool.gfs2_grow can only be run on a mounted GFS file system.
Journal files for GFS are installed in space outside of the GFS file system, but on the same device. After creating a GFS file system, you can run gfs2_add to add the journal files for it. If you are expanding a current GFS file system, you need to run gfs2_add first. Like gfs2_grow, gfs2_add can only be run on mounted file systems. With the setfacl command you can set permissions for files and directories.
|
Command |
Description |
|
dlm_tool |
Distributed Lock Manager, implemented as a kernel module. |
|
gfs2_fsck |
The GFS 2 file system checker |
|
gfs2_grow |
Grows a GFS 2 file system |
|
gfs2_jadd |
Adds a journal to a GFS 2 file system |
|
mkfs.gfs2 |
Makes a GFS 2 file system |
|
gfs2_quota |
Manipulates GFS 2 disk quotas |
|
gfs2_edit |
Edit a GFS 2 file system |
|
getfacl |
Gets the ACL permissions for a file or directory |
|
setfacl |
Sets access control (ACL) for a file or directory |
Table 11-6: GFS2 Tools
To create new file systems on the cluster devices, you use the gfs2_mkfs command and mount them with the -t gfs2 option. The following command creates a GFS file system on the /dev/gv0/mgfs and then mounts it to the /mygfs directory. For gfs2_mkfs, the -t option indicates the lock table used and the -p option specifies the lock protocol. The -j option specifies the number of journals, and the -p option specifies the lock protocol to use.
gfs2_mkfs -t mycluster:mygfs -p lock_dlm -j 2 /dev/vg0/mgfs
mount -t gfs /dev/vg0/mgfs /gfs1
To have the gfs service script mount the GFS file system for you, you need to place an entry for it in the /etc/fstab file. If you do not want the file system automatically mounted, add the noauto option.
/dev/vg0/mgfs /mygfs gfs2 noauto,defaults 0 0
GFS also supports access controls. You can restrict access by users or groups to certain files or directories, specifying read or write permissions. With the setfacl command you can set permissions for files and directories. You use the -m option to modify an ACL permission and -x to delete it. The getfacl obtains the current permissions for file or directory. The following sets read access by the user dylan to myfile.
setfacl -m u:dylan:r myfile
All materials on the site are licensed Creative Commons Attribution-Sharealike 3.0 Unported CC BY-SA 3.0 & GNU Free Documentation License (GFDL)
If you are the copyright holder of any material contained on our site and intend to remove it, please contact our site administrator for approval.
© 2016-2026 All site design rights belong to S.Y.A.