Ubuntu 15.04 Server with systemd: Administration and Reference (2015)
Part IV. Network Support
Chapter 16. Network Auto-configuration with IPv6, DHCPv6, and DHCP
Many networks now provide either IPv6 autoconfiguration or the DHCP (Dynamic Host Configuration Protocol) service, which automatically provides network configuration for all connected hosts. Autoconfiguration can be either stateless, as in the case of IPv6, or stateful, as with DHCP. Stateless IPv6 autoconfiguration requires no independent server or source to connect to a network. It is a direct plug-and-play operation, where the hardware network interfaces and routers can directly determine the correct addresses. DCHP is an older method that requires a separate server to manage and assign all addresses. Should this server ever fail, hosts cannot connect.
With the DHCP protocol, an administrator uses a pool of IP addresses from which the administrator can assign an IP address to a host as needed. The protocol can also be used to provide all necessary network connection information such as the gateway address for the network or the netmask. Instead of having to configure each host separately, network configuration can be handled by a central DHCP server. The length of time that an address can be used can be controlled by means of leases, making effective use of available addresses. If your network is configuring your systems with DHCP, you will not have to configure it.
There are currently two versions of DHCP, one for the original IPv4 protocol and another, known as DHCPv6, for the IPv6 protocol, which includes information for dynamic configuration that the IPv4 protocol lacks. In this respect, the IPv4 protocol is much more dependent on DHCP than is IPv6.
IPv6 Stateless Autoconfiguration
In an IPv6 network, the IPv6 protocol includes information that can directly configure a host. With IPv4 you either had to configure each host manually or rely on a DHCP server to provide configuration information. With IPv6, configuration information is integrated into the Internet protocol directly. IPv6 address autoconfiguration is described in detail in RFC 2462.
IPv6 autoconfiguration capabilities are known as stateless, meaning that it can directly configure a host without recourse of an external server. Alternatively, DHCP, including DHCPv6, is stateful, where the host relies on an external DHCP server to provide configuration information. Stateless autoconfiguration has the advantage of hosts not having to rely on a DHCP server to maintain connections to a network. Networks can even become mobile, hooking into one subnet or another, automatically generating addresses as needed. Hosts are no longer tied to a particular DHCP server.
Generating the Local Address
To autoconfigure hosts on a local network, IPv6 makes use of the each network device’s hardware MAC address. This address is used to generate a temporary address, with which the host can be queried and configured.
The MAC address is used to create a link-local address, one with a link-local prefix, FE80::0, followed by an interface identifier. The link-local prefix is used for physically connected hosts such as those on a small local network.
A uniqueness test is then performed on the generated address. Using the Neighbor Discovery Protocol (NDP), other hosts on the network are checked to determine whether another host is already using the generated link-local address. If no other host is using the address, the address is assigned for that local network. At this point the host has only a local address valid within the local physical network. Link-local addresses cannot be routed to a larger network.
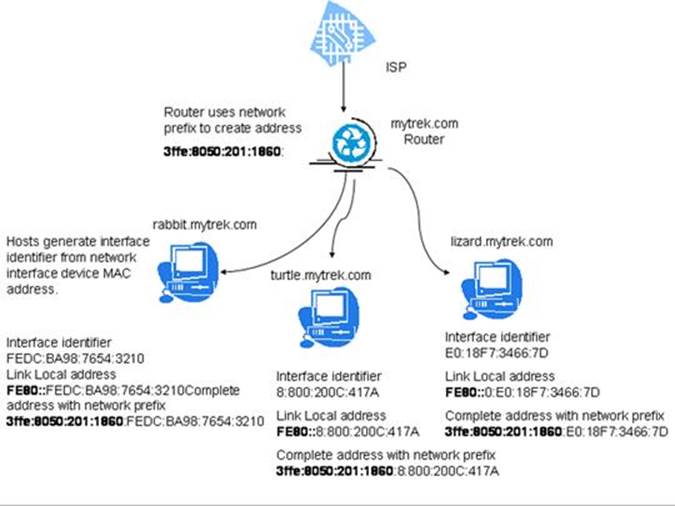
Figure 16-1: Stateless IPv6 address autoconfiguration
Generating the Full Address: Router Advertisements
Once the link-local address has been determined, the router for the network is queried for additional configuration information. The information can be stateful, stateless, or both. For stateless configuration, information such as the network address is provided directly, whereas for stateful configuration, the host is referred to a DHCPv6 server where it can obtain configuration information. The two can work together. Often the stateless method is used for addresses, and the stateful DHCPv6 server is used to provide other configuration information such as DNS server addresses.
In the case of stateless addresses, the router provides the larger network address, such as the network’s Internet address. This address is then added to the local address, replacing the original link-local prefix, giving either a complete global Internet address or, in the case of private networks, unique-local addresses. Routers will routinely advertise this address information, though it can also be specifically requested. The NDP is used to query the information. Before the address is assigned officially, a duplicate address detection procedure checks to see if the address is already in use. The process depends on the router’s providing the appropriate addressing information in the form of router advertisements. If there is no router, or there are no route advertisements, then a stateful method like DHCPv6 or manual configuration must be used to provide the addresses.
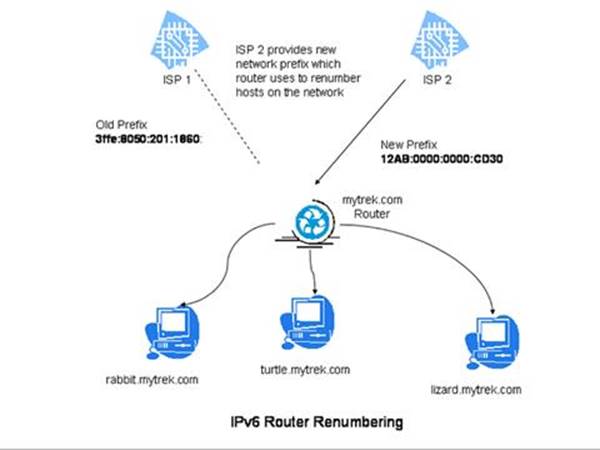
Figure 16-2: Router renumbering with IPv6 autoconfiguration
Figure 16-1 shows a network that is configured with stateless address autoconfiguration. Each host first determines its interface identifier using its own MAC hardware address to create a temporary link-local address for each host using the FE80::0 prefix. This allows initial communication with the network's router. The router then uses its network prefix to create full Internet addresses, replacing the link-local prefix.
Router Renumbering
With IPv6, routers have the ability to renumber the addresses on their networks by changing the network prefix. Renumbering is carried out through the Router Renumbering (RR) Protocol. (See RFC 2894 for a description of router renumbering.) Renumbering is often used when a network changes ISP providers and requires that the net address for all hosts be changed (see Figure 16-2 ). It can also be used for mobile networks in which a network can be plugged in to different larger networks, renumbering each time.
With renumbering, routers place a time limit on addresses, similar to the lease time in DHCP, by specifying an expiration limit for the network prefix when the address is generated. To ease transition, interfaces still keep their old addresses as deprecated addresses, while the new addresses are first being used. The new addresses will be the preferred addresses used for any new connections, while deprecated addresses are used for older connections. In effect, a host can have two addresses, one deprecated and one preferred. This regeneration of addresses effectively renumbers the hosts.
Note: The IPv6 version of DHCP (DHCPv6) provides stateful autoconfiguration to those networks that still want a DHCP-like service on IPv6 networks. A version of the DHCPv6 server and client are available from the DHCPv6 project and located in the Ubuntu Universe repository aswide-dhcpv6 collection of packages. You can find out more about the DHCPv6 project at https://fedorahosted.org/dhcpv6/. The server requires its own Wide DHCPv6 clients. Keep in mind that Ubuntu currently provides support for the ISC DHCP version 4.1 server, which integrates DHCPv6 support and has superseded officially the DHCPv6 project software, https://www.isc.org/software/dhcp/new-features-4.1.0.
Linux as an IPv6 Router: radvd
For a Linux system that operates as a router, you would use the radvd (Router ADVertisement Daemon) to advertise addresses, specifying a network prefix in the /etc/radvd.conf file (Ubuntu main repository). The radvd daemon will detect router network address requests from hosts, known as router solicitations, and provide them with a network address using a router advertisement. These router advertisements will also be broadcast to provide the network address to any hosts that do not send in requests. For radvd to work, you will have to turn on IPv6 forwarding. Usesysctl and set net.ipv6.conf.all.forwarding to 1. To start up the radvd daemon, you use the radvd startup script. To check the router addresses radvd is sending, you can use radvdump.
sudo service radvd start
You will have to configure the radvd daemon yourself, specifying the network address to broadcast. Configuration, though, is very simple, as the full address will be automatically generated using the host’s hardware address. A configuration consists of interface entries, which in turn list interface options, prefix definitions, and options, along with router definitions if needed. The configuration is placed in the /etc/radvd.conf file, which will look something like this:
interface eth0 {
AdvSendAdvert on;
prefix fc00:0:0:0::/64
{
AdvOnLink on;
AdvAutonomous on;
};
};
This assumes one interface is used for the local network, eth0. This interface configuration lists an interface option (AdvSendAdvert) and a prefix definition, along with two prefix options (AdvOnLink and AdvAutonomous). To specify prefix options for a specific prefix, add them within parentheses following the prefix definition. The prefix definition specifies your IPv6 network address. If a local area network has its own network address, you will need to provide its IPv6 network prefix address. For a private network, such as a home network, you can use the unique-local IPv6 prefix, which operates like the IPv4 private network addresses, 192.168.0. The preceding example uses a unique-local address that is used for private IPv6 networks, fc00:0:0:0::, which has a length of 64 bits.
The AdvSendAdvert interface option turns on network address advertising to the hosts. The AdvAutonomous network prefix option provides automatic address configuration, and AdvOnLink simply means that host requests can be received on the specified network interface.
A second network interface is then used to connect the Linux system to an ISP or larger network. If the ISP supports IPv6, this is simply a matter of sending a router solicitation to the ISP router. This automatically generates your Internet address, using the hardware address of the network interface that connects to the Internet and the ISP router’s advertised network address. In Figure 16-2 , shown earlier, the eth0 network interface connects to the local network, whereas eth1 connects to the Internet.
DHCP
DHCP provides configuration information to systems connected to a TCP/IP network, whether the Internet or an intranet. The machines on the network operate as DHCP clients, obtaining their network configuration information from a DHCP server on their network. A machine on the network runs a DHCP client daemon that automatically receives its network configuration information from its network’s DHCP server. The information includes its IP address, along with the network’s name server, gateway, and proxy addresses, including the netmask. Nothing has to be configured manually on the local system, except to specify the DHCP server it should get its network configuration from. This has the added advantage of centralizing control over network configuration for the different systems on the network. A network administrator can manage the network configurations for all the systems on the network from the DHCP server.
A DHCP server also supports several methods for IP address allocation: automatic, dynamic, and manual. Automatic allocation assigns a permanent IP address for a host. Manual allocation assigns an IP address designated by the network administrator. With dynamic allocation, a DHCP server can allocate an IP address to a host on the network only when the host actually needs to use it. Dynamic allocation takes addresses from a pool of IP addresses that hosts can use when needed and releases them when they are finished.
The current version of DHCP supports the DHCP failover protocol, in which two DHCP servers support the same address pool. Should one fail, the other can continue to provide DHCP services for a network. Both servers are in sync and have the same copy of network support information for each host on the network. Primary and secondary servers in this scheme are designated with the primary and secondary statements.
A variety of DHCP servers and clients are available for different operating systems. The Ubuntu main repository provides DHCP version 4 software from the Internet Software Consortium (ISC) at www.isc.org. See https://www.isc.org/software/dhcp/new-features-4.1.0. It integrates support for both IPv4 and IPv6 addressing. The software available includes a DHCP server (isc-dhcp-server), common DHCP files (isc-dhcp-common), a client (isc-dhcp-client), and a relay agent (isc-dhcp-relay). Ubuntu no longer supports DHCP version 3.
sudo apt-get install isc-dhcp-server
Configuring DHCP Client Hosts
Configuring hosts to use a DHCP server is a simple matter of setting options for the host’s network interface device, such as an Ethernet card. For a Linux host, you can use a distribution network tool to set the host to access a DHCP server automatically for network information. On a network tool’s panel for configuring the Internet connection, you will normally find a check box for selecting DHCP. Clicking this box will enable DHCP.
Client support is carried out by the dhclient tool. When your network starts up, it uses dhclient to set up your DHCP connection. Though defaults are usually adequate, you can further configure the DHCP client using the /etc/dhcp/dhclient.conf file. Consult the dhclient.conf Man page for a detailed list of configuration options. Further configuration is provided in the /etc/dhcp/dhclient-enter-hooks.d and /etc/dhcp/dhclient-exit-hooks.d files for Avahi, Samba, the time server (NTP), and debugging. Check the dhclient-script man page for more details. Lease information on the DCHP connection is kept in the /var/lib/dhcp/dhclient.leases file. You can also directly run dhclient to configure DHCP connections.
dhclient
Configuring the DHCP Server
The DHCP sever package provided a single server, dhcpd, for both IPv4 addressing and for IPv6 addressing. Each form of addressing has a separate configuration file: for IPv4 it is /etc/dhcp/dhcpd.conf, and for IPv6 it is /etc/dhcp/dhcpd6.conf. Documentation for IPv6 configuration is integrated into the man pages for the DHCP server. See the man pages for dhcpd.conf for details on both IPv4 and the IPv6 addressing. The IPv6 sections are labeled DHCP6. The dhcp-options man page lists the DHCP/DHCP6 options. Any server runtime parameter can be set in the corresponding /etc/default files for the two methods of addressing: /etc/default/dhcpd and /etc/default/dhcpd6. Arguments are assigned to the DHCPDARGS variable.
For IPv4 addressing, systemd manages the DHCP server using the isc-dhcp-server.service unit file in the /lib/systemd/system directory. For IPv6 addressing it uses the isc-dhcp-server6.service unit file. The DHCP server is started after networking (After) and for the multi-user.target (WantedBy). It is started using the /usr/sbin/dhcpd command which reads configuration from dhcpd.conf. The isc-dhcp-server6.service unit file is the same except that the dhcpd command read the dhcpd6.conf file and has the option -6 for IPv6.
isc-dhcp-server.service
[Unit]
Description=ISC DHCP Ipv4 server
Documentation=man:dhcpd(8)
Wants=network-online.target
After=network-online.target
After=time-sync.target
ConditionPathExists=/etc/default/isc-dhcp-server
ConditionPathExists=/etc/ltsp/dhcpd.conf
ConditionPathExists=/etc/dhcp/dhcpd.conf
[Service]
EnvironmentFile=/etc/default/isc-dhcp-server
RuntimeDirectory=dhcp-server
#Allow dhcp server to write lease and pid file as 'dhcpd' user
ExecStartPre=/bin/chown dhcpd:dhcpd /run/dhcp-server
#The leases file needs to be root:root even when dropping privileges
ExecStart=/bind/sh –ec ‘\
CONFIG_FILE=/etc/dhcp/dhcpd.conf
if [ -f /etc/ltsp/dhcpd.conf ]; then CONFIG_FILE=/etc/ltsp/dhcpd.conf; fi; \
[ -e /var/ lib/dhcp/dhcpd.leases ] || touch /var/lib/hdcp/dhcpd.leases; \
chown root:root /var/lib/dhcp /var/lib/dhcp/dhcpd.leases*; \
exec dhcpd -user dhcpd -group dhcpd –f -4 -pf /run/dhcp-server/dhcpd.pid –cf $CONFIG_FILE $INTERFACES’
[Install]
WantedBy=multi-user.target
Use service command with the isc-dhcp-server or isc-dhcp-server6 command with the start, restart, and stop options. The following examples start the dhcp server with either IPv4 or IPv6 addressing. Use the stop option to shut it down and restart to restart them.
sudo service isc-dhcp-server start
sudo service isc-dhcp-server6 start
Dynamically allocated IP addresses, known as leases, will be assigned for a given time. When a lease expires it can be extended, or a new one generated. Current leases are listed in the dhcpd.leases file located in the /var/lib/dhcp directory. A lease entry will specify the IP address and the start and end times of the lease along with the client's hostname.
/etc/dhcp/dhcpd.conf
The configuration file for the DHCP server is /etc/dhcp/dhcpd.conf. Here you specify parameters and declarations that define how different DHCP clients on your network are accessed by the DHCP server, along with options that define information passed to the clients by the DHCP server. These parameters, declarations, and options can be defined globally for certain sub-networks or for specific hosts. Global parameters, declarations, and options apply to all clients, unless overridden by corresponding declarations and options in subnet or host declarations. Technically, all entries in a dhcpd.conf file are statements that can be either declarations or parameters.
All statements end with a semicolon. Options are specified in options parameter statements. Parameters differ from declarations in that they define if and how to perform tasks, such as how long a lease is allocated. Declarations describe network features such as the range of addresses to allocate or the networks that are accessible. See Table 16-1 for a listing of commonly used declarations and options.
Declarations provide information for the DHCP server or designate actions it is to perform. For example, the range declaration is used to specify the range of IP addresses to be dynamically allocated to hosts:
range 192.168.0.5 192.168.0.128;
With parameters, you can specify how the server is to treat clients. For example, the default-lease-time declaration sets the number of seconds a lease is assigned to a client. The filename declaration specifies the boot file to be used by the client. The server-name declaration informs the client of the host from which it is booting. The fixed-address declaration can be used to assign a static IP address to a client. See the Man page for dhcpd.conf for a complete listing.
|
Entries |
Description |
|
Declarations |
|
|
shared-network name |
Indicates if some subnets share the same physical network. |
|
subnet subnet-number netmask |
References an entire subnet of addresses. |
|
range [ dynamic-bootp ] low-address [ high-address]; |
Provides the highest and lowest dynamically allocated IP addresses. |
|
host hostname |
References a particular host. |
|
group |
Lets you label a group of parameters and declarations and then use the label to apply them to subnets and hosts. |
|
allow unknown-clients; |
Does not dynamically assign addresses to unknown clients. |
|
allow bootp;deny bootp; |
Determines whether to respond to bootp queries. |
|
allow booting;deny booting; |
Determines whether to respond to client queries. |
|
Parameters |
|
|
default-lease-time time; |
Assigns length in seconds to a lease. |
|
max-lease-time time; |
Assigns maximum length of lease. |
|
hardware hardware-type hardware-address; |
Specifies network hardware type (Ethernet or token ring) and address. |
|
filename"filename"; |
Specifies name of the initial boot file. |
|
server-name"name"; |
Specifies name of the server from which a client is booting. |
|
next-server server-name; |
Specifies server that loads the initial boot file specified in the filename. |
|
fixed-address address [, address ... ]; |
Assigns a fixed address to a client. |
|
get-lease-hostnames flag; |
Determines whether to look up and use IP addresses of clients. |
|
authoritative; |
Denies invalid address requests. |
|
server-identifier hostname; |
Specifies the server. |
|
Options |
|
|
option subnet-mask ip-address; |
Specifies client’s subnet mask. |
|
option routers ip-address [, ip-address... ]; |
Specifies list of router IP addresses on client’s subnet. |
|
option domain-name-servers ip-address [, ip-address... ]; |
Specifies list of domain name servers used by the client. |
|
option log-servers ip-address [, ip-address... ]; |
Specifies list of log servers used by the client. |
|
option host-name string; |
Specifies client’s hostname. |
|
option domain-name string; |
Specifies client’s domain name. |
|
option broadcast-address ip-address; |
Specifies client’s broadcast address. |
|
option nis-domain string; |
Specifies client’s Network Information Service domain. |
|
option nis-servers ip-address [, ip-address... ]; |
Specifies NIS servers the client can use. |
|
option smtp-server ip-address [, ip-address... ]; |
Lists SMTP servers used by the client. |
|
option pop-server ip-address [, ip-address... ]; |
Lists POP servers used by the client. |
|
option nntp-server ip-address [, ip-address... ]; |
Lists NNTP servers used by the client. |
|
option www-server ip-address [, ip-address... ]; |
Lists web servers used by the client. |
Table 16-1: DHCP Declarations, Parameters, and Options
Options provide information to clients that they may need to access network services, such as the domain name of the network, the domain name servers that clients use, or the broadcast address. See the Man page for dhcp-options for a complete listing. This information is provided byoption parameters as shown here:
option broadcast-address 192.168.0.255;
option domain-name-servers 192.168.0.1, 192.168.0.4;
option domain-name "mytrek.com";
Your dhcpd.conf file will usually begin with declarations, parameters, and options that you define for the network serviced by the DHCP server. The following example provides router (gateway), netmask, domain name, and DNS server information to clients. Additional parameters define the default and maximum lease times for dynamically allocated IP addresses.
option routers 192.168.0.1;
option subnet-mask 255.255.255.0;
option domain-name "mytrek.com ";
option domain-name-servers 192.168.0.1;
default-lease-time 600;
max-lease-time 7200;
With the subnet, host, and group declarations, you can reference clients in a specific network, particular clients, or different groupings of clients across networks. Within these declarations, you can enter parameters, declarations, or options that will apply only to those clients. Scoped declarations, parameters, and options are enclosed in braces. For example, to define a declaration for a particular host, use the host declaration as shown here:
host rabbit {
declarations, parameters, or options;
}
You can collect different subnet, global, and host declaration into groups using the group declaration. In this case, the global declarations are applied only to those subnets and hosts declared within the group.
Dynamic IPv4 Addresses for DHCP
Your DHCP server can be configured to select IP addresses from a given range and assign them to different clients. Given a situation where you have many clients that may not always be connected to the network, you can effectively service them with a smaller pool of IP addresses. IP addresses are assigned only when they are needed. With the range declaration, you specify a range of addresses that can be dynamically allocated to clients. The declaration takes two arguments, the first and last addresses in the range.
range 192.168.1.5 192.168.1.128;
For example, if you are setting up your own small home network, you would use a network address beginning with 192.168. The range would specify possible IP addresses with that network. So, for a network with the address 192.168.0.0, you place a range declaration along with any other information you want to give to your client hosts. In the following example, a range of IP addresses extending from 192.168.0.1 to 192.168.0.128 can be allocated to the hosts on that network:
range 192.168.0.5 192.168.0.128;
You should also define your lease times, both a default and a maximum:
default-lease-time 600;
max-lease-time 7200;
For a small, simple home network, you just need to list the range declaration along with any global options as shown here. If your DHCP server is managing several sub-networks, you will have to use the subnet declarations.
In order to assign dynamic addresses to a network, the DHCP server will require that your network topology be mapped. This means it needs to know what network addresses belong to a given network. Even if you use only one network, you will need to specify the address space for it. You define a network with the subnet declaration. Within this subnet declaration, you can specify any parameters, declarations, or options to use for that network. The subnet declaration informs the DHCP server of the possible IP addresses encompassed by a given subnet. This is determined by the network IP address and the netmask for that network. The next example defines a local network with address spaces from 192.168.0.0 to 192.168.0.255. The range declaration allows addresses to be allocated from 192.168.0.5 to 192.168.0.128.
subnet 192.168.1.0 netmask 255.255.255.0 {
range 192.168.0.5 192.168.0.128;
}
Versions of DHCP prior to 3.0 required that you even map connected network interfaces that are not being served by DHCP. Thus each network interface has to have a corresponding subnet declaration. Those not being serviced by DHCP don’t have a notauthoritative parameter as shown here (192.168.2.0 being a network not to be serviced by DHCP). In version 3.0 and later, DHCP simply ignores unmapped network interfaces:
subnet 192.168.2.0 netmask 255.255.255.0 {
not authoritative;
}
The implementation of a very simple DHCP server for dynamic addresses is shown in the sample dhcpd.conf file that follows:
/etc/dhcp/dhcpd.conf
option routers 192.168.0.1;
option subnet-mask 255.255.255.0;
option domain-name "mytrek.com ";
option domain-name-servers 192.168.0.1;
subnet 192.168.1.0 netmask 255.255.255.0 {
range 192.168.0.5 192.168.0.128;
default-lease-time 21600;
max-lease-time 43200;
}
DHCP Dynamic DNS Updates
For networks that also support a Domain Name Server, dynamic allocation of IP addresses currently needs to address one major constraint: DHCP needs to sync with a DNS server. A DNS server associates hostnames with particular IP addresses, whereas, in the case of dynamic allocation, the DHCP server randomly assigns its own IP addresses to different hosts. These may or may not be the same as the IP addresses that the DNS server expects to associate with a hostname. A solution to this problem is Dynamic DNS. With Dynamic DNS, the DHCP server is able to automatically update the DNS server with the IP addresses the DHCP server has assigned to different hosts. You can find detailed information about dynamic DNS in the dhcpd.conf Man page.
Note: Alternatively, if you want to statically synchronize your DHCP and DNS servers with fixed addresses, you configure DHCP to assign those fixed addresses to hosts. You can then have the DHCP server perform a DNS lookup to obtain the IP address it should assign, or you can manually assign the same IP address in the DHCP configuration file. Performing a DNS lookup has the advantage of specifying the IP address in one place, the DNS server.
The DHCP server has the ability to dynamically update BIND DNS server zone configuration files. You enable dynamic updates on a DNS server for a zone file by specifying the allow-update option for it in the named.conf file. Furthermore, it is strongly encouraged that you use TSIG signature keys to reference and authenticate the BIND and DHCP servers. Enabling the use of a TSIG key involves syncing configurations for both your DHCP and DNS servers. Both have to be configured to use the same key for the same domains. First you need to create a shared secret TSIG signature key using dnssec-keygen. In the DNS server, you place TSIG key declarations and allow-update entries in the server's named.conf file, as shown in this example:
key mydhcpserver {
algorithm HMAC-MD5;
secret "ONQAfbBLnvWU9H8hRqq/WA==";
};
zone "mytrek.com" {
type master;
file "mytrek.com";
allow-update {key mydhcpserver;};
};
zone "1.168.192.IN-ADDR.ARPA" {
type master;
file "192.168.0";
allow-update {key mydhcpserver;};
};
In the DHCP server, you place a corresponding TSIG key declaration and allow-update entries in the server’s dhcpd.conf file, as shown in this example. The key declaration has the same syntax as the DNS server. DHCP zone statements are then used to specify the IP address of the domain and the TSIG key to use. The domain names and IP addresses need to match exactly in the configuration files for both the DNS and DHCP servers. Unlike in a named configuration file, there are no quotes around the domain name or IP addresses in the dhcpd.conf file. In the dhcpd.conffile, the domain names and IP addresses used in the zone statement also need to end with a period, as they do in the DNS zone files. The key statement lists the key to use. Though the DHCP server will try to determine the DNS servers to update, it is recommended that you explicitly identify them with a primary statement in a zone entry.
key mydhcpserver {
algorithm HMAC-MD5;
secret "ONQAfbBLnvWU9H8hRqq/WA==";
};
zone mytrek.com. { #DNS domain zone to update
primary 192.168.0.1; #address of DNS server
key mydhcpserver; #TSIG signature key
};
zone 1.168.192.IN-ADDR.ARPA. { #domain PTR zone to update
primary 192.168.0.1; #address of DNS server
key mydhcpserver; # TSIG signature key
};
To generate a fully qualified hostname to use in a DNS update, the DHCP server will normally use its own domain name and the hostname provided by a DHCP client (see the dhcpd.conf Man page for exceptions). Should you want to assign a specific hostname to a host, you can use the ddns-hostname statement to specify it in the host’s hardware section. The domain name is specified in the domain-name option:
option domain-name "mytrek.com"
The DNS update capability can be turned on or off for all domains with the ddns-update-style statement. It is off by default. Set it to yes to turn it on. To turn off DNS updates for particular domains, you can use the ddns-updates statement. This is also on by default.
ddns-updates-style yes;
DHCP Subnetworks
If you are dividing your network space into several subnetworks, you can use a single DHCP server to manage them. In that case, you will have a subnet declaration for each subnetwork. If you are setting up your own small network, you use a network address beginning with 192.168. The range specifies possible IP addresses within that network so, for a network with the address 192.168.0.0, you create a subnet declaration with the netmask 255.255.255.0. Within this declaration, you place a range declaration along with any other information you want to give to your client hosts. In the following example, a range of IP addresses extending from 192.168.0.1 to 192.168.0.75 can be allocated to the hosts on that network:
subnet 192.168.0.0 netmask 255.255.255.0 {
range 192.168.0.5 192.168.0.75;
}
You may want to specify different policies for each subnetwork, such as different lease times. Any entries in a subnet declaration will override global settings. So if you already have a global lease time set, a lease setting in a subnet declaration will override it for that subnet. The next example sets different lease times for different subnets, as well as different address allocations. The lease times for the first subnet are taken from the global lease time settings, whereas the second subnet defines its own lease times:
default-lease-time 21600;
max-lease-time 43200;
subnet 192.168.1.0 netmask 255.255.255.0 {
range 192.168.0.5 192.168.0.75;
}
subnet 192.168.1.128 netmask 255.255.255.252 {
range 192.168.0.129 192.168.0.215;
default-lease-time 56000;
max-lease-time 62000;
}
If your subnetworks are part of the same physical network, you need to inform the server of this fact by declaring them as shared networks. You do this by placing subnet declarations within a shared-network declaration, specifying the shared network’s name. The name can be any descriptive name, though you can use the domain name. Any options specified within the shared-network declaration and outside the subnet declarations will be global to those subnets. In the next example, the subnets are part of the same physical network and so are placed within a shared-networkdeclaration:
shared-network mytrek.com
{
default-lease-time 21600;
max-lease-time 43200;
subnet 192.168.1.0 netmask 255.255.255.0 {
range 192.168.0.5 192.168.0.75;
}
subnet 192.168.1.128 netmask 255.255.255.252 {
range 192.168.0.129 192.168.0.215;
default-lease-time 56000;
max-lease-time 62000;
}
}
DHCP Fixed Addresses
Instead of using a pool of possible IP addresses for your hosts, you may want to give each one a specific address. Using the DHCP server still gives you control over which address will be assigned to a given host. However, to assign an address to a particular host, you need to know the hardware address for that host’s network interface card (NIC). In effect, you need to inform the DHCP server that it has to associate a particular network connection device with a specified IP address. To do that, the DHCP server needs to know which network device you are referring to. You can identify a network device by its hardware address, known as its MAC address. To find out a client’s hardware address, log in to the client and use the ifconfig command to find out information about your network devices. To list all network devices, use the -a option. If you know your network device name, you can use that. The next example will list all information about the first Ethernet device, eth0:
ifconfig eth0
This will list information on all the client’s network connection devices. The entry (usually the first) with the term HWaddr will display the MAC address. Once you have the MAC address, you can use it on the DHCP server to assign a specific IP address to that device.
In the dhcpd.conf file, you use a host declaration to set up a fixed address for a client. Within the host declaration, you place a hardware option in which you list the type of network connection device and its MAC address. Then use the fixed-address parameter to specify the IP address to be assigned to that device. In the following example, the client’s network device with a MAC address of 08:00:2b:4c:29:32 is given the IP address 192.168.0.2:
host rabbit {
option host-name "rabbit.mytrek.com"
hardware ethernet 08:00:2b:4c:29:32;
fixed-address 192.168.0.2;
}
You can also have the DHCP server perform a DNS lookup to obtain the host’s IP address. This has the advantage of letting you manage IP addresses in only one place, the DNS server. Of course, this requires that the DNS server be operating so that the DHCP server can determine the IP address. For example, a proxy server connection (which can provide direct web access) needs just an IP address, not a DNS hostname, to operate. If the DNS server were down, the preceding example would still assign an IP address to the host, whereas the following example would not:
host rabbit {
option host-name "rabbit.mytrek.com"
hardware ethernet 08:00:2b:4c:29:32;
fixed-address rabbit.mytrek.com;
}
You can also use the host declaration to define network information for a diskless workstation or terminal. In this case, you add a filename parameter specifying the boot file to use for that workstation or terminal. Here the terminal called myterm obtains boot information from the serverturtle.mytrek.com:
host myterm {
option host-name "myterm.mytrek.com"
filename "/boot/vmlinuz";
hardware ethernet 08:00:2b:4c:29:32;
server-name "turtle.mytrek.com";
}
A common candidate for a fixed address is the DNS server for a network. Usually, you want the DNS server located at the same IP address, so that it can be directly accessed. The DHCP server can then provide this IP address to its clients.
All materials on the site are licensed Creative Commons Attribution-Sharealike 3.0 Unported CC BY-SA 3.0 & GNU Free Documentation License (GFDL)
If you are the copyright holder of any material contained on our site and intend to remove it, please contact our site administrator for approval.
© 2016-2026 All site design rights belong to S.Y.A.