Ubuntu 15.04 Server with systemd: Administration and Reference (2015)
Part II. Services
Chapter 6. Mail Servers
Mail servers provide Internet users with electronic mail services. They have their own TCP/IP protocols such as the Simple Mail Transfer Protocol (SMTP), the Post Office Protocol (POP), and the Internet Mail Access Protocol (IMAP). Messages are sent across the Internet through mail servers that service local domains. A domain can be seen as a subnet of the larger Internet, with its own server to handle mail messages sent from or received for users on that subnet. When a user mails a message, it is first sent from his or her host system to the mail server. The mail server then sends the message to another mail server on the Internet, the one servicing the subnet on which the recipient user is located. The receiving mail server then sends the message to the recipient’s host system.
At each stage, a different type of operation takes place using different agents (programs). A mail user agent (MUA) is a mail client program, such as Evolution, Thunderbird, Kmail, or mail. With an MUA, a user composes a mail message and sends it. Then a mail transfer agent (MTA) transports the messages over the Internet. MTAs are mail servers that use SMTP to send messages across the Internet from one mail server to another, transporting them among subnets. On Ubuntu, the commonly used MTAs are Postfix and Exim. These are mail server daemons that constantly check for incoming messages from other mail servers and send outgoing messages to appropriate servers (see Table 6-1 ). Incoming messages received by a mail server are distributed to a user with mail delivery agents (MDAs). Ubuntu supports the procmail and dovecot MDAs, taking messages received by the mail server and delivering them to user accounts. Dovecot refers to its delivery function as an LDA (Local Delivery Agent) which is the same as MDA.
Ubuntu now bundles both dovecot and Postfix into a meta package to install both the MTA and LDA, as well as dovecot IMAP and POP servers, into the dovecot-postfix package. Install this package to set up a fully functional mail server.
For those systems not supported by a mail server directly, a mail retrieval agent (MRA), like fetchmail, will manually retrieve mail from a remote mail server and direct the mail to the system's mail clients (MUAs).
Mail Transport Agents
On Ubuntu you can install and configure the Exim, Postfix, or Sendmail mail servers. You can also set up your Linux system to run a POP server. POP servers hold users’ mail until they log in to access their messages, instead of having mail sent to their hosts directly. The two recommended MTAs are Exim and Postfix, both in the main Ubuntu repository. Sendmail is also available from the Universe repository.
Exim is a fast and flexible MTA similar to Sendmail. Developed at the University of Cambridge, it has a very different implementation than Sendmail. You can find out more about Exim at http://wiki.debian.org/PkgExim4 and at http://www.exim.org. Exim is a Debian Linux project. Ubuntu, as a version a Debian Linux, implements Exim reliably.
Courier (Universe repository) is a fast, small, and secure MTA that maintains some compatibility with Sendmail. The Courier software package also includes POP, IMAP, and webmail servers along with mailing list services. It supports extensive authentication methods including shadow passwords, PAM, and LDAP.
Qmail (Multiverse repository) is also a fast and secure MTA, but it has little compatibility with Sendmail. It has its own configuration and maintenance files. Like Postfix, it has a modular design, using a different program for each mail task. It also focuses on security, speed, and easy configuration.
|
Agent |
Description |
|
Postfix |
Fast, easy-to-configure, and secure mail transfer agent compatible with Sendmail and designed to replace it (Ubuntu repository) |
|
Exim |
MTA based on smail3 (Ubuntu repository) |
|
Sendmail |
Sendmail mail transfer agent, supported by the Sendmail consortium (Universe repository) |
|
Courier |
Courier MTA (Universe repository) |
|
Qmail |
Fast, flexible, and secure MTA with its own implementation and competitive with Postfix (Multiverse repository) |
Table 6-1: Mail Transfer Agents
Postfix
Postfix is a fast, secure, and flexible MTA designed to replace Sendmail while maintaining as much compatibility as possible. Written by Wietse Venema and originally released as the IBM Secure Mailer, it is now available under the GNU license (www.postfix.org). Postfix was created with security in mind, treating all incoming mail as potential security risks. Postfix uses many of the same Sendmail directories and files and makes use of Sendmail wrappers, letting Sendmail clients interact seamlessly with Postfix servers. Postfix is also easier to configure than Sendmail, using its own configuration file.
Check the Ubuntu Server Guide | Email Services | Postfix for basic configuration.
https://help.ubuntu.com/stable/serverguide/postfix.html
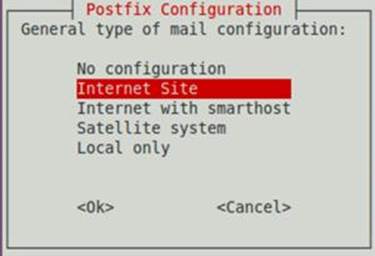
Figure 6-1: Postfix standard configuration selection
Postfix is available on the main Ubuntu repository. When you install Postfix, two configuration screens will appear to prompt you for the kind of installation you want. The first screen asks you select a standard configuration, with Internet site already selected as the default (see Figure 6-1 ). You can choose from Internet site, Internet with smarthost, Satellite system, Local, or No configuration. If you install using the desktop (Synaptic Package Manager or Ubuntu Software Center), the screen will look different, but the prompts will be the same.
Instead of one large program, Postfix is implemented as a collection of smaller programs, each designed to perform a specific mail-related task. A Postfix master daemon runs continuously and manages the use of the other Postfix daemons, running them only as needed. A bouncedaemon handles undeliverable mail, a trivial-rewrite daemon redirects messages, and the showq daemon provides information on the print queues.
The options are as follows:
Internet site: The default configuration. Mail server interacts directly with the Internet. Mail sent directly with SMTP.
Internet site with smarthost: Mail server for a local network that, in turn, uses an ISP mail server to interact with the Internet. Mail is received and sent to and from the ISP mail server with mail server access tools like fetchmail. Mail can be received, but not sent, directly from the Internet.
Local only: System only mail server (no network access) for users on the mail server's system (localhost).
No configuration: No configuration to standard configuration files (requires detailed configuration on your part).
Satellite system: Outgoing forwarding mail server for sent mail only (no received mail).
The following configuration screen will prompt you for your system mail name, displaying your computer host name as the default.
Several other support packages are also available on the Ubuntu repository for Postfix. These include the Postfix documentation with examples (postfix-doc), LDAP (postfix-ldap), PGSQL (postfix-pgsql) and MySQL (postfix-mysql), as well as Postfix greylisting support (postgrey).
Postfix is managed by systemd using the /run/system/generator.late/postfix.service unit file. The file is generated by the systemd-sysv-generator from the /etc/init.d/postfix script. Postfix is started as a standalone daemon for the multi-user and graphical targets (runlevel targets 2, 3, 4, and 5) (Before). The /etc/init.d/postfix script is used to start, stop, and reload the server (ExecStart, ExecReload, and ExecStop).
postfix.service
[# Automatically generated by systemd-sysv-generator
[Unit]
Documentation=man:systemd-sysv-generator(8)
SourcePath=/etc/init.d/postfix
Description=LSB: Postfix Mail Transport Agent
Before=runlevel2.target runlevel3.target runlevel4.target runlevel5.target shutdown.target mail-transport-agent.target
After=local-fs.target remote-fs.target systemd-journald-dev-log.socket nss-lookup.target network-online.target time-sync.target postgresql.service mysql.service clamav-daemon.service postgrey.service spamassassin.service saslauthd.service dovecot.service
Wants=mail-transport-agent.target network-online.target
Conflicts=shutdown.target
[Service]
Type=forking
Restart=no
TimeoutSec=5min
IgnoreSIGPIPE=no
KillMode=process
GuessMainPID=no
RemainAfterExit=yes
ExecStart=/etc/init.d/postfix start
ExecStop=/etc/init.d/postfix stop
ExecReload=/etc/init.d/postfix reload
Postfix Commands
Several Postfix commands allow you to manage your server tasks. The sendmail command sends messages. You use mailq to display the status of your mail queues. The newaliases command takes mail aliases listed in the aliases files and stores them in a database file that can be used by Postfix.
The postmap command is used to maintain various database files used by Postfix, such as the alias file for mail aliases and the access file that restricts messages received by the server. You can also implement these database files as SQL databases like MySQL, allowing for easier management. The mysql_table Man page provides detailed information on how to configure SQL database support (check pgsql_table for Postgresql database support). You could also use LDAP instead of SQL (ldap_table).
In addition, Postfix provides lower-level tools, all beginning with the term post, such as the postalias command, which maintains the alias database, and postcat, which displays print queue files.
Quick configuration with dpkg-reconfigure
Instead of manually editing the main.cf file directly, you can perform an automatic configuration using the dpkg-reconfigure command. With the postfix option, dpkg-reconfigure will run a series of screens prompting you to enter basic Postfix configuration options. As when you first installed Postfix, you are prompted to enter the configuration type and the system mail name. Additional screens let you enter more detailed options, like the administrator account and the domains supported.
Before you use the dpkg-reconfigure command, be sure to back up your main.cf file, with a command like the following. The dpkg-reconfigure operation will replace the main.cf file entirely.
sudo cp /etc/postfix/main.cf mainback.cf
You can then start up the dpkg-reconfigure operation in terminal window or from the command line with the following command.
sudo dpkg-reconfigure postfix
The dpkg-reconfigure operation uses a screen-based keyboard interface. Use the TAB key to move to the button labels at the bottom of the screen. Use the ENTER key to select a button. Some screens will display menus, from which you can select an entry using the arrow keys and then, using the TAB key move to the OK button to choose it. You can use the ESC key to move back to the previous screen. The screens are as follows.
Welcome screen with configuration descriptions and configuration type (see Figure 6-2 ). Choose a configuration type (usually you would select Internet).
Enter the system mail name (the hostname of your current system will already be entered), see Figure 6-3 .
Enter the user that will be the Postfix administrator.
Enter the domains that this mail server supports (the final destination (your current host and domain are entered for you. You should change this to the network domain that this mail server is meant to serve), see Figure 6-4 .
You are then asked if you want to force synchronous updates. "No" will be selected by default. Normally you do not need synchronous updates. The ext4 file system used on all Ubuntu systems supports journaling, which easily recovers from any crashes.
You are then asked to specify the networks for which the server will relay mail. IP address entries will already be displayed for your local host (IPv4 and IPv6 versions). To use the postfix default, leave this entry blank.
You can then specify a limit to your mailbox files, 0 is no limit (the default). A size limit can prevent large email attachments.
You then have the option to change the character used for the local address. The default is the plus sign (+) and is already entered. Normally you would use this sign.
You are then given the option to choose which IP protocol to use. The default is the one already in use on your system and will be selected already. You can choose to use IPV4, IPV6, or both (all).

Figure 6-2: Postfix dpkg-reconfigure, first screen (press TAB and ENTER)
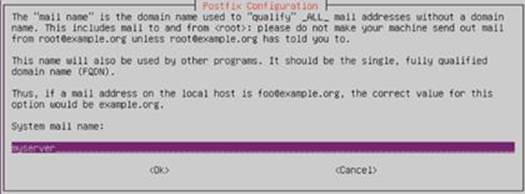
Figure 6-3: Postfix dpkg-reconfigure, administrator user

Figure 6-4: Postfix dpkg-reconfigure, domains
Postfix Configuration: /etc/postfix/main.cf
Postfix configuration is handled by setting parameters in its configuration file, main.cf. In addition, a master.cf file holds parameters for running Postfix services, and dynamicmaps.cf file for additional runtime capabilities.
A default /etc/postfix/main.cf file is installed with Postfix, with most of the essential configuration values already set. Parameter names tend to be user-friendly. For example, directory locations are specified by parameters ending in the term directory, such as queue_directory for the location of Postfix queues and daemon_directory for the location of the Postfix daemons. Defaults are already implemented for most parameters. For example, defaults are set for particular resource controls, such as message size, time limits, and the number of allowed messages per queue. You can edit the main.cf file to change the parameter values to meet your own needs. After making any changes, you need only to reload the configuration using the postfixreload command:
postfix reload
The Ubuntu main.cf file
Ubuntu installs a customized version of main.cf, using only a few options, several of which are Debian specific.
The myorigin parameter specifies the origin address for e-mail sent by the server. On Debian/Ubuntu this is commented out. On Ubuntu, the myorigin value is set to the myhostname value, which you entered in the second configuration screen during the Postfix installation. This is the host name for your mail server. Alternatively, the commented entry is set to the file that holds the host name, the same value as myhostname. If enabled, the entry line would read the origin address from a designated file, like /etc/mailname.
#myorigin=/etc/mailname
One of the first lines in the main.cf file will set the banner. On the Ubuntu version, the term Ubuntu is displayed with the host name and software name (mail_name is set to Postfix).
smtpd_banner = $myhostname ESMTP $mail_name (Ubuntu)
Several of the Ubuntu entries are designed to make your server more efficient. For efficiency purposes, the biff option is set to no, turning off the biff notification operation for the mail server.
biff = no
The append_dot_mydomain option adds the domain name to the email address. This operation is now handled by mail clients (MUA) like Thunderbird and Evolution. Ubuntu turns it off.
# appending .domain is the MUA's job.
append_dot_mydomain = no
Ubuntu will include a commented entry to the delay_warning_time option. This option will notify the sender of undelivered mail after a specified time period. The time period default is four hours.
# Uncomment the next line to generate "delayed mail" warnings
#delay_warning_time = 4h
The readme_directory option specifies the location of the Postfix documentation. On Ubuntu, Postfix documentation is held in the postfix-doc package which is installed separately. If the package is not installed, the option will be set to no. If installed, the location is set to/etc/share/doc/postfix.
readme_directory = /usr/share/doc/postfix
The html_directory entry holds the location of documentation in the Web page format.
html_directory = /usr/share/doc/postfix/html
Several TLS options are specified to provide Secure Socket Layer (SSL) security. See the following section on SMTP Authentication.
Network options are then set, including myhostname, mydestination, and mynetworks. These were set up during configuration. myhostname is the server URL, mydestination is a list of domains supported by the server, and mynetworks is the list of supported networks. Thealias_maps directive specifies the file that holds aliases associated with users, like that for postmaster. The alias database specifies the file that holds aliases for destination addresses. Usually these are the same file, /etc/aliases. The relay_host directive is used if you are using another mail server to send and receive mail. This is empty if your mails server sends and receives mail directly.
myhostname = my-server
alias_maps = hash:/etc/aliases
alias_database = hash:/etc/aliases
mydestination = my-server, localhost.localdomain, localhost
relayhost =
mynetworks = 127.0.0.0/8 [::ffff:127.0.0.0]/104 [::1]/128
To easily control spam, relay restrictions are put in place with smtpd_relay_restrictions for relay operation. With Postfix 2.10, relay restrictions are specified with their own options, instead of using recipient restrictions. Relay operations are allowed from local networks (permit_mynetworks), from authenticated sources (Simple Authentication and Security Layer, SASL) (permit_sasl_authenticated), and rejects unauthorized destinations (defer_unauth_destination).
smptd_relay_restrictions = permit_mynetworks permit_sasl_authenticated defer_unauth_destination
Then several mailbox configuration entries are listed. The mailbox_size directive is used to restrict the size of user's mailbox files, the files that hold their messages. It is set to 0 by default, meaning an unlimited size. The recipient_delimiter character is usually set to +.
mailbox_size_limit = 0
recipient_delimiter = +
Then certain basic network options are set. The inet_interfaces directive specifies the network device that supports the mail server. Usually this is set to all.
inet_interfaces = all
The Ubuntu server default main.cf file is shown here without the Mail User Agent options:
# See /usr/share/postfix/main.cf.dist for a commented, more complete version
# Debian specific: Specifying a file name will cause the first
# line of that file to be used as the name. The Debian default
# is /etc/mailname.
#myorigin = /etc/mailname
smtpd_banner = $myhostname ESMTP $mail_name (Ubuntu)
biff = no
# appending .domain is the MUA's job.
append_dot_mydomain = no
# Uncomment the next line to generate "delayed mail" warnings
#delay_warning_time = 4h
readme_directory = /usr/share/doc/postfix
# TLS parameters
smtpd_tls_cert_file = /etc/ssl/certs/ssl-cert-snakeoil.pem
smtpd_tls_key_file = /etc/ssl/private/ssl-cert-snakeoil.key
smtpd_use_tls = yes
smtpd_tls_session_cache_database = btree:${data_directory}/smtpd_scache
smtp_tls_session_cache_database = btree:${data_directory}/smtp_scache
# See /usr/share/doc/postfix/TLS_README.gz in the postfix-doc package for
# information on enabling SSL in the smtp client.
smptd_relay_restrictions = permit_mynetworks permit_sasl_authenticated defer_unauth_destination
myhostname = myserver
alias_maps = hash:/etc/aliases
alias_database = hash:/etc/aliases
mydestination = my-server, localhost.localdomain, , localhost
relayhost =
mynetworks = 127.0.0.0/8 [::ffff:127.0.0.0]/104 [::1]/128
mailbox_size_limit = 0
mailbox_command = procmail -a "$EXTENSION"
recipient_delimiter = +
inet_interfaces = all
inet_protocols = all
html_directory = /usr/share/doc/postfix/html
SMTP Authentication
Several TLS options in the main.cf file provide Secure Socket Layer (SSL) security for the SMTP server (outgoing mail). Encryption uses Transport Layer Security (TLS), which is the current version of SSL. These options have the prefix smtpd_tls. The smtpd_tls_cert_file andsmtpd_tls_key_file options specify the files for the TLS certificate and SSL key in the /etc/ssl directory. The smtpd_use_tls option is set to yes to enable the use of TLS encryption. The two tls_session_cache_database options designate a secure cache to hold passwords for the extent of a session.
# TLS parameters
smtpd_tls_cert_file = /etc/ssl/certs/ssl-mail.pem
smtpd_tls_key_file = /etc/ssl/private/ssl-mail.key
smtpd_use_tls = yes
smtpd_tls_session_cache_database = btree:${data_directory}/smtpd_scache
smtp_tls_session_cache_database = btree:${data_directory}/smtp_scache
For an actual mail server, you should obtain a certificate and key for that server, and set the smtpd_tls_cert_file and smtpd_tls_key_file options to the new certificate and key files.
https://help.ubuntu.com/stable/serverguide/certificates-and-security.html
Mail User Agent Options and Authentication
When you install a Mail User Agent like dovecot or procmail, several options will be added to the main.cf file, denoting the MUA installed and specifying security options to use. The mailbox_command directive specifies the mail delivery agent to use for delivering mail to user's mailboxes (be sure one is installed, dovecot or procmail). If you install procmail, it will be listed.
mailbox_command = procmail -a "$EXTENSION"
If you have installed dovecot, then it will be used instead.
mailbox_command = /usr/lib/dovecot/deliver -c /etc/dovecot/conf.d/01-mail-stack-delivery.conf -m "${EXTENSION}"
The home_mailbox specifies the subdirectory for mailboxes.
home_mailbox = Maildir/
For MUA Authentication it is recommended that you install dovecot-postfix package. This will implement SASL security for mail clients, as well as use dovecot for your mail delivery agent.
For MUA support, dovecot will add several smtpd_sasl options to provide MUA security. The smtpd_sasl_auth_enable option will enable SASL security. The smtpd_sasl_type option specifies the MUA used, such as dovecot. smtpd_sasl_security_options will list nonanonymous to deny anonymous use. smtpd_sasl_local_domain is set to the server host name.
The smtpd_recipient_restrictions option sets several conditions for accepting mail, such as reject_unknown_sender_domain, permit_mynetworks, and reject_unauth_destination. The smtpd_sender_restrictions place restrictions on outgoing mail, likereject_unknown_sender_domain.
In additions, the MUA also has its own smtpd_tls options such as smtpd_tls_received_header, smtpd_tls_mandatory_ciphers, and smtpd_tls_auth_only.
smtpd_sasl_auth_enable = yes
smtpd_sasl_type = dovecot
smtpd_sasl_path = private/dovecot-auth
smtpd_sasl_authenticated_header = yes
smtpd_sasl_security_options = noanonymous
smtpd_sasl_local_domain = $myhostname
broken_sasl_auth_clients = yes
smtpd_recipient_restrictions = reject_unknown_sender_domain, reject_unknown_recipient_domain, reject_unauth_pipelining, permit_mynetworks, permit_sasl_authenticated, reject_unauth_destination
smtpd_sender_restrictions = reject_unknown_sender_domain
smtp_use_tls = yes
smtpd_tls_received_header = yes
smtpd_tls_mandatory_protocols = SSLv3, TLSv1
smtpd_tls_mandatory_ciphers = medium
smtpd_tls_auth_only = yes
tls_random_source = dev:/dev/urandom
Postfix directives for main.cf
Postfix provides an extensive set of configuration directives letting you set up more complex configurations. The /usr/share/postfix directory has sample main.cf files listing available directives, many with detailed comments (install postfix-doc). You can find the complete version ofmain.cf with detailed comments at:
/usr/share/postfix/main.cf.dist
Network Parameters
You will most likely need to set several network parameters. To ease this process, Postfix defines parameters that hold key network information, such as myhostname, which holds the hostname of your system, and mydomain, which holds the domain name of your network. For example,myhostname would be set to the host turtle.mytrek.com, whereas mydomain would be just mytrek.com. Parameters like myhostname and mydomain are themselves used as values assigned to other parameters. On Ubuntu, myhostname will be set to the system mail name you entered in the second configuration screen during the Postfix installation. In the next example, myhostname and mydomain are set to the host the mail server is running on and its network domain:
myhosturtle.mytrek.com
mydomain=mytrek.com
The myorigin parameter specifies the origin address for e-mail sent by the server. On Debian/Ubuntu this is commented out. It is set to the file that holds the host name, the same value as myhostname. You could assign the value of myhostname to it directly as shown here and described in the main.cf.dist sample version:
myorigin=$myhostname
On Ubuntu/Debian, the line would, instead, read the origin address from a designated file, like /etc/mailname.
#myorigin=/etc/mailname
If you are using a single system directly attached to the Internet, you may want to keep this configuration, labeling mail as being sent by your host. However, if your system is operating as a gateway for a network, your mail server is sending out mail from different hosts on that network. You may wish to change the origin address to the domain name, so that mail is perceived as sent from the domain.
myorigin=$mydomain
The inet_protocols option specifies the IP protocol to use. This can be IPV4, IPV6, or all for both.
inet_protocols = ipv4
Local Networks
The mydestination parameter holds the list of domains that your mail server will receive mail for. By default, these include localhost and your system’s hostname.
mydestination = $myhostname localhost.$mydomain
If you want the mail server to receive mail for an entire local network, you need to also specify its domain name. That way, the server can receive mail addressed just to the domain, instead of your specific host.
mydestination = $myhostname localhost.$mydomain $mydomain
Also, if your host goes by other hostnames and there are DNS records identifying your host by those names, you need to specify those names as well. For example, your host could also be a web server to which mail could be directed. A host turtle.mytrek.com may also be identified as the website mytrek.com. Both names would have to be listed in the mydestination parameter.
mydestination = $myhostname localhost.$mydomain $mydomain www.$mydomain
If your system is a gateway for one or more local networks, you can specify them with the mynetworks parameter. This allows your mail server to relay mail addressed to those networks. Networks are specified using their IP addresses. The relay_domains parameter lets you specify domain addresses of networks for which you can relay messages. By default, this is set to mydestination:
mynetworks=192.168.0.0
relay_domains=$mydestination
Hosts within the local network connected to the Internet by a gateway need to know the identity of the relay host (the mail server). You set this with the relayhost parameter. Also, myorigin should be set to just mydomain. If there is a DNS server identifying the gateway as the mail server, you can just set relayhost to the value of mydomain. If not, then relayhost should be set to the specific hostname of the gateway/mail server. If your local network is not running a DNS server, be sure to set disable_dns_lookups to yes.
relay_host=$mydomain
Direct Connections
If your system is directly connected to the Internet and you use an ISP (Internet service provider) for receiving mail, you can configure Postfix as a null client to only send mail. Set the relay_host parameter to just your own domain name. Also, in the master.cf file, comment out the SMTP server and local delivery agent entries.
relayhost = $mydomain
Masquerading
If your mail server is operating on a gateway for a local network and you want to hide the hosts in that network, you can opt to masquerade the local hosts, letting it appear that all mail is coming from the domain in general, instead of a particular host. To set this option, you use themasquerade_domains parameter. In the following example, all mail sent by a local host such as rabbit.mytrek.com will be addressed as coming from mytrek.com. Thus a message sent by the user chris@rabbit.mytrek.com is sent out as coming from chris@mytrek.com:
masquerade_domains = $mydomain
Received mail is not masqueraded by default. This allows Postfix to still deliver received mail to particular hosts. If you want received mail to also be masqueraded, you have to add the envelope_recipients parameter to the list of values assigned to the masquerade_class parameter. In that case, Postfix will no longer be able to deliver received mail.
Virtual Domains and Virtual Accounts
If your network has implemented virtual domains, you will need to set up a virtual domain table and specify that table with the virtual_maps option. Setting up a table is a simple matter of listing virtual names and their real addresses in a text file such as /etc/postfix/virtual. Then use thepostmap command to create a Postfix table:
postmap /etc/postfix/virtual
In the main.cf file, specify the table with the virtual_maps parameter. Postfix will then use this table to look up virtual domains.
virtual_maps = hash:/etc/postfix/virtual
Note: See the Postfix FAQ at http://postfix.org for detailed information on how to set up Postfix for a gateway, a local workstation, or a host directly connected to the Internet (null server).
Instead of using mail accounts for actual users on a system, you can set up virtual accounts. Virtual accounts can be managed either in standard Postfix text files, in SQL databases, or as LDAP entries. SQL databases are preferred for managing a large number of virtual accounts. For SQL support, you first create tables in a MySQL database for domains (the virtual domains), users (user accounts), and forwarding (aliases). Corresponding virtual domain configuration files will list information like the database, tables, and host to use, such as a mysql_virt.cf for SQL database access and mysql_users.cf for accessing the user table. Check the documentation at http://www.postfix.org for detailed information.
Postfix Greylisting Policy Server
Postfix also supports greylisting with the Postfix Greylisting Policy Server. Greylisting blocks spammers based on their mailing methods rather than content, relying on the idea that spammers will not attempt retries if rejected (greylisting.org). Messages from new previously unknown sources are rejected, whereupon a valid MTA will retry, whereas a spammer will not. To support the Greylisting Policy Server, Postfix is configured to delegate Policy access to a server. In the /etc/postfix directory you can use the postgrey_whitelist files to exclude email addresses from greylisting.
The Greylisting Policy Server is run as a standalone server, using its own startup script. The postgrey Man page provides detailed information about the server's options.
Controlling User and Host Access
With an access file, you can control access by certain users, hosts, and domains. The access file works much like the one used for Sendmail. Entries are made in a text file beginning with the user, host, or domain name or address, followed by an action to take. A user, host, or domain can be accepted, rejected with no message, or rejected with a message. Once entries are made, they can be installed in a Postfix database file with the postmap command:
postmap /etc/postfix/access
You can then use the access file in various Postfix operations to control clients, recipients, and senders.
Access can also be controlled by use of the Mail Abuse Prevention System (MAPS), which provides the RBL+ service, a collection of mail address DNS-based databases (mail-abuse.com). These databases, like the Realtime Blackhole List (RBL), list mail addresses that are known be used by mail abusers. A domain or host is matched against a list maintained by the service, which can be accessed on a local server or directly from an online site. Various Postfix operations let you use MAPS databases to control access by clients, recipients, or senders.
Header and Body Checks
With the header_checks parameter, you can specify a Postfix table where you can list criteria for rejecting messages. Check the /etc/postfix/header_checks file for details. The criteria are patterns that can match message headers. You can have matching messages rejected, rejected with a reply, simply deleted, or logged with a warning. You have the option of taking several actions, including REJECT, DISCARD, WARN, HOLD, and IGNORE.
header_checks = regexp:/etc/postfix/header_checks
The database, in this case /etc/postfix/header_checks, will have lines, each with a regular expression and a corresponding action. The regular expression can either be a standard regular expression as denoted by regexp in the header_checks parameter, or conform to a Perl Compatible Regular Expression, prece.
The body_checks parameter lets you check the body of text messages, line by line, using regular expressions and actions like those used for header_checks in a /etc/postfix/body_checks file.
Controlling Client, Senders, and Recipients
Combined with Dovecot, Postfix defines sender and recipient controls in the /etc/postfix/main.cf file a shown here.
smtpd_recipient_restrictions = reject_unknown_sender_domain,
reject_unknown_recipient_domain, reject_unauth_pipelining, permit_mynetworks,
permit_sasl_authenticated, reject_unauth_destination
smtpd_sender_restrictions = reject_unknown_sender_domain
You could also configure Postfix with added or different client, sender, and recipient options. With the smtpd_client_restrictions parameter, you can restrict access to the mail server by certain clients. Restrictions you can apply include reject_unknown_client_hostname, which will reject any clients with unresolved addresses; permit_mynetworks, which allows access by any clients defined by mynetworks; and check_client_access, which will check an access database to see if a client should be accepted or rejected. The reject_rbl_client and reject_rhsbl_client parameters will reject clients from specified domains.
smtpd_client_restrictions = permit_mynetworks, \
reject_unknown_client, check_client_access, reject_maps_rbl
The reject_rbl_client restriction rejects domain addresses according to a specified MAPS service. The site can be an online site or a local one set up to provide the service. The reject_rhsbl_client restriction rejects host addresses.
smtpd_client_restrictions = reject_rbl_client relays.mail-abuse.org
To implement restrictions from an access file, you can use the hash directive and the name of the file.
smtpd_client_restrictions = hash:/etc/postfix/access
The corresponding smtpd_sender_restrictions parameter works much the same way as its client counterpart but controls access from specific senders. It has many of the same restrictions but adds reject_non_fqdn_sender, which will reject any mail header without a fully qualified domain name, andreject_sender_login_mismatch, which will require sender verification. The reject_rhsbl_sender restriction rejects domain addresses according to a specified MAPS service.
The smtpd_recipient_restrictions parameter will restrict the recipients the server will accept mail for. Restrictions include permit_auth_destination, which allows authorized messages, and reject_unauth_destination, which rejects unauthorized messages. The check_recipient_access restriction checks local networks for a recipient address. The reject_unknown_recipient_domain restriction rejects recipient addresses with no DNS entry. The reject_rhsbl_recipient restriction rejects domain addresses according to a specified MAPS service.
You can further refine restrictions with parameters such as smtpd_helo_restrictions, which requires a HELO command from a client. Restriction parameters include reject_invalid_hostname, which checks for faulty syntax, reject_unknown_hostname, for hosts with no DNS entry, and reject_non_fqdn_hostnamefor hosts whose names are not fully qualified. The strict_rfc821_envelopes parameter will implement strict envelope protocol compliance.
Note: Sendmail operates as a server to both receive and send mail messages. Sendmail listens for any mail messages received from other hosts and addressed to users on the network hosts it serves and, at the same time, handles messages users are sending out to remote users, determining what hosts to send them to. You can learn more about Sendmail at http://www.sendmail.org, including online documentation and current software packages. You can also obtain a commercial version from http://www.sendmail.com.
POP and IMAP Server: Dovecot
The protocols Internet Mail Access Protocol (IMAP) and Post Office Protocol (POP) allow a remote server to hold mail for users who can fetch their mail from it when they are ready. Unlike procmail, which delivers mail messages directly to a user account on a Linux system, the IMAP and POP protocols hold mail until a user accesses an account on the IMAP or POP server. The servers then transfer any received messages to the user’s local mailbox. Such servers are often used by ISPs to provide Internet mail services for users. Instead of being sent directly to a user’s machine, the mail resides in the IMAP or POP server until it’s retrieved. Ubuntu installs Dovecot as its recommended IMAP and POP servers. It will be installed as part of the dovecot-postfix package, and used by Postfix as the delivery agent. Other popular IMAP and POP servers available are Qpopper, the Qmail POP server, the Washington University POP and IMAP servers, and the Courier POP and IMAP servers.
You can access the POP server from different hosts; however, when you do, all the messages are transferred to that host. They are not kept on the POP server (though you can set an option to keep them). The POP server simply forwards your messages to the requesting host. When you access your messages from a certain computer, they will be transferred to that computer and erased from the POP server. If you access your POP server again from a different computer, those previous messages will be gone.
The Internet Mail Access Protocol (IMAP) allows a remote server to hold mail for users who can log in to access their mail. Unlike the POP servers, IMAP servers retain user mail messages. Users can even save their mail on the IMAP mail server. This has the advantage of keeping a user’s mail in one centralized location accessible anywhere on the network. Users can log in to the mail server from any host on the network and read, send, and save their mail.
Unlike POP, IMAP allows users to set up multiple folders on their mail server in which they can organize their mail. IMAP also supports the use of shared folders to which several users can access mail on a given topic.
Dovecot
Dovecot is a combination IMAP and POP server, as well as an LDA (Local Delivery Agent). Using its own indexing methods, Dovecot is able to handle a great deal of e-mail traffic. It features support for SSL, along with numerous authentication methods. Password database support includes shadow passwords, LDAP, PAM, and MySQL. Dovecot is available in POP, IMAP, common packages, and the dovecot-postfix meta package, on the Ubuntu main repository. Dovecot can function as a local delivery agent for the major mail servers, including Postfix, Exim, and Sendmail. For detailed configuration information check http://wiki.dovecot.org/. For information about the Dovecot LDA check http://wiki.dovecot.org/LDA.
The dovecot configuration files are located in the /etc/dovecot directory. The main configuration file is /etc/dovecot/dovecot.conf, which includes configuration files located in the conf.d subdirectory such as 10-logging.conf, 10-ssl.conf, 10-auth.conf, and 10-mail.conf. Options specific to imap and pop3 are placed in their own files. Corresponding copies are placed in the /usr/share/dovecot/conf.d directory. These are some basic settings to configure:
protocols This can be set to imap and pop3, as well as imaps and pop3s for SSL-encrypted connections. Protocols are listed in the /usr/share/dovecot/protocols.d directory.
listen This can be set to IPv4 or IPv4 addresses on which to listen for connections. The * character indicates all IPv4 network interfaces, and [::] on all IPv6 interfaces.
Authentication processes are listed in the 10-auth.conf file in the /etc/dovecot/conf.d directory.
mechanism in 10-auth.conf file is plain by default. The digest-MD5 and cran-MD5 methods are supported, but they are not needed if you are using SSL.
mail_location The default mail storage method and location (/etc/dovecot/conf.d/10-mail.conf file).
On Ubuntu, the standard dovecot configuration options are set up in the .conf file. These files are read in at the end of the dovecot.conf file as part of the dovecot configuration. It will set the protocols, ssl, and mail_location options, as well as set options for the IMAP, POP3, and LDA.
!include conf.d/*.conf
Dovecot supports either mailbox or maildir (IMAP) storage formats. The mailbox format uses single large mailbox files to hold several mail messages. This will be the user's mbox file at /var/mail. Updates can be time consuming. The maildir format uses a separate file for each message, making updates much more efficient. You can configure Dovecot to use a maildir format by setting the mail_location option to use a maildir setting, specifying the directory to use. The %u symbol can be used to represent the user name, %h for the home directory. Messages will be stored in a user’s maildir directory instead of an mbox file. Be sure to create the maildir directory and give it read, write, and execute access The default maildir entry in the10-mail.conf file uses the mail subdirectory in the user's home directory, but for inboxes uses the /var/mail directory with a subdirectory for the user .
mail_location=mbox:~/mail:INBOX=/var/mail/%u
Alternatively you could place mail in separate files instead of an mbox file in the user's home directory.
mail_location=maildir:~/Maildir
If you have installed Postfix, then dovecot configures the user mail directory with the home_mailbox option in the /etc/posfix/main.cf file. This sets the mail box directory to the Maildir directory in the user's home directory.
home_mailbox = Maildir/
Other POP and IMAP Servers
Many distributions also include the Cyrus IMAP server, which you can install and use instead of Dovecot. In addition, several other IMAP and POP servers are available for use on Linux:
The University of Washington POP and IMAP servers (ftp://ftp.cac.washington.edu/imap) are part of the University of Washington’s ipopd package (Universe repository). The POP server daemons are called ipop2d and ipop3d. Your Linux system runs as a POP2 and POP3 server for your network.
The Cyrus IMAP server (http://cyrusimap.web.cmu.edu) features security controls and authentication, using a private mailbox structure that is easily scalable (Universe repository). Designed to be run on dedicated mail servers, it is supported and maintained by Carnegie Mellon. The name of the Cyrus IMAP server daemon is imapd.
The Courier-IMAP server (http://courier-mta.org) is a small, fast IMAP server that provides extensive authentication support including LDAP and PAM (Universe repository).
Spam: SpamAssassin
With SpamAssassin, you can filter sent and received e-mail for spam. The filter examines both headers and content, drawing on rules designed to detect common spam messages. When they are detected, it then tags the message as spam, so that a mail client can then discard it. SpamAssassin will also report spam messages to spam detection databases. The version of SpamAssassin distributed for Linux is the open source version developed by the Apache project, located at http://spamassassin.apache.org. There you can find detailed documentation, FAQs, mailing lists, and even a listing of the tests that SpamAssassin performs.
Note: For dovecot IMAP server you can use dovecot-antispam plugin to implement spam detection.
SpamAssassin rule files are located at /usr/share/spamassassin. The files contain rules for running tests such as detecting the fake hello in the header. Configuration files for SpamAssassin are located at /etc/spamassassin. The local.cf file lists system-wide SpamAssassin options such as how to rewrite headers. The init.pre file holds spam system configurations. Server options such as enabling SpamAssassin, are listed in the /etc/default spamassassin file.
Users can set their own SpamAssassin option in their .spamassassin/user_prefs file. Common options include required_scorei, which sets a threshold for classifying a message as SPAM, numerous whitelist and blacklist options that accept and reject messages from certain users and domains, and tagging options that either rewrite or just add SPAM labels. Check the Mail::SpamAssassin::Conf man page for details.
Configuring Postfix for use with SpamAssassin can be complicated. A helpful tool for this task is amavisd-new, an interface between a mail transport agent like Exim or Postfix and content checkers like SpamAssassin and virus checkers. Check http://www.ijs.si/software/amavisd/ for more details.
Mail Filtering: Amavisd-new
See the Ubuntu Server Guide for information on how to set up mail filtering. ,.
https://help.ubuntu.com/stable/serverguide/mail-filtering.html
On Ubuntu you can set up mail filtering using Amavisd-new, which invokes the ClamAV virus protection utility and SpamAssassin to filter mail. You can also use external filters such as opendkim for Sendmail and python-policy-spf for Postfix. Avmadvisd-new which calls filtering tools as needed. First, a message is filtered using an external filters such as opnedkim or python-policy-spf (Postfix will use both), then Amavisd-new has the message scanned by ClamAV for viruses, followed by an analysis by SpamAssassin to see if it is spam. Only then does Amavisd-new allow the message to be placed in the in box.
To implement mail filtering, be sure you have installed amavisd-new, spamassassin, and clamav, along with the external filters.
sudo apt-get install amavisd-new spamassassin clamav-daemon
sudo apt-get install opendkim postfix-policyd-spf-python
Ubuntu also recommends that you install supporting applications such as pyzor, razor, and the extraction utilities if you have not already done so (arg, capextract, cpio, lha, nomarch, pax, rar, unrar, unzip, zip).
Add the clamav user to the amavis group to allow amavis to use clamav to scan files.
sudo adduser calmav amavis
sudo adduser amavis clamav
Enable spamassassin by editing the spamassassin configuration file, /etc/default/spamassassin, and setting the ENABLED entry to 1.
ENABLED=1
Then start spamassassin.
sudo service spamassasin start
You can then configure Amavisd-new using files in the /etc/amavis/conf.d directory. To activate virus detection and spamassassin, edit the /etc/amavis/conf.d/15_content_filter_mode file and uncomment the lines for virus detection and spamassassin as indicated by the comments.
Ubuntu also recommends that you disable the bounce response for spam emails by settings the final_spam_destiny option in the 20_debian_defaults file to D_DISCARD instead of D_BOUNCE. You can also adjust the level of spam detection
$final_spam_destiny = D_DISCARD;
Should your mail server DNS address be different from the DNS MX record, you have to specify the mail server’s domain name in the 50_user file. If your server supports different domains, you would list them in the local_domain_acl directive.
Amavisd-new also supports whitelists for domains and subdomains with valid Domain Keys (DKIM whitelists). These are configures in the 40-policy_banks file.
Mailing Lists: Mailman
Mailman provides a Web interface for managing email mailing lists used for email discussions and newsletters. It supports Postfix, Sendmail, Exim, and Qmail mail servers. To use mailman you configure the Apache Web server to run a mailman virtual Web server. A default Apache configuration file for a mailman Web host is located at /etc/mailman/apache.conf. You can copy this file to the Apache sites-available directory as mailman.conf. ,
sudo cp /etc/mailman/apache.conf /etc/apache2/sites-available/mailman.conf
Simply enable the mailman virtual host with the a2ensite command and then restart Apache.
sudo a2ensite mailman.conf
sudo service apache2 restart
For Postfix, you have to specify the mailing list domain, in the /etc/postfix/main.cf file. You can use the postconf –e command to add the mailman configuration entries.
sudo postconf -e 'relay_domains = lists.example.com'
sudo postconf -e 'transport_maps = hash:/etc/postfix/transport'
sudo postconf -e 'mailman_destination_recipient_limit = 1'
In the /etc/postfix/transport file specify the domain for the mailman lists.
lists.example.com mailman:
Then rebuild the transport map.
sudo postmap -v /etc/postfix/transport
You can then start the mailman server.
sudo service mailman start
Use the newlist command to create a default mailing list.
sudo newlist mailman
The mailman Web server is managed using CGI scripts in the /usr/lib/chi-bin/mailman directory. Administrators can access mailman at (hostnane is the name of your machine):
http://hostname/cgi-bin/mailman/admin
Users can access the mailing list at:
http://hostname/cgi-bin/mailman/listinfo
All materials on the site are licensed Creative Commons Attribution-Sharealike 3.0 Unported CC BY-SA 3.0 & GNU Free Documentation License (GFDL)
If you are the copyright holder of any material contained on our site and intend to remove it, please contact our site administrator for approval.
© 2016-2026 All site design rights belong to S.Y.A.