Ubuntu Hacks: Tips & Tools for Exploring, Using, and Tuning Linux (2009)
Chapter 2. The Linux Desktop
Hacks 15-27
On its own, the X Window System (X11) isn't much of a friendly face. If you've ever run X11 without a window manager, you've no doubt seen it at its barest: a screen filled with a repeating crosshatch pattern, with an X for a mouse cursor. This simplicity does nothing to hint at X11's power, but once you've fired up GNOME, KDE, or any of the many window managers available for Ubuntu, you start to see what it's all about.
This chapter takes you a little deeper into the GNOME and KDE environments, which are so much more than window managers. You'll also learn how to check out some more lightweight window managers in case you're after something simpler and less CPU-intensive.
Once you're settled into your desktop environment, you're going to want to get some work done. This chapter shows you how to install Java, which is needed by many applications, including some of the peer-to-peer (P2P) applications discussed herein. You'll also learn how to connect your handheld Palm or Pocket PC device to Ubuntu, work with remote file servers, and more.
Hack 15. Get Under the Hood of the GNOME Desktop
![]()
![]()
GNOME, the default Ubuntu desktop, is a powerful environment with a lot of features. Here is the information you need to quickly get up to speed on how to customize it.
Recently, the GNOME desktop seems to have lost some features. Looking around on mailing lists and reading people's blogs, you'll often find gripes about how some feature that was someone's personal favorite no longer exists. In reality, GNOME has far more features and configuration options available now than it ever had in the pastthey're just hidden from sight, with users shown only the most commonly used options in the standard interface. This has the effect of making GNOME simpler and easier to use for the average person, but it also makes it a prime target for getting under the hood and tweaking the deskop to suit your own tastes if you're an advanced user and want everything to work just the way you like it.
Configuration Nirvana: the Configuration Editor
GNOME provides a central mechanism called GConf for storing user preferences on behalf of individual applications. Instead of writing out their own preferences files and then parsing them again to read values back in, applications can simply use the GConf API. This has a number of benefits, such as the ability to share preference settings among applications and have preferences applied immediately to all running applications.
The GConf database is structured like a simple filesystem, containing keys organized into a tree hierarchy. Each key can be a directory that contains more keys, or it can have an actual value of its own. For example, the key /apps/nautilus/preferences is a key that contains other keys (in a similar manner to a directory), and inside it is the /apps/nautilus/preferences/background_color key with a default value of #ffffff. While keys are expressed as paths, as in a filesystem, they don't actually exist on disk in that way: they are stored in an XML document, with the path representing the nested items within it.
GConf has several tools that you can use to directly browse, query, and manipulate the database using either a GUI or the command line. Configuration Editor provides a very nice graphical interface to the database, but it doesn't appear in Ubuntu's Applications menu by default, so you can launch it from the command line:
$ gconf-editor
Alternatively, you can edit the Applications menu and add it. Go to Applications![]() Accessories
Accessories![]() Alacarte Menu Editor, select System Tools, and turn on Configuration Editor, as shown in Figure 2-1.
Alacarte Menu Editor, select System Tools, and turn on Configuration Editor, as shown in Figure 2-1.
Figure 2-1. Edit the Applications menu
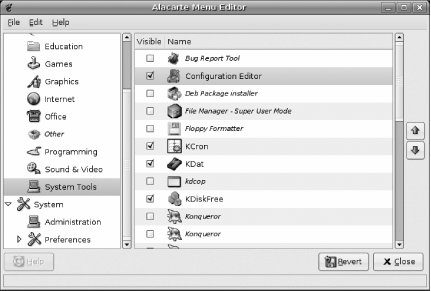
Once you close the Menu Editor and return to the Applications menu, you'll find a new entry for Configuration Editor under System Tools.
When you open Configuration Editor, you'll notice that there is no Save button and all changes you make are applied immediatelyso be careful! Browse around to see what options you can set for various applications, including Nautilus (the GNOME file manager) and Metacity (the default window manager). To get started, here are some specific options you can tweak with the gconf-editor:
Icons on desktop
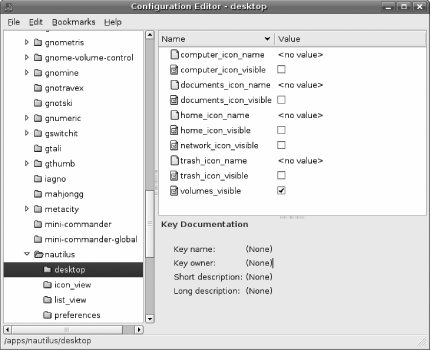
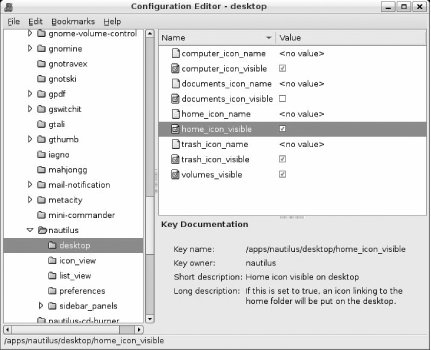
The default Ubuntu desktop configuration is totally empty: no trash can, no computer icon, no home icon. In Configuration Editor, go to /apps/nautilus/desktop to see options to turn on or off a variety of desktop icons, as shown in Figure 2-2.
Figure 2-2. Enable desktop icons with gconf-editor
Empty trash without warnings
Emptying the trash generates an annoying confirmation message that has to be clicked, but you can suppress the confirmation by turning off /apps/nautilus/preferences/confirm_trash.
And if you want to be able to bypass the Trash entirely and delete files by right-clicking on them, turn on apps/nautilus/preferences/enable_delete to add a "Delete" option to the right-click contextual menu. Now you can delete items immediately without sending them to the Trash first!
Open files with a single click
GNOME's default behavior is for a single-click to select files and a double-click to open them, but KDE and some other environments use a web-like "hot links" metaphor, in which files open on a single click. To enable the same behavior in GNOME, go to /apps/nautilus/preferences/click_policy and replace the double value with single.
Scripting GConf
Automating changes to the GConf database is easy with tools such as gconftool, which is a command-line GConf client. Use it to read or set specific values in the database as well as explore its structure.
Recursively walk through parts of the database structure by specifying a starting point and using the -R (recursive read) option:
$ gconftool -R /apps/nautilus
Get the attribute type of a specific key using the -T (type) option:
$ gconftool -T /apps/nautilus/preferences/enable_delete
Read specific values by explicitly setting the key and using the -g (get) option:
$ gconftool -g /apps/nautilus/preferences/enable_delete
Write values by specifying the data type, using the -s (set) flag, the key, and the new value:
$ gconftool -t bool -s /apps/nautilus/preferences/enable_delete true
Writing values like this is a good way to demonstrate that changes really are immediate. Open up Configuration Editor and browse to /apps/nautilus/preferences/. Then watch the "enable_delete" checkbox while you set and unset the value using gconftool.
Once you get started, you'll find that your imagination is the limit when it comes to scripting GConf! For example, you could write a script that pulls down a webcam image every 10 minutes and then calls gconftool to set it as your desktop background. Make sure the image filename is different each time; otherwise, GConf won't see the change, and the background won't change:
$ gconftool -t string -s /desktop/gnome/background/picture_filename \\
/home/jon/CamImages/Pic53332.jpg
Or you could set up a script to use XPlanet to generate an updated view of Earth and set it as your desktop background, and then call it from cron every 30 minutes. Install XPlanet:
$ sudo apt-get install xplanet xplanet-images
Then create a script to execute it. If you don't know the latitude and longitude of your city, you can probably find it (or a nearby city) in Wikipedia (http://www.wikipedia.org). Just adjust the following script to suit your location and screen resolution:
#!/bin/sh
rm -f /tmp/earth-*.jpg;
IMAGE=/tmp/earth-\Qdate +%s\Q.jpg;
nice xplanet -num_times 1 -output $IMAGE -geometry 1280x1024 \\
-longitude 96 -latitude 0;
gconftool -t string -s /desktop/gnome/background/picture_filename $IMAGE;
You can also use gconftool as a convenient way to add new URI handlers to GNOME. For example, to specify that you want tel: links to execute your Vonage client and initiate a call, you can run the following commands:
$ gconftool -t string -s /desktop/gnome/url-handlers/tel/command \\
"bin/vonage-call %s"
$ gconftool -s /desktop/gnome/url-handlers/tel/needs_terminal false -t bool
$ gconftool -t bool -s /desktop/gnome/url-handlers/tel/enabled true
![]()
Hack 16. Tweak the KDE Desktop
![]()
![]()
Get up to speed with configuring KDE, the default desktop environment for the Kubuntu variant of Ubuntu.
While GNOME, the heart of Ubuntu, seems to be adopting an extremist policy of "simplify simplify simplify" that goes so far as to result in the father of Linux strongly criticizing it (see http://mail.gnome.org/archives/usability/2005-December/msg00021.html), KDE, the heart of Kubuntu, has sought to simplify without reducing features. Instead of simply hiding configuration options in the Windows Registry-like GConf or requiring that users know arcane key commands that serve to bring up important capabilities, both of which GNOME practices, KDE preserves the customizability and power that has garnered it fans all over the world, while streamlining options and increasing ease of use.
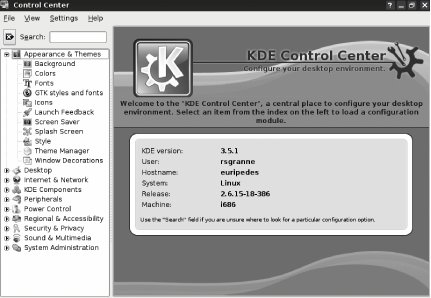
A prime example of this can be seen in KDE's evolution from the Control Center to System Settings. The Control Center allowed users to customize KDE in virtually infinite ways, but its layout was cluttered and confusing, as shown in Figure 2-3.
Figure 2-3. The old-fashioned KDE Control Center was pretty cluttered
The KDE developers responded to the criticisms they received and are transitioning to System Settings, which is found in Kubuntu (if, for some reason, it wasn't installed on your system, run the command sudo apt-get install kde-systemsettings to install it). As you can see in Figure 2-4, the layout is cleaner, easier to read, and more inviting. To start System Settings, click the K button and choose System Settings.
Figure 2-4. The new and improved KDE System Settings
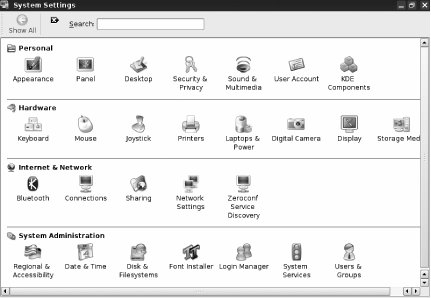
The infinite customizability is still present, but it's now more approachable for both experts and newbies. Instead of removing features or squirreling them away in byzantine ways, the KDE developers adopted an evolutionary path that improves usability without sacrificing power.
Right after I install Kubuntu, there are a few important changes I make using System Settings that I feel improve my use of KDE. Think of these as suggestions that you can try, but you really should explore the world of System Settings yourself to truly make your copy of Kubuntu your own.
Personal
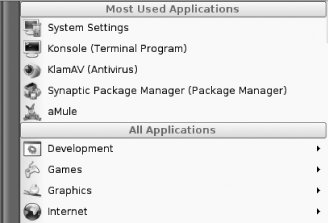
Click on the Panel button, and then on the Menus tab of Panels. Under QuickStart Menu Items, I like the fact that "Show the applications most frequently used" is selected, but in some cases, I've found that the number is set to 0. Change that to 5, and the five programs most frequently used in a session will show up at the top of the K menu, as you can see in Figure 2-5.
Figure 2-5. Show the five most used applications on the K menu
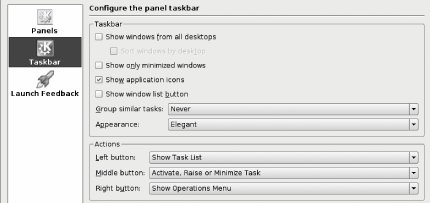
While also in Panel, select the Taskbar button. One of the so-called "innovations" that Windows XP introduced was taskbar grouping: if you have several windows from the same app open, they are grouped together as one button on the taskbar. To see the individual windows, select that taskbar button, holding down the mouse button, and a menu opens showing the various windows, which you can then pick from. Personally, I hate this feature. I want to see all open windows on a particular desktop, so I always change "Group similar tasks" from When Taskbar Full to Never. In addition, when I'm using multiple desktops, I don't want to see all the windows from all those desktops on the taskbar, which to me defeats the whole purpose of multiple desktops in the first place, so I uncheck "Show windows from all desktops" and "Sort windows by desktop." See Figure 2-6 for the changes I make.
Figure 2-6. Turn off taskbar grouping
Back in System Settings, move on to Sound & Multimedia![]() System Notifications. I hate it when my computer constantly beeps and boops at me; the noise that KDE makes every time a window opens or closes drives me especially batty. I check the box for "Apply to all applications" and then click the Turn Off All button next to Sounds, shown in Figure 2-7.
System Notifications. I hate it when my computer constantly beeps and boops at me; the noise that KDE makes every time a window opens or closes drives me especially batty. I check the box for "Apply to all applications" and then click the Turn Off All button next to Sounds, shown in Figure 2-7.
Figure 2-7. Turn off annoying system sounds
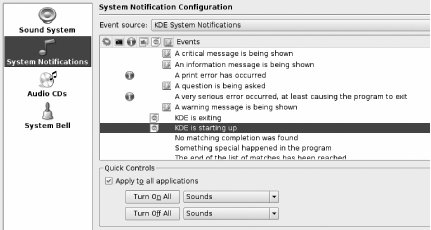
Still, I like the sound KDE makes when it's first loading and when it's shutting down, so I always go ahead and click in the Sound column (the fifth column) next to "KDE is exiting" and "KDE is starting up," so I can hear those tiny melodies.
Hardware
In an effort to be more "web-like," the default behavior in KDE to open files and folders is a single click. While I love this behavior in Firefox, I don't like it so much in my file manager. To turn it off, select the Mouse button in the Hardware section and then, on the General tab, choose "Double-click to open files and folders."
System Administration
This one will help solve an annoyance that otherwise might cause U.S. users to smack their heads on their keyboards in frustration. In System Administration, choose "Regional and Accessibility," then "Country/Region and Language," and finally the "Other" tab. Change "Paper format" from A4 (which works great in Europe) to US Letter, the standard paper size in America. Now printing works again! And while you're there, change "Measure system" from Metric to Imperial, which is again what the U.S. uses. Of course, if your country's standards are different, here is where you change them.
When it comes to configuring KDE, I've just scratched the surface, but I hope this is enough to get you started. My advice is to click on every single item in System Settings and investigate what you find there. After you finish that, head over to http://www.kde-look.org, where you can download new wallpaper, themes, icons, styles, skins, screensavers, and splash screens to change how your copy of KDE appears. But KDE-Look.org isn't just about eye candy. You can also find service menus, software, improvements, and tips for changing how your KDE acts and behaves. It's a friendly, helpful community, and I know you'll find something fun and useful there. Linux is all about choice, and nowhere is that more obvious than when it comes to KDE and Kubuntu!
Scott Granneman
Hack 17. Switch to a Lighter Window Manager
![]()
![]()
GNOME and KDE are great, but they are a little heavy. If you're on an older system, or you just want a change of pace, you can use other window managers under Ubuntu, such as Fluxbox, XFCE, and Enlightenment.
If there's one thing that's great about Linux, it's choice. If you don't like a particular program, there's a pretty good chance that Linux has at least one alternative. This even applies to your entire desktop environment. The desktop environment comprises a lot of different programs, such as a window manager (which handles drawing borders around your windows, moving them, and so forth), panels so you can launch programs, background-management programs, and more. The most popular of these desktop environments are GNOME and KDE. Ubuntu defaults to GNOME [Hack #15] as its desktop environment but also offers a Kubuntu alternative [Hack #16] that automatically defaults to KDE instead.
If you don't particularly like GNOME or KDE, you still have other options. Linux has a large number of window managers that you can use instead of a full desktop environment such as GNOME or KDE, and all of the popular ones are available for Ubuntu. There are a number of reasons why you might want to give some of these window managers a try:
· Both GNOME and KDE need a fair amount of resources to run. Most of the alternative window managers require substantially fewer resources, so they might be attractive if you are using an older computer or if you just just want better performance out of your desktop.
· Alternative window managers often offer a totally different set of features and, in some cases, a different way to look at how to manage your windows. Some of these features include the ability to group windows into a single tabbed window (Fluxbox) or set up lots of fancy eye candy and control your windows' placement to a fine degree (Enlightenment).
|

Even if you don't have a particular reason to try a different window manager, it doesn't hurt to install a few and see how they approach window management. You can easily switch back to your preferred desktop environment if you don't like them.
In this hack, we describe a few other window managers and how to install and use them in Ubuntu. There are hundreds of window managers we could cover, but here we will talk about three of the more popular alternatives to GNOME and KDE: XFCE, Fluxbox, and Enlightenment.
Generate Program Menus
The first step before you install a new window manager is to install and update a program to manage application menus so that you can launch applications without the GNOME or KDE launchers. Use your preferred package installation tool and install the package called menu. Once the program is installed, open a terminal and update the current list of programs for this menu:
$ sudo update-menus
Change to Your New Window Manager
We will discuss how to install and use each of the different window managers, but since you will use the same method to change to each of them, we'll describe that first. Each of these window managers is integrated with the desktop manager Ubuntu uses (GDM by default, KDM for Kubuntu) and will add itself to the list of available sessions when you install it.
After you install a particular window manager, log out of your current desktop environment to get to the main login screen. Click on the Sessions button to see a list of available desktop environments and window managers, and select the window manager you'd like to try. After you log in, you will be presented with the option to accept this window manager permanently or to accept it just for this session. If you want to switch back, log out and then select your previous window manager from the list (GNOME under Ubuntu, KDE under Kubuntu).
Try XFCE
If you are interested in other window managers or desktop environments, probably one of the first desktop environments to try is XFCE. XFCE (http://www.xfce.org) aims to be lightweight, so you will get many of the familiar features of a full desktop environmentsuch as a panel, desktop icons, and a taskbarbut with improved performance.
To install XFCE, use your preferred package-installation program to install the xfce4 package. The desktop environment and many accompanying tools will be installed. XFCE has a number of other nonessential plug-ins and programs that you can install as well. Just use your package manager's search tool with the keyword xfce to show them all.
Once XFCE is installed, log out, choose the XFCE session, log in, and you will be presented with the default XFCE desktop (see Figure 2-8).
Figure 2-8. The default Ubuntu XFCE desktop
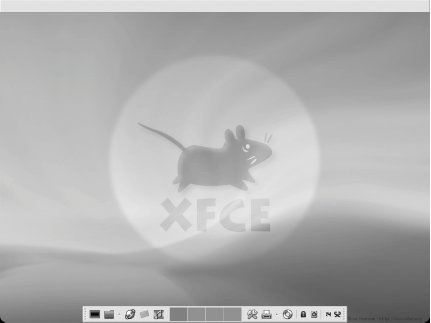
XFCE is organized into a panel at the bottom where you can launch common tools such as a terminal, XFCE's file manager xffm, a web browser, and other applications. To launch applications that aren't in the panel, right-click on the desktop to open the main menu. You can change a launcher's settings by right-clicking on it in the panel. You can also right-click on other parts of the panel to add new items, such as launchers, pagers, and other programs.
Along the top of the desktop is the taskbar, where you can see and switch between all open applications on the current desktop. Right-click on one of the applications in the taskbar to get extra options, such as the ability to maximize, close, and hide the program.
XFCE provides a graphical configuration tool you can access by clicking on the wrench icon in the panel. This program lets you configure anything from the desktop background to keybindings, screensaver settings, and the taskbar. Click the User Interface icon to open the theme manager, where you can configure the look and feel of XFCE.
To log out of XFCE, click the power icon on the panel, or right-click on the desktop and choose Quit. For more information about XFCE, visit the official page at http://www.xfce.org.
Use Fluxbox
Fluxbox (http://www.fluxbox.org) is an alternative window manager that is popular for its speed and ability to group windows into tabs. While it is relatively lightweight, Fluxbox offers a number of features, including the ability to remember window placement, configurable panels, and add-ons that let you have icons on your desktop (fbdesk) and a pager (fbpager).
To install Fluxbox, select the fluxbox package in your preferred package management tool. After it is installed, log out of your current desktop environment, select the Fluxbox session, and log back in to see the default Fluxbox desktop, shown in Figure 2-9.
Figure 2-9. Default Ubuntu Fluxbox desktop
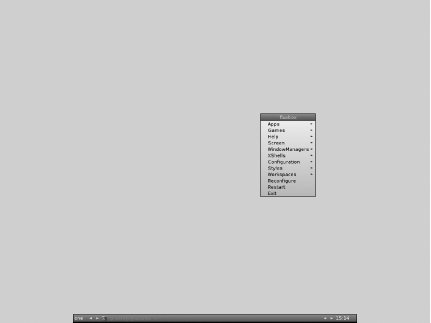
By default, the Fluxbox desktop is pretty bare; there is only a small panel along the bottom of the screen. This panel contains a taskbar to display all applications open on the current desktop and can switch to new desktops. Right-click on the panel to change panel-specific options.
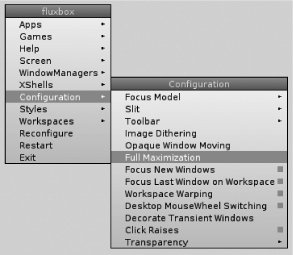
Instead of an application menu in the panel, Fluxbox displays the menu whenever you right-click on the desktop. In addition to the standard application categories, such as Apps and Games, the main menu has a Configuration submenu where you can configure Fluxbox settingsincluding how it focuses windows and toolbar settings, as shown in Figure 2-10. There is also a Styles menu that lets you change the theme.
Figure 2-10. Fluxbox Configuration submenu
As mentioned previously, Fluxbox allows you to group windows together with tabs. Middle-click on the titlebar of a window and then drag and drop it onto another window. Fluxbox will automatically tab the windows together so that you can click on one of the tabs on the titlebar to select a window. To remove a tab, middle-click on it in the titlebar and drag and drop it onto the desktop.
To exit Fluxbox, right-click on the desktop and select Exit. For more information on Fluxbox, visit the main project page at http://www.fluxbox.org.
Seek Enlightenment
Enlightenment (http://www.enlightenment.org) has long been known as the window manager with all the eye candy. Back in the days of 100 MHz processors, it was also known as being slow. These days, Enlightenment offers the same eye candy with almost infinite configurability and, with modern computers, a really snappy response.
To install Enlightenment, install the enlightenment package with your preferred package manager. In addition, you may want to install the e16keyedit and e16menuedit tools, since they provide the GUI to edit your keybindings and main menu, respectively. After the enlightenment package is installed, log out of your current desktop, choose the Enlightenment session, and then log back in.
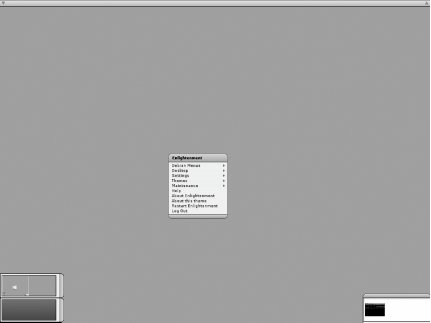
The default Enlightenment desktop is almost as bare as Fluxbox (see Figure 2-11). Along the top is a desktop dragbar, which you can use to switch desktops. If you are on any desktop other than the main root desktop, you can also drag the desktop dragbar down to reveal the desktop underneath. At the bottom left of the desktop is the Enlightenment pager. The pager displays a view of each desktop, along with any windows open on that desktop. You can drag and drop windows from one desktop to another by dragging them within the pager, or even by dragging them from the pager and dropping them on the current desktop. Along the bottom right of the desktop is the iconbox. The iconbox stores icons for any windows you iconify (minimize), instead of having them appear in a taskbar. Right-click on the iconbox to configure its settings, including its size and whether the background is transparent. To access the main application menu, middle-click on the desktop. Right-click on the desktop to configure Enlightenment settings, including the number of desktops, background settings, and so on. Right-click and select Special FX Settings to see the different types of eye candy you can configure.
Figure 2-11. Default Ubuntu Enlightenment desktop
Enlightenment also offers advanced window memory. Window memory allows you to remember settings about a particular window, such as its location, its size, which desktop it's on, and other settings. The next time you start the program, Enlightenment will remember and use any or all of the settings you told it to remember. This way, you can, for instance, always have your web browser open on a particular desktop. To configure which settings to remember, right-click on the titlebar for a window and select Remember.
Window grouping is another feature Enlightenment offers that many other window managers don't. To group windows, right-click the titlebar on the first window and select Window Groups![]() "Start a new group." Then right-click on the titlebar for any other windows you want to group with it and select Window Groups
"Start a new group." Then right-click on the titlebar for any other windows you want to group with it and select Window Groups![]() "Add this Window to the Current Group." When windows are grouped, they can all be configured to mimic operations performed on any other window in the group. For instance, if you minimize one window in the group, the rest will minimize. If you move one window, the others will move along with it. To configure which behaviors all members of a group will adhere to, right-click on the titlebar for one of the windows and select Window Groups
"Add this Window to the Current Group." When windows are grouped, they can all be configured to mimic operations performed on any other window in the group. For instance, if you minimize one window in the group, the rest will minimize. If you move one window, the others will move along with it. To configure which behaviors all members of a group will adhere to, right-click on the titlebar for one of the windows and select Window Groups![]() "Configure this Window's Groups."
"Configure this Window's Groups."
To exit Enlightenment, middle-click on the desktop and select Log Out. For more information about Enlightenment, middle-click on the desktop and select Help, or you can visit the main project page at http://www.enlightenment.org.
Other Window Managers
There are plenty of other window managers you can install under Ubuntu, such as Blackbox, Openbox, WindowMaker, Afterstep, and FVWM. To install any of these window managers, search for its name in your preferred package manager and then install the corresponding package. Most of the major window managers will add themselves to your sessions menu so you can easily select them when you log in.
![]()
Hack 18. Install Java
![]()
![]()
The modern web-browsing experience requires Java. Here's how to install Java and caffeinate your web browser.
Ubuntu's an amazing Linux distribution for lots of different reasons, but one of the things people find attractive about it is the fact that it ships with lots of different software, preconfigured and ready to use. However, until recently, one of the things that the Ubuntu developers couldn't include was the Sun Java Runtime Environment (JRE), because it used a nonfree license that prevented its bundling with a Linux distribution.
Recently, however, Sun Microsystems relaxed the restrictions on the Java license, introducing the Distro License for Java (DLJ). This new license allows distributors to ship Sun's JRE and Java Development Kit (JDK) as installable packages, rather than the self-extracting binaries that were previously available. It also gives Linux distributors the ability to define the packaging, installation, and support for Java within their Linux distribution.
As such, Dapper Drake now ships with Sun's Java available as a non-free package in the multiverse repository. You'll need to have the universe and multiverse repositories enabled [Hack #60] to install Java.
The Ubuntu developers have separated the Java components into several packages:
sun-java5-bin
Contains the binaries
sun-java5-demo
Contains demos and examples
sun-java5-doc
Contains the documentation
sun-java5-fonts
Contains the Lucida TrueType fonts from the JRE
sun-java5-jdk
Contains the metapackage for the JDK
sun-java5-jre
Contains the metapackage for the JRE
sun-java5-plugin
Contains the plug-in for Mozilla-based browsers
sun-java5-source
Contains source files for the JDK
Installing the Java Runtime Environment
Once you've got the multiverse repository enabled, installing Sun's Java package is easy. Simply open a terminal window and apt-get the package. Since you are going to be installing the JRE and the web browser plug-in, you'll be using the following command from a terminal window:
bill@constellation:~$ sudo apt-get install sun-java5-jre sun-java5-plugin \\
sun-java5-fonts
Once apt-get downloads the packages and begins the installation, you'll get a screen that contains the Sun Operating System Distributor License for Java. Read the license, if you wish, and hit Enter to continue. You'll see a dialog that asks you if you agree with the DLJ license terms. Select Yes, and hit Enter; the JRE will finish installing.
At this point, Java is installed.
Confirming the Installation
You'll want to confirm that your system is configured properly for Sun's JRE. This is a two-step process. First, check that the JRE is properly installed by running the following command from a terminal. You should get similar output:
bill@constellation:~$ java -version
java version "1.5.0_06"
Java(TM) 2 Runtime Environment, Standard Edition (build 1.5.0_06-b05)
Java HotSpot(TM) Client VM (build 1.5.0_06-b05, mixed mode, sharing)
|

If the JRE is properly installed, confirm that the Java plug-in is installed in your browser by opening Firefox and typing about:plugins in the address bar (see Figure 2-12).
Figure 2-12. Verifying that the Java web plug-in is installed
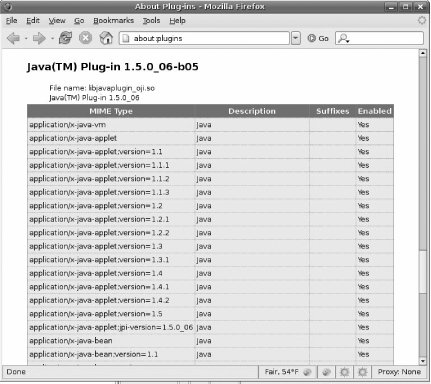
Congratulations, you've caffeinated your browser! You can now surf to Java-enabled web sites and use Java applications!
Hack 19. Search Your Computer
![]()
![]()
Have Beagle find and fetch your information faster than you thought possible.
One of Linux's weaker points as a desktop OS has been the lack of a search feature. Nautilus has had a "find this file" function for quite some time, but it's really not much more sophisticated than a GUI wrapper around the command-line find command. Both Nautilus and the find command do similar things: they'll look at each and every file in the directory structure, trying to find a match for the criteria you've given them.
There is a better way to search a filesystem. It involves creating an index of all the files on that filesystem, which enables you to search the index much like you would a database. This is what Windows and Mac OS X do for their file-search capabilities, and now Linux has it too in the form of Beagle, a modular search engine that's written in Mono. It's easy to add Beagle to Ubuntu, and the usability benefits are tremendous.
Installing Beagle
In this hack, you'll be installing Beagle and a very cool search frontend known as deskbar-applet. deskbar-applet sits in your GNOME panel and enables all manner of search goodness for you. As with many optional goodies, you'll need to have the universe repository enabled [Hack #60] to install both of these packages. Now, open up a terminal [Hack #13] and install beagle and deskbar-applet:
bill@lexington:~$ sudo aptitude install beagle deskbar-applet
Starting beagled
Once you've got beagle and deskbar-applet installed, you'll need to start beagled (the main engine and database) manually. From a terminal, you'll simply run beagled. It should start and detach from your terminal, and run in the background:
bill@lexington:~$ beagled
It will then begin the process of indexing your hard disk(s). This will take a while, depending on the amount and type of data you have. We have seen beagled take up to three hours to fully index a disk. If you're running beagled on a laptop, you may want to make sure it's plugged into AC power, because the high I/O from beagled's initial indexing could drain your battery. While beagled is indexing, you can set up your GNOME desktop to automatically start beagled when you log in. Simply click on the System Menu, and select Preferences and then Sessions. Add beagled to your Startup Programs, and it will be ready to fetch stuff for you on your next login.
Using Beagle and deskbar-applet
Now that the Beagle daemon is running, it's time to add deskbar-applet to the mix. The deskbar applet is a GNOME applet, so add it to one of the GNOME panels by right-clicking on the panel and selecting "Add to Panel." Select Deskbar, click Add, and then close the window. You'll see the deskbar in your panel now.
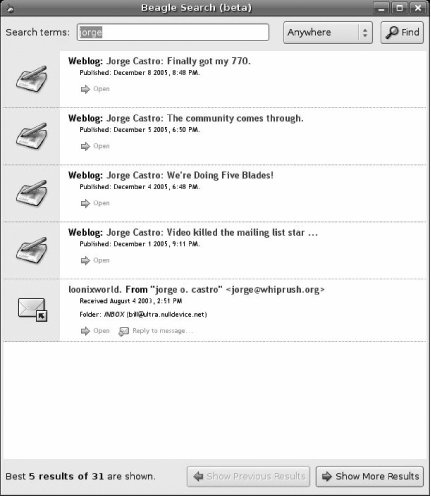
At this point, you can put criteria into the deskbar applet and go ahead and search for something (see Figure 2-13). If you put your search criteria in the applet and click the little magnifying glass, you can tell the deskbar applet to search any one of a number of databases, including Beagle, which is not enabled by default. (The default search can be changed in the preferences for deskbar-applet; simply right-click on the applet and select Preferences to adjust it.)
Figure 2-13. Searching Beagle with deskbar

Once you click on "Search for...using Beagle," Beagle takes over, digging through its index and fetching the proper results. By default, Beagle will search the files in your home directory, as well as metadata like email archives, instant messages, and blog posts. It doesn't matter where the data is; Beagle will fetch it for you (see Figure 2-14).
Figure 2-14. Beagle fetching data
As you start to use Beagle, you'll gradually see the benefit of having an agent index all your data and metadata. It may sound clich\x8e d, but over time, this will change the way you work.
Hack 20. Access Remote Filesystems
![]()
![]()
Use integrated desktop tools to access a number of different remote network shares.
Let's face it: sometimes it's difficult to fit all of the files you need on a single computer. Whether they be Windows shares at your office, FTP servers somewhere on the Internet, or even machines on the network running SSH, you can access all of these servers and more from the Ubuntu desktop with a few clicks.
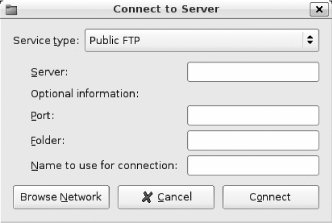
The key to connecting to remote filesystems is the "Connect to Server" dialog window. Click Places![]() Connect to Server to see the default window, shown in Figure 2-15.
Connect to Server to see the default window, shown in Figure 2-15.
Figure 2-15. A sample "Connect to Server" dialog for FTP connections
There are a number of different connection types the dialog supports. Figure 2-16 shows the options available from the drop-down menu. Apart from a few specific options, each of these connection types shares the same sorts of options. The top of the window requests the location of the server (a hostname or IP address), and then below that is a list of nonessential options you can configure. For instance, you can give each of your connections custom names so that they are easier to tell apart from each other.
Figure 2-16. The submenu shows the different types of remote servers you can connect to
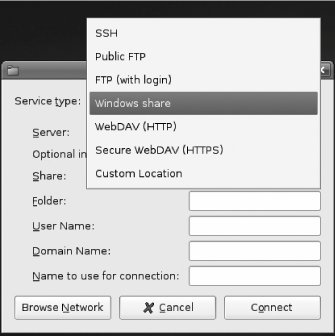
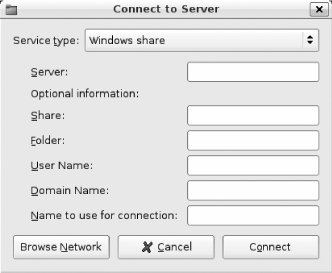
Connecting to a Windows share is a good example of how to use the "Connect to Server" dialog. First, select "Windows share" from the drop-down menu. Then, fill in the name of the server you want to connect to and, optionally, the name of the share you want to connect to (Figure 2-17). If your network requires authentication, you can also configure the username and domain name in this window. Once you have configured the share, click the Connect button. A new icon for this share will then appear on your desktop. Double-click that icon to open the Nautilus file browser to that share.
Figure 2-17. Sample "Windows share" dialog without any fields filled in
|
One of the more interesting abilities of the "Connect to Server" dialog is to connect to remote SSH servers and share files over SFTP. Not only does this mean that you don't have to configure any special file sharing on the remote machine, but any machine that runs SSH is now also a file share you can access. What's more, all of the communication is sent over an encrypted channel.
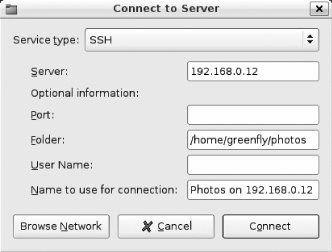
To connect to a remote SSH server, select SSH from the "Service type" drop-down menu. In Figure 2-18, you can see a sample window filled out with information to connect to a server on the network. By default, the SSH connection will open into the / directory, but you can change that to any directory you wish in the Folder field. If you needed to connect to the remote server as a different user, you could also specify that in this window. Finally, you can give this share a custom name that will appear both on its icon in the desktop and in the sidebar of the file browser.
Figure 2-18. You can even connect to remote servers securely over SSH
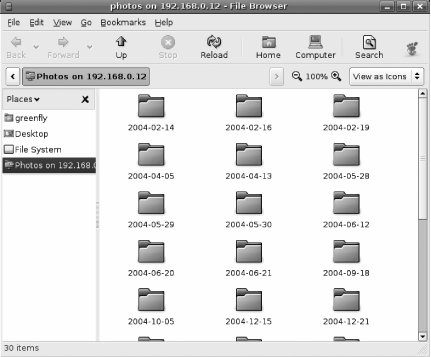
Once you click Connect, a new icon appears on the desktop, and if you double-click it, you can access all of the photos on the remote server, as shown in Figure 2-19. You can then drag and drop them to and from the local machine as you do with any other directory.
Figure 2-19. Some files accessed over SSH
If you decide that you no longer want to access a particular share, just right-click on its icon on the desktop and select Unmount Volume. Otherwise, file shares will appear both in the sidebar of your file manager and in the Places![]() Network Servers window.
Network Servers window.
![]()
Hack 21. Tweak Your Desktop Like a Pro
![]()
![]()
Customize your desktop environment, and find a few things you never knew you needed, like a pop-up Quake-style terminal, automatic wallpaper shuffling, and dashboard functionality.
The default Ubuntu GNOME environment is very streamlined and easy to use. Due to its ease of use, however, some of the "power user" features aren't included in the base install. KDE can also benefit from the same tweaking. Here's how to get more usability and features from Ubuntu.
Get Icons on Your Desktop
The default Ubuntu Dapper Drake desktop has no icons on itwhich gives the system a very clean and simple look. If you're coming from Windows, you may miss the My Computer icon and other desktop icons in that OS. It's relatively simple to add them to Ubuntu; it just requires the use of a configuration editor called gconf-editor [Hack #15].
If you hit Alt-F2, the system will pop up a Run Application dialog. Type gconf-editor in that dialog and click Run. The Gconf configuration program will start. Select "apps" from the left pane; then select "nautilus" and "desktop." In the right pane, you will see several options, like "computer_icon_name" and "computer_icon_visible." If you click on the checkbox next to the "<name>_icon_visible" option (see Figure 2-20), Nautilus will spontaneously add that icon to your desktop. In this fashion, you can add icons for your computer, home directory, network places, documents, and wastebasket.
Figure 2-20. GConf showing the Nautilus icon-configuration options
Get Organized with Tomboy
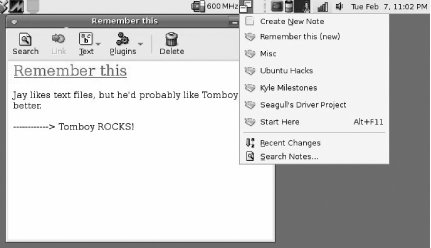
Tomboy, shown in Figure 2-21, is a tiny application that sits in your panel and acts as an always-on mini Wiki. It's great for making quick notes to yourself without worrying about saving myriad text files or waiting for an editor to start. Much like a Wiki, you can cross-reference the Tomboy notes you make using Wiki-like annotations. Not only that, but the notes are quickly searchable using Tomboy's built-in search capabilities.
Figure 2-21. Tomboy notes
To install Tomboy, just apt-get it from a terminal:
bill@defiant:~$ sudo apt-get install tomboy
That will fetch and install Tomboy and its dependencies. Once that's completed, you can add Tomboy to your panel by right-clicking on the panel, selecting "Add to Panel," and then choosing Tomboy Notes from the dialog.
Automatic Wallpaper Switching
Something GNOME doesn't provide for is a way to automatically rotate your desktop wallpaper. Luckily, there's a little application written by someone known only as "Earthworm" called wp_tray that will sit in your notification area and rotate your wallpaper based on whatever scheme you wish. The source code for this application is at http://planetearthworm.com/projects/wp_tray/files/wp_tray-0.4.6.tar.gz, but Bill has built it for Ubuntu and made it available at http://wildbill.nulldevice.net/ubuntu/wp-tray_0.4.6-1_i386.deb. Download the .deb for wp_tray and install it using the following command:
bill@defiant:~$ sudo dpkg -i wp-tray_0.4.6-1_i386.deb
Once wp_tray is installed, add it to your startup programs so it starts when you log in: click on the System Menu, then Preferences, then Sessions, and add wp_tray to the list of Startup Programs. Log out and log in again, and you will be able to right-click on the applet (see Figure 2-23).
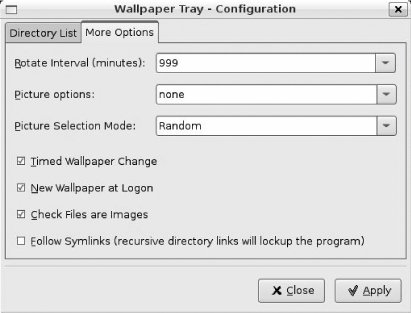
Figure 2-22. The interface to wp_tray
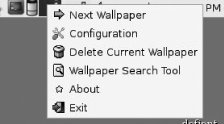
Figure 2-23. wp_tray's configuration screen
Getting a Pull-Down "Quake" Terminal
There's a very useful KDE application called yakuake that takes the standard KDE Konsole and changes it to a drop-down, on-demand terminal over your desktop and applications. (It's called a "Quake" terminal because of its resemblence to the console that drops down in the Quake series of games.) This is a very handy little application. To install, simply use apt-getto install both konsole and yakuake:
bill@lexington:~$ sudo apt-get install konsole yakuake
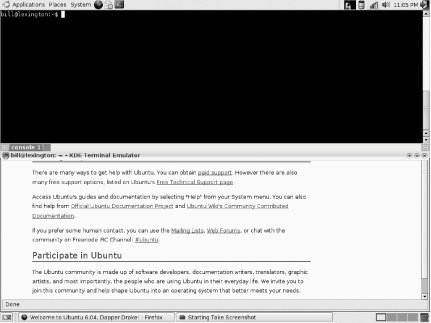
Add yakuake to your startup session using the same instructions for the wp_tray applet. Log out and log in again, and then you can hit F12 to cause yakuake to drop down over your desktop, as shown in Figure 2-24.
Figure 2-24. yakuake: the drop-down konsole
![]()
Hack 22. Sync Your Palm PDA
![]()
![]()
Your Palm OS handheld can join in on the Ubuntu fun. Learn how to install applications on your Palm or Treo, keep it in sync with Evolution, and back it up.
Getting a Palm OS PDA to synchronize with Linux has usually involved some amount of effort, and some pain installing and configuring the necessary software. The folks working on Ubuntu have made it easy, however. Ubuntu includes all the software necessary to synchronize your Palm with Evolution and do almost everything you've done under Windows.
Configuring Palm Synchronization
Since the Ubuntu and Evolution developers included the gnome-pilot package in Ubuntu, there's no software that needs to be installed. Everything you need is on your system; it just needs to be configured to sync with your Palm.
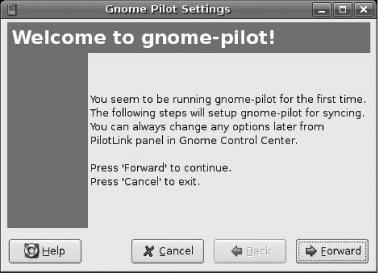
To begin the configuration process, start Evolution, click on the Edit menu, and select Synchronization Options. The gnome-pilot splash screen will appear (see Figure 2-25). Click on Forward to proceed.
Figure 2-25. The gnome-pilot startup dialog
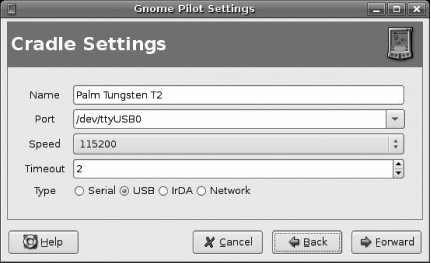
Next, gnome-pilot displays the Cradle Settings dialog, shown in Figure 2-26. Put values corresponding to your Palm and your system in this dialog box. For instance, USB-equipped Palms will probably sync using port /dev/ttyUSB0 and a speed of 115200, and they will require the USB radio button to be selected. Older, serial Palms will probably need the port set to /dev/ttyS0 and a speed of 57600, and they will need the Serial radio button selected. Click on Forward to continue.
Figure 2-26. The Cradle Settings dialog
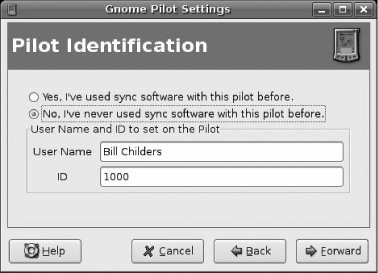
Now it's time to identify the Palm (see Figure 2-27). If you've synchronized your Palm with another PC or operating system before, select "Yes, I've used sync software with this pilot before." If you have never synchronized your Palm, select "No, I've never used sync software with this pilot before." If you select No, ensure that your User Name is set to something you'd like the Palm to have embedded in it. The ID string doesn't require any changes or editing. Click on Forward to move to the next step (initial sync).
At this point, you'll be prompted to press the Hotsync button on your Palm. Press it, and you should hear a couple of quick beeps from the Palm. Click Forward to move on to the next step.
Figure 2-27. Identifying the Palm
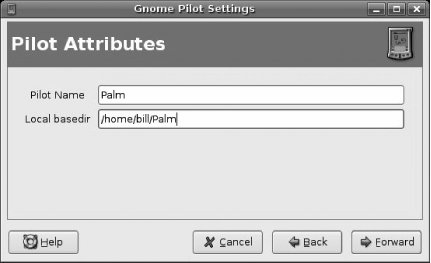
The next screen (see Figure 2-28) asks you to enter a descriptive name for your Palm and a directory path. It defaults to MyPilot; you can leave it at the default or change it as we have.
Figure 2-28. Setting the Pilot attributes
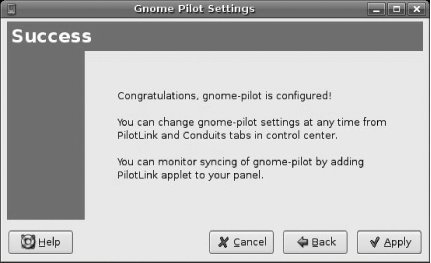
You're now done configuring the Palm sync method. Click on the Apply button (see Figure 2-29) to commit the configuration.
Figure 2-29. Palm sync configured
|
Configuring the Sync Conduits
The only thing that remains is to configure the individual synchronization conduits. In Evolution, go back to the Edit menu and select Synchronization Options. The Pilot Settings dialog is where you can enable and disable the Evolution conduits, and set up the synchronization methods and rules. To edit conduits, click on the Conduits tab, select a conduit, and click Enable or Disable.
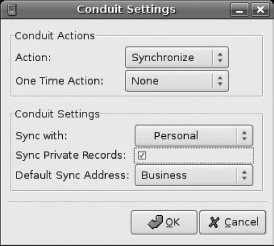
You can set the default sync action as well as a one-time action that will fire just on the next sync. You can choose to add private records to your sync and decide which Evolution database you'd like to sync to. Figure 2-30 shows an example of the Address Book conduit.
Figure 2-30. Address Book sync options
Add the Pilot Applet
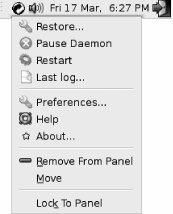
To make sure the GNOME Pilot daemon (gpilotd) is started when you log in, you should add the Pilot Applet to your panel. Right-click on the panel and choose Add To Panel. Locate Pilot Applet under Utilities, and add this to the panel. You can click the applet to bring up the conduit settings and right-click it to get a menu with several options, shown in Figure 2-31.
Figure 2-31. Pilot Applet option menu
At this point, your Palm is ready to sync with Evolution. Simply hook up the Palm and initiate a hotsync, and it'll sync with Linux just like it did under Windows.
![]()
Hack 23. Sync Your Pocket PC
![]()
![]()
Just because your Pocket PC is powered by Windows doesn't mean you can't sync it with Ubuntu.
Inside the box of your Pocket PC, you'll find a USB cable that's compatible with nearly every computer on the planet. What you won't find is software that's compatible with anything other than Windows. To sync your Pocket PC with Ubuntu, you'll need some additional software. Fortunately, most of this software is available in Ubuntu's universe repository.
ActiveSync, the software that comes with your Pocket PC, takes care of synchronizing calendars and contacts, and also installing applications in the Pocket PC. With the ipaq USB-serial module, the SynCE suite of tools, and Multisync, you can do all of this on your Linux system.
Connecting the Pocket PC
The first order of business is to figure out which interface your Pocket PC uses. If you're using a recent Pocket PC, it will probably look like an iPAQ as far as Linux is concerned. Before you plug in your Pocket PC, run sudo modprobe ipaq to load the iPAQ USB-to-serial driver. Plug in your Pocket PC and examine the output of dmesg to see whether it was detected and which device represents it. In the following example, a Pocket PC was detected on /dev/ttyUSB0:
bjepson@ubuntu:~$ sudo modprobe ipaq
Password:
bjepson@ubuntu:~$ dmesg | tail
[ 1720.274390] usbcore: registered new driver usbserial
[ 1720.285461] drivers/usb/serial/usb-serial.c: USB Serial support registered for generic
[ 1720.317318] usbcore: registered new driver usbserial_generic
[ 1720.319073] drivers/usb/serial/usb-serial.c: USB Serial Driver core
[ 1720.415421] drivers/usb/serial/usb-serial.c: USB Serial support registered for PocketPC PDA
[ 1720.448394] drivers/usb/serial/ipaq.c: USB PocketPC PDA driver v0.5
[ 1720.457095] usbcore: registered new driver ipaq
[ 1738.233238] usb 1-1: new full speed USB device using ohci_hcd and address 2
[ 1738.796279] ipaq 1-1:1.0: PocketPC PDA converter detected
[ 1738.803167] usb 1-1: PocketPC PDA converter now attached to ttyUSB0
|
The next thing you'll need to do is install some packages, but before you do so, make sure you've enabled the universe repository in /etc/apt/sources.list. Then, run sudo apt-get update to get the latest packages and install synce, dccm, and some supporting tools:
bjepson@ubuntu:~$ sudo apt-get install synce-dccm synce-serial librra0-tools
When dpkg hits the synce-serial package, it will ask you for a few things: the serial interface used by your Pocket PC, the IP addresses for the PPP connection used with your Pocket PC, and the IP address of your DNS server. You need to provide the DNS server address, but you can accept the defaults for the rest (although you should check the serial interface against what you found earlier in the output of dmesg). Although you specified the serial port during the setup, I've found that you need to do it once more after installation, so run this command:
bjepson@ubuntu:~$ sudo synce-serial-config /dev/ttyUSB0
You can now run synce-serial-start to start a serial connection.
Testing the Connection
Now it's time to give it a try. Make sure your Pocket PC is connected to your computer, and start the dccm daemon. Without arguments, it will run in the background. Since this is its first time out, I suggest starting it in the foreground (-f) with debugging enabled (-d 4):
bjepson@ubuntu:~$ dccm -d 4 -f
dccm[4599]: Running in foreground
dccm[4599]: Listening for connections on port 5679
Open another terminal and start up SynCE:
bjepson@ubuntoo2:~$ sudo synce-serial-start
synce-serial-start is now waiting for your device to connect
|
Watch the shell where you started dccm and wait a while; it can take anywhere from 30 seconds to a minute for the Pocket PC and dccm to start chatting. Once they begin talking to one another, you'll see something like this:
dccm[4941]: Connection from 192.168.131.201 accepted
info package (104 bytes):
0000: 28 00 00 00 04 14 00 00 (.......
0008: 11 0a 00 00 00 00 00 00 ........
0010: 2a 1e c3 37 00 00 00 00 *..7....
0018: 28 00 00 00 3c 00 00 00 (.......
0020: 5a 00 00 00 00 00 00 00 Z.......
0028: 50 00 6f 00 63 00 6b 00 P.o.c.k.
0030: 65 00 74 00 5f 00 50 00 e.t._.P.
0038: 43 00 00 00 50 00 6f 00 C...P.o.
0040: 63 00 6b 00 65 00 74 00 c.k.e.t.
0048: 50 00 43 00 00 00 53 00 P.C...S.
0050: 53 00 44 00 4b 00 00 00 S.D.K...
0058: 00 00 50 00 57 00 31 00 ..P.W.1.
0060: 30 00 42 00 31 00 00 00 0.B.1...
0068:
dccm[4941]: Talking to 'Pocket_PC', a PocketPC device of type PW10B1
|
Establish a Partnership
Before you can sync to the Pocket PC, you'll need to set up a partnership. Pocket PCs can be partnered with at most two computers, so if you've already configured your Pocket PC with a Windows computer running ActiveSync, you'll have one slot left. The synce-matchmaker program will pick an empty slot and use it:
bjepson@ubuntoo2:~$ synce-matchmaker create
[rra_matchmaker_create_partnership:356] Partnership slot 1 is empty on device
[rra_matchmaker_create_partnership:356] Partnership slot 2 is empty on device
Partnership creation succeeded. Using partnership index 1.
If you don't have a free slot, you'll need to pick one to remove. See the synce-matchmaker manpage for details.
|
Synchronize with Evolution
To synchronize your Pocket PC with Evolution, you'll need to install Multisync (http://multisync.sourceforge.net), a modular synchronization package that lets you create pairs of repositories that are kept in sync. To install Multisync and the SynCE plug-in, issue the command sudo apt-get install libmultisync-plugin-all synce-multisync-plugin, which will also install a collection of plug-ins, including the Evolution plug-in and the backup plug-in. You'll use the backup plug-in to verify that Multisync is running correctly before you try to synchronize it with SynCE.
|
Don't look for Multisync in Evolution: you won't find it under Edit![]() Synchronization Options or Edit
Synchronization Options or Edit![]() Plugins. You'll need to launch the multisync application under X11 to work with it (you can either launch it from a shell or load it from Applications
Plugins. You'll need to launch the multisync application under X11 to work with it (you can either launch it from a shell or load it from Applications![]() Accessories
Accessories![]() Multisync). When you launch Multisync, its main window appears, as shown in Figure 2-32.
Multisync). When you launch Multisync, its main window appears, as shown in Figure 2-32.
Figure 2-32. Launching Multisync for the first time

Testing Multisync
To make sure that Multisync is working properly, you should configure the backup plug-in and do a test sync with it. Click the New button, and the Synchronization Pair dialog will appear, as shown in Figure 2-33.
Figure 2-33. Testing Multisync with the backup plug-in
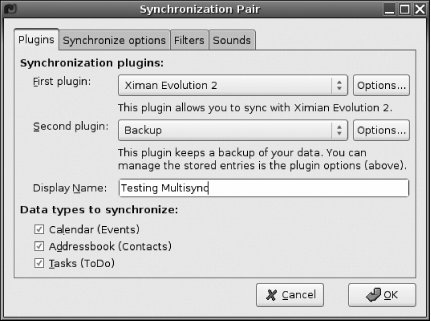
Specify Ximian Evolution 2 as the first plug-in and Backup as the second (see Figure 2-33). Give this pair a name, and then click and set the Options for each plug-in. For Evolution, you need to specify which calendar, address book, and task categories to sync. For Backup, you need to specify a backup directory (this appears on the Options tab of the Backup plug-in options dialog). You can then dismiss the Synchronization Pair dialog by clicking OK, which returns you to the main Multisync window. Click once to select the pair you just created, and then click the Sync button. The sync should go quickly, depending on how many contacts, tasks, and appointments you have. Once it's finished, open a shell or Nautilus window and navigate to whichever backup directory you specified in the Backup options. You should see some new files there:
bjepson@ubuntoo2:~$ cd backup/
bjepson@ubuntoo2:~/backup$ ls -l
total 8
-rw-r--r-- 1 bjepson bjepson 26 2006-02-07 16:14 backup_entries
-rw-r--r-- 1 bjepson bjepson 422 2006-02-07 16:14 multisync1139346850-0
Syncing to the Pocket PC
Return to the Multisync main window and click Add again. This time, set up a Synchronization Pair between Evolution and the SynCE plug-in. Just as you did with the earlier pair, click Options (next to Evolution) to configure which categories to synchronize (the SynCE plug-in has no options). Click OK to dismiss the dialog and return to the Multisync main window. Click to select the Evolution/SynCE pair and click the Sync button.
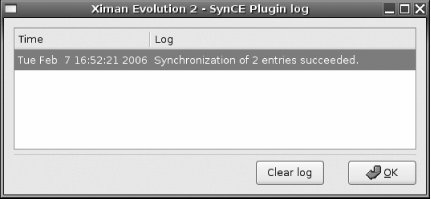
If all went well, your Pocket PC and Evolution will be in sync. Click the Log button to see what happened. In Figure 2-34, you can see that two entries were copied successfully from the Pocket PC to Evolution.
Figure 2-34. The Multisync log after synchronizing with a Pocket PC
Each time you want to sync, you'll need to start dccm (or keep it running in the background), plug in the Pocket PC, and run sudo synce-serial-start. Then you can launch Multisync and synchronize. To disconnect, run killall -HUP dccm and unplug the Pocket PC.
Install Pocket PC Software
Pocket PC software usually comes in one of two forms: a self-installing .exe file designed to be run under Windows, or a .cab (cabinet) file that contains ready-to-run binaries for your Pocket PC. If you're stuck with an .exe file, no need to worry. The orange package is available in the universe repository [Hack #60] and will extract the .cab files for you:
$ orange PocketVCSSetup.exe
squeezing out: /home/bjepson/pocketvcs.arm.cab
squeezing out: /home/bjepson/pocketvcs.mips.cab
squeezing out: /home/bjepson/pocketvcs.sh3.cab
-------
3 files
Once you have the .cab file (either downloaded from a web site or extracted using orange), you can install it onto your Pocket PC. Most modern Pocket PCs are of the ARM variety, but you can use synce-pstatus to find out for sure:
$ synce-pstatus | grep ^Processor
Processor architecture: 5 (ARM)
Processor type: 2577 (StrongARM)
Then you can use synce-install-cab to install the .cab file for the appropriate architecture:
$ synce-install-cab pocketvcs.arm.cab
Copying file 'pocketvcs.arm.cab' to device...
File copy of 1660980 bytes took 0 minutes and 6 seconds, that's 276830 bytes/s.
Installing 'pocketvcs.arm.cab'...
After the file is copied over, you will see an installer run on your Pocket PC. You may be prompted for additional information. You can use the synce-list-programs and synce-remove-program utilities to list and remove programs you've installed on the Pocket PC.
Accessing the Pocket PC's Filesystem
You can work with files on the Pocket PC using the utilities listed in Table 2-1.
|
Table Utilities for working with the Pocket PC filesystem |
|
|
Utility |
Description |
|
synce-pcp |
Copy a file |
|
synce-pls |
List files |
|
synce-pmkdir |
Create a directory |
|
synce-pmv |
Move/rename a file |
|
synce-prmdir |
Remove a directory |
For example, the PocketVCS application (http://pocketvcs.emuunlim.com) isn't much good without some games. As you can see, it doesn't come with any:
$ synce-pls "/My Documents/PocketVCS/"
AC-------- 444646 Tue 11 Mar 2003 04:19:22 PM EST PocketVCS.pro
To actually manipulate a file (copy, remove, etc.), you need to prefix it on the remote filesystem with a colon (:). Here's how to copy the free Oystron (http://www.io.com/~nickb/atari/oystron.html) over to the Pocket PC:
$ synce-pcp OYSTR29.BIN ":/My Documents/PocketVCS/OYSTR29.BIN"
File copy took less than one second!
As you can see, the file is over there and ready to play:
$ synce-pls "/My Documents/PocketVCS/"
AC-------- 4096 Thu 01 Jul 2004 04:56:26 AM EDT OYSTR29.BIN
AC-------- 444646 Tue 11 Mar 2003 04:19:22 PM EST PocketVCS.pro
Troubleshooting
If you have trouble with your Pocket PC, make sure that the ipaq module was loaded correctly and examine the output of dmesg to ensure that the Pocket PC was detected and the serial link was established.
If your Pocket PC and Evolution don't seem to be talking, go back to the terminal that's running dccm and make sure that it has recognized your Pocket PC and established a connection to it. If they aren't talking, try stopping the connection and reconnecting. If killall -HUP dccm doesn't reset the connection, try sudo synce-serial-abort. Pocket PCs are notorious for getting confused about things, so if you find that it's impossible to connect after that point, you might want to reset your Pocket PC. Heck, you might even need to reboot your computer if things get really confused.
If you still have problems, visit the SynCE web site (http://synce.sourceforge.net) for documentation and other troubleshooting information.
Brian Jepson
![]()
Hack 24. Customize the Right-Click Contextual Menu
![]()
![]()
Write your own scripts to perform custom actions when you right-click on a file, folder, or the desktop, and add templates to make document creation quick and painless.
Right-clicking on items on the desktop or in the Nautilus file browser pulls up a contextual menu that allows you to perform operations directly on the item. But you're not limited to just the default options: you can add template documents and scripts to the menu for easy access with a single click.
Easy-Access Templates
Right-clicking on the desktop or in the background of a Nautilus window brings up a Create Document menu item, which normally includes only an "Empty File" item. If you select Empty File, a new file called new file will be created, and you can rename it to anything you like. However, the new file is just a totally empty file. Creating a document this way is essentially the same as running:
$ touch "new file"
and about as useful.
However, it's easy to add your own templates to the menu. Create a directory called Templates in your home directory:
$ mkdir ~/Templates
Any document you place in that directory will now be available through the Create Document contextual menu. If the menu becomes large, you can group items into submenus by placing them in subdirectories within Templates.
HTML developers can put a file called HTML File.html in this directory (it will appear as "HTML File" on the Create Document menu) and fill it with the skeleton of an HTML file. If you create a lot of corporate documents using OpenOffice.org templates, copy the templates in, and you'll be able to start a new document in any location by just right-clicking and selecting the template.
If you do not see your new templates appear in the menu right away, just log out of GNOME and log back in again.
Custom Scripts
You can also execute custom scripts directly from the contextual menu by placing your scripts into a special directory located inside your home directory: .gnome2/nautilus-scripts/. Any script you place in that location can be accessed by right-clicking on a file or window and selecting it from the Scripts submenu. (The Scripts menu will not be available unless you have some scripts installed.)
When a script is executed via the contextual menu, it is passed a number of environment variables and usually a number of arguments so it can optionally act on the files you have selected. If you execute the script from the context of a local folder on your computer, it will be passed the names of all selected files as arguments. If you execute the script from the context of a remote folder [Hack #20], such as a Nautilus window showing web or FTP content, no arguments will be passed to it.
Four environment variables are also set, which you can access from within the script:
NAUTILUS_SCRIPT_SELECTED_FILE_PATHS
Newline-delimited paths for selected files if they are local
NAUTILUS_SCRIPT_SELECTED_URIS
Newline-delimited URIs for selected files
NAUTILUS_SCRIPT_CURRENT_URI
URI for current location
NAUTILUS_SCRIPT_WINDOW_GEOMETRY
Position and size of the current window
There are even packages for various prewritten script collections, such as the Nautilus Subversion Management Scripts and Nautilus Audio Convert packages, which allow you to perform Subversion actions and convert audio file formats by right-clicking on files:
$ sudo apt-get install nautilus-script-collection-svn \\
nautilus-script-audio-convert
|
As a simple example, you could place the following into ~/.gnome2/nautilus-scripts/Terminal to give you easy access to a terminal from the contextual menu:
#!/bin/sh
gnome-terminal
This will open a terminal with the current directory set to the directory that encloses whatever you right-clicked on. So, if you right-clicked on the icon for ~/foo, you'd get a terminal whose current working directory was ~. But suppose you right-click on a directory. The following Terminal script will check each item in NAUTILUS_SCRIPT_SELECTED_FILE_PATHS, and if it finds a directory, it will cd to it and open the terminal there. Otherwise, it will just open the terminal in the directory that contains the item you clicked on:
#!/bin/sh
for d in $NAUTILUS_SCRIPT_SELECTED_FILE_PATHS; do
if [ -d $d ]; then
cd $d
gnome-terminal
exit
fi
done
gnome-terminal
More complex uses could be to encrypt a selected file using GPG, set a selected image as the desktop background, or send a selected file as an email attachment. For a collection of a variety of scripts specifically designed for use in the contextual menu, visit http://g-scripts.sourceforge.net.
![]()
Hack 25. Download and Share Files with the Best P2P Software
![]()
![]()
File sharing is here to stay, and Ubuntu provides some powerful tools that enable users to join the revolution.
Peer-to-peer is huge and getting bigger all the time. Linux users don't have to be left out of all the excitement. In fact, we have a huge variety of P2P apps and networks from which to choose. In this hack, I'm going to show you how to install several different P2P apps; using them, however, will be up to you. And be sensible about what you share, OK? I don't want any large organizations, whose job is protecting dying cartels, suing you.
BitTorrent
When it comes to P2P, first and foremost on any serious Linux user's machine is BitTorrent, the fabulous technology developed by Bram Cohen that makes downloading ISOs and other huge collections of files easy, fast, and stable.
|
There are oodles of BitTorrent apps, and they can all be classified as either command-line or GUI-based. You should know about both, since they each have their purposes. If I'm looking for something quick and dirty, I use the command line; if I want a lot more info and control, I use a GUI.
Command line
You probably already have BitTorrent installed on your copy of Ubuntu, which the following command will confirm:
$ whereis bittorrent
bittorrent: /usr/share/bittorrent
If you don't have it on your computer, run the following:
$ sudo apt-get install bittorrent
Accept any dependencies if they're requested, and now you're ready to roll.
To test the software, try downloading a Linux ISO image. Open Firefox and head over to http://linuxtracker.org, which tracks many different Linux distros, all available via BitTorrent. Find a distro that intrigues you, and click on the little floppy-disk icon. When Firefox asks you where to save the .torrent file, pick a location on your hard drive and save it (Firefox may just go ahead and drop it in the Desktop directory). In my case, I'll use ~/iso, a directory in my home for ISO images. Close Firefox, open your terminal, cd to the directory containing the .torrent, and then use the text-mode BitTorrent client (btdownloadcurses) to download the file:
$ cd ~/iso
$ ls
KANOTIX-2006-CeBIT-RC3.iso.torrent
$ btdownloadcurses --responsefile KANOTIX-2006-CeBIT-RC3.iso.torrent
Once BitTorrent starts up, you'll see information about the progress of your download (and upload, since BitTorrent also shares whatever you download with other users; if you want to limit upload speed, use the --max_upload_rate SPEED option on the command line, replacing SPEED with the speed in kilobytes per second):
| file: KANOTIX-2006-CeBIT-RC3.iso
| size: 694,765,568 (662.58 MiB)
| dest: /home/scott/iso/KANOTIX-2006-CeBIT-RC3.iso
| progress: ##_____________________________________________ _
| status: finishing in 1:09:25 (3.5%)
| dl speed: 193.6 KB/s
| ul speed: 0.5 KB/s
| sharing: 0.007 (0.2 MB up / 28.5 MB down)
| seeds: 13 seen now, plus 0.882 distributed copies
| peers: 1 seen now, 85.7% done at 56.2 kB/s
If you have a URL instead of a torrent file, use a slightly different command:
$ btdownloadcurses --url "http://linuxtracker.org/download.
![]()
php?id=1624&name=KANOTIX-2006-CeBIT-RC3.iso.torrent"
The same progress information will appear, allowing you to follow along with the progress of BitTorrent. Just leave your terminal open until your download finishes. In order to give something back to your fellow BitTorrent users, it's a good idea to leave everything running until your upload is equal to your download. When you're ready to stop BitTorrent, just press Q to quit.
|
GUI
There are lots of good BitTorrent GUIs out there, but Azureus is probably the bestwith the most features, constant updates, and a dedicated development team. Before you can use the program, however, you need to install Java [Hack #18], since Azureus requires it. (Sun's licensing, however, makes it impossible for Ubuntu to include the official Java Runtime Environment in its repositories.)
After you've installed Java, download Azureus from http://azureus.sourceforge.net/. Extract the file somewhere, such as /opt:
$ cd /opt/
$ sudo tar xvfj /home/bjepson/Desktop/Azureus_2.4.0.2_linux.tar.bz2
You can now run Azureus by executing /opt/azureus/azureus. As you can see in Figure 2-35, it's a program that gives you an enormous amount of data about the files you're downloading and sharing.
Figure 2-35. Azureus is a full-featured, powerful P2P app
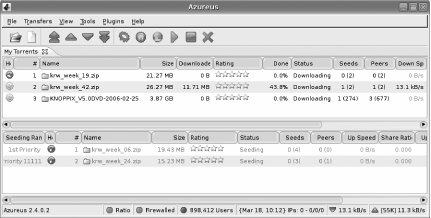
For more on this great app, check out an article I wrote for Linux Magazine titled "Azureus: A Better Way to BitTorrent" (http://www.linux-mag.com/content/view/1923/43/). It'll give you some tips when it comes to using Azureus that you should find useful.
aMule and eDonkey2000
aMule is a P2P client for the eDonkey2000 (or ed2k) network, which, according to Wikipedia, is the most widely used P2P network in the world (see http://en.wikipedia.org/wiki/EDonkey_network for that statistic, as well as some other important information you should read if you plan to use the ed2k network). You can install aMule using apt-get, since it is part of Ubuntu's universe repository.
Make sure that the universe repository [Hack #60] is enabled, and then enter the following:
$ sudo apt-get install amule
You'll be asked if you want to install some other packages that aMule needs, so go ahead and say yes. When apt finishes, you can start aMule by going to the K menu![]() Internet
Internet![]() aMule (if you use KDE) or Applications
aMule (if you use KDE) or Applications![]() Internet
Internet![]() aMule (if you use GNOME). The program will start up, as you can see in Figure 2-36.
aMule (if you use GNOME). The program will start up, as you can see in Figure 2-36.
Figure 2-36. Running aMule
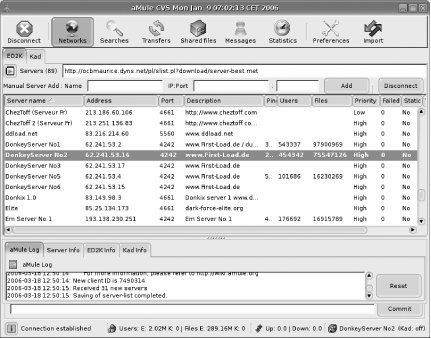
aMule is running, but there's a lot more to do. To configure and use aMule, start with the "aMule wiki" (http://www.amule.org/wiki/index.php/Main_Page), especially the Getting Started page (http://www.amule.org/wiki/index.php/Getting_Started). Another great source of help is the aMule forums (http://www.amule.org/amule/index.php). Try out aMule: you really can find just about anything there.
LimeWire and Gnutella
One of the first solutions to the centralized-server problem posed by Napster was the Gnutella network (for more info, see http://en.wikipedia.org/wiki/Napster and http://en.wikipedia.org/wiki/Gnutella). Today, there are many Gnutella clients available for Linux users, but one of the best is undoubtedly LimeWire. There are two versions of LimeWire: the pay version (which is $18.00 for six months of updates) and the free version, which will constantly bother you to upgrade to the pay version but is otherwise adware- and spyware-free.
To get the free version, point your web browser to http://www.limewire.com/LimeWireSoftLinux, and you should be prompted to accept a download. It's an RPM file, which normally won't work on a Debian-based distro like Ubuntu, but don't worry. You're going to use a wonderful program called Alien to convert the RPM into something you can use on your distro. First, you'll need to install alien:
$ sudo apt-get install alien
You may have to approve a few additional packages that satisfy dependencies, so go ahead and do so. Once alien is in place, you can use it to transform the RPM into a DEB suitable for installing on your Ubuntu box:
$ sudo alien LimeWireLinux.rpm
limewire-free_4.10.9-1_i386.deb generated
Now you can install the LimeWire DEB:
$ sudo dpkg -i limewire-free_4.10.9-1_i386.deb
As a bonus, you now have a DEB that you can use on other Ubuntu machines under your control, or you can pass it along to friends.
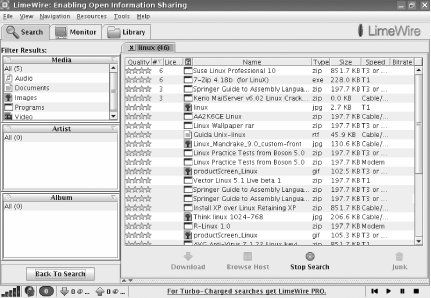
To use LimeWire, go to the K menu![]() Internet
Internet![]() LimeWire (for KDE) or Applications
LimeWire (for KDE) or Applications![]() Internet
Internet![]() LimeWire (for GNOME). LimeWire will open and ask you a few questions to get started, and then you can begin using it to search for goodies, as you can see in Figure 2-37. (Regrettably, some of the search results appear to be unauthorized copies of books and other material.)
LimeWire (for GNOME). LimeWire will open and ask you a few questions to get started, and then you can begin using it to search for goodies, as you can see in Figure 2-37. (Regrettably, some of the search results appear to be unauthorized copies of books and other material.)
Figure 2-37. LimeWire in action
LimeWire is a powerful program that connects to a large and popular network, so you should be able to have a lot of fun with it.
Other P2P Apps
I've shown you programs for many of the popular P2P networks, but there are many others out there, and it seems like new networks and programs pop up all the time. A great way to keep up-to-date with this growing technology is through the Wikipedia article "Comparison of file sharing applications" (http://en.wikipedia.org/wiki/Comparison_of_P2P_applications). If you see one that looks interesting, do a Google search for that app or network, followed by the word "Ubuntu"; so, for instance, if a new P2P app appeared named "arglebargle," you'd query Google for arglebargle ubuntu to see if there was any Ubuntu-specific info available. Just remember: be careful with what you share!
Scott Granneman
Hack 26. Make Your Own PDFs
![]()
![]()
Are you used to using the "Print to PDF" feature in Adobe Acrobat? Here's how you can make your own PDF files using a similar technique.
A very handy feature that's included in the Mac OS X operating system is the ability to "print" a PDF file from any application. Windows can also do this, via Adobe Acrobat. However, with the addition of a single package and a little bit of tweaking, you can get the same capability for free on Ubuntu Linux.
Installing CUPS-PDF
The key to getting PDF printing enabled is in the package cups-pdf, which is in the universe repository [Hack #60]. Use apt-get from a terminal window to install the cups-pdf package:
bill@lexington:~$ sudo apt-get install cups-pdf
Password:
Reading package lists... Done
Building dependency tree... Done
The following NEW packages will be installed
cups-pdf
0 upgraded, 1 newly installed, 0 to remove and 34 not upgraded.
Need to get 23.4kB of archives.
After unpacking 147kB of additional disk space will be used.
Get: 1 http://us.archive.ubuntu.com dapper/universe cups-pdf 2.0.3-1 [23.4kB]
Fetched 23.4kB in 0s (31.2kB/s)
Selecting previously deselected package cups-pdf.
(Reading database ... 105713 files and directories currently installed.)
Unpacking cups-pdf (from .../cups-pdf_2.0.3-1_i386.deb) ...
Setting up cups-pdf (2.0.3-1) ...
* Stopping Common Unix Printing System: cupsd [ ok ]
* Starting Common Unix Printing System: cupsd ...done.
After the installation of cups-pdf is complete, the CUPS configuration file requires a small edit to enable PDF printing. From a terminal window, run:
bill@lexington:~$ sudo gedit /etc/cups/cupsd.conf
Find the line that says RunAsUser Yes and change it to RunAsUser No, and then save the file and exit gedit. Next, you'll need to restart CUPS to make the configuration change effective:
bill@lexington:~$ sudo /etc/init.d/cupsys restart
* Stopping Common Unix Printing System: cupsd [ ok ]
* Starting Common Unix Printing System: cupsd ...done.
Configuring CUPS for the PDF Printer
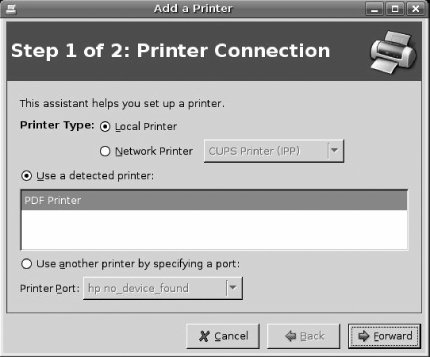
Now you must tell CUPS to use the newly installed cups-pdf package. Click on the System menu; select Administration and then Printing. Double-click on New Printer to start the "Add a Printer" wizard. Ensure that Local Printer is selected under the printer type and that "Use a Detected Printer" is selected, with PDF Printer highlighted in the list below (see Figure 2-38). Click on Forward to proceed.
Figure 2-38. Adding the PDF printer
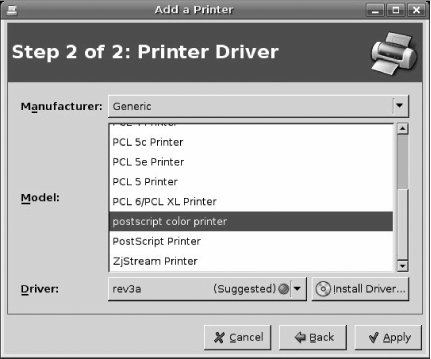
On the next screen, select Generic under the Manufacturer field (see Figure 2-39). Pull down the Model pull-down and select "postscript color printer." Click on Apply to commit the changes.
Figure 2-39. Specifying the PostScript driver
Using Your New PDF Printer
Using the new PDF printer is simple: from any application, use that application's native printing facility and select "postscript-color-printer" as your printer. The printer driver will automatically create a PDF and put it in a PDF subdirectory within your home directory. The filename will probably be something like job_1-untitled_document.pdf. That's it, it's just that easy! Who needs Acrobat?
![]()
Hack 27. Blog with Ubuntu
![]()
![]()
Blogging is all the rage, and you can update your blog from Ubuntu using the Drivel blog client.
Blogging has become a very popular activity as of late; there's even been an O'Reilly book about it (Essential Blogging by Cory Doctorow et al.). Lots of people have LiveJournals or maintain their own blog servers. Most blogs have their own web-based administrative interfaces, but if you're not online, you can't update your blog. That's where a blog client comes in: it allows you to write blog posts offline and upload them when you're ready. There is a very good blog client called Drivel in the universe repository, which is very easy to configure and use.
Installing Drivel
Thanks to apt-get, Drivel is extremely easy to install (you need to have the universe repository enabled [Hack #60]). Simply run the following command from a terminal window:
bill@lexington:~$ sudo apt-get install drivel
Reading package lists... Done
Building dependency tree... Done
The following NEW packages will be installed
drivel
0 upgraded, 1 newly installed, 0 to remove and 34 not upgraded.
Need to get 353kB of archives.
After unpacking 1487kB of additional disk space will be used.
Get: 1 http://us.archive.ubuntu.com dapper/universe drivel 2.0.2-5 [353kB]
Fetched 353kB in 1s (191kB/s)
Selecting previously deselected package drivel.
(Reading database ... 105636 files and directories currently installed.)
Unpacking drivel (from .../drivel_2.0.2-5_i386.deb) ...
Setting up drivel (2.0.2-5) ...
There will be a new menu entry for Drivel created in the Applications menu in the Internet section. Simply click on that entry to start Drivel.
Configuring and Using Drivel
Upon starting Drivel for the first time, you'll be presented with the main Drivel dialog box, which is where you'll need to configure the program. Enter your username, password, and server address into the appropriate fields in the dialog, and select your journal type from the drop-down menu. (If you're using a Movable Type or Movable Type-compatible blog such as Wordpress, make sure to put the path to your mt-xmlrpc.cgi file in the Server Address field.) Click on Log In (see Figure 2-40), and Drivel will hook up to your blog and pull down an index of your latest blog posts.
Figure 2-40. Drivel's splash and login screen
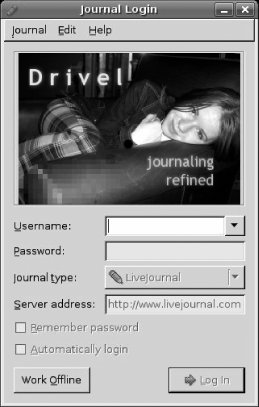
Now Drivel's ready for you to make your first post (see Figure 2-41)! Fill in a subject line for your post, and type some content in the big body field. When you click Post, Drivel will upload the post to your blog, where it'll be made available to the whole world. The "Show more options" arrow will bring down a pull-down dialog where you can select which category you want your post to be categorized in, if your blog supports categories.
Figure 2-41. Drivel's main window
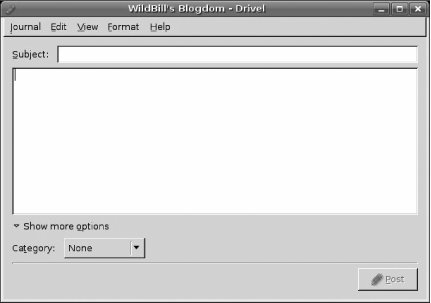
Drivel also supports different fonts and font effects via the Format menu. It will also automatically construct image links for you, although you'll have to upload the image (in the correct size) to your blog outside of Drivel. Drivel also makes it easy to call up old blog entries and edit them if necessary; simply click on the Journal menu and select Recent Entries to see the last few entries you've written.
In all, Drivel's one of those small applications that does one thing, and does it well. Give it a test-drive and see if it can't help you manage your blog.
All materials on the site are licensed Creative Commons Attribution-Sharealike 3.0 Unported CC BY-SA 3.0 & GNU Free Documentation License (GFDL)
If you are the copyright holder of any material contained on our site and intend to remove it, please contact our site administrator for approval.
© 2016-2026 All site design rights belong to S.Y.A.