Ubuntu Hacks: Tips & Tools for Exploring, Using, and Tuning Linux (2009)
Chapter 6. Package Management
Hacks 54-66
One of Ubuntu's key strengths is the quality of the software packages that are included in the main distribution: they have been relentlessly tested, and come together to form a rock-solid Linux distribution. These packages are managed by a tool called APT (Advanced Packaging Tool) as well as a variety of frontends that make apt a bit easier to work with. In this chapter, you'll learn how to work with apt and those frontends.
Although the main Ubuntu distribution is integrated and very solid, that stability comes at a price: many of the optional packages you may want have been excluded from the main distribution. However, there are many ways to bring in optional packages, and there are hacks in this chapter to help you do so. These hacks will also help you understand the consequences of adding optional packages. You'll also learn how to compile applications from source, create your own Ubuntu packages, and host packages in a custom repository for others to use.
![]()
Hack 54. Manage Packages from the Command Line
![]()
![]()
Dive under the hood and manage packages directly from the command line.
Ubuntu provides a number of very nice graphical tools for managing software packages from the desktop, but sometimes you just have to get hands-on to really get things done. Servers don't generally have a graphical desktop environment installed, and if you manage machines remotely through a shell session, you need to know how to use Ubuntu's command-line package-management tools.
Ubuntu strives for consistency in the process of managing software. All software is packaged using a strictly defined format that contains the program itself plus information about how it needs to be installed, and all packages are stored on your computer in the exact same way. The package-management tools are layered, with each layer building on the levels below. At the lowest level is dpkg, which directly manages packages; mid-level tools like apt sit on dpkg and provide more functionality, such as automatic dependency resolution; and high-level tools like Synaptic and Adept sit on apt and let you graphically browse package lists and do simple point-and-click installation.
dpkg
dpkg is the basis of the Debian package-management system and allows direct manipulation of packages. If you have a local package on disk called program-1.0-1.deb that you want to install, dpkg is the tool to use. Because it's such an important part of the package-management stack, it has a whole hack of its own [Hack #57].
apt and Friends
While it was not originally intended as a frontend tool, but rather as an intermediate layer between dpkg and end-user tools such as Synaptic and Adept, running apt directly is probably the most common method for managing packages on the command line.
Some commands require root privileges, so you need to prepend them with sudo if you're running as an unprivileged user.
Here are some commands you'll wonder how you ever lived without:
Retrieve the current list of packages from all servers
If you don't do this from time to time, your local list of available packages may become out of date. Run this command occasionally before doing a dist-upgrade or searching for a new package. The package lists are large, and doing an update may result in several MB of data being retrieved from the Internet:
$ sudo apt-get update
Do a keyword search
The search command searches through the list of available packages, including package names and descriptions. You can use several keywords; for example, apt-cache search texteditor finds a list of text editors:
$ apt-cache search
keywords
Get more information
Once you've found a package that looks interesting using apt-cache search, you can display more detailed information about it using apt-cache show program. This will tell you things like the size of the package (important if you are installing it via the Internet) and an extended description, as well as what other packages it depends on in order to work and the name of the developer who maintains the package:
$ apt-cache show
program
Install a package
This will get the latest version of the specified package and install it, along with any other packages that it depends on in order to work. If the requested package is already installed, this will upgrade it to the latest available version:
$ sudo apt-get install
program
Remove a program
If you've previously installed a program and decide you don't want it anymore, you can remove it using this command. Because some software packages can depend on others, removing one program may break other programs. Running apt-get remove therefore checks first to see if any other software programs need the program to work, and offers to uninstall them as well. This is just one example of the way the Ubuntu package-management tools have been designed to try to keep your computer in a sane state, without broken or half-installed software. It's certainly possible to break an Ubuntu system, but generally you have to try to do it. The remove command also has a --purge option that removes not just the program itself but also all configuration files associated with it:
$ sudo apt-get remove
program
$ sudo apt-get remove --purge
program
Upgrade your system
Over time, most of the software packages on your computer will become out of date, as new versions are released to add features or fix bugs. You could manually do apt-getinstall foo on each one, but that's not very convenient, so apt provides a simple way to upgrade your entire system at once. Just type apt-get upgrade to have apt check every single package on your system for a new version and then download and install it. This command will never install new packages; it will only upgrade packages that are already installed:
$ sudo apt-get upgrade
Perform a full upgrade
Sometimes, you'll have a software package installed, and a new version will come out that has a lot of new features and therefore now depends on some other program to run. For example, you may have a movie player installed that supports a lot of different movie formats. When new formats come out, modules for those formats may be added in separate packages, so the latest version of the movie-player software now depends on a new package that you don't yet have installed on your system. If you just run apt-getupgrade, you'll get the latest movie player, but you won't get all the new movie-format packages. The apt-get dist-upgrade command solves that problem for you: not only does it get the latest version of every package already installed just like apt-get upgrade, it also installs any new packages they need that may not be on your system yet. If you want to keep your system up-to-date with all the latest updates and security patches, running apt-get update; apt-get dist-upgrade from time to time is the best way to do it:
$ sudo apt-get dist-upgrade
Clean up
When you ask apt to install a software package, it downloads the package and stores it in a cache on your disk before it does the actual installation. If you then remove the package but later change your mind again and reinstall it, apt doesn't need to fetch it from the Internet again because the package is sitting in the local cache. That's great for saving bandwidth, but after a while, the cache can use up space on your disk, so it's a good idea to periodically delete old packages from it. Running apt-get clean will totally flush the package cache, possibly freeing up some precious disk space. This command is quite safe because the worst that can happen is apt may need to download a package again if you remove it and then reinstall it:
$ sudo apt-get clean
Clean smarter
autoclean is almost the same as clean, except it's just a little bit smarter: instead of cleaning out your entire package cache, it deletes only superseded packages. For example, your package cache may contain packages for the last four versions of a text editor that has been upgraded a number of times. Running apt-get autoclean will delete the oldest three versions from the cache, leaving only the latest one. That makes sense because you're not likely to reinstall anything except the latest version anyway:
$ sudo apt-get autoclean
Lazy like a fox
If you spend a lot of time working on the command line, you can make things easier for yourself by creating shortcuts for the common commands. Add these lines to your ~/.bashrc:
alias agi='sudo apt-get install'
alias agu='sudo apt-get update'
alias ags='apt-cache search'
alias agsh='apt-cache show'
alias agr='sudo apt-get remove'
alias agd='sudo apt-get dist-upgrade'
Then you won't need to type the whole command. To do a search, for example, just type ags foo and enter your password if required. Laziness is a virtue!
Hack 55. Manage Packages with Synaptic
![]()
![]()
Use the default Ubuntu package manager to easily install and update programs on your system.
One thing that can be difficult to get used to if you are new to Linux is package management. On one hand, the way that Ubuntu handles program installation and upgrading is much simpler than on other operating systems. On the other hand, it's rather different from what you might be used to, so it takes some time to learn the ins and outs. Luckily, all you need to learn is a single tool and you can then apply that knowledge to install and upgrade any of thousands of Ubuntu programs. In this hack, we talk about how to use the default Ubuntu package manager called Synaptic to manage all of Ubuntu's packages efficiently and easily.
The first step is to start Synaptic. Click System![]() Administration
Administration![]() Synaptic Package Manager to launch the program. Synaptic requires root privileges to run, so you will be prompted for your password when it starts. Figure 6-1 shows the default interface, which has a lot of information on it, but once you are familiar with its functions, you'll find it's not too difficult to navigate.
Synaptic Package Manager to launch the program. Synaptic requires root privileges to run, so you will be prompted for your password when it starts. Figure 6-1 shows the default interface, which has a lot of information on it, but once you are familiar with its functions, you'll find it's not too difficult to navigate.
Figure 6-1. The default Synaptic window
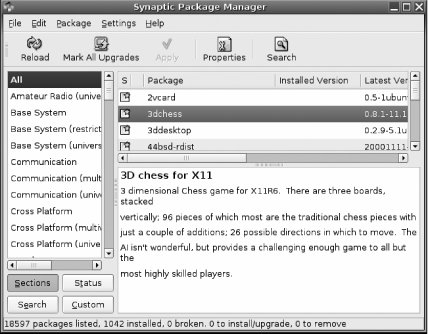
The main window is divided into a few sections. The sidebar displays the different package categories so that you can quickly drill down to a particular group of packages (like games) and not have to read through packages in other categories. The first category, All, displays all packages. On the right side of the window along the top is the list of packages, along with information about whether they are installed and what the latest version is. If you select a particular package, detailed information is displayed in the pane below. Near the top of the screen are a few buttons that correspond to the main actions you'll want to perform when using Synaptic, described next.
Reload the Package List
In Ubuntu, packages reside in what are known as package repositories. "Modify the List of Package Repositories" [Hack #60] goes into more detail about the different package repositories that exist for Ubuntu, but in short, these repositories allow different types of packages to be kept together in a central place. As a user, this means that you don't need to search around on the Internet to find a program; you just find the program in the package manager, and it retrieves that program's package, as well as any other packages that program needs from the appropriate package repositories.
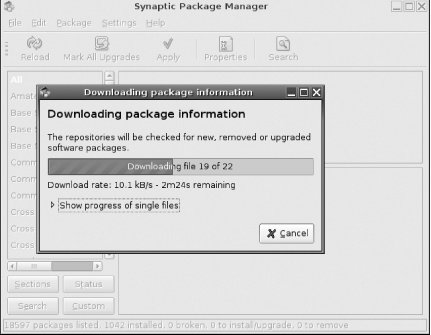
There are often updates to these package repositories as new versions of software are released, so before you do anything else, you will want to get the very latest list of packages and their versions. To do so, click the Reload button at the top of the window. Synaptic will download and update its local database of packages with these new versions (Figure 6-2). Once it is finished, you are ready to install and update packages.
Figure 6-2. Click Reload to grab the latest list of packages
Install Packages
To install a package in Synaptic, find the particular package in the package list. You can either scroll down manually or, if you know the name of the package, you can start typing in that list to highlight it. If you aren't sure about the category or the name of a particular program, you can also search within Synaptic for it. More information on how to use the Synaptic search feature can be found in "Search for Packages," later in this hack.
After you identify the package you want to install, right-click on it and select "Mark for Installation." If you want to install more than one package, mark them all for installation at this point. Synaptic will prompt you if a package depends on another package to install so that you can approve the installation of it. Once all of the packages you wish to install are selected, click the Apply button, and Synaptic will display a prompt letting you know which packages it will install along with how much space it will need. Then Synaptic will automatically download and install all of the programs onto the system.
Update Packages
One particularly nice feature of a centralized package repository is that it makes upgrading all of the programs on your system a breeze. To update your system, click the Mark All Upgrades button. Synaptic will go through and mark any and all packages that have an update available. Click Apply to apply the changes, and Synaptic will download and install all available updates for your system: from desktop programs to libraries to games. You will want to periodically update the programs on your system to make sure you have the latest bug fixes and security patches.
|

Remove Packages
You can remove packages in Synaptic in much the same way as you can install them. Find the package you want to remove in the package list, right-click, and select "Mark for Removal" if you want to remove the program but leave behind any configuration files you may have changed. You can also select "Mark for Complete Removal" if you want to purge even the configuration files from the system.
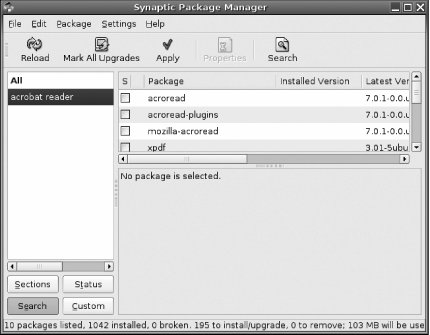
Search for Packages
Sometimes you know what sort of program you want to install, but you aren't completely sure what the exact name of the package is. Synaptic includes a search tool to make it simple to find the packages you need. Click the Search button at the top of the window and enter any keywords you want to search for. Synaptic will then display a filtered package list that contains only the packages that match those keywords (Figure 6-3). You can then more easily locate and install them. To get back to the standard package list, click the Sections button at the bottom of the window.
Figure 6-3. The Synaptic search interface
Edit Preferences and Add Repositories
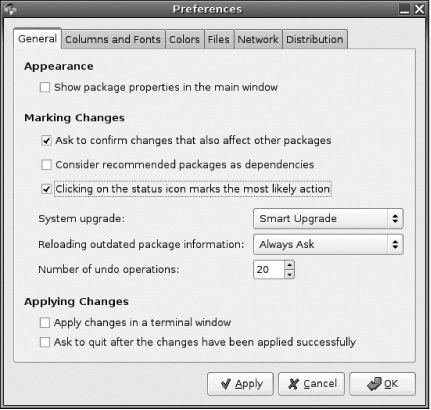
The above steps are enough to do standard package management, but as you get used to Synaptic you may want to tweak some of its settings. Click Settings![]() Preferences to see the main preferences window (Figure 6-4). In the Preferences window, you can configure some of Synaptic's default behavior, such as how many undo operations to allow, what colors and fonts to use for packages, which columns to display in the main window, and the details of your network proxy settings.
Preferences to see the main preferences window (Figure 6-4). In the Preferences window, you can configure some of Synaptic's default behavior, such as how many undo operations to allow, what colors and fonts to use for packages, which columns to display in the main window, and the details of your network proxy settings.
Figure 6-4. Synaptic's Preferences window lets you tweak default behavior
You may also want to add extra software repositories to your system. Extra repositories such as universe and multiverse [Hack #60] contain a much larger set of software; however, the software is packaged and supported by the Ubuntu community instead of the Ubuntu project itself, so these packages may not be as well tested. To change your repository settings, click Settings![]() Repositories. Figure 6-5 shows the main window that displays all of the main repositories you have configured. To add subcategories to a particular repository, select the repository and click Add. To add universe or multiverse subcategories, click their corresponding checkboxes. If you are somewhat familiar with the sources.list layout, you can also click the Edit button to more directly configure the repository settings.
Repositories. Figure 6-5 shows the main window that displays all of the main repositories you have configured. To add subcategories to a particular repository, select the repository and click Add. To add universe or multiverse subcategories, click their corresponding checkboxes. If you are somewhat familiar with the sources.list layout, you can also click the Edit button to more directly configure the repository settings.
|
Figure 6-5. Add to Synaptic's package repositories
![]()
Hack 56. Manage Packages with Adept
![]()
![]()
Adept is the KDE equivalent of Synaptic, allowing you to manage packages on a Kubuntu system.
Ubuntu's package-management tools are some of its greatest strengths. A huge amount of work has been put into the underlying management code in order to make it as flexible as possible, separating the user interface from the code that performs the actual heavy lifting. The result is that there are many different ways to interact with apt, allowing you to manage packages from the command line [Hack #54] in a variety of ways or use one of many graphical frontends that hides the details from you and provides a point-and-click GUI. This approach allows graphical frontends to be relatively lightweight: they don't need to include basic package-management logic because all of that is provided by apt itself, which in turn makes the GUI application simpler and more robust.
Adept is a graphical package-management interface that sits on the libapt API and uses the Qt libraries, making it an ideal alternative to Synaptic for Kubuntu systems. You can use it to install, upgrade, and remove packages, of course, but it also comes with a couple of little extra utilities to make your life easier: adept-notifier and adept-updater.
Basic Adept Usage
If you don't already have it installed, use the command line or an alternative package-management tool to install Adept:
$ sudo apt-get install adept libqt-perl
The reason for installing libqt-perl is that it enables some extra features in Adept, including the ability to configure and reconfigure packages directly.
Launch Adept from K menu![]() System
System![]() Adept. The main management window is quite similar to Synaptic but includes some interesting additional features, such as Debtags support, shown in Figure 6-6.
Adept. The main management window is quite similar to Synaptic but includes some interesting additional features, such as Debtags support, shown in Figure 6-6.
Figure 6-6. Package management with Adept

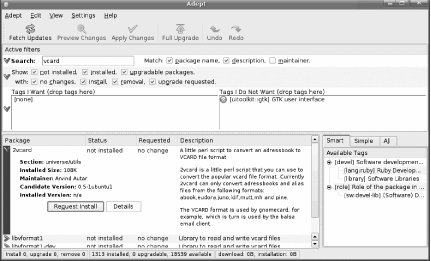
Debtags is an initiative to associate specific keywords with packages, rather than rely on searching package titles and descriptions to find what you want. It's a lot like the tags used for free-form taxonomy by Flickr and various blogging tools. You can browse through the currently available tags at the bottom right of the window, and drag them into the Tags I Want and Tags I Do Not Want boxes to restrict package search results. For example, if you don't want to see any GNOME packages listed in search results, just browse through the tags to the "GTK user interface" tag and drop it on Tags I Do Not Want.
The search system is dynamic, so you can just start typing search terms, and the list of packages will be narrowed automatically (see Figure 6-7). Then you can click the triangle next to a package name to see a description of the package and a Request Install button to install it. If the package is already installed, the button will say Request Removal instead.
Figure 6-7. Adept package search
Installation and removal of packages doesn't happen immediately. Instead, flags are set on the packages, and when you are happy with the changes you have made to package selections, you can click the Apply Changes button at the top of the window.
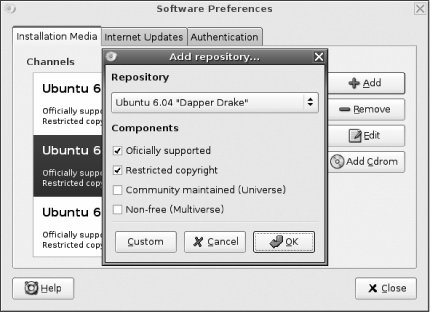
Adept also allows you to modify the list of software repositories used by your computer to fetch new packages. You can manually modify the list of package repositories directly [Hack #60], or go to View![]() Manage Repositories in Adept to see the repository list conveniently divided into Type, URL, Distribution, and Components columns.
Manage Repositories in Adept to see the repository list conveniently divided into Type, URL, Distribution, and Components columns.
After making any changes to the repositories, click the Fetch Updates button at the top of the window to force Adept to fetch the latest package lists.
Adept also provides a convenient Full Upgrade button that finds and marks all packages on your system that have upgrades available, so a quick way to keep your entire system up-to-date is to open Adept, click Fetch Updates, then Full Upgrade, and then Apply Changes.
Receive Update Notifications Automatically
Updated software packages are released quite frequently, and if you want to stay on top of the latest security updates, it's important to know when updates are available. Instead of manually updating the package list every day and checking for new software, you can just use the adept-notifier panel applet to keep you informed.
adept-notifier sits in your system tray and regularly checks the package repositories for new releases. If there are no updates to install, it gives you a green light in the panel, but if new versions of any software you have installed become available, it pops up a notification message to let you know. That way you can get on with just using your computer and not worry about checking for updates manually.
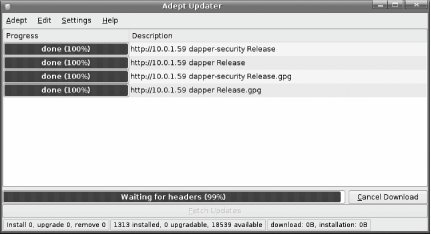
Adept Updater is a convenient way to apply updates to all your currently installed packages. Launch it by going to K menu![]() System
System![]() Adept Updater, and then click the big Fetch Updates button at the bottom. You will see progress as the latest package lists are retrieved, as shown in Figure 6-8.
Adept Updater, and then click the big Fetch Updates button at the bottom. You will see progress as the latest package lists are retrieved, as shown in Figure 6-8.
Figure 6-8. Adept Updater
If any packages need to be updated, you will then be given the option of downloading and applying those updates.
Hack 57. Install and Remove Standalone .deb Files
![]()
![]()
Use command-line tools to install individual .deb files when other automated tools aren't an option.
The package management for Debian-based distributions like Ubuntu is very powerful and saves a lot of effort that could be wasted finding the latest packages and tracking down dependencies. Automated tools like apt-get, Synaptic, and Adept should serve most users' needs almost all of the time, and you should stick to those tools whenever possible. However, there are some circumstances when you need to install a .deb package directly.
|

You have built your own kernel "the Ubuntu way"
If you have compiled your own kernel source using make-kpkg, you will end up with a .deb package for the kernel binaries, along with .debs for any extra modules you may have built (see "Build Kernels the Ubuntu Way" [Hack #78] for the specific steps in this procedure).
You have compiled your own package from Ubuntu source
As when compiling a kernel, when you compile from Ubuntu source using the dpkg tools, you end up with a standalone .deb that you will need to install manually.
You want to roll back to an older version of a program
This circumstance might show up particularly if you are using a development release of Ubuntu. Sometimes the latest version of a package in a development release has bugs. In these circumstances, you might want to roll back to the previous version of a package. One of the simplest ways to do so is to track down the older .deb (possibly in your local package cache at /var/cache/apt/archives/) and install it manually.
A program you want to install has a .deb but isn't in Ubuntu repositories
There might be some circumstances where a .deb you want to install doesn't appear in your Ubuntu repositories, possibly because it's a newer version than Ubuntu provides, because you have found a generic .deb file you want to install, or because a third party has provided a .deb for Ubuntu but hasn't created its own package repository (such as how the Opera web browser is currently packaged).
|
A program you have installed or upgraded won't fully install due to another package installing the same files
We have seen relatively rare circumstances where two packages provide the same file and when one is upgraded, it errors out with the message that it would overwrite files from another package. In these cases, you need to manually install that package using some of the --force options available to dpkg.
Install a .deb
Whatever the reason, when you find yourself with a .deb to install, it's time to turn to dpkg. dpkg is the tool that Debian-based distributions like Ubuntu use to install .deb files. (Even when you use an automated package-management tool, dpkg is used behind the scenes to actually install the packages to the system.) If you are familiar with the rpm tool for RPM-based distributions, you'll find dpkg has similar syntax. To install an ordinary .deb from the command line, type:
whiprush@ubuntu:~$ sudo dpkg -i
packagename
.deb
Replace packagename .deb with the .deb file you wish to install. If you have multiple files you want to install at the same time, you can either list them one after another on the command line:
whiprush@ubuntu:~$ sudo dpkg -i
package1
.deb
package2
.deb
package3
.deb
or use a file glob [Hack #13] to install all .deb files in the current directory:
whiprush@ubuntu:~$ sudo dpkg -i
*.deb
dpkg also has a recursive option (-R). If you have a directory full of debs you want to install, type:
whiprush@ubuntu:~$ sudo dpkg -i -R
/path/to/directory
and dpkg will recursively find and install all .deb files within that directory and its subdirectories.
Occasionally, when you install a package with dpkg, it might abort because a package is marked hold, it conflicts with another package, it depends on other packages that aren't installed, installing the package would overwrite files from another package, or a number of other reasons. dpkg provides a number of --force options you can use to ignore these problems and proceed with package installation.
|
To see the complete list of --force options, type:
whiprush@ubuntu:~$ dpkg --force-help
Some of the more useful options include:
--force-hold
Install a package even if it is marked hold.
--force-overwrite
Install a package even if it might overwrite files from another package.
--force-depends
List any missing dependency errors as warnings and proceed anyway.
--force-conflicts
Even if a package conflicts with another package, install anyway.
So if you have a .deb you need to install that overwrites files from another package, and you have done your homework and confirmed that it is OK to proceed, type:
whiprush@ubuntu:~$ sudo dpkg -i --force-overwrite
packagename
.deb
Remove a Package
Occasionally, you may need to remove a standalone package manually. dpkg provides the -r and -P options to remove and purge packages, respectively. To remove a package, type:
whiprush@ubuntu:~$ sudo dpkg -r
packagename
Note that you don't specify the name of the complete .deb file you might have installed previously, only the name of the package itself. When given the -r option, dpkg will find and remove all of the files for this package except for configuration files, which it leaves behind in case you install the program again. If you want to purge the system of all files, including configuration files, use -P instead:
whiprush@ubuntu:~$ sudo dpkg -P
packagename
Hack 58. Search for Packages from the Command Line
![]()
![]()
When you aren't exactly sure which Ubuntu package has the files you need, use these handy command-line tools to find out.
The Ubuntu package-management system is truly impressive. Simply choose a package name, and Ubuntu will automatically download and install it along with any dependencies it may have. What happens, though, when you don't know the exact name of the package you want to install? The graphical package manager Synaptic has a search tool, but there are two separate command-line tools, apt-cache and apt-file, that you'll find are even more powerful. Each tool suits a particular type of search. apt-cache lets you search for a package based on keywords (among some of its other uses), and apt-file allows you to search for a package based on files inside that package. Each approach is useful in different circumstances, and this hack introduces you to how to use both tools effectively.
Search for Packages Based on Keywords
The apt-cache tool is actually much more than a keyword-based package search utility. apt-cache is a general tool used to query and manipulate the apt package cache. To search within the apt package cache, use the search argument followed by one or more keywords. For instance, if you wanted to find packages having to do with Adobe's Acrobat Reader, you could run the following search:
$ apt-cache search acrobat reader
xpdf - Portable Document Format (PDF) suite
xpdf-utils - Portable Document Format (PDF) suite -- utilities
acroread - Adobe Acrobat Reader: Portable Document Format file viewer
acroread-debian-files - Debian specific parts of Adobe Acrobat Reader
acroread-plugins - Plugins for Adobe Acrobat(R) Reader
mozilla-acroread - Adobe Acrobat(R) Reader plugin for mozilla / konqueror
xpdf-chinese-simplified - Portable Document Format (PDF) suite -- simplified Chinese language support
xpdf-chinese-traditional - Portable Document Format (PDF) suite -- traditional Chinese language support
xpdf-japanese - Portable Document Format (PDF) suite -- Japanese language support
xpdf-korean - Portable Document Format (PDF) suite -- Korean language support
The resulting packages listed in the output either directly relate to Acrobat Reader or indirectly relate to the PDF format. Note that because this is a keyword-based search, keywords will sometimes turn up packages that are only marginally related to what you are looking for. Use multiple keywords to narrow things down. Alternatively, you can pipe the results through grep to look for particular keywords in the package names themselves. For instance, if you knew the package you were looking for contained the word acro, you could type:
$ apt-cache search acrobat reader | grep acro
acroread - Adobe Acrobat Reader: Portable Document Format file viewer
acroread-debian-files - Debian specific parts of Adobe Acrobat Reader
acroread-plugins - Plugins for Adobe Acrobat(R) Reader
mozilla-acroread - Adobe Acrobat(R) Reader plugin for mozilla / konqueror
Search for Packages Based on Files They Contain
There are times when you wish to have a particular file, and you want to track down which package installs this file. Or perhaps you know that you need a particular library for a program, but you don't know the exact name of the package that contains it. While you could use apt-cache and guess, Ubuntu offers a more precise approach with the apt-file tool. apt-file lets you specify a particular file or directory name, and it will search through a package database and print out the name of a package that contains that file or directory, along with the complete path to it.
By default, Ubuntu does not include the apt-file tool. To install it, you will need to make sure that you include the universe repository [Hack #60] in your list of package repositories. Then choose "apt-file" from the Base System (universe) section if you use Synaptic [Hack #55]; otherwise, open a terminal and type:
$ sudo apt-get install apt-file
Unlike apt-cache, apt-file does not use the included apt package cache for its searches. Instead it maintains its own database that you need to update as you do with apt-get update. Before you use apt-file for the first time, you will need to do a full update:
$ sudo apt-file update
Depending on your Internet connection, this might take some time, since apt-file needs to download all of the repository lists you currently have configured. Every once in a while, you will want to update this repository list, especially if you intend to do a number of searches and want newer packages to show up in the results.
After the repository list is up-to-date, you can search for packages much as you do with apt-cache. For instance, to find out what package contains the configuration file /etc/jvm, type:
$ apt-file search /etc/jvm
java-common: etc/jvm
Notice that the results not only tell you which package contains this file (java-common), but also give you the full path to that file. This can be useful when more than one package provides a file with the same name but in different directories. With the full path displayed, you can more easily figure out which package you were looking for.
Hack 59. Install Software from Source
![]()
![]()
When there's no repository and no package, there's still hope. Here's how to build and install standalone programs from source.
It used to be that when you wanted to install a new program under Linux, you would locate the project's home page, find a source tarball, download it, and then extract and compile the source. After a lot of text scrolled by in your terminal, your program would finally be installed. This sort of method was so common, in fact, that many distributions would ship with all of the basic compilers and libraries installed. Ahh, the good old days....
These were not the good old days. The reality was that along with the steps mentioned above, you had some additional chores:
1. You had to revisit the project home page when you realized that there were numerous library dependencies that you needed to first track down, along with any other programs this software relied on.
2. If the software depended on other programs, you usually needed to download and compile those first, only to discover that they had external dependencies, too, so you had to revisit their project pages to track them down as well.
3. Finally, after all the time you spent tracking down all the dependencies and successfully installing the software, the developer would have just released a new version with more features and fewer bugs, so you would have to start again from scratch.
Nowadays, almost every distribution, including Ubuntu, not only uses packages (software that has been compiled and bundled for you), but also incorporates some sort of automatic dependency management. When you want to install software, you just tell Ubuntu which program to install and it will find it and any dependencies, and install it all for you. When you want to upgrade, Ubuntu will manage any new dependencies and new versions for you. So little software these days requires you to download and compile source that (by default) Ubuntu doesn't even install all of the software you need to compile source code. Nine times out of 10, the package you want will either be packaged for the distribution already, or at least be available in a precompiled .deb package. ("Install and Remove Standalone .deb Files" [Hack #57] describes how to install these packages.)
Having said all of this, there are still a few circumstances that crop up that require you to download and compile a program from source:
· A brand-new open source project has been released. It is so new that no one has yet decided to package it for Ubuntu.
· There is some special feature in the kernel or other piece of software that isn't enabled by default, or a patch you would like to add, so that you must compile the kernel from source. (However, you might find that you can customize the source .deb package [Hack #63] to get what you need.)
· A third-party hardware manufacturer has released drivers for Linux; however, they are released only in source form (or perhaps they are released only as RPMs built for Red Hat or SUSE along with a .tar.gz file for any other distribution), and Ubuntu hasn't released some sort of prebuilt package for it.
· You are a programmer yourself, and you would like to help out with an open source project by submitting patches, or perhaps you want to start a whole new project.
· A new version of a program has come out, and you can't wait for it to be packaged, but you will have to build it yourself. (However, note that, depending on the program, you risk breaking other parts of the system that depend on the older version of the program. Typically, when a program has been updated that affects other programs, it and its dependencies will be held back temporarily by the package manager until they are all ready to be installed together.)
|
Install Compiler Tools
If you do need to compile from source, first you will need to install a compiler and all of the other packages essential to building programs from source. Ubuntu makes this easy: just open your preferred package manager, and find and install the build-essential package. This will grab and install the GNU C compiler (gcc), make, g++, and a number of other programs you will need:
$ sudo apt-get install build-essential
Get and Compile the Source
Once all of these programs have installed, download the tarball for your program and extract it somewhere, such as your home directory. Most tarballs extract into their own directory (often named after the program name), so the next step is to cd into that directory:
greenfly@ubuntu:~$ tar xvzf
program.tar.gz
greenfly@ubuntu:~$ cd
program/
Most programs these days follow a common three-step compile method of configuring, but before you launch into the process, you will want to read the installation instructions the developer has provided (usually in a file called INSTALL or README in the main source directory, or otherwise provided on its main project page).
Step 1: configure
The first step in the build process is usually to run the configure script that is located in the main source directory:
greenfly@ubuntu:~/program$ ./configure
This program will scan the system and make sure that all of the libraries that the program needs exist, as well as set any file paths or other settings. If you don't have all of the libraries the program needs, the configure script will error out and tell you what library you are missing (or what newer version you need). If you see this type of error, you will need to not only track down the package that contains that library, but also the development package that contains all of the header files for that library (in Ubuntu, most of these packages end in -dev). Once you get these libraries installed, run the configure script again to see if there are any other libraries you need.
Step 2: compile
Once the configure script exits successfully, the next step is to compile the source code. Most projects use makefiles these days along with the configure script, so the next step is to run make from the main source directory:
greenfly@ubuntu:~/program$ make
You should see a stream of compiler output roll by, and eventually you will end up back at the prompt. It's possible for errors to occur during this step, but these are generally more difficult to debug because they may have resulted from a syntax error in the source code or some other problem. If you do find some sort of compiler error, check the software's mailing list or other support channels (if one exists) for a possible known bug with the software; otherwise, file a bug report.
Step 3: install
Once the source code is compiled, the final step is to install the software on the system. Most programs include a function in their makefiles for installation; however, note that you will generally have to install the program as root, since it will want to install files under /usr and other directories that are writable only by root. Make sure you are still in the main source directory and type:
greenfly@ubuntu:~/program$ sudo make install
The program will now be installed to the system.
|
Hacking the Hack
In most cases, installing a package using this procedure will install the application in /usr/local. But if you want to be sure that the installation will stay away from the parts of the filesystem patrolled by Ubuntu, add --prefix= pathname to the ./configure command, as in:
greenfly@ubuntu:~/program$ ./configure --prefix=
/opt
This will almost always work. However, there are some programs that don't respect the --prefix option, and some programs (such as those that include kernel modules) will insist on spreading themselves all over your filesystem.
Hack 60. Modify the List of Package Repositories
![]()
![]()
Add extra Ubuntu software repositories to your system to gain access to thousands of new pieces of packaged software.
If you are used to installing programs on operating systems other than Linux, the idea of package managers and repositories might seem a bit foreign. To install a program on Windows or Mac OS X, you would insert a CD or download an installer from the Internet and run it. Under Ubuntu, software comes in packages. Packages are the different groups of files that make up a particular piece of software, along with the instructions Ubuntu needs to install and remove the software, dependency information, and so on. With packages, Ubuntu lets you install and update all of your software using a single tool. Whether you use Synaptic [Hack #55], Adept [Hack #56], or apt-get [Hack #54], your package manager will automatically download and install packages you specify along with any other packages (dependencies) they might require.
Instead of being randomly scattered on project pages around the Internet, Ubuntu packages reside in software repositories, which are centralized sites that contain a large number of packages. Each software repository contains a certain class of software that is generally intended for a particular release of Ubuntu, usually in both source and binary form (these are divided into their own repositories) and then further subdivided by what sort of support or software license the package has. Here are some of the main package repositories available for Ubuntu:
dapper
This is the main repository for the Dapper Drake release of Ubuntu. Prior releases of Ubuntu also have repositories named after their release names, so there are Breezy, Hoary, Warty, etc. repositories. When Ubuntu releases a new version, it will also create a repository named after its release name. This method makes it easy to ensure that packages intended for a particular Ubuntu release don't get mixed up with other versions.
dapper-updates
This repository contains updates for a particular release, so you'll generally want to be subscribed to this repository (and you are by default).
dapper-security
Ubuntu uses this repository to separate out security updates that have been applied to a particular package. These updates are often backported to a particular version of software that ships with a release, so you aren't required to update to the latest version of a piece of software to get the security fix.
dapper-backports
This repository is disabled by default, but it contains updated versions of software that has been backported to work with Dapper. This repository is disabled by default because these backports do not undergo the level of testing that other packages do. It has been made available since it might be handy to have a newer version of software with new features.
These repositories are further subdivided into categories based on what level of support a package has and, in some cases, what sorts of licenses or restrictions the software has. If you, for instance, want only software that is fully supported by Ubuntu, you can ensure that by choosing only the main subcategory. Here are the primary subcategories:
main
The primary package category is called main (also referred to as Officially Supported) and contains all of the default Ubuntu packages that have been tested to such a level that they are officially supported by the distribution. As such, this category is enabled by default.
restricted
This category contains packages that are restricted due to copyright or possibly other aspects of their licenses such that they are considered nonfree. This repository exists so that users who want to use only "free" open source software can disable this category and pull software only from main.
universe
Ubuntu is based on the Debian Linux distribution but contains only a subset of Debian's software due to the amount of testing required to support each package. universe is a subcategory that contains software that the community has packaged and supports for Ubuntu. If you are looking for a particular piece of software and can't seem to find it, there's a good chance that it is in universe or the next subcategory, multiverse. Note that since these packages are not officially supported by Ubuntu, there's a chance that you risk some instability by installing software from this category.
multiverse
Like universe, the multiverse category contains software that is not officially supported but is maintained by the Ubuntu community. multiverse is to universe as restricted is to main. Here you will find contributed or nonfree packages that are not officially supported by Ubuntu.
Add and Remove Repositories
There are a few different ways to change the repositories you subscribe to, based on what tools you use for package management. "Manage Packages with Synaptic" [Hack #55] and "Manage Packages with Adept" [Hack #56] cover managing package repositories with those tools. Still, all of these package managers reference the same /etc/apt/sources.list file. Here is a sample sources.list file for Dapper that illustrates the syntax:
# dapper
deb http://archive.ubuntu.com/ubuntu/ dapper main restricted
deb-src http://us.archive.ubuntu.com/ubuntu/ dapper main restricted
# dapper-updates
deb http://us.archive.ubuntu.com/ubuntu/ dapper-updates main restricted
deb-src http://us.archive.ubuntu.com/ubuntu/ dapper-updates main restricted
# dapper-security
deb http://security.ubuntu.com/ubuntu dapper-security main restricted
deb-src http://security.ubuntu.com/ubuntu dapper-security main restricted
Knowing how Ubuntu separates repositories into categories, you can see how the syntax of these lines works. The first section of a line specifies whether Ubuntu is going to pull binary packages (deb) or source packages (deb-src) for a particular repository. The next section of the line contains the URL for the particular repository, which is usually either HTTP or FTP. Next, the particular repository is listed (in this example, dapper, dapper-updates, or dapper-security). Finally, you see a space-delimited list of subcategories to pull from. By default, Ubuntu will use main and restricted subcategories, but to add new subcategories, just add their names at the end of a particular line. So, for instance, to add universe and multiverseto the Dapper repository for both binary and source packages, change:
deb http://archive.ubuntu.com/ubuntu/ dapper main restricted
deb-src http://archive.ubuntu.com/ubuntu/ dapper main restricted
to:
deb http://archive.ubuntu.com/ubuntu/ dapper main restricted universe
![]()
multiverse
deb-src http://archive.ubuntu.com/ubuntu/ dapper main restricted universe
![]()
multiverse
Once you save your changes, you will need to update your package list to use the new repositories either via apt-get update or through the Synaptic or Adept interface. To add new subcategories to other repositories, simply make the appropriate changes to their repository entries.
Unofficial Repositories
There are a number of other unofficial package repositories on the Internet that you can also use with Ubuntu. Often these repositories provide a small subset of special packages that Ubuntu doesn't package by default, or perhaps provide a newer version of a package. These repositories generally will tell you the particular line to add to your sources.list, but be sure that the repository is designed to work with your particular Ubuntu release, or you may face compatibility conflicts between dependencies in the third-party repository and Ubuntu's native packages.
Hack 61. Cache Packages Locally with Apt-cacher
![]()
![]()
Save time and bandwidth when updating multiple Ubuntu machines by keeping a local package cache.
If you manage multiple Ubuntu machines, you probably wish there were some way to download new packages only once and install them on every machine. Better still, it would be good if it worked totally transparently so you could just use the regular package-management tools in Ubuntu and not care about what happens behind the scenes.
Apt-cacher allows you to do exactly that. With Apt-cacher running on one machine on your network, you can configure all your other machines to fetch packages through it.
|
Apt-cacher is different from many other caching systems because rather than being a standalone program, it runs as a CGI script under Apache. That has a number of advantages, such as making it small, simple, and therefore more robust because it doesn't need its own protocol-handling code. It also makes it very flexible because you can use Apache's built-in access-control mechanism in case you want to let only certain machines use your cache.
Apt-cacher itself needs to be set up on only one machine, the one you decide to use as your local cache. Then all computers on your local network have a setting modified to tell them to direct all package requests to your cache machine rather than directly to the package server.
Apt-cacher works by intercepting requests for packages and fetching them on behalf of local machines, while simultaneously storing them on disk in case other machines later ask for the same package. Once set up, there is no need to do anything differently to install packages: just install a package on one machine with apt or Synaptic, and it comes off the Internet; then when you install it on other machines later, it comes from the local cache. Easy!
Installing Apt-cacher
Getting Apt-cacher working involves two parts: setting up the cache server itself and then telling your local machines to use it.
Server setup
First, select a machine to use as your cache server. Apt-cacher puts very little load on the system, so you can safely run it on just about any machine you have available, even one that's normally used as a workstation. Probably the most critical things are to make sure your cache server has a fixed IP address, so other computers on your network can find it, and that there is plenty of disk space, because the cache itself can become quite large. Disk usage depends on how many packages you have cached, so the greater variety of software you run, the more space you will need. A few hundred megabytes is common, while large caches may need several gigabytes.
On the machine nominated to be your cache, start by installing the apt-cacher package:
$ sudo apt-get install apt-cacher apache
This will also install Apache plus a couple of other packages, unless they were already in place. If you already have Apache installed, you should restart it:
$ sudo /etc/init.d/apache restart
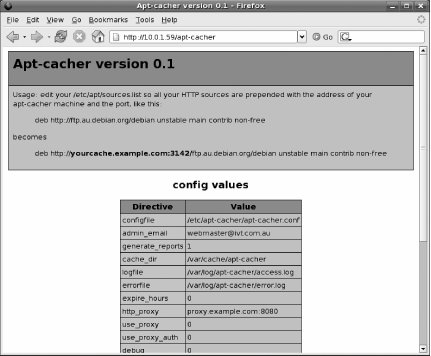
And you're done. (If you installed Apache after you installed Apt-cacher, you should run the command sudo dpkg-reconfigure apt-cacher.) You can test that the installation worked properly by opening a web browser and going to the address http://<cache.example.com>/apt-cacher, replacing <cache.example.com> with the hostname or IP address of your cache server. If all went well, you'll see an information page generated by Apt-cacher, as shown in Figure 6-9.
Figure 6-9. Apt-cacher default screen
Client setup
Client machines don't need to have anything installed to use Apt-cacher; they just need to have their list of package sources modified so that they send their package requests to the cache server.
The list of package sources is stored in a file called /etc/apt/sources.list (see "Modify the List of Package Repositories" [Hack #60] for information on modifying this file). Here is an HTTP entry for the dapper repository:
deb http://archive.ubuntu.com/ubuntu/ dapper main restricted
Each HTTP entry needs to have the address of your cache server prepended, so the previous entry becomes something like this:
deb http://cache.example.com/apt-cacher/archive.ubuntu.com/ubuntu/ dapper
![]()
main restricted
Once you've modified all your entries, run:
$ apt-get update
to tell your machine to update its package list, and you're set. Any packages you install from now on will come via the cache server.
Configuration Options
At this point, you've created a working installation of Apt-cacher without touching a single config setting on the cache server. However, Apt-cacher has a number of options you can set by editing the file /etc/apt-cacher/apt-cacher.conf. You don't need to restart anything after editing this file; all changes are immediate.
The config file is very well commented, so for all the details, just read the file itself. Options include the ability to restrict use of your cache to specific IPv4 or IPv6 address ranges, restrict access to only approved software repositories, and pass requests through an upstream proxy server.
Traffic Reports
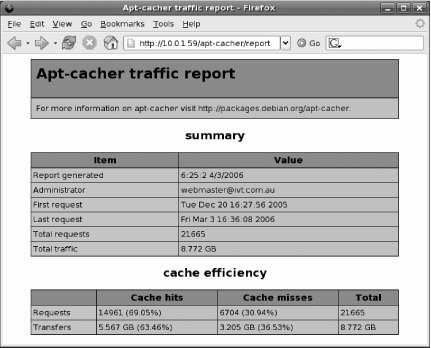
Apt-cacher can be configured to generate daily traffic reports. Generating reports is extremely fast even with a high-traffic cache and happens only once per day, so this option can safely be turned on without any impact on performance. To access the report, just point your browser at http://<cache.example.com>/apt-cacher/report, and you should see something like Figure 6-10.
Figure 6-10. Apt-cacher traffic report
The actual report is generated by a script at /usr/share/apt-cacher/apt-cacher-report.pl, which is run by cron and writes an HTML report to /var/log/apt-cacher/report.html.
Hacking the Hack
What if you want the report emailed to you each day? Because the report is in HTML format, it will need to be sent as an attachment. To do so, you can use the extremely versatile Mutt mail client. First, install the mutt package:
$ sudo apt-get install mutt
Then, edit /etc/cron.daily/apt-cacher and add the following line to the end:
echo "Apt-cacher report \Qdate\Q" | mutt -a \\
/var/log/apt-cacher/report.html -s "Apt-cacher report" user@example.com
(Be sure to replace user@example.com with your email address.) Run this whole command manually just to check that it works and to force Mutt to create a mail directory for the user if it doesn't already exist. From now on, you'll receive daily updates on the efficiency of your Apt-cache.
![]()
Hack 62. Create an Ubuntu Package
![]()
![]()
Package your software for easy installation on Ubuntu.
Ubuntu is built on Debian and uses the .deb package format to ensure that all software is installed in a consistent way. If you want to make your software really easy to install on Ubuntu, you need to know how to put it into a Debian package.
There is a large variety of helper tools and build suites to assist with creating Debian packages, and just about as many approaches to streamlining package creation as there are package maintainers. To fully understand how Debian packages work, start by exploring the Debian New Maintainers Guide (http://www.debian.org/doc/maint-guide), Debian Policy Manual (http://www.debian.org/doc/debian-policy), and Debian Developers Reference (http://www.debian.org/doc/manuals/developers-reference), which, between them, run to many hundreds of pages of detailed information.
This hack is a quick-and-dirty introduction to show you how to build a basic binary package as quickly as possible. It assumes that the program you want to package is in a source tarball named myprogram-version.tar.gz and can be installed with a simple procedure [Hack #59] such as:
$ ./configure
$ make
$ sudo make install
The procedure for packaging libraries and other types of software can be more involved, so consult the Debian references mentioned earlier for more information.
Start by installing some of the developer tools:
$ sudo apt-get install fakeroot debhelper build-essential \\
lintian dh-make devscripts
Create a directory to work in so all your files stay neat:
$ mkdir
myprogram
Copy the source tarball into the myprogram directory and extract it (the directory that this process creates must have a version number in it, as in myprogram-1.0):
$ tar zxf
myprogram-1.0.tar.gz
Create Package Files
You now have both a tarball and an extracted copy of the source code. Go into the extracted source code directory and run dh_make to set up sample files for you:
$ cd
myprogram-1.0
$ dh_make -e
user@example.com
-f
../myprogram-1.0.tar.gz
dh_make will ask you what sort of package you want to create. In this case, it's a single binary package, so select that option (s, not b). dh_make will then create a debian directory containing all the files necessary to build the package, and the email address you provided will automatically be inserted into the package changelog. Now go into the newly created debian directory and customize some of the files as necessary, but don't run dh_make again: it needs to run only when the package is first set up, and running it again in an already configured package will almost certainly break it. Here are the files you may want to change:
control
The control file contains meta information about the package. Most of the fields in the file should be self-explanatory, so change any entries as necessary and put in short and long descriptions for the package. Note that any blank lines in the long description need to contain a single period.
rules
The rules file is a makefile that is executed at package build time to compile the package source into a binary. The file will have been automatically configured by dh_make to suit a typical build process, but if your package requires any unusual steps to be performed, you may need to edit the appropriate section of the rules file.
preinst
postinst
prerm
postrm
Because package installation and removal can sometimes require arbitrary commands to be run, the Debian package format provides support for four optional scripts that are run before and after installation, and before and after removal. If you want to use any of them, rename the appropriate .ex file to remove the extension and edit the file to add commands you want to execute.
Build the Package
Now that the package source directory has been set up, you can build the actual package. This needs to be done from inside the extracted source directory, so if you are still inside the debian directory after customizing the package scripts, you need to cd .. to back up one level, then run dpkg-buildpackage:
$ dpkg-buildpackage -b -uc -rfakeroot
The -b option specifies that only a binary package should be built. If you also want to build a source package, leave off that option. The -uc option specifies that the changes file in the package should not be GPG-signed, so if you have a GPG key and want to sign the package, you can leave off that option as well. The -rfakeroot option specifies that fakeroot should be used to create the temporary build environment.
Once that process has finished, you will have a couple of new files outside your source directory, including a package named myprogram-1.0_i386.deb or similar. Before going any further, you can use a program called lintian to run some automatic checks on the package to make sure there are no obvious mistakes. lintian performs hundreds of checks to make sure the package complies with the official Debian policy and packaging guidelines, so even though it may generate warnings that you don't care about for packages you create for personal use, it's still a great way to check that you haven't missed any important steps.
Run lintian with the path to the changes file that was created along with your new package:
$ lintian
myprogram_1.0.1_i386.changes
You can now use the instructions in "Install and Remove Standalone .deb Files" [Hack #57] to install and test your new package, and even "Create Your Own Package Repository" [Hack #65] if you want to publish it for the world to use.
Update the Package
When the software itself is released as a new version, you need to build a new package to suit. Start by copying the new source tarball into your working directory alongside the original version, and then extract it. You should now have two source directories and two tarballs. Copy your customized debian directory from the old source directory to the new one:
$ cp -a
myprogram-1.0
/debian
myprogram-1.1/
Then enter the new source directory and increment the Debian changelog:
$ cd
myprogram-1.1
$ dch -i
The dch -i command will throw you into an editor and automatically place a new entry at the top of the package changelog; it will also auto-complete your name and email address as well as increment the version number. If the new version number is not correct, just edit it to suit the new upstream version number, write a brief explanation for the new release, and save and exit the editor.
Now rerun the command to build the package:
$ dpkg-buildpackage -b -uc -rfakeroot
![]()
Hack 63. Compile a Source Package
![]()
![]()
Rebuild packages with custom options to suit your architecture, environment, or whims.
Software is generally installed on Ubuntu using binary packages that contain a precompiled copy of the program (the binary), but sometimes it can be useful to recompile the program yourself using custom options. To make that process easier, all official Ubuntu packages are also available in source form, and tools are provided to enable you to build your own custom binary package from the source package.
To compile a source package, take the following steps.
Enable Source Repositories
Each official binary-package repository in your /etc/apt/sources.list has a matching source-package repository that has the exact same address but a deb-src prefix instead of deb:
deb http://archive.ubuntu.com/ubuntu dapper main restricted
deb-src http://archive.ubuntu.com/ubuntu dapper main restricted
You can "Modify the List of Package Repositories" [Hack #60] if you don't already have source repositories enabled.
Install Package Build Tools
Install the basic tools required for building binary packages:
$ sudo apt-get install devscripts build-essential fakeroot
Install Build Dependencies and Fetch the Source
Packages have varying build requirements that are defined in the package header. For example, rebuilding a package for a PHP module requires that you have the PHP headers installed on your system so they can be linked when the module is compiled. The package system can take care of fetching all the build dependencies for you automatically:
$ sudo apt-get build-dep
packagename
For example, this command fetches dependencies for the php4-apd module:
$ sudo apt-get build-dep php4-apd
Next, fetch the source package you want to rebuild. Note that, unlike almost every other use of apt-get, you do not need to run this with root privileges because it doesn't actually install the package; all it does is download the source package and place it in your current directory. To keep things neat, you may want to create a directory in which to do the build and change into it before fetching the source:
$ mkdir php4-apd
$ cd php4-apd
$ apt-get source php4-apd
This will place a number of files in your current location, including a directory containing a fully extracted copy of the package:
jon@jon:~/php4-apd$ ls -l
drwxr-xr-x 6 jon jon 4096 2005-11-30 14:43 php4-apd-0.4p2
-rw-r--r-- 1 jon jon 532 2005-12-02 04:25 php4-apd_0.4p2-6.dsc
-rw-r--r-- 1 jon jon 368800 2005-12-02 04:25 php4-apd_0.4p2-6.tar.gz
Apply Changes
Enter the extracted package directory:
$ cd php4-apd-0.4p2
Any necessary changes can now be made to the extracted copy of the package, but note that the build process will be controlled by a special makefile in debian/rules rather than any makefiles provided with the original program. If you need to make changes to the configure or build flags, you should apply them by editing debian/rules.
Build Binary Package
If you are not listed as the package maintainer in debian/control and debian/changelog, you will need to pass in flags to tell debuild not to sign the new package:
$ debuild -us -uc -b
The -us and -uc flags signify unsigned source and unsigned changes files, and the -b flag signifies to build only a binary package.
You will now have a number of new files in your working directory, including a .deb binary package file built with your custom options applied. You can use dpkg to install and remove standalone packages [Hack #57] and make sure it works as intended, and even set up a package repository [Hack #65] if you want to distribute your custom package to the world.
Hack 64. Convert Non-Ubuntu Packages
![]()
![]()
Packages created for other Linux distributions can be installed on your Ubuntu system with a little TLC.
Various Linux distributions use their own packaging schemes, and although there are a huge number of packages available directly within Ubuntu, there may be times you come across software that's available only in a package for Red Hat or some other distro, only in source code form, or only as a Debian package that has been built against a different version of the toolchain.
If the software is available only as a tarball, you can create a package [Hack #62] and install it directly. If the software is available as a Debian package but hasn't been compiled specifically for Ubuntu (perhaps it's only in Debian Experimental, for example), you can fetch the source package and then use the standard package tools to compile a source package [Hack #63]. And if the software is provided in an alternative package format altogether, such as an RPM, you can use Alien to convert it into the correct format.
Convert Packages with Alien
Alien is a utility that understands a number of package formatsincluding RPM (Red Hat Package Manager), LSB (Linux Standards Base), SLP (Stampede), Slackware, PKG (Solaris), and DEB (Debian package, used by Ubuntu)and can convert from one to another.
Start by downloading the package you need to convert. Then install Alien:
$ sudo apt-get install alien
Now you can feed it your package to convert:
$ alien -c
myprogram-1.0.1-1.i386.rpm
The -c flag tells Alien to also convert any installation or removal scripts that it finds in the original package.
Once Alien has finished, you will have an equivalent .deb package; use the instructions in "Install and Remove Standalone .deb Files" [Hack #57] to install it and check that it works. If things didn't go quite as planned, however, read on.
Solve Package-Conversion Problems
Software packages can be remarkably complex and contain scripts that perform specific setup routines when the package is installed, upgraded, or removed. These scripts may contain references to programs that are located in different places on different distributions, and this is almost impossible to convert totally automatically, so you have to understand that Alien performs conversions on a "best effort" basis. If the original package relies on another program already existing on your system, the installation may fail in strange and obscure ways that are hard to track down.
If the package appeared to install properly but doesn't seem to work, the first step to debugging the problem is to use dpkg to find where the various files were put on disk:
$ dpkg -L
myprogram
Doing so may uncover obvious problems immediately, such as a program binary being installed in an unusual location such as /usr/local/bin instead of the more usual /usr/bin.
If that doesn't help, you can try running Alien again, but this time add the -g flag that tells it to just extract the original package instead of converting it:
$ alien -cg
myprogram-1.0.1-1.i386.rpm
This will open up the package into its individual parts, allowing you to look inside and examine any scripts used to install the software, as well as examine the directory structure that will be used when the package is installed. Editing the installation script to suit your environment and then running it by hand may be enough to get the package working.
Convert Ubuntu Packages to Other Formats
The default behavior for Alien is to convert any package passed to it into a .deb package. That suits Ubuntu systems just fine, of course, but you can also use Alien to convert .debpackages to other formats, or to convert between formats. For example, to convert an Ubuntu package to RPM for installation on a Red Hat machine, run:
$ alien -c --to-rpm
myprogram_1.0.1_i386.deb
![]()
Hack 65. Create Your Own Package Repository
![]()
![]()
Create and manage a package repository for distributing your own Ubuntu packages.
Ubuntu uses online package repositories to locate available software and then download it to your computer for installation. If you create your own Ubuntu packages, you can install them directly using dpkg [Hack #57], but that's not very convenient when you want to make your packages publicly available or install them on a large number of computers. The solution is to build your own package repository, just like the ones used to distribute the official Ubuntu packages, and populate it with your own custom packages. Once your packages have been published in a repository, anyone can then use it to install your packages using any of the standard package-management tools such as apt, Synaptic, or Adept. All they need to do is add the address of your repository to their system [Hack #60].
This also makes it much easier for users of your software to stay up-to-date because their system will be able to automatically detect new versions of your packages and ask them if they want to update.
Anatomy of a Repository
An Ubuntu package repository is actually quite simple. In its simplest form, it can be just a number of packages placed on a web or FTP server along with a special Packages.gz file that describes them. Each package is a self-contained .deb file that can be downloaded and installed on a computer, while the Packages file acts as a directory for the packages in that particular repository and includes information about each package such as the name, description, version, dependencies, name of the maintainer, and location of the actual package files. By fetching the Packages files from various repositories, Ubuntu can provide the user with a list of available packages and their descriptions, and determine dependencies without having to download each package individually. For a small repository, the .deb and Packages files are pretty much all you need to provide, and setting up everything is quite simple.
Larger repositories often include additional files and are structured differently to make them more efficient. For example, some larger repositories place packages into subdirectories named after the first letter of the package name, rather than just lumping them all in the same directory: audacity and aumix go into an a/ subdirectory, blam goes into b/, and so on. That way no single directory contains too many files, and the performance of the server's filesystem doesn't become a bottleneck. That's not generally a problem until you have many thousands of packages, though, so unless you're setting up an extremely large repository, it's not something you should have to worry about.
Some large repositories also implement package pools. Pools are a way to save disk space and processor time when you have multiple repositories that share some of the same packages. This is the case with the official Debian repositories, for example, where some packages can exist in exactly the same version in two or more of the Experimental, Unstable, Testing, and Stable repositories at the same time. Pools allow all packages in all versions to be stored in the same big directory structure on the server, and each repository then acts as a sort of virtual index that lists or links to only the packages that are intended to be available in it. The Packages file for each of the repositories therefore references just a subset of the packages in the total package pool.
Getting Started
To create your own repository, first you need to create the software packages themselves (see "Create an Ubuntu Package" [Hack #62], "Compile a Source Package" [Hack #63], and "Convert Non-Ubuntu Packages" [Hack #64]). Install the packages manually on your local system and make sure they function correctly before you try publishing them in a repository.
You will also need some web-hosting space on either a server that you run or web space provided by a hosting company. In any case, the repository needs to have a consistent address so that other computers know where to find it. You could just use the server's IP address, but ideally it should have a hostname set up properly in DNS.
The main trick to maintaining a repository is generating the Packages file properly, and there are a number of tools to help you do so simply and consistently. The tool you'll use for this hack is apt-ftparchive, a simple program that you can run whenever you want to update your repository. It's best suited to manually maintaining a small-to-medium number of packages in a simple repository. Other tools you can consider include mini-dinstall, which runs as a daemon and automatically handles new packages as they are uploaded to a special incoming directory, and dpkg-scanpackages, which is run manually. The granddaddy of all repository managers is dinstall itself, which is designed to run very large repositories, such as the official Debian package servers, with tens of thousands of packages.
apt-ftparchive is part of the apt-utils package, so the very first thing to do is install apt-utils:
$ sudo apt-get install apt-utils
Next, you need to create a directory inside your web server's document root to store the packages. You could just create a single directory and put everything in there, but for future flexibility, it's a good idea to also create a subdirectory to allow you to have subsets of packages. This is typically used to publish packages built against different releases, such as different versions of the same package for Dapper and Breezy. In this example, you'll create a subdirectory for Dapper packages, but you can name it something else if you prefer. The repository should be in your web server's document root, so if your document root is /var/www (the standard location in Ubuntu), you could just run:
# mkdir -p /var/www/ubuntu/dapper
Now copy the .deb packages you want to serve into that directory. At this point, you should be able to access the packages by pointing a web browser at http://localhost/ubuntu/dapper/<your_package>.deb.
Finally, open a shell and move into the ubuntu directory to execute apt-ftparchive and then compress the resulting Packages file:
# cd /var/www/ubuntu
# apt-ftparchive packages dapper > dapper/Packages
# gzip dapper/Packages
The packages argument tells apt-ftparchive to process packages it finds; dapper is the path to search, which in this case is the dapper subdirectory; and > dapper/Packages redirects the output into a file called Packages, which is then compressed to make it download faster. Easy!
At this point, you have a repository that you can access from other computers to install the packages you've just published, but first you need to tell them how to find it by adding a line to their /etc/apt/sources.list file. The entry should look something like:
deb http://www.example.com/ubuntu dapper/
where www.example.com is replaced by the actual address of your package server.
Then run apt-get update, and you should see your repository being indexed along with the normal Ubuntu repositories, after which you can apt-cache search for your packages, and they should be reported as being available. With a simple apt-get install packagename, you can install any of the packages you've published.
Update the Repository
Created a new or updated package? No problem. Just copy it into the repository alongside the other packages and follow the steps described earlier to rerun apt-ftparchive and generate a new Packages file. Because updated packages have different filenames, you'll need to manually delete superseded packages prior to rerunning apt-ftparchive; otherwise, your repository will just keep getting bigger.
Manage a Repository Without Shell Access
While it's simplest to create your repository directly on the web server, it's certainly not essential. If you have access to web space by FTP but can't get shell access to the server, you can create a repository on your local computer following the instructions in this hack and then just use FTP to upload all the directories and files to the correct location on the server. Then, when you do an update to any of the packages in the repository, just rerun apt-ftparchive locally and then bring the copy on your web server up-to-date again by FTP.
![]()
Hack 66. Convert Debian to Ubuntu
![]()
![]()
Convert an existing Debian installation to Ubuntu without reinstalling from scratch.
While the usual approach to switching Linux distributions is to erase your disk and reinstall from scratch, Ubuntu is based on Debian, so it's possible to switch directly from one to the otherprovided you're willing to spend time tweaking and fixing obscure problems. It's even possible to have your computer track both Debian and Ubuntu simultaneously and install packages from one or the other at will.
Perform the Conversion
The naive solution to converting an existing Debian system to Ubuntu is to just edit your /etc/apt/sources.list to switch all the Debian archive references to the equivalent Ubuntu archives and then upgrade all packages. That's a good start, but unfortunately it will most likely leave you with a fairly broken system because many of the libraries in Debian will have newer versions than their equivalents in Ubuntu, so it's necessary to do a bit more work to end up with a usable system.
Edit your /etc/apt/sources.list to comment out all the Debian archives and add entries for the Ubuntu archives. If you need to generate an Ubuntu sources.list file, you can use the "source-o-matic" tool available online at http://www.ubuntulinux.nl/source-o-matic, or you can just put in some basic entries as a starting point:
deb http://archive.ubuntu.com/ubuntu dapper main restricted
deb http://security.ubuntu.com/ubuntu dapper-security main restricted
Then update the package list and install sudo if you don't already have it installed:
# apt-get update
# apt-get install sudo
Since Ubuntu relies so much on the primary user having sudo privileges, it's also a good idea to edit your /etc/sudoers by running visudo and adding a line like this:
%admin ALL=(ALL) ALL
Then place your primary user into the admin group, replacing username with your actual username:
# usermod
username
-g admin
As a first step to getting all the installed packages in order, you can manually force a reinstall of every package on your system to the specific version available in Ubuntu, but since a typical Debian system has over a thousand packages installed, that can be rather tedious. You can save yourself some time by writing a little script like this:
#!/bin/sh
for name in \Qdpkg --get-selections | grep '[[:space:]]install$' \\
| awk '{print $1}'\Q
do
sudo apt-get install --assume-yes ${name}=\Qapt-cache show $name \\
| grep '^Version' | awk '{print $2}'\Q
done
It's highly likely that some packages you have previously installed from the Debian archives won't "cross-grade" cleanly to the version available in Ubuntu, and you may have to manually uninstall some packages to allow the process to complete. Depending on how your system is set up, you may need to do a lot of poking and prodding to get to the point where:
$ sudo apt-get update
$ sudo apt-get dist-upgrade
can execute cleanly.
Once you have your existing packages converted to the Ubuntu versions, it's time to pull in the core Ubuntu packages:
$ sudo apt-get install ubuntu-standard ubuntu-desktop
The result won't be perfect, but you should then have a system that is a reasonable approximation of a full Ubuntu install.
Mix Ubuntu and Debian
If you want to be able to install packages from either Debian or Ubuntu at will, you can make use of a package-management feature called pinning, which is designed to allow you to lock packages to specific versions while other packages are upgraded.
Start by adding some basic Debian archive entries to /etc/apt/sources.list:
deb http://ftp.us.debian.org/debian sarge main non-free contrib
deb http://non-us.debian.org/debian-non-US sarge/non-US main contrib non-free
If you don't have one already, create a file called /etc/apt/preferences and put in these entries:
Package: *
Pin: release a=dapper
Pin-Priority: 700
Package: *
Pin: release a=sarge
Pin-Priority: 600
What this does is give the packages in Dapper a higher priority than the packages in Sarge, so if you apt-get install foo a package, the system will try to install the Dapper version of a package if it's available and fall back to using Debian packages if necessary. In reality, the algorithm for determining package priority is rather more complex than a simple priority, and to fully understand it, you should read the apt_preferences manpage (man apt_preferences).
Because apt in Ubuntu uses a new security infrastructure to check package signatures, you will also need to install the Debian archive key, or your system will complain every time it tries to install a package from the Debian archives. The Debian archive keys are replaced every year but are located at an address like http://ftp-master.debian.org/ziyi_key_<year>.asc, where <year> is the current year. Use wget to retrieve the current key, import it into your GPG keyring, and then check the fingerprint:
$ wget http://ftp-master.debian.org/ziyi_key_2006.asc
$ gpg --import ziyi_key_2006.asc
gpg: key 2D230C5F: public key "Debian Archive Automatic Signing Key (2006) <ftpmaster@debian.org>" imported
gpg: Total number processed: 1
gpg: imported: 1
$ gpg --fingerprint 2D230C5F
pub 1024D/2D230C5F 2006-01-03 [expires: 2007-02-07]
Key fingerprint = 0847 50FC 01A6 D388 A643 D869 0109 0831 2D23 0C5F
uid Debian Archive Automatic Signing Key (2006) <ftpmaster@debian.org>
If you want to be really careful, you can then use this fingerprint to prove the authenticity of the key via Debian's web of trust.
Now install the key into apt so that it will trust packages signed by it:
$ gpg --armor --export 2D230C5F | sudo apt-key add -
You're now ready to install packages from either Ubuntu or Debian. Any packages you want to specifically pull from the Debian archive can be accessed by adding a -t (target release) flag to apt:
$ sudo apt-get install -t sarge
myprogram
All materials on the site are licensed Creative Commons Attribution-Sharealike 3.0 Unported CC BY-SA 3.0 & GNU Free Documentation License (GFDL)
If you are the copyright holder of any material contained on our site and intend to remove it, please contact our site administrator for approval.
© 2016-2026 All site design rights belong to S.Y.A.