Ubuntu: Questions and Answers (2014)
Software Installation
Questions
Q: How do I install Adobe Flash player?
Tags: software-installation (Next Q)
I have had significant problems with watching flash video in 64-bit Ubuntu. Does anyone know of a good way to get flash running on the platform?
Tags: software-installation (Next Q)
User: steven-oxley
Answer by nathan-osman
For 11.04 and earlier:
Are you installing it from the Ubuntu Software Center?
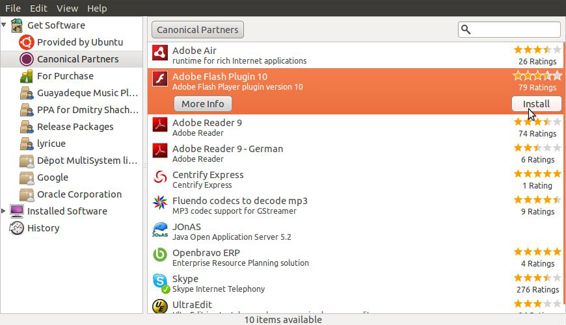
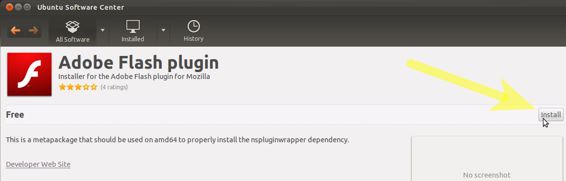
1. Go to Applications->Ubuntu Software Center.
2. Click on Canonical Partners
3. Click the Adobe Flash Plugin 11 and click install.
Note: this is the method I use on my 64-bit Ubuntu install and it has yet to fail me.
Answer by fossfreedom
For 11.10 and later
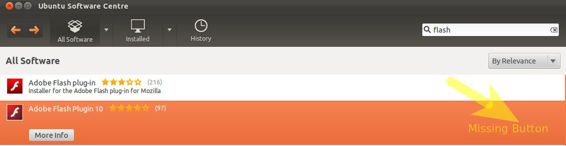
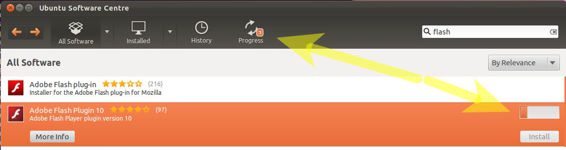
Start Software Center from the Launcher and search for flash
Two entries will be found. The first is the wrapper around the 32bit flash version from Adobe. The second is the 64bit flash version.
Select the second flash entry - if the following picture is seen then you have not already enabled the Canonical Partner Repository previously.
Click More Info
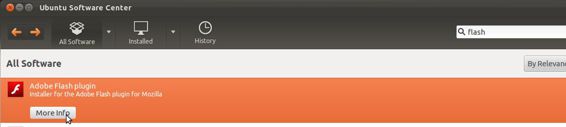
... and click Use this source to enable the Canonical Partner Repository
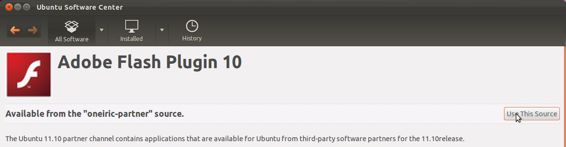
see the end of this answer for the bug-report
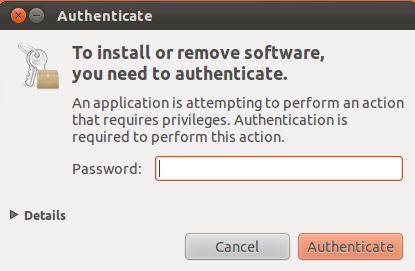
Click Install
Click the Install button and enter your password when prompted. Note - you must have permission to install software.
The installation will proceed:
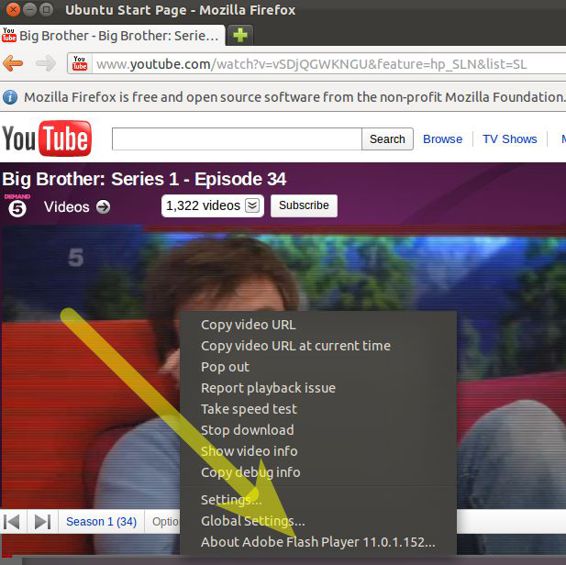
Once complete - launch Firefox and browse to your Flash Video. Right click and confirm that the latest version of Flash has been installed correctly.
Note - pictures subject to change - the 64bit version has only been recently packaged in the last week before Oneiric release - One issue currently exists:
1. https://bugs.launchpad.net/ubuntu/+source/flashplugin-nonfree/+bug/870835
In the interim - either use the first "Multiverse" 32bit plugin in the pictures above or use adobe-flashplugin
sudo apt-get install adobe-flashplugin
Answer by ignite
This is how to install Adobe Flash Plugin for Firefox:
1. Go to this page and select the option .tar.gz for other Linux. Download the file.
2. Unpack the plugin tar.gz and copy the files to the appropriate location.
3. Save the plugin tar.gz locally and note the location the file was saved to.
4. Launch terminal and change directories to the location the file was saved to.
5. Unpack the tar.gz file. Once unpacked you will see the following:
o libflashplayer.so
o /usr
6. Identify the location of the browser plugins directory, based on your Linux distribution and Firefox version.(Usually it is /usr/lib/mozilla/plugins/)
7. Copy libflashplayer.so to the appropriate browser plugins directory. At the prompt type:
8. sudo cp libflashplayer.so <BrowserPluginsLocation>
8. Copy the Flash Player Local Settings configurations files to the /usr directory. At the prompt type:
9. sudo cp -r usr/* /usr
9. Now restart your browser.
Tags: software-installation (Next Q)
Q: What's the easiest way to set up a LAMP stack?
Tags: software-installation (Next Q), php (Next Q), apache2 (Next Q)
I set up a new VPS instance of Ubuntu and am wondering what the easiest way is to get up and running with a basic LAMP stack (i.e. which packages are required, which configuration options need to be tweaked, if any, etc.).
Tags: software-installation (Next Q), php (Next Q), apache2 (Next Q)
User: jerhinesmith
Answer by andol
sudo apt-get install tasksel
sudo tasksel install lamp-server
It will install all the basic LAMP stack for you, prompt for MySQL root password, etc.
More specifically it will install the following packages, and their dependencies.
mysql-client-core-5.1 libwrap0 apache2
libaprutil1-dbd-sqlite3 tcpd
libapache2-mod-php5 apache2.2-common
apache2-utils php5-common
libaprutil1-ldap libaprutil1
php5-mysql mysql-server-core-5.1
libdbi-perl libplrpc-perl mysql-server
apache2.2-bin libdbd-mysql-perl
libhtml-template-perl
libnet-daemon-perl libapr1
mysql-server-5.1 libmysqlclient16
ssl-cert apache2-mpm-prefork
mysql-common mysql-client-5.1
You might also want to take a peek at the Ubuntu Server Guide.
Tags: software-installation (Next Q), php (Next Q), apache2 (Next Q)
Q: What is the best place to install user apps?
Tags: software-installation (Next Q)
Occasionally I am installing application with something other than apt-get or the Package Manager.
What is the "best practice" location for installing user apps? (/usr/bin/, /usr/local/bin/, /opt/, etc)
Tags: software-installation (Next Q)
User: citadelgrad
Answer by umang
That depends, really. If the application has a makefile, (for python apps) uses distutils (has a setup.py file) or a similar build/install system, put it into /usr/local/ (default behavior).
If you just need to extract a tarball and run directly (e.g. Thunderbird, Firefox) then put it into /opt/.
Why? From what I understand, /usr/local/ has a hierarchy that is similar to /usr/. So a program expecting to get "installed" into /usr/ should work fine in /usr/local/. A program that just needs one directory and will get all files/libraries relative to that directory can get one directory for itself in /opt/.
Answer by popey
The Linux Filesystem Hierarchy Standard indicates /usr/local
http://tldp.org/LDP/Linux-Filesystem-Hierarchy/html/usr.html
"The original idea behind '/usr/local' was to have a separate ('local') '/usr' directory on every machine besides '/usr', which might be just mounted read-only from somewhere else. It copies the structure of '/usr'. These days, '/usr/local' is widely regarded as a good place in which to keep self-compiled or third-party programs. The /usr/local hierarchy is for use by the system administrator when installing software locally. It needs to be safe from being overwritten when the system software is updated. It may be used for programs and data that are shareable amongst a group of hosts, but not found in /usr. Locally installed software must be placed within /usr/local rather than /usr unless it is being installed to replace or upgrade software in /usr."
Answer by source-lab
Install unstable programs like firefox devel in /home/user/opt/ makes it a lot easier to remove, and no confusion for other users as to what version they should use... So if it is not a program for global use, install it in a subfolder in your home directory.
Never install programs in /usr/, it is likely to cause chaos, things installed in /usr/ is meant to be for distribution packages only. /usr/local/ is for packages locally compiled. And the srtucture works in exactly the same way! files in /usr/local/ will be prioritized over files in /usr/
/opt/ should be used for installation of pre-compiled (binary) packages (Thunderbird, Eclipse, Netbeans, IBM NetSphere, etc) and the like. But if they are only for a single user they should be put in your home directory.
If you want to be able to run a program installed in a "weird" location (like /home/user/opt/firefox/) without typing the whole path you need to add it to your $PATH variable, you can do this be adding a line like this in your /home/user/.profile
export PATH=/home/user/opt/firefox:$PATH
The folder name should be the one where the executable file you need to run is located.
Tags: software-installation (Next Q)
Q: How do I install the latest stable version of Firefox?
Tags: software-installation (Next Q)
I want to install the latest Firefox on my Ubuntu (64bit) box.
What is the best way to do this? Is there a specific update site or should I download the binaries manually? If doing manually, in which directory should I put the files? In my home directory, or is there a better place?
Tags: software-installation (Next Q)
User: danimajo
Answer by peter-smit
The latest version of Firefox is available for as a security updates in all supported releases of Ubuntu, just doing a normal update will pull it in.
Usually it's available within a few hours of Mozilla's announcement, sometimes faster, depending on the archive builders, and the speed of your local mirror, etc.
See also:
· Firefox New Version - Community Help Wiki
· How to install the latest stable version of Thunderbird?
Tags: software-installation (Next Q)
Q: How can I accept the Microsoft EULA agreement for ttf-mscorefonts-installer?
Tags: software-installation (Next Q), apt (Next Q)
After a recent update, ttf-mscorefonts-installer prompted me to accept its license agreement.
For some reason my terminal will not allow me to accept, or for some reason I am pressing the wrong hotkey... I've tried every letter on the keyboard and Enter among others... I'm sure there is a very simple and obvious solution to this.
I've also just tried to remove the package completely however the terminal states that due to the package not being correctly installed, I should reinstall the package before removing it. Very frustrating! Essentially, because I cannot successfully install this package, I can't really ever upgrade my system because I always have to end up terminating the terminal with the license agreement (thus the upgrade fails).
Tags: software-installation (Next Q), apt (Next Q)
User: magic
Answer by stefano-palazzo
It's TAB , then return .
:-)
In general, to navigate ncurses-style menus:
· Use the Tab key to move from one element (e.g., button, text box) to the next. Use Shift+Tab to move in reverse.
· Use Spacebar to "click" the selected button.
· Use Enter to click the default button (or currently selected button, if there is no default).
· You can move up and down in a textbox with the arrow keys, and with Page Up and Page Down. If that doesn't work, press Tab until the text box you want to navigate in is selected.
If you've accidentally said you don't agree to the EULA, and you want a chance to review it again and agree, you can reinstall ttf-mscorefonts-installer, purging its global configuration files:
sudo apt-get --purge --reinstall install ttf-mscorefonts-installer
Answer by uzhoasit
Normal install
To install completely silent you can use the --quiet parameter:
sudo apt-get install ttf-mscorefonts-installer --quiet
When deploying or in scripts
Use debconf to preset the selection:
echo ttf-mscorefonts-installer msttcorefonts/accepted-mscorefonts-eula select true | debconf-set-selections
Note: In connection with sudo you have to use
echo ttf-mscorefonts-installer msttcorefonts/accepted-mscorefonts-eula select true | sudo debconf-set-selections
With Kickstart
Add this to your Kickstart.cfg file:
preseed --owner ttf-mscorefonts-installer msttcorefonts/accepted-mscorefonts-eula boolean true
Answer by casey-watson
You can also accept the license with a single command like this:
echo ttf-mscorefonts-installer msttcorefonts/accepted-mscorefonts-eula select true | debconf-set-selections
This will avoid creating the conf file.
If your using puppet, here is a recipe for installing the package:
class unifocus-context::msfonts {
exec { "accept-msttcorefonts-license":
command => "/bin/sh -c \"echo ttf-mscorefonts-installer msttcorefonts/accepted- mscorefonts-eula select true | debconf-set-selections\""
}
package { "msttcorefonts":
ensure => installed,
require => Exec['accept-msttcorefonts-license']
}
}
Tags: software-installation (Next Q), apt (Next Q)
Q: How do I install and use the latest version of GNOME?
Tags: software-installation (Next Q), gnome (Next Q)
I followed the instructions for compiling GNOME Shell and it did compile with a few errors here and there but it didn't run. I installed GNOME Shell using sudo apt-get install gnome-shell but I got version 2.31.x, while the latest is 2.91.5 or something. So is there a way for me to install the latest build?
Is there some repository available for the latest build?
Tags: software-installation (Next Q), gnome (Next Q)
User: martin-zeltin
Answer by jon
Installing from the Software Center (11.10 and newer)
Open the software center search for "gnome shell" and install it, or just click this button:

After it installs, log out.
· For 11.10
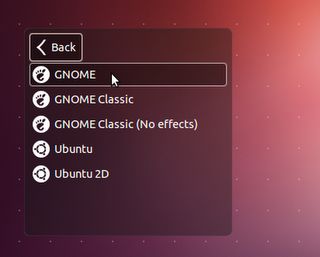
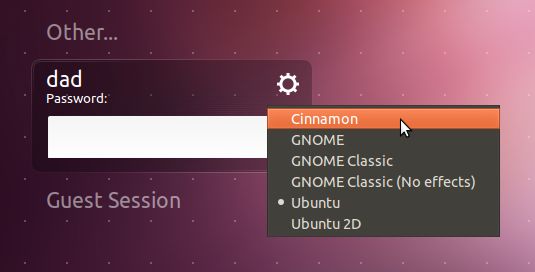
at the login screen click the little gear icon and select "GNOME" from the menu.
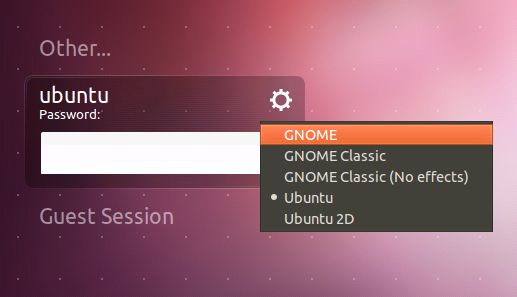
· For 12.04 and 12.10
At the login screen click the icon show and select "GNOME" from the menu.
After that just put in your password and login:
The login manager will remember the last session you went into so you only need to select GNOME once, after that you can just login normally.
Customizing it further
You can also use the fallback mode if you prefer an old-school experience:
· How to revert to GNOME Classic?
And if you use auto logins you might need to tell lightdm to always use shell:
· How can I use gnome shell by default instead of unity?
Other Goodies to install with it
· gnome-documents
· gnome-boxes
Command Line Instructions:
sudo apt-get install gnome-shell
Where to report problems:
· Discussion about GNOME3 packaging (Mailing list link on the bottom left): https://launchpad.net/~gnome3-team
o Most problems and issues with this set of packages can go on this list, it should be the first place you report problems and issues.
· Bug reports that are NOT packaging related: https://bugzilla.gnome.org/
o If GNOME3 isn't working well it could be packaging related, so please don't just randomly report bugs to GNOME unless you are confident that it's an upstream GNOME problem.
o If you're not sure if you should report the bug upstream then ask someone either on IRC or on the mailing list above if you need help determining if something should be reported to GNOME.
Answer by htorque
Building GNOME Shell from source
(Last content update: 11. Feb. 2011, based on the official guide, feel free to edit.)
0. Warnings/errors during compilation
GNOME Shell is under heavy development and sources are often updated a couple of times a day. While below instructions generally should work, it can happen that successful compilation needs some hacks or is not possible at all.
If you encounter any problems, check:
· the GNOME Shell thread on ubuntuforums.org
· the IRC channel #gnome-shell on irc.gnome.org (keep an eye on the channel's topic!)
· the GNOME Shell mailing list
· there's also a list of common problems
Current problems:
· It's necessary to remove a couple of files in the library directories, else compilation will fail. When doing system updates, those files could return: read this for an explanation why it's necessary to remove those files and how to prevent upgrades to re-install them.
· sudo rm -rf /usr/lib*/*.la
(No worries, this won't harm your system!)
· Before being able to run GNOME Shell, you need to remove a file after the build process:
· rm ~/gnome-shell/install/lib*/gtk-3.0/modules/libcanberra-gtk-module.so
1. Building GNOME Shell
(Tested on Ubuntu 10.10 32-bit and the development version of Ubuntu 11.04 64-bit.)
The following will download, compile, and install GNOME Shell in a sandbox-like way - meaning, it won't touch the rest of your system!
· Install dependencies:
· sudo apt-get install curl dpkg-dev autopoint libedataserverui1.2-dev \
· libecal1.2-dev evolution-data-server-dev libcups2-dev libupower-glib-dev \
· libgnome-keyring-dev libxklavier-dev libvorbis-dev libltdl-dev \
· libgstreamer0.10-dev libcroco3-dev xserver-xephyr xulrunner-dev \
· python-dev libpam0g-dev mesa-utils mesa-common-dev libxml2-dev \
· libreadline5-dev libpulse-dev liborbit2-dev libgl1-mesa-dev libwnck-dev \
· libtiff4-dev libstartup-notification0-dev libpng12-dev libjpeg62-dev \
· libjasper-dev libgtop2-dev libgnome-desktop-dev libgnome-menu-dev \
· libffi-dev libexpat1-dev libdbus-glib-1-dev icon-naming-utils \
· gtk-doc-tools gnome-common git-core gettext flex bison automake cvs
· Get GNOME Shell's setup script:
· curl -O https://git.gnome.org/browse/gnome-shell/plain/tools/build/gnome-shell-build-setup.sh
· Build the build tool jhbuild and download configuration files:
· /bin/bash gnome-shell-build-setup.sh
· This will install jhbuild to ~/bin, which you need to add to your PATH-variable:
· . ~/.profile
· [Optional]: You can change several jhbuild options like the path for downloading sources, etc. via editing the file ~/.jhbuildrc-custom.
· Start the build process:
· jhbuild build
This will (currently) compile 33 modules. Get a cup of coffee, take a nap -> it will take some time.
Once you see *** success *** [33/33] you are done. Congratulations, you've just compiled GNOME Shell!
2. Running GNOME Shell
· If you're running Compiz, you first need to stop it (by starting Metacity) or else GNOME Shell won't start:
· metacity --replace &
· Finally, run:
· cd ~/gnome-shell/source/gnome-shell/src
· ./gnome-shell --replace
That's it, you hopefully should now be running GNOME Shell.
3. Making GNOME Shell the default window manager
In Ubuntu 10.10, you can simply replace the GNOME session's window manager via changing a GConf key:
· Create a local .desktop launcher for GNOME Shell:
· ln -s ~/gnome-shell/install/share/applications/gnome-shell.desktop ~/.local/share/applications/gnome-shell.desktop
· Then change the session's window manager to be GNOME Shell:
· gconftool-2 -s /desktop/gnome/session/required_components/windowmanager "gnome-shell" -t string
· To revert the change, run:
· gconftool-2 -s /desktop/gnome/session/required_components/windowmanager "gnome-wm" -t string
In Ubuntu 11.04, changing the windowmanager key doesn't seem to work. Instead you can add a new session item that you can select at the GDM login screen. Therefor you need to create the local .desktop file like above and then create two files:
1. A session file: /usr/share/gnome-sessions/sessions/gnome-shell.session:
2. [GNOME Session]
3. Name=gnome-shell
4. Required=windowmanager;
5. Required-windowmanager=gnome-shell
6. DefaultApps=gnome-settings-daemon;
2. The session item pointing to the session file: /usr/share/xsessions/gnome-shell.desktop:
3. [Desktop Entry]
4. Name=GNOME Shell
5. Comment=This session logs you into Ubuntu
6. Exec=gnome-session --session=gnome-shell
7. TryExec=gnome-session
8. Icon=
9. Type=Application
10.X-Ubuntu-Gettext-Domain=gnome-session-2.0
Log out, and you should be able to choose GNOME Shell as session.
4. Updating GNOME Shell
· Running
· jhbuild build
should update the sources and rebuild what's necessary.
· If it fails for a module, e.g. you get something like this:
· fatal: git-write-tree: error building trees
· Cannot save the current index state
· *** Error during phase checkout of gdk-pixbuf: ########## Error running git stash save jhbuild-stash *** [7/33]
then you can try to wipe the current module directory and start with clean sources by choosing option 6:
[6] Go to phase "wipe directory and start over"
· If that doesn't help, you can start from scratch by running:
· jhbuild build -afc
Still not compiling? Then check the places mentioned in 0.
Answer by edm
For 12.04 and GNOME 3.4
If you have 12.04, a lot of the 3.4 packages will be installed by default minus a few that will be kept at 3.2 for stability reasons. You can add two gnome testing ppas that contain the additional packages that dont make it into 12.04 however there is a chance these will break your system.
It is highly unlikely that it will be considered "stable" for at least a month, probably more.
sudo add-apt-repository ppa:gnome3-team/gnome3
sudo add-apt-repository ppa:ricotz/testing
Then update your system.
Warning: If you try this on 11.10, it will break a lot of stuff. Really, it will.
If you are on 11.10, you can still use these ppas but you should expect lots of breakages. At your own risk, add those ppas, then:
sudo apt-get update && sudo apt-get dist-upgrade
sudo apt-get install gnome-shell
Tags: software-installation (Next Q), gnome (Next Q)
Q: How do I install a .tar.gz (or .tar.bz2) file?
Tags: software-installation (Next Q)
I have downloaded tar.gz files. But I don't know how to install it. How do I install this kind of file?
Tags: software-installation (Next Q)
User: silambarasan
Answer by andrea-lazzarotto
The first thing you need to do is extracting it in a folder, let's make it your desktop. You can extract an archive right clicking on it and choosing the appropriate entry. It should create a new folder with a similar name, e.g. program-1.2.3. Now you need to open your terminal and then go to that directory:
cd /home/yourusername/Desktop/program-1.2.3
Make sure you first read a file called INSTALL or INSTALL.txt or README. Check if there is any of these files with the ls command, and then display the right one with:
xdg-open INSTALL
The file will contain the right indications to go on with the compiling process. Usually the three "classical" steps are:
./configure
make
sudo make install
You may also need to install some dependencies, generally after some configure error which will tell you what you are missing. You can also use checkinstall instead of make install. See here https://help.ubuntu.com/community/CheckInstall
Remember that your mileage may vary.
Answer by lekensteyn
You cannot "install" a .tar.gz file or .tar.bz2 file. .tar.gz files are gzip-compressed tarballs, compressed archives like .zip files. .bz2 files are compressed with bzip2. You can extract .tar.gz files using:
tar xzf file.tar.gz
Similarly you can extract .tar.bz2 files with
tar xjf file.tar.bz2
If you would like to see the files being extracted during unpacking, add v:
tar xzvf file.tar.gz
Even if you have no Internet connection, you can still use Ubuntu's package management system, just download the .deb files from http://packages.ubuntu.com/. Do not forget to download dependencies too.
For an easier way to install packages offline, see the question How can I install software offline?.
Answer by alvar
How you compile a program from a source
1. open a console
2. use the command cd to navigate to the correct folder. If there is a README file with installation instructions, use that instead.
3. extract the files with one of the commands
o If it's tar.gz use tar xvzf PACKAGENAME.tar.gz
o if it's a tar.bz2 use tar xvjf PACKAGENAME.tar.bz2
4. ./configure
5. make
6. sudo make install
Download a package from the software sources or the software center.
If you install a package via the software sources and not downloading the package on your own, you will get new updates to that package and install them via the Update Manager.
You could just install MYPACKAGE by typing in a terminal:
sudo apt-get install MYPACKAGE
or by using the software center and searching for MYPACKAGE. But if it's not there go with the source..
Tags: software-installation (Next Q)
Q: How to install Eclipse?
Tags: software-installation (Next Q), ppa (Next Q), eclipse (Next Q)
I want to install the latest version of Eclipse but the Ubuntu Software Centre contains an older version.
Is there a PPA or some other way to install latest Eclipse? Please describe the steps for full installation.
Tags: software-installation (Next Q), ppa (Next Q), eclipse (Next Q)
User: gaurav-butola
Answer by bitsbuffer
If you've downloaded Eclipse from their official website, follow these steps for the installation.
1. Extract the eclipse.XX.YY.tar.gz using
2. tar -zxvf eclipse.XX.YY.tar.gz
2. Become root and Copy the extracted folder to /opt
3. sudo mv eclipse.XX.YY /opt
3. Create a desktop file and install it:
4. gedit eclipse.desktop
and copy the following to the eclipse.desktop file.
[Desktop Entry]
Name=Eclipse
Type=Application
Exec=env UBUNTU_MENUPROXY=0 eclipse44
Terminal=false
Icon=eclipse
Comment=Integrated Development Environment
NoDisplay=false
Categories=Development;IDE;
Name[en]=Eclipse
then execute the following command to automatically install it in the unity:
desktop-file-install eclipse.desktop
4. Create a symlink in /usr/local/bin using
5. ln -s /opt/eclipse/eclipse /usr/local/bin/eclipse44
5. For eclipse icon to be displayed in dash, eclipse icon can be added as
6. cp /opt/eclipse/icon.xpm /usr/share/pixmaps/eclipse.xpm
6. Give eclipse the required permissions to modify the osgi file.
7. sudo chown -R $USER:$USER /opt/eclipse/configuration/org.eclipse.osgi
That's it.
Answer by hbdgaf
12.04 LTS
The preferred method:
Open Software Center -
In Ubuntu software center select Eclipse
I installed the Extensible Tool Paltform and Java IDE as well, but installing that is optional.
Enter your password in the authentication dialog.
This will get you 3.7.1 inside of a package management system.
Alternative options:
The next most preferred method
PPA:
As of this moment, the eclipse-team PPA has no eclipse package for 12.04.
I'll update the answer as things develop.
When it becomes available, if you already installed via software center-
sudo add-apt-repository ppa:eclipse-team/ppa && sudo apt-get update && sudo apt-get upgrade
The least preferred method
Portable:
For a portable installation you can still download directly from the Eclipse website. This gives you the ability to customize several Eclipse installations for different languages CDT, Java, and PyDev or Aptana for instance. It doesn't allow automatic updates. Installing through Software Center is always the preferred method.
I tested the portable 3.7.1 and 3.7.2 tarballs and they work just fine on 12.04 LTS.
An added disadvantage to portable installs is that you have to update your launcher if you move the folder or launch it directly.
Answer by joe
How to install Eclipse 4.2 on Ubuntu 12.04
Since the Eclipse packages in the Ubuntu repositories are out of date, if we want to install latest releases, we are going to have to do it manually. You can just download the tar.gz file from eclipse.org.
1. Download Eclipse. I got eclipse-jee-juno-SR1-linux-gtk.tar.gz
2. Extract it by executing a command line
3. tar -xzf eclipse-jee-juno-SR1-linux-gtk.tar.gz
Or with Archive Manager extraction.
3. Move extracted eclipse folder to /opt/ folder
4. mv eclipse /opt/
5. sudo chown -R root:root /opt/eclipse
6. sudo chmod -R +r /opt/eclipse
4. Create an eclipse executable in your user path
5. sudo touch /usr/bin/eclipse
6. sudo chmod 755 /usr/bin/eclipse
Create a file named eclipse in /usr/bin/ with your preferred editor (nano, gedit, vi...)
Copy this into it
#!/bin/sh
export ECLIPSE_HOME="/opt/eclipse"
$ECLIPSE_HOME/eclipse $*
And save the file
5. Create a Gnome menu item
Create a file named eclipse.desktop in /usr/share/applications/ with your preferred editor (nano, gedit, vi...)
Copy this into it
[Desktop Entry]
Encoding=UTF-8
Name=Eclipse
Comment=Eclipse IDE
Exec=eclipse
Icon=/opt/eclipse/icon.xpm
Terminal=false
Type=Application
Categories=GNOME;Application;Development;
StartupNotify=true
And save the file
6. Launch Eclipse
/opt/eclipse/eclipse -clean &
7. Now you can Lock Eclipse to the launcher bar by clicking right button on Lock to Laucher
Tags: software-installation (Next Q), ppa (Next Q), eclipse (Next Q)
Q: How do I install the latest version of node.js?
Tags: software-installation (Next Q)
How do I install node.js in Ubuntu? I've been looking around, and I can't find anything. Is there a Ubuntu package for node.js, or do I have to compile it myself?
Tags: software-installation (Next Q)
User: jrg
Answer by jrg
You can use this node.js PPA:
ppa:chris-lea/node.js (Click here for instructions on using PPAs.)
If you're on Ubuntu Server, first do this:
sudo apt-get install python-software-properties
Then, do this:
sudo add-apt-repository ppa:chris-lea/node.js
sudo apt-get update
sudo apt-get install nodejs
Then, you have the latest version of node.js installed.
Answer by nickguletskii
Yes, go to Synaptic, search for "nodejs". The packages are located in the universe repository. I suggest you install all of the packages starting with nodejs if you are doing development.
Just in case that doesn't work:
sudo apt-get install g++ curl libssl-dev apache2-utils git-core
git clone git://github.com/joyent/node.git
cd node
./configure
make
sudo make install
That will download the sourcecode of node.js, make it and install it.
Tags: software-installation (Next Q)
Q: How to automatically fetch missing dependencies when installing software from .deb?
Tags: software-installation (Next Q)
I'm trying to install MySQL Workbench on my Ubuntu box (11.04). The website has a Ubuntu .deb available for download (for 10.10 and 10.04 so I chose 10.10).
However,
sudo dpkg -i mysql-workbench-gpl-5.2.34-1ubu1010-amd64.deb
yields:
Skip code block
(Reading database ... 194069 files and directories currently installed.)
Preparing to replace mysql-workbench-gpl 5.2.34-1ubu1010 (using mysql-workbench-gpl-5.2.34-1ubu1010-amd64.deb) ...
Unpacking replacement mysql-workbench-gpl ...
dpkg: dependency problems prevent configuration of mysql-workbench-gpl:
mysql-workbench-gpl depends on libctemplate0; however:
Package libctemplate0 is not installed.
mysql-workbench-gpl depends on libpython2.6 (>= 2.6); however:
Package libpython2.6 is not installed.
mysql-workbench-gpl depends on libzip1 (>= 0.8); however:
Package libzip1 is not installed.
mysql-workbench-gpl depends on python-paramiko; however:
Package python-paramiko is not installed.
mysql-workbench-gpl depends on python-pysqlite2; however:
Package python-pysqlite2 is not installed.
dpkg: error processing mysql-workbench-gpl (--install):
dependency problems - leaving unconfigured
Processing triggers for bamfdaemon ...
Rebuilding /usr/share/applications/bamf.index...
Processing triggers for desktop-file-utils ...
Processing triggers for python-gmenu ...
Rebuilding /usr/share/applications/desktop.en_US.utf8.cache...
Processing triggers for python-support ...
Errors were encountered while processing:
mysql-workbench-gpl
My question is, is there a way to tell dpkg to automatically fetch missing dependencies, or do I need to manually apt-get install missing packages like libctemplate0 and libpython2.6?
(Or alternatively, is there some other way to get MySQL Workbench easily up & running?)
Tags: software-installation (Next Q)
User: jonik
Answer by enzotib
You can install a package and get dependencies from repositories with
sudo gdebi package.deb
If you already installed the package with missed dependencies, you can dowload and install dependencies automatically with
sudo apt-get -f install
Also available is a graphical version gdebi-gtk, linked to .deb nautilus right click action "Open With GDebi Package Installer".
Answer by rafał-cieślak
dpkg itself is not capable of managing repositories. It is required to use a higher-level tool, like apt-get, to fetch anything from repositories. dkpg is only the core tool, that installs/removes/configures packages, taking care of dependencies and other factors. apt-get and aptitude are tools that manage repositories, download data from them, and use dkpg to install/remove packages from them. This means, that apt-get and aptitude can resolve dependencies and get required packages from repository, but dpkg cannot, because it knows nothing about repositories.
Tags: software-installation (Next Q)
Q: How would I install Picasa 3.9?
Tags: software-installation (Next Q)
I've noticed a new release of Picasa (3.9). How would I install it over my current install of Picasa?
Tags: software-installation (Next Q)
User: rolandixor
Answer by desgua
To install Picasa 3.9
1) Install wine and winetricks:
sudo apt-get install wine winetricks
2) Download Picasa 3.9 from google:
cd ~/ && wget http://dl.google.com/picasa/picasa39-setup.exe
3) Install Picasa with wine:
wine ~/picasa39-setup.exe
To fix login
Now you have Picasa 3.9 installed but there is a problem if you want to login to Google to upload some pictures, so to fix it do this:
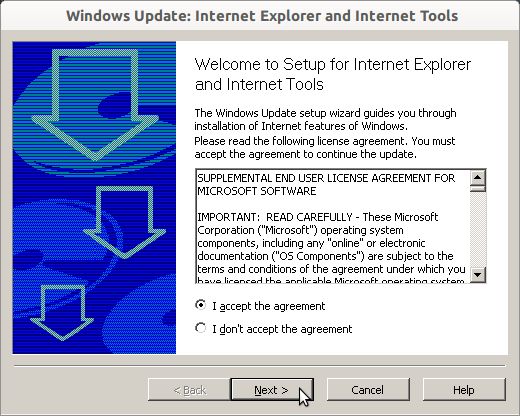
4) Install Internet Explorer 6:
env WINEARCH=win32 WINEPREFIX=~/.tmp winetricks ie6
You will have to click "Next" and "Accept" in a few windows:
5) Copy the installation into wine folder:
cp -r ~/.tmp/* ~/.wine/
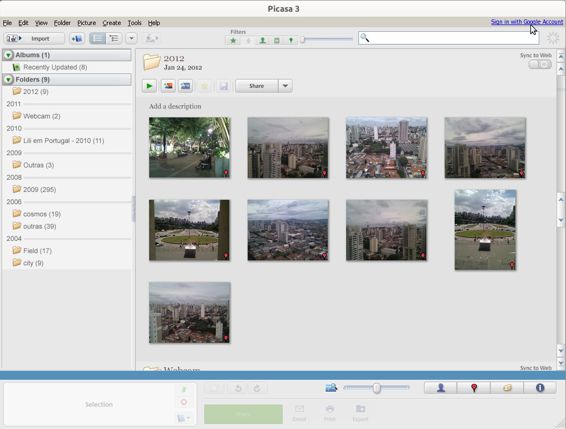
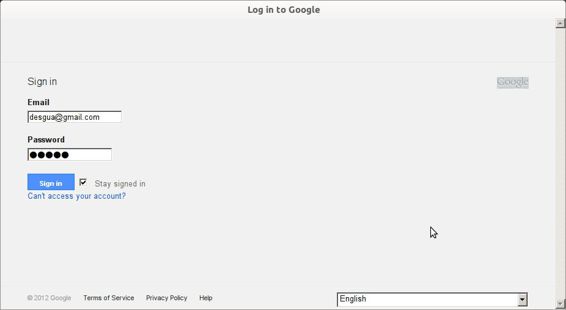
6) Done! Now just open Picasa as any other program:
Open Dash and search for Picasa. Click at the top right corner to login:
Notes:
I) With this method each user will have to run the steps 2 to 5 to get Picasa fully working into his/her user folder. Or ask for he/she to run this once at terminal:
cd ~/ && wget http://dl.google.com/picasa/picasa39-setup.exe && wine ~/picasa39-setup.exe && env WINEARCH=win32 WINEPREFIX=~/.tmp winetricks ie6 && cp -r ~/.tmp/* ~/.wine/
II) If you are feeling lazy, just paste this at terminal and all the steps above will be done for you (as a user specific installation):
sudo apt-get install wine winetricks && cd ~/ && wget http://dl.google.com/picasa/picasa39-setup.exe && wine ~/picasa39-setup.exe && env WINEARCH=win32 WINEPREFIX=~/.tmp winetricks ie6 && cp -r ~/.tmp/* ~/.wine/
III) After the step 5, the file "picasa39-setup.exe" can be deleted:
rm ~/picasa39-setup.exe
And also the folder "~/.tmp":
rm ~/.tmp
IV) To uninstall everything:
sudo apt-get remove --purge wine ; sudo apt-get remove --purge winetricks ; sudo apt-get autoremove ; sudo rm /usr/share/applications/Picasa3.desktop ; rm ~/picasa39-setup.exe ; rm -r ~/.tmp ; rm -r ~/.wine ; rm -r ~/.local/share/applications/wine* ; sed -i '/wine/d' ~/.local/share/applications/mimeinfo.cache
V) I have made two scripts (see it: check and installp) that can check if Picasa is installed and install it if needed with the IE6 to fix the login. The following command will download it from my dropbox with a beautiful icon from qyasogk at Deviantart. After running this command, just search for "Picasa" at Dash, if needed, the install will begin, if don't needed, Picasa will run.
sudo apt-get install wine winetricks ; cd ~/ ; wget -c http://dl.dropbox.com/u/4098082/picasa/check ; wget -c http://dl.dropbox.com/u/4098082/picasa/installp ; wget -c http://dl.dropbox.com/u/4098082/picasa/Picasa-icon.png ; wget -c http://dl.dropbox.com/u/4098082/picasa/Picasa3.desktop ; sudo mkdir /opt/picasa ; sudo mv ~/check /opt/picasa/ ; sudo mv ~/installp /opt/picasa/ ; sudo mv ~/Picasa-icon.png /opt/picasa/ ; sudo mv ~/Picasa3.desktop /usr/share/applications/ ; sudo chmod 777 /opt/picasa/check ; sudo chmod 777 /opt/picasa/installp
To remove it:
sudo rm -r /opt/picasa ; sudo rm /usr/share/applications/Picasa3.desktop ; rm ~/.firstpicasarun
Tags: software-installation (Next Q)
Q: How can I install Adobe AIR?
Tags: software-installation (Next Q)
I am a heavy user of certain applications that are built on AIR.
It appears that AIR has discontinued support for Linux. Even the older versions in the Adobe AIR Archives seem to support only 32 bit Linux distributions and I am on 64 bit currently.
Is there even a slight possibility that I could run AIR in these conditions? If so, can you please tell me where can I get a detailed step by step installation for this?
Tags: software-installation (Next Q)
User: vamsi-emani
Answer by bashpotato
I need Air for about three programs - YNAB, LongTailPro, Xtend:
1. Download Latest Version Air 2.6.0 For Linux to your Desktop:
o http://airdownload.adobe.com/air/lin/download/2.6/AdobeAIRInstaller.bin - 15.4Mb
2. Ctrl+Alt+T to open terminal
3. sudo apt-get install ia32-libs - (32bit crap if you want to run this in x64 Ubuntu; if you have trouble, see "Depends: ia32-libs-multiarch but it is not installable" - Solution)
4. cd Desktop (change dir. to Desktop dir.)
5. chmod +x AdobeAIRInstaller.bin (change mode - execute permission yes)
6. ./AdobeAIRInstaller.bin (after you accept the Adobe Air license, it will prompt you for your password; it needs root access in order to install)
Maybe you'll get an error after the last command?
Sorry, an error has occurred. Adobe AIR could not be installed. Install either Gnome Keyring or KDE KWallet before installing Adobe AIR.
This can be fixed:
· In a terminal (default shortcut: Ctrl+Alt+T), type:
· locate libgnome-keyring.so
· This is my result (yours might be different):
· /usr/lib/x86_64-linux-gnu/libgnome-keyring.so.0
· /usr/lib/x86_64-linux-gnu/libgnome-keyring.so.0.2.0
· As suggested below by @jmendeth, the easiest way to tell the installer where to find these files is to use LD_LIBRARY_PATH:
o For 32-bit Ubuntu (tested on 12.04):
o LD_LIBRARY_PATH=/usr/lib/i386-linux-gnu ./AdobeAIRInstaller.bin
o For 64-bit Ubuntu, the command line would probably be:
o LD_LIBRARY_PATH=/usr/lib/x86_64-linux-gnu ./AdobeAIRInstaller.bin
If the LD_LIBRARY_PATH trick doesn't work, you can try this:
· Create a symbolic link to your location strings that you found with the previous commands:
· sudo ln -s /usr/lib/x86_64-linux-gnu/libgnome-keyring.so.0 /usr/lib/libgnome-keyring.so.0
· sudo ln -s /usr/lib/x86_64-linux-gnu/libgnome-keyring.so.0.2.0 /usr/lib/libgnome-keyring.so.0.2.0
· Use following commands for 32-bit systems:
· sudo ln -s /usr/lib/i386-linux-gnu/libgnome-keyring.so.0 /usr/lib/libgnome-keyring.so.0
· sudo ln -s /usr/lib/i386-linux-gnu/libgnome-keyring.so.0.2.0 /usr/lib/libgnome-keyring.so.0.2.0
· Then repeat step 4 & 6 (skip 5, as the permission to execute the file hasn't changed).
· Remove symbolic links after installation of Adobe AIR 2.6.0:
· sudo rm /usr/lib/libgnome-keyring.so.0
· sudo rm /usr/lib/libgnome-keyring.so.0.2.0
Reference:
· http://www.clarifylinux.org/2012/04/ubuntu-1204-tweak-and-hack-round-up.html
Answer by yuvilio
Alternately, you can install a prebuilt .deb
There is air 2.6 (last supported Linux one) available here for both architectures (Both use 32 bit underneath but at least it works). Thanks to prusswan for pointing it out.
Make sure you have 32 bit libs it'll need:
sudo apt-get install ia32-libs
I downloaded the AMD64 one (adobeair_2.6.0.19170_amd64.deb) and installed on my computer (am64 with Precise Pangolin 12.04)
sudo dpkg -i adobeair_2.6.0.19170_amd64.deb
Then I installed the application that needed Adobe Air in the first place and it worked.
Update for Ubuntu 13:10+,
Trying this technique, i get "Package ia32-libs-gtk is not installed"
I looked up the package and tried installing those dependencies and other related packages I can think of directly:
sudo apt-get install gtk2-engines:i386 libart-2.0-2:i386 libcairo2:i386 libcanberra-gtk0:i386 libdatrie1:i386 libgail-common:i386 libgconf2-4:i386 libgtk2.0-0:i386 liblua5.1-0:i386 libpango1.0-0:i386 libpixman-1-0:i386 libqt4-network:i386 libqt4-test:i386 libqtcore4:i386 libthai0:i386 libbonobo2-0:i386 libglade2-0:i386 libgnomecanvas2-0:i386 libidl0:i386 liborbit2:i386 libwmf0.2-7:i386 gtk2-engines-murrine:i386
But that didn't work for either the deb or original binary.
Answer by avinash-raj
Ubuntu 13.10 and 14.04 (64 bit)
1. Install i386 libraries, that are required for successful installation and running of Adobe Air and air applications.
2. sudo apt-get install libxt6:i386 libnspr4-0d:i386 libgtk2.0-0:i386 libstdc++6:i386 libnss3-1d:i386 lib32nss-mdns libxml2:i386 libxslt1.1:i386 libcanberra-gtk-module:i386 gtk2-engines-murrine:i386
2. Install libgnome-keyring0:i386 package.
3. sudo apt-get install libgnome-keyring0:i386
3. Create symlinks to gnome-keyring so Adobe Air could see it.
4. sudo ln -s /usr/lib/x86_64-linux-gnu/libgnome-keyring.so.0 /usr/lib/libgnome-keyring.so.0
5.
6. sudo ln -s /usr/lib/x86_64-linux-gnu/libgnome-keyring.so.0.2.0 /usr/lib/libgnome-keyring.so.0.2.0
4. Download Adobe Air installer from here.
5. Give execute permission and then run that .bin file.
6. sudo chmod +x AdobeAIRInstaller.bin
7. sudo ./AdobeAIRInstaller.bin
Source
Tags: software-installation (Next Q)
Q: How do I install the Cinnamon Desktop?
Tags: software-installation (Next Q)
I have read that there is a new Gnome-2 like interface called Cinnamon produced by the Linux Mint developers.
Is this available for Ubuntu users - and if so how do I install it?
Tags: software-installation (Next Q)
User: fossfreedom
Answer by fossfreedom
Cinnamon is a Gnome-Shell desktop fork. It is not strictly a Gnome-2 interface, although the developers aims are laudable - to produce a simpler more traditional desktop interface.
Development seems to be rapid. It is usable and certainly fun to play with with a growing number of extensions to install to extend the base installation.
How to install
for 13.04 & 13.10
Cinnamon is now available in the Universe repository
cinnamon
Since it is in this repository, it is community maintained and thus it is up to the community to update the packages as and when new releases and bug-fixes are released.
For Ubuntu 14.04, there is currently no cinnamon packages in the Universe repository.
Via PPA for 11.10 and later
EDIT: 22/05/2014 - the PPA ppa:gwendal-lebihan-dev/cinnamon-stable has been removed or hidden from public view. I contacted the maintainer and the following is their reply:
The stable PPA is indeed no longer being maintained.
The nightly PPA is being kept for development purposes and should not be used on any sort of production machine (it can and will break at any time).
To be honest, I don't have an alternative to offer Ubuntu users at the moment, apart from switching to a distribution that does support Cinnamon. There are many such distributions out there, and I'm only hoping for someone to (finally) step up on Ubuntu's side to provide proper packages to its users.
EDIT: 25/04/14 - Two alternative PPA's have now been created - both claiming to enable the stable version of Cinnamon for Ubuntu users. I cannot vouch for the veracity of these PPAs
Option 1: 12.04 & 14.04 users only:
sudo add-apt-repository ppa:tsvetko.tsvetkov/cinnamon
sudo apt-get update
sudo apt-get install cinnamon
Option 2: 14.04 users only:
sudo add-apt-repository ppa:lestcape/cinnamon
sudo apt-get update
sudo apt-get install cinnamon
As an alternative you may wish to consider the unstable nightly automatic builds - please note Gwendal's warning above:
sudo add-apt-repository ppa:gwendal-lebihan-dev/cinnamon-nightly
sudo apt-get update
sudo apt-get install cinnamon
After installation
Logout and select the Cinnamon session:
Enter you password and you'll see the Cinnamon desktop
... showing the traditional start type menu and applet design from Gnome-2

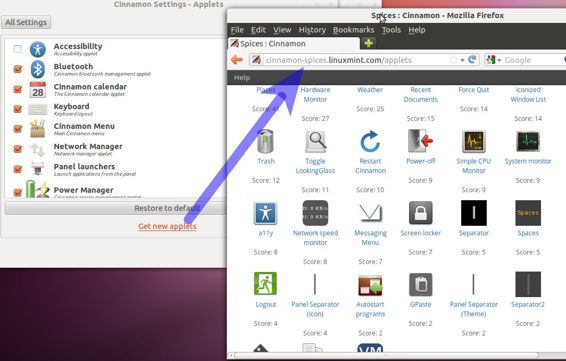
Extensions/Applets
The Cinnamon desktop uses the same philosophy as Gnome-Shell - functionality can be added to by installing Extensions & Applets.
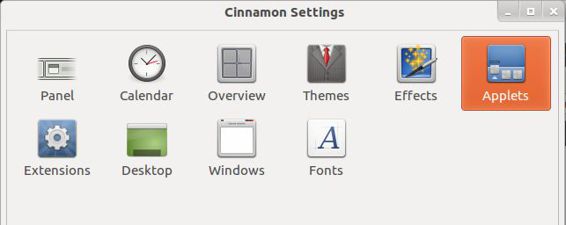
Cinnamon uses its own Settings tool.
Cinnamon Settings
Cinnamon Applets
Similar to gnome-shell extensions - you can install applets from a dedicated Mint website.
Answer by fossfreedom
12.04 vs 11.10
I contacted the Ubuntu Cinnamon PPA owner - Gwendal LE BIHAN - 2nd April - this is the reply:
We are currently in the process of finalizing the migration of cinnamon to gnome3.4. The PPA will be updated with precise packages as soon as this is done.
Those packages should be available within a week or 2, and definitely before precise's release.
Note that no more releases of cinnamon will be available for other versions of Ubuntu, since the gnome3.4 libraries are not available on versions of Ubuntu prior to precise.
Precise builds are now available in the PPA and can be installed per the linked answer.
From now on, the Oneiric packages in the PPA will be fixed at v1.4. Thus if you are an Oneiric (11.10) user, your upgrade route should be via the 12.04 distro route, followed by reactivating or adding the PPA.
Alternatively, you may wish to consider one of the other answers to the question.
Tags: software-installation (Next Q)
Q: What is the correct way to install proprietary ATI Catalyst Video Drivers (fglrx) directly from AMD?
Tags: software-installation (Next Q)
I am planning on doing a fresh install of Ubuntu and want to know what is the correct way to install ATI Catalyst Video Driver?
There are multiple valid answers for this question spanning over several versions of Ubuntu. For your convenience an index of each below:
· 14.04
· 13.04
· 12.10
· 12.04
· 11.10/11.04 etc
Tags: software-installation (Next Q)
User: stephen-myall
Answer by stephen-myall
The following instructions explain how to install the latest ATI Catalyst video driver of Ubuntu 12.04 LTS (Precise Pangolin).
· Ubuntu 12.10 instructions
· Ubuntu 13.04 instructions
Note
AMD has released the Catalyst 12.8 driver for Linux systems in August bringing some improvements and bug fixes. This driver is based on the fglrx 8.982 release, and it improves support for Ubuntu 12.04 LTS.
To keep up to date with the latest driver information always refer to AMDs official website as updates are published fairly regularly.
Installing the AMD/ATI Catalyst drivers for 12.04 LTS
Tested: v12.4, v12.6, v12.8
Important Information and Preparation
Only use these instructions if you have opted NOT to use the official Ubuntu binaries.
· If you wish to use the official Ubuntu binaries or want to install the latest ATI Catalyst video driver for previous versions of Ubuntu, navigate to the answer of this question and follow the instructions.
Before deciding, check if Ubuntu supports your video card here.
· If you are currently using the official Ubuntu binaries and want to install the latest ATI Catalyst video driver there is a prerequisite to purge some files. Before proceeding with these instructions. You can Skip the step to purgeif you have a fresh install of Ubuntu 12.04.
Removing (purging) existing drivers
sudo sh /usr/share/ati/fglrx-uninstall.sh
sudo apt-get remove --purge fglrx fglrx_* fglrx-amdcccle* fglrx-dev*
Install these dependencies
You need to install some dependencies to your system, do this by running these in Terminal:
sudo apt-get install build-essential cdbs fakeroot dh-make debhelper debconf libstdc++6 dkms libqtgui4 wget execstack libelfg0 dh-modaliases
For 64-bit Only
sudo apt-get install ia32-libs-multiarch i386 lib32gcc1 libc6-i386
Installing the lastest ATI/AMD driver
Download the appropriate driver for your machine here from the AMD/ATI Website and then enter the following into the terminal (remember to navigate to where you extracted the driver to beforehand and make sure no other .run files exist in that folder):
sudo sh *.run --buildpkg Ubuntu/precise
If it is required, a package manager window will open and install some dependencies and after a while create the following four .deb packages:
fglrx_8.961-0ubuntu1_amd64.deb
fglrx-amdcccle_8.961-0ubuntu1_amd64.deb
fglrx-dev_8.961-0ubuntu1_amd64.deb
Note: It will also create a file called fglrx-installer_8.961-0ubuntu1_amd64.changes. If you wish you can read this file to know the changes that have been affected through AMD/ATI Catalyst and related information.
To install the created .deb files, type:
sudo dpkg -i *.deb
Note: In case any of the packages are broken, open Synaptic Package Manager and go to Edit -> Fix Broken Packages. In case you are new to Ubuntu, broken here means that some dependent packages are not yet installed. Once you sort out the issue as indicated above through the Synaptic Package Manager, the problem of broken packages should be resolved.
Continuing with the installation, type:
sudo aticonfig --initial
Before rebooting your computer: If you are using a beta version, you may want to remove the AMD "Testing" watermark. Otherwise skip the next block of instructions.
Beta versions: Removing the AMD "Testing" watermark
Edit the ATI signature file via "nano" or "gedit":
sudo nano /etc/ati/signature
OR
sudo gedit /etc/ati/signature
By replacing the "UNSIGNED" line with the following code:
9777c589791007f4aeef06c922ad54a2:ae59f5b9572136d99fdd36f0109d358fa643f2bd4a2644d9efbb4fe91a9f6590a145:f612f0b01f2565cd9bd834f8119b309bae11a1ed4a2661c49fdf3fad11986cc4f641f1ba1f2265909a8e34ff1699309bf211a7eb4d7662cd9f8e3faf14986d92f646f1bc
Make sure to save before/on closing the file.
That will remove the AMD "Testing" watermark (which you will now never see) from the bottom right of your screen when you reboot (source).
Now go ahead and reboot your computer.
If all is right, the fglrx driver that corresponds to AMD/ATI Catalyst will be installed and working on your system. To confirm the drivers are working open a terminal and type:
fglrxinfo
You should get an output similar to the following:
display: :0 screen: 0
OpenGL vendor string: Advanced Micro Devices, Inc.
OpenGL renderer string: ATI Radeon HD 4300/4500 Series
OpenGL version string: 3.3.11631 Compatibility Profile Context
Note: If you see any mention of MESA in the output, the fglrx drivers have not been installed correctly. See the troubleshooting section for more details
You can make configuration changes through the AMD/ATI Catalyst Control Center. It can either be found in your Application menu or you can launch it through a terminal like this:
sudo amdcccle
IMPORTANT NOTE:
Be aware that when you manually install fglrx, this can subtly break your system, since the packaging system isn't made aware of your changes.
The Launchpad developers get many bug reports from users who do this and then later discover after a few upgrades that their system starts behaving weird because of those fglrx remnants.
Answer by stephen-myall
Installing the ATI Catalyst Drivers for 12.10
Important UPDATE (22nd October 2012)
Latest proprietary AMD Catalyst driver version 12.9 cannot be used with Ubuntu 12.10 If you have a AMD Radeon HD 2xxx-4xxx series card.
Drivers for these cards are now available in a separate branch called legacy series. Unfortunately these legacy drivers (version 12.6) have not been updated to work with Ubuntu 12.10. Ubuntu 12.10 comes with xorg 1.13 while these drivers have support for older xorg 1.12. So if you want to install these drivers in Ubuntu 12.10, you have to downgrade to xorg 1.12.
Source and get Legacy Drivers here (if above note applies to you
INSTRUCTIONS
Uninstall firstly the current AMD driver with these two commands:
sudo sh /usr/share/ati/fglrx-uninstall.sh
sudo apt-get remove --purge fglrx fglrx_* fglrx-amdcccle* fglrx-dev* xorg-driver-fglrx
Note: You will need to install the drivers (following the instructions below) but first add the same dependencies described in the answer above for 12.04LTS.
Start now the installation of ATI Catalyst v# with these commands under Ubuntu 12.10 or older:
cd /tmp && wget -O amd-driver-12-6-x86_64.run http://www2.ati.com/drivers/linux/amd-driver-installer-12-6-x86.x86_64.run
chmod +x amd-driver-12-6-x86_64.run
sudo sh amd-driver-12-6-x86_64.run
Then follow setup instructions:
Run next this command to finish the installation:
sudo aticonfig --initial -f
Then reboot your system:
sudo reboot
That's it!
Answer by rodrigo-martins
Installing the ATI Catalyst Drivers for 13.04
These instructions will install Catalyst v13.4, in order to see what is the latest available driver visit the Official AMD Website
Instructions
Check your card
Only RadeonHD cards are supported by Catalyst drivers.
To know which card is installed in your system type the following command in a terminal:
lspci | grep VGA
It may show you your graphic card.
Before continue please read first! Which Radeon cards are no longer supported by ATI's Catalyst:
· Cards that no longer can make use of AMD Catalyst drivers and are limited to open-source drivers:
ATI Radeon 9500-9800, Xpress200-1250, 690G, 740G, X300-X2500, Mobility RadeonHD 2300
· Cards that doesn't work with AMD Catalyst in Xserver versions newer than v1.13 and Linux Kernel newer than v3.5:
ATI RadeonHD 2x00 - 4xx0 cards
These cards can make use of the Catalyst Legacy driver, but only if you downgrade your Xserver version. This can be done really easily by following the instructions given at LaunchPad. This PPA downgrades the Xserver and install a patched version of fglrx that supports kernel version 3.5.
Removing (purging) existing drivers
sudo sh /usr/share/ati/fglrx-uninstall.sh
sudo apt-get remove --purge fglrx fglrx_* fglrx-amdcccle* fglrx-dev*
Install Dependencies
· For 32-bit systems:
· sudo apt-get install build-essential cdbs dh-make dkms execstack dh-modaliases linux-headers-generic fakeroot libqtgui4
· For 64-bit systems:
· sudo apt-get install build-essential cdbs dh-make dkms execstack dh-modaliases linux-headers-generic fakeroot libqtgui4 lib32gcc1
Download Catalyst package
cd ~/
mkdir catalyst
cd catalyst/
In order to have the latest drivers installed check if v13.4 is the latest offered in AMD Webpage, if v13.4 isn't the latest you may want to manually download the drivers from there, extract the zip file to ~/catalyst/ folder and then skip the following first two commands and execute the last replacing the package name with the name of the extracted one in ~/catalyst/ folder
wget http://www2.ati.com/drivers/linux/amd-catalyst-13.4-linux-x86.x86_64.zip
unzip amd-catalyst-13.4-linux-x86.x86_64.zip
chmod +x amd-catalyst-13.4-linux-x86.x86_64.run
Install Drivers
Navigate to the extracted package (~/catalyst/), make sure it is the only .run file in that folder, and type in the following command
sudo sh *.run --buildpkg Ubuntu/raring
An AMD Catalyst window will open to deploy the .deb packages wait until it finishes and then execute this command to proceed:
sudo dpkg -i fglrx*.deb
Configuration
· Generic Configuration
This will work for most people
sudo aticonfig --initial -f
· Minimal Config
A very basic /etc/X11/xorg.conf file might be what you need if you have a new card that's not fully supported by aticonfig. Here follows the entirety of a minimal xorg.conf file for the Radeon HD 6870:
Section "Device"
Identifier "ATI radeon 6870"
Driver "fglrx"
EndSection
· X2/Dual GPU Cards
Only use if you have an X2 card (e.g. 4870X2 or 5970) !!Do not use for two separate cards in crossfire!!
sudo amdconfig --initial -f --adapter=all
· Dual/Multi Monitors
If you have a dual monitor display (also known as "Big Desktop")
sudo aticonfig --initial -f
sudo aticonfig --set-pcs-str="DDX,EnableRandR12,FALSE"
Be advised that you may need to manually set the correct refresh rate for your second monitor through catalyst. See this threat.
Before Rebooting
Just in case, write down these instructions for the case you get a black screen:
· If the X server fails to start, switch to a new TTY using Ctrl+Alt+F2. Log in, and attempt to start the X server.
· sudo startx
· If it fails to start, you will likely see a stacktrace, and immediately above it will be something along the lines of "Could not stat /usr/lib64/fglrx/switchlibGL" which means that you failed to copy the executables properly. Ctrl+C, and immediately copy the switchlibGL and switchlibglx executables to the fglrx folder in /usr/lib64/ or /usr/lib32/.
· If all else fails, revert your xorg.conf and reboot:
· sudo cp /etc/X11/xorg.conf.orig /etc/X11/xorg.conf
This should return your original display.
· If anything worked, try these key combinations in this order:
Ctrl+Alt+F1 ; Ctrl+Alt+Backspace ; Alt+PrntScr+r ; Alt+PrntScr+s ; Alt+PrntScr+e ; Alt+PrntScr+i ; Alt+PrntScr+n ; Alt+PrntScr+u ; Alt+PrntScr+b ; and in the last case hold Ctrl+Alt+SysRq (SysRq usually is the same as Print Screen) and type very slowly R E I S U B.
Test your Installation
Restart your system and type in the terminal:
fglrxinfo
The output may be similar to this if everything went fine:
display: :0 screen: 0
OpenGL vendor string: Advanced Micro Devices, Inc.
OpenGL renderer string: AMD Radeon HD 7900 Series (This line may be different depending on what graphics card you are using.)
OpenGL version string: 4.2.12217 Compatibility Profile Context 12.104 (This line may be different depending on what graphics card and Catalyst version you are using.)
Now try:
fgl_glxgears
If you experience issues or a hang, you may need to disable fast TLS:
sudo aticonfig --tls=0
That is it!
Source
Tags: software-installation (Next Q)
Q: How do I resolve unmet dependencies?
Tags: software-installation (Next Q), apt (Next Q), package-management (Next Q)
How do I resolve unmet package dependencies?
Occasionally, when I'm installing stuff, I get an error like the following:
Some packages could not be installed. This may mean that you have
requested an impossible situation or if you are using the unstable
distribution that some required packages have not yet been created
or been moved out of Incoming.
The following information may help to resolve the situation:
The following packages have unmet dependencies:
package1 : Depends: package2 (>= 1.8) but 1.7.5-1ubuntu1 is to be installed
E: Unable to correct problems, you have held broken packages.
How can I resolve this?
Tags: software-installation (Next Q), apt (Next Q), package-management (Next Q)
User: jrg
Answer by basharat-sialvi
APT is a package management system for Debian and other Linux distributions based on it, such as Ubuntu. For the most part,APT is easy to use for installing, removing, and updating packages. In rare instances, often when you are mixing in third-party dependencies, there is a chance that apt-get may end up giving you an error telling you that a package installation could not be completed.
Solutions:
It is always a good idea to back up configuration files like /etc/apt/sources.list, so you can revert the changes if needed.
· If the error shows something like this:
<some-package>: Depends: <other-package> (= version) but this-version is to be installed
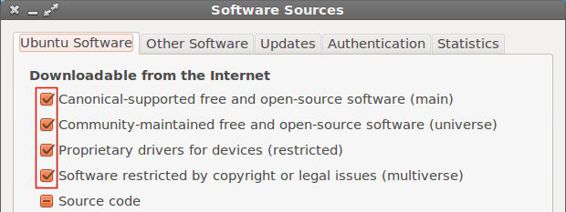
Then make sure that the restricted and universe repositories are enabled. Hit Alt+F2, type software-properties-gtk and hit Enter.
Under Ubuntu Software tab, enable all the repositories.
· One possible cause of unmet dependencies could be corrupted package database, and/or some packages werent installed properly. To fix this problem, hit Alt+Ctrl+T to open terminal and try to run one of the following commands:
sudo apt-get clean
or,
sudo apt-get autoclean
apt-get clean clears out the local repository of retrieved package files (the .deb files). It removes everything but the lock file from /var/cache/apt/archives/ and /var/cache/apt/archives/partial/. apt-get autoclean clears out the local repository of retrieved package files, but unlike apt-get clean, it only removes package files that can no longer be downloaded, and are largely useless.
· One of the most basic fixes to resolve dependencies problems is to run:
sudo apt-get -f install
The -f here stands for fix broken. Apt will attempt to correct broken dependencies. If you manually installed a package that had unmet dependencies, apt-get will install those dependencies, if possible, otherwise it may simply remove the package that you installed in order to resolve the problem.
Then run:
sudo dpkg --configure -a
Then run this again:
sudo apt-get -f install
If the output is:
0 upgraded, 0 newly installed, 0 to remove and 1 not upgraded.
That means it failed.
· Next solution is to run:
sudo apt-get -u dist-upgrade
If it shows any held packages, it is best to eliminate them. Packages are held because of dependency conflicts that apt cannot resolve. Try this command to find and repair the conflicts:
sudo apt-get -o Debug::pkgProblemResolver=yes dist-upgrade
If it cannot fix the conflicts, it will exit with:
0 upgraded, 0 newly installed, 0 to remove and 6 not upgraded.
Delete the held packages one by one, running dist-upgrade each time, until there are no more held packages. Then reinstall any needed packages. Be sure to use the --dry-run option, so that you are fully informed of consequences:
sudo apt-get remove --dry-run package-name
Since removing the package you are trying to install may not be ideal, you might also try finding a repository that has the packages you need to satisfy the dependencies.
Finally, if all else fails, you can attempt to satisfy the dependencies yourself, either by finding and installing the necessary packages, or by installing them from source and then creating deb packages for them.
Disable/Remove/Purge PPAs:
PPAs (Personal Package Archive) are repositories hosted on Launchpad. You can use PPAs to install or upgrade packages that are not available in the official Ubuntu repositories.
One of the most common causes of unmet dependencies are PPAs, specially when used to upgrade the existing package in Ubuntu repositories. To solve the problem you have tree options, disable, purge (revert back to original package in Ubuntu repositories) or remove PPA.
· Disable:
Disabling a PPA means no more updates for the packages installed from that PPA. To disable a PPA: Open Software Center > Edit > Software Sources Or,
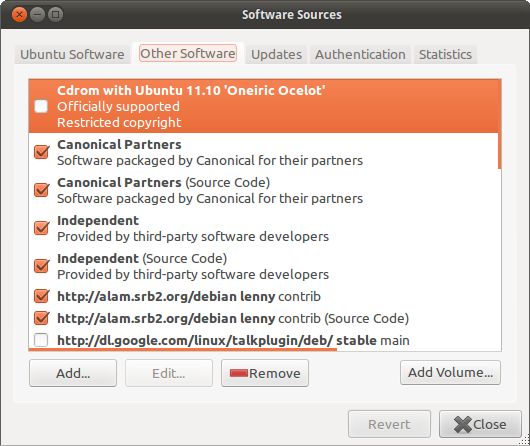
Hit Alt+F2 and run software-properties-gtk.
Click on Other Software tab, you'll see that each PPA have two lines here, one for the compiled packages and one for the source, Uncheck both lines to disable a PPA. Here you can also add and remove PPAs.
· Purge:
Purging a PPA means, downgrading the packages in the selected PPA to the version in the official Ubuntu repositories and disabling that PPA. PPA Purge does exactly that. To install PPA Purge run the following command:
sudo apt-get install ppa-purge
But, Considering the question apt is broken so the above command will fail. So use this command
mkdir ppa-purge && cd ppa-purge && wget http://mirror.pnl.gov/ubuntu/pool/universe/p/ppa-purge/ppa-purge_0.2.8+bzr56_all.deb && wget http://mirror.pnl.gov/ubuntu//pool/main/a/aptitude/aptitude_0.6.6-1ubuntu1_i386.deb && sudo dpkg -i ./*.deb
To use PPA Purge:
sudo ppa-purge ppa:someppa/ppa
If 'ppa-purge' command fails for some reason, you can't run 'ppa-purge' again unless you re-enable the PPA (To enable the PPA follow the same steps as disabling a PPA and Check the both lines of a particular PPA to enable it).
Note: PPA Purge doesn't remove PPAs (may be in future), So you'll have to manually remove the PPA.
· Remove:
If the package installed from a PPA doesn't exist in official Ubuntu repositories then using PPA Purge is not recommended, because there's nothing to be downgraded and PPA Purge wouldn't delete it either. To remove a PPA and installed packages run the following commands: (Ignore the first command if you don't want to remove the installed packages)
sudo apt-get autoremove --purge package-name
sudo add-apt-repository --remove ppa:someppa/ppa
sudo apt-get autoclean
Alternatively you can use Y PPA Manager to disable/remove/purge PPA's (Details at the end of answer).
Preventive Measures:
So how can we avoid this from happening in the first place?
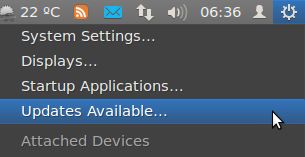
· Keep Ubuntu Up to date. Ubuntu automatically notifies when updates are available, you can also check for available updates by clicking on Session Indicator in Unity panel:
Or, Hit Alt+Ctrl+T to open terminal and run following commands:
sudo apt-get update
sudo apt-get upgrade
Update: Synchronizes your list of available packages with the servers in source repositories. Upgrade: Downloads & installs any newer versions of your installed packages.
· If you decide to add other repositories to sources.list, make sure that the repository is meant to work (and known to work) with Ubuntu. Repositories that are not designed to work with your version of Ubuntu can introduce inconsistencies in your system and might force you to re-install. Also, make sure that you really need to add external repositories as the software package(s) you are looking for may already have been introduced into the official repositories! Source
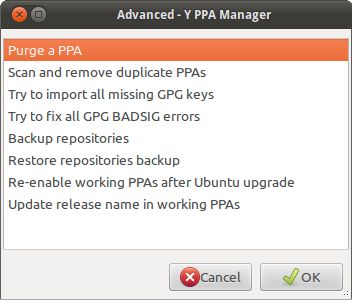
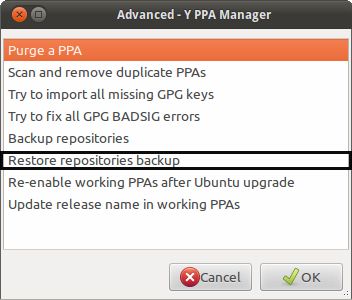
· Remove duplicate PPAs. Y PPA Manager (installation guide at the end of answer) can easily scan and remove duplicate PPAs.
o Hit Alt+F2 and run y-ppa-manager to open Y PPA Manager.
o Once open, double click or hit Enter on Advanced.
o In resulting window select Scan and remove duplicate PPAs and click OK.
Getting Help:
When asking for help on Askubuntu or any other help forum, you should include the output of the following commands in your question:
· sudo apt-get install package-name
Output of actual error.
· cat /etc/apt/sources.list
This will show your sources.list
· cat /etc/apt/sources.list.d/*
This will show the list of PPAs (If any).
Additional Sources:
· 'apt' Ubuntu Manpage
· 'apt-get' Ubuntu Manpage
· 'apt-get/how-to' Community Ubuntu documentation
· 'Repositories/Ubuntu' Community Ubuntu documentation
· 'Repositories/CommandLine' Community Ubuntu documentation
Y PPA Manager: Y PPA Manager is an one stop shop for all of your PPA needs.
Here are some of its features:
· search packages in all Launchpad PPAs
· list and download packages in a PPA
· add / remove / purge a PPA
· backup and restore PPA sources
· remove duplicate PPA sources
To install Y PPA Manager, open terminal by hitting Alt+Ctrl+T and run following commands:
sudo add-apt-repository ppa:webupd8team/y-ppa-manager
sudo apt-get update
sudo apt-get install y-ppa-manager
Considering the question, apt is broken, so use these commands instead
sudo su
and
32 Bit:
mkdir y-ppa-manager && cd y-ppa-manager && wget https://launchpad.net/~webupd8team/+archive/y-ppa-manager/+files/launchpad-getkeys_0.3.2-1~webupd8~oneiric_all.deb && wget https://launchpad.net/~webupd8team/+archive/y-ppa-manager/+files/y-ppa-manager_0.0.8.6-1~webupd8~precise_all.deb && wget https://launchpad.net/~webupd8team/+archive/y-ppa-manager/+files/yad_0.17.1.1-1~webupd8~precise_i386.deb && dpkg -i ./*.deb
64 Bit:
mkdir y-ppa-manager && cd y-ppa-manager && wget https://launchpad.net/~webupd8team/+archive/y-ppa-manager/+files/launchpad-getkeys_0.3.2-1~webupd8~oneiric_all.deb && wget https://launchpad.net/~webupd8team/+archive/y-ppa-manager/+files/y-ppa-manager_0.0.8.6-1~webupd8~precise_all.deb && wget https://launchpad.net/~webupd8team/+archive/y-ppa-manager/+files/yad_0.17.1.1-1~webupd8~precise_amd64.deb && dpkg -i ./*.deb
Answer by amith-kk
Note: All commands asked to be run must be run in the terminal, which can be opened by either Ctrl+Alt+T or searching for terminal in the dash.
Is it really broken?
Try running the following command and try to reinstall the software you were trying to install
sudo apt-get update
Pre-Perfomance Steps
Backing up
Back up the following files:
· /etc/apt/sources.list
· /var/lib/dpkg/status
To do so, use these commands
sudo cp /etc/apt/sources.list /etc/apt/sources.list.original
and
sudo cp /var/lib/dpkg/status /var/lib/dpkg/status.original
Clearing your apt-cache
apt keeps a cache of recently downloaded packages to save bandwidth when it is required to be installed. This can be counter-productive in some cases
Now, to clean it, you have two options
sudo apt-get clean
This will remove all cached packages belonging to the folder /var/cache/apt/archives/ and /var/cache/apt/archives/partial except the .lock files. This is recommended
sudo apt-get autoclean
This scans the folders /var/cache/apt/archives/ and /var/cache/apt/archives/partial and checks if the package is still in the repositories and removes the ones that aren't
Fixing dependencies
Using apt's fix-broken mode
sudo apt-get -f install
This will cause apt to scan for missing dependencies and fix them from the repositories
If the output states that nothing new was installed or upgraded, it has failed.
Checking if all required sources are enabled
Type gksu software-properties-gtk and you'll get this window
Make sure all sources are enabled.
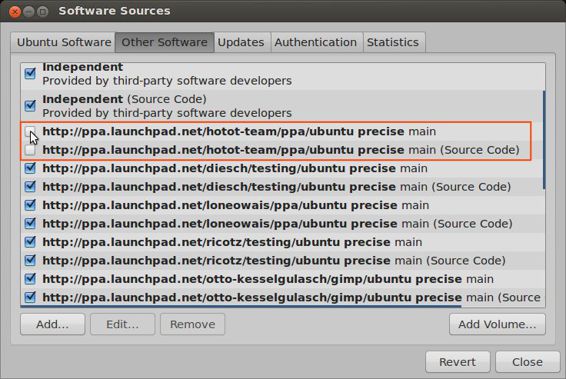
next, go to the Other software tab and check if the required PPAs for the software to be installed are there and are enabled. Also, try disabling some PPAs which might be having broken packages
now, run sudo apt-get update
Try installing the software now
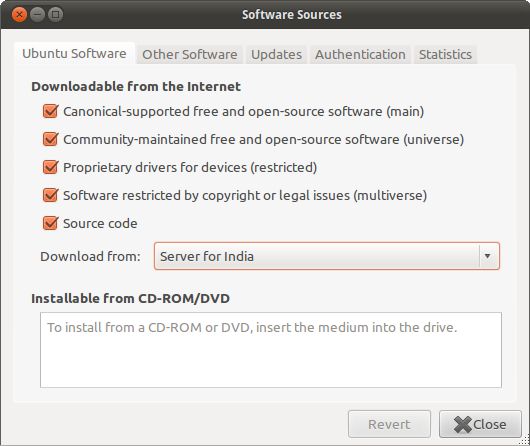
Selecting a better server to download from
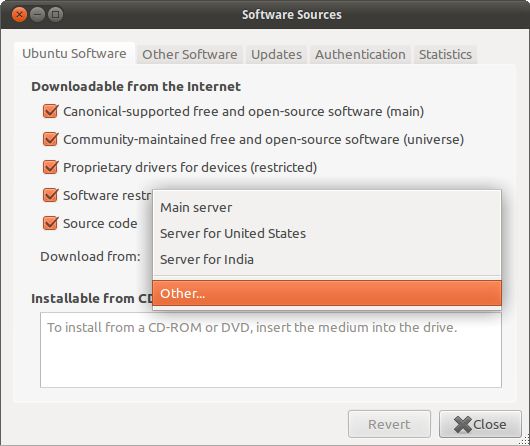
Type gksu software-properties-gtk and you'll get this window
Click the Download from the Dropdown box and select other
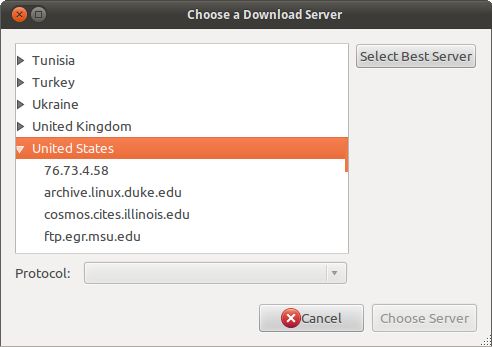
Click Select Best Server
Run sudo apt-get update
Try installing the software
also, try using sudo apt-get install -f
PPA Purge
This is a tool used to purge broken/unwanted ppa's and their applications along with it
To install it, run
sudo apt-get install ppa-purge
But, Considering the question apt is broken so the above command will fail. So use this command
mkdir ppa-purge && cd ppa-purge && wget http://mirror.pnl.gov/ubuntu/pool/universe/p/ppa-purge/ppa-purge_0.2.8+bzr56_all.deb && wget http://mirror.pnl.gov/ubuntu//pool/main/a/aptitude/aptitude_0.6.6-1ubuntu1_i386.deb && sudo dpkg -i ./*.deb
Now use ppa purge
sudo ppa-purge ppa:someppa/ppa
Y-PPA Manager
Y-PPA Manager is a gui app that helps you manage PPA's and various problems assosiated with it
To install it
sudo add-apt-repository ppa:webupd8team/y-ppa-manager
and
sudo apt-get update
and
sudo apt-get install y-ppa-manager
Considering the question, apt is broken so, use these command instead
sudo su
and
32 Bit:
mkdir y-ppa-manager && cd y-ppa-manager && wget https://launchpad.net/~webupd8team/+archive/y-ppa-manager/+files/launchpad-getkeys_0.3.2-1~webupd8~oneiric_all.deb && wget https://launchpad.net/~webupd8team/+archive/y-ppa-manager/+files/y-ppa-manager_0.0.8.6-1~webupd8~precise_all.deb && wget https://launchpad.net/~webupd8team/+archive/y-ppa-manager/+files/yad_0.17.1.1-1~webupd8~precise_i386.deb && dpkg -i ./*.deb
64 Bit:
mkdir y-ppa-manager && cd y-ppa-manager && wget https://launchpad.net/~webupd8team/+archive/y-ppa-manager/+files/launchpad-getkeys_0.3.2-1~webupd8~oneiric_all.deb && wget https://launchpad.net/~webupd8team/+archive/y-ppa-manager/+files/y-ppa-manager_0.0.8.6-1~webupd8~precise_all.deb && wget https://launchpad.net/~webupd8team/+archive/y-ppa-manager/+files/yad_0.17.1.1-1~webupd8~precise_amd64.deb && dpkg -i ./*.deb
Now type in y-ppa-manager
You'll be presented with this window
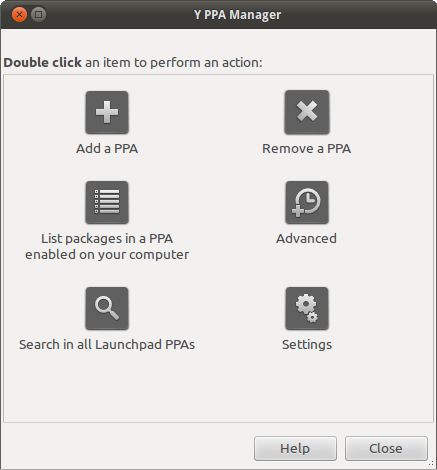
Double click on advanced, and you'll get this window
Do the following Tasks outlined in black
Prevention is better than cure
It is better to prevent than to search for this question on AskUbuntu :D
So, here are the guidelines to keep you safe
Keep your system up-to-date
always run the following command regularly
sudo apt-get update&&sudo apt-get upgrade
or, you can always use Update Manager with this command
gksu update-manager
Using only trusted PPA's
Only use PPA's meant to be used on Ubuntu also, only use PPA's with trusted sources. Infact, the package might already be in the ubuntu repositories
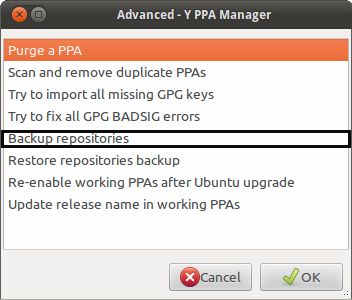
Backing up when things are good and restoring it later
For this you need Y-PPA-Manager. The steps to install it are given above.
Run this command to open Y-PPA-Manager
y-ppa-manager
You'll be presented with this window
Double click on advanced, and you'll get this window
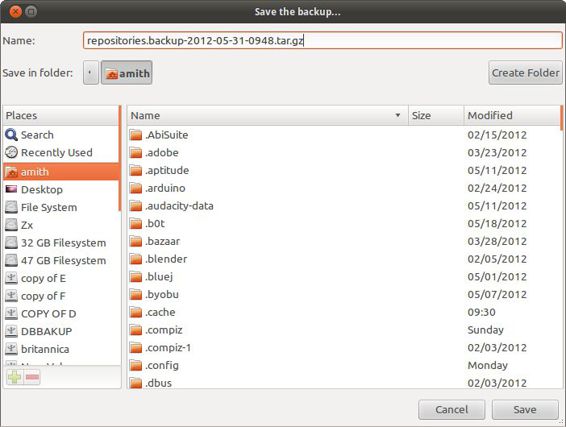
Run this:
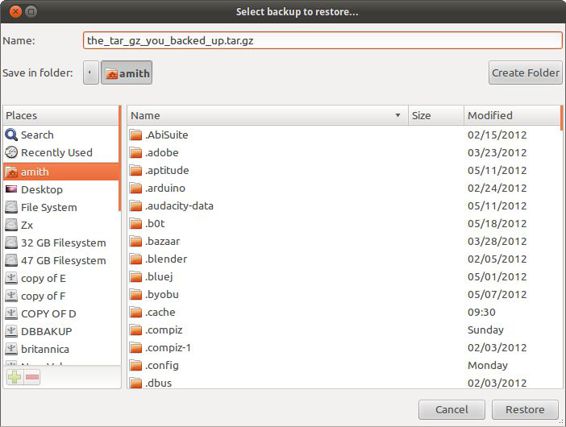
You'll be asked to save a tar.gz file with a dialog similar to the one below. Save it in another partition or a safe place
Later, when you need to restore it again, follow similar steps and when you get to the advanced dialog,Click on this:
You'll be asked to restore from the previous backup which you saved before with a dialog similar to the one below
All In one Script
Coming soon
Still not working?
Package dependency errors are not always generic and depends on the package to be installed.
If following all the steps given to fix the error does not work for you, you can always ask on Ask Ubuntu
Here are some commands which you need to post the output of
sudo apt-get install packagename
and
cat /etc/apt/sources.list
and
cat /etc/apt/sources.list.d/*
(Thanks to Basharat Sial)
There are also other files/commands that you need the output of that might be error specific, and users will probably prompt you in the comments to post the file/command.
Answer by overprescribed
These answers so far are focused on how to automagically resolve such an issue, mostly hoping that it resolves itself, but not focused on understanding how to investigate dependencies. Its important to try things like making sure your package lists are up to date, for you need to make sure a simple update or clearing of the cache doesn't resolve the issue before digging deeper. If everything behind the scenes is working as it should, however, its paramount to learn how to understand dependencies. Sometimes the layers of dependencies can seem overwhelming, but the concept is simple, and key to understanding how software is installed/uninstalled in an Ubuntu system.
I highly recommend aptitude to anyone using a .deb based system like Ubuntu. Its tree structure allows you to easily browse dependencies including recommended and suggested packages, as well as visualize conflicts and unmet dependencies. It is an invaluable tool for when apt-get doesn't offer a simple solution, and for visualizing dependencies in general. (Synaptic is also available in Ubuntu, but I don't find it as intuitive.)
Aptitude also offers a conflict resolver that will walk you through all the possible combinations of installed/removed/upgraded/etc packages to satisfy all requirements without conflict or issue. This can be successful even when apt is unable to find a solution. As a Ubuntu user, situations don't normally arise that require you to investigate why that particular package is being installed, but its almost inevitable as you use the system more.
Tags: software-installation (Next Q), apt (Next Q), package-management (Next Q)
Q: How do I install the latest TeX Live 2012?
Tags: software-installation (Next Q)
Ubuntu 12.04 still includes the outdated and obsolete 2009 version of TeX Live. Other than installing manually from the TeX Live website, is there any alternative to install the latest 2012 version on Ubuntu Precise 12.04?
Tags: software-installation (Next Q)
User: izx
Answer by izx
TeX Live 2012 is available for 12.04 in an official "backports" PPA
TeX Live 2012 is scheduled for inclusion in the next Ubuntu release (Quantal 12.10). Meanwhile, Ubuntu's TeX Live maintainer, Jeremy Bicha, has created an official "backports" PPA to allow 12.04 users to easily install/upgrade to the new version.
To install/upgrade to TeX Live 2012:
1. Open a terminal with Ctrl+Alt+T
2. Add the texlive-backports PPA by typing the below (enter your password when prompted):
3. sudo add-apt-repository ppa:texlive-backports/ppa
3. Then type:
4. sudo apt-get update
4. Installation:
o If you are installing TeX Live for the first time, type:
o sudo apt-get install texlive
o If you already have TeX Live installed and are upgrading, type:
o sudo apt-get upgrade
Warning: this will also upgrade all other packages on your Ubuntu system for which upgrades are available. If you do not wish to do this, please use the previous sudo apt-get install texlive instead.
Tags: software-installation (Next Q)
Q: How do I install Sublime Text 2/3?
Tags: software-installation (Next Q)
I installed Sublime Text 2 on 12.04 as per this tutorial.
However I don't have adequate permissions when launching the program from the Unity launcher. For example I cannot install packages, or if I add a folder to the sidebar when I close Sublime and reopen, the folder is no longer listed. If I run sudo sublime in the terminal all changes remain after closing.
I've tried chown-ing the Sublime Text 2 folder in usr/lib sudo chown -R mylogin:mylogin /usr/lib/"Sublime Text 2" but this seemed to have no effect.
Tags: software-installation (Next Q)
User: michael-gruber
Answer by jared-burrows
Install via the Package Manager(apt-get):
I know this already answered but you can simply just add to your packages:
For Sublime-Text-2:
sudo add-apt-repository ppa:webupd8team/sublime-text-2
sudo apt-get update
sudo apt-get install sublime-text
For Sublime-Text-3:
sudo add-apt-repository ppa:webupd8team/sublime-text-3
sudo apt-get update
sudo apt-get install sublime-text-installer
Source: https://gist.github.com/dantoncancella/4977978
Install Manually via Terminal:
Download from the Sublime Site:
32-bit:
wget http://c758482.r82.cf2.rackcdn.com/Sublime\ Text\ 2.0.2.tar.bz2
tar vxjf Sublime\ Text\ 2.0.2.tar.bz2
64-bit:
wget http://c758482.r82.cf2.rackcdn.com/Sublime\ Text\ 2.0.2\ x64.tar.bz2
tar vxjf Sublime\ Text\ 2.0.2\ x64.tar.bz2
For Both::
sudo mv Sublime\ Text\ 2 /opt/
sudo ln -s /opt/Sublime\ Text\ 2/sublime_text /usr/bin/sublime
Source: http://www.tecmint.com/install-sublime-text-editor-in-linux/
Install Manually via Script:
Check out this nice script on Github("Install Sublime Text on Fedora.") that you can run, just make sure to edit the "*.tar.bz2" in the script to download the latest version of Sublime Text!
Skip code block
#!/usr/bin/env bash
# Usage: {script} [ OPTIONS ] TARGET BUILD
#
# TARGET Default target is "/usr/local".
# BUILD If not defined tries to get the build into the Sublime Text 3 website.
#
# OPTIONS
#
# -h, --help Displays this help message.
#
# Report bugs to Henrique Moody <henriquemoody@gmail.com>
#
set -e
if [[ "${1}" = '-h' ]] || [[ "${1}" = '--help' ]]; then
sed -E 's/^#\s?(.*)/\1/g' "${0}" |
sed -nE '/^Usage/,/^Report/p' |
sed "s/{script}/$(basename "${0}")/g"
exit
fi
declare URL
declare URL_FORMAT="http://c758482.r82.cf2.rackcdn.com/sublime_text_3_build_%d_x%d.tar.bz2"
declare TARGET="${1:-/usr/local}"
declare BUILD="${2}"
declare BITS
if [[ -z "${BUILD}" ]]; then
BUILD=$(
curl -Ls http://www.sublimetext.com/3 |
grep '<h2>Build' |
head -n1 |
sed -E 's#<h2>Build ([0-9]+)</h2>#\1#g'
)
fi
if [[ "$(uname -m)" = "x86_64" ]]; then
BITS=64
else
BITS=32
fi
URL=$(printf "${URL_FORMAT}" "${BUILD}" "${BITS}")
read -p "Do you really want to install Sublime Text 3 (Build ${BUILD}, x${BITS}) on \"${TARGET}\"? [Y/n]: " CONFIRM
CONFIRM=$(echo "${CONFIRM}" | tr [a-z] [A-Z])
if [[ "${CONFIRM}" = 'N' ]] || [[ "${CONFIRM}" = 'NO' ]]; then
echo "Aborted!"
exit
fi
echo "Downloading Sublime Text 3"
curl -L "${URL}" | tar -xjC ${TARGET}
echo "Creating shortcut file"
cat ${TARGET}/sublime_text_3/sublime_text.desktop |
sed "s#/opt#${TARGET}#g" |
cat > "/usr/share/applications/sublime_text.desktop"
echo "Creating binary file"
cat > ${TARGET}/bin/subl <<SCRIPT
#!/bin/sh
if [ \${1} == \"--help\" ]; then
${TARGET}/sublime_text_3/sublime_text --help
else
${TARGET}/sublime_text_3/sublime_text \$@ > /dev/null 2>&1 &
fi
SCRIPT
echo "Finish!"
Source: https://gist.github.com/henriquemoody/3288681
This helped me and I hope it helps everyone else as well!
Answer by sergey
Basically, your problem is that you're using a wrong article :) If it was on an SE site I would down-vote it.
Manually copying stuff which does not come from Ubuntu repositories into /usr is WRONG. This directory is managed by Ubuntu's package manager and messing with it is going to cause you trouble at some point or another - for example, the next time you upgrade your system Sublime will likely be removed without a trace.
Running the program as root is even wronger, especially in the case of SublimeText which has its own package manager which basically downloads stuff from Internet and lets it run on your computer. A simple typo in a plugin could destroy all data on your machine.
A proper solution, if you want to install the program system-wide, would be to find/build a .deb file and install it - this way package manager would be aware of the package. Webupd8 maintains a PPA for SublimeText2, so you can just use that.
However, there's a much lazier solution which I am personally using - just unpack SublimeText somewhere in your home directory, create a bin directory in your home directory and symlink sublime_text executable into that directory. This does not require root privileges at all and the editor runs just fine.
The article also does some shell integration, such as registering sublime_text as a default editor and adding an icon, and I was too lazy to do that - however, I'm sure that it can be done without messing with system-wide settings.
This does not explain, however, the problems with permissions you're having - SublimeText stores all its settings in your home folder anyway, so even if you installed it system-wide it should not have problems. What probably happened is that you started it the first time with superuser privileges (i.e. from the sudo shell), so the editor's config directory (in ~/.config/sublime-text-2) is owned by root now. You need to do something like
sudo chown -R yourusername:yourusername /home/yourusername/.config/sublime-text-2
to fix this.
Answer by alex-l.
Here is how to solve this.
1) undo all the steps in the linked webpage in reverse order.
1a) if you didn't save a copy of your original defaults.list then open a terminal and run
sudo cp /usr/share/applications/defaults.list /usr/share/applications/defaults.list.bak && cat /usr/share/applications/defaults.list.bak | sed "s/sublime\.desktop/gedit.desktop/g" | sudo tee /usr/share/applications/defaults.list
2) get the version of sublime you want and extract it to the current directory.
3) in bash cd to the directory where you extracted sublime
4) mv Sublime\ Text\ 2 ~/.local
4a) if you want to be able to run sublime from the command line then run mkdir -p ~/bin && ln -s ~/.local/Sublime\ Text\ 2/sublime_text ~/bin/sublime. The default .bashrc will add ~/bin to your $PATH the next time your shell launches.
5) Make a file called sublime.desktop in ~/.local/share/applications/ and paste the following inside.
Skip code block
[Desktop Entry]
Version=1.0
Name=Sublime Text 2
# Only KDE 4 seems to use GenericName, so we reuse the KDE strings.
# From Ubuntu's language-pack-kde-XX-base packages, version 9.04-20090413.
GenericName=Text Editor
Exec=~/.local/Sublime\ Text\ 2/sublime_text
Terminal=false
Icon=~/.local/Sublime Text 2/Icon/48x48/sublime_text.png
Type=Application
Categories=TextEditor;IDE;Development
X-Ayatana-Desktop-Shortcuts=NewWindow
[NewWindow Shortcut Group]
Name=New Window
Exec=~/.local/Sublime\ Text\ 2/sublime_text -n
TargetEnvironment=Unity
6) test -e ~/.local/share/applications/defaults.list -a 1$(grep -sc \[Default\ Applications\] ~/.local/share/applications/defaults.list) != 10 || echo "[Default Applications]" >> ~/.local/share/applications/defaults.list; grep gedit.desktop /usr/share/applications/defaults.list | sed "s/gedit\.desktop/sublime.desktop/g" >> ~/.local/share/applications/defaults.list
7) done.
It should now be installed locally in your home directory and you should have no more issues with permissions.
Tags: software-installation (Next Q)
Q: How do I update Oracle Java 7 (JDK and JRE)
Tags: software-installation (Next Q), java (Next Q)
Recently, I've installed JDK 7 from the Oracle site, using these instructions.
Now, I'm wondering what is the correct method to update it (or, better, to keep up-to-date automatically)? For instance, there were some security issues fixed few days ago.
Tags: software-installation (Next Q), java (Next Q)
User: pilat
Answer by buzz-dee
You can use the webupd8 java ppa, so you get updates automatically through the package manager.
sudo add-apt-repository ppa:webupd8team/java
sudo apt-get update
sudo apt-get install oracle-java7-installer
sudo update-java-alternatives -s java-7-oracle
· Are "PPA's" safe to add to my system, and what are some "red flags" to watch out for?
If you need the latest Oracle Java 6, you install it too:
sudo apt-get install oracle-java6-installer
If you want test Oracle Java 8 early access builds, you can install it too:
sudo apt-get install oracle-java8-installer
To switch between different Java versions, you could use the following terminal command:
sudo update-alternatives --config java
Source:
· Web Upd8: Install Oracle Java 7 in Ubuntu via PPA Repository
· Web Upd8: Oracle Releases Critical Security Update For Java 7 (7U13) And Java 6 (6U39), PPA Updated
· Web Upd8: Install Oracle Java 8 In Ubuntu Via PPA [JDK8]
Tags: software-installation (Next Q), java (Next Q)
Q: How to install Internet Explorer (multiple versions)?
Tags: software-installation (Next Q), virtualbox (Next Q), virtualization (Next Q)
I am developing one site which has chat feature in Rails. I am using Ubuntu 12.04 LTS. I need to check that the site is IE9 because the chat feature using socket io of HTML5. I want to know that how to install IE9 in Ubuntu. I have looked at Chrome and Firefox extensions but if any standalone is available then please give me suggestion.
Tags: software-installation (Next Q), virtualbox (Next Q), virtualization (Next Q)
User: anand-soni
Answer by suhaib
Microsoft has created some customized Windows VHDs with the purpose of allowing web designers to test websites in Internet Explorer 10, 9, 8 and 7, for Free for 30 days:
You can download the virtual machine images from this website:
· Virtual Machine (VM), Windows Virtual PC & Browserstack | Modern.IE#downloads
From the site:
1. Download the SFX and all RAR files for the VM (smaller VMs may not have files with RAR extension). In each set below that contains a split archive, the provided text file (.txt) contains URLs to all files in the set, and this can be used directly with the 'wget' command in Linux. From the terminal, enter wget -i [URL TO TEXT FILE]. For Windows XP single file downloads, use wget [URL TO DOWNLOAD FILE] instead.
Example 1:
wget -i https://az412801.vo.msecnd.net/vhd/IEKitV1_Final/VirtualBox/Linux/IE8_Win7/IE8.Win7.For.LinuxVirtualBox_2.txt
Example 2:
wget https://az412801.vo.msecnd.net/vhd/IEKitV1_Final/VirtualBox/Linux/IE6_XP/IE6.WinXP.For.LinuxVirtualBox.sfx
1. After the download of all files for a set is complete, give the SFX file execute permission by typing chmod +x filename.sfx at the terminal.
2. Execute the SFX executable from the terminal with ./filename.sfx to expand the virtual machine to the current directory.
See also:
· Making Internet Explorer Testing Easier with new IE VMs - Rey Bango
· Free Official MSIE VM's for Linux and Mac | Hacker News
Answer by mendhak
Is this for personal/normal use or for testing website development?
If it's for normal browsing, you can get winetricks. Then run
winetricks ie6
or
winetricks ie7
or
winetricks ie8
And it should install a barebones, just-functioning version of IE. It won't be the full thing though. You may find that running IE in VMWare Player or VirtualBox with their seamless integration may be a better choice.
If this is for testing web development, have a look at browsershots.org which can test the website for you in different browsers and versions.
Answer by kv1dr
The best option is to run IE from the VirtualBox. Some time ago Microsoft created some files to run IE 7, 8 and 9 for free from VirtualBox(no Windows license needed). Give it a try.
Quoted from Webupd8.org:
Microsoft has created some customized Windows VHDs with the purpose of allowing web designers to test websites in Internet Explorer 9, 8 and 7, for free. To make it easier to set up, xdissent has created a Mac OSX / Linux script that will download the required files, extract them, install the latest VirtualBox guest additions and so on.
Read more here. :)
Tags: software-installation (Next Q), virtualbox (Next Q), virtualization (Next Q)
Q: How to add "Open terminal here" to Nautilus' context menu?
Tags: software-installation (Next Q), nautilus (Next Q)
I am working on Ubuntu 12.04 64bit.
I want to add "Open terminal here" to Nautilus context or right-click menu but it tries to download 32bit version from Internet.
Tags: software-installation (Next Q), nautilus (Next Q)
User: sagar-nikam
Answer by air-dex
You have to install the nautilus-open-terminal package :
sudo apt-get install nautilus-open-terminal
Then:
nautilus -q
in order to reset Nautilus
Tags: software-installation (Next Q), nautilus (Next Q)
Q: How do I install LibreOffice 4?
Tags: software-installation (Next Q), libreoffice (Next Q)
I want to download and install LibreOffice 4. How can I do this?
Tags: software-installation (Next Q), libreoffice (Next Q)
User: seth
Answer by user76204
You can use the Libreoffice 4.2 ppa from the libreoffice packaging team, which offers stable backports for Precise (12.04), Saucy (13.10), and Trusty (14.04).
Note: if you rely on libreoffice for work or school you may not want to risk updating, even though the backports provided are largely stable.
sudo add-apt-repository ppa:libreoffice/libreoffice-4-2
sudo apt-get update
sudo apt-get dist-upgrade
Obviously, if you don't already have libreoffice installed, you will also need to run
sudo apt-get install libreoffice
It should be noted that this ppa will only produce updates for the 4.2 series, while the main libreoffice ppa will provide updates beyond the 4.2 series, although that ppa is largely for testing and development builds.
When the 4.2 stable series becomes available, I will update this ppa.
Update: The 4.2 stable version has become available.
(The original 4.0 series ppa is here at launchpad, if anyone has any special reason to use that series.)
For more information, see this very recent useful article on libreoffice 4, and the getting started guide at the official documentation site.
Answer by seth
This method is not recommended!
While using this method will still work fine, and you will end up with the latest version of LibreOffice, LibreOffice 4.2 is now available in the Trusty repositories and the recommended method of installation is using the software center or apt.
If you want to live on the wild side, or you want the absolute latest and greatest version of LibreOffice use this answer.
If you find something out of date, please leave a comment below or go ahead and fix it yourself :)
Start by downloading it:
· Direct torrent link: LibreOffice 4.3.0 torrent 64 bit or LibreOffice 4.3.0 torrent 32 bit
· Normal installer direct link: LibreOffice 4.3.0 normal installer 64 bit or LibreOffice 4.3.0 normal installer 32 bit
I recommend the torrent for faster download speed and for slow connections.
To install LibreOffice 4 you will need to remove all previous versions. Run:
sudo apt-get remove --purge libreoffice-core libreoffice-common
sudo apt-get autoremove --purge
Note: I'm not 100% sure this will remove all of LibreOffice. If you experience any errors later, please let me know.
Extract the files:
1. cd to the Downloads directory:
2. cd Downloads
2. Extract the tar.gz:
For 64 bit:
tar -xvzf LibreOffice_4.3.0_Linux_x86-64_deb.tar.gz
For 32 bit:
tar -xvzf LibreOffice_4.3.0_Linux_x86_deb.tar.gz
Install the program:
1. cd to the programs folder:
For 64 bit:
cd LibreOffice_4.3.0_Linux_x86-64_deb/DEBS
For 32 bit:
cd LibreOffice_4.3.0_Linux_x86_deb/DEBS
2. Install part one (for both 32 and 64 bit):
3. sudo dpkg -i *.deb
You're done! You can now remove both the directory and the tarball:
rm -r ~/Downloads/LibreOffice_4.3.0_Linux_x86-64_deb
rm ~/Downloads/LibreOffice_4.3.0_Linux_x86-64_deb.tar.gz
Go add the re-add the applications to your launcher!
Some Kubuntu users will need to run this command to fix how LibreOffice 4 looks in KDE:
sudo mv /opt/libreoffice/ure/lib/libstdc++.so.6 /opt/libreoffice/ure/lib/libstdc++.so.6.old
Tags: software-installation (Next Q), libreoffice (Next Q)
Q: How to install gcc-4.8
Tags: software-installation (Next Q), gcc (Next Q)
I checked the gcc version on my system.
It is currently at 4.6.3. I read that gcc-4.8 is out.
I tried the following commands without success:
sudo apt-get install gcc (gcc is already the newest version)
sudo apt-get install gcc-4.8 (unable to locate package)
Does anyone know how to install this package on 12.04?
Tags: software-installation (Next Q), gcc (Next Q)
User: mdt
Answer by kevin-bowen
Is GCC-4.8 available for 12.04 Precise now?
Update: As of 6/05/2013, there is currently a release of gcc 4.8.1 for 12.04(precise) available at https://launchpad.net/~ubuntu-toolchain-r/+archive/test.
The short answer is: gcc-4.8 is currently available for 12.04(Precise) via the toolchain PPA or by compiling the source(see below for details).
Release Announcement
The announcement for the release of gcc-4.8 was made on March 22nd, so you probably won't be seeing this in an official repository just yet.
However, it appears that Launchpad does have a PPA available for the toolchain test builds that does include gcc-4.8, here: https://launchpad.net/~ubuntu-toolchain-r/+archive/test
According to the changelog and package list, there are debs for i386, amd64, arm, and powerpc and were built against raring 13.04.
The latest available version of gcc, for 12.04, is 4.8.1 and is available in the toolchain PPA.
Adding the toolchain/test PPA:
To add the PPA to your system, open a terminal(Ctrl+Alt+t) and run the following commands:
sudo apt-get install python-software-properties
sudo add-apt-repository ppa:ubuntu-toolchain-r/test
sudo apt-get update
sudo apt-get install gcc-4.8
sudo update-alternatives --install /usr/bin/gcc gcc /usr/bin/gcc-4.8 50
You will also be prompted to install a number of suggested packages. These packages are recommended, but optional, for the installation of gcc-4.8.
· What are PPAs and how do I use them?
· Are PPA's safe to add to my system and what are some "red flags" to watch out for?
What C++ features are available in gcc-4.8 that are not available in gcc-4.7.2?
· According to GNU.ORG, gcc-4.7, supports a number of C++11 features.
· As of the gcc-4.8 release, gcc-4.7 does not support 8 out of 64 features (See C++0x/C++11 Support in GCC)
· These features are:
· Language Features
· - Rvalue references for *this
· - Generalized attributes
· - Alignment support
· - Inheriting constructors
· Concurreny
· - Bidirectional Fences
· - Memory model
· - Abandoning a process and at_quick_exit
· - Thread-local storage
· For a full list of changes in gcc-4.8, see the Changelist
I need these gcc features on 12.04 Precise, now. How can I get them?
Building GCC-4.8 from source:
If you need gcc-4.8 on 12.04 now, your only option is to build it from source.
Please read the GCC installation FAQ prior to installation.
You can download gcc-4.8 from one of gnu.org's mirror sites or directly from their SVN server.
Here is an example of steps to compile from source (see here for additional details.) Note that these may vary depending on your system and preferences.
1. Download the source code
o Make a build directory ( mkdir gcc-build && cd gcc-build)
o Download the source file: wget http://www.netgull.com/gcc/releases/gcc-4.8.0/gcc-4.8.0.tar.bz2 (adjust this command to use an appropriate mirror site.
o Unzip the file (tar -xvjf <file name>)
2. Install some additional libraries (sudo apt-get install libgmp-dev libmpfr-dev libmpc-dev libc6-dev)
3. Compile the source: ./gcc-4.8.0/configure --prefix=/app/gcc/4.8.0
4. Run make (This will take some time to complete. Go make some coffee, or bake some cookies. ;-))
5. Install the code: sudo make install
Once this process has completed, run the command gcc --version to verify that the installation has completed successfully. You should see something similar to the following output:
maggotbrain@foucault:~$ gcc --version
gcc (Linaro 4.8.0) 4.8.0
Copyright (C) 2013 Free Software Foundation, Inc.
This is free software; see the source for copying conditions. There is NO
warranty; not even for MERCHANTABILITY or FITNESS FOR A PARTICULAR PURPOSE.
The bottom line: Thank all those folks who provide easy to install Ubuntu backports for you. Give them some of the cookies that you baked while running make. ;-)
Tags: software-installation (Next Q), gcc (Next Q)
Q: How can I install and use powerline plugin?
Tags: software-installation (Next Q), vim (Next Q)
Powerline is a plug-in to display informational and beautiful statusline for vim, tmux and shell prompt for bash, zsh.
Vim statusline: ![]()
![]()
![]()
![]() How can I install and setup Powerline for different applications and shells in Ubuntu?
How can I install and setup Powerline for different applications and shells in Ubuntu?
Tags: software-installation (Next Q), vim (Next Q)
User: basharat-sialvi
Answer by basharat-sialvi
Plugin Installation:
Install python-pip and git: Open terminal by hitting Ctrl+Alt+T and run:
sudo apt-get install python-pip git
· Per user:
In terminal run:
· pip install --user git+git://github.com/Lokaltog/powerline
Add ~/.local/bin to $PATH by modifying ~/.profile with your favourite editor:
gksudo gedit ~/.profile
and adding following lines at the end of it:
if [ -d "$HOME/.local/bin" ]; then
PATH="$HOME/.local/bin:$PATH"
fi
· System wide:
In terminal run:
· su -c 'pip install git+git://github.com/Lokaltog/powerline'
Font Installation:
Powerline provides two ways of installing the required fonts. If you're using one of following terminal: Gnome Terminal, Konsole, lxterminal, st, Xfce Terminal, Terminator, Guake, Yakuake then you should use "Fontconfig" method.
· Fontconfig: (recommended)
o Per User:
Run the following commands in terminal:
o wget https://github.com/Lokaltog/powerline/raw/develop/font/PowerlineSymbols.otf https://github.com/Lokaltog/powerline/raw/develop/font/10-powerline-symbols.conf
o mkdir -p ~/.fonts/ && mv PowerlineSymbols.otf ~/.fonts/
o fc-cache -vf ~/.fonts
o mkdir -p ~/.config/fontconfig/conf.d/ && mv 10-powerline-symbols.conf ~/.config/fontconfig/conf.d/
o System wide:
Run the following commands in terminal:
o wget https://github.com/Lokaltog/powerline/raw/develop/font/PowerlineSymbols.otf https://github.com/Lokaltog/powerline/raw/develop/font/10-powerline-symbols.conf
o sudo mv PowerlineSymbols.otf /usr/share/fonts/
o sudo fc-cache -vf
o sudo mv 10-powerline-symbols.conf /etc/fonts/conf.d/
· Patched font:
Use this method only if "Fontconfig" method doesn't work for you or you're using a terminal other than mentioned above.
o Download the font of your choice from powerline-fonts.
o Move your patched font to ~/.fonts/ for per user installation or /usr/share/fonts for system wide installation.
o Run fc-cache -vf ~/.fonts to update your font cache, sudo fc-cache -vf to do it system wide.
To use patched font in Gvim see this answer and to change the font of your respective terminal check this question: How to change the font of various terminal emulators?. You may have to reboot your system after font installation for changes to take effect.
Usage: (for per user installation)
· Vim statusline:
Add following to your ~/.vimrc or /etc/vim/vimrc:
· set rtp+=$HOME/.local/lib/python2.7/site-packages/powerline/bindings/vim/
·
· " Always show statusline
· set laststatus=2
·
· " Use 256 colours (Use this setting only if your terminal supports 256 colours)
· set t_Co=256
· Bash prompt:
Add the following line to your ~/.bashrc or /etc/bash.bashrc:
· if [ -f ~/.local/lib/python2.7/site-packages/powerline/bindings/bash/powerline.sh ]; then
· source ~/.local/lib/python2.7/site-packages/powerline/bindings/bash/powerline.sh
· fi
· Zsh prompt:
Add the following line to your ~/.zshrc or /etc/zsh/zshrc:
· if [[ -r ~/.local/lib/python2.7/site-packages/powerline/bindings/zsh/powerline.zsh ]]; then
· source ~/.local/lib/python2.7/site-packages/powerline/bindings/zsh/powerline.zsh
· fi
· Tmux statusline:
Add the following line to your ~/.tmux.conf:
· source ~/.local/lib/python2.7/site-packages/powerline/bindings/tmux/powerline.conf
· set-option -g default-terminal "screen-256color"
If your terminal supports 256 colours, set TERM environment variable to xterm-256color by modifying ~/.bashrc or /etc/bash.bashrc and adding following line:
export TERM=xterm-256color
To check if your terminal supports 256 colours check the documentation of your terminal or google it. Most popular terminals support 256 colours.
Usage: (for system wide installation)
· Vim statusline:
Add following to your ~/.vimrc or /etc/vim/vimrc:
· set rtp+=/usr/local/lib/python2.7/dist-packages/powerline/bindings/vim/
·
· " Always show statusline
· set laststatus=2
·
· " Use 256 colours (Use this setting only if your terminal supports 256 colours)
· set t_Co=256
· Bash prompt:
Add the following line to your ~/.bashrc or /etc/bash.bashrc:
· if [ -f /usr/local/lib/python2.7/dist-packages/powerline/bindings/bash/powerline.sh ]; then
· source /usr/local/lib/python2.7/dist-packages/powerline/bindings/bash/powerline.sh
· fi
· Zsh prompt:
Add the following line to your ~/.zshrc or /etc/zsh/zshrc:
· if [[ -r /usr/local/lib/python2.7/dist-packages/powerline/bindings/zsh/powerline.zsh ]]; then
· source /usr/local/lib/python2.7/dist-packages/powerline/bindings/zsh/powerline.zsh
· fi
· Tmux statusline:
Add the following line to your ~/.tmux.conf:
· source /usr/local/lib/python2.7/dist-packages/powerline/bindings/tmux/powerline.conf
· set-option -g default-terminal "screen-256color"
If your terminal supports 256 colours, Set TERM environment variable to xterm-256color by modifying ~/.bashrc or /etc/bash.bashrc and adding following line:
export TERM=xterm-256color
To check if your terminal supports 256 colours check the documentation of your terminal or google it. Most popular terminals support 256 colours.
Configuration:
For detailed information on configuring Powerline: Configuration.
Uninstall:
To uninstall Powerline run one of following commands in terminal:
· To uninstall per user installation:
· pip uninstall powerline
· To uninstall system wide installation:
· su -c 'pip uninstall powerline'
Source: Powerline beta documentation
Alternatives:
If you're installing Powerline just for Vim you should try vim-airline which is more customizable and lightweight.
Tags: software-installation (Next Q), vim (Next Q)
Q: How to install Wine
Tags: software-installation (Next Q), wine (Next Q)
I am looking for a step by step instruction to guide me in the ways of installing, configuring and debugging many of the issues new users have when dealing with Wine in Ubuntu.
What is the recommended way of installing Wine, some of the issues that it has and how to solve them.
If I have a specific problem with an App in Wine, how do I go about solving it. What are the recommended steps to ensure that I can fix a problem related to an app I wish to use.
Tags: software-installation (Next Q), wine (Next Q)
User: luis-alvarado
Answer by luis-alvarado
Please see the Wine Application Database before reading this guide for specific app problems since it covers all apps currently tested in Wine, components you need to use and most problems and solutions for each app. This should be the first thing you do when dealing with any Wine specific app issue.
Main Content
1. Differences between the Wine version in Software Center and the PPA
2. How can I install the Wine version from Software Center / PPA
3. How to deal with 2 or more versions of Wine installed (PlayOnLinux)
4. How to know which components an application needs
5. How to install additional components, DLLS and Libraries to Wine
6. Troubleshooting a Wine App
7. How do I open multiple Wine apps without them using the same Window (Overlapping)
8. Does having Ubuntu 64 bit influence Wine
9. Benefits of Using PlayOnLinux (PoL) / CodeWeavers CrossOver / DosBox
10.What are some special parameters and tips I can use with Wine
11.Stability, Performance and App Support Wine offers to end users
Steam for Linux please see: How can I install Steam?
1. Differences between the Wine version in Software Center and the PPA
The Wine version available in the Software Center is good, but over time it gets old and with less updates applied to it. Even though the Development version is considered "unstable", since around 1.3.x it has been more stable, has offered better performance and has solved many problems than the current "stable".
In comparison, the stable version receives an update 3 months after release. The development version receives an update every 2 weeks which is uploaded to the PPA in a few days after release.
The decision to stick with the stable version (Even number version: 1.0, 1.2, 1.4...) or with the unstable versions (Odd number version: 1.1, 1.3, 1.5...) is up to the user, but they should know the difference between them and why it would be better, not just for compatibility but also performance to stay with the Development version. You not only get the latest with any new fixes it offers, but also become a tester for the latest and can help in the development cycle. Additionally you carry a version that has solved more bugs than the current stable version. Keep that in mind when deciding which version to use.
2. How can I install the Wine version from Software Center / PPA
Ubuntu by default comes with Wine in it's repositories. To do it via Software Center, simply open Software Center and type in the search box 'wine'. This should show you the Wine package and you can click on it to install. After that you need to open at least once the 'winecfg' for the wine environment to create itself.
To do it via PPA (Recommended) in the terminal type the following:
sudo add-apt-repository ppa:ubuntu-wine/ppa -y && sudo apt-get update && sudo apt-get install wine
That should leave you with the latest version. When the development cycle for 1.7 comes out for example, you would change wine to wine1.7. Installing the PPA will also install winetricks.
3. How to deal with 2 or more versions of Wine installed
You can have more than 1 version of Wine installed (with some tricks) but it is generally NOT RECOMMENDED. There are some special cases where a piece of software might only work on an specific Wine version until developers solve the problem but it is unwise to have 2 or more versions of wine that can conflict with one another, specially if the user starts confusing each one.
For such a scenario I would recommend to deal with this multiple instances of Wine via PlayOnLinux (PoL), which can create an individual container for each version. To install PoL simply go to their site and install the Ubuntu package. Then follow their step by step configuration which offers several advantages over traditional Wine installations.
This also applies to updates. When you have a previous Wine version like Wine 1.5 and want Wine 1.7, I recommend removing the previous package and the proceeding to install the newer one. A simple sudo apt-get remove wine1.5 should do that and then proceed with installing the newer development version.
4. How to know which components an application needs
To find out what components an app needs, look in the Wine Application Database. It lists if the application is usable, what components it needs and how to install them.
5. How to install additional components, DLLS and Libraries to Wine
To have a working and enhanced Wine environment for your games and apps, I suggest you use winetricks to install additional components which will offer better compatibility with games for example. winetricks comes installed by default when you install the Wine PPA. So, to have a better working system do the following:
In this example I will use winetricks to prepare for HL/HL2 (Non steam versions, since the Steam versions already came out. For this versions I would suggest: How can I install Steam? . Know that Half-Life and HL2 are natively supported in Ubuntu). To play HL/HL2 you need the Wine PPA as mentioned above. After installing and opening winecfg at least once continue with winetricks. you can open winetricks in 2 ways, the terminal, in which you would type winetricks (In case the winetricks window does not open, then type winetricks --gui) or in the Dash by typing winetricks. After it opens follow this steps:
Select Select the default wineprefix
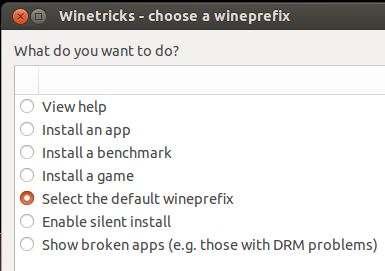
Select Install a windows DLL or component
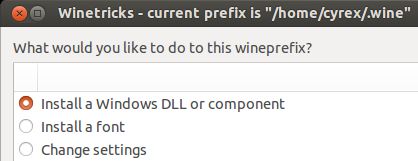
Install all that I have marked (and any additional you need). This covers many apps:

Now right click the installer for HL/HL2 and select Open with Wine. Both games should work perfectly. This applies to apps in general and depending on the app you will need to install more or less components.
Also know that you can install each component in terminal by simply adding the name of the component after the winetricks command, for example:
winetricks vcrun2010 - Will install vcrun2010 using winetricks
winetricks xna40 - Will install xna40
6. Troubleshooting a Wine App
Sometimes, when running an App one or several of the following can actions can happen:
· Frozen App
· Wine opens a Blue window for a moment and then closes it
· Nothing appears to happen
· Inside the Wine window everything is Black in the start or at some point
· DLL, Video card or Component not recognized
For most of this problems there are solutions. Here are the recommended steps for you to start troubleshooting your way into a Wine app:
1. Always visit the Wine App Site to see what other testers have done to make the App work. For example here is me testing Dead Island: Riptide which I gave it a Bronze since after the selecting the character the whole game went to a Black screen. What I did to test out what was happening was to go to the terminal and run the game from there. In the terminal some of the errors suggested I was missing a vital piece for the game to work. After reading the error output and doing what it suggested (Replacing a corrupted DLL) I could install a component the game needed and the game worked perfectly.
2. Knowing what the game needs is crucial to getting the game working correctly. Setting the winecfg options and OS environment is only a small part. This is only creating the environment for the app. You need to add other functionality like DirectX, XNA, .NET Framework and more that the app might need in order to work. This are key components for some apps. Without them, even if some apps work correctly, others will not. Making sure you have all of this components gives you a higher chance of complying with what an app needs.
3. As you can see from my Dead Island test I added several winetricks packages and also installed 3 packages the games comes with (DirectX, Windows Media Format and Microsoft Visual C++ 2010). With this I managed to guarantee that the game would start and be playable.
4. Some apps are only created for certain Windows versions as seen with Dungeon Keeper. To specify a particular Windows Version for a particular app you can open winecfg navigate to Applications and select Add Application, then search for the applications executable file and click on Open. Now select the application from the list and then change the Windows Version for it. This way, only this application will have an specific version of Windows assigned to it, instead of globally changing the Windows version for all apps.
5. Changing the Windows version globally can affect apps that were installed with a different Windows version. For example, Installing Terraria in a Windows XP environment and then changing it after playing to Windows 7 will give you one of two errors, one, not finding the saved games and two not running the app.
6. Running an app to diagnose what the problem can be done through the terminal which is the best way by far to know what the app is doing or needing. The app can tell you information like:
§ What missing DLL it needs to run (mscore.dll, steam_api.dll)
§ What missing component it needs to run (XNA, DirectX, .NET...)
§ If the problem is you are using a 64 Bit environment instead of a 32 Bit
§ If you need to add a parameter for the app to run
For missing DLLs I suggest using dll-files to download specific DLLs missing that are needed for the APP. Normally you can paste this DLLs inside the game folder or in the Windows/System32 folder (Or both) and that should solve the problem. For missing components use winetricks.
7. When troubleshooting an App, always run the app in an emulated Desktop Window. Open winecfg go to Graphics and enable Emulate a Virtual Desktop. Then set the resolution for it. This way, if the app freezes, hijacks the keyboard and/or mouse focus, at least you have a way to eliminate the app instead of having it fullscreen where you have few choices:
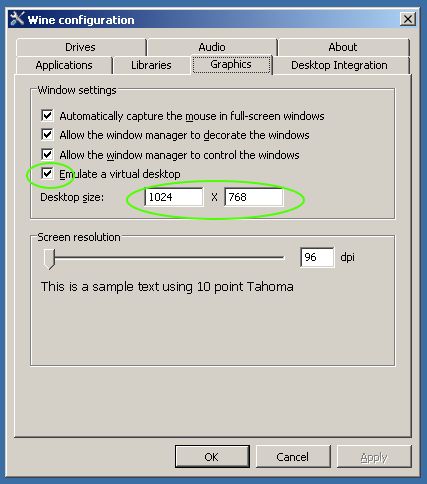
8. For freezing scenarios of an app at fullscreen I suggest activating the "Kill X" feature that is found in the Keyboard Layout Window which can save you several seconds of time when trying to get out of a frozen Wine app:

9. Another technique of getting out of frozen or not responding Wine apps is by pressing CTRL+ALT+F1, login in and typing wineserver -k. For this cases I typically first try to press CTRL+ALT+T to make the terminal open and I can do the wineserver -k from there. This will kill the running Wine process and give you the freedom to troubleshoot from another angle.
10.Remember that if an app needs a minimum or recommended hardware requirement in Windows, it will also need the same on Linux. If the app needs 512 MB of RAM and a 2.0 Ghz CPU, it will need the same on Linux using Wine.
11.Sometimes you will come across an app in an ISO or any other Image format that you can not manage to open or install. Ubuntu comes with several tools to open this files but the best one I have tried so far is CDEMU which covers several types of images that bring Multi-Sector or Protected format. This is the closest you will get to something similar to DAEMON Tools. Cases like The Sims 3, Simcity 2000 and others can only be opened and installed using this app. More info in Apps capable of mounting/unmounting CD/DVD Images with multi-sector or protected format
12.For cases where an specific app is not running, showing graphical glitches, black screen or not running with full graphics I actually recommend reading one of the following links that applies to the end user for video support:
Nvidia Users - Installing Nvidia Drivers
Hybrid - Is a NVIDIA GeForce with Optimus Technology supported by Ubuntu?
Ati - What is the correct way to install proprietary ATI Catalyst Video Drivers (fglrx) directly from AMD?
Apart from checking the above, if you have the correct drivers I would also add that you need to check if your video card has OpenGL support. For this I would first install mesa-utils if not yet installed:
sudo apt-get install mesa-utils
to test for OpenGL support. Simply run a check to see if you have OpenGL support:
glxinfo|grep 'direct rendering'
which should say Yes if you do have support. Another alternative would be:
/usr/lib/nux/unity_support_test -p.
Lastly, you can run glxgears to give you an idea of how your video card renders and its FPS for the render. Another very important point is to run the application from the terminal as in wine AppName.exe, this way it will show what the problem is.
13.If the Unity Launcher is not hiding itself when running a Wine app or is moving the app to the right you can do one of 2 things:
§ Hold the ALT key and click and drag the Wine to the Left
§ In the appearance option select "Auto-Hide The Launcher" and set the sensitivity to a level you like. This way the launcher will hide when the mouse leaves it's area.
14.Shader Model 3.0 is not recognized in Wine (Including Steam games)
There are games that require Shader Models and output an error similar to Required OpenGL extension GL_EXT_texture_compression_s3tc. To fix this simply type the following in the terminal:
sudo apt-get install libtxc-dxtn-s2tc0
Wine has come a LONG way from the days where newer games could not be played. It has gotten to a point where playing in Ubuntu is effortless. Wine has even some support for SM4.0 and DirectX 10/11 on Wine 1.6. If the problem persists it means that either your video card does not support this or you are missing the correct libraries.
Another reason that Wine might not detect Shader Model is because it might be set to Disabled in the Winetricks. Open the Dash and type winetricks. Select your wineprefix then Change Settings. Then look for the glsl=enabled option and select it. This should solve the Shader Model issue. Cases like the game Limbo are solved this way.
7. How do I open multiple Wine apps without them using the same Window (Overlapping)
You can setup multiple Wine windows by adjusting some Wine parameters before starting each individual Wine program. The fastest way is to open the terminal where the executable of the app you want to run exists. Let us assume it is the Wow.exe app. Then simply type the following:
wine explorer /desktop=WOW,1024x768 "Wow.exe" -opengl -console
This would open the Wow.exe executable with a Window titled "WOW", a resolution of 1024x768 for that specific Window and it would apply the parameters -opengl and -console to the Wow executable. Now assuming you have the game installed somewhere else, you would the following change:
wine explorer /desktop=WOW,1024x768 "/media/cyrex/fun/wow/Wow.exe" -opengl -console
This would execute the Wow.exe assuming it resides in the folder wow inside a partition called fun in your /media/USER folder. The output should be similar to this when running for example 4 apps:
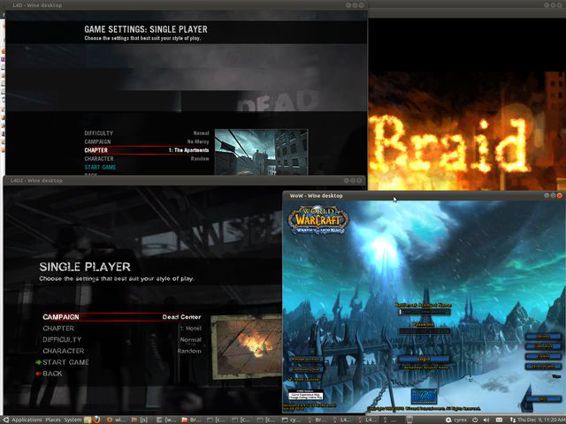
Now this is all great but, what if you wanted to execute the game every time but you do not want to type all of that or open the terminal at all. Well there is a more easier way to accomplish this. The idea is to create a Desktop shortcut. Simply right click on the Desktop to open the Context Menu and select New Document --> Empty Document. This should create an "Untitled Document" file on your desktop. Now open the file and paste in it the following:
[Desktop Entry]
Type=Application
Now save it and rename the file to the application you want to open but at the end add ".desktop". It will turn into an "Executable Windows Icon". Now right click the Icon again and go to Properties --> Permissions --> Activate Allow executing file as program. Now go to the Basic Tab and insert the information you need to execute that wine app. The end result should be something like this:
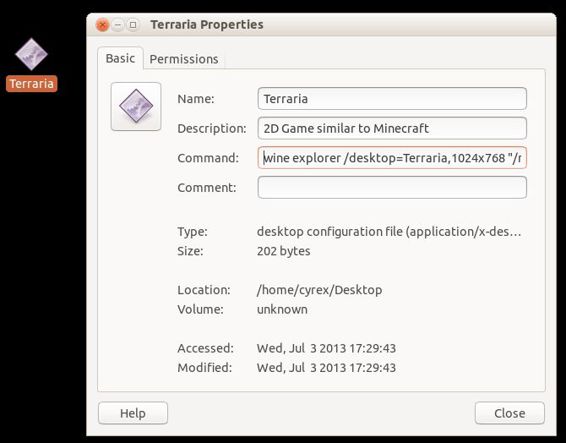
8. Does having Ubuntu 64 bit influence Wine
Yes, having Ubuntu 64 Bit will also set Wine as 64 bit. This will create several problems for many Windows apps that only work on 32 Bit. To solve this you need to do the following after having succesfully installed the PPA version as I mentioned above. Immediately afer installing the PPA wine package and before opening winecfg open the terminal (Make sure you are at your home folder by typing cd ~) and type the following:
rm -fr ~/.wine
export WINEARCH=win32
export WINEPREFIX="/home/USER/.wine"
winecfg
Change USER with your user account. For example in My case, that line would read export WINEPREFIX="/home/cyrex/.wine"
With this method you have changed the Wine architecture to 32 bit and on the moment you open Winecfg, it will configure all the Windows versions available to 32 Bit.
9. Benefits of Using PLayOnLinux (PoL) / CodeWeavers CrossOver / DosBox
PlayOnLinux (PoL)
Although you can actually install and configure everything you need with Wine alone and it's complementing apps (winetricks, regedit, explorer) using PoL can save you some trouble and time when installing an application. With PoL you can find a list of apps that you can select and install in it's database:
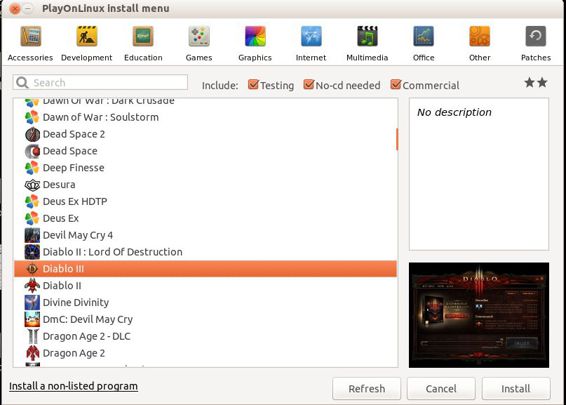
and by simply selecting to install you achieve the following benefits:
· Creating an independent container which holds the app installed, a specific Wine version for the app installed (In some cases, a specific Wine version works better for a specific app than the current Wine version).
· Automatically installing any additional DLL and Components the app needs to function correctly.
· Adding the appropriate registry keys the app needs
· Create an independent way of running multiples apps without them overlapping each other with Windows version changes, regedit changed, specific Wine versions, etc..
Of course, it is important to know that PoL works side by side with Wine and it needs Wine to work correctly (It is based on it). In many cases, an app might not work with PoL but will work with the default Wine configurations I have mentioned in this guide. So if you find the app you want to use in PoL, great. But if you don't find it, remember you always have the alternative to using the default Wine to install and configure the app.
The benefits of installing the app using Wine and installing it using PoL is that with Wine, you can access and execute the App using the DASH, like in the images below:
 (Terraria)
 (Dead Space & Dead Island)
CodeWeavers CrossOver (CC)
CC is very similar to PoL on how to install and configure apps. The main difference is that CC offers official support. They even have their own CodeWeavers Database which holds more than 10.000+ apps. Not only that but they have a ranking system similar to the one in Wine's AppDB. They have also contributed to the development of Wine some of which you can see in their Support.
DosBox (DB)
DB is to MS-DOS apps as Wine is to Windows apps. With DB you can run MS-DOS apps in your system. Simply install the dosbox package and you are done. Running an app is as simple as going to the folder where the app resides and executing the following:
dosbox ./
This will open the current folder as a drive letter on the DB environment.
You can also mount a folder by doing the following after opening DB:
mount x: /Absolute/Path/To/Folder/Of/App
For example
mount c: /home/cyrex/Desktop/Dune2
Will create the C: Drive letter which contains the Dune2 folder. So if I simply execute dune2.exe I get the following:
10. What are some special parameters and tips I can use with Wine
There are a couple, for example:
COMMANDS
wine --version - Shows the version of wine
wineserver -k - Kills all wine versions for the specific user. This is useful if your Wine app is frozen, took the whole screen and does not let you use Ubuntu, has the mouse or keyboard focused on it and other Wine issues that might appear with some apps.
wine explorer - Will open an explorer similar to the Windows Explorer
wine explorer /desktop=X,Y - Creates a virtual desktop where X is the name of the Desktop Window and Y is the resolution of the Window. For example: wine explorer /desktop=WOW,1024x768 Wow.exe
regedit - Will open the regedit version of Wine similar to the Windows one.
wine uninstaller - Will open the Add & Remove of Wine similar to the one in Windows. Here you will be able not only see which apps you have install and uninstall them, but also be able to install new apps if you wish.
winetricks - Will open the winetricks app to install missing Libraries, DLLS and Components essential for the correct functionality of many Windows apps.
winecfg - Will open the Wine Configuration where you can set Video, Sound and Windows version.
wine ipconfig - Shows you the IP that Wine can see. Similar to ipconfig.
wine netstat - Shows you the IP/Port connections made. Similar to netstat.
wine start - Sets the working directory for the executable. This option helps in cases where the executable only works from the same folder and not from a full path.
export WINEPREFIX - This variable is used to change the Wine Prefix to another location. For example if you wish to merge PoL and Wine (Not recommended since PoL has multiple Prefixes) you can do the following:
export WINEPREFIX="/home/USER/.PlayOnLinux/wineprefix/PREFIX"
Where PREFIX is the one you want to merge with Wine. You would have to run winecfg again.
TIPS
· When dealing with a folder tha has spaces (eg: World of Warcraft), you can execute the Wow.exe file by adding the \ symbol in front of every space, this escapes the symbol. The end result would be something like "World\ of\ Warcraft\Wow.exe". If you do not want to add this escape symbols to your line of code, simply double quote the entire link, so it looks like:
wine explorer /desktop=WOW,1024x768 "/media/cyrex/My Partition/World of Warcraft/Wow.exe" -opengl -console
as you can see, there are 2 folders with spaces in them, "My Partition" and "World of Warcraft", but since I quoted the whole string, the need to include escape characters is not needed. If you wished to use the Wine Path (eg: C:/) then all slashes would be a double slash (eg: "C:\Program Files\App").
· Parameters that are applied to an app should always be OUTSIDE the quoted strings. Using the example above, we can see -opengl and -console outside the quotes.
· When dealing with apps that take hold of you mouse and/or keyboard, you can use wineserver -k to kill the app, or simply opening the App in Windows mode or setting the Windows mode with the wine explorer /desktopparameter will save you from having this mouse/keyboard problems.
11. Stability, Performance and App Support Wine offers to end users
APP SUPPORT
I have tried Wine since 2005 and seen how the developing process in Wine under Ubuntu has been quickly catching up to the latest games.
Around 2009 if somebody came to me and wanted to change to Ubuntu, one of the questions they would ask me would be: Can I play X game on Ubuntu?. If the answer was positive for that game the next question would be something along the lines of: Will it have the same performance?
In 2009 my normal answer was no in both questions. After Wine 1.2 came out in 2012 and then 1.4 in 2012, I had changed my answer for several games and for the first time I was more positive about telling a new user that they could actually play the game. Many cases started to appear which would amaze me a many other users, cases like Deep Space 2 which is/was one of the latest games I could play and which I tested 3 days after it was released. Alice in Wonderland (The new one I mean), The Sims 3, World of Warcraft, Amnesia and others. Even Skyrim could be played. This are games that demand powerful graphics and you can play them with little to no additional setups other than the normal install and play steps I provided above.
A quick way to know what games can or can not be played on Wine (In Ubuntu) and a method I actually recommend is to visit the Wine App Database: http://appdb.winehq.org/ which holds more than 10000+ games. This also includes information for most games about the performance and stability, which is not the same for each game that can be playable on Linux. This helps knowing if a game is playable and has the same confirmed performance over the same game on Windows.
The Wine App Database also offers something called Ranking which helps determining what games can be played with less configuration and a bigger chance of them working out of the box. When you see this ranks, you have an idea if the App will work or not. Mind that you need to also take into consideration what hardware and Wine version the tester shows on the Wine Database. The rankings are as follow:
Platinum Rank - It means you have a 99% chance it will work out of the box with no problems at all, from start to finish. This includes stability, performance and anything you can do with the app. The chance the app has on working is almost 100%.
Gold Rank - It means you might find yourself doing a little bit of configuring but at the end it will work out good, but note that in most cases, Gold status will work out of the box for most users. They might also show as Gold because they have not being tested with the latest Wine version so the problems manifested on an older version might be gone already. The chance the app has on working ranges between 60% to 99%.
Silver Rank - It means that the game will run, but might have graphical, sound or control issues. Apart from this, you might also need to configure or do many steps for the app to work correctly. The chance the app has on working ranges between 30% to 60%.
Bronze Rank - It means the game might run, it needs a lot of configuration to make it work and in most cases it will not work correctly. The chance the app has on working ranges between 0% to 30%.
Garbage Rank - It means the app still does not work, not even install. The only way to make it work would be when Superman starts eating kryptonian cereal in the morning.
A couple of years ago the amount of Platinum games was less than 50. In 2012 you could find More than 1500 games out of which almost 200 were in the Latest Titles. Today there are more than 5800 Games of which 1800+ are Platinum. The only need here is for more people to participate and test the apps on Wine. This is the main reason I will always recommend using the PPA from Wine.
PERFORMANCE
For game tests and performance information see Gaming performance difference between Windows and Ubuntu
Tags: software-installation (Next Q), wine (Next Q)
Q: Complete Installation Guide for Android SDK / ADT Bundle on Ubuntu
Tags: software-installation (Next Q)
What all needs to be done to install Android SDK / ADT Bundle on Ubuntu?
Each of the steps in the answer was found on some different forum as I encountered obstacles getting started with my Android SDK and posted questions in appropriate forums thereafter. So I thought this would be useful in that it is a one stop solution available, in case one ever needs to re-install Ubuntu and install the Android SDK / ADT Bundle from scratch!
Tags: software-installation (Next Q)
User: host-website-on-ipage
Answer by host-website-on-ipage
Step 1:
Check in System Settings -> Details, whether your Ubuntu is 32-bit or 64-bit
Step 2:
(Using software centre or command lines) If your Ubuntu is a 32-bit OS then install libgl1-mesa-dev
In case of 64-bit OS install ia32-libs (Ubuntu 13.04 or earlier), or libgl1-mesa-dev:i386 (Ubuntu 13.10 and above)
Step 3: Install openjdk-6-jdk or better, openjdk-7-jdk
Step 4: Download the Android SDK or the ADT Bundle from here and unzip it to wherever you want.
Step 5: Check that the unzipped ADT Bundle folder (or Android SDK folder, as the case may be) have the folders tools and platform-tools. These folders contain some important commands stored. Add them to your executable path. Adding them to the path can be done as follows:
First execute gedit ~/.pam_environment. A file opens. Just add these lines to that file:
PATH DEFAULT=${PATH}:/path/to/tools
PATH DEFAULT=${PATH}:/path/to/platform-tools
Here you have to replace /path/to/tools and /path/to/platform-tools by the absolute paths according to where you unzipped the SDK or the ADT bundle download. Now all the commands adb, android, emulator etc can be simply executed in the terminal without giving absolute paths. That is, you will not get a "command not found" error if you gave it without its absolute path.
Answer by casper-li
Target : Super Newbies
IDE : Eclipse
1. Installing Java Runtime (JDK) and Eclipse IDE
· Search Software on Ubuntu and launch Ubuntu Software Center
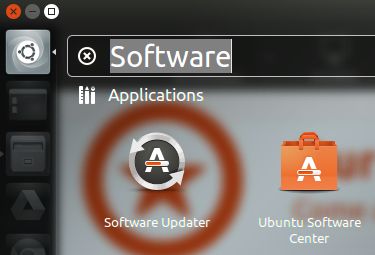
· Search Java on Ubuntu Software Center and then install the OpenJDK Java Runtime.
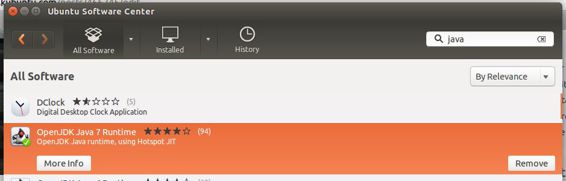
· Search Eclipse on Ubuntu Software Center and then install it.
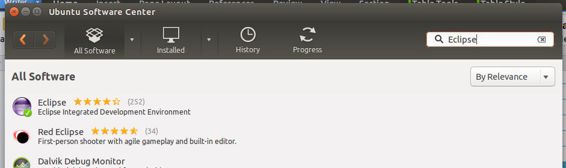
· If you have successfully installed eclipse and JDK, it will appear in the search result on your computer.
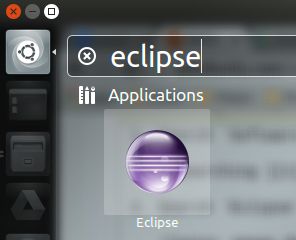
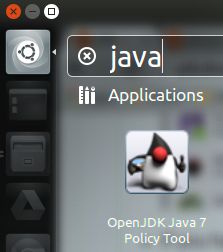
· For the JDK, you can also press CTRL + ALT + T to open a terminal and type command java -version to check again.

· Tips : Lock the eclipse icon on launcher.
2. Downloading SDK
· Go to http://developer.android.com/sdk/index.html to download the latest version of SDK. 
· Scroll down and click DOWNLOAD FROM OTHER PLATFORMS 
· Click android-sdk_r22.6.2-linux.tgz under Linux 32 & 64-bit of SDK Tools Only.
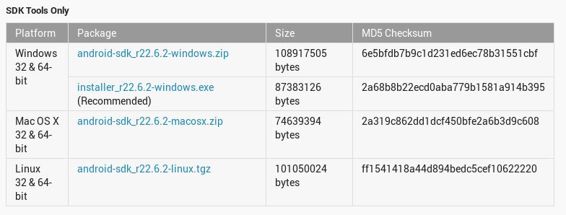
· Tick I have read and agree with the above terms and conditions and click Download android-sdk_r22.6.2-linux.tgz.
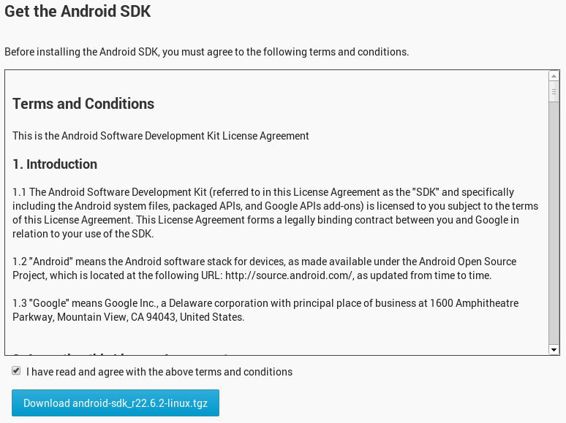
· Wait for the download process.
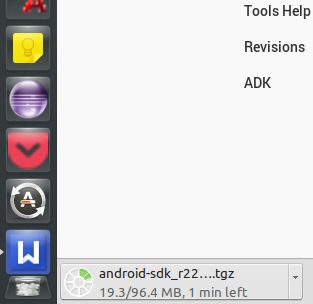
3. Preparing for Installation
· Go to the location where you set to download the file.
· Rigth click the file[.tgz] and select Extract Here.
· Now you can see that a file called android-sdk-linux appears as if the following.
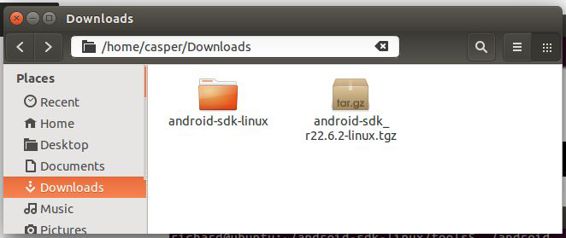
· Enter the folder android-sdk-linux.

· Enter the folder tools and then copy the folder location.

· Press the keys CTRL + ALT + T to open a terminal and then use the following command. Where /home/casper/Downloads/android-sdk-linux/tools is the location I copied previously. You can just type cd and right click to past the location to the terminal.
· cd /home/casper/Downloads/android-sdk-linux/tools
· ./android

· Now the Android SDK Manager will be run.
4. Installing Packages
· Click Install [Number] packages....
· Click Accept License and then click Install.
· Wait for the installation process.
· Finally, this message will be shown.
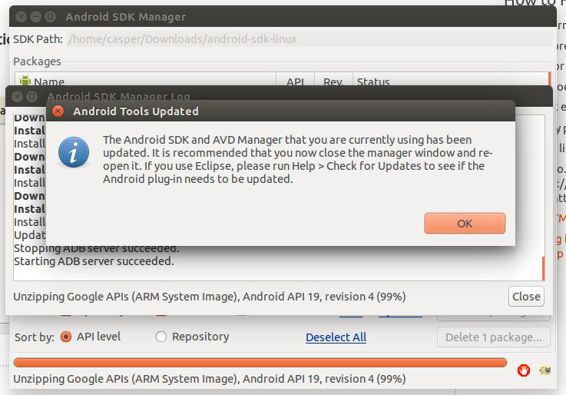
5. Editing ".bashrc"
· Press CTRL + ALT + T to open a new terminal and type : gedit ~/.bashrc
· Now the following text will appear.
· Add the following to the top of the entire text and then save it. (Do not close the file)
· export PATH=${PATH}:~/android-sdk-linux/tools
· export PATH=${PATH}:~/android-sdk-linux/platform-tools
· Example :
· [Recommended] Move the whole file android-sdk-linux to your eclipse's workspace and under a folder that you create named Android. Moreover, you have to copy the location.
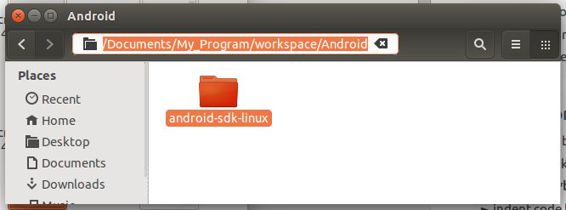
· Now back to the ".bashrc" file and the replace the '~' with the location you copied previously and then save it and close it.
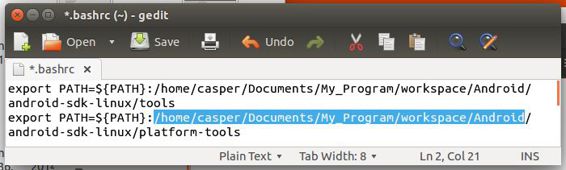
· Logout and relogin your Ubuntu system.
6. Setting Up an Android Virtual Device
· Press CTRL + ALT + T and type android avd to open the Android Virtual Device Manager.
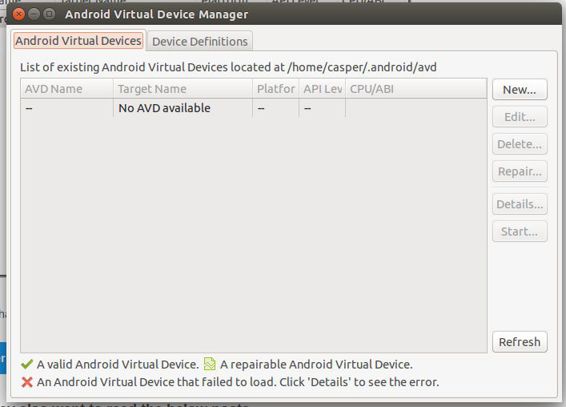
· Click New.... Set up like the following and click OK.
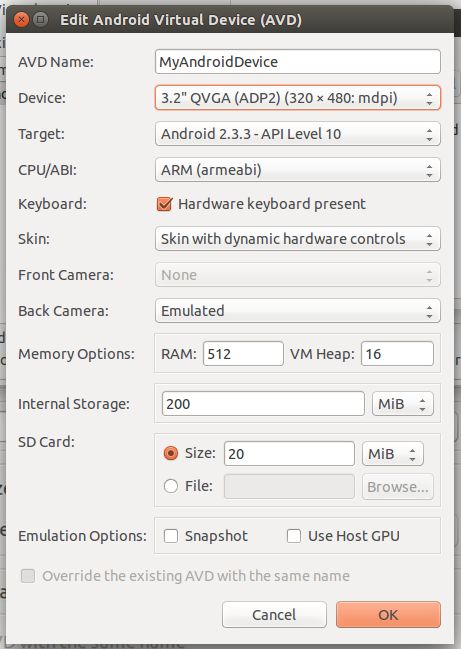
· Click your virtual device and then click Start....
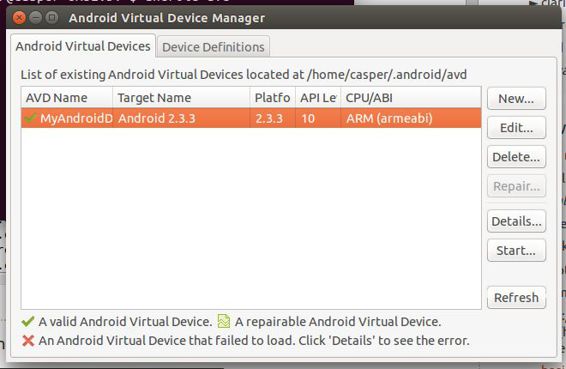
· Click Launch.
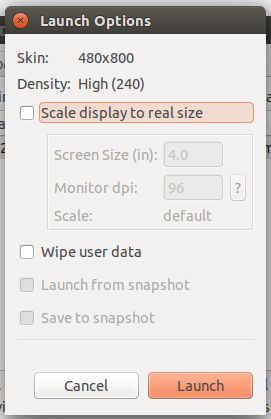
· Launching your virtual device 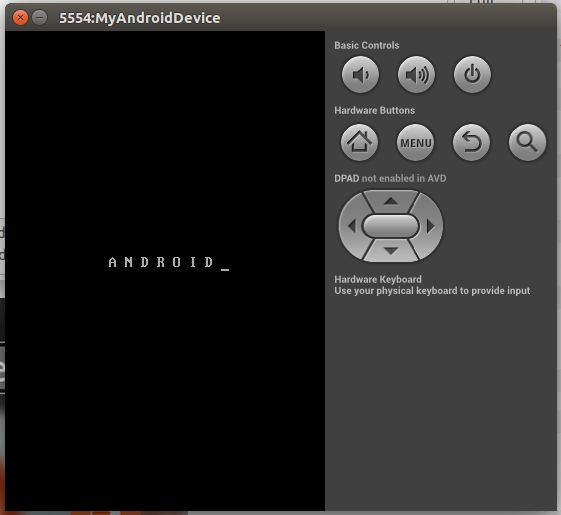
7. Installing ADT Plugin on Eclipse
· Start Eclipse and go to Help -> Install New Software...
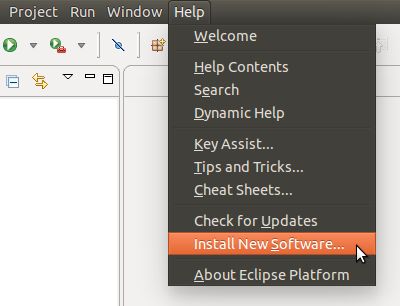
· Click Add....
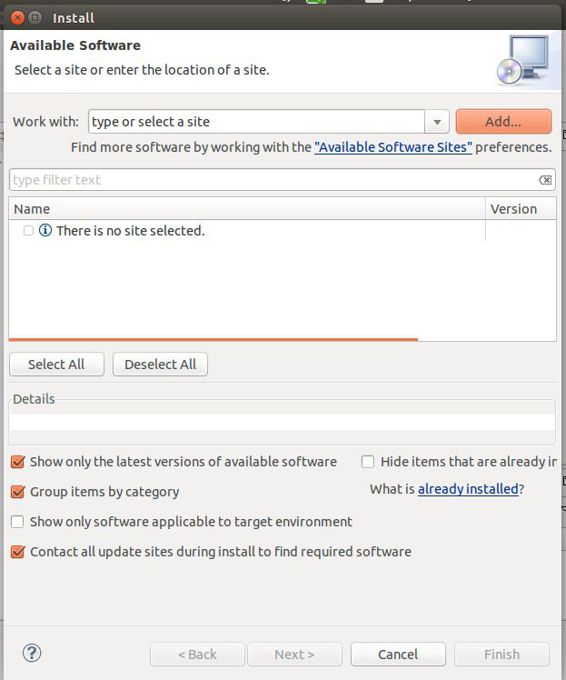
· Type the following and then click OK.
· Name : ADT Plugin
· Location : https://dl-ssl.google.com/android/eclipse/
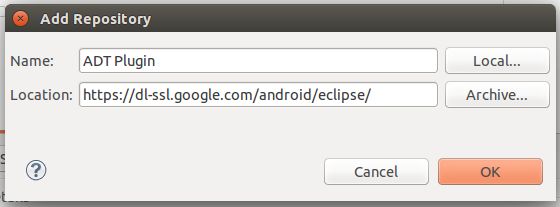
· Tick the checkbox of Developer Tools and then click Next>.
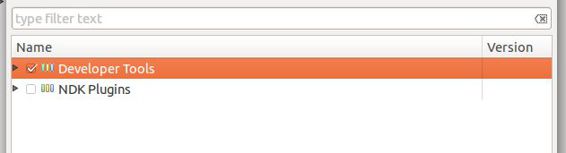
· Click Next>.
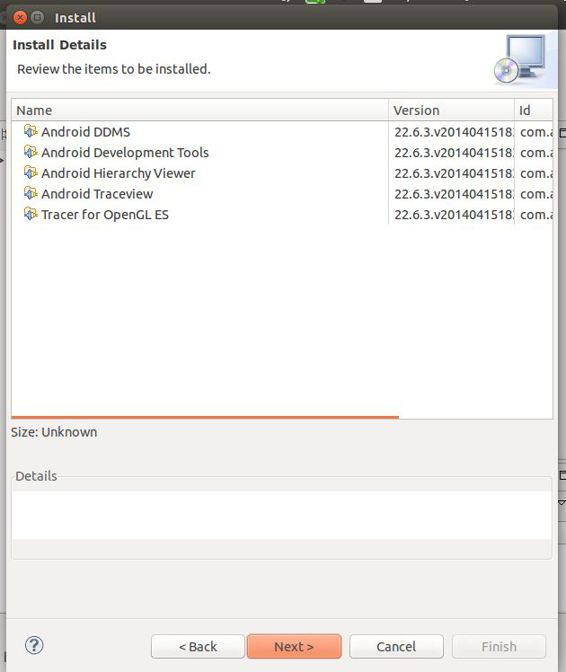
· Click "I accept the..." and click Finish.
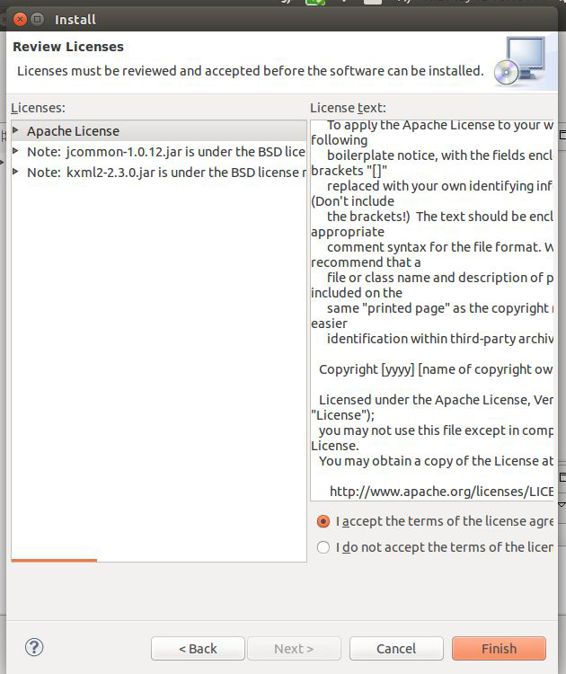
· Wait for the installation process.
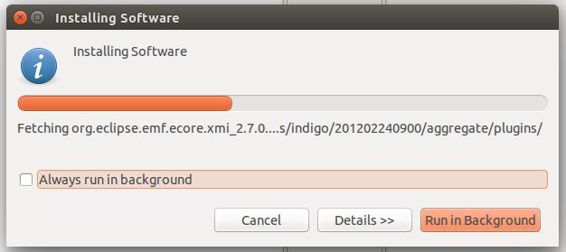
· Restart eclipse.
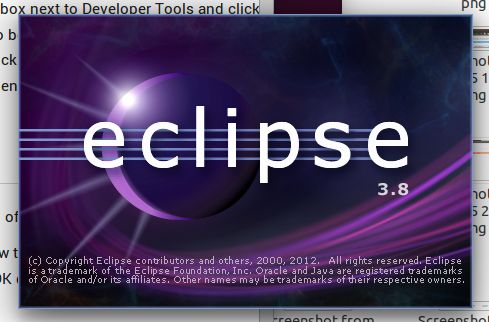
· Click Open Preferences.
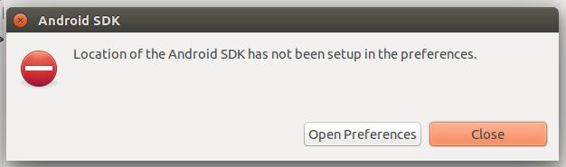
· Copy your own SDK location (The location of the file android-sdk-linux).
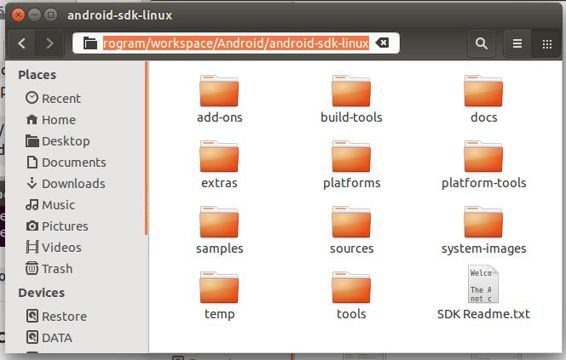
· Paste to the SDK Location: textbox and then click Apply and OK.
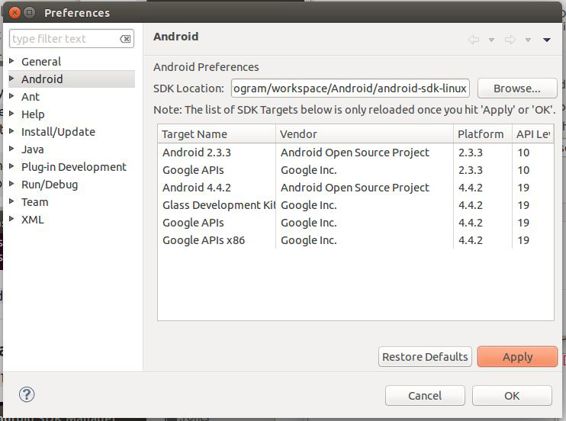
· Enjoy to create any android application with your Ubuntu.
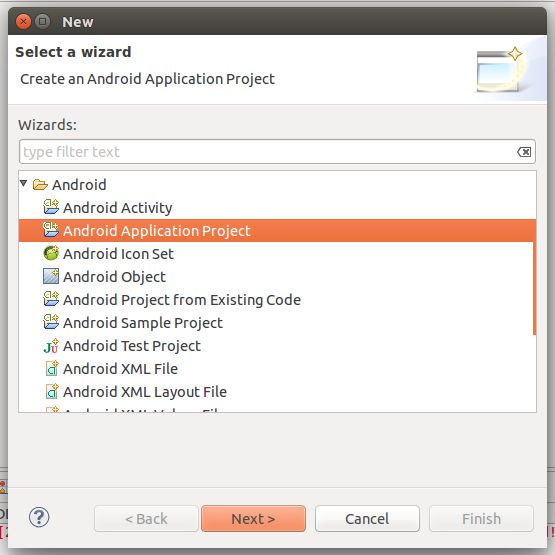
Tags: software-installation (Next Q)
Q: Installed Teamviewer using a 64-bits system, but I get a dependency error
Tags: software-installation (Next Q), apt (Next Q), dpkg (Next Q)
I was trying to install Teamviewer, but I was getting a dependency error. I tried to install them, but with no luck.
I'm getting this error:
Skip code block
Unpacking teamviewer (from teamviewer_linux_x64.deb) ...
dpkg: dependency problems prevent configuration of teamviewer:
teamviewer depends on lib32asound2; however:
Package lib32asound2 is not installed.
teamviewer depends on lib32z1; however:
Package lib32z1 is not installed.
teamviewer depends on ia32-libs; however:
Package ia32-libs is not installed.
dpkg: error processing teamviewer (--install):
dependency problems - leaving unconfigured
Errors were encountered while processing:
teamviewer
I tried
sudo apt-get -f install
Getting
Skip code block
Package ia32-libs is not available, but is referred to by another package.
This may mean that the package is missing, has been obsoleted, or
is only available from another source
However the following packages replace it:
lib32z1 lib32ncurses5 lib32bz2-1.0
Package lib32asound2 is not available, but is referred to by another package.
This may mean that the package is missing, has been obsoleted, or
is only available from another source
E: Package 'lib32asound2' has no installation candidate
E: Package 'ia32-libs' has no installation candidate
I can't even get to the
sudo dpkg -i teamviewer_linux_x64.deb
If I force installation
sudo dpkg --force-depends -i teamviewer_linux_x64.deb
Although it's "Setting up Temviewer" it gives me this:
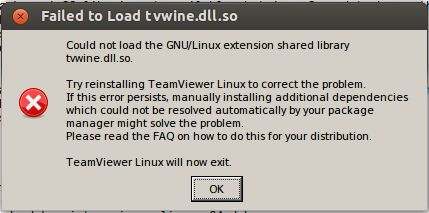
How can I fix this problem?
Tags: software-installation (Next Q), apt (Next Q), dpkg (Next Q)
User: the-mini-john
Answer by braiam
The problem is that the teamviewer_linux_x64.deb has dependencies problems. Isn't recommended for distributions using multiarch (Ubuntu 12.04 and later). For said distributions the teamviewer_linux.deb package should be used.
This is noted in the help page of Teamviewer:
Notes to Multiarch:
On newer 64-bit DEB-systems with Multiarch-support (Debian 7) teamviewer_linux_x64.deb cannot be installed because the package ia32-libs is not available anymore on these systems. In this case you can use teamviewer_linux.deb instead.
So, how to install it?
First, download it:
wget http://www.teamviewer.com/download/teamviewer_linux.deb
Now you have 2 options. You can use gdebi (recommended) to solve the dependencies, or you can solve them yourself.
Gdebi method:
First, install gdebi:
sudo dpkg --add-architecture i386
sudo apt-get update
sudo apt-get install gdebi
In the same directory you downloade the .deb file just run:
sudo gdebi teamviewer_linux.deb
It will list the dependencies and install it with a y.
Manual method:
Here you need to do everything manual. First, query the package dependencies so you can install them first:
dpkg-deb -I teamviewer_linux.deb | grep Depends
It will return something like this:
Depends: libc6 (>= 2.4), libgcc1, libasound2, libfreetype6, zlib1g, libsm6, libxdamage1, libxext6, libxfixes3, libxrender1, libxtst6
Just installing such dependencies with :i386 should be enough:
sudo apt-get install libc6:i386 libgcc1:i386 libasound2:i386 libfreetype6:i386 zlib1g:i386 libsm6:i386 libxdamage1:i386 libxext6:i386 libxfixes3:i386 libxrender1:i386 libxtst6:i386 libxrandr2:i386
Then installing Teamviewer as normal:
sudo dpkg -i teamviewer_linux.deb
That should be all:
dpkg --no-act -i Downloads/teamviewer_linux.deb
dpkg: could not open log '/var/log/dpkg.log': Permission denied
Selecting previously unselected package teamviewer.
(Reading database ... 210950 files and directories currently installed.)
Unpacking teamviewer (from Downloads/teamviewer_linux.deb) ...
Tags: software-installation (Next Q), apt (Next Q), dpkg (Next Q)
Q: Is FFmpeg missing from the official repositories in 14.04?
Tags: software-installation (Next Q)
I tried to install ffmpeg in trusty/Ubuntu 14.04 and got the following message:
$sudo apt-get install ffmpeg
Reading package lists... Done
Building dependency tree
Reading state information... Done
Package ffmpeg is not available, but is referred to by another package.
This may mean that the package is missing, has been obsoleted, or
is only available from another source
E: Package 'ffmpeg' has no installation candidate
Why isn't the package available?
Tags: software-installation (Next Q)
User: user254877
Answer by livewirebt
FFmpeg and libav
libav from the Ubuntu repositories
Ubuntu started shipping the libav fork instead of FFmpeg in recent releases. If you installed the ffmpeg package, then you actually installed the libav-tools package and a program that told you to use avconv instead of ffmpeg in the future, giving the impression that ffmpeg is deprecated, which it is not.
The transitional ffmpeg package seems to have been removed from trusty/Ubuntu 14.04 (compare the package files listing for saucy and trusty of the source package).
So one option is to install the libav-tools package and use avconv instead (NB that this is not "mainline" FFmpeg but a prominent fork instead).
FFmpeg from a PPA on Launchpad
Another option is to use a PPA that provides FFmpeg. Please have a look at the FFmpeg download page for details of possible PPA's.
Related questions:
· Are PPA's safe to add to my system and what are some "red flags" to watch out for?
Install from source
Another option is to install FFmpeg dependency packages, then manually compile+install it from source.
The following is what I could find, when researching this topic. I haven't been following the development of both projects closely and it is not my intention to blame anyone. You as a reader shouldn't do either.
How did the fork happen?
Wikipedia states that the forked project as well as the initial release were announced on March 13th 2011, however there is a bit more that was going on.
Digging through Git commits
· 18 Jan 2011 - commit f4f5cab94e0881cd30965b28f3d78d9c63d6918e
The FFmpeg project leader Michael Niedermayer is removed from the MAINTAINERS file.
· 27 Jul 2011 - commit 6291d7e41605c0b1e9debfae8a2b1d4cf7b0e0b3
avconv is introduced:
Make a copy of ffmpeg under a new name -- avconv.
It will be further developed with a few incompatible changes.
ffmpeg.c will stay as is for some time, so any scripts using it won't be broken.
· 27 Jul 2011 - commit 791a86c37a03b94207bc2d0ad4cbe7f39d7e495a
A warning is added to the forked version of ffmpeg.c source code, that may be misleading to users who haven't noticed about the fork and that they are not using FFmpeg anymore.
· 12 Jan 2012 - commit 0fec2cb15cc6ff1fcc724c774ec36abadcb7b6ad
ffmpeg.c is removed from the source code.
Official announcements on libav.org
The following posts are from the news section (with the oldest in last):
August 09 2011
Updated on 12.09.2011.
For consistency with our new name we have renamed ffplay to avplay, ffserver to avserver and ffprobe to avprobe. Their behavior is the same, just the names were changed.
With ffmpeg (the command line tool) we decided to use this opportunity to fix some longstanding usability problems, which involves breaking compatibility. Therefore we have added a new tool named avconv which is based on ffmpeg, but has a different (hopefully more powerful and easier to use) syntax for some options. ffmpeg will be kept in its current state for some time, so no scripts or frontends using it will break. However it will not be developed further.
Differences between avconv and ffmpeg are:
[...]
Note that the avconv interface is not considered stable yet. More incompatible changes may come in the following weeks. We will announce here when avconv is stable.
And earlier in 2011:
Mar 18, 2011
We have just pushed another point release from our 0.6 release branch: Libav 0.6.2. This is another maintenance-only release addressing two security issues.
From now on, we will be using our new project name libav. But don't worry, compared to the preceding release 0.6.1, the only functional changes are the two security fixes for the VC1 and APE decoders. This means that libav provides a painless drop-in replacement for existing FFmpeg installations.
Moreover, we are proud to accompany this source release with executables and libraries for the win32 platform. These binaries include H.264 encoding using the bundled x264 library. Enjoy!
Distributors and system integrators are encouraged to update and share their patches against our release branches.
Mar 17, 2011
We have just pushed another point release from our 0.5 release branch: FFmpeg 0.5.4. This is another maintenance-only release that addresses a number of security issues.
Distributors and system integrators are encouraged to update and share their patches against our release branches.
March 13, 2011
We, as a group of FFmpeg developers, have decided to continue developing FFmpeg under the name Libav. All existing infrastructure will be transferred to the libav.org domain.
· Website: http://www.libav.org/
· Git: git://git.libav.org/libav.git (see http://libav.org/download.html)
· FATE: http://fate.libav.org/
· Roundup: https://roundup.libav.org/
· Patchwork: http://patches.libav.org/
· Mailinglists: http://lists.libav.org/ (developer list: libav-devel@libav.org)
You can update your git repository using the following command:
git remote set-url origin 'git://git.libav.org/libav'
For now we are still reachable over FFmpeg's mailing lists and IRC channels but we will migrate to libav.org counterparts. For a transition period both the website and source might still contain references to FFmpeg. These will disappear over time, except where historically relevant.
February 24, 2011
FFmpeg development has moved to Git, and the SVN repository is no longer updated. The SVN repository may be removed in a near future, so you're recommended to use a Git repository instead.
The last revision committed to SVN was r26402 on 2011-01-19 and replaced the svn:external libswscale with a standalone copy.
Note that FFmpeg development has in fact moved to a Git repository by now and that there are two Git repositories. See the corresponding projects download page.
Answer by rutrus
ffmpeg was replaced in previous releases by the avconv program from the libav project.
To install avconv you need to install the libav-tools package:
sudo apt-get install libav-tools
avconv is very similar to ffmpeg, but they also have some differences in syntax.
Answer by guillaume
You can also use this PPA: ppa:jon-severinsson/ffmpeg
sudo apt-add-repository ppa:jon-severinsson/ffmpeg
sudo apt-get update
sudo apt-get install ffmpeg
Tags: software-installation (Next Q)
Q: Can sudo be reinstalled after being removed?
Tags: software-installation (Next Q), sudo (Next Q)
This seems to be a chicken-egg problem. The most common task using sudo is installing and removing software.
sudo apt-get purge <appname>
But sudo itself can be removed.
sudo apt-get purge sudo # Do not run this command on production computers!
This is where the fun comes
ubuntu@ubuntu:~$ sudo
bash: /usr/bin/sudo: No such file or directory
Although it's obvious that no person in his right mind will purge sudo (other than me), someone can be fooled to run this command (not directly, in its hex mode, or whatever it's called) or a person could SSH in disguised as tech guru and do the mess.
So is there a way of reinstalling sudo?
Tags: software-installation (Next Q), sudo (Next Q)
User: registered-user
Answer by radu-rădeanu
I can install applications using:
pkexec apt-get install <appname>
From man pkexec:
pkexec allows an authorized user to execute PROGRAM as another user. If
username is not specified, then the program will be executed as the
administrative super user, root.
So, I suppose that pkexec apt-get install sudo should work as well.
Edit: now I can confirm: yes, sudo can be installed using using pkexec apt-get install sudo:
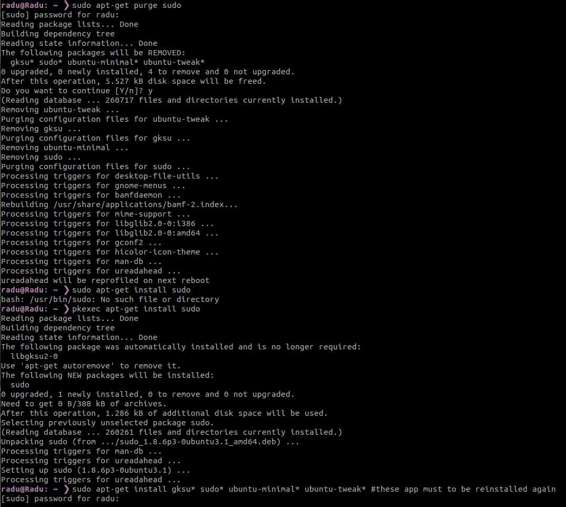
(click to enlarge)
Answer by vojtech-trefny
You can always boot into Recovery Mode, drop to root shell and install it without sudo.
Answer by avinash-raj
Yes, reinstalling sudo package would be possible via chroot method.
· First boot from Ubuntu live disk.
· Mount the previously installed Ubuntu partition into whatever directory you want.In my case, i mounted it in /media/ubuntu.
· sudo mkdir /media/ubuntu
· sudo mount /dev/sdaX /media/ubuntu # /dev/sdaX - previously installed Ubuntu partition.
· By default you didn't able to get internet connection after chrooted into a partition.So run the below command to make it work.
· for d in dev sys run proc; do sudo mount --bind /$d /media/ubuntu/$d ; done
Thanks to @Oli for this wonderful piece of code .
· Now chroot into that mounted directory,
· $ sudo chroot /media/ubuntu
· # apt-get update
· Install sudo package by running,
· # apt-get install sudo
· Now exit out of chrooted environment.
· exit
· Finally boot up your Ubuntu OS.Now test your sudo command, it will surely works.
Tags: software-installation (Next Q), sudo (Next Q)
Q: How to install Skype 4.3?
Tags: software-installation skype (Next Q)
Skype 4.3 is just released with considerable improvements. As a regular Skype user I want to use the latest Skype on my Ubuntu 14.04, but there is no updates from Update Manager. Even in Skype website only Skype 4.3 is available only for Ubuntu 12.04. Is there anyway to use this latest Skype on Ubuntu 14.04 or how much we have to wait for the update?
Tags: software-installation skype (Next Q)
User: tuxtu
Answer by kasiya
Step 1: Remove previous version.
sudo apt-get remove skype skype-bin:i386 skype:i386
sudo apt-get install sni-qt:i386
It is Important if you installed older version of Skype on your Ubuntu, Clear the old Skype folder before installing latest version. Then clear that by using:
rm -rf ~/.Skype
Step 2: Preparing to Installing Skype.
· Users of 64-bit Ubuntu, should enable MultiArch if it isn't already enabled by running the command
· sudo dpkg --add-architecture i386
· Update repositories and "updates" list:
· sudo apt-get update
· sudo apt-get install gdebi #(read Why you need to install gdebi...)
Step 3: Installing Skype
Method 1: Download and install from file
wget download.skype.com/linux/skype-ubuntu-precise_4.3.0.37-1_i386.deb
sudo gdebi skype-ubuntu-precise_4.3.0.37-1_i386.deb
Method 2: Install Skype from Canonical Partner Repository
So add the Canonical Partner Repository to "updates" list by following the command:
sudo add-apt-repository "deb http://archive.canonical.com/ $(lsb_release -sc) partner"
Then install Skype via the Software-Center or via the Terminal.
sudo apt-get update && sudo apt-get install skype
source
Why you need to install gdebi instead of using dpkg or Ubuntu software center.
dpkg (for Debian package) is a software tool from the command line is responsible for installing, creating, deleting, and managing Debian (packets deb), the type of packets processed by Ubuntu. It also allows the Debian package management from sources outside the apt repositories.
To install packages, dpkg has a graphical interface, gdebi , you can use if you prefer to avoid the command line.
gdebi is an application installation and management of Debian (.deb) packages. This is a utility that works both in graphic mode console and allow the installation of packages outside of APT deposits : from a website, CD-ROM, portable media, etc. It has the same functionality as apt-get or Ubuntu Software Center : it ensures that the package to be installed is compatible with the version and architecture of the Ubuntu system in which you try to install it, and also ensures that all dependencies required by the package are satisfied. Otherwise, the dependencies are downloaded from the Internet. Using tabs, gdebi also provides access to important information such as folder paths in which to install the various files from .deb package.
Finally gdebi is a lightweight deb packages installer which was the default in Ubuntu Desktop. Now Ubuntu uses Ubuntu Software Center which is slow and sometimes you get The package is of bad quality error.
Read more about GDebi:
To install a package you have downloaded from a website, rather than from a software repository. These packages are called .deb files. Because they may have been created for a different Linux distribution, you might find that there's dependency issues with Ubuntu, meaning that they may be uninstallable.
gdebi is a simple tool to install .deb files. It has a graphical user interface but can also be used in your terminal. It lets you install local deb packages resolving and installing its dependencies.. It automatically checks packages for their dependencies and will try to download them from the Ubuntu software repositories if possible. You may first need to install gdebi - simply install the gdebi package using one of the package managers like dkpg, Synapticor open a Terminal and type sudo apt-get install gdebi. Once you have installed gdebi, use the File Browser to find the package you want to install.
Double-click the package to open it with gdebi. If all dependencies have been met for the selected package, simply click the Install package button to install it. gdebi will warn you if there are unmet dependencies, which means that there's dependencies that aren't resolved in the repositories that you're using.
Answer by warrioring64
Install From Ubuntu Software Center
As of August 2, 2014, you can now install Skype 4.3 directly from the Ubuntu Software Center.
To do this, you must first enable the Canonical Partner Repository, using the following steps (based on steps provided by OMG! Ubuntu; see source):
· Search for and open Software Sources or 'Software & Updates' in the Unity Dash
· Select the Other Software tab
· Check/tick the boxes next to the two entries headed Canonical Partners
· Exit, and hit Ok on the software reload prompt
Then search for Skype in the Ubuntu Software Center and install it as you would any other software.
(Source)
Install From Skype's Website
You can download the latest version of Skype as a .deb package directly from its website. Choose the 12.04 (multiarch) version if you're running Ubuntu 12.04 LTS or newer; it'll still work if you're on i.e. 14.04 LTS, because that's just what Microsoft lists as the minimum Ubuntu version.
Once you have it, run the following commands to ensure your system is clear of any previous installations:
sudo apt-get remove skype skype-bin:i386 skype:i386
Then double-click on the downloaded .deb file to open it in the Ubuntu Software Center and install it like any other software.
Afterwards, also run the following command in the terminal to ensure that support for the indicator menu is available:
sudo apt-get install sni-qt:i386
Now you can find Skype in the dash, run it and enjoy it!
(Source: WebUpd8)
Tags: software-installation skype (Next Q)
Q: How do I install Adobe Flash player?
Q: What's the easiest way to set up a LAMP stack?
Q: What is the best place to install user apps?
Q: How do I install the latest stable version of Firefox?
Q: How can I accept the Microsoft EULA agreement for ttf-mscorefonts-installer?
Q: How do I install and use the latest version of GNOME?
Q: How do I install a .tar.gz (or .tar.bz2) file?
Q: How to install Eclipse?
Q: How do I install a .deb file via the command line?
Q: How do I install the latest version of node.js?
Q: How to automatically fetch missing dependencies when installing software from .deb?
Q: How to install Chrome browser properly via command line?
Q: How would I install Picasa 3.9?
Q: How can I install Adobe AIR?
Q: How do I install the Cinnamon Desktop?
Q: What is the correct way to install proprietary ATI Catalyst Video Drivers (fglrx) directly from AMD?
Q: How do I resolve unmet dependencies?
Q: How do I install the latest TeX Live 2012?
Q: How do I install Sublime Text 2/3?
Q: How do I update Oracle Java 7 (JDK and JRE)
Q: How to install Internet Explorer (multiple versions)?
Q: How to add "Open terminal here" to Nautilus' context menu?
Q: How do I install LibreOffice 4?
Q: How to install gcc-4.8
Q: How can I install and use powerline plugin?
Q: How to install Wine
Q: Complete Installation Guide for Android SDK / ADT Bundle on Ubuntu
Q: Installed Teamviewer using a 64-bits system, but I get a dependency error
Q: Is FFmpeg missing from the official repositories in 14.04?
Q: Can sudo be reinstalled after being removed?
Q: How to install Skype 4.3?
All materials on the site are licensed Creative Commons Attribution-Sharealike 3.0 Unported CC BY-SA 3.0 & GNU Free Documentation License (GFDL)
If you are the copyright holder of any material contained on our site and intend to remove it, please contact our site administrator for approval.
© 2016-2026 All site design rights belong to S.Y.A.