Ubuntu Unleashed 2017 Edition (2017)
Part III: System Administration
Chapter 10. Command-Line Beginner’s Class
In This Chapter
![]() What Is the Command Line?
What Is the Command Line?
![]() Accessing the Command Line
Accessing the Command Line
![]() User Accounts
User Accounts
![]() Reading Documentation
Reading Documentation
![]() Understanding the Linux File System Hierarchy
Understanding the Linux File System Hierarchy
![]() Navigating the Linux File System
Navigating the Linux File System
![]() Working with Permissions
Working with Permissions
![]() Working with Files
Working with Files
![]() Working as Root
Working as Root
![]() Commonly Used Commands and Programs
Commonly Used Commands and Programs
![]() References
References
The Linux command line is one of the most powerful tools available for computer system administration and maintenance. The command line is also known as the terminal, shell, the console, the command prompt, and the command-line interface (CLI). For the purposes of this chapter and the next, these terms are interchangeable, although fine-grained differences do exist between them.
The command line is an efficient way to perform complex tasks accurately and much more easily than it would seem at a first glance. Knowledge of the commands available to you and also how to string them together makes using Ubuntu easier for many tasks. Many of the commands were created by the GNU Project as free software analogs to previously existing proprietary UNIX commands. If you are interested, you can learn more about the GNU Project at www.gnu.org/gnu/thegnuproject.html.
This chapter covers some of the basic commands that you need to know to be productive at the command line. You find out how to get to the command line and discover some of the commands used to navigate the file system and perform basic operations with files, directories, and users. This chapter does not give comprehensive coverage of all the commands discussed, but it does give you enough to get started. Chapter 11, “Command-Line Master Class Part 1,” advances the subject further while expanding on some of the commands from this chapter. The skills you discover in this chapter help you get started using the command line with confidence.
What Is the Command Line?
If you spend any amount of time with experienced Linux users, you have heard them mention the command line. Some, especially those who have begun their journey in the Linux world using distributions that make it easy to complete many tasks using a graphical user interface (GUI), such as Ubuntu, might speak with trepidation about the mysteries of the text interface. Others either praise its power or comment about doing something via the command line as if it is the most natural and obvious way to complete a task.
It is not necessary for you to embrace either extreme. You might develop an affinity for the command line when performing some tasks and prefer the GUI for others. This is where most users end up today. Some might say that you will never need to access the command line because Ubuntu offers a slew of graphical tools that enable you to configure most things on your system. Although the premise might be true most of the time, there are some good reasons to acquire a fundamental level of comfort with the command line that you should consider before embracing that view.
Sometimes things go wrong, and you might not have the luxury of a graphical interface to work with. In these situations, a fundamental understanding of the command line and its uses can be a real lifesaver. Also, some tasks end up being far easier and faster to accomplish from the command line. More important, though, you will be able to make your way around a command-line-based system, which you will encounter if you ever work with a Linux server because most Linux servers have no GUI, and all administration is done using a command-line interface.
Note
Don’t be tempted to skip over this chapter as irrelevant. You should take the time to work through the chapter and ensure that you are comfortable with the command line before moving on. Doing so will benefit you greatly for years to come.
Initially, you might be tempted to think of the command line as the product of some sort of black and arcane art, and in some ways it can appear to be extremely difficult and complicated to use. However, with a little perseverance, by the end of this chapter you will start to feel comfortable using the command line, and you’ll be ready to move on to Chapter 11, “Command-Line Master Class Part 1,” and Chapter 12, “Command-Line Master Class Part 2.”
This chapter introduces you to commands that enable you to perform the following:
![]() Routine tasks—Logging in and out, changing passwords, listing and navigating file directories
Routine tasks—Logging in and out, changing passwords, listing and navigating file directories
![]() Basic file management—Creating files and folders, copying or moving them around the file system, renaming and deleting them
Basic file management—Creating files and folders, copying or moving them around the file system, renaming and deleting them
![]() Basic system management—Shutting down or rebooting, changing file permissions, and reading man pages, which are entries for commands included as files already on your computer in a standardized manual format
Basic system management—Shutting down or rebooting, changing file permissions, and reading man pages, which are entries for commands included as files already on your computer in a standardized manual format
The information in this chapter is valuable for individual users or system administrators who are new to Linux and are learning to use the command line for the first time.
Tip
Those of you who have used a computer for many years will probably have come into contact with MS-DOS, in which case being presented with a black screen will fill you with a sense of nostalgia. Don’t get too comfy; the command line in Linux is different from (and actually more powerful than) its distant MS-DOS cousin. Even cooler is that whereas MS-DOS skills are transferable only to other MS-DOS environments, the skills that you learn at the Linux command line can be transferred easily to other UNIX and UNIX-like operating systems, such as Solaris, OpenBSD, FreeBSD, and even Mac OS X, which provides access to the terminal.
Accessing the Command Line
You can quickly access the terminal using the desktop menu option Terminal. This opens gnome-terminal, from which you can access the terminal while remaining in a GUI environment. This time, the terminal appears as white text on an aubergine (dark purple) background. This is the most common method for accessing the terminal for most desktop users.
Note
Finding and running programs, such as Terminal, from a GUI is covered in Chapter 3, “Working with Unity,” as is logging it to a Linux system using a graphical interface. This chapter focuses on text-based logins and the use of Linux.
The second most common way for graphical desktop users to access the command line is to press the key combination Ctrl+Alt+F1, after which Ubuntu switches to a black screen and a login prompt like this:
Ubuntu 16.04 seymour ttyl
seymour login:
Tip
This is tty1, one of six virtual consoles that Ubuntu provides. After you have accessed a virtual console, you can use Ctrl+Alt + any of F1 through F6 to switch to a different console, tty1 through tty6. If you want to get back to the graphical interface, press Ctrl+Alt+F7. You can also switch between consoles by holding the Alt key and pressing either the left or the right cursor key to move down or up a console, such as tty1 to tty2.
Regardless of which way you access the terminal, using the virtual tty consoles accessible at Ctrl+Alt+F1-6 or via the windowed version atop your GUI desktop, you will find the rest of the usage details that we cover work the same. As you continue to learn and experiment beyond the contents of this book, you might start to discover some subtle differences between the two and develop a preference. For our purposes, either method works quite well.
There are many other ways to access and use the command line. You could use a traditional console with a monitor, keyboard, and mouse attached to the PC, but which boots into a command-line interface instead of a GUI. You can also connect to your system through a wired or wireless network using the telnet or ssh commands, as covered in Chapter 19, “Remote Access with SSH, Telnet, and VNC.”
With that, let’s begin.
Text-Based Console Login
However you connect to a command-line interface, you start with a prompt similar to this one:
Ubuntu 16.04 seymour ttyl
seymour login:
Your prompt might vary, depending on the version of Ubuntu you are using and the method you are using to connect. In any event, at this prompt, type in your username and press Enter. When you are prompted for your password, type it in and press Enter.
Note
Your password is not echoed back to you, which is a good idea. Why is it a good idea? Well, people are prevented from looking over your shoulder and seeing your screen input. It is not difficult to guess that a five-letter password might correspond to the user’s spouse’s first name. After typing your username and pressing the Enter key, you are asked for your password, which you type. Note that Ubuntu does not show any characters while you are typing your password in. This is a good thing because it prevents any shoulder surfers from seeing what you’ve typed or the length of the password.
Pressing the Enter key drops you to a shell prompt, signified by the dollar sign:
matthew@seymour:~$
This particular prompt tells me that I am logged in as the user matthew on the system seymour and I am currently in my home directory; Linux uses the tilde (~) as shorthand for the home directory, which would usually be something like /home/matthew.
Tip
Navigating through the system at the command line can get confusing at times, especially when a directory name occurs in several places. Fortunately, Linux includes a simple command that tells you exactly where you are in the file system. It’s easy to remember because the command is just an abbreviation of the present working directory, so type pwd at any point to get the full path of your location. For example, typing pwd after following these instructions shows /home/yourusername, meaning that you are currently in your home directory.
Using the pwd command can save you a lot of frustration when you have changed directory half a dozen times and have lost track.
Logging Out
Use the exit or logout command or Ctrl+D to exit your session. You are then returned to the login prompt. If you use virtual consoles, remember to exit each console before leaving your PC. (Otherwise, someone could easily sit down and use your account.)
Logging In and Out from a Remote Computer
Although you can happily log in on your computer, an act known as a local login, you can also log in to your computer via a network connection from a remote computer. Linux-based operating systems provide a number of remote access commands you can use to log in to other computers on your local area network (LAN), wide area network (WAN), or the Internet. Note that you must have an account on the remote computer, and the remote computer must be configured to support remote logins; otherwise, you won’t be able to log in.
Note
See Chapter 18, “Networking,” to see how to set up network interfaces with Linux to support remote network logins and Chapter 19, “Remote Access with SSH, Telnet, and VNC,” to see how to start remote access services (such as sshd).
The best and most secure way to log in to a remote Linux computer is to use ssh, the Secure Shell client. Your login and session are encrypted while you work on the remote computer. The ssh client features many command-line options but can be simply used with the name or IP address of the remote computer, as follows:
Click here to view code image
matthew@seymour:~$ ssh 192.168.0.41
The authenticity of host '192.168.0.41 (192.168.0.41)' can't be established.
RSA key fingerprint is e1:db:6c:da:3f:fc:56:1b:52:f9:94:e0:d1:1d:31:50.
Are you sure you want to continue connecting (yes/no)?
yes
The first time you connect with a remote computer using ssh, Linux displays the remote computer’s encrypted identity key and asks you to verify the connection. After you type yes and press Enter, you are warned that the remote computer’s identity (key) has been entered in a file named known_hosts under the .ssh directory in your home directory. You are also prompted to enter your password:
Click here to view code image
Warning: Permanently added '192.168.0.41' (RSA) \
to the list of known hosts.
matthew@192.168.0.41's password:
matthew@babbage~$
After entering your password, you can work on the remote computer, which you can confirm by noticing the changed prompt that now uses the name of the remote computer on which you are working. Again, because you are using ssh, everything you enter on the keyboard in communication with the remote computer is encrypted. When you log out, you return to the shell on your computer:
matthew@babbage~$ logout
matthew@seymour:~$
User Accounts
A good place to start is with the concept of user-based security. For the most part, only two types of people access the system as users. (Although there are other accounts that run programs and processes, here we are talking about accounts that represent human beings rather than something like an account created for a web server process.) Most people have a regular user account. These users can change anything that is specific to their accounts, such as the wallpaper on the desktop, their personal preferences, and the configuration for a program when it is run by them using their account. Note that the emphasis is on anything that is specific to their accounts. This type of user cannot make systemwide changes that could affect other users.
To make systemwide changes, you need to use super user privileges, such as can be done using the account you created when you started Ubuntu for the first time (see Chapter 1, “Installing Ubuntu and Post-Installation Configuration”). With super user privileges you have access to the entire system and can carry out any task, even destructive ones. To help prevent this from happening, this user does not run with these powers enabled at all times, but instead spends most of the time as a regular user.
To use super user privileges from the command line, you need to preface the command you want to execute with another command, sudo, followed by a space and the command you want to run. As a mnemonic device, some think of this as “super user do.” When you press Enter (after typing the remaining command), you are prompted for your password, which you should type and then press the Enter key. As usual on any UNIX-based system, the password does not appear on the screen while you are typing it as a security measure, in case someone is watching over your shoulder. Ubuntu then carries out the command, but with super user privileges.
An example of the destructive nature of working as the super user is the age-old example sudo rm -rf /, which erases everything on your hard drive. If you enter a command using sudo as a regular user who does not have an account with super user privileges, an error message appears and nothing happens because the command will not run. We recommend that you don’t try this particular command as a test, though. If you enter this command using an account with super user privileges, you will soon find yourself starting over with a fresh installation and hoping you have a current backup of all your data. You need to be especially careful when using your super user privileges; otherwise, you might do irreparable damage to your system.
However, the ability to work as the super user is fundamental to a healthy Linux system and should not be feared, but rather respected, even while used only with focused attention. Without this ability, you could not install new software, edit system configuration files, or do a large number of important administration tasks. By the way, you have already been performing operations with super user privileges from the GUI if you have ever been asked to enter your password to complete a specific task, such as installing software updates. The difference is that most graphical interfaces limit the options that users have and make it a little more difficult to do some of the big, disruptive tasks, even the ones that are incredibly useful.
Ubuntu works slightly differently from many other Linux distributions. If you study some other Linux distros, especially older or more traditional ones, you will hear about a specific user account called root, which is a super user account. In those distros, instead of typing in sudo before a command while using a regular user account with super user privileges, you log in to the root account and simply issue the command without entering a password (at least by default; in almost all cases, sudo can be installed and configured in these distros). In those cases, you can tell when you are using the root account at the command line because you will see a pound sign (#) in the command line prompt in the place of the dollar sign ($).
For example: matthew@seymour:~# versus the usual matthew@seymour:~$
In Ubuntu, the root account is disabled by default because forcing regular users with super user privileges to type a specific command every time they want to execute a command as a super user should have the benefit of making them carefully consider what they are doing when they use that power. It is easy to forget to log out of a root account, and entering a powerful command while logged in to root can be catastrophic. However, if you are more experienced and comfortable with the more traditional method of using super user privileges and want to enable the root account, you can use the command sudo passwd. When prompted, enter your user password to confirm that your user account has super user privileges. You are then asked for a new UNIX password, which will be the password for the root account, so make sure to remember it. You are also prompted to repeat the password, in case you’ve made any mistakes. After you’ve typed it in and pressed Enter, the root account is active. You find out how to switch to root later on.
An alternative way of getting a root prompt, without having to enable the root account, is to issue the command sudo -i. After entering your password, you find yourself at a root prompt (#). Do what you need to do, and when you are finished, type exit, and press Enter to return to your usual prompt. You can learn more about sudo and root from an Ubuntu perspective at https://help.ubuntu.com/community/RootSudo.
Reading Documentation
Although you learn the basics of using Ubuntu in this book, you need time and practice to master and troubleshoot more complex aspects of the Linux operating system and your distribution. As with any operating system, you can expect to encounter some problems or perplexing questions as you continue to work with Linux. The first place to turn for help with these issues is the documentation included with your system; if you cannot find the information you need there, check Ubuntu’s website.
Using Man Pages
To learn more about a command or program, use the man command followed by the name of the command. Man pages are stored in places like /usr/share/man and /usr/local/share/man, but you don’t need to know that. To read a man page, such as the one for the rm command, use the man command like this:
matthew@seymour:~$ man rm
After you press Enter, the less command (a Linux command known as a pager) displays the man page. The less command is a text browser you can use to scroll forward and backward (even sideways) through the document to learn more about the command. Type the letter h to get help, use the forward slash (/) to enter a search string, or press q to quit.
No one can remember everything. Even the best and most experienced systems administrators use man pages regularly. Looking up complicated information is easy because this frees you from having to recall it all, enabling you to focus on your task rather than punishing you for not remembering syntax.
Note
Nearly all the hundreds of commands included with Linux each have a man page; however, some do not or may only have simple pages. You may also use the info command to read more detailed information about some commands or as a replacement for others. For example, to learn even more about info (which has a rather extensive manual page), use the info command like this:
Click here to view code image
matthew@seymour:~$ info info
Use the arrow keys to navigate through the document and press q to quit reading.
Using apropros
Linux, like UNIX, is a self-documenting system, with man pages accessible through the man command. Linux offers many other helpful commands for accessing its documentation. You can use the apropos command (for example, with a keyword such as partition) to find commands related to partitioning, like this:
Click here to view code image
matthew@seymour:~$ apropos partition
addpart (8) - Simple wrapper around the "add partition" ioctl
all-swaps (7) - Event signaling that all swap partitions have been ac...
cfdisk (8) - Curses/slang based disk partition table manipulator fo...
delpart (8) - Simple wrapper around the "del partition" ioctl
fdisk (8) - Partition table manipulator for Linux
gparted (8) - Gnome partition editor for manipulating disk partitions.
Mpartition (1) - Partition an MSDOS hard disk
Partprobe (8) - Inform the OS of partition table changes
Partx (8) - Telling the kernel about presence and numbering of on-...
Pvcreate (8) - Initialize a disk or partition for use by LVM
Pvresize (8) - Resize a disk or partition in use by LVM2
Sfdisk (8) - Partition table manipulator for Linux
Using whereis
To find a command and its documentation, you can use the whereis command. For example, if you are looking for the fdisk command, you can do this:
Click here to view code image
matthew@seymour:~$ whereis fdisk
fdisk: /sbin/fdisk /usr/share/man/man8/fdisk.8.gz
Understanding the Linux File System Hierarchy
Linux has inherited from UNIX a well-planned hierarchy for organizing things. It isn’t perfect, but it is generally logical and mostly consistent, although distributions do tend to make some modifications that force some thinking and adaptation when moving between, say, Fedora, Slackware, and Ubuntu. Table 10.1 shows some of the top-level directories that are part of a standard Linux distro.
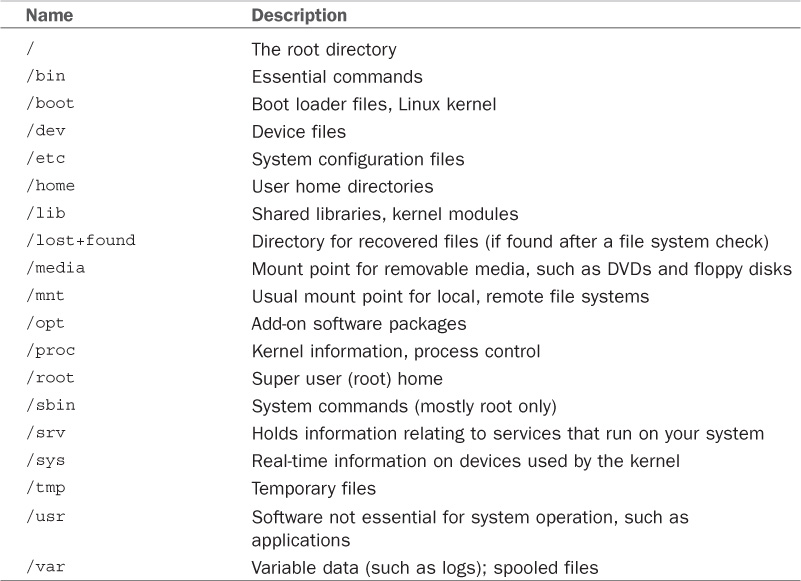
TABLE 10.1 Basic Linux Directories
Knowing these directories can help you find files when you need them. This knowledge can even help you partition hard drives when you install new systems by letting you choose to put certain directories on their own distinct partition, which can be useful for things like isolating directories from one another, such as a server security case like putting a directory like /boot that doesn’t change often on its own partition and making it read-only and unchangeable without specific operations being done by a super user during a maintenance cycle. Desktop users probably won’t need to think about that, but the directory tree is still quite useful to know when you want to find the configuration file for a specific program and set some program options systemwide to affect all users.
Note
This is a lot to remember, especially at first. For reference, there is a man page for the Linux filesystem hierarchy:
matthew@seymour:~$ man hier
This returns a detailed listing, with descriptions of each part.
Some of the important directories in Table 10.1, such as those containing user and root commands or system configuration files, are discussed in the following sections. You may use and edit files under these directories when you use Ubuntu.
Essential Commands in /bin and /sbin
The /bin directory contains essential commands used by the system for running and booting the system. In general, only the root operator uses the commands in the /sbin directory. The software in both locations is essential to the system; they make the system what it is, and if they are changed or removed, it could cause instability or a complete system failure. Often, the commands in these two directories are statically linked, which means that the commands do not depend on software libraries residing under the /lib or /usr/lib directories. Nearly all the other applications on your system are dynamically linked, meaning that they require the use of external software libraries (also known as shared libraries) to run. This is a feature for both sets of software.
The commands in /bin and /sbin are kept stable to maintain foundational system integrity and do not need to be updated often, if at all. For the security of the system, these commands are kept in a separate location and isolated where changes are more difficult and where it will be more obvious to the system administrator if unauthorized changes are attempted or made.
Application software changes more frequently, and applications often use the same functions that other pieces of application software use. This was the genesis of shared libraries. When a security update is needed for something that is used by more than one program, it has to be updated in only one location, a specific software library. This enables easy and quick security updates that will affect several pieces of non-system-essential software at the same time by updating one shared library, contained in one file on the computer.
Configuration Files in /etc
System configuration files and directories reside under the /etc directory. Some major software packages, such as Apache, OpenSSH, and xinetd, have their own subdirectories in /etc filled with configuration files. Others like crontab or fstab use one file. Examples of system-related configuration files in /etc include the following:
![]() fstab—The file system table is a text file listing each hard drive, CD-ROM, floppy, or other storage device attached to your PC. The table indexes each device’s partition information with a place in your Linux file system (directory layout) and lists other options for each device when used with Linux (see Chapter 22, “Kernel and Module Management”). Nearly all entries in fstab can be manipulated by root using the mount command.
fstab—The file system table is a text file listing each hard drive, CD-ROM, floppy, or other storage device attached to your PC. The table indexes each device’s partition information with a place in your Linux file system (directory layout) and lists other options for each device when used with Linux (see Chapter 22, “Kernel and Module Management”). Nearly all entries in fstab can be manipulated by root using the mount command.
![]() modprobe.d/—This folder holds all the instructions to load kernel modules that are required as part of the system startup.
modprobe.d/—This folder holds all the instructions to load kernel modules that are required as part of the system startup.
![]() passwd—The list of users for the system, including special-purpose nonhuman users like syslog and CouchDB, along with user account information.
passwd—The list of users for the system, including special-purpose nonhuman users like syslog and CouchDB, along with user account information.
![]() sudoers—A list of users or user groups with super user access.
sudoers—A list of users or user groups with super user access.
User Directories: /home
The most important data on a non-server Linux system often resides in the user’s directories, found under the /home directory. User directories are named by default according to account usernames, so on a computer where I have an account named matthew, my home directory would generally be found in /home/matthew. This can be changed, and if you’re curious you can read more about it in Chapter 11, “Command-Line Master Class Part 1.”
Segregating the system and user data can be helpful in preventing data loss and making the process of backing up easier. For example, having user data reside on a separate file system or mounted from a remote computer on the network might help shield users from data loss in the event of a system hardware failure. For a laptop or desktop computer at home, you might place /home on a separate partition from the rest of the file system, so that if the operating system is upgraded, damaged, or reinstalled, /home would be more likely to survive the event intact.
Using the Contents of the /proc Directory to Interact with the Kernel
The content of the /proc directory is created from memory and exists only while Linux is running. This directory contains special files that either extract information from or send information to the kernel. Many Linux utilities extract information from dynamically created directories and files under this directory, also known as a virtual file system. For example, the free command obtains its information from a file named meminfo:
Click here to view code image
matthew@seymour:~$ free
total used free shared buffers cached
Mem: 4055680 2725684 1329996 0 188996 1551464
-/+ buffers/cache: 985224 3070456
Swap: 8787512 0 8787512
This information constantly changes as the system is used. You can get the same information by using the cat command to see the contents of the meminfo file:
Click here to view code image
matthew@seymour:~$ cat /proc/meminfo
MemTotal: 4055680 KB
MemFree: 1329692 KB
Buffers: 189208 KB
Cached: 1551488 KB
SwapCached: 0 KB
Active: 1222172 KB
Inactive: 1192244 KB
Active(anon): 684092 KB
Inactive(anon): 16 KB
Active(file): 538080 KB
Inactive(file): 1192228 KB
Unevictable: 48 KB
Mlocked: 48 KB
SwapTotal: 8787512 KB
SwapFree: 8787512 KB
Dirty: 136 KB
Writeback: 0 KB
AnonPages: 673760 KB
Mapped: 202308 KB
Shmem: 10396 KB
Slab: 129248 KB
SReclaimable: 107356 KB
SUnreclaim: 21892 KB
KernelStack: 2592 KB
PageTables: 30108 KB
NFS_Unstable: 0 KB
Bounce: 0 KB
WritebackTmp: 0 KB
CommitLimit: 10815352 KB
Committed_AS: 1553172 KB
VmallocTotal: 34359738367 KB
VmallocUsed: 342300 KB
VmallocChunk: 34359387644 KB
HardwareCorrupted: 0 KB
HugePages_Total: 0
HugePages_Free: 0
HugePages_Rsvd: 0
HugePages_Surp: 0
Hugepagesize: 2048 KB
DirectMap4k: 38912 KB
DirectMap2M: 4153344 KB
The /proc directory can also be used to dynamically alter the behavior of a running Linux kernel by “echoing” numerical values to specific files under the /proc/sys directory. For example, to “turn on” kernel protection against one type of denial-of-service (DoS) attack known as SYN flooding, use the echo command to send the number 1 to the following /proc path:
Click here to view code image
matthew@seymour:~$ sudo echo 1 >/proc/sys/net/ipv4/tcp_syncookies
Other ways to use the /proc directory include the following:
![]() Getting CPU information, such as the family, type, and speed from /proc/cpuinfo.
Getting CPU information, such as the family, type, and speed from /proc/cpuinfo.
![]() Viewing important networking information under /proc/net, such as active interfaces information under /proc/net/dev, routing information in /proc/net/route, and network statistics in /proc/net/netstat.
Viewing important networking information under /proc/net, such as active interfaces information under /proc/net/dev, routing information in /proc/net/route, and network statistics in /proc/net/netstat.
![]() Retrieving file system information.
Retrieving file system information.
![]() Reporting media mount point information via USB; for example, the Linux kernel reports what device to use to access files (such as /dev/sda) if a USB camera or hard drive is detected on the system. You can use the dmesg command to see this information.
Reporting media mount point information via USB; for example, the Linux kernel reports what device to use to access files (such as /dev/sda) if a USB camera or hard drive is detected on the system. You can use the dmesg command to see this information.
![]() Getting the kernel version in /proc/version, performance information such as uptime in /proc/uptime, or other statistics such as CPU load, swap file usage, and processes in /proc/stat.
Getting the kernel version in /proc/version, performance information such as uptime in /proc/uptime, or other statistics such as CPU load, swap file usage, and processes in /proc/stat.
Working with Shared Data in the /usr Directory
The /usr directory contains software applications, libraries, and other types of shared data for use by anyone on the system. Many Linux system administrators give /usr its own partition. A number of subdirectories under /usrcontain manual pages (/usr/share/man), software package shared files (/usr/share/name_of_package, such as /usr/share/emacs), additional application or software package documentation (/usr/share/doc), and an entire subdirectory tree of locally built and installed software, /usr/local.
Temporary File Storage in the /tmp Directory
As its name implies, the /tmp directory is used for temporary file storage; as you use Linux, various programs create files in this directory. Files in this directory are cleared daily by a cron job and every time the system is booted.
Accessing Variable Data Files in the /var Directory
The /var directory contains subdirectories used by various system services for spooling and logging. Many of these variable data files, such as print spooler queues, are temporary, whereas others, such as system and kernel logs, are renamed and rotated in use. Incoming email is usually directed to files under /var/spool/mail.
Linux also uses /var for other important system services, such as the topmost File Transfer Protocol (FTP) directory under /var/ftp (see Chapter 27, “Remote File Serving with FTP”), and the Apache web server’s initial home page directory for the system, /var/www/html. (See Chapter 24, “Apache Web Server Management,” for more information about using Apache.)
Note
There is a recent trend to move data that is served from /var/www and /var/ftp to /srv, but this is not universal.
Navigating the Linux File System
In the Linux file system, as with its predecessor UNIX, everything is a file: data files, binary files, executable programs, even input and output devices. These files are placed in a series of directories that act like file folders. A directory is nothing more than a special type of file that contains a list of other files/directories. These files and directories are used to create a hierarchical structure that enables logical placement of specific types of files. Later this chapter discusses the standard hierarchy of the Linux file system. First, you learn how to navigate and interact with the file system.
Note
A directory with contents is called a parent, and its contents are called children, as in “/home/matthew/Documents is a child directory of /home/matthew, its parent.”
Listing the Contents of a Directory with ls
The ls command lists the contents of the current directory. It is commonly used by itself, but a number of options (also known as switches) are available for ls and give you more information. If you have just logged in as described earlier, this command lists the files and directories in your user’s home directory:
Click here to view code image
matthew@seymour:~$ ls
Documents Music file.txt Pictures Music
Note
All directory listings in this chapter are abbreviated to save space.
By itself, the ls command shows just a list of names. Some are files and some are directories. This is useful if I know what I am looking for but cannot remember the exact name. However, using ls in this matter has some limitations. First, it does not show hidden files. Hidden files use filenames that start with a period (.) as the first character. They are often used for configuration of specific programs and are not accessed frequently. For this reason, they are not included in a basic directory listing. You can see all the hidden files by adding a switch to the command like this:
Click here to view code image
matthew@seymour:~$ ls -a
. .bash_logout Documents Music
.. .bashrc file.txt Pictures
.bash_history .config .local .profile
There is still more information available about each item in a directory. To include details such as the file/directory permissions, owner and group (all of which are discussed later in this chapter), as well as the size, and the date and time it was last modified, enter the following:
Click here to view code image
matthew@seymour:~$ ls -al
total 608
drwxr-xr-x 38 matthew matthew 4096 2015-06-04 08:20 .
drwxr-xr-x 3 root root 4096 2015-05-16 16:48 ..
-rw------- 1 matthew matthew 421 2015-06-04 10:27 .bash_history
-rw-r--r-- 1 matthew matthew 220 2015-05-16 16:48 .bash_logout
-rw-r--r-- 1 matthew matthew 3353 2015-05-16 16:48 .bashrc
drwxr-xr-x 13 matthew matthew 4096 2015-05-21 10:42 .config
drwxr-xr-x 2 matthew matthew 4096 2015-05-16 17:07 Documents
-rw-r--r-- 1 matthew matthew 335 2015-05-16 16:48 file.txt
drwxr-xr-x 3 matthew matthew 4096 2015-05-16 17:07 .local
drwxr-xr-x 2 matthew matthew 4096 2015-05-16 17:07 Music
drwxr-xr-x 3 matthew matthew 4096 2015-05-16 18:07 Pictures
-rw-r--r-- 1 matthew matthew 675 2015-05-16 16:48 .profile
The listing (abbreviated here) is now given with one item per line, but with multiple columns. The listing starts with the number of items in the directory. (Both files and subdirectories are included; remember that the listing here is abbreviated.) Then, the details are as shown in Figure 10.1.

FIGURE 10.1 Decoding the output of a detailed directory listing.
These details are discussed more completely later in the chapter in the “Working with Permissions” section.
Another useful switch is this:
matthew@seymour:~$ ls -R
This command scans and lists all the contents of the subdirectories of the current directory. This is likely to be a lot of information, so you might want to redirect the output to a text file so that you can browse through it at your leisure by using the following:
Click here to view code image
matthew@seymour:~$ ls -laR > listing.txt
Tip
The previous command sends the output of ls -laR to a file called listing.txt and demonstrates part of the power of the Linux command line. At the command line, you can use files as inputs to commands, or you can generate files as outputs as shown. For more information about redirects and combining commands, see Chapter 14, “Automating Tasks and Shell Scripting.” In the meantime, note that you can read the contents of that text file using the command less listing.txt, which lets you read the file bit by bit using the arrow keys to navigate in the file (or Enter to move to the next line), the spacebar to move to the next page, and q to exit when done.
Changing Directories with cd
Use the cd command to move within the file system from one directory to another. It might help you remember this command to think of it meaning “change directory.” The most basic usage of cd is this:
matthew@seymour:~$ cd somedir
That looks in the current directory for the somedir subdirectory, and then moves you into it. You can also specify an exact location for a directory, like this:
Click here to view code image
matthew@seymour:~$ cd /home/matthew/stuff/somedir
You can also use the cd command with several shortcuts. For example, to quickly move up to the parent directory, the one above the one you are currently in, use the cd command like this:
matthew@seymour:~$ cd ..
To return to your home directory from anywhere in the Linux file system, use the cd command like this:
matthew@seymour:~$ cd
You can also use the $HOME shell environment variable to accomplish the same thing. Environment variables are discussed in greater detail in Chapter 12, “Command-Line Master Class Part 2.” Type this command and press Enter to return to your home directory:
matthew@seymour:~$ cd $HOME
You can accomplish the same thing by using the tilde (~) like this:
matthew@seymour:~$ cd ~
Finding Your Current Directory with pwd
Use pwd to remind you where you are within the file system:
matthew@seymour:~$ pwd
Working with Permissions
Under Linux (and UNIX), everything in the file system, including directories and devices, is a file. And every file on your system has an accompanying set of permissions based on ownership. These permissions provide data security by giving specific permission settings to every single item denoting who may read, write, or execute the file. These permissions are set individually for the file’s owner, for members of the group the file belongs to, and for all others on the system.
You can examine the default permissions for a file you create by using the umask command, which lists default permissions using the number system explained next, or by using the touch command and then the ls command’s long-format listing like this:
Click here to view code image
matthew@seymour:~$ touch file
matthew@seymour:~$ ls -l file
-rw-r--r-- 1 matthew matthew 0 2015-06-30 13:06 file
In this example, the touch command is used to quickly create a file. The ls command then reports on the file, displaying the following (from left to right):
![]() The type of file created—Common indicators of the type of file are in the leading letter in the output. A blank (which is represented by a dash, as in the preceding example) designates a plain file, d designates a directory, cdesignates a character device (such as /dev/ttyS0), and b is used for a block device (such as /dev/sda).
The type of file created—Common indicators of the type of file are in the leading letter in the output. A blank (which is represented by a dash, as in the preceding example) designates a plain file, d designates a directory, cdesignates a character device (such as /dev/ttyS0), and b is used for a block device (such as /dev/sda).
![]() Permissions—Read, write, and execute permissions for the owner, group, and all others on the system. (You learn more about these permissions later in this section.)
Permissions—Read, write, and execute permissions for the owner, group, and all others on the system. (You learn more about these permissions later in this section.)
![]() Number of links to the file—The number 1 designates that there is only one file, whereas any other number indicates that there might be one or more hard-linked files. Links are created with the ln command. A hard-linked file is an exact copy of the file, but it might be located elsewhere on the system. Symbolic links of directories can also be created, but only the root operator can create a hard link of a directory.
Number of links to the file—The number 1 designates that there is only one file, whereas any other number indicates that there might be one or more hard-linked files. Links are created with the ln command. A hard-linked file is an exact copy of the file, but it might be located elsewhere on the system. Symbolic links of directories can also be created, but only the root operator can create a hard link of a directory.
![]() The owner—The account that owns the file; this is originally the file creator, but you can change this designation using the chown command.
The owner—The account that owns the file; this is originally the file creator, but you can change this designation using the chown command.
![]() The group—The group of users allowed to access the file; this is originally the file creator’s main group, but you can change this designation using the chgrp command.
The group—The group of users allowed to access the file; this is originally the file creator’s main group, but you can change this designation using the chgrp command.
![]() File size and creation/modification date—The last two elements indicate the size of the file in bytes and the date the file was created or last modified.
File size and creation/modification date—The last two elements indicate the size of the file in bytes and the date the file was created or last modified.
Assigning Permissions
Under Linux, permissions are grouped by owner, group, and others, with read, write, and execute permission assigned to each, as follows:
Owner Group Others
rwx rwx rxw
Permissions can be indicated by mnemonic or octal characters. Mnemonic characters are listed here:
![]() r indicates permission for an owner, member of the owner’s group, or others to open and read the file.
r indicates permission for an owner, member of the owner’s group, or others to open and read the file.
![]() w indicates permission for an owner, member of the owner’s group, or others to open and write to the file.
w indicates permission for an owner, member of the owner’s group, or others to open and write to the file.
![]() x indicates permission for an owner, member of the owner’s group, or others to execute the file (or read a directory).
x indicates permission for an owner, member of the owner’s group, or others to execute the file (or read a directory).
In the previous example for the file named file, the owner, matthew, has read and write permission. Any member of the group named matthew may only read the file. All other users may only read the file. Also note that default permissions for files created by the root operator (while using sudo or a root account) will differ because of umask settings assigned by the shell.
Many users prefer to use numeric codes, based on octal (base 8) values, to represent permissions. Here’s what these values mean:
![]() 4 indicates read permission.
4 indicates read permission.
![]() 2 indicates write permission.
2 indicates write permission.
![]() 1 indicates execute permission.
1 indicates execute permission.
In octal notation, the previous example file has a permission setting of 644 (read + write or 4 + 2, read-only or 4, read-only or 4). Although you can use either form of permissions notation, octal is easy to use quickly after you visualize and understand how permissions are numbered.
Note
In Linux, you can create groups to assign a number of users access to common directories and files, based on permissions. You might assign everyone in accounting to a group named accounting and allow that group access to accounts payable files while disallowing access by other departments. Defined groups are maintained by the root operator, but you can use the newgrp command to temporarily join other groups to access files (as long as the root operator has added you to the other groups). You can also allow or deny other groups’ access to your files by modifying the group permissions of your files.
Directory Permissions
Directories are also files under Linux. For example, again use the ls command to show permissions like this:
Click here to view code image
matthew@seymour:~$ mkdir directory
matthew@seymour:~$ ls -ld directory
drwxr-xr-x 2 matthew matthew 4096 2015-06-30 13:23 directory
In this example, the mkdir command is used to create a directory. The ls command, and its -ld option, is used to show the permissions and other information about the directory (not its contents). Here you can see that the directory has permission values of 755 (read + write + execute or 4 + 2 + 1, read + execute or 4 + 1, and read + execute or 4 + 1).
This shows that the owner can read and write to the directory and, because of execute permission, also list the directory’s contents. Group members and all other users can list only the directory contents. Note that directories require execute permission for anyone to be able to view their contents.
You should also notice that the ls command’s output shows a leading d in the permissions field. This letter specifies that this file is a directory; normal files have a blank field in its place. Other files, such as those specifying a block or character device, have a different letter.
For example, if you examine the device file for a Linux serial port, you will see the following:
Click here to view code image
matthew@seymour:~$ ls -l /dev/ttyS0
crw-rw---- 1 root dialout 4, 64 2015-06-30 08:13 /dev/ttyS0
Here, /dev/ttyS0 is a character device (such as a serial communications port and designated by a c) owned by root and available to anyone in the dialout group. The device has permissions of 660 (read + write, read + write, no permission).
On the other hand, if you examine the device file for an IDE hard drive, you see this:
Click here to view code image
matthew@seymour:~$ ls -l /dev/sda
brw-rw-- -- 1 root disk 8, 0 2015-06-30 08:13 /dev/sda
In this example, b designates a block device (a device that transfers and caches data in blocks) with similar permissions. Other device entries you will run across on your Linux system include symbolic links, designated by s.
Altering File Permissions with chmod
You can use the chmod command to alter a file’s permissions. This command uses various forms of command syntax, including octal or a mnemonic form (such as u, g, o, or a and rwx, and so on) to specify a desired change. You can use the chmod command to add, remove, or modify file or directory permissions to protect, hide, or open up access to a file by other users (except for the root account or a user with super user permission and using sudo, either of which can access any file or directory on a Linux system).
The mnemonic forms of chmod’s options are (when used with a plus character, +, to add, or a minus sign, -, to remove):
![]() u—Adds or removes user (owner) read, write, or execute permission
u—Adds or removes user (owner) read, write, or execute permission
![]() g—Adds or removes group read, write, or execute permission
g—Adds or removes group read, write, or execute permission
![]() o—Adds or removes read, write, or execute permission for others not in a file’s group
o—Adds or removes read, write, or execute permission for others not in a file’s group
![]() a—Adds or removes read, write, or execute permission for all users
a—Adds or removes read, write, or execute permission for all users
![]() r—Adds or removes read permission
r—Adds or removes read permission
![]() w—Adds or removes write permission
w—Adds or removes write permission
![]() x—Adds or removes execution permission
x—Adds or removes execution permission
For example, if you create a file, such as a readme.txt, the file has the following default permissions (set by the umask setting in /etc/bashrc, covered in the next section):
Click here to view code image
-rw-r--r-- 1 matthew matthew 0 2015-06-30 13:33 readme.txt
As you can see, you can read and write the file. Anyone else can only read the file (and only if it is outside your home directory, which will have read, write, and execute permission set only for you, the owner). You can remove all write permission for anyone by using chmod, the minus sign (-), and aw, as follows:
Click here to view code image
matthew@seymour:~$ chmod a-w readme.txt
matthew@seymour:~$ ls -l readme.txt
-r--r--r-- 1 matthew matthew 0 2015-06-30 13:33 readme.txt
Now, no one can write to the file (except you, if the file is in your /home or /tmp directory because of directory permissions). To restore read and write permission for only you as the owner, use the plus sign (+) and the u and rwoptions like so:
Click here to view code image
matthew@seymour:~$ chmod u+rw readme.txt
matthew@seymour:~$ ls -l readme.txt
-rw-r--r-- 1 matthew matthew 0 2015-06-30 13:33 readme.txt
You can also use the octal form of the chmod command (for example, to modify a file’s permissions so that only you, the owner, can read and write a file). Use the chmod command and a file permission of 600, like this:
Click here to view code image
matthew@seymour:~$ chmod 600 readme.txt
matthew@seymour:~$ ls -l readme.txt
-rw------- 1 matthew matthew 0 2015-06-30 13:33 readme.txt
If you take away execution permission for a directory, files might be hidden inside and may not be listed or accessed by anyone else (except the root operator, of course, who has access to any file on your system). By using various combinations of permission settings, you can quickly and easily set up a more secure environment, even as a normal user in your /home directory.
File Permissions with umask
When you create a file, it is created with a default set of permissions. You can view and modify the default permissions for files with umask, which works like a filter. When a file is created by a user account, whether that account is owned by a human like matthew or a process like init, the file will be created using specific permissions.
The numbers we used above when discussing file permissions are also used with umask, but with an interesting change. Now, the numbers defined in umask are subtracted from the ultimate file permissions. So, if we wanted all new files to be created with a default permission of 777, we would type:
matthew@seymour:~$ umask 000
Of course, we would never want to have all our files accessible by default because this would be incredibly insecure and unsafe. The default umask is 022, which means that files are created by default with 755 permissions, except in your /home directory where the umask is 002 and files are created with 775.
To find the current umask setting, use:
matthew@seymour:~$ umask
This may list four digits instead of three. If so, don’t be confused. The additional digit is the first one; it is explained later in this chapter in the sections covering setuid, setgid, and the sticky bit.
To change the umask setting—for example, if you wanted the default to be 740—use:
matthew@seymour:~$ umask 037
File Permissions with chgrp
You can use the chgrp command to change the group to which a file belongs:
Click here to view code image
matthew@seymour:~$ chgrp wheel filename
Changing File Permissions with chown
You can use the chown command to change the owner of a file:
Click here to view code image
matthew@seymour:~$ chown matthew filename
You can also use the chown command to change the group of a file at the same time:
Click here to view code image
matthew@seymour:~$ chown matthew:wheel filename
Understanding Set User ID, Set Group ID, and Sticky Bit Permissions
The first two of the three listed types of permission are “set user ID,” known as suid, and “set group ID,” or sgid. These settings, when used in a program, enable any user running that program to have program owner or group owner permissions for that program. These settings enable the program to be run effectively by anyone, without requiring that each user’s permissions be altered to include specific permissions for that program.
One commonly used program with suid permissions is the passwd command:
Click here to view code image
matthew@seymour:~$ ls -l /usr/bin/passwd
-rwsr-xr-x 1 root root 42856 2015-01-26 10:09 /usr/bin/passwd
This setting allows normal users to execute the command (as root) to make changes to a root-only-accessible file /etc/passwd.
By default, these are turned off on files. To set them, add an extra digit to the beginning of a number in a chmod command. Suid uses 4. Sgid uses 2. You can set both at the same time using a 6 (4+2). For example, for a file owned by root with current 711 permissions allowing anyone to run it, you can make it run as root with:
Click here to view code image
matthew@seymour:~$ chmod 4711 filename
Note
Other files that might have suid or guid permissions include at, rcp, rlogin, rsh, chage, chsh, ssh, crontab, sudo, sendmail, ping, mount, and several UNIX-to-UNIX Copy (UUCP) utilities. Many programs (such as games) might also have this type of permission to access a sound device.
Files or programs that have suid or guid permissions can sometimes present security holes because they bypass normal permissions. This problem is compounded if the permission extends to an executable binary (a command) with an inherent security flaw because it could lead to any system user or intruder gaining root access. In past exploits, this typically happened when a user fed a vulnerable command with unexpected input (such as a long pathname or option); the command would fail, and the user would be presented a root prompt. Although Linux developers are constantly on the lookout for poor programming practices, new exploits are found all the time, and can crop up unexpectedly, especially in newer software packages that haven’t had the benefit of peer developer review.
Savvy Linux system administrators keep the number of suid or guid files present on a system to a minimum. The find command can be used to display all such files on your system:
Click here to view code image
matthew@seymour:~$ sudo find / -type f -perm /6000 -exec ls -l {} \;
Note
The find command is quite helpful and can be used for many purposes, such as before or during backup operations.
Note that the programs do not necessarily have to be removed from your system. If your users really do not need to use the program, you can remove the programs execute permission for anyone. You have to decide, as the root operator, whether your users are allowed, for example, to mount and unmount CD-ROMs or other media on your system. Although Linux-based operating systems can be set up to accommodate ease of use and convenience, allowing programs such as mount to be suid might not be the best security policy. Other candidates for suid permission change could include the chsh, at, or chage commands.
An additional setting called the sticky bit is available using this same additional first digit. A sticky bit limits who may rename or delete files within a directory. When set, files in that directory may be unlinked or renamed only by a super user, the directory owner, or the file owner. Set the sticky bit to on using a 1, like this for a directory with 755 permissions:
Click here to view code image
matthew@seymour:~$ chmod 1755 directoryname
You can set the sticky bit concurrently with suid and sgid, like this (4+2+1):
Click here to view code image
matthew@seymour:~$ chmod 7755 directoryname
Setting Permissions with Access Control Lists
POSIX is a family of standards created to maintain stability and consistency across operating systems for UNIX and UNIX-like systems, such as Linux. One important feature of POSIX is the access control list or ACL (often pronounced ak-el). ACLs permit even more fine-grained control over access permissions.
By default, all files have an ACL. To view the ACL for a file, use:
Click here to view code image
matthew@seymour:~$ getfacl filename
A typical getfacl output includes multiple lines, like this for filename.txt:
# file: filename.txt
# owner: matthew
# group: matthew
user::rw-
group::rw-
other::r--
The information listed here is standard and clear, based on what we already know. The real power of ACLs is that you can add to them. You are not restricted to the standard set of user, group, or other. You can add multiple users and groups with permissions specific to each.
To add the user sandra with read, write, and execute permissions to the ACL for a file named secrets.txt, use:
Click here to view code image
matthew@seymour:~$ setfacl -m u:sandra:rwx secrets.txt
To remove and reset sandra’s permissions on the file to the file’s defaults, use:
Click here to view code image
matthew@seymour:~$ setfacl -r u:sandra: secrets.txt
From these two examples, you can see that -m is for modify, -r is for remove.
ACLs permit similar actions with groups and others, just as we did with a user. Instead of the u: before the name, use a g: for groups and an o: for others, like this:
Click here to view code image
matthew@seymour:~$ setfacl -m g:groupname:rwx secrets.txt
matthew@seymour:~$ setfacl -m o:r secrets.txt
Notice that with others there is no user name or group name to include in the commands.
A useful feature is masking, by which you only list those permissions that are available. For example:
Click here to view code image
matthew@seymour:~$ setfacl -m m:rx secrets.txt
This limits everyone, regardless of any other settings. So, in this case, a group may have rwx settings on the file, but the mask here says to only permit rx, so rx will be the only settings that are available.
As an exercise to the reader, see if you can figure out the meaning of this output from getfacl for a file named coffeecup.conf.
# file: coffeecup.conf
# owner: matthew
# group: yirgacheffe
user::rw-
group::rw-
other::r--
group:qa:rwx
group:uat:rwx
mask::rwx
Working with Files
Managing files in your home directory involves using one or more easily remembered commands.
Creating a File with touch
To create an empty file called filename within your current directory, use the following command:
Click here to view code image
matthew@seymour:~$ touch filename
To edit this file, you must use a text editor. Several are discussed in Chapter 14, “Automating Tasks and Shell Scripting.” However, it is sometimes useful to create an empty file as this creates an access record because of the time and date information that is connected to the file. You can also use touch to update this information, called a timestamp, without otherwise accessing or modifying a file.
You can create a file in a different location by changing what is after touch. To create a new file in /home/matthew/randomdirectory, if I am already in my home directory, I can use the following:
Click here to view code image
matthew@seymour:~$ touch randomdirectory/newfile
Or from anywhere using an absolute path, I use this:
Click here to view code image
matthew@seymour:~$ touch /home/matthew/randomdirectory/newfile
Or from anywhere using a path shortcut, I use the following command:
Click here to view code image
matthew@seymour:~$ touch ~/randomdirectory/newfile
Creating a Directory with mkdir
To create an empty directory called newdirectory within your current directory, use this command:
Click here to view code image
matthew@seymour:~$ mkdir newdirectory
You can create a directory in a different location by changing what is after mkdir. To create a new directory in /home/matthew/music, if I am already in my /home directory, I can use the following:
Click here to view code image
matthew@seymour:~$ mkdir music/newdirectory
Or from anywhere using an absolute path, I can use this:
Click here to view code image
matthew@seymour:~$ mkdir /home/matthew/music/newdirectory
Or from anywhere using a path shortcut, I can use the following command:
Click here to view code image
matthew@seymour:~$ mkdir ~/music/newdirectory
The -p option is valuable. It enables you to create a directory and its parent directories at the same time, if they do not already exist. This can be a real-time saver. If the parent directories exist, the command works normally. For example, suppose I want to make a new directory with two layers of subdirectories. In this example, music and newdirectory already exist, but subdir1 and subdir2 are to be created:
Click here to view code image
matthew@seymour:~$ mkdir -p ~/music/newdirectory/subdir1/subdir2
Deleting a Directory with rmdir
To delete an empty directory named directoryname, use the following command:
Click here to view code image
matthew@seymour:~$ rmdir directoryname
You can remove a directory in a different location by changing what is after rmdir. To remove a directory in /home/matthew/music, if I am already in my /home directory, I can use the following:
Click here to view code image
matthew@seymour:~$ rmdir music/directoryname
Or from anywhere using an absolute path, I can use this:
Click here to view code image
matthew@seymour:~$ rmdir /home/matthew/music/directoryname
Or from anywhere using a path shortcut, I can use the following command:
Click here to view code image
matthew@seymour:~$ rmdir ~/music/directoryname
The directory must be empty to be removed using rmdir. However, there is a way to remove a directory with its contents using rm.
Caution
You cannot easily recover anything that has been deleted using rmdir or rm, so proceed carefully. Be absolutely certain you will never need what you are about to delete before you do so. Only a professional data recovery service is likely to be able to recover the files, and even then at great expense.
Deleting a File or Directory with rm
To delete a file named filename, use this command:
Click here to view code image
matthew@seymour:~$ rm filename
You can remove a file in a different location by changing what is after rm. To remove a directory in /home/matthew/randomdirectory, if I am already in my /home directory, I can use the following:
Click here to view code image
matthew@seymour:~$ rm randomdirectory/filename
Or from anywhere using an absolute path, I can use this:
Click here to view code image
matthew@seymour:~$ rm /home/matthew/randomdirectory/filename
Or from anywhere using a path shortcut, I can use the following command:
Click here to view code image
matthew@seymour:~$ rm ~/randomdirectory/filename
If you try to use rm to remove an empty directory, you will receive an error message: rm: cannot remove 'random/': Is a directory. In this case, you must use rmdir. However, you can remove a directory and its contents using rm.
Caution
Be sure that all the contents of a directory are known and unwanted if you choose to delete them. There is no way to recover them later. Also, be careful that you don’t have extra spaces, mistype the name of the directory, or use sudo to delete something that you shouldn’t be deleting. Linux gives you great power, and it will let you use that power without questioning you about it; that’s the human’s job.
To delete a directory and all its contents, use the -r recursive switch. This switch works with many commands, not only rm:
Click here to view code image
matthew@seymour:~$ rm -r /home/matthew/randomdirectory/
Everything in randomdirectory as well as in the directory itself will be deleted, including other subdirectories, without considering whether they are empty or have contents.
Moving or Renaming a File with mv
In Linux land, moving and renaming a file are the same thing. It doesn’t matter whether you are moving the directory to another or from one filename to another filename in the same directory, there is only one command to remember. To move a file named filename from ~/documents to ~/archive, use this command:
Click here to view code image
matthew@seymour:~$ mv documents/filename archive
Notice that the filename is not included in the destination. The destination here must be an existing directory. If it is not, the file is renamed to the term used. Some examples will make this clear.
To rename a file that is in my current directory, I could use the following:
Click here to view code image
matthew@seymour:~$ mv oldfilename newfilename
To rename a file as I move it from ~/documents to ~/archive, I could use this:
Click here to view code image
matthew@seymour:~$ mv documents/oldfilename archive/newfilename
Or from anywhere using an absolute path, I could use the following command:
Click here to view code image
matthew@seymour:~$ mv /home/matthew/documents/oldfilename /home/matthew/archive/newfilename
Or from anywhere using a path shortcut, I could use this:
Click here to view code image
matthew@seymour:~$ mv ~/documents/oldfilename ~/archive/newfilename
Copying a File with cp
Copying works similarly to moving, but retains the original in the original location. To copy a file named filename from ~/documents to ~/archive, use this command:
Click here to view code image
matthew@seymour:~$ cp documents/filename archive
Notice that the filename is not included in the destination. The destination here must be an existing directory. If it is not, the file is renamed to the term used. Some examples will make this clear.
To copy a file that is in my current directory I could use the following, and it will work exactly the same as mv, except that both files will exist afterward:
Click here to view code image
matthew@seymour:~$ cp oldfilename newfilename
To rename a file as I copy it from ~/documents to ~/archive, I could use this:
Click here to view code image
matthew@seymour:~$ cp documents/oldfilename archive/newfilename
Or from anywhere using an absolute path, I could use the following command:
Click here to view code image
matthew@seymour:~$ cp /home/matthew/documents/oldfilename /home/matthew/archive/newfilename
Or from anywhere using a path shortcut, I can use this:
Click here to view code image
matthew@seymour:~$ cp ~/documents/oldfilename ~/archive/newfilename
Displaying the Contents of a File with cat
To view the contents of a text file named filename on your screen, use this command:
Click here to view code image
matthew@seymour:~$ cat filename
Notice that the text is displayed on your screen but that you cannot edit or work with the text in any way. This command is convenient when you want to know the contents of a file but don’t need to make any changes. Text editors for the terminal are covered in Chapter 12, “Command-Line Master Class Part 2.” This command works best with short files because the contents of longer files will scroll off of the screen too quickly to be read.
Displaying the Contents of a File with less
When you need to view the contents of a longer text file from the command line, you can use less. This produces a paged output, meaning that output stops each time your screen is full. You can then use your up- and down-arrow keys and page-up and page-down keys to scroll through the contents of the file. Then, use q to quit and return to the command line:
Click here to view code image
matthew@seymour:~$ less filename
There was a program that did give paged output in the early days of UNIX called more. It was the first paged output program but did not include the ability to scroll up and down. less was written to add that capability and was named as a bit of hacker humor because “less is more.” You can also use more, but today it is merely an alias for less.
Using Wildcards and Regular Expressions
Each of these commands can be used with pattern-matching strings known as wildcards or regular expressions. For example, to delete all files in the current directory beginning with the letters abc, you can use an expression beginning with the first three letters of the desired filenames. An asterisk (*) is then appended to match all these files. Use a command line with the rm command like this:
matthew@seymour:~$ rm abc*
Linux shells recognize many types of file naming wildcards, but this is different from the capabilities of Linux commands supporting the use of more complex expressions. You learn more about using wildcards in Chapter 11, “Command-Line Master Class Part 1,” and in Chapter 14, “Automating Tasks and Shell Scripting.”
Note
You can also learn more about using expressions by reading the grep manual pages (man grep), but because both man and grep are covered in Chapter 11, “Command-Line Master Class Part 1,” consider this mention as included only to whet your appetite.
Working as Root
The root, or super user account, is a special account and user on UNIX and Linux systems. Super user permissions are required in part because of the restrictive file permissions assigned to important system configuration files. You must have root permission to edit these files or to access or modify certain devices (such as hard drives). When logged in as root, you have total control over your system, which can be dangerous.
When you work in root, you can destroy a running system with a simple invocation of the rm command like this:
Click here to view code image
matthew@seymour:~$ sudo rm -rf /
This command line not only deletes files and directories but also could wipe out file systems on other partitions and even remote computers. This alone is reason enough to take precautions when using root access.
The only time you should run Linux as the super user is when you are configuring the file system, for example, or to repair or maintain the system. Logging in and using Linux as the root operator isn’t a good idea because it defeats the entire concept of file permissions.
Knowing how to run commands as the super user (root) without logging in as root can help avoid serious missteps when configuring your system. In Ubuntu, you can use sudo to allow you to execute single commands as root and then quickly return to normal user status. For example, if you would like to edit your system’s file system table (a text file that describes local or remote storage devices, their type, and location), you can use sudo like this:
Click here to view code image
matthew@seymour:~$ sudo nano -w /etc/fstab
[sudo] password for matthew:
After you press Enter, you are prompted for a password that gives you access to root. This extra step can also help you “think before you leap” into the command. Enter the root password, and you are then editing /etc/fstab, using the nano editor with line wrapping disabled (thanks to the -w).
Caution
Before editing any important system or software service configuration file, make a backup copy. Then make sure to launch your text editor with line wrapping disabled. If you edit a configuration file without disabling line wrapping, you could insert spurious carriage returns and line feeds into its contents, causing the configured service to fail when restarting. By convention, nearly all configuration files are formatted for 80-character text width, but this is not always the case. By default, the vi and emacs editors don’t use line wrap.
Understanding and Fixing sudo
Most Ubuntu users never have a problem here, but sometimes, people who like to experiment break things, especially while learning. This section exists to help you first understand more completely how sudo works and also how to restore sudo access to a specific user when, for some reason, it has ceased to function for that user.
Note
You will usually know a problem has occurred because an error message like this will appear when a user tries to issue a command using sudo:
Click here to view code image
matthew@seymour:~$ sudo shutdown -h now
[sudo] password for matthew:
matthew is not in the sudoers file. This incident will be reported.
Sometimes, you might not even receive an error message, but the command issued simply does nothing. Either way, you can fix the problem using the following knowledge and procedure.
In order for a user to use sudo, the user account must belong to the sudo group and also be listed in the /etc/sudoers file. If both conditions are met, the user will be permitted to temporarily use root powers for specific commands that are issued at the command line by that user account by prefacing the command with the word sudo.
A Problem Can Occur for a Specific User with sudo When
A user is taken out of the sudo group but should not have been. The permissions for the /etc/sudoers file has been changed to anything other than 440. The /etc/sudoers file has been changed in a way that does not allow members of the sudo group to use root powers.
Tip
Generally, these things are the result of a user doing something they should not have done, such as changing the permissions on all files rather than taking the time to figure out a specific file that is causing problems due to permissions issues. Take heed, it is better to spend a bit more time learning than it is to take a shortcut that causes bigger problems.
Fixing any of these problems requires the use of root powers. This is an obvious problem because if sudo is not working, then the account does not have access to root. To fix it, we must gain root access. You can do this by booting into recovery mode using the following steps:
1. Hold down the Shift key while the computer is booting.
2. When the GRUB menu page appears, use the arrow keys on your keyboard to scroll to the entry that ends with (recovery mode) and press Enter to select it.
3. When the boot process finishes, you have several options. Select the menu entry for root, which is described as Drop to Root Shell Prompt. You are now at the command line with full root access to the computer.
4. Ubuntu mounts filesystems as read-only by default in recovery mode, so you need to remount the root filesystem, /, as read-write so that you can fix the problem. Enter the following:
Click here to view code image
root@seymour:~# mount -o rw,remount /
Note
You now have complete root access and read-write privileges on the machine. This is an example of why security of a physical machine is important. If someone has physical access to your computer, he can easily and quickly gain full control over the machine and all it contains if he knows what he is doing.
If the problem exists because the user account was removed from the admin group, enter
Click here to view code image
root@seymour:~# adduser username admin
If the problem exists because the permissions for /etc/sudoers are wrong, enter
Click here to view code image
root@seymour:~# chmod 440 /etc/sudoers
If the problem exists because of an internal problem in /etc/sudoers, make a backup of the existing file and use visudo to edit it (this is a special use of the vi editor, covered in Chapter 12, “Command-Line Master Class Part 2,” that runs a check on the file after editing to be certain that it is correct—this particular problem usually occurs when someone edits the file using another editor that does not make this check). The contents of the file should be the following:
Click here to view code image
#
# This file MUST be edited with the 'visudo' command as root.
#
# Please consider adding local content in /etc/sudoers.d/ instead of
# directly modifying this file.
#
# See the man page for details on how to write a sudoers file.
#
Defaults env_reset
Defaults secure_path="/usr/local/sbin:/usr/local/bin:/usr/sbin:/usr/bin:/sbin:/bin"
# Host alias specification
# User alias specification
# Cmnd alias specification
# User privilege specification
root ALL=(ALL:ALL) ALL
# Members of the admin group may gain root privileges
%admin ALL=(ALL) ALL
# Allow members of group sudo to execute any command
%sudo ALL=(ALL:ALL) ALL
# See sudoers(5) for more information on "#include" directives:
#includedir /etc/sudoers.d
After your fix is complete, exit the root command line:
root@seymour:~# exit
You return to the recovery mode menu. Select resume, described as Resume Normal Boot, to finish and return to a normal boot. When the boot completes, you should be able to use sudo correctly again.
Creating Users
When a Linux system administrator creates a user, an entry in /etc/passwd for the user is created. The system also creates a directory, labeled with the user’s username, in the /home directory. For example, if you create a user named sandra, the user’s home directory is /home/sandra.
Note
In this chapter, you learn how to manage users from the command line. See Chapter 13, “Managing Users,” for more information on user administration including doing so using graphical administration utilities.
Use the adduser command, along with a user’s name, to quickly create a user:
Click here to view code image
matthew@seymour:~$ sudo adduser sandra
After creating the user, you must also create the user’s initial password with the passwd command:
Click here to view code image
matthew@seymour:~$ sudo passwd sandra
Changing password for user sandra.
New password:
Retype new password:
passwd: all authentication tokens updated successfully.
Enter the new password twice. If you do not create an initial password for a new user, the user cannot log in.
The adduser command has many command-line options. The command can be used to set policies and dates for the new user’s password, assign a login shell, assign group membership, and other aspects of a user’s account. See man adduser as well as Chapter 13, “Managing Users,” for more info.
Deleting Users
Use the deluser command to delete users from your system. This command removes a user’s entry in the system’s /etc/passwd file. You should also use the command’s --remove-all-files and --remove-homeoption to remove all the user’s files and directories (such as the user’s mail spool file under /var/spool/mail):
Click here to view code image
matthew@seymour:~$ sudo deluser --remove-all-files --remove-home andrew
If you do not use the -remove-home option, you have to manually delete the user’s directory under /home, along with the user’s /var/spool/mail queue.
Shutting Down the System
Use the shutdown command to shut down your system. The shutdown command has a number of different command-line options (such as shutting down at a predetermined time), but the fastest way to cleanly shut down Linux is to use the -h or halt option, followed by the word now or the numeral zero (0), like this:
Click here to view code image
matthew@seymour:~$ sudo shutdown -h now
or
Click here to view code image
matthew@seymour:~$ sudo shutdown -h 0
To incorporate a timed shutdown and a pertinent message to all active users, use shutdown’s time and message options, as follows:
Click here to view code image
matthew@seymour:~$ sudo shutdown -h 18:30 "System is going down for maintenance this
evening at 6:30 p.m. Please make sure you have saved your work and logged out by
then or you may lose data."
This example shuts down your system and provides a warning to all active users 15 minutes before the shutdown (or reboot). Shutting down a running server can be considered drastic, especially if there are active users or exchanges of important data occurring (such as a backup in progress). One good approach is to warn users ahead of time. This can be done by editing the system Message of the Day (MOTD) motd file, which displays a message to users when they log in using the command-line interface, as is common on multi-user systems.
It used to be that to create a custom MOTD you only had to use a text editor and change the contents of /etc/motd. However, this has changed in Ubuntu as the developers have added a way to automatically and regularly update some useful information contained in MOTD using cron. To modify how the MOTD is updated, you should install update-motd and read the man page.
You can also make downtimes part of a regular schedule, perhaps to coincide with security audits, software updates, or hardware maintenance.
You should shut down Ubuntu for only a few very specific reasons:
![]() You are not using the computer, no other users are logged in or expected to need or use the system, such as your personal desktop or laptop computer, and you want to conserve electrical power.
You are not using the computer, no other users are logged in or expected to need or use the system, such as your personal desktop or laptop computer, and you want to conserve electrical power.
![]() You need to perform system maintenance that requires any or all system services to be stopped.
You need to perform system maintenance that requires any or all system services to be stopped.
![]() You want to replace integral hardware.
You want to replace integral hardware.
Tip
Do not shut down your computer if you suspect that intruders have infiltrated your system; instead, disconnect the machine from any or all networks and make a backup copy of your hard drives. You might want to also keep the machine running to examine the contents of memory and to examine system logs. Exceptions to this are when the system contains only trivial data files and nonessential services, such as a personal computer that is only used to run a web browser, and when you have no intention of trying to track down what an intruder might have changed, either to repair the damage or to try to catch them using computer forensics, but rather plan to merely wipe everything clean and rebuild or reinstall the system from scratch.
Rebooting the System
You should also use the shutdown command to reboot your system. The fastest way to cleanly reboot Linux is to use the -r option, and the word now or the numeral zero (0):
Click here to view code image
matthew@seymour:~$ sudo shutdown -r now
or
Click here to view code image
matthew@seymour:~$ sudo shutdown -r 0
Both rebooting and shutting down can have dire consequences if performed at the wrong time (such as during backups or critical file transfers, which arouses the ire of your system’s users). However, Linux-based operating systems are designed to properly stop active system services in an orderly fashion. Other commands you can use to shut down and reboot Linux are the halt and reboot commands, but the shutdown command is more flexible.
Commonly Used Commands and Programs
The following programs and built-in shell commands are commonly used when working at the command line. These commands are organized by category to help you understand the command’s purpose. If you need to find full information for using the command, you can find that information under the command’s man page.
![]() Managing users and groups—chage, chfn, chsh, edquota, gpasswd, groupadd, groupdel, groupmod, groups, mkpasswd, newgrp, newusers, passwd, umask, useradd, userdel, usermod
Managing users and groups—chage, chfn, chsh, edquota, gpasswd, groupadd, groupdel, groupmod, groups, mkpasswd, newgrp, newusers, passwd, umask, useradd, userdel, usermod
![]() Managing files and file systems—cat, cd, chattr, chmod, chown, compress, cp, dd, fdisk, find, gzip, ln, mkdir, mksfs, mount, mv, rm, rmdir, rpm, sort, swapon, swapoff, tar, touch, umount, uncompress, uniq, unzip, zip
Managing files and file systems—cat, cd, chattr, chmod, chown, compress, cp, dd, fdisk, find, gzip, ln, mkdir, mksfs, mount, mv, rm, rmdir, rpm, sort, swapon, swapoff, tar, touch, umount, uncompress, uniq, unzip, zip
![]() Managing running programs—bg, fg, kill, killall, nice, ps, pstree, renice, top, watch
Managing running programs—bg, fg, kill, killall, nice, ps, pstree, renice, top, watch
![]() Getting information—apropos, cal, cat, cmp, date, diff, df, dir, dmesg, du, env, file, free, grep, head, info, last, less, locate, ls, lsattr, man, more, pinfo, ps, pwd, stat, strings, tac, tail, top, uname, uptime, vdir, vmstat, w, wc, whatis, whereis, which, who, whoami
Getting information—apropos, cal, cat, cmp, date, diff, df, dir, dmesg, du, env, file, free, grep, head, info, last, less, locate, ls, lsattr, man, more, pinfo, ps, pwd, stat, strings, tac, tail, top, uname, uptime, vdir, vmstat, w, wc, whatis, whereis, which, who, whoami
![]() Console text editors—ed, jed, joe, mcedit, nano, red, sed, vim
Console text editors—ed, jed, joe, mcedit, nano, red, sed, vim
![]() Console Internet and network commands—bing, elm, ftp, host, hostname, ifconfig, links, lynx, mail, mutt, ncftp, netconfig, netstat, pine, ping, pump, rdate, route, scp, sftp, ssh, tcpdump, traceroute, whois, wire-test
Console Internet and network commands—bing, elm, ftp, host, hostname, ifconfig, links, lynx, mail, mutt, ncftp, netconfig, netstat, pine, ping, pump, rdate, route, scp, sftp, ssh, tcpdump, traceroute, whois, wire-test
References
![]() https://help.ubuntu.com/community/UsingTheTerminal—The Ubuntu community help page for using the terminal.
https://help.ubuntu.com/community/UsingTheTerminal—The Ubuntu community help page for using the terminal.
![]() https://help.ubuntu.com/community/LinuxFilesystemTreeOverview—The Ubuntu community help page for and overview of the Linux file system tree.
https://help.ubuntu.com/community/LinuxFilesystemTreeOverview—The Ubuntu community help page for and overview of the Linux file system tree.
![]() https://help.ubuntu.com/community/RootSudo—An Ubuntu community page explaining sudo, the philosophy behind using it by default, and how to use it.
https://help.ubuntu.com/community/RootSudo—An Ubuntu community page explaining sudo, the philosophy behind using it by default, and how to use it.
All materials on the site are licensed Creative Commons Attribution-Sharealike 3.0 Unported CC BY-SA 3.0 & GNU Free Documentation License (GFDL)
If you are the copyright holder of any material contained on our site and intend to remove it, please contact our site administrator for approval.
© 2016-2026 All site design rights belong to S.Y.A.