Ubuntu Unleashed 2017 Edition (2017)
Part III: System Administration
Chapter 20. Securing Your Machines
In This Chapter
![]() Understanding Computer Attacks
Understanding Computer Attacks
![]() Assessing Your Vulnerability
Assessing Your Vulnerability
![]() Protecting Your Machine
Protecting Your Machine
![]() Viruses
Viruses
![]() Configuring Your Firewall
Configuring Your Firewall
![]() AppArmor
AppArmor
![]() Forming a Disaster Recovery Plan
Forming a Disaster Recovery Plan
![]() References
References
No computer with a connection to the Internet is 100 percent safe. If this information does not concern you, it should. Although there is no way to guarantee the ability to stop patient, creative, and serious crackers who are intent on getting into your computer or network, there are ways to make it harder for them and to warn you when they do. This chapter discusses all aspects of securing your Linux machines. You might have wondered why we did not spread this information around the book wherever it was appropriate, but the reason is simple: If you ever have a security problem with Linux, you know you can turn to this page and start reading without having to search or try to remember where you saw a tip. Everything you need is here in this one chapter, and we strongly advise you read it from start to finish.
Built-In Protection in the Kernel
A number of networking and low-level protective services are built in to the Linux kernel. These services can be enabled, disabled, or displayed using the sysctl command, or by echoing a value (usually a 1 or a 0 to turn a service on or off) to a kernel process file under the /proc directory. See the discussion of setting a variable with echo in Chapter 11, “Command-Line Master Class Part 1,” or the man pages for sysctl and echo for more.
Understanding Computer Attacks
There are many ways in which computer attacks can be divided for classification. Perhaps the easiest dichotomy is to separate attacks as internal, which are computer attacks done by someone with access to a computer on the local network, and external, which are attacks by someone with access to a computer through the Internet. This might sound like a trivial separation to make, but it is actually important: Unless you routinely hire talented computer crackers or allow visitors to plug computers into your network, the worst internal attack you are likely to encounter is from a disgruntled employee.
Hacker Versus Cracker
In earlier days, there was a distinction made between the words hacker and cracker. A hacker was someone who used technology to innovate in new or unusual ways, whereas a cracker was someone who used technology to attack another’s computers and cause harm. In the original definition, hackers did good or cool things and crackers did bad things.
This distinction was lost on the general public, so the term hacker has now regretfully come to mean the same thing as cracker for most people. However, we recognize the distinction and use the term cracker to mean a malicious person using a computer to cause problems for others. In your real-world conversations, realize that most people do not make a distinction, and so be prepared to define your terms if you call yourself a hacker.
Although you should never ignore the internal threat, you should arguably be more concerned with the outside world. The big bad Internet is a security vortex. Machines connected directly to the outside world can be attacked by people across the world, and invariably are, even only a few minutes after having been connected.
This situation is not a result of malicious users lying in wait for your IP address to do something interesting. Instead, canny virus writers have created worms that exploit a vulnerability, take control of a machine, and then spread it to other machines around them. As a result, most attacks today are the result of these autocracking tools; there are only a handful of true clever crackers around, and, to be frank, if one of them ever actually targets you seriously, it will take a mammoth effort to repel the cracker, regardless of which operating system you run.
Autocracking scripts also come in another flavor: prewritten code that exploits a vulnerability and gives its users special privileges on the hacked machine. These scripts are rarely used by their creators; instead, they are posted online and downloaded by wannabe hackers, who then use them to attack vulnerable machines.
So, the external category is itself made up of worms, serious day job crackers, and wannabe crackers (usually called script kiddies). Combined they will assault your Internet-facing servers, and it is your job to make sure your boxes stay up, happily ignoring the firefight around them.
On the internal front, things are somewhat more difficult. Users who sit inside your firewall are already past your primary source of defense and, worse, they might even have physical access to your machines. Anyone with malicious intent and physical access to a machine is nearly impossible to stop unless they are simply inept. The situation is only slightly better if they don’t have physical access but do have access to your internal network.
Regardless of the source of the attack, you can follow a five-step checklist to help secure your box:
1. Assess your vulnerability. Decide which machines can be attacked, which services they are running, and who has access to them.
2. Configure the server for maximum security. Install only what you need, run only what you must, and configure a local firewall.
3. Secure physical access to the server.
4. Create worst-case-scenario policies.
5. Keep up-to-date with security news.
Each of these is covered in the following sections, and each is as important as the others.
Assessing Your Vulnerability
It is a common mistake for people to assume that switching on a firewall makes them safe. This is not the case and, in fact, has never been the case. Each system has distinct security needs, and taking the time to customize its security layout will give you maximum security and the best performance.
The following list summarizes the most common mistakes:
![]() Installing every package—Do you plan to use the machine as a DNS server? If not, why have BIND installed? Go through and ensure that you have only the software you need.
Installing every package—Do you plan to use the machine as a DNS server? If not, why have BIND installed? Go through and ensure that you have only the software you need.
![]() Enabling unused services—Do you want to administer the machine remotely? Do you want people to upload files? If not, turn off SSH and FTP because they just add needless attack vectors. This goes for many other services.
Enabling unused services—Do you want to administer the machine remotely? Do you want people to upload files? If not, turn off SSH and FTP because they just add needless attack vectors. This goes for many other services.
![]() Disabling the local firewall on the grounds that you already have a firewall at the perimeter—In security, depth is crucial: The more layers someone has to hack through, the higher the likelihood the cracker will give up or get caught.
Disabling the local firewall on the grounds that you already have a firewall at the perimeter—In security, depth is crucial: The more layers someone has to hack through, the higher the likelihood the cracker will give up or get caught.
![]() Letting your machine give out more information than it needs to—Many machines are configured to give out software names and version numbers by default, which is just giving crackers a helping hand.
Letting your machine give out more information than it needs to—Many machines are configured to give out software names and version numbers by default, which is just giving crackers a helping hand.
![]() Placing your server in an unlocked room—If you do, you might as well just turn it off now and save the worry. The exception to this is if all the employees at your company are happy and trustworthy. But why take the risk?
Placing your server in an unlocked room—If you do, you might as well just turn it off now and save the worry. The exception to this is if all the employees at your company are happy and trustworthy. But why take the risk?
![]() Plugging your machine into a wireless network—Unless you need wireless, avoid it, particularly if your machine is a server. Never plug a server into a wireless network because it is just too fraught with security problems.
Plugging your machine into a wireless network—Unless you need wireless, avoid it, particularly if your machine is a server. Never plug a server into a wireless network because it is just too fraught with security problems.
After you have ruled out these potential issues, you are onto the real problem: Which attack vectors are open on your server? In Internet terms, this comes down to which services are Internet-facing and which ports they are running on.
Two tools are often used to determine your vulnerabilities: Nmap and Nessus. The nmap package is available in the Ubuntu software repositories. If you want Nessus, you will have to download it from their website at http://www.tenable.com/products/nessus.
Nessus scans your machine, queries the services running, checks their version numbers against its list of vulnerabilities, and reports problems.
Although Nessus sounds clever, it does not work well in many modern distributions (Ubuntu included) because of the way patches are made available to software. For example, if you’re running Apache 2.2.21 and a bug is found that’s fixed in 2.2.22, Ubuntu backports that patch to 2.2.21. This is done because the new release probably also includes new features that might break your code, so the Ubuntu team takes only what is necessary and copies it into your version. As a result, Nessus sees the version 2.2.21 and thinks it is vulnerable to a bug that has in fact been backported.
The better solution is to use Nmap, which scans your machine and reports on any open TCP/IP ports it finds. Any service you have installed that responds to Nmap’s query is pointed out, which enables you to ensure that you have locked everything down as much as possible.
Nmap is available to install from the Ubuntu software repositories. Although you can use Nmap from a command line, it is easier to use with the front end—at least until you become proficient. To run the front end, open a terminal and run nmapfe. If you want to enable all Nmap’s options, you must have administrator privileges and run sudo nmapfe.
When you run Nmap (click the Scan button), it tests every port on your machine and checks whether it responds. If a port does respond, Nmap queries it for version information and then prints its results onscreen.
The output lists the port numbers, service name (what usually occupies that port), and version number for every open port on your system. Hopefully, the information Nmap shows you will not be a surprise. If there is something open that you do not recognize, it could be that a cracker placed a back door on your system to allow easy access, so you should check into it further.
Use the output from Nmap to help you find and eliminate unwanted services. The fewer services that are open to the outside world, the more secure you are. Only use Nmap on systems that you own. It is impolite to scan other people’s servers, and you may also be accused of doing so in preparation for illegal activity.
Protecting Your Machine
After you have disabled all the unneeded services on your system, what remains is a core set of connections and programs that you want to keep. However, you are not finished yet: You need to clamp down your wireless network, lock your server physically, and put scanning procedures in place (such as Tripwire and promiscuous mode network monitors).
Securing a Wireless Network
Because wireless networking has some unique security issues, those issues deserve a separate discussion.
Wireless networking, although convenient, can be very unsecure by its very nature because transmitted data (even encrypted data) can be received by remote devices. Those devices could be in the same room; in the house, apartment, or building next door; or even several blocks away. You must use extra care to protect the actual frequency used by your network. Great progress has been made in the past couple of years, but the possibility of a security breech is increased when the attacker is in the area and knows the frequency on which to listen. It should also be noted that the encryption method used by more wireless NICs is weaker than other forms of encryption (such as SSH), and you should not consider it as part of your security plan.
Tip
Always use OpenSSH-related tools, such as ssh or sftp, to conduct business on your wireless LAN. Passwords are not transmitted as plain text, and your sessions are encrypted. See Chapter 19, “Remote Access with SSH, Telnet, and VNC,” to see how to connect to remote systems using ssh.
The better the physical security is around your network, the more secure it will be. (This applies to wired networks as well.) Keep wireless transmitters (routers, switches, and so on) as close to the center of your building as possible. Note or monitor the range of transmitted signals to determine whether your network is open to mobile network sniffing—now a geek sport known as war driving. Wireshark is an example of a program that is useful for analyzing wireless traffic (as well as all network activity). An occasional walk around your building not only gives you a break from sitting at your desk, but can also give you a chance to notice any people or equipment that should not be in the area.
Keep in mind that it takes only a single rogue wireless access point hooked up to a legitimate network hub to open access to your entire system. These access points can be smaller than a pack of cigarettes, so the only way to spot them is to scan for them with another wireless device.
Passwords and Physical Security
The next step toward better security is to use secure passwords on your network and ensure that users use them as well. For somewhat more physical security, you can force the use of a password with the GRUB bootloader, remove bootable devices such as floppy and CD-ROM drives, or configure a network-booting server for Ubuntu.
Also keep in mind that some studies show that as many as 90 percent of network break-ins are done by current or former employees. If a person no longer requires access to your network, lock out access or, even better, remove the account immediately. A good security policy also dictates that any data associated with the account first be backed up and retained for a set period of time to ensure against loss of important data. If you are able to, remove the terminated employee from the system before the employee leaves the building.
Finally, be aware of physical security. If a potential attacker can get physical access to your system, getting full access becomes trivial. Keep all servers in a locked room and ensure that only authorized personnel are given access to clients. Laptops and other mobile devices should be configured with only what is needed and any truly sensitive data should be kept on machines that are physically secured. When machines containing any sensitive data must be used outside of a secure environment, you should use hard drive encryption, such as is available when installing Ubuntu.
Something that you may find useful for laptops and other mobile devices is Prey. Prey has a basic version that is open source, free software that will help you track down a missing device, provided it was installed on the device before it was lost. There is also a paid version with a few more features. You can learn about Prey from their website at http://preyproject.com/.
Configuring and Using Tripwire
Tripwire is a security tool that checks the integrity of normal system binaries and reports any changes to syslog or by email. Tripwire is a good tool for ensuring that your binaries have not been replaced by Trojan horse programs. Trojan horses are malicious programs inadvertently installed because of identical filenames to distributed (expected) programs, and they can wreak havoc on a breached system.
There are two versions of Tripwire, an open-source version and a commercial product. The free version of Tripwire is available in the Ubuntu repositories. You can find out about the differences at www.tripwire.org.
To initialize Tripwire, use its -init option, like this:
Click here to view code image
matthew@seymour~:$ sudo tripwire -init
Please enter your local passphrase:
Parsing policy file: /etc/tripwire/tw.pol
Generating the database...
*** Processing Unix File System ***
....
Wrote database file: /var/lib/tripwire/shuttle2.twd
The database was successfully generated.
Note that not all the output is shown here. After Tripwire has created its database (which is a snapshot of your file system), it uses this baseline along with the encrypted configuration and policy settings under the /etc/tripwiredirectory to monitor the status of your system. You should then start Tripwire in its integrity checking mode, using a desired option. (See the tripwire manual page for details.) For example, you can have Tripwire check your system and then generate a report at the command line, like this:
Click here to view code image
matthew@seymour~:$ sudo tripwire -m c
No output is shown here, but a report is displayed in this example. The output could be redirected to a file, but a report is saved as /var/lib/tripwire/report/hostname-YYYYMMDD-HHMMSS.twr (in other words, using your host’s name, the year, the month, the day, the hour, the minute, and the seconds). This report can be read using the twprint utility, like this:
Click here to view code image
matthew@seymour~:$ sudo twprint—print-report -r \
/var/lib/tripwire/report/shuttle2-20020919-181049.twr | less
Other options, such as emailing the report, are supported by Tripwire, which should be run as a scheduled task by your system’s scheduling table, /etc/crontab, on off-hours. (It can be resource intensive on less powerful computers.) The Tripwire software package also includes a twadmin utility you can use to fine-tune or change settings or policies or to perform other administrative duties.
Plan to spend some time reading documentation if you want to use Tripwire. It is powerful but not simple. We recommend starting with the man pages and www.tripwire.com.
Devices
Do not ever advertise that you have set a NIC to promiscuous mode. Promiscuous mode (which can be set on an interface by using ifconfig’s promisc option) is good for monitoring traffic across the network and can often enable you to monitor the actions of someone who might have broken into your network. The tcpdump command also sets a designated interface to promiscuous mode while the program runs; unfortunately, the ifconfigcommand does not report this fact while tcpdump is running!
Remember to use the right tool for the right job. Although you can use a network bridge to connect your network to the Internet, it would not be a good option. Bridges have almost become obsolete because they forward any packet that comes their way, which is not good when a bridge is connected to the Internet. A router enables you to filter which packets are relayed.
Viruses
In the right hands, Linux is every bit as vulnerable to viruses as Windows is. That might come as a surprise to you, particularly if you made the switch to Linux on the basis of its security record. However, the difference between Windows and Linux is that it is much easier to secure against viruses on Linux. Indeed, as long as you are smart and diligent, you need never worry about them. Here is why:
![]() Linux never puts the current directory in your executable path, so typing ls runs /bin/ls rather than any program named ls in the current directory.
Linux never puts the current directory in your executable path, so typing ls runs /bin/ls rather than any program named ls in the current directory.
![]() A nonroot user can infect only the files that user has write access to, which is usually only the files in the user’s home directory. This is one of the most important reasons for never using sudo when you don’t need to.
A nonroot user can infect only the files that user has write access to, which is usually only the files in the user’s home directory. This is one of the most important reasons for never using sudo when you don’t need to.
![]() Linux forces you to manually mark files as executable, so you can’t accidentally run a file called myfile.txt.exe thinking it is just a text file.
Linux forces you to manually mark files as executable, so you can’t accidentally run a file called myfile.txt.exe thinking it is just a text file.
![]() By having more than one common web browser and email client, Linux has strength through diversity: Virus writers cannot target one platform and hit 90 percent of the users.
By having more than one common web browser and email client, Linux has strength through diversity: Virus writers cannot target one platform and hit 90 percent of the users.
Despite all that, Linux is susceptible to being a carrier for viruses. If you run a mail server, your Linux box can send virus-infected mails on to Windows boxes. The Linux-based server would be fine, but the Windows client would be taken down by the virus.
In this situation, consider a virus scanner for your machine. You have several to choose from, both free and commercial. The most popular free suite is Clam AV (www.clamav.net), but Central Command, BitDefender, F-Secure, Kaspersky, McAfee, and others all compete to provide commercial solutions. Look around for the best deal before you commit.
Configuring Your Firewall
Always use a hardware-based or software-based firewall on computers connected to the Internet. Ubuntu has a firewall application installed by default named Uncomplicated Firewall (UFW). This tool enables you to implement selective or restrictive policies regarding access to your computer or LAN.
UFW is run from the terminal, and you must have administrative privileges to use it. Commands are given like this:
Click here to view code image
matthew@seymour~:$ sudo ufw status
The most useful commands are listed in Table 20.1. For others, the UFW man page. Many are described in greater detail after the table.
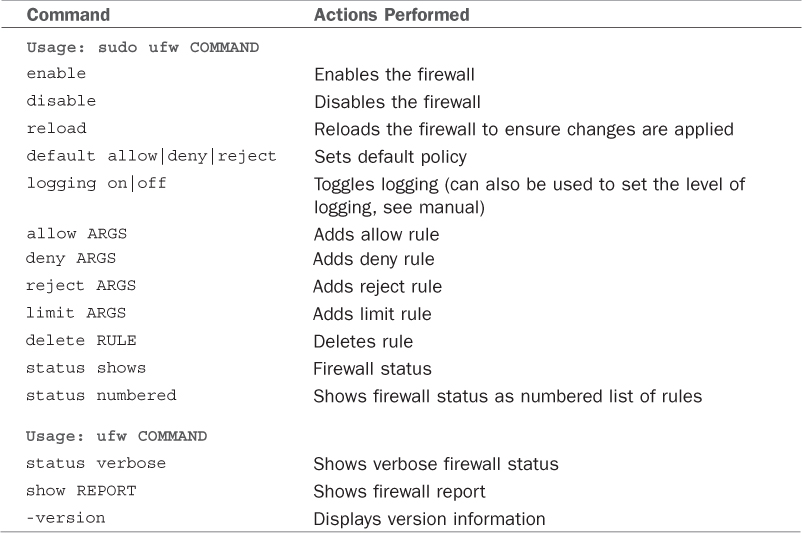
TABLE 20.1 Useful Commands for UFW
By default, the UFW or firewall is disabled. To enable the firewall, you run the following command:
Click here to view code image
matthew@seymour~:$ sudo ufw enable
To disable, replace enable with disable.
Next, you want to enable firewall logging. Much like the enable command, you run the following command:
Click here to view code image
matthew@seymour~:$ sudo ufw logging on
To enable specific ports on the firewall you can run the ufw command along with the port number to open. For example, if you want to allow port 80 (HTTP) incoming connections to your Ubuntu server you enter the following:
Click here to view code image
matthew@seymour~:$ sudo ufw allow 80
To remove the firewall rule allowing port 80 connections, run the following command:
Click here to view code image
matthew@seymour~:$ sudo ufw delete allow 80
Many services are already defined in ufw. This means you don’t have to remember the standard ports those services use, and you can allow, deny, or delete using the service name, like this:
Click here to view code image
matthew@seymour~:$ sudo ufw allow ssh
You can also allow incoming connections from particular IP addresses. For example, if you want to let 192.168.0.1 to connect to your server, you enter the following:
Click here to view code image
matthew@seymour~:$ sudo ufw allow from 192.168.0.1
To remove the firewall rule allowing the previous IP address to connect, run the following command:
Click here to view code image
matthew@seymour~:$ sudo ufw delete allow from 192.168.0.1
There is a graphical interface that you can install from the Ubuntu repositories to manage UFW called GUFW. The same details apply, but the interface is easier and does not require you to remember as much, as you can see in Figure 20.1 where we have a rule to allow traffic in on port 22 (for the SSH service) and incoming traffic on port 5900 if it uses TCP (for the VNC service).

FIGURE 20.1 The GUFW graphical interface.
If you click Add, you can easily add rules for preconfigured services, as shown in Figure 20.2, or you can configure your own rules from the Simple and Advanced tabs.
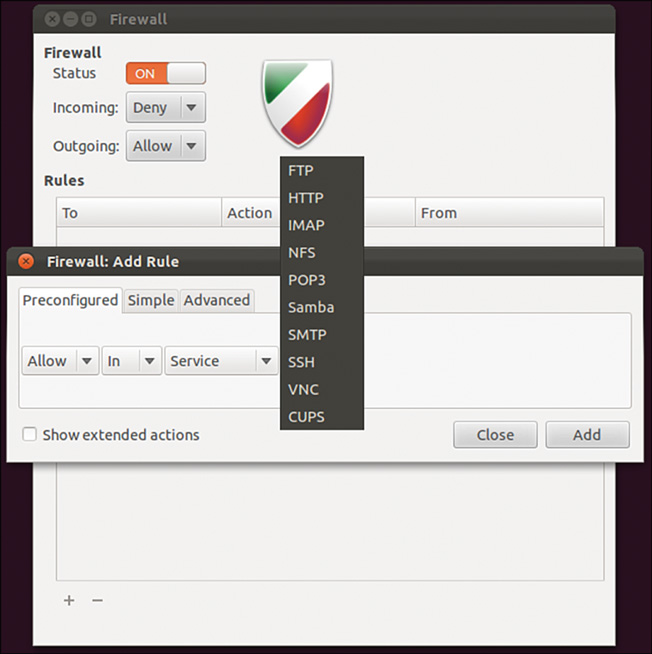
FIGURE 20.2 GUFW preconfigured service options.
UFW is based on iptables, which are tables used to configure the Linux kernel’s built-in firewall. UFW simplifies the user tasks and syntax, but is really just using iptables. You probably won’t need to know this on your Ubuntu machine, but for completeness and to help you if you use a different Linux distribution in the future, Table 20.2 lists simple, basic commands as a brief introduction to iptables, just to whet your appetite.
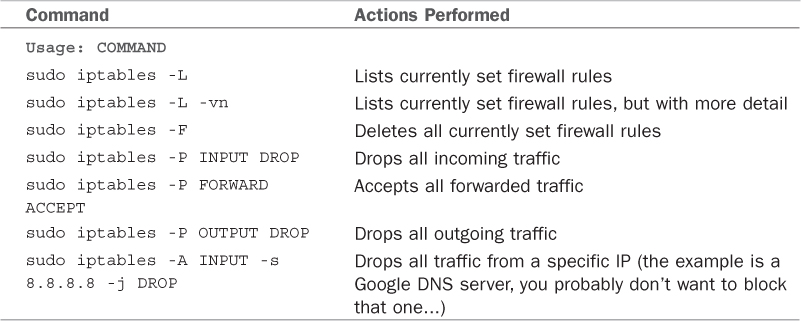
TABLE 20.2 Useful Commands for iptables
In the table, you will see words in all-caps like ACCEPT and DROP, which are policies to be set for things called chains. Chains are descriptions of specific types of network access, such as you can see below as INPUT, FORWARD, and OUTPUT. And other interactions in a network. You can, for example, define the default policy as DROP, which means to reject, and then ALLOW specific types of traffic to go through the firewall. iptables is quite complex and incredibly powerful.
You can block or allow traffic based on IP address, NIC, port, network, and more. You can set iptables to log all actions or just specific actions. You can even use it to configure NAT routers. For more, see the man pages for iptables and its IPv6 cousin, ip6tables.
AppArmor
AppArmor is a mandatory access control (MAC) system. It is less complicated than the better known SELinux (www.nsa.gov/research/selinux/), a MAC created by the U.S. National Security Agency (NSA). AppArmor is designed to limit what specific programs can do by restricting them to the use of predetermined resources and only those resources. This is done via profiles, which are loaded into the kernel at boot. It can be run in complain mode, where information is logged about unsecure practices but no action is taken, or in enforce mode, where policies and limits are active.
This is a brief introduction to AppArmor. For a fuller introduction, check the links listed in the “References” section at the end of this chapter.
By default, AppArmor does little. You can install some extra profiles from the Ubuntu repositories by installing the apparmor-profiles package. These run in complain mode and log issues in /var/log/messages.
To unleash the power of AppArmor, you need to edit or create text files in /etc/apparmor.d. Profiles are named for the application they restrict, including the full path to the application in the filesystem. For example, the file sbin.rsyslogd, shown here, restricts the system logging daemon:
Click here to view code image
# Last Modified: Sun Sep 25 08:58:35 2011
#include <tunables/global>
# Debugging the syslogger can be difficult if it can't write to the file# that the
kernel is logging denials to. In these cases, you can do the# following:# watch -n 1
'dmesg | tail -5'
/usr/sbin/rsyslogd { #include <abstractions/base> #include <abstractions/
nameservice>
capability sys_tty_config, capability dac_override, capability dac_read_search,
capability setuid, capability setgid, capability sys_nice, capability syslog,
# rsyslog configuration /etc/rsyslog.conf r, /etc/rsyslog.d/ r, /etc/
rsyslog.d/** r, /{,var/}run/rsyslogd.pid rwk, /var/spool/rsyslog/ r, /var/spool/
rsyslog/** rwk,
/usr/lib{,32,64}/rsyslog/*.so mr,
/dev/tty* rw, /dev/xconsole rw, @{PROC}/
kmsg r,
/dev/log wl, /var/lib/*/dev/log wl, /var/spool/
postfix/dev/log wl,
# 'r' is needed when using imfile /var/log/** rw,
# Add these for mysql support #/etc/mysql/my.cnf r, #/{,var/}run/mysqld/mysqld.
sock rw,
# Add thes for postgresql support ##include <abstractions/openssl> ##include
<abstractions/ssl_certs> #/{,var/}run/postgresql/.s.PGSQL.*[0-9] rw,
# Site-specific additions and overrides. See local/README for details. #include
<local/usr.sbin.rsyslogd>}
Even without knowing the syntax, you can see from this file that profiles are simple text files that support the use of comments, that absolute paths and globbing (pattern matching for filenames) are supported, that specific capabilities are allowed or disallowed, and what locations and programs in the filesystem may be accessed or used.
Each access rule specifies specific permissions from this list:
Click here to view code image
r - read
w - write
ux - unconstrained execute
Ux - unconstrained execute - scrub the environment
px - discrete profile execute
Px - discrete profile execute - scrub the environment
ix - inherit execute
m - allow PROT_EXEC with mmap(2) calls
l - link
These permissions are listed at the end of lines.
Genprof is a program that helps you generate or update a profile. You supply the name of the executable (or the path, if it is not already in the path) and may optionally supply the path to the profiles, as well:
Click here to view code image
matthew@seymour~:$ sudo genprof google-chrome
You will be asked to start the program and use it for a bit. After it is complete, you are given an opportunity to choose whether access to each function should be allowed or denied. The program then writes a text file in /etc/apparmor.d using the name of the program and its path (in this case, opt.google.chrome.google-chrome, which I installed directly from Google [www.google.com/chrome?platform=linux], so no premade AppArmor profile exists on my system). You may then edit the text file as desired, which you must do if you want to change from complain to enforce mode.
After you have a set of profiles that cover what you need, these are the commands you will use most often:
Click here to view code image
start:
matthew@seymour~:$ sudo service apparmor start
stop:
matthew@seymour~:$ sudo service apparmor stop
reload:
matthew@seymour~:$ sudo service apparmor reload (or restart)
show status:
matthew@seymour~:$ sudo service apparmor status
We have just scratched the surface of AppArmor, but hopefully we have given you enough information to have whetted your appetite to do some further reading.
Forming a Disaster Recovery Plan
No one likes planning for the worst, which is why two-thirds of people do not have wills. It is a scary thing to have your systems hacked: One or more criminals has broken through your carefully laid blocks and caused untold damage to the machine. Your boss, if you have one, wants a full report of what happened and why, and your users want their email when they sit down at their desks in the morning. What to do?
If you ever do get hacked, nothing will take the stress away entirely. However, if you take the time to prepare a proper response in advance, you should at least avoid premature aging. Here are some tips to get you started:
![]() Do not just pull the network cable out—This acts as an alert that the cracker has been detected, which rules out any opportunities for security experts to monitor for that cracker returning and actually catching him.
Do not just pull the network cable out—This acts as an alert that the cracker has been detected, which rules out any opportunities for security experts to monitor for that cracker returning and actually catching him.
![]() Only inform the people who need to know—Your boss and other IT people are at the top of the list; other employees are not. Keep in mind that it could be one of the employees behind the attack, and this tips them off.
Only inform the people who need to know—Your boss and other IT people are at the top of the list; other employees are not. Keep in mind that it could be one of the employees behind the attack, and this tips them off.
![]() If the machine is not required and you do not want to trace the attack, you can safely remove it from the network—However, do not switch it off because some backdoors are enabled only when the system is rebooted.
If the machine is not required and you do not want to trace the attack, you can safely remove it from the network—However, do not switch it off because some backdoors are enabled only when the system is rebooted.
![]() Take a copy of all the log files on the system and store them somewhere else—These might have been tampered with, but they might contain nuggets of information.
Take a copy of all the log files on the system and store them somewhere else—These might have been tampered with, but they might contain nuggets of information.
![]() Check the /etc/passwd file and look for users you do not recognize—Change all the passwords on the system and remove bad users.
Check the /etc/passwd file and look for users you do not recognize—Change all the passwords on the system and remove bad users.
![]() Check the output of ps aux for unusual programs running—Also check to see whether any cron jobs are set to run.
Check the output of ps aux for unusual programs running—Also check to see whether any cron jobs are set to run.
![]() Look in /var/www and see whether any web pages are there that should not be.
Look in /var/www and see whether any web pages are there that should not be.
![]() Check the contents of the .bash_history files in the /home directories of your users. Are there any recent commands for your primary user?
Check the contents of the .bash_history files in the /home directories of your users. Are there any recent commands for your primary user?
![]() If you have worked with external security companies previously, call them in for a fresh audit—Hand over all the logs you have and explain the situation. They will be able to extract all the information from the logs that is possible.
If you have worked with external security companies previously, call them in for a fresh audit—Hand over all the logs you have and explain the situation. They will be able to extract all the information from the logs that is possible.
![]() Start collating backup tapes from previous weeks and months—Your system might have been hacked long before you noticed, so you might need to roll back the system more than once to find out when the attack actually succeeded.
Start collating backup tapes from previous weeks and months—Your system might have been hacked long before you noticed, so you might need to roll back the system more than once to find out when the attack actually succeeded.
![]() Download and install Rootkit Hunter from www.rootkit.nl/projects/rootkit_hunter.html—This searches for (and removes) the types of files that bad guys leave behind for their return.
Download and install Rootkit Hunter from www.rootkit.nl/projects/rootkit_hunter.html—This searches for (and removes) the types of files that bad guys leave behind for their return.
Keep your disaster recovery plan somewhere safe; saving it as a file on the machine in question is a very bad move.
References
![]() https://help.ubuntu.com/community/InstallingSecurityTools—Ubuntu community documentation of and suggestions for various security tools.
https://help.ubuntu.com/community/InstallingSecurityTools—Ubuntu community documentation of and suggestions for various security tools.
![]() https://nmap.org—The official site for Nmap.
https://nmap.org—The official site for Nmap.
![]() www.tripwire.org—Information and download links for the open-source version of Tripwire.
www.tripwire.org—Information and download links for the open-source version of Tripwire.
![]() www.ubuntu.com/usn—The official Ubuntu security notices list; well worth keeping an eye on.
www.ubuntu.com/usn—The official Ubuntu security notices list; well worth keeping an eye on.
![]() https://help.ubuntu.com/community/UFW—Ubuntu community documentation for UFW.
https://help.ubuntu.com/community/UFW—Ubuntu community documentation for UFW.
![]() https://wiki.ubuntu.com/UncomplicatedFirewall—Ubuntu documentation for UFW.
https://wiki.ubuntu.com/UncomplicatedFirewall—Ubuntu documentation for UFW.
![]() http://wiki.apparmor.net/—The official documentation for AppArmor.
http://wiki.apparmor.net/—The official documentation for AppArmor.
![]() https://help.ubuntu.com/community/AppArmor—Ubuntu community documentation for AppArmor.
https://help.ubuntu.com/community/AppArmor—Ubuntu community documentation for AppArmor.
![]() https://wiki.ubuntu.com/Security/Features—An Ubuntu wiki page outlining and describing security features, Ubuntu, and configuration.
https://wiki.ubuntu.com/Security/Features—An Ubuntu wiki page outlining and describing security features, Ubuntu, and configuration.
All materials on the site are licensed Creative Commons Attribution-Sharealike 3.0 Unported CC BY-SA 3.0 & GNU Free Documentation License (GFDL)
If you are the copyright holder of any material contained on our site and intend to remove it, please contact our site administrator for approval.
© 2016-2026 All site design rights belong to S.Y.A.