Ubuntu Unleashed 2017 Edition (2017)
Part V: Programming Linux
Chapter 43. Beginning Mobile Development for Android
In This Chapter
![]() Introduction to Android
Introduction to Android
![]() Installing Android Studio
Installing Android Studio
![]() Create Your First Application
Create Your First Application
![]() References
References
So many Linux users have embraced not only smartphones, but specifically those based on Android. Android is owned by Google and based on the Linux kernel and is one of the best-selling platforms for smartphones and tablet computers. Android includes the operating system, middleware, and several key applications. Middleware and application examples include an integrated web browser based on WebKit, optimized graphics libraries, media support for most formats, and structured data storage with SQLite. It also includes software for hardware-dependent functions such as GSM, Bluetooth, 3G, Wi-Fi, camera, GPS, and more.
Most of the Android source code is freely available and licensed using the Apache License. Google operates an online app store called Google Play where anyone with an Android phone or tablet computer can download free and for-payment applications to extend the functionality of their devices. Other third-party sites exist for the same purpose, thereby creating many paths by which one may make one’s software available to Android users.
This chapter helps you get started writing software for Android on your Ubuntu machine by describing how to find and set up the development tools you need. It discusses the basic details you need to know as you consider whether you want to develop programs for the Android platform, and if so, whether you want to try to get those programs uploaded to and made available via Google Play or a third-party site.
Introduction to Android
Before we get further into the details of development of software for Android, a more detailed introduction to the Android architecture seems appropriate. Our description starts with the hardware and builds layer upon layer from that foundation.
Hardware
Although it has been proved possible to run Android on other platforms, the main target platform is ARM. ARM processors are 32-bit reduced instruction set computer (RISC) processors. Like other RISC processors, they are designed for speed with the idea that a simpler set of processor instructions creates greater efficiency and throughput. ARM processors are also designed for low power usage, making them ideal for mobile and embedded devices. Indeed, ARM is the dominant processor in these markets.
Linux Kernel
The first layer of software to run in the Android stack is a customized Linux kernel. Most of the customizations take the form of feature enhancements or optimizations to help Android and Linux work together more efficiently. Originally, Google made a point of contributing code it developed, but some of the features were rejected by the mainline Linux kernel developers for inclusion in the standard Linux kernel. This meant that to keep its desired code customizations, Google had to create a fork of the Linux kernel, which is permissible due to the license under which the kernel is released. Chapter 22, “Kernel and Module Management,” gives an introduction to the Linux kernel.
Libraries
On top of the kernel run a set of software libraries. These are used by the higher-level components of Android and are made available to developers to use when writing Android applications using the Android software development kit (SDK), which is discussed later in this chapter. These libraries include a version of the standard C library (libc), libraries for recording and playback of many popular media formats, graphics and web browser engines, font rendering, and more.
Android Runtime
Some of the higher-level components of Android in the Application Layer (described next) interact directly with the libraries just described. Other parts of the Application Layer interact with the libraries via the Android Runtime. Android software is primarily written in Java, using Google-developed and specific Java libraries. That software runs on the Android Runtime, comprised of some additional core libraries running on top of a special virtual machine called Dalvik. The core libraries provide most of the functionality of Java. Dalvik performs just-in-time (JIT) compilation and is optimized for mobile devices.
Application Framework
The Application Framework is a set of useful systems and services that top-level applications can call. These provide standardized means of accessing system information, using device hardware, creating notifications, and so on. They are the same set that are used by the core applications included in Android, so end-user-created applications can have the same look, feel, and interaction style as those provided by Android.
Applications
Android comes with a set of core applications. These include a web browser, programs for text messaging, managing contacts, a calendar, an email client, and more. As noted earlier, Android software is written in Java.
Installing Android Studio
Android provides a bundled integrated development environment (IDE) with software development kit, which is a set of tools to enable the creation of applications to run on Android. Android Studio has versions available for Linux, Mac OS X, and for Windows.
Install Android Studio
Download the latest version of Android Studio from the Android Developers website at http://developer.android.com/studio/index.html. For Ubuntu, you need the Linux version, which is made available as a ZIP file. Unpack the file in the location where you want the development kit to reside (for example, /home/matthew). Doing so creates a new directory called android-studio. Note where you put this directory; you will need the information later.
Navigate to the android-studio/bin/ directory and run studio.sh.
matthew@seymour:~$ studio.sh
The first time you run Android Studio, a wizard will appear and walk you through the initial setup procedure and then download and install any basic components you need.
Install SDK Packages
The initial setup installs the basics, but to start developing you will want other tools, platforms, and packages. This is done within Android Studio (Figure 43.1) using the Android SDK Manager. From Android Studio (Figure 43.2) select Configure and then click SDK Manager.
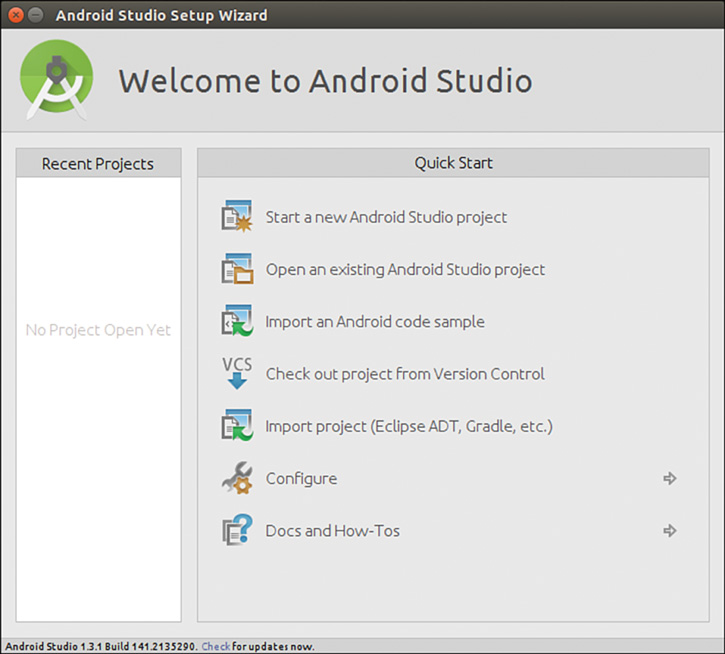
FIGURE 43.1 The main Android Studio options appear when you start it.
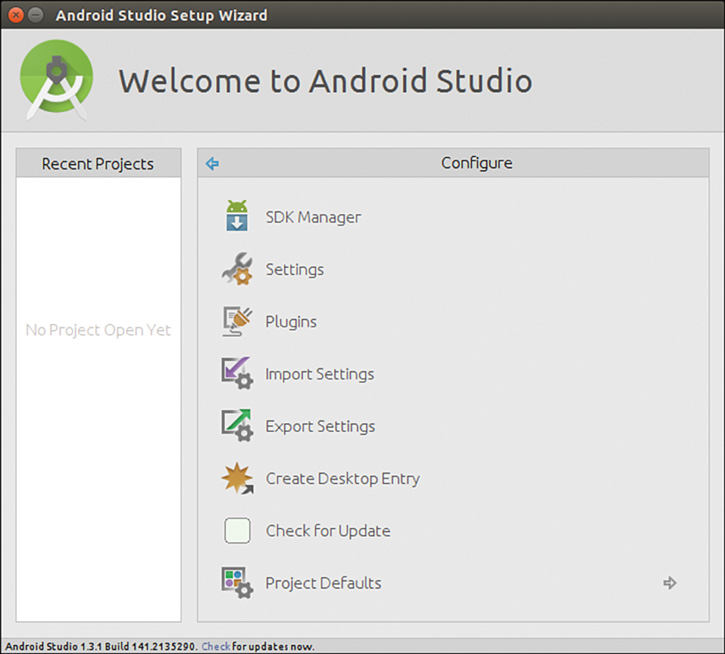
FIGURE 43.2 You can configure Android Studio to suit your preferences as a developer.
In the Android SDK Manager, select and install the tools and other packages you want (Figure 43.3). You will want to include tools for any Android platform/release for which you want to develop. It is strongly suggested that you do not remove any of the files that were installed by default to ensure the best results.
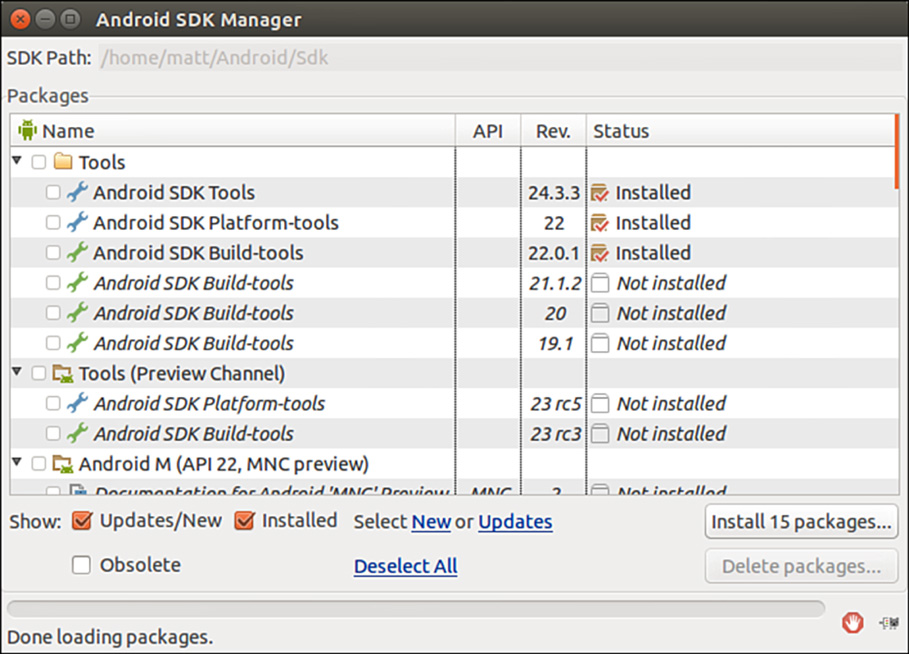
FIGURE 43.3 Use Android SDK Manager to find what you need and remove what you do not.
At a minimum, we suggest you install the following.
![]() From the Tools directory, Android SDK Tools.
From the Tools directory, Android SDK Tools.
![]() From the Tools directory, Android SDK Platform Tools.
From the Tools directory, Android SDK Platform Tools.
![]() From the Tools directory, Android SDK Build-tools (the highest version listed).
From the Tools directory, Android SDK Build-tools (the highest version listed).
![]() From the first Android X.X directory, which is the latest version listed, SDK Platform.
From the first Android X.X directory, which is the latest version listed, SDK Platform.
![]() From the first Android X.X folder, a system image for the emulator, such as ARM EABI v7a System Image.
From the first Android X.X folder, a system image for the emulator, such as ARM EABI v7a System Image.
![]() From the Extras directory, Android Support Library.
From the Extras directory, Android Support Library.
![]() From the Extras directory, Google Play Services.
From the Extras directory, Google Play Services.
Create Your First Application
Now you are ready to begin. Click Start a new Android Studio Project and use the wizard to enter the basic details of your new application.
References
![]() http://developer.android.com/—The main website for Android development. Most of this chapter could not exist if it were not for this site, which goes into much greater detail than this short introduction and is where this book’s author learned most of what he knows on the subject.
http://developer.android.com/—The main website for Android development. Most of this chapter could not exist if it were not for this site, which goes into much greater detail than this short introduction and is where this book’s author learned most of what he knows on the subject.
![]() http://developer.android.com/sdk/—The main web page for Android Studio.
http://developer.android.com/sdk/—The main web page for Android Studio.
![]() https://wiki.ubuntu.com/Touch/DualBootInstallation—There is a new beta project being tested that may interest some of you. This provides a way to dual boot Ubuntu and Android on the same device.
https://wiki.ubuntu.com/Touch/DualBootInstallation—There is a new beta project being tested that may interest some of you. This provides a way to dual boot Ubuntu and Android on the same device.
All materials on the site are licensed Creative Commons Attribution-Sharealike 3.0 Unported CC BY-SA 3.0 & GNU Free Documentation License (GFDL)
If you are the copyright holder of any material contained on our site and intend to remove it, please contact our site administrator for approval.
© 2016-2026 All site design rights belong to S.Y.A.