The Official Ubuntu Book (2011)
Chapter 6. More Applications for Ubuntu
• Creating Graphics with GIMP and Inkscape
• Desktop Publishing with Scribus
• Creating Music with Jokosher
• Playing to Learn with Educational Programs
• Getting There Faster with Docky
• Summary
In addition to those installed by default, Ubuntu offers a wealth of other applications to help you make the most of your computer. Different people use their computers in different ways, and it is for that reason that we wanted to help you discover how to enable your Ubuntu computer to do even more.
In this chapter, we show you just a few of the thousands of additional applications that you can install on your Ubuntu system. Each section showcases one application, starting with the name of the package you need to install and what Windows/OS X equivalents might exist. This is followed by the main thrust of the chapter, which shows you how that application works and walks you through the initial steps of creation. At the end of the discussion of each application, you will find a Further Resources section to help you go from novice to expert. Let’s get ready to supercharge your Ubuntu!
Creating Graphics with GIMP and Inkscape
GIMP
Package name: gimp
Windows equivalent: Adobe Photoshop or GIMP
The GNU Image Manipulation Program, affectionately known as GIMP to its friends, is a powerful graphics package. GIMP provides a comprehensive range of functionality for creating different types of graphics. It includes tools for selecting, drawing, paths, masks, filters, effects, and more. It also includes a range of templates for different types of media such as Web banners, different paper sizes, video frames, CD covers, floppy disk labels, and even toilet paper. Yes, toilet paper.
Note
In previous versions of Ubuntu, GIMP was installed by default, but for 10.04, it was replaced by Pitivi, a video editor. For this reason, GIMP is now included in this additional applications chapter.
Unlike Adobe Photoshop, GIMP does not place all of its windows inside a single large window; instead, GIMP has a number of separate child windows. This can be a little confusing at first for new users—especially those used to Photoshop. To get you started, let’s run through a simple session in GIMP.
An Example
Start GIMP by clicking Applications > Graphics > GNU Image Manipulation Program.
When GIMP loads, you will see a collection of different windows, as shown in Figure 6-1.
Figure 6-1 GIMP does not put everything in one window like Adobe Photoshop.
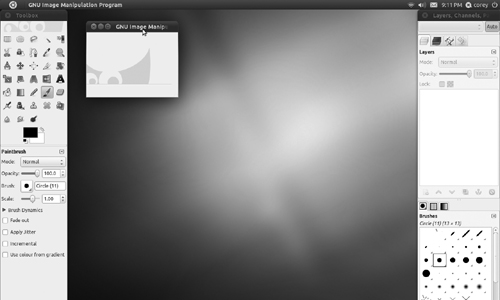
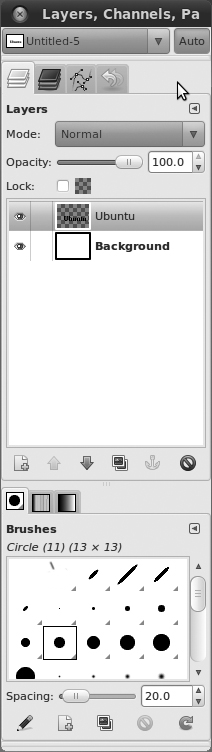
Close the Tip of the Day window, and you are left with two other windows. The one on the left in the screenshot is the main tool palette. This window provides you with a range of different tools that can be used to create your images. The window on the right provides details of layers, brushes, and other information. GIMP provides a huge range of different windows that are used for different things, and these are just two of them.
To create a new image, click File > New. The window shown in Figure 6-2 will appear.
Figure 6-2 Lots of templates are available, including one for toilet paper!
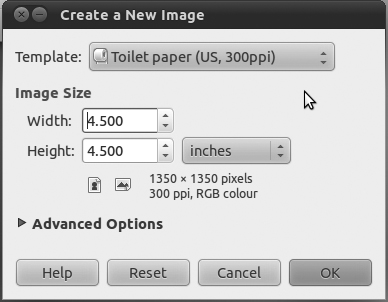
The easiest way to get started is to select one of the many templates. Click the Template combo box and select 640 × 480. If you click the Advanced Options expander, you can also select whether to use RGB or grayscale with the Colorspace box. You can also choose a background fill color or having a transparent background.
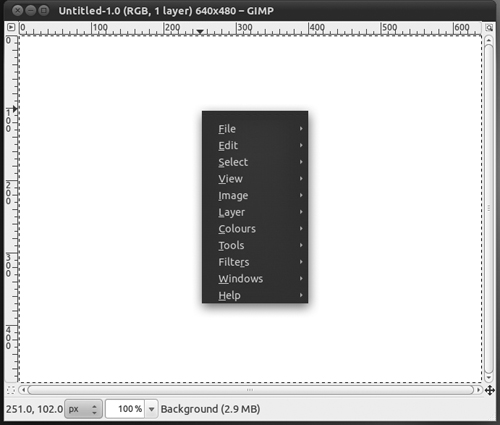
Click OK, and you will see your new image window (Figure 6-3).
Figure 6-3 Use the right mouse button on the image to access lots of GIMP options and features.
To work on your image, use the tool palette to select which tool you want to use on the new image window. Each time you click on a tool in the palette, you see options for the tool appear at the bottom half of the palette window.
When you click the button that looks like an A in the toolbox, it selects the text tool. At the bottom of the toolbox, you will see the different options. Click the Font button that looks like an uppercase and a lowercase case A (like Aa) and select the Sans Bold font. Now click the up arrow on the Size box, and select the size as 60 px. Move your mouse over to the empty image window, and you will see the mouse pointer change to a text carat. Click in the image, and a box pops up in which you can enter the text to add to the image. Type in “Ubuntu.” With the text entry still open, click the up arrow on the Size box so the text fills most of the window. As you can see, you can adjust the text while it is in the image. When you are happy with the formatting, click Close on the text entry box. Your image should look a little like Figure 6-4.
Figure 6-4 Ubuntu comes with a range of attractive fonts for use in your images.

Now in the toolbox, click the button that has a cross with an arrow on each end. You can use this tool to move the text around. Click the black text, and move the mouse.
Let’s now add an effect filter. GIMP comes with a range of different filters built in. You can access these by right-clicking the image and selecting the Filters submenu.
For our image, right-click the image and select Filters > Blur > Gaussian Blur. In the Horizontal and Vertical boxes, select 5 as the value. Click OK, and the blur is applied to your text. Anything in GIMP can be undone by clicking Edit > Undo or typing Ctrl+Z. Your image should now look like Figure 6-5. Now we are going to create another layer and put some text over our blurred text to create an interesting effect. If the Layers window isn’t open yet, open it with Windows > Dockable Dialogues > Layers. The Layers window will now appear (Figure 6-6).
Figure 6-5 Several filters and effects are bundled with GIMP in Ubuntu.
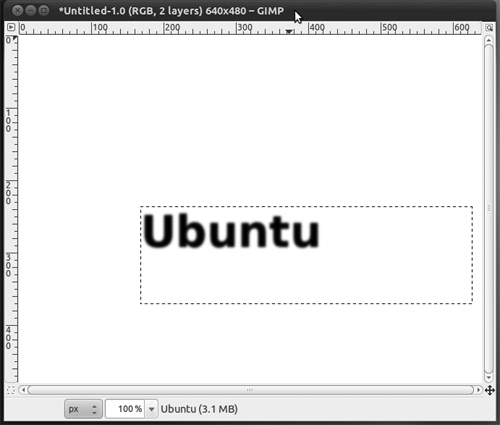
Figure 6-6 Layers are essential when creating complex images with lots of parts.
Layers are like clear plastic sheets that can be stacked on top of each other. They allow you to create some imagery on one layer and then create another layer on top with some other imagery. When combined, layers can create complex-looking images that are easily editable because you can edit layers individually. Currently, our blurred text is one layer. We can add a new layer by clicking the paper icon in the Layers dialog box. Another window appears to configure the layer. The defaults are fine (a transparent layer the size of your image), so click OK.
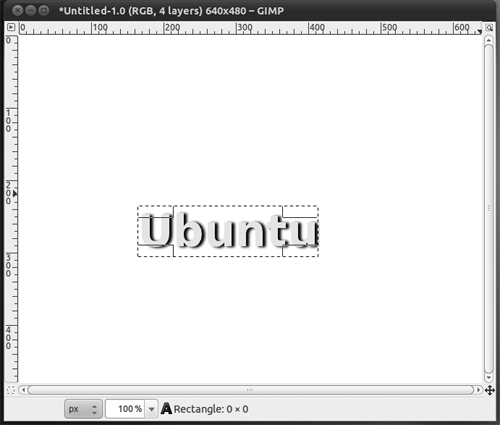
Now double-click the black color chip in the toolbox window and select a light color. You can do this by moving the mouse in the color range and then clicking OK when you find a color you like. Now click the text button from the palette and again add the “Ubuntu” text. When the text is added, it will be the same size as before. Now use the move tool and position it over the blurred text. Now you have the word “Ubuntu” with a healthy glow, as shown in Figure 6-7!
Figure 6-7 Combining steps as we have done can result in interesting effects such as this.
The final step is to crop the image to remove the unused space. Click Tools > Transform Tools > Crop, and use the mouse to draw around the Ubuntu word. You can click in the regions near the corners of the selection to adjust the selection more precisely. Click inside the selection, and the image will be cropped. To save your work, click File > Save, and enter a filename. You can use the Select File Type expander to select from one of the many different file formats.
Further Resources
A great start is GIMP’s own help, which is not installed by default, but if you are on the Internet, the help viewer will download it automatically. You can also install it by searching for gimp help in the Software Center. The GIMP’s own Web site at www.gimp.org has all the help plus tutorials and more.
Inkscape
Package name: inkscape
Windows/OS X equivalents: Adobe Illustrator, Inkscape, Macromedia Freehand
Inkscape is also a drawing and graphic creation tool, much like GIMP, but one that has a slightly different focus. Unlike GIMP, which works with raster graphics, Inkscape is a vector drawing tool. This means rather than a grid of pixels, each assigned a color, drawings are mathematically described using angles and arbitrary units.
To get started with Inkscape, launch it from the Applications > Graphics menu, and very shortly you will see the default window with the basic canvas of either Letter or A4 depending on where in the world you live. At the top of the screen, below the menus, are three sets of toolbars. The topmost contains common tools like save and zoom, the second a series of snapping options, and the third is changeable depending on the tool selected.
All the tools are listed on the left-hand side of the menu, starting with the selection tool and running down to the eyedropper or paint color selector tool. Let’s get started by drawing a simple shape and coloring it in (Figure 6-8).
Figure 6-8 Inkscape’s toolbar
![]()
First, select the rectangle tool on the left, just below the zoom icon. Draw a rectangle anywhere on the screen. Now let’s change the color of the fill and outside line or stroke.
Note
With any of the drawing tools, the Shift key will cause objects to grow from the center of where you clicked and Ctrl will allow you to constrain dimensions and rotation.
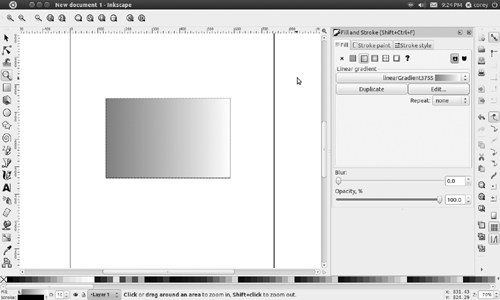
With your rectangle still selected, go to the Object menu and choose Fill and Stroke. Over on the right, you will see the window appear, with three different tabs: Fill, Stroke Paint, and Stroke Style. Let’s fill that rectangle with a gradient from orange to white. Immediately below the Fill tab, change from Flat color to Linear Gradient (Figure 6-9).
Figure 6-9 Your rectangle, now with gradient-filled goodness
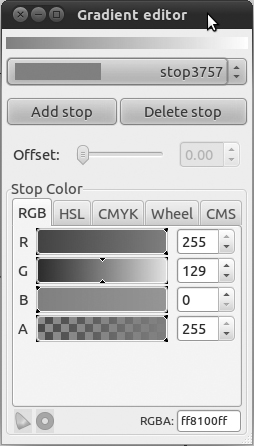
Look back at your rectangle and see the gradient and a new line running horizontally across the rectangle. Moving either the square or the circle allows you to define where the gradient starts and stops. To change the colors, click the Edit... button. Once the Edit dialog is up, each end of the gradient is called a stop and can be edited separately (Figure 6-10).
Figure 6-10 Gradient editing dialog
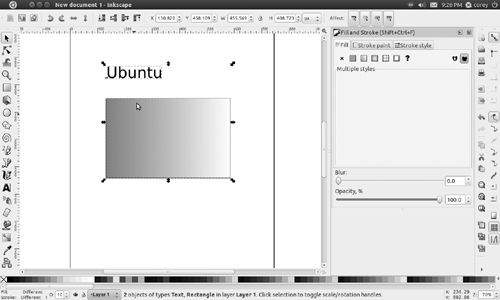
Now that we have a rectangle, let’s add some text to our image. Select the Text tool, which is right near the bottom on the left, and click anywhere. A cursor appears, and you can start typing. Type “Ubuntu,” and then we are going to change the color and size of the text. Let’s make the text 56 points, which can be selected in the upper right, beside the Font name.
The Fill & Stroke dialog should still be open on the right, but if it isn’t, reopen it. Change the text color to Red, then choose the selection tool again. Now drag a box around both the text and the rectangle, and you should see both selected (Figure 6-11).
Figure 6-11 Text and rectangle selected
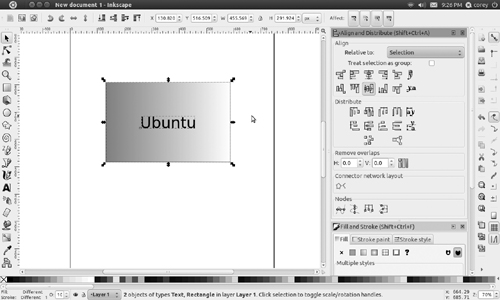
Now open the Alignment dialog, which is right near the bottom of the Object menu. Like the Fill and Stroke dialog, it appears on the right-hand side. To center the text in the box, see the middle two icons with a line and some blue lines on the side of them. Click both the Horizontal and Vertical alignment options, and both the text and image will be centered on the page (Figure 6-12).
Figure 6-12 Your final drawing
Now that you have created an image, what can you do with it? By default, Inkscape saves in the SVG or Scalable Vector Graphics format, an open standard for vector graphics. If you want to take your work elsewhere for showing on another computer or printing, Inkscape can also save into PDF format, although if you choose to do so, make certain you also save a copy as an SVG so you can edit the image later if you wish. Both SVG and PDF are options in the Save dialog. One key advantage for PDF is that it embeds fonts and graphics, meaning your image looks the same on nearly any computer you show it on. You can also export your image as a PNG for embedding in a text document or uploading to the Web, although many modern Web browsers such as Firefox and Chrome can display SVG directly, although most don’t support the full SVG standard. To export, go to File > Export, which allows you to choose to export just the objects selected, the whole document, or some portion.
Hopefully, you have seen just how powerful Inkscape can be. There are many more things you can do with Inkscape, so play around with the various options, dialogs, and shapes.
Further Resources
A good start is always Inkscape’s own help, which is in SVG format, so you can see how the original authors created the tutorials. Inkscape’s Web site at http://inkscape.org has some great tutorials and articles. If you want a book, Tav Bah’s Inkscape: Guide to Vector Drawing Program, Third Edition, is a good place to start.
Desktop Publishing with Scribus
Package name: scribus
Windows equivalents: Adobe InDesign, Scribus
For more powerful document creation than LibreOffice can allow, Scribus is just the ticket. A desktop publishing application, Scribus is built for designing and laying out documents of various sizes and sorts. As such, it makes a few different assumptions that might catch you up if you are used to using LibreOffice to create your documents.
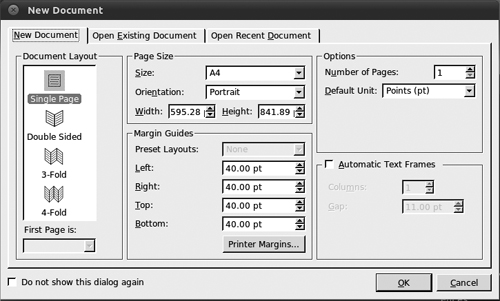
When you first launch Scribus, it asks you what kind of document you want to create or if you want to open an existing document. Let’s create a one-page document and take Scribus for a spin (Figure 6-13).
Figure 6-13 Scribus’s opening dialog with lots of options
The first thing to remember about Scribus is that as a desktop publishing program, it is not designed for the direct editing of images and text. You edit and create your images in applications like GIMP or Inkscape and your text in word processors like LibreOffice and then import them.
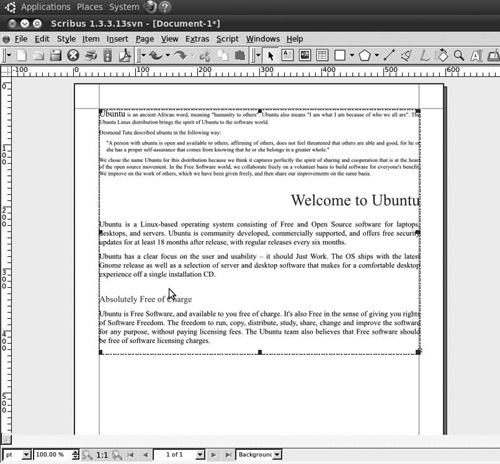
For starters, let’s create a pair of text frames and then import the document Welcome_to_Ubuntu.odt from Example Content. To create a text frame, you need to use the Insert Text Frame tool, which can be found near the middle of the toolbar. After you draw the text frame, you need to add text to it. Right-click on the frame and choose Get Text. A dialog very similar to the Open dialog appears. Choose the Welcome_to_Ubuntu.odt file, and then select OK. You will be asked a few options; for now, accept the defaults. You should see the text appear on the screen (Figure 6-14).
Figure 6-14 The imported text in a frame
Note
Scribus currently cannot import Microsoft Word documents, so you will need to open them in LibreOffice.org and convert them to .odt files so Scribus can import them.
But as you can see, the text overflows the frame. In order for the rest of the text to show up, you need to create another text frame and then link the two, allowing the overflow to appear in the second frame. Go up to the toolbar again, select the Insert Text Frame, and draw another frame roughly on the bottom of the page. Then select the first frame and choose the Link Text Frames icon on the toolbar, which looks like two columns with an arrow between them. After you have selected that, click on the second text box and you should see an arrow appear and, more importantly, your text will now flow from one frame to the next (Figure 6-15).
Figure 6-15 Text now flows from frame to frame.
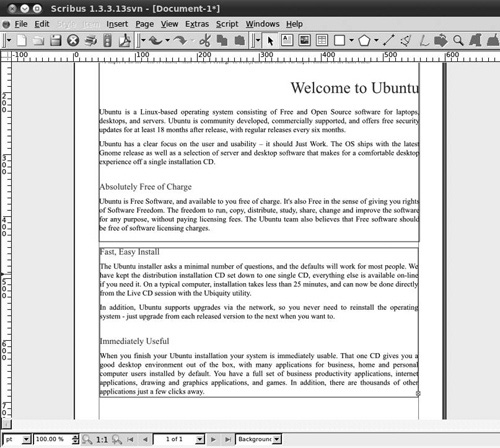
Next let’s insert an image at the bottom of the screen. As with text, you need to create an image frame, then add the image to that frame. Draw the image frame below the two text frames, and then right-click and choose Get Image. Just as with the text import, choose your file, this time an image file, in the Open dialog, and it will appear in the frame. Let’s choose the Ubuntu logo, under the Logo folder in Example Content. It will appear in your image frame (Figure 6-16).
Figure 6-16 Your document with an image added
Note
Scribus can import gif, jpg, png, xpm, psd, tiff, eps, and pdf. It cannot yet import GIMP’s XCF, so you will need to save any images you create in the the GIMP in one of the supported formats.
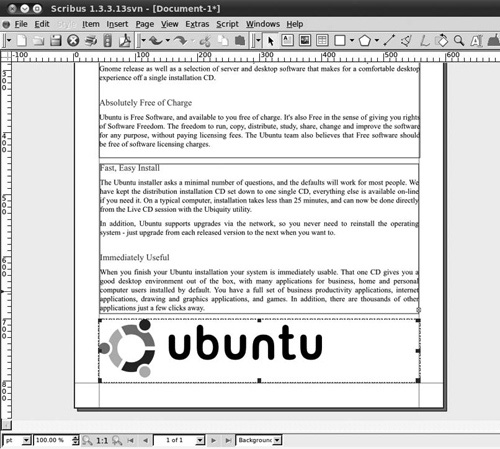
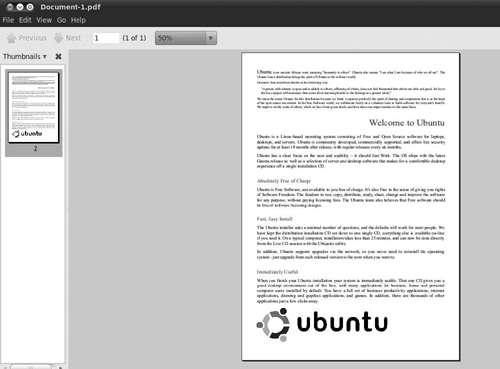
Now that you have added some text and an image, let’s export to PDF so you can share your creation with the world. On the toolbar near the left-hand edge, you will see the PDF logo, just to the left of the traffic light icon. Select that, and don’t worry about the error about the DPI of the image. Select Ignore Errors, and you will see a large dialog with many options for embedding fonts and the like. Don’t worry too much about them right now, as the document you have created isn’t that complicated. Choose a good name for your document, and then save it to your Documents folder. Now let’s take a look at your creation in the Document Viewer. Open the File Manager and load your new document (Figure 6-17).
Figure 6-17 Your document as a PDF
Now let’s go back to Scribus and save the image in Scribus’s own SLA format so that you can edit it later if you wish. Enter the name you chose for the PDF name and save it in the Documents folder as well. You have now created your first document in Scribus. There is a lot more to explore, so go and try things out. Just remember to save every now and again.
Further Resources
As always, Scribus’s own help is a great place to start. The Scribus Web site at www.scribus.net has a help wiki, further documentation, and more. There is also an official book, which isn’t out as of this writing but should be very shortly. Information about it can also be found on the Scribus Web site.
Creating Music with Jokosher
Package name: jokosher
Windows/OS X equivalents: Garage Band
Musicians abound in the Ubuntu community and the wider world, but until Jokosher came along, there wasn’t an easy-to-use and simple program for creating that music. Founded by Ubuntu’s own Jono Bacon and named after a kosher joke about the food that is Jono’s name, Jokosher makes creating music or other audio recordings a breeze.
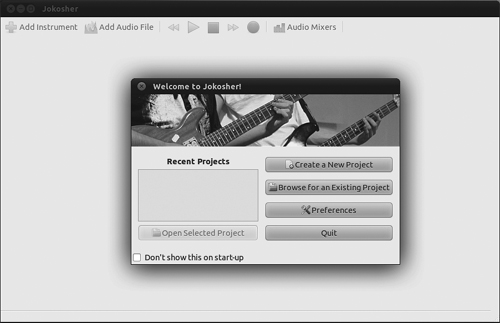
To get started in Jokosher, you first need to create a project to hold the various audio tracks that make up the end file. For our basic project, we are going to take two of the free culture showcase projects that ship with Ubuntu and combine them together. Click on the Create a New Project button in the welcome screen (Figure 6-18) and then on the next window, enter in Ubuntu combination into the Project Name field.
Figure 6-18 Jokosher’s welcome window
Note
Jokosher is a non-destructive editor, which means that it doesn’t edit the files you add directly, rather it stores the edits and applies them separately.
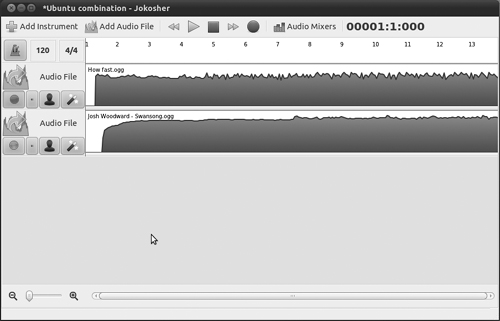
Once that is open, you will see a largely blank screen and you need to fill that with sound files. Choose Add Audio File on the upper toolbar and type in /usr/share/example-content in the location bar. Select one of two files in the Ubuntu Free Culture Showcase folder. After that is loaded, select Add Audio File again and select the other audio files. You should see something like in Figure 6-19.
Figure 6-19 The audio files are loaded.
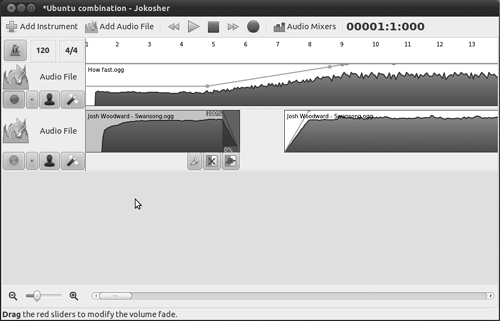
Now that we have both files loaded, let’s create some sweet solos so that you can only hear one of the two files. To create a cut in the audio file, simply double-click wherever you want your cut. So anywhere in the How Fast.ogg file, double-click and then drag the second piece to the left.
This will create a very abrupt break in the music, so to make it more pleasing, let’s create a pair of fades on either side. While holding the shift key down, click near the end of the first part and drag to the end. Release the mouse and you should see a pair of 100% boxes. Click and drag the right-most one down to the bottom where it will read 0%. After you are done, you should have something like Figure 6-20.
Figure 6-20 Adding some fades and cuts
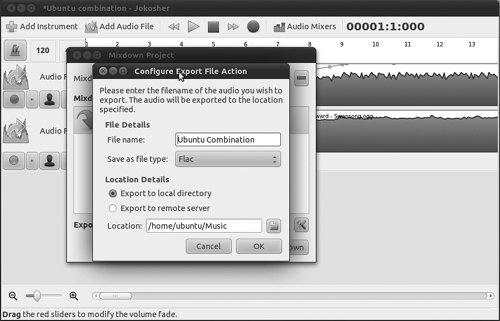
Now let’s export that file so you can share your awesome creation with your friends. Go to File > Mixdown Project and in the Mixdown Project, create a new profile by clicking the plus icon in the upper right. Name is exported and then click ok. Now you need to add an action, in this case export, so click on the lower right-most plus icon. Select Export File and then select Add Action. Now we need to configure the file name, type of audio file, and where you are going to save it to. Select Export File on the list and click the little configure icon in the lower right, it looks a like wrench and screwdriver. Name your file Ubuntu Combination and then Save it as a FLAC file. In the location bar, click the folder icon and choose your music folder. After you’re done, it should look like Figure 6-21. Now click the Mixdown button and your file is created. Go to your Music folder and hit play for the fun to begin.
Figure 6-21 Naming your file and exporting to the right place is easy.
We have just scratched the surface with Jokosher. We didn’t get into adding live instruments and recording them directly, which is where Jokosher really shines. But we did get a taste of the power of Jokosher even with a few simple audio files that come with Ubuntu. Go out and have fun.
Further Resources
As always, Jokosher’s own help is a great place to start. The Jokosher web site at www.jokosher.org has a help wiki, further documentation, and more.
Playing to Learn with Educational Programs
There are many different educational applications available on Ubuntu. Let’s take a look at just a few of them in the Applications > Education menu. You will find a brief summary for all applications here as well as more detailed explanations and screenshots of some of the more advanced packages.
Note
Along with the Edubuntu DVD, there is an easy way to install much of the educational software via preselected bundles aimed at different age groups, be it preschool, primary, secondary, or tertiary. To install the bundles, install the ubuntu-edu-preschool, -primary, -secondary, or -tertiary package.
GCompris Administration
This is the administration tool for the GCompris set of tools, which is described a little later. Using this tool, you can create separate profiles for different users of GCompris and enable or disable the list of available activities.
Kalzium
Kalzium presents the pinnacle of periodic table exploration for users of any ages. In its simplest form, it provides a quick and easy reference to the periodic table. Kalzium includes 105 of the naturally occurring elements, many of which are accompanied by sample pictures. If the user hovers the mouse pointer over an element symbol in the periodic table, a balloon appears showing the selected element’s name, atomic number, and mass (Figure 6-22).
Figure 6-22 Kalzium
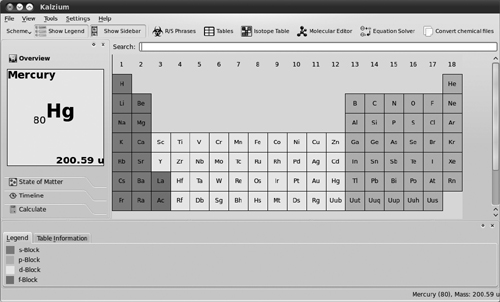
For more advanced users, Kalzium provides a fascinating way to explore the periodic table. Using the left-hand panel, users have access to the timeline, boiling point, and melting point sliders. When users move these sliders, the elements on the periodic table change color according to their dates of discovery, boiling points, or melting points respectively. Users can then start to see patterns emerging in the periodic table right in front of their eyes.
As well as presenting the basic information, Kalzium provides very advanced statistics on each of the 105 elements present.
Kanagram
Kanagram is a simple package that messes up the letters of a word to create an anagram that children must then unscramble. The package comes with hints, a cheat feature that reveals the word, and built-in word lists, which can be extended.
KBruch
KBruch is a math program to help students practice the use of fractions. It comes with four distinct modes of play.
• Fraction Task: In this exercise, the user is given a fraction sum that must be solved by adding the numerator and denominator. The difficulty of the sum can be changed by the user, who has control over the number of fractions to use, the maximum size of the main denominator, and the mathematical operations to use, such as addition, subtraction, multiplication, and division.
• Comparison: This exercise is designed to test the user’s understanding of fraction sizes by making him or her compare two given fractions.
• Conversion: The Conversion mode tests the user’s skills at taking a given number and converting it into a fraction.
• Factorization: Factorization tests the user in calculating the factors of a given number. Factorization is a key skill in using and manipulating fractions.
KHangman
This modern version of a classic game helps children learn to spell and recognize letter patterns in words. KHangman shows a blank base to start; as the user chooses letters, they are entered into the word if correct or placed on the tries list if incorrect, in which case the hangman begins to grow. KHangman comes with three built-in word lists, but these can be extended easily.
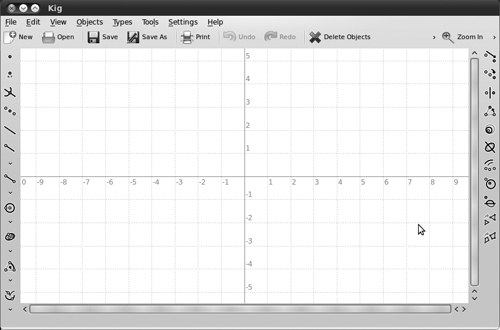
Kig
For people wishing to learn about geometrical construction in mathematics, Kig is a must. It is an extremely powerful package but very simple to use. Kig allows users to create complex geometrical abstractions from over thirty simple tools, such as points, parallel and perpendicular lines, arcs, bisectors, circles, and hyperbola (Figure 6-23). When creating abstractions, Kig uses other lines and points already on the diagram to lock onto, making it easy to achieve high precision.
Figure 6-23 Kig
Kig also includes some testing tools. Once a geometrical diagram has been drawn, it is often required to prove a concept by showing that two lines are indeed parallel or perpendicular. Kig offers these tools and more in an easy-to-use manner. Just clicking on the tool prompts the user to choose the item to test against. Then, each time the user hovers over another item while moving the cursor around, Kig will pop up with a message to tell whether or not it satisfies the test case.
KmPlot
KmPlot is a mathematical function–graphing program for Edubuntu. The package has a powerful expression parser built in and can plot different functions simultaneously and combine their function terms to build more complex mathematical functions. KmPlot also supports functions with parameters and functions in polar coordinates. KmPlot can create graphs to a very high precision, making it excellent for teaching purposes.
Stellarium
With a default catalog of over 600,000 stars, Stellarium is a powerful planetarium designed to show you exactly what you would see with the naked eye, binoculars, or telescope.
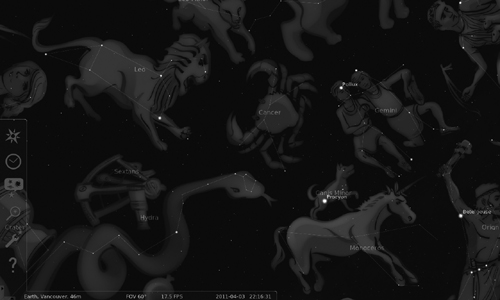
In keeping with the multicultural nature of Ubuntu and Open Source, Stellarium can not only show you the constellations from the Greek and Roman traditions (Figure 6-24) but also those of other “sky cultures”, as Stellarium describes them, such as the various Chinese traditions, Ancient Egyptian, and Polynesian.
Figure 6-24 Stellarium
Stellarium is even capable of driving a dome projector, like you would see at a large-scale, purpose-built planetarium as well as controlling a wide variety of telescopes directly.
KTouch
In this day and age, typing is an everyday occurrence for most people. KTouch is a tutor that gives help and support to those wishing to learn the art of touch typing. With fifteen levels and automatic level progression, KTouch is a fairly advanced tutor program, offering statistics and alternative language options, too.
KTurtle
KTurtle is a Logo programming language interpreter for Edubuntu. The Logo programming language is very easy to learn, and thus young children can use it. A unique quality of Logo is that the commands or instructions can be translated, so the user can program in his or her native language. This makes Logo ideal for teaching children the basics of programming, mathematics, and geometry. One of the reasons many children warm to Logo is that the programmable icon is a small turtle, which can be moved around the screen with simple commands and can be programmed to draw objects (Figure 6-25).
Figure 6-25 KTurtle
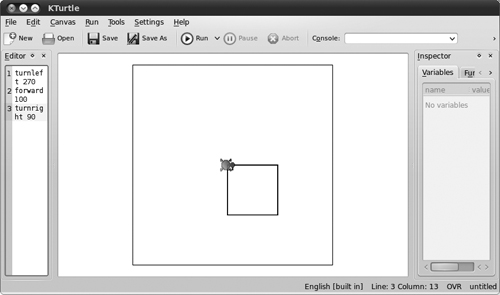
By typing in commands such as turnleft 90, forward 4, children are using a language native to themselves while also learning procedural logic. KTurtle can even handle simple subroutines, so it’s easy to extend the programming onward and upward.
With the introduction of KDE 4, Edubuntu includes a group of brand new educational packages. Following is a brief summary of each new application.
Marble
Marble, the desktop globe, is a virtual globe and world atlas, which can be utilized to learn more about the Earth. With the ability to pan and zoom, click on a label to open a corresponding Wikipedia article, and view the globe and maps with various projections, Marble is a welcome addition to Edubuntu’s educational packages.
Parley
Parley, the digital flash card, allows you to easily remember things utilizing the spaced repetition learning method, otherwise known as flash cards. Features include different testing types, fast and easy setup, multiple languages, the ability to share and download flash cards, and much more.
Step
Step is an interactive physics simulator that allows you not only to learn but to feel how physics works. By placing bodies on the scene and adding some forces such as gravity or springs, you can simulate the law of physics, and Step will show you how your scene evolves.
Blinken
Blinken takes you back, back to the 1970s, as a digital version of the famous Simon Says game. Watch the lights, listen to the sounds, and then try to complete the sequence in order. Blinken provides hours of fun with the added benefit of learning.
Others Not on the Education Menu
Some educational applications are not located in the Education menu. Here are brief descriptions of two of them.
• Tux Paint: Applications > Graphics > Tux Paint is a drawing package for younger children. Although geared toward a younger audience, Tux Paint still packs in some of the more advanced features of drawing packages and can draw shapes, paint with different brushes, use a stamp, and add text to the image. The Magic feature allows many of the more advanced tools normally found in full-fledged photo editors to be used, such as smudge, blur, negative, tint, and many more. There is also the facility to save as well as print.
• GCompris: Applications > Games > GCompris is a set of small educational activities aimed at children between two and ten years old and is translated into over forty languages. Some of the activities are game oriented and at the same time educational. Among the activities, there are tasks to educate children in computer use, algebra, science, geography, reading, and more. More than eighty activities are available in the latest release. GCompris won a Free Software Award in France in 2004.
Getting There Faster with Docky
Docky is a replacement for the old bottom panel meant for faster launching and switching of applications. After you have Docky installed, you need to start it.
Note
You will need to have compositing (also called desktop effects) enabled for Docky to work. To enable it, open the Visual Effects tab in System > Preferences > Appearances.
If you run your mouse over the dock, icons will grow and shrink as you do so, exactly as the OS X dock does. This makes it easier to click on the correct icon. Depending on whether or not the program is already running, you will see two different things. If it is not yet running, the icon will bounce to show you it is starting before the application itself starts. However, if it is already running, you will zoom to that window.
On the far left of the dock is a brown icon with an anchor on it. This launches the preferences window for Docky. This is where you can choose whether or not to launch Docky at startup, various options for how it appears, and Docklets and Helpers.
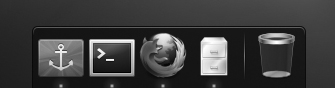
Docklets are icons that appear on the dock even though they are not applications. These include a trash icon, a clock, and more (Figure 6-26).
Figure 6-26 Docklets

Helpers are small scripts that can add items to the right-click menu of an icon, such as controlling the playback of music in Banshee. With the helper enabled, you can start, stop, go back, and go forward without opening Banshee at all (Figure 6-27).
Figure 6-27 The Banshee helper menu
New helpers are easy to install, either on a per-user or computerwide basis. To learn more, see http://wiki.go-docky.com/index.php?title=List_of_helpers.
Further Resources
The Docky Web site at www.go-docky.com is always a good place to start, and it includes a help wiki if you need a bit more help.
Summary
In this chapter, you’ve learned how to install and use just a few of the additional applications available for Ubuntu. Although this chapter only scratched the surface of what each application can do, you should have enough of an understanding of each to get started with them, and the Further Resources sections should help you become an expert. But beyond what is in this chapter, the vast universe of new programs is available. Go and explore—try out something new. At worst, you will have wasted a few hours, but you might find something that will change your life.
Always remember that there is a wealth of help and documentation available online. If you ever find yourself stuck, take a look at the Ubuntu Web site at www.ubuntu.com or the Ubuntu documentation at http://help.ubuntu.com and make use of the forums, wiki, mailing lists, and IRC channels.
All materials on the site are licensed Creative Commons Attribution-Sharealike 3.0 Unported CC BY-SA 3.0 & GNU Free Documentation License (GFDL)
If you are the copyright holder of any material contained on our site and intend to remove it, please contact our site administrator for approval.
© 2016-2026 All site design rights belong to S.Y.A.