The Official Ubuntu Book (2011)
Chapter 9. GNOME 3, GNOME Shell, and More
• A Different Path
• Installing the GNOME Shell
• Exploring the GNOME Shell
• Using the Keyboard
• Common Questions
• Summary
A Different Path
This is an exciting time to be using GNOME and Ubuntu because of all the new technology on the horizon. As Ubuntu has been innovating with Unity, Red Hat and others have been working on GNOME Shell, a new way of launching applications and managing programs. Like Unity, GNOME Shell is a replacement for both the panel and the window manager, offering new ways of manipulating windows, notifications, and other secondary functions of a desktop. Unique among desktop applications in GNOME, GNOME Shell is written in JavaScript and rendered with the Mozilla-based gjs. This use of JavaScript and cascading style sheets (CSS) makes adding new effects easy and lowers the barrier for Web developers coming to the GNOME desktop for the first time.
Beyond the use of Javascript, GNOME Shell is also based on mutter, an Intel-driven project that prior versions of Unity and its predecessor, the netbook-launcher, used. Unity has now moved to being written as a Compiz extension (with a Qt-driven 2D version). All this talk brings us to a word of warning: Although mutter is very shiny technology, it has a few rough edges depending on your video card used. Mileage may vary.
Installing the GNOME Shell
Early on in the 11.04 development cycle, the Ubuntu Desktop team decided to keep the GNOME 3 changes in a PPA because of the massive changes they introduced. In order to enjoy GNOME Shell, you will need to add the gnome3-team/gnome3 ppa. After you have added that PPA, simply install the GNOME Shell package.
Note
Installing GNOME 3 might break your theming due to the changes in GTK+ 3.
Note
If GNOME Shell fails to run, make certain you have the xulrunner-2.0 package installed. As GNOME Shell is written entirely in Mozilla-specific Javascript, without the xulrunner package, GNOME Shell will fail to run.
Exploring the GNOME Shell
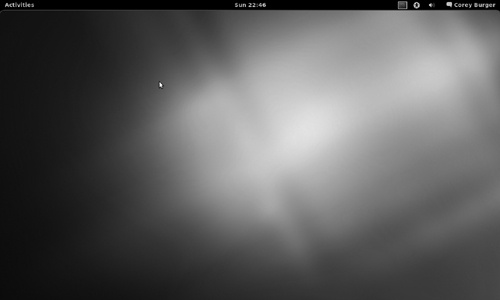
At a quick glance, GNOME Shell and Unity look like very similar projects. Both have some of their start in a 2008 GNOME user experience hackfest in Canonical’s office. Like Unity, there is only a single pane at the top of the screen. To the right of that is the currently open window name. In the middle of the panel, you will find the clock, and if you click on it, you will get the calendar, exactly as the old clock worked (Figure 9-1).
Figure 9-1 The main GNOME shell window
It is in the upper right that you will see the most difference. Because GNOME Shell completely replaces Unity, the new activity indicators and the Me Menu aren’t there. What replaces it is a variant on the standard Network Manager menu and a basic presence and logout menu. However, like Unity, GNOME Shell does integrate with Empathy to set a user’s online/offline status.
Now let’s get into the real power of the GNOME Shell, the overlay mode. To activate that, you need to either click on the Activities menu or run your mouse right into the “hot corner” of the upper left corner of the screen.
Note
Hitting the Super or “Windows” key will allow you to toggle the overlay mode on and off (Figure 9-2). On the left-hand side of the screen, or the dash, you will see a list of quick-launch icons, for Evolution, Empathy, Shotwell, LibreOffice Writer, and the File Manager, followed by icons for any open windows. Open windows will have a small spotlight underneath them, much like Unity shows you with an arrow. To launch an application from here, click on the icon. Right-clicking will allow you to add or remove something from favorites or various application-specific options such as opening a new window. Icons can also be rearranged by dragging them around.
Figure 9-2 The overlay
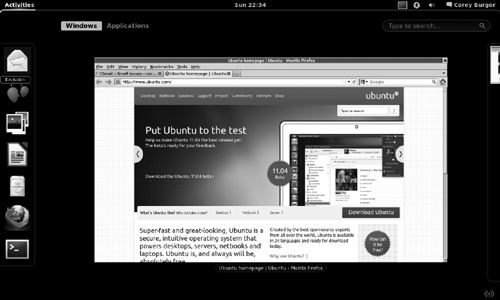
In the middle of the screen you will see any open windows in this workspace. In the case of the screenshot below, you can see that there are three workspaces, each with a single window open. GNOME Shell will automatically add workspaces as you drag windows to and from them, so at the end of the list there will always be an empty workspace.
Above the open windows are two buttons: Windows & Applications. The Windows button is activated by default, and shows you the currently open windows. Click on the Applications button to change to the launcher view. A giant list of all the applications listed on your system will show up. On the right-hand side are the various categories, which are identical to the old menu system and Unity.
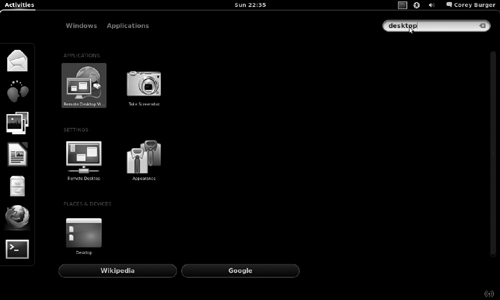
One powerful piece of GNOME Shell is the built-in search. Type your search term to bring up any application, preference control, or place & device on your system. If you don’t find what you want, the Wikipedia and Google buttons at the bottom will open Firefox (or a tab in an already-opened Firefox) and start a search for that term (Figure 9-3).
Figure 9-3 Searching through GNOME Shell
The last piece to mention is the new Alt+Tab menu for choosing different windows. As with the standard desktop, you can cycle through the various windows by holding down Alt and clicking Tab multiple times. However, visually, all windows in the current workspace are to the left of the vertical divider and the rest of the windows are to the right. Multiple windows of the same application are also grouped together, so you can select them by holding down the Alt key and using either the arrows or the mouse.
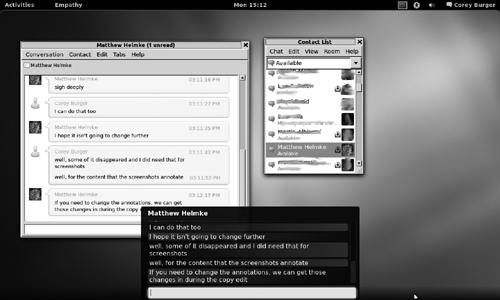
Like Ubuntu, GNOME Shell has been doing some thinking around messaging the user, although they have taken a slightly different design path than Unity has. Rather than remove all the actions from the notifications, GNOME Shell has moved them to a bar along the the bottom of the screen, which can be brought up by running your mouse into the lower left corner.
In the messaging bar, the latest applications to display messages are shown and you can either show the last message by clicking on the name or bring up a menu by right-clicking. This is one difference from Unity and the Ubuntu notification system, because GNOME Shell allows buttons on their notifications, as can be seen in Figure 9-4 where two of the authors message each other.
Figure 9-4 The message bar with a message from Matthew
Using the Keyboard
GNOME Shell can be manipulated with the keyboard as well as the mouse, so here are some common keyboard commands to get you started.
• System (Windows) key: Switch between overview and desktop
• Alt+F1: Switch between overview and desktop
• Alt+F2: Pop up command dialog
• Alt+Tab: Cycle between windows
• Alt+Shift+Tab: Cycle in reverse direction in the window cycler
• Alt+`: Switch between windows of the same application in Alt+Tab
• Ctrl+Shift+Alt+R: Start and end screencast recording
• Ctrl+Alt+D: Show desktop and raise windows back
• Ctrl+Alt+Right/Left arrow: Switch between workspaces
• Ctrl+Alt+Shift+Right/Left arrow: Move the current window to a different workspace
If you need a quick and handy reference for the keyboard shortcuts, they can be found in the keyboard settings window, which can found by searching for keyboard in the overlay.
Common Questions
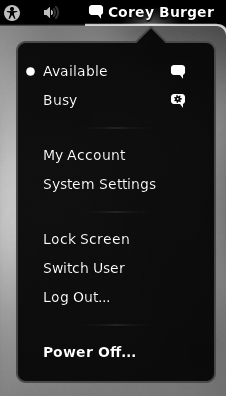
How do I shut my computer off?
One of the more controversial design decisions taken with the shell is the removal of option to shut down the computer. Thankfully that option is not completely gone, merely hidden. While the user menu is open, hold the Alt key and you will see Suspend change to Power Off... just like in Figure 9-5.
Figure 9-5 Showing the shut down options
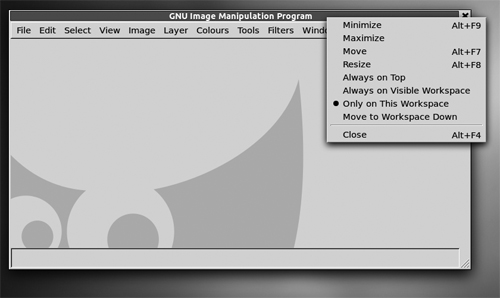
Where are the window controls? How do I minimize and maximize?
GNOME Shell introduces yet another choice for window controls. Unlike GNOME 2’s right hand side and Ubuntu’s more recent choice of the left corner, GNOME Shell retains the right hand side, but eliminates all but the close arrow. Minimizing can now only be done via the keyboard shortcut (Alt-F9), while windows can be maximized via double-clicking on the window bar. Right-clicking on the window bar will also bring up the window control menu, as can be seen in Figure 9-6.
Figure 9-6 Controlling the windows via a menu
How do I change the theme?
Short answer: you can’t. The long answer is that theming is coming and isn’t viewed as a high priority, given all the massive architecture changes and the fact that GNOME shell is written in a completely new language, JavaScript. Expect theming to appear soon, because people like nothing more than to make their windows pretty colors.
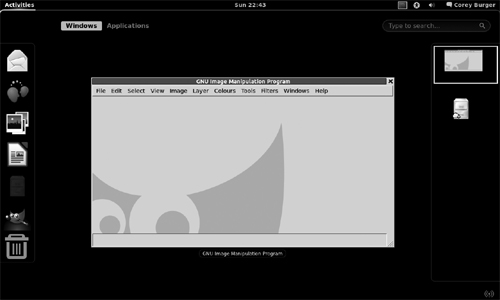
How do I open an application in the background?
If you want to open an application in the background, rather than just clicking on the icon, click and hold, then drag it to another workspace. It will open in that workspace without closing the overview mode. This even works with the Applications listing, as the overlay will switch to the Windows listing upon dragging of an application, as can be seen in Figure 9-7.
Figure 9-7 Opening an application in the background
Summary
There you have the new GNOME shell. I hope you have fun playing with it. It should be interesting to see how it and Unity compete and collaborate in the desktop space over the next year or more, as both refine down their interfaces and design decisions.
All materials on the site are licensed Creative Commons Attribution-Sharealike 3.0 Unported CC BY-SA 3.0 & GNU Free Documentation License (GFDL)
If you are the copyright holder of any material contained on our site and intend to remove it, please contact our site administrator for approval.
© 2016-2026 All site design rights belong to S.Y.A.