Hacking Ubuntu (2007)
Part II: Working with Compatibility
Chapter List
Chapter 4: Managing Software
Chapter 5: Communicating Online
Chapter 6: Collaborating
Chapter 4: Managing Software
Overview
Operating systems evolve. There is a constant flow of patches and updates that needs to be reviewed and installed. And then there is custom software-packages that are not included in a standard distribution but can be very valuable anyway. How do you even begin to browse for these packages?
As part of the Linux open source family, Ubuntu can use most open source packages. Large repositories such as SourceForge (sourceforge.net) and FreshMeat (freshmeat.net) store hundreds of thousands of projects. Unfortunately for some projects, downloading, compiling, and installing can be overwhelming. In addition, dead projects, unchanged in years with no active maintainers, are available for download.
Fortunately, the Ubuntu community maintains many different repositories of precompiled packages that are ready to install and use. All you need to do is specify the ones you want and they are installed-no manual compilation required. Programs such as the Advanced Package Tool (APT) and its graphical front end, Synaptic, simplify the search and install process.
Each package contains several items:
§ Precompiled applications
§ Dependency information for other packages needed by this package
§ Install scripts
§ Package information and description
§ License information
You can obtain packages from the Ubuntu CD-ROM, DVD, or over the network.
Not every package works after a successful installation. Some packages require additional configurations before working properly. Scripts such as EasyUbuntu have automated a few of the common, complex installations. In the worst cases, you will still need to download sources and compile code. For these situations, you will need to install a programming environment.
Understanding Package Repositories
Packages (precompiled executables) come from a variety of locations. Ubuntu maintains four main repository types (called components) where most software can be retrieved.
§ main-This component contains all officially supported open source projects without restrictive licensing. Gnome, GDM, and the Linux kernel are all found in main.
§ restricted-These packages are officially supported, but have restrictive licenses. This component primarily contains third-party video and network drivers.
§ universe-These packages are not officially supported by Ubuntu, but are provided and maintained by the Ubuntu community. As with main, the universe component only contains open source projects without restrictive licensing. Games, compilers, and a wide variety of tools are found here.
§ multiverse-This is the catchall component that contains community-supported packages with restrictive licensing. Example packages include Adobe's Acrobat PDF reader, some fonts, and MP3-related tools.
Packages from the main and restricted components are included on the Ubuntu installation CD-ROMs (see the /pool directory). Although Ubuntu officially supports these two components, the community provides the other two: universe and multiverse. This means that their contents may not be as thoroughly tested or updated as the official repositories.
By dividing software based on licensing and support, software developers and corporations can make intelligent decisions based on their own needs. For example, a company that develops custom software may want to stay away from the restricted and multiverse repositories in order to reduce the risk of licensing contamination. A small office looking for reliable support may stick to fully supported packages from the main and restricted repositories.
Differentiating Distributions
Along with the four components (main, restricted, universe, and multiverse) are a variety of Ubuntu repositories. For Ubuntu, each repository contains the name of the Ubuntu version. For Dapper Drake, all distributions contain "dapper".
§ dapper-This indicates the primary distribution for the operating system.
§ dapper-updates-This repository holds updates to the main dapper distribution. Updates are kept separate from the main distribution so an installation baseline is maintained.
§ dapper-security-This is a special repository specifically used for security updates.
§ dapper-backports-This repository contains software that has been backported-compiled from a newer version of Ubuntu to work with Dapper. For example, Edgy Eft will use a newer version of Gnome than Dapper. Edgy's Gnome version may be backported to work with Dapper. Because these versions are not thoroughly tested under Dapper, the backport distributions are disabled by default.
Debs, RPMs, and Repositories
Most large Linux distributions provide some form of precompiled code. RedHat and SUSE Linux, for example, use the RedHat Package Manager (RPM). Although the rpm package exists for Ubuntu, it is not commonly used. Each RPM contains licensing information. A single RPM repository may contain packages with both restricted and unrestricted licenses.
Debian Linux uses the Debian Package Manager (dpkg) to install deb packages. Since Ubuntu is based on Debian, it too uses dpkg and debs. Other package management tools, such as APT and Synaptic, are actually wrappers around dpkg. As with Ubuntu, Debian divides packages based on licensing, but Debian uses slightly different divisions.
§ Debian main-This is similar to the Ubuntu main component. All code is supported, open source, and provided with unrestrictive licensing.
§ Contrib-This component contains open source with unrestrictive licensing, but may be dependent on code that has restrictive licensing.
§ Non-Free-As with the Ubuntu restricted component, these packages contain licenses that restrict use or distribution.
§ Non-US/Main-These packages do not have restrictive licensing, but may not be exported outside of the United States. This usually means the packages contain cryptography.
§ Non-US/Non-Free-This component is the counterpart to Non-US/Main. Most of these packages use proprietary cryptography or are restricted by patents.
Although you can install Debian deb packages under Ubuntu, most of these packages have been ported to the Ubuntu repositories.
Compatibility leads to the biggest problems when using binaries from other platforms. Depending on the software and how it was compiled, some packages may not work under your version of Ubuntu. Different kernel and shared library versions can break executables. If you can, consider sticking with Ubuntu binaries. If you can't find Ubuntu binaries, then be careful. Don't try binary kernel modules without knowing how to remove them first; incompatible modules can crash your system. For regular user applications, incompatible binaries may not run or may complain about missing libraries. Sometimes you can fix dependencies by installing older libraries, but you are probably better off looking for source code. If the binaries are proprietary, then you are out of luck unless you can use them in a virtual machine (see Chapter 6).
Each distribution contains main, restricted, universe, and multiverse repositories. Different servers may host some or all of the different distributions and repositories.
|
Note |
Not all Ubuntu servers provide the same software. Even though the official repositories are supposed to be mirrors, sometimes they contain different packages. Similarly, a mirror may only carry the main component for Dapper, whereas the original server may provide all components for Dapper and other Ubuntu versions. |
Running Synaptic
Synaptic is the graphical interface for selecting packages for installation. To open it, choose the System ![]() Administration
Administration ![]() Synaptic Package Manager menu (see Figure 4-1). The Synaptic Package Manager displays the available sections on the left, and the available packages on the right. At any time, you can select a package for installation or deselect an already installed package. If you select a package that has dependencies, then all dependencies are automatically selected (or deselected). The bottom status line of the window displays a summary of the selections.
Synaptic Package Manager menu (see Figure 4-1). The Synaptic Package Manager displays the available sections on the left, and the available packages on the right. At any time, you can select a package for installation or deselect an already installed package. If you select a package that has dependencies, then all dependencies are automatically selected (or deselected). The bottom status line of the window displays a summary of the selections.
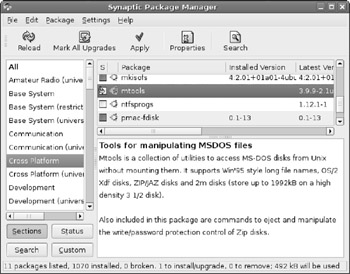
Figure 4-1: The Synaptic Package Manager
When you are ready to make the system changes, select the Apply button. Although there are a few confirmation and status screens, the installations usually require no manual efforts.
Searching with Synaptic
The most powerful part of Synaptic is its search capabilities. You can search for packages by name, description, version, dependencies, and more. Searches are listed as a category on the left side, with search results showing the packages on the right.
To switch back to the repository list, click the Sections button. You can always return to your search history by clicking on the lower Search button.
Synaptic Gaps
As powerful as Synaptic is, it has a couple of usability issues. First, there isn't a Stop button available when you do a search. If you have a slow computer (or slow network connection) and you search for a common term, such as the word the, you should be prepared to wait until the search completes.
A second limitation concerns the search button itself: there are two of them. One is at the top and the other is at the bottom. The top Search button allows you to conduct a new search. The bottom Search button shows you the search history and previous search results.
Finally, the search history is limited to the current session. When you close Synaptic, you will lose your search history.
Changing Repositories
The default Ubuntu installation only has the officially supported dapper, dapper-updates, and dapper-security distributions enabled. You may want to also enable the universe and multiverse repositories. You can do this while in Synaptic through the Settings ![]() Repositories menu. A list of standard distributions is provided-you can simply check the appropriate entries to enable them.
Repositories menu. A list of standard distributions is provided-you can simply check the appropriate entries to enable them.
Besides enabling distributions, you can select specific repositories from the distributions using the Add button (see Figure 4-2). After modifying the repositories, you will need to click Reload to rescan the list of packages.
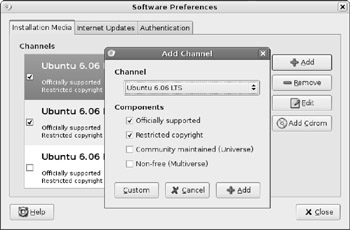
Figure 4-2: Adding to the repository list
|
Warning |
Synaptic does little to prevent you from adding invalid repository-component combinations, or from adding the same distribution twice. Bad choices may result in error messages later, but you will get no warning when you make the selection. |
Installing from a CD-ROM or Directory
Besides installing over the network, Synaptic supports installations from a CD-ROM drive or fixed directory. This can come in really handy when working without a network connection or in a close network environment such as a mission critical server room. Installing from a CD-ROM is very easy-simply put the CD-ROM in the drive. Ubuntu will recognize the disk as being a repository and will prompt you to add it to the repository list. At this point, the CD-ROM will act like any other repository.
|
Note |
If the CD-ROM is not automatically recognized, you can use Settings |
In closed environments, it is usually more convenient to install from a shared or local directory. You can configure this using Settings ![]() Repositories. Rather than selecting a pre-set value, click on the Add button and then select Custom to add your own repository. For example, the following enables package installation from a downloaded ISO file:
Repositories. Rather than selecting a pre-set value, click on the Add button and then select Custom to add your own repository. For example, the following enables package installation from a downloaded ISO file:
1. Download one of the Ubuntu installation CD-ROMs. Let's call it ubuntu.iso.
2. Mount the disk image.
3. sudo mkdir -p /mnt/iso
4. sudo mount -o loop ubuntu.iso /mnt/iso
5. Using the custom add button under Synaptic (Settings ![]() Repositories
Repositories ![]() Add
Add ![]() Custom), add the following repository:
Custom), add the following repository:
6. deb file:/mnt/iso dapper main restricted
|
Note |
When using Synaptic to add repositories, each repository will appear at the end of /etc/apt/ source.list file. However, when searching for a package, the repositories are scanned from the top of the file to the bottom. If you want your new repository to be used first, you will need to edit /etc/apt/sources.list and change the order of the repositories. |
Synaptic will look for the dapper distribution's main repository in the /mnt/iso/dists/ dapper/main and /mnt/iso/pool/dapper/main directories. The dists directory contains the indexes for packages, whereas the pool directory contains the actual packages.
Turning Off Repositories
Using a repository from a CD-ROM or local directory can improve install speeds since you are not dependent on the network. Local repositories also give you the ability to customize the software your system can access.
However, as useful as it is to use a CD-ROM or local directory as a repository, you may want to disable them after you do an installation. Without turning them off, Synaptic will complain that the repository is no longer accessible after you remove the CD-ROM or disable the directory.
To turn off repositories, select System ![]() Repositories. You can clear the CD-ROMs and custom directories to turn them off. If you do not think you will need them again, you can also click on the Remove button.
Repositories. You can clear the CD-ROMs and custom directories to turn them off. If you do not think you will need them again, you can also click on the Remove button.
Managing Updates
The default Synaptic installation periodically checks for new revisions. If there are updates or patches for packages that you already have installed, then Synaptic can flag these or automatically install them. When new updates are available, you will see a star icon on the top panel. Hovering the mouse over this icon will show you the number of pending updates (see Figure 4-3), and clicking on the icon will allow you to apply updates.

Figure 4-3: The indicator showing that updates are available
You can change the update settings by using Software Preferences applet. Either select it from the System ![]() Administration
Administration ![]() Software Properties menu, or by right-clicking the update indicator. The Internet Updates tab shows the settings. You can tell Ubuntu to periodically check for updates (or never check), download updates (but not install), or automatically install security updates.
Software Properties menu, or by right-clicking the update indicator. The Internet Updates tab shows the settings. You can tell Ubuntu to periodically check for updates (or never check), download updates (but not install), or automatically install security updates.
Some updates require a special confirmation before installing. These include kernel updates and critical libraries. Upgrading these usually requires a reboot and could break some applications. As a result, these packages require additional confirmation and are not automatically installed.
By default, Dapper checks for updates daily and automatically installs all security updates. For critical systems and controlled environments, you may want to completely disable automatic updates. This enables you to apply updates during a scheduled period rather than when updates they are available. In contrast, regular home users should keep the defaults: check for updates daily and automatic installation of security updates. If you are on a slow network connection, you may want to change the check for update frequency, but it should be at least every two weeks.
|
Warning |
Completely disabling updates is usually a bad decision. While many updates apply security patches, others address stability issues. The only time you may want to disable auto-updates is when you have some other plan for maintaining the system. |
Living Without Synaptic
Despite its quirks, Synaptic is a very useful utility for keeping up-to-date on patches and installing new software. Unfortunately, Synaptic requires human interaction and a graphical interface. If you installed the Ubuntu server or are remotely logged into the system, then you probably do not have the graphical interface. And when managing dozens (or hundreds) of systems, depending on a graphical interface becomes an impediment.
Fortunately, Synaptic is a graphical front end to the Advanced Package Tool environment; every basic Synaptic function comes from APT. Using the APT commands, you can search for software, install packages, and perform upgrades from the command line.
Modifying Sources
APT uses a configuration file to tell it where repositories are located. The file /etc/apt/ sources.list contains a list of servers, distributions, and repositories. Listing 4-1 shows some sample repositories. If you want to add or change repositories, simply edit the file (as root) and make your additions or modifications. There is no need to restart any services or processes.
|
Note |
The /etc/apt/sources.list file is used by dpkg, APT, and Synaptic. Technically, APT is a wrapper around dpkg, and Synaptic is a graphical front-end to APT. Changes to this file affect all of these tools. |
Each line within this file contains four key elements:
§ Type of data-The available data is either precompiled binaries (deb) or source code for compiling binaries (deb-src).
§ Location-A URL says how to get the data. This is usually an HTTP, HTTPS, or FTP server, but it can also be a local CD-ROM or a directory.
§ Distribution-The name of the distribution is provided. Example names include dapper, dapper-updates, and dapper-security.
§ Component-One or more components are specified, such as main, restricted, universe, or multiverse.
When All Else Fails…
Knowing how Synaptic works under the hood, and how to use APT from the command line can be critical for system recovery. On August 21, 2006, the maintainers of Ubuntu accidentally released a bad update. This update disabled X-Windows, leaving users at a command line prompt. Graphical tools, such as Synaptic, suddenly became unavailable. The only mitigation option was to use apt-get to reinstall the X-server from the command line after Ubuntu fixed the error in the X-Windows packages.
Not all failures are due to bad updates. On Saturday, July 22, 2006, many of the servers hosting Ubuntu repositories went offline-and some stayed offline the entire weekend. Refreshing the Synaptic repository list generated a cryptic error message (and sometimes crashed Synaptic). Knowing how to manually change the servers from one region to another was the only way to apply patches and install essential software. And changing the servers is a task easier done without using Synaptic. (The downtime was later attributed to a series of server upgrades.)
Accidents happen, but without knowing how to identify errors or recover from them, you can end up with an unusable system. The command line apt-get and apt-cache tools generate informative errors that can be used to diagnose these problems. In the case of a bad server or network connection, editing the /etc/ apt/sources.list file can provide a quick solution.
Listing 4-1: Sample Entries from an /etc/apt/source.list
# The server "uk.archive.ubuntu.com" contains source code for the "dapper"
# distribution. The distribution contains "main" and "restricted" repositories.
deb-src http://uk.archive.ubuntu.com/ubuntu/ dapper main restricted
# The same server contains binary for the updates distribution.
deb http://uk.archive.ubuntu.com/ubuntu/ dapper-updates main restricted
# The CD-ROM with label "Ubuntu 6.06 _Dapper Drake_ - Release i386 (20060531)"
# also contains dapper main.
deb cdrom:[Ubuntu 6.06 _Dapper Drake_ - Release i386 (20060531)]/ dapper main
# A local directory -- this can be a mounted directory such as a CD-ROM or a
# networked file system (NFS)
deb file:/mnt/iso dapper main
# My full list of sources
deb http://us.archive.ubuntu.com/ubuntu/ dapper main restricted
deb-src http://us.archive.ubuntu.com/ubuntu/ dapper main restricted
deb http://us.archive.ubuntu.com/ubuntu/ dapper-updates main restricted
deb-src http://us.archive.ubuntu.com/ubuntu/ dapper-updates main restricted
deb http://security.ubuntu.com/ubuntu dapper-security main restricted
deb-src http://security.ubuntu.com/ubuntu dapper-security main restricted
deb http://security.ubuntu.com/ubuntu dapper-security universe
deb-src http://security.ubuntu.com/ubuntu dapper-security universe
|
Tip |
If you want to exclude a specific repository, then make sure the /etc/apt/sources.list file does not include it on any of the repository lines. For example, to exclude multiverse, make sure all multiverse lines are commented out (with a # character) or removed from the uncommented line. |
|
After you make any changes to /etc/apt/sources.list, you will need to refresh the APT cache of available packages: sudo apt-get update. This updates the cache of available software. Without this command, you won't search the list of available software. When you enable the automatic check for patches, the system actually runs the apt-get update command.
|
Note |
If you make changes to /etc/apt/sources.list and you use Synaptic, then you can click the Reload button to refresh the cache. Otherwise you need to run sudo apt-get update. |
The list of servers should match your region. For example, us.archive.ubuntu.com is intended for users in the United States. The uk.archive.ubuntu.com server is for the United Kingdom, and ca.archive.ubuntu.com supports Canada. A few two-character country codes (for example, uk and us) are currently defined; undefined country codes are redirected to the United Kingdom because that is where Canonical is located. If you find that a particular region is temporarily unavailable, then try changing regions by modifying each of the server's names in /etc/apt/source.list. It is rare for all of the servers to be unavailable at the same time.
Adding CD-ROM Repositories
Besides using Synaptic, there are two ways to add a CD-ROM to /etc/apt/source.list. The first way requires you to manually identify the CD-ROM label and then add it. The apt- cdrom command can list the disk's label. Let's assume that the Ubuntu installation CD-ROM is mounted at /mnt/iso:
$ apt-cdrom -m -d /mnt/iso ident
Using CD-ROM mount point /mnt/iso/
Mounting CD-ROM
Identifying.. [d9f91a1075ce140463bf88837cc07be6-2]
Stored label: Ubuntu 6.06 _Dapper Drake_ - Release i386 (20060531)
|
Tip |
The -m parameter for apt-cdrom says to not mount the disk, otherwise the CD-ROM sitting in the drive will be used. The -d parameter specifies the mount point for acquiring the label and ident directs the command to identify the CD-ROM label. |
After finding the CD-ROM name, you can add it to the /etc/apt/sources.list file with a cdrom: resource. For example, to install the main component, I would use:
deb cdrom:[Ubuntu 6.06 _Dapper Drake_ - Release i386 (20060531)]/ dapper main
Although you can add a disk manually, the easiest way to add a CD-ROM is to let apt-cdrom do it.
1. Insert the CD-ROM into the drive.
2. Run the command.
3. sudo apt-cdrom add
The CD-ROM is automatically added to the /etc/apt/source.list file.
|
Note |
After adding a CD-ROM to the /etc/apt/sources.list file, be sure to run apt-get update. This adds the packages on the CD-ROM to the cache of known packages. |
Browsing the APT Cache
Another command, apt-cache, enables you to search the repositories for a particular subject or file name. The search word will match any package's name or description. For example, if you are searching for a calculator, you could use:
$ apt-cache search calculator
bc - The GNU bc arbitrary precision calculator language
gcalctool - A GTK2 desktop calculator
dc - The GNU dc arbitrary precision reverse-polish calculator
bison - A parser generator that is compatible with YACC
|
Tip |
Searches are case-insensitive and look for sub-strings. You can search for multiple words in sequence using quotes like apt-cache search "gnu bc". You can also list multiple terms (without quotes) that will be matched in any order. For example: apt-cache search calculator calctool. |
It may seem odd that Bison (Yet Another Compiler-Compiler) is listed as a calculator, but another apt-cache command shows the entire package's description and lets us understand why it was listed. (Bison's description contains the word calculator.)
$ apt-cache show bison
Package: bison
Status: install ok installed
Priority: standard
Section: devel
Installed-Size: 1264
Maintainer: Chuan-kai Lin <cklin@debian.org>
Architecture: i386
Version: 1:2.1-0.2ubuntu1
Depends: m4, libc6 (>= 2.3.4-1)
Recommends: bison-doc
Description: A parser generator that is compatible with YACC
Bison is a general-purpose parser generator that converts a
grammar description for an LALR(1) context-free grammar into a C
program to parse that grammar. Once you are proficient with Bison, you
may use it to develop a wide range of language parsers, from those used
in simple desk calculators to complex programming languages.
...
Other options for apt-cache can show dependencies, requirements, and contents. The man page for apt-cache details other options (man apt-cache).
Organizing Search Results
The results from apt-get search are not sorted by package name. Instead, they are sorted by server repository. In the case of the calculator search, bison is listed after dc because it came from a different repository. If you want the results sorted by package name, then you will need to sort them yourself:
apt-cache search calculator | sort
Similarly, if you are searching for a specific package name or description, then you will need to apply a filter:
apt-cache search calculator | grep gcalctool
|
Tip |
You can use grep to restrict results to the displayed text. This is different than using multiple terms with apt-cache search since the matched results may not be in the displayed text. |
Installing with APT
After you know what to install, you can use the apt-get install command to perform the installation. You can list one or more packages after the install instruction. If you want to see what will happen without actually doing the install, use the -s option to simulate the installation. You will see every warning and message without actually doing the install.
sudo apt-get -s install gcalctool # check the install
sudo apt-get install gcalctool # perform the install
Although the gcalctool application is installed by default, when you install the Ubuntu desktop, its source code is not. Source code is available for all packages in main and universe. However, source may not be available for packages found in restricted or multiverse.
|
Tip |
While Synaptic gives cryptic error messages (or crashes) when /etc/apt/sources.list contains bad entries or is misconfigured, the apt-cache and apt-get commands will display plenty of errors and warnings. |
Removing Packages with APT
Package removal is nearly as painless as installation.
1. First, find the package name you want to remove. You can use apt-cache search or apt-cache pkgnames to list all packages, but the easiest way is to use dpkg.
2. dpkg -l | more
Alternately, if you know a file that is in the package, then you can use dpkg -S to list all packages containing that file. For example, to remove whatever package provides the program bc, you can use:
dpkg -S `which bc`
3. Use apt-get to check what will be removed. Some package dependencies will force the removal of other packages. For example, to check the removal of the bc package, use:
4. sudo apt-get -s remove bc
5. If the removal looks safe, then use apt-get to remove the package. For example, to remove the bc package, use:
6. sudo apt-get remove bc
|
Warning |
The bc package is installed as part of the default desktop. Removing bc removes a dependency from a trivial package called ubuntu-desktop. This isn't the actual desktop, but it is used as a flag to indicate that the full desktop is installed. To see everything in the ubuntu-desktop package, use dpkg -L ubuntu-desktop. |
Removing Residues
Most software removals are clean-everything that went in is taken out. Unfortunately, some removals leave residues, such as configuration and data files. Removing or reinstalling a package because it is misconfigured may not replace critical configuration files. This can result in the package remaining misconfigured after being installed. A few examples:
§ Removing and reinstalling a Web browser will not clear user-caches or replace user settings. This is not a solution for fixing privacy issues from cached Web pages.
§ Removing and reinstalling Gnome will not remove $HOME/.gnome, $HOME/.gnome2, and other Gnome-related files in user directories.
§ Many packages check for modified configuration files. If you modify a configuration file, such as /etc/X11/xorg.conf or /etc/gdm/gdm.conf, then it may not be removed when these packages are removed.
|
Note |
If you are reinstalling software because of a configuration problem, be aware that this may not fix the problem. |
Leftover files and other residues may need to be manually cleaned up (or deleted) before you decide to reinstall the package. In the case of a misconfiguration, reinstalling the system usually will not resolve problems-especially if the configuration problem is due to files stored in a user's directory or created after the installation.
Tracking Removals
As mentioned earlier, one of the biggest problems with removals comes from dependent packages. Removing one package may automatically select other packages and remove them too. Although using apt-get -s remove can be useful, always remember to use the -s to check first. If you forget the -s then you will need some way to see everything that was removed (so you can put back critical packages). Fortunately, you have two options (besides restoring from a system backup). First, the /var/log/dpkg.log file contains a list of every addition and removal (see Listing 4-2). This log file is updated every time Synaptic, ATP, or dpkginstalls or removes packages. Using this list, you can see what was removed and undo an accidental removal.
Listing 4-2: Sample Contents from /var/log/dpkg.log
2006-08-25 18:37:17 install dpkg-dev <none> 1.13.11ubuntu6
2006-08-25 18:37:17 status half-installed dpkg-dev 1.13.11ubuntu6
2006-08-25 18:37:18 status unpacked dpkg-dev 1.13.11ubuntu6
2006-08-25 18:37:18 status unpacked dpkg-dev 1.13.11ubuntu6
2006-08-25 18:37:18 status unpacked dpkg-dev 1.13.11ubuntu6
2006-08-25 18:37:18 status unpacked dpkg-dev 1.13.11ubuntu6
2006-08-25 18:37:18 status unpacked dpkg-dev 1.13.11ubuntu6
2006-08-25 18:37:18 status half-configured dpkg-dev 1.13.11ubuntu6
2006-08-25 18:37:18 status installed dpkg-dev 1.13.11ubuntu6
2006-08-26 08:06:01 status installed dpkg-dev 1.13.11ubuntu6
2006-08-26 08:06:02 remove dpkg-dev 1.13.11ubuntu6 1.13.11ubuntu6
2006-08-26 08:06:02 status half-configured dpkg-dev 1.13.11ubuntu6
2006-08-26 08:06:02 status half-installed dpkg-dev 1.13.11ubuntu6
2006-08-26 08:06:02 status config-files dpkg-dev 1.13.11ubuntu6
The second option is to use the script command. This command logs all command line output to a file:
$ script -c "sudo apt-get remove dpkg-dev" apt-get.log
Script started, file is apt-get.log
Reading package lists... Done
Building dependency tree... Done
The following packages will be REMOVED:
dpkg-dev
0 upgraded, 0 newly installed, 1 to remove and 2 not upgraded.
Need to get 0B of archives.
After unpacking 541kB disk space will be freed.
Do you want to continue [Y/n]? y
(Reading database ... 106427 files and directories currently installed.)
Removing dpkg-dev ...
Script done, file is apt-get.log
From the script command, you will get a file called apt-get.log containing the entire removal session. This command can even be turned into a simple script that you can use instead of using the actual apt-get command (see Listing 4-3).
Listing 4-3: Replacement /usr/local/bin/apt-get for Logging Results
#!/bin/sh
# Run the apt-get command and append (-a) results to ./apt-get.log
script -a -c "sudo /usr/bin/apt-get $*" apt-get.log
Upgrading with APT
Applying upgrades is a two-step process. First, use apt-get update to retrieve the list of available software packages and upgrades based on your /etc/apt/sources.list. If there are any updates, then the update indicator will appear on the top panel. After getting the list of updates, use apt-get upgrade to perform the upgrade.
$ sudo apt-get update
Get:1 http://archive.ubuntu.com dapper Release.gpg [189B]
Get:2 http://archive.ubuntu.com dapper Release [34.8kB]
Get:3 http://archive.ubuntu.com dapper/universe Packages [2458kB]
Hit http://us.archive.ubuntu.com dapper Release
Hit http://us.archive.ubuntu.com dapper-updates Release
Hit http://us.archive.ubuntu.com dapper/main Sources
...
Fetched 3117kB in 7s (416kB/s)
Reading package lists... Done
$ sudo apt-get upgrade
Installing Common Functions
When setting up an Ubuntu desktop system, there are some packages that most people want to install. Many of these center around multimedia functionality: playing MP3 files, DVD movie media, and multimedia streams with RealNetwork RealPlayer. Although downloading with apt-get is relatively easy, many of these packages still require configuration before they can be used. At this point, you have two options: use an automated installer that will perform any required configurations, or install and configure packages by hand.
Using EasyUbuntu
EasyUbuntu is a script designed to download and automatically configure common packages. It only supports about 40 widely used packages (not every available package) and it does not install any source code packages. This software has one other limitation: EasyUbuntu is not found in any of the main, restricted, universe, or multiverse repositories. Instead, you will need to visit the EasyUbuntu homepage (http://easyubuntu.freecontrib.org/) and follow the installation instructions. The installation itself is straightforward:
1. Apply all updates. EasyUbuntu can have problems if the system is not up to date. Fortunately, problems simply means that components are not installed; problems do not cause system instability.
2. sudo apt-get update
3. sudo apt-get upgrade
4. Go to the EasyUbuntu home page and follow the installation instructions. These are usually a few lines of code for installing and running EasyUbuntu. Be sure to choose the current release. For EasyUbuntu 3.022, the installation instructions are:
5. wget http://easyubuntu.freecontrib.org/files/easyubuntu-3.022.tar.gz
6. tar -zxf easyubuntu-3.022.tar.gz
7. cd easyubuntu
8. sudo python easyubuntu.in
|
Note |
If you use these commands as is, you will use EasyUbuntu version 3.022. Newer versions are periodically released as packages are updated. You should use the current version (whatever version number that may be). Newer versions may also include different installation steps. See the EasyUbuntu homepage for the latest installation instructions. |
9. Open a terminal window (Applications ![]() Accessories
Accessories ![]() Terminal) and paste the installation instructions into the terminal.
Terminal) and paste the installation instructions into the terminal.
10. The final sudo command will prompt you for your password. After that, the graphical interface will start up.
Easy Does It
EasyUbuntu cannot be installed using apt-get because it does not exist in any of the repositories. The reason is mainly based on legal issues. EasyUbuntu can help you install drivers that may not be legal in your country. For example the w32codecs enables you to play proprietary Windows multimedia files, and libdvdcss2 enables you to play DVD movies by cracking the DVD encryption. In some countries, these packages are illegal.
EasyUbuntu also supports packages from the Penguin Liberation Front (PLF) repository. As with main, restricted, universe, and multiverse, PLF is a specialized repository. It can be added to /etc/apt/sources.list and used to install software. The line to add is:
deb http://medibuntu.sos-sts.com/repo/ dapper free non-free
However, PLF has an interesting history: it distributes software that cannot be included in the standard repositories due to copyright, patents, or other legal restrictions. Installing software from this repository may also be illegal depending on your country's laws.
The user interface for EasyUbuntu displays four tabs showing the different package categories, and each tab displays the available packages. Since some packages are not available on every platform, only the available software is displayed (see Figure 4-4). For example, since the binary audio packages gstreamer0.10-pitfdll and w32codecs, and the NVIDIA video drivers do not exist for the PowerPC, EasyUbuntu on a PowerPC does not display the Binary Codecs option.
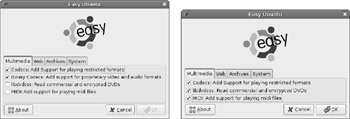
Figure 4-4: The EasyUbuntu user interface as seen on a PC (i386) and Macintosh (PowerPC). Some options are not available on all platforms.
EasyUbuntu uses dpkg to check which software has already been installed. If a package already exists on the system, then the check box is grayed out. This prevents you from trying to reinstall software. After making your selections, you can click OK to perform the installation. Depending on your choices and network speed, this may take a while.
|
Note |
EasyUbuntu is used only to install and configure packages. You cannot use it to remove software. |
Software sometimes changes faster than EasyUbuntu-the EasyUbuntu developers are constantly playing catch-up with other package developers. If an installation fails, EasyUbuntu will not corrupt your system. Instead, it will create a variety of popup windows that display errors and warnings. These are similar to the messages given by APT. You will need to manually install any failed packages.
Debugging EasyUbuntu
Errors during EasyUbuntu installation are usually due to invalid entries in /etc/apt/source.list, missing repositories, new package locations, or bad package dependencies. Unfortunately, EasyUbuntu will not tell you what failed or why. The /var/log/dpkg.log file will show you specific package failures, but not missing repositories. In other words, if the installation cannot find a required package, EasyUbuntu will not tell you about the failure.
If EasyUbuntu fails, try installing each checked item individually. This enables you to identify which packages fail. In the EasyUbuntu directory is the file packagelist-dapper.xml. This shows every package that is installed for each selection. For example, when I select Video from the Web tab, EasyUbuntu 3.022 installs the package totem-gstreamer-firefox-plugin. Unfortunately, on the PowerPC platform, this package depends on a specific version of totem- gstreamer, and the dependency was outdated. Although the failure was due to the repository, EasyUbuntu does not identify what caused the installation failure. Instead, I narrowed down this problem by installing each item, one at a time, until I found that Video would not install. Then I looked in packagelist-dapper.xml and saw that it included totem-gstreamer- firefox-plugin. Finally, I performed the installation by hand using apt-get and saw the cause of the failure.
$ sudo apt-get -s install totem-gstreamer-firefox-plugin
Reading package lists... Done
Building dependency tree... Done
The following packages have unmet dependencies:
totem-gstreamer-firefox-plugin: Depends: totem-gstreamer (= 1.4.1-0ubuntu4)
but 1.4.3-0ubuntu1 is to be installed
E: Broken packages
My solution to this problem is to download the source code to the plug-in (apt-get source totem-gstreamer-firefox-plugin) and compile it manually.
Ain't So Easy
There is an alternative to EasyUbuntu: Automatix. This tool is similar to EasyUbuntu in many ways. Automatix automates software installation and is not found in any of the standard repositories. Visit the Automatix home page (http://www.getautomatix.com/) for installation instructions.
Automatix supports more packages than EasyUbuntu, but has other limitations. The biggest concern with Automatix is its automatic installation of potentially harmful packages. It is very possible to trash your system if you select incompatible packages. It also requires modification to /etc/apt/sources.list for installation, and it requires a high technical level to understand all of the options.
In my opinion, community recommendations carry weight. Most forums that compare Automatix with EasyUbuntu recommend EasyUbuntu because of the low technical requirements, safe installations, and simpler download instructions. Two evaluations of these tools are available at https://lists.ubuntu.com/archives/ubuntu-users/2006-March/071696.html and http://nalioth.hostdestroyer.com/comparison.html.
If you just want to click-and-run, then EasyUbuntu is the simpler option. If you're looking for more detailed configurations, consider the Easy Linux Ubuntu Guide, available at http://easylinux.info/wiki/Ubuntu_dapper and http://ubuntuguide.org/wiki/Dapper. Although this guide is not automated, it is very complete-covering more options than either EasyUbuntu or Automatix-and has relatively easy to follow step-by-step instructions.
Installing Common Packages by Hand
Because automated installation systems, such as EasyUbuntu and Automatix, use graphical interfaces, they cannot be used from the default Ubuntu server installation. In addition, remote logins may not support the required graphic interface. If you want to install additional multimedia support without using graphics, then you will need to install the packages by hand.
Installing Multimedia Support
Different multimedia formats need different libraries to encode and decode the formats. A variety of coder-decoder (codec) libraries are available for Ubuntu. Each of these packages is installed using apt-get install package_name. Some of these packages are located on the universe, multiverse, or plf repositories. No additional configuration steps are required.
§ MP3-MP3 is one of the most common and popular audio formats. As mentioned in Chapter 2, the sox and lame packages provide MP3 encoding and decoding support. While these tools do provide command-line support, they do not provide audio libraries. For libraries that will work with most audio players, you will need to install the ffmpeg package from the universe repository.
§ Ogg-Ogg Vorbis is an alternate audio format that is free from MP3's licensing restrictions. To support Ogg Vorbis files, you will need to install the vorbis-tools package from the restricted repository.
§ MPEG and Video-For MPEG and other video file formats, you will want to install the mjpegtools package. This multiverse package provides codecs for MPEG, AVI, QuickTime, and other video formats.
§ MPEG4-The libxvidcore4 and faad packages provide video and audio support for this file format. Both packages are found in the multiverse repository.
§ Windows Codecs-The w32codecs package provides binary support for proprietary Microsoft codecs such as WMA and WMV. This package is found in the plf repository.
§ DVD-Commercial DVD movies are encoded using a system called CSS. The libdvdcss2 permits unlicensed DVD players to view these movies. This package is found in the plf repository.
|
Warning |
Packages such as libdvdcss2 and w32codecs could cause legal headaches-particularly in corporate and government environments. If you have any questions here, you might want to consult legal council before installing these packages. |
After you load the codecs onto the system, you will need to add plug-ins to your multimedia players so that they know the codecs exist.
§ Gstreamer-The Gstreamer interface provides multimedia support for most Gnome applications. Although there are generic plug-ins, their package naming convention is less than descriptive.
o gstreamer0.10-ffmpeg: This package provides support for the ffmpeg package.
o gstreamer0.10-pitfdll: Adds support for the controversial w32codecs package.
o gstreamer0.10-plugins-bad: Support for codecs, such as WAV audio codecs, that are not as refined as other codecs. The naming convention bad denotes codecs that are still under development. They are close to production quality, but are not there yet.
o gstreamer0.10-plugins-bad-multiverse: Support for multiverse codecs that are not as refined as other codecs. This includes faad and libxvidcore4.
o gstreamer0.10-plugins-ugly: This package provides support for MPEG formats. While the "bad" codecs are just not refined, the "ugly" codecs may have distribution issues due to licensing restrictions or patents.
o gstreamer0.10-plugins-ugly-multiverse: Similar to gstreamer0.10- plugins-ugly, this supports packages from the multiverse repository.
§ Xine-Xine is an alternative audio and video player to Gnome's totem player. As with the Gstreamer interface, Xine supports plug-ins. The gxine package installs the gxine base player. The libxine-main1 and libxine-extracodecs packages provide codecs.
Installing Web Support
Some multimedia formats are primarily found on the Web. This includes Macromedia Flash movies and RealNetworks audio and video streams.
Getting Flashy
Macromedia provides a Flash player for Ubuntu. Installing the flashplugin-nonfree package from the multiverse repository will actually download and install the Linux Flash player from the Adobe web site. After installing the package, you will need to run the update- flashplugin command to configure your browser.
sudo apt-get install flashplugin-nonfree
sudo update-flashplugin
Unfortunately, the flashplugin-nonfree package is only available for PCs. As an alternative, the swf-player package provides basic SWF (Flash file) support for all Ubuntu platforms.
|
Note |
The swf-player package does not support all SWF versions. Newer versions of Flash animations may not play using swf-player. |
Getting Real
In contrast to Flash, there are two different RealPlayer packages for Ubuntu. The realplayer package in the multiverse repository provides support for RealPlayer 8, while the PLF repository has a realplay (not realplayer) package that provides support for RealPlayer 10.
These packages configure the Firefox browser so they are automatically recognized and available for use.
|
Note |
RealPlayer support is only provided on the x86 architecture. If you are using a PowerPC or AMD64 system, then there is no native driver available. |
Finally, you may want to have a multimedia player like Totem integrated into your web browser. Normally multimedia files are saved to disk. Having the player integrated in the browser can create a seamless user experience by automatically running the player when you click on a link. You can enable the integration by installing the totem-gstreamer-firefox- plugin package. For using Xine in Firefox, use totem-xine-firefox-plugin.
Installing Font Packages
There are a few desktop packages that you will probably want to install. The first set of packages provides different desktop fonts. These are used by everything from text menus to PDF and Postscript viewers. If an application cannot find a particular font, then it will attempt to substitute it with a different font, and the results can be ugly.
Ubuntu supports three main types of fonts: xfonts, gsfonts, and ttf. Xfonts are used by X-Windows. These bitmapped fonts are designed for specific resolutions (dpi) and can appear blocky when scaled. For example, the xfonts-100dpi package provides fonts that render best at 100dpi.
Ghostscript fonts (gsfonts) are vector-based rather than bitmapped. These may take longer to render than bitmapped fonts, but they will look smoother and scale well. These are usually used for displaying documents, word processing, and printing, but not for regular screen fonts.
The final group consists of TrueType fonts (ttf). These are also vector-based and are commonly used on Windows systems. If you receive a document in PDF or Word that has ugly or missing fonts, then you probably need to install a ttf font package.
Font definitions are relatively small and consume no system resources if they are not used. For best results, consider installing all of the available fonts for languages that you expect to encounter. This way, you won't end up rendering with poor substitutions.
|
Note |
The default font in most cases is called misc-fixed and is a monospaced San Serif font. When converting between graphic formats, like Postscript and PDF, missing system fonts may be replaced with bitmapped fonts, resulting in very rough text that is readable but not pretty. The technical term for drawing text with bitmapped fonts is ugly rendering. |
§ Ghostscript fonts-Ghostscript is the open source Postscript rendering and viewing system. The fonts used by Ghostscript can be used by any available X-Windows application. The gv package provides the Ghostscript Ghostview program for viewing Postscript files. The gsfonts package provides Ghostscript fonts, and gsfonts-x11 makes the fonts available for X11.
§ sudo apt-get install gv gsfonts gsfonts-x11
§ International fonts-There are many different packages for providing international language support. All of the most common languages are supported, as well as some lesser- known languages. Example font packages include:
o xfonts-intl-european provides support for most European and Latin-based languages. This includes Spanish, German, and French.
o gsfonts-wadalab-common, gsfonts-wadalab-gothic, gsfonts-wadalab- mincho, konfont, and ttf-sazanami-mincho each provide support for Japanese.
o Chinese is supported through a variety of font packages including ttf2pt1- chinese, ttf-arphic-ukai, ttf-arphic-uming, xfonts-cmex-big5p, xfonts-intl-chinese, and xfonts-intl-chinese-big.
o ttf-farsiweb and ttf-paktype supplies Farsi and Urdu fonts.
o ttf-khmeros supplies fonts for the Khmer language of Cambodia.
o There are dozens of xfont packages (apt-cache search xfonts) for supporting most European, Asian, and Middle-Eastern languages.
§ Windows fonts-The msttcorefonts package provides the core TrueType fonts found on Microsoft systems. While this does provide true compatibility with Windows systems, there may be licensing issues.
After installing the fonts, you will need to inform applications that they exist. Fortunately, all standard applications look at the same cache directories. The command sudo fc-cache -f -v will scan and list the font directories, and update the shared font information.
|
Note |
If the fonts do not appear after you install them, you may have forgotten to run fc-cache. |
Compiling and Developing Software
The packages found in the Ubuntu repositories do not include all open source software (far from it!). The main and restricted repositories only include software explicitly supported by Ubuntu and its managing company, Canonical. The universe and multiverse repositories only include Ubuntu packages that are (or were) supported by someone in the community. There are hundreds of thousands of open source projects that are not in these repositories, and many only require you to download the source and compile them.
There are many reasons why you might want to download source code. Some of the common reasons include:
§ Cutting edge-Software found in the Ubuntu repositories may be outdated. If you want the most recent version, you will probably need to visit the project's home page and download source code.
§ Tweaking-If you don't like how some piece of software functions, you can download the source code and change it.
§ Fixing-Some packages do not work. This may be due to broken dependencies or out- dated software components. In any case, you can retrieve the code, patch it as necessary, and install it on your system. You are not limited to precompiled software.
§ Educating-If you want to understand how something works, you can download the source and look at the code. Code from open source projects can be used as excellent examples and templates.
§ Extending-Many projects are extensible. By downloading the source code, you can see how to interface new software into a project.
§ Leveraging-Why reinvent the wheel? If some source code does a function that you need, you can download the code and adapt it to your needs. Be sure to pay attention to the original author's licensing requirements; some source code cannot be freely used without restrictions.
§ Sharing-Every package in the universe and multiverse repositories was compiled and tested by someone. Perhaps you would like to add your favorite projects so the community can benefit?
§ Uniqueness-Many open source projects not found in the Ubuntu repositories provide very unique and useful functions. If you cannot download the functionality in binary form, then you will need to acquire the source.
Regardless of the reason, you will need some way to retrieve the source code and compile it. Some open source code is built for specific platforms and operating systems. For example, the mail reader elmand the graphic program xv were both designed for very old versions of Linux and have not been maintained. Downloading the source to these projects is not enough. You will likely need to edit the files before you can build these executables. To compile any incompatible projects, you may need a full development environment.
Installing Package Source Code
Many packages are available as pre-compiled executables and as source code. If you plan to install any source code then you'll need to install the dpkg-dev package. This brings in one required executable: /usr/bin/dpkg-source. This is used to unpack source code packages.
Many packages include developer installs. For example, the linux-kernel-devel package places source code on the system for people doing kernel development. Most major subsystems, including audio, USB, and X-Windows, provide developer packages.
|
Note |
Some packages do not actually install code. For example, linux-kernel-devel is a package that is only used to install some specific dependencies. The code actually comes from its dependencies. |
The other way to retrieve source code from the Ubuntu repositories is to actually download the source, and not an installation package. Source code is downloaded using apt-get source package_name. Every package in the main and universe repositories should include source code, but source code may be missing from the restricted and multiverse repositories.
|
Note |
Not every package includes source code. Although source code is expected for packages in the main and universe repositories, it may not exist for software found in the restricted and multi- verse repositories. |
The installation of binary files requires you to run apt-get as root. This is because files are placed in privileged directories and the catalog of installed packages must be updated. In contrast, source files are deposited in the current directory, so root permission is not required. This also means that there is no automatic removal. For example, to download the source code to gcalctool and unpack it, use:
mkdir src
cd src
apt-get source gcalctool
If you also want to automatically compile it, add the –compile flag to the apt-get line.
apt-get --compile source gcalctool
|
Warning |
While apt-get install downloads dependencies, the apt-get source command does not. You may be required to download and install different developer packages and additional source code. Do not expect automatic compilation to work perfectly every time. |
If you are done with the source code, you can remove it without using apt-get.
rm -rf gcalctool*
Programming with C
Most open source projects are written in C, C++, Java, Perl, Python, or Shell Script. Perl, Python, and Bash (for Shell Scripts) are installed by default. Although basic C and C++ compilers are installed, these are not the full development environments. You should consider installing full environments.
There are many components to the full C and C++ environment. The key ones to install are:
§ The Gnu C Compiler (gcc) and Gnu C++ (g++). These packages also install the manuals and documentation in case you need to look up any standard library calls.
§ sudo apt-get install gcc g++
§ sudo apt-get install gcc-doc manpages-dev
§ The make command is commonly used for building executables. Other build-environment tools include autoconf, automake, and libtool.
§ sudo apt-get install make autoconf automake libtool
§ If the code uses any complicated state machines or lexical analyzers, then you will probably need flex and bison.
§ sudo apt-get install flex bison bison-doc
§ The zlib library is very common. Most tools that perform compression use it. Some well-known examples include gzip, bz2, and unzip, but other tools like JPEG rendering systems and MP3 players also use zlib.
§ sudo apt-get install zlib1g zlib1g-dev
§ Most graphic systems use the X11 graphic library. You will probably need the development environment since it provides the application programming interface (API) to X- Windows.
§ sudo apt-get install xlibs-dev
§ If you plan to do any hard-core development, you might want an integrated development environment (IDE). Under Ubuntu, you have a couple of options.
o Anjuta is a fully functional IDE with a graphical interface. To install it, use sudo apt-get install anjuta.
o Eclipse is a very popular IDE for Java, but it does have an extension for C programming. Use sudo apt-get install eclipse-cdt to install the C Developer Tool.
|
Note |
Anjuta is designed for C and C++ software development. In contrast, Eclipse is an extension of a Java IDE. As a result, Eclipse requires include a lot of additional packages that Anjuta does not need. The list of requirements for Eclipse includes Ant (a Java build system that is comparable to make), Java (the full environment), and even the Mozilla web browser (Uh, I don't know why, but it is a prerequisite). |
Enabling Java
Java is a programming language that is used by some developers as an alternative to C and C++. Its strength is in portability: a program created in Java does not need to be recompiled on every platform. Because of its portability, some web sites use Java instead of static HTML or dynamic HTML with JavaScript.
|
Note |
Despite the naming similarity, Java and JavaScript are very different languages. The JavaScript name was more of a marketing blitz than a functional expression. At the time the language was created, Java was popular and scripts implied simple. Unfortunately, many non-programmers still think that JavaScript uses Java. |
In previous versions of Ubuntu, there were many options for installing Java, and all required multiple steps. The problem was the licensing: Sun Microsystems used a restrictive license that was not appropriate for the restrictive or multiverse repositories. When Ubuntu Dapper was released, Sun changed the licensing, allowing the package to be placed in the multiverse repository. To install Java:
1. Enable the multiverse repository by editing /etc/apt/source.list and removing the commented line for the multiverse repository.
2. deb http://us.archive.ubuntu.com/ubuntu/ dapper-backports main \
3. restricted universe multiverse
4. Install the Java Runtime Environment (JRE).
5. sudo apt-get install sun-java5-jre
6. If you would like to use Java with the Mozilla Firefox web browser, you will need to install the Java plugin and configure it as the default JRE.
7. sudo apt-get install sun-java5-plugin
8. sudo update-alternatives --config java
9. For build environments, Ant is the tool of choice (few Java environments use make).
10. sudo apt-get install ant ant-doc
11. If you need a full IDE for Java, consider using Eclipse.
12. sudo apt-get install eclipse
The Sun Java 5.0 runtime environment requires you to agree to the Sun licensing. In some environments, this may not be desirable. In addition, this version of Java is not available for all platforms. For example, as of August 2006, sun-java5-jre did not install on the PowerPC because the sun-java5-bin package was unavailable. Fortunately, there are some alternatives to Sun's Java implementation.
§ The free-java-sdk package provides an open source Java development and runtime environment.
§ sudo apt-get install free-java-sdk
§ The GNU compiler for Java is an alternate open source Java implementation. A basic GCJ compiler is installed by the default, but you may want to install the entire JRE and the web browser plug-in.
§ sudo apt-get install gcj gij
§ sudo apt-get install gcjwebplugin
Summary
Ubuntu provides many different ways to search for software, install packages, and manage updates. Some of the methods require a graphic display-these are very easy to use but may limit remote administration. If the graphic display is unavailable (or inconvenient), you can always fall back to the command line software management system. Although most of the common software that you might want is available from one of the four standard repositories, you should be prepared to download source code and compile software by hand since some cool projects are not readily available for Ubuntu.
All materials on the site are licensed Creative Commons Attribution-Sharealike 3.0 Unported CC BY-SA 3.0 & GNU Free Documentation License (GFDL)
If you are the copyright holder of any material contained on our site and intend to remove it, please contact our site administrator for approval.
© 2016-2026 All site design rights belong to S.Y.A.